Angular has a lot of features, but the one that grabs the most attention is the way that changes propagate through the application so that filling in a form field or clicking a button causes immediate updates to the application state. But there are limitations to the changes that Angular can detect, and some features require working directly with the library that Angular uses to distribute updates throughout an application. This library is called Reactive Extensions, also known as RxJS.
In this chapter, I explain why working with Reactive Extensions is required for advanced projects, introduce the core Reactive Extensions features (known as Observers and Observables), and use them to enhance the application so that users can edit existing objects in the model, as well as create new ones. Table 23-1 puts Reactive Extensions into context.
Note
The focus of this chapter is on the RxJS features that are most useful in Angular projects. The RxJS package has a lot of features, and if you want more information, you should consult the project home page at https://github.com/reactivex/rxjs.
Table 23-1
Putting the Reactive Extensions Library in Context
Question
Answer
What is it?
The Reactive Extensions library provides an asynchronous event distribution mechanism that is used extensively inside Angular for change detection and event propagation.
Why is it useful?
RxJS allows for the parts of an application that are not addressed by the standard Angular change detection process to receive notifications of important events and respond appropriately. Since RxJS is required in order to use Angular, its functionality is readily available for use.
How is it used?
An Observer is created that collects the events and distributes them to subscribers through an Observable. The simplest way to achieve this is to create a Subject, which provides both Observer and Observable functionality. The flow of events to a subscriber can be managed using a set of operators.
Are there any pitfalls or limitations?
Once you have mastered the basics, the RxJS package is easy to use, although there are so many features that it can take some experimentation to find the combination that efficiently achieves a specific outcome.
Are there any alternatives?
RxJS is required to access some Angular features, such as updates to child and view children queries and making asynchronous HTTP requests.
Use events to enable collaboration between components
Use Observable
10–12
Manage the flow of events
Use operators such as filter or map
13–18
Preparing the Example Project
This chapter uses the exampleApp project created in Chapter 22. No changes are required for this chapter. Run the following command in the exampleApp folder to start the Angular development tools:
ng serve
Open a new browser tab and navigate to http://localhost:4200 and show the content illustrated in Figure 23-1.
Angular excels at detecting changes in the expressions used for data bindings. It does this seamlessly and efficiently, and the result is a framework that makes it easy to create dynamic applications. You can see the change detection at work in the example application by clicking the Create New Product button. The service that provides the shared state information is updated by the table component, which is then reflected in the data bindings that control the appearance of the elements managed by the form component, as shown in Figure 23-2. When you click the Create New Product button, the color of the title and buttons in the form changes immediately.
Figure 23-2
Updating data binding expressions
As the number of objects in an application increases, change detection can spiral out of control and put an enormous drain on an application’s performance, especially on less capable devices such as phones and tablets. Rather than keep track of all the objects in the application, Angular focuses on data bindings and, specifically, on working out when property values change.
That presents a problem because Angular manages the bindings for the HTML elements automatically, but it doesn’t provide any support for responding to service changes within the component itself.
You can see an immediate consequence of the lack of change in the component by clicking one of the Edit buttons in the table. Although the data bindings will update immediately, the component doesn’t get a notification when the button is clicked and doesn’t know it needs to update the property that will populate the form elements for editing.
The lack of updates means that the form component needs to fall back on the ngDoCheck method, originally described in Chapter 15, to determine when an important change occurs, as shown in Listing 23-1.
import { Component } from "@angular/core";
import { NgForm } from "@angular/forms";
import { Product } from "../model/product.model";
import { Model } from "../model/repository.model"
import { MODES, SharedState } from "./sharedState.model";
Monitoring Service Changes in the form.component.ts File in the src/app/core Folder
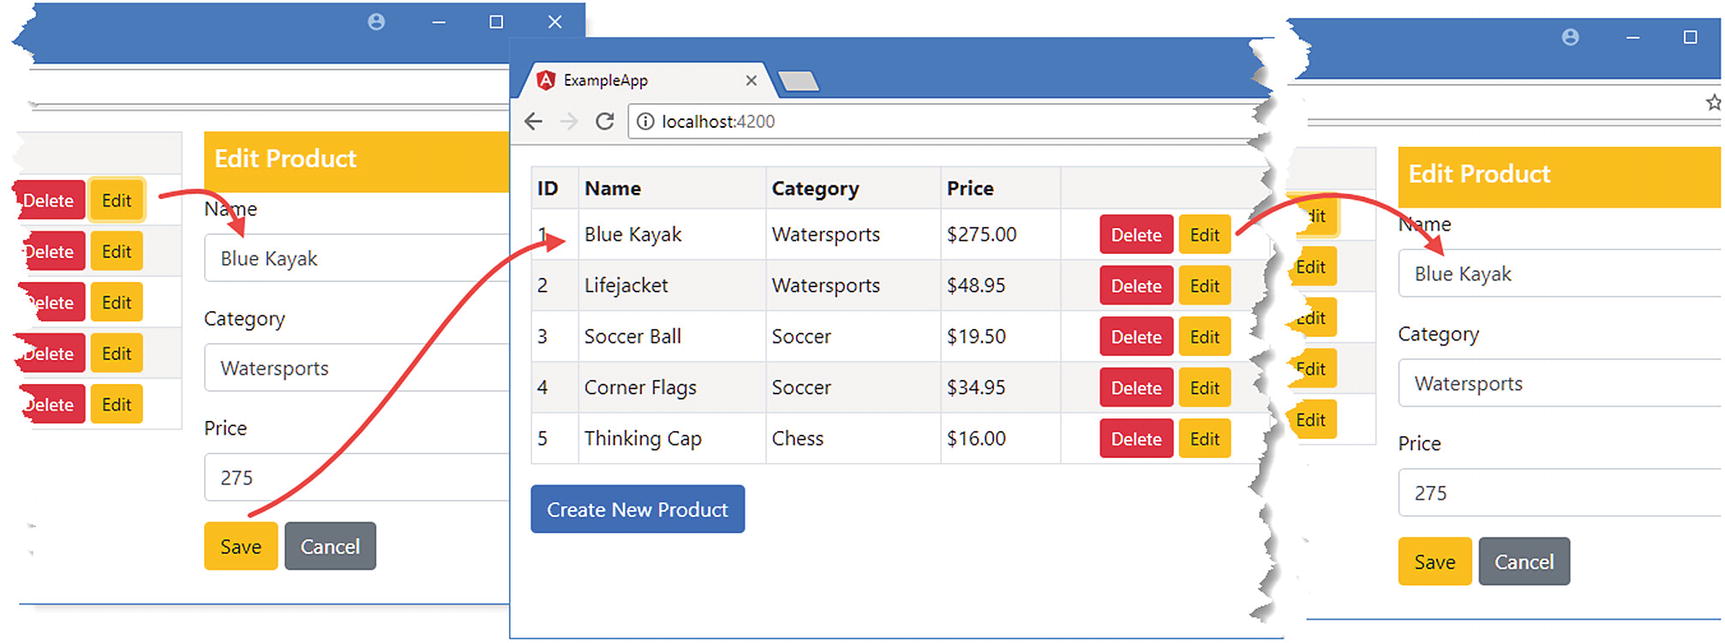
To see the effect of this change, click one of the Edit buttons in the table, and the form will be populated with the details for editing. When you have finished editing the values in the form, click the Save button, and the data model will be updated, reflecting your changes in the table, as shown in Figure 23-3.
Figure 23-3
Updating a product
The problem with this code is that the ngDoCheck method will be called whenever Angular detects any kind of change in the application. It doesn’t matter what happens or where it happens: Angular is going to have to call the ngDoCheck method to give the component a chance to update itself. You can minimize the amount of work that is done in the ngDoCheck method, but as the number of directives and components in the application increases, the number of change events and the number of calls to the ngDoCheck method will increase, which can drag down the performance of the application.
It is also harder than you might think to handle change detection correctly. As an example, try editing a product using the example application, clicking the Save button to store the changes in the model, and then clicking the Edit button again for the same product: nothing will happen. This is a common mistake in implementing the ngDoCheck method, which is called even when a change is triggered by the component itself, confusing the checks in the ngDoCheck method that are trying to avoid doing unnecessary work. Overall, this approach is unreliable, is expensive, and doesn’t scale well.
Solving the Problem with Reactive Extensions
The reason that the Reactive Extensions library is useful in Angular applications is because it provides a simple and unambiguous system for sending and receiving notifications. It doesn’t sound like a huge achievement, but it underpins most of the built-in Angular functionality, and it can be used directly by applications to avoid the problems that come from trying to implement change detection using ngDoCheck. To prepare for the direct use of Reactive Extensions, Listing 23-2 defines an opaque token that will be used to provide a service that uses Reactive Extensions to distribute updates and changes the SharedState class so that it defines a constructor. These changes will temporarily break the application because Angular will not be able to provide values for the SharedState constructor when it tries to instantiate an instance to use as a service. The application will start working again once the changes required for Reactive Extensions are complete.
import { InjectionToken } from "@angular/core";
export enum MODES {
CREATE, EDIT
}
export class SharedState {
constructor(public mode: MODES, public id?: number) { }
}
export const SHARED_STATE = new InjectionToken("shared_state");
Listing 23-2
Defining a Provider Token in the sharedState.model.ts File in the src/app/core Folder
Understanding Observables
The key Reactive Extensions building block is Observable, which represents an observable sequence of events. An object such as a component can subscribe to an Observable and receive a notification each time an event occurs, allowing it to respond only when the event has been observed instead of every time there is a change anywhere in the application.
The basic method provided by an Observable is subscribe, which accepts three functions as arguments, as described in Table 23-3.
Table 23-3
The Types of Web Forms Code Nuggets
Name
Description
onNext
This function is invoked when a new event occurs.
onError
This function is invoked when an error occurs.
onCompleted
This function is invoked when the sequence of events ends.
Only the onNext function is required to subscribe to an Observable, although it is generally good practice to implement the others to provide error handling and to respond if you expect the sequence of events to come to an end. There won’t be an end to the events for this example, but for other uses of Observable, such as for handling HTTP responses, knowing when the event sequence has ended can be more useful. Listing 23-3 revises the form component so that it declares a dependency on an Observable service.
import { Component, Inject } from "@angular/core";
import { NgForm } from "@angular/forms";
import { Product } from "../model/product.model";
import { Model } from "../model/repository.model"
import { MODES, SharedState, SHARED_STATE } from "./sharedState.model";
Using an Observable in the form.component.ts File in the src/app/core Folder
The Reactive Extensions NPM package includes individual JavaScript modules for each of the types that it provides so that you can import the Observable type from the rxjs module.
To receive notifications, the component declares a dependency on the SHARED_STATE service, which is received as an Observable<SharedState> object. This object is an Observerable whose notifications will be SharedState objects, which will represent an edit or create operation started by the user. The component calls the Observable.subscribe method, providing a function that receives each SharedState object and uses it to update its state.
WHAT ABOUT PROMISES?
You may be used to representing asynchronous activities using Promise objects. Observables perform the same basic role but are more flexible and have more features. Angular does provide support for working with Promises, which can be useful as you transition to Angular and when working with libraries that rely on Promises.
Reactive Extensions provides an Observable.fromPromise method that will create an Observable using a Promise as the source of events. There is also an Observable.toPromise method if you have an Observable and need a Promise for some reason.
In addition, there are some Angular features that let you choose which you use, such as the guards feature described in Chapter 27, which supports both.
But the Reactive Extensions library is an important part of working with Angular, and you will encounter it often in the chapters in this part of the book. I recommend you work with Observable when you encounter it and minimize the conversions to and from Promise objects.
Understanding Observers
The Reactive Extensions Observer provides the mechanism by which updates are created, using the methods described in Table 23-4.
Table 23-4
The Observer Methods
Name
Description
next(value)
This method creates a new event using the specified value.
error(errorObject)
This method reports an error, described using the argument, which can be any object.
complete()
This method ends the sequence, indicating that no further events will be sent.
Listing 23-4 updates the table component so that it uses an Observer to send out events when the user has clicked the Create New Product button or one of the Edit buttons.
import { Component, Inject } from "@angular/core";
import { Product } from "../model/product.model";
import { Model } from "../model/repository.model";
import { MODES, SharedState, SHARED_STATE } from "./sharedState.model";
Using an Observer in the table.component.ts File in the src/app/core Folder
The component declares a dependency on the SHARED_STATE service, which is received as an Observer<SharedState> object, meaning an Observer will send events that are described using SharedState objects. The editProduct and createProduct methods have been updated so they call the next method on the observer to signal a change in state.
Understanding Subjects
Both of the components have declared dependencies on services using the SHARED_STATE token, but each expects to get a different type: the table component wants to receive an Observer<SharedState> object, while the form component wants an Observable<SharedState> object.
The Reactive Extensions library provides the Subject class, which implements both the Observer and Observable functionality. This makes it easy to create a service that allows events to be produced and consumed with a single object. In Listing 23-5, I have changed the service declared in the @NgModule decorator’s providers property to use a Subject object.
import { NgModule } from "@angular/core";
import { BrowserModule } from "@angular/platform-browser";
import { FormsModule } from "@angular/forms";
import { ModelModule } from "../model/model.module";
import { TableComponent } from "./table.component";
import { FormComponent } from "./form.component";
import { SharedState, SHARED_STATE } from "./sharedState.model";
providers: [{ provide: SHARED_STATE, useValue: new Subject<SharedState>() }]
})
export class CoreModule { }
Listing 23-5
Changing the Service in the core.module.ts File in the src/app/core Folder
The value-based provider tells Angular to use a Subject<SharedState> object to resolve dependencies on the SHARED_STATE token, which will provide the components with the functionality they need to collaborate.
The result is that changing the shared service so that it is a Subject allows the table component to emit distinct events that are received by the form component and that are used to update its state without needing to rely on the awkward and expensive ngDoCheck method. There is also no need to try to work out which changes have been generated by the local component and which come from elsewhere since a component that subscribes to an Observable knows that all the events it receives must have originated from the Observer. This means that niggly problems like not being able to edit the same product twice simply go away, as shown in Figure 23-4.
Figure 23-4
The effect of using Reactive Extensions
THE DIFFERENT TYPES OF SUBJECT
Listing 23-5 uses the Subject class, which is the simplest way to create an object that is both an Observer and an Observable. Its main limitation is that when a new subscriber is created using the subscribe method, it won’t receive an event until the next time the next method is called. This can be unhelpful if you are creating instances of components or directives dynamically and you want them to have some context data as soon as they are created.
The Reactive Extensions library includes some specialized implementations of the Subject class that can be used to work around this problem. The BehaviorSubject class keeps track of the last event it processed and sends it to new subscribers as soon as they call the subscribe method. The ReplaySubject class does something similar, except that it keeps track of all of its events and sends them all to new subscribers, allowing them to catch up with any events that were sent before they subscribed.
Using the Async Pipe
Angular includes the async pipe, which can be used to consume Observable objects directly in a view, selecting the last object received from the event sequence. This is an impure pipe, as described in Chapter 18, because its changes are driven from outside of the view in which it is used, meaning that its transform method will be called often, even if a new event has not been received from the Observable. Listing 23-6 shows the addition of the async pipe to the view managed by the form component.
Using the Async Pipe in the form.component.html File in the src/app/core Folder
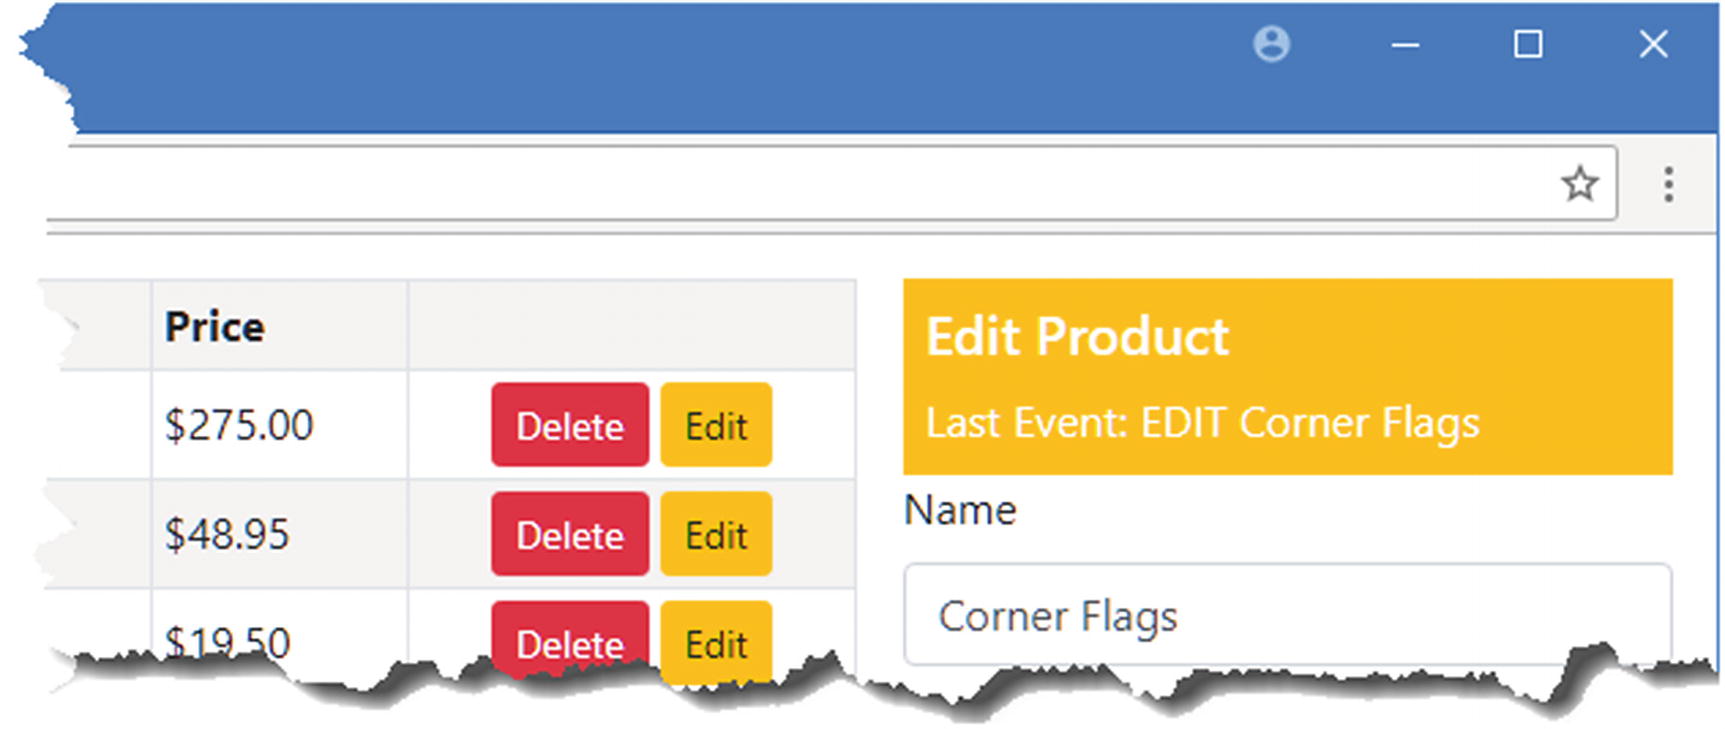
The string interpolation binding expression gets the stateEvents property from the component, which is the Observable<SharedState> object, and passes it to the async pipe, which keeps track of the most recent event that has been received. The async filter then passes on the event to the json pipe, which creates a JSON representation of the event object. The result is that you can keep track of the events that are received by the form component, as shown in Figure 23-5.
Figure 23-5
Displaying observable events
This isn’t the most useful display of data, but it does give some useful debugging insight. In this case, the most recent event has a mode value of 1, which corresponds to the Edit mode, and an id value of 4, which is the ID of the Corner Flags product.
Using the Async Pipe with Custom Pipes
The async pipe can be used with custom pipes to present the event data in a more user-friendly manner. To demonstrate, I added a file called state.pipe.ts to the src/app/core folder and used it to define the pipe shown in Listing 23-7.
import { Pipe } from "@angular/core";
import { SharedState, MODES } from "./sharedState.model";
import { Model } from "../model/repository.model";
The Contents of the state.pipe.ts File in the src/app/core Folder
In Listing 23-8, I have added the pipe to the set of declarations made by the core module.
Tip
TypeScript enumerations have a useful feature through which the name of a value can be obtained. So, the expression MODES[1], for example, will return EDIT since that is the name of the MODES enumeration value at index 1. The pipe in Listing 23-7 uses this feature to present the state update to the user.
import { NgModule } from "@angular/core";
import { BrowserModule } from "@angular/platform-browser";
import { FormsModule } from "@angular/forms";
import { ModelModule } from "../model/model.module";
import { TableComponent } from "./table.component";
import { FormComponent } from "./form.component";
import { SharedState, SHARED_STATE } from "./sharedState.model";
Applying a Custom Pipe in the form.component.html File in the src/app/core Folder
This example demonstrates that events received from Observable objects can be processed and transformed just like any other objects, as shown in Figure 23-6, which illustrates how a custom pipe can build on the core functionality provided by the async pipe.
Figure 23-6
Formatting values received through an observable sequence
Scaling Up Application Feature Modules
The same Reactive Extensions building blocks can be used anywhere in the application and make it easy to allow building blocks to collaborate, even if the use of Reactive Extensions isn’t exposed to all the collaborating parts of the application. As a demonstration, Listing 23-10 shows the addition of a Subject to the MessageService class to distribute the messages that should be displayed to the user.
import { Injectable } from "@angular/core";
import { Message } from "./message.model";
import { Observable } from "rxjs";
import { Subject } from "rxjs";
@Injectable()
export class MessageService {
private subject = new Subject<Message>();
reportMessage(msg: Message) {
this.subject.next(msg);
}
get messages(): Observable<Message> {
return this.subject;
}
}
Listing 23-10
Using a Subject in the message.service.ts File in the src/app/messages Folder
The previous implementation of the message service supported only a single recipient of the messages that should be displayed to the user. I could have added code that managed multiple recipients, but given that the application already uses Reactive Extensions, it is much simpler to delegate that work to the Subject class, which scales up well and won’t require any additional code or testing if there are multiple subscribers in the application.
Listing 23-11 shows the corresponding changes in the message component that will display the most recent message to the user.
import { Component } from "@angular/core";
import { MessageService } from "./message.service";
Observing Messages in the message.component.ts File in the src/app/messages Folder
The final step is to generate some messages to display. In Listing 23-12, I have modified the configuration of the core feature module so that the SHARED_STATE provider uses a factory function to create the Subject that is used to distribute state change events and adds a subscription that feeds the events into the message service.
import { NgModule } from "@angular/core";
import { BrowserModule } from "@angular/platform-browser";
import { FormsModule } from "@angular/forms";
import { ModelModule } from "../model/model.module";
import { TableComponent } from "./table.component";
import { FormComponent } from "./form.component";
import { SharedState, SHARED_STATE } from "./sharedState.model";
import { Subject } from "rxjs";
import { StatePipe } from "./state.pipe";
import { MessageModule } from "../messages/message.module";
import { MessageService } from "../messages/message.service";
import { Message } from "../messages/message.model";
import { Model } from "../model/repository.model";
Feeding the Message Service in the core.module.ts File in the src/app/core Folder
The code is a little messy, but the result is that every state change event sent by the table component is displayed by the message component, as shown in Figure 23-7. Reactive Extensions makes it easy to wire up parts of the application, and the reason that the code in the listing is so dense is that it is also using the Model service to look up names from the data model to make the events easier to read.
Figure 23-7
Using Reactive Extensions in the Message service
Going Beyond the Basics
The examples in the previous sections cover the basic use of Observable, Observer, and Subject. There is, however, a lot more functionality available when working with Reactive Extensions that can be used in advanced or complex applications. The full set of operations is described at https://github.com/reactivex/rxjs, but in this chapter, I demonstrate a small number of the features that you are most likely to require in an Angular application, as described in Table 23-5. The methods described in the table are used to control the way that events are received from an Observable object.
Table 23-5
Useful Reactive Extensions Methods for Selecting Events
Name
Description
filter
This method invokes a function to evaluate each event received from the Observable and discards those for which the function returns false.
map
This method invokes a function to transform each event received from the Observable and passes on the object that the function returns.
distinctUntilChanged
This method suppresses events until the event object changes.
skipWhile
This method filters events until a specified condition is satisfied, after which they are forwarded to the subscriber.
takeWhile
This method passes on events to the subscriber until a specified condition is satisfied, after which events are filtered.
Filtering Events
The filter method accepts a method that is used to inspect each object that is received from the Observable and selects only those that are required. Listing 23-13 demonstrates the use of the filter method to filter out the events that relate to a specific product.
import { Component, Inject } from "@angular/core";
import { NgForm } from "@angular/forms";
import { Product } from "../model/product.model";
import { Model } from "../model/repository.model";
import { MODES, SharedState, SHARED_STATE } from "./sharedState.model";
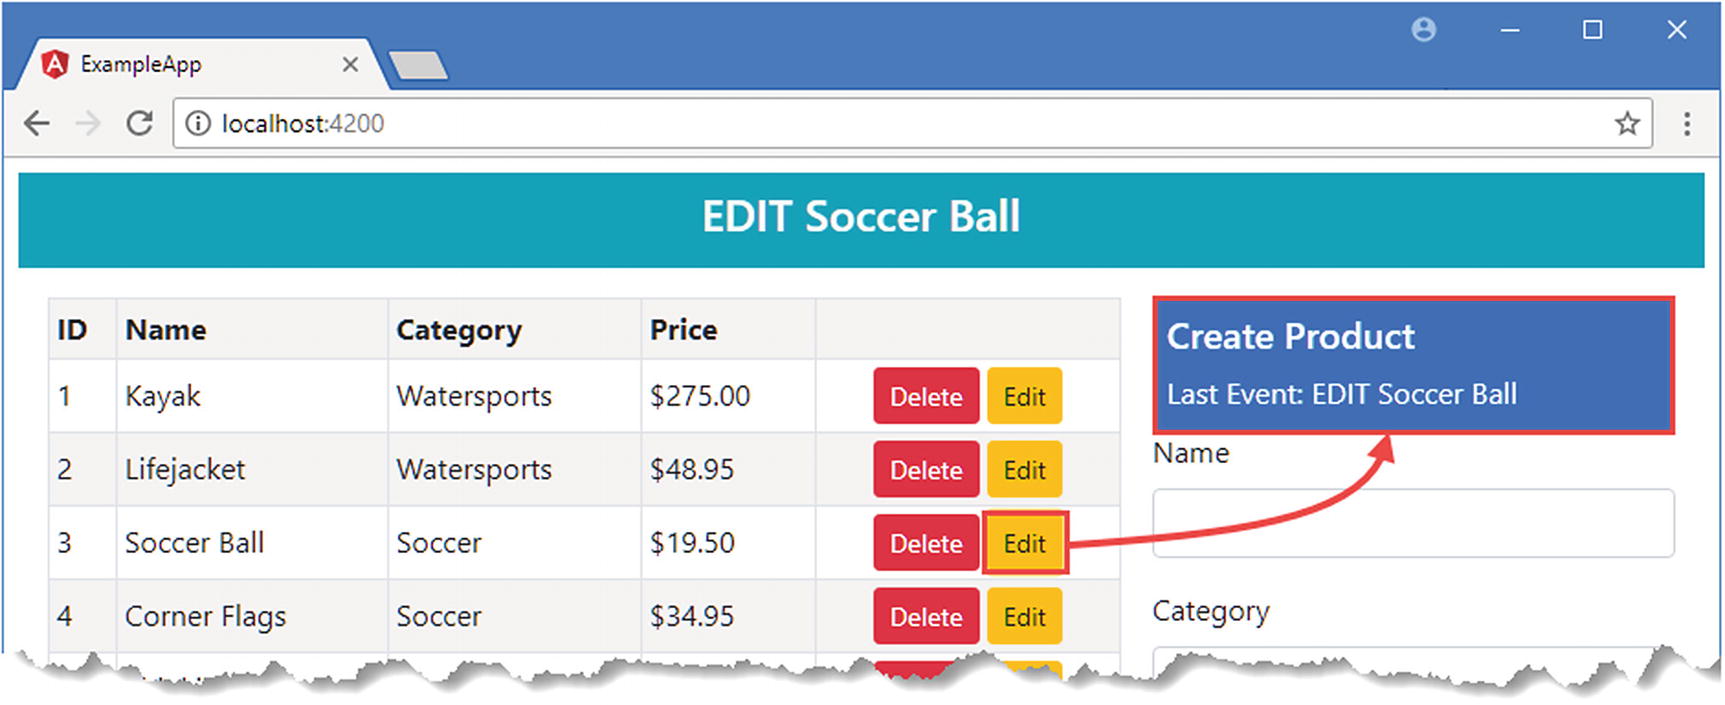
The argument to the filter method is a statement selects the events that are required, which are passed on to the function provided using the subscribe method.
You can see the effect by clicking the Edit button for the Soccer Ball product, which has the ID that the filter function is checking for. The async pipe shows that an EDIT event has been sent through the shared service, but the filter method prevents it from being received by the component’s subscribe function. The result is that the form doesn’t reflect the change in state and isn’t populated with the selected product information, as shown in Figure 23-8.
Figure 23-8
Filtering events
Transforming Events
The map method is used to transform the objects received from an Observable. You can use this method to transform event objects in any way, and the result from the method replaces the event object. Listing 23-14 uses the map method to change the value of an event object property.
import { Component, Inject } from "@angular/core";
import { NgForm } from "@angular/forms";
import { Product } from "../model/product.model";
import { Model } from "../model/repository.model";
import { MODES, SharedState, SHARED_STATE } from "./sharedState.model";
Transforming Events in the form.component.ts File in the src/app/core Folder
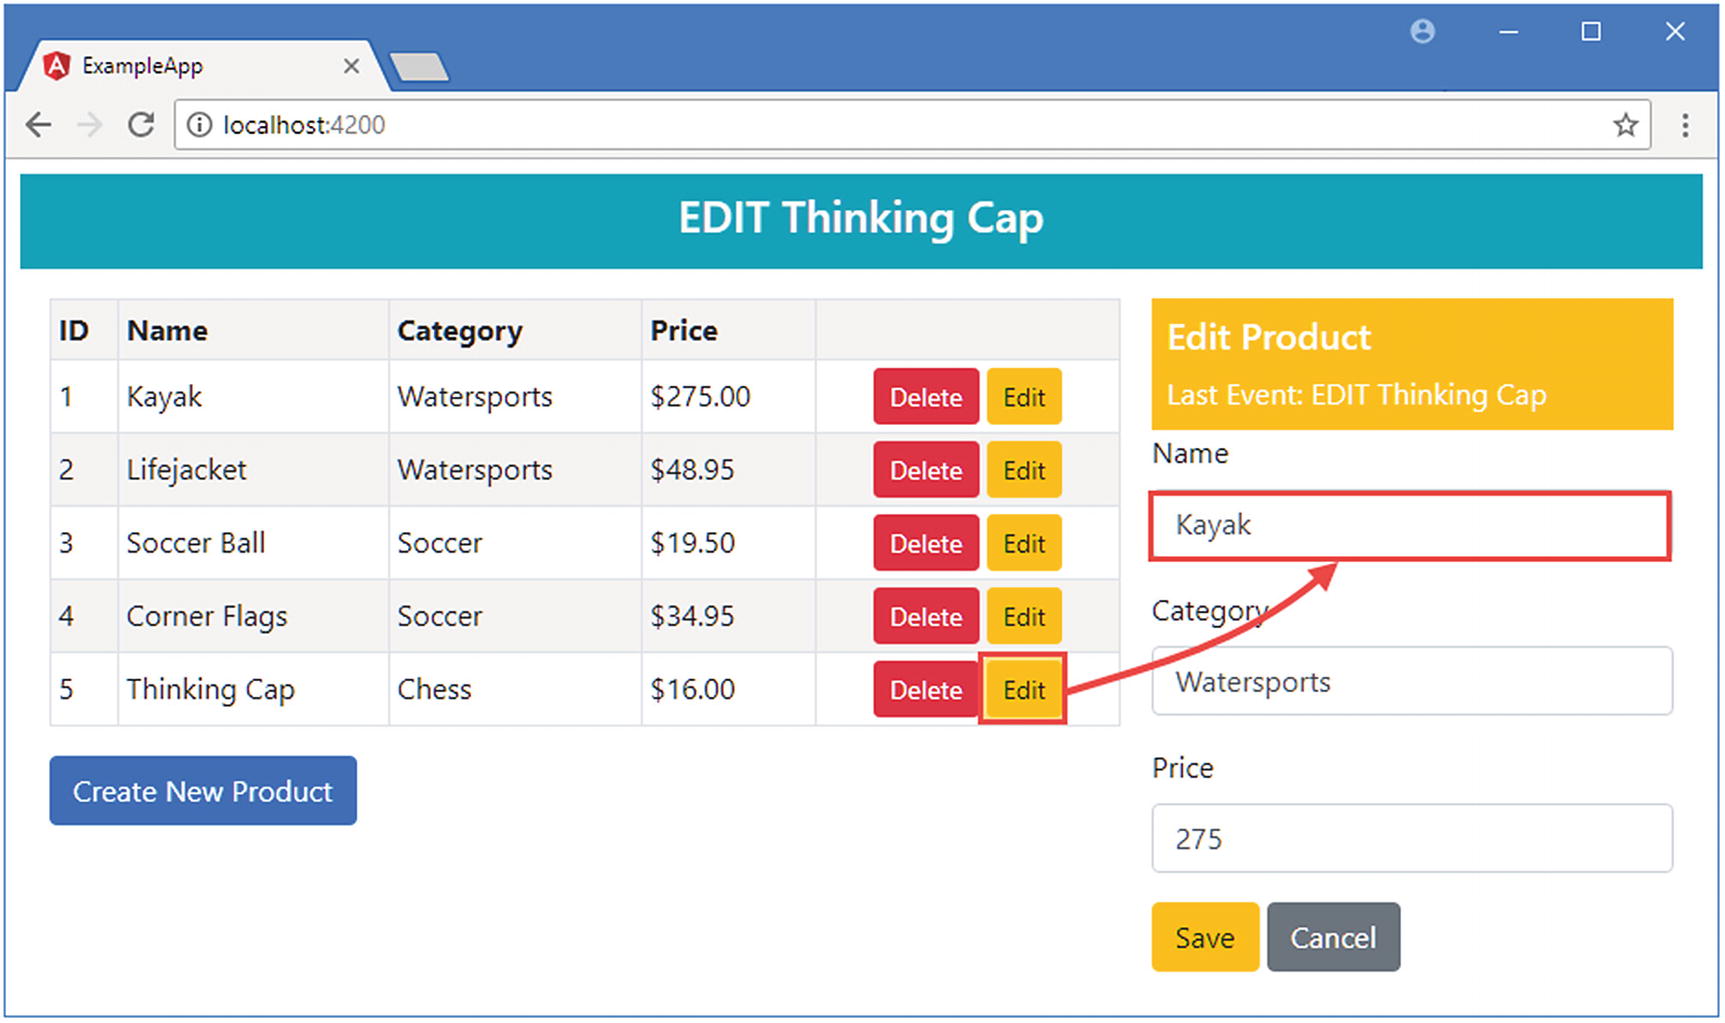
The function passed to the map method in this example looks for SharedState objects that have an id value of 5 and, when found, changes the value to 1. The result is that clicking the Edit button for the Thinking Cap product selects the Kayak product for editing, as shown in Figure 23-9.
Caution
When using the map method, do not modify the object that is received as the argument to the function. This object is passed to all the subscribers in turn, and any changes you make will affect subsequent subscribers. This means that some subscribers will receive the unmodified object, and some will receive the object returned by the map method. Instead, create a new object, as shown in Listing 23-14.
Notice that the methods used to prepare and create a subscription on an Observable object can be chained together. In the example, the result from the map method is piped to the filter method, whose results are then passed to the subscribe method’s function. Chaining methods together in this way allows complex rules to be created for the way that events are processed and received.
Figure 23-9
Transforming events
Using Different Event Objects
The map method can be used to produce any object and is not limited to changing property values on the object it receives. In Listing 23-15, I have used the map method to produce a number whose value encodes the operation and the object to which it applies.
Projecting a Different Type in the form.component.ts File in the src/app/core Folder
There is no advantage in making a simple data type represent an operation and specify its target. In fact, it generally causes problems because it means that the component assumes that there will never be an object in the model whose id property is -1. But as a simple example, it demonstrates how the map method can project different types and how those types are then passed along the chain of Reactive Extensions methods, meaning that the number values produced by the map method are received as the values to be processed by the filter method and, in turn, the subscribe method, the functions for which have both been updated to work with the new data values.
Receiving Only Distinct Events
The distinctUntilChanged method filters the sequence of events so that only distinct values are passed along to the subscriber. To see the kind of problem that this can be used to solve, click the Edit button for the Kayak product and change the value of the Category field. Without clicking the Save button, click the Kayak’s Edit button again, and you will see your edits discarded. In Listing 23-16, I have added the distinctUntilChanged method to the chain of methods so that it applies to the number values produced by the map method. Only different values will be forwarded to the filter and subscribe methods.
import { Component, Inject } from "@angular/core";
import { NgForm } from "@angular/forms";
import { Product } from "../model/product.model";
import { Model } from "../model/repository.model";
import { MODES, SharedState, SHARED_STATE } from "./sharedState.model";
import { Observable } from "rxjs";
import { filter, map, distinctUntilChanged } from "rxjs/operators";
Preventing Duplicate Events in the form.component.ts File in the src/app/core Folder
If you repeat the Kayak editing process, you will see that the changes are no longer discarded when you click the Edit button for the product that is being edited since this will produce the same value as the previous event. Editing a different product will cause the map method to emit a different number value, which will be passed on by the distinctUntilChanged method.
Using a Custom Equality Checker
The distinctUntilChanged method can make easy comparisons between simple datatypes like number, but it doesn’t know how to compare objects and will assume that any two objects are different. To address this, you can specify a comparison function that will be used to check whether events are distinct, as shown in Listing 23-17.
import { Component, Inject } from "@angular/core";
import { NgForm } from "@angular/forms";
import { Product } from "../model/product.model";
import { Model } from "../model/repository.model";
import { MODES, SharedState, SHARED_STATE } from "./sharedState.model";
import { Observable } from "rxjs";
import { filter, map, distinctUntilChanged } from "rxjs/operators";
Using a Equality Checker in the form.component.ts File in the src/app/core Folder
This listing removes the map and filter methods and provides the distinctUntilChanged method with a function that compares SharedState objects by comparing their mode and id properties. Distinct objects are passed onto the function provided to the subscribe method.
Taking and Skipping Events
The skipWhile and takeWhile methods are used to specify conditions that will cause events to be filtered or passed on to the subscriber. These methods must be used carefully because it is easy to specify conditions that will permanently filter events from the subscriber. In Listing 23-18, I have used the skipWhile method to filter events until the user clicks the Create New Product button, after which events will be passed on.
import { Component, Inject } from "@angular/core";
import { NgForm } from "@angular/forms";
import { Product } from "../model/product.model";
import { Model } from "../model/repository.model";
import { MODES, SharedState, SHARED_STATE } from "./sharedState.model";
import { Observable } from "rxjs";
import { filter, map, distinctUntilChanged, skipWhile } from "rxjs/operators";
Skipping Events in the form.component.ts File in the src/app/core Folder
Clicking the Edit buttons in the table will still generate events, which will be displayed by the async pipe, which is subscribed to the Subject without any filtering or skipping. But the form component doesn’t receive those events, as shown in Figure 23-10, since its subscription is filtered by the skipWhile method until an event whose mode property isn’t MODES.EDIT is received. Clicking the Create New Product button generates an event that ends the skipping, after which the component will receive all events.
Figure 23-10
Skipping events
Summary
In this chapter, I introduced the Reactive Extensions package and explained how it can be used to handle changes in the parts of the application that are not managed by the Angular change-detection process. I demonstrated the use of Observable, Observer, and Subject objects to distribute events in an application, showed you how the built-in async pipe works, and introduced some of the most useful operators that the Reactive Extensions library provides for controlling the flow of events to a subscriber. In the next chapter, I explain how to make asynchronous HTTP requests in Angular applications and how to consume RESTful web services.