The Angular routing feature allows applications to change the components and templates that are displayed to the user by responding to changes to the browser’s URL. This allows complex applications to be created that adapt the content they present in an open and flexible way, with minimal coding. To support this feature, there are data bindings and services that can be used to change the browser’s URL, allowing the user to navigate around the application.
Routing is useful as the complexity of a project increases because it allows the structure of an application to be defined separately from the components and directives, meaning that changes to the structure can be made in the routing configuration and do not have to be applied to the individual components.
In this chapter, I demonstrate how the basic routing system works and apply it to the example application. In Chapters 26 and 27, I explain the more advanced routing features. Table 25-1 puts routing in context.
Table 25-1
Putting Routing and Navigation in Context
Question
Answer
What is it?
Routing uses the browser’s URL to manage the content displayed to the user.
Why is it useful?
Routing allows the structure of an application to be kept apart from the components and templates in the application. Changes to the structure of the application are made in the routing configuration rather than in individual components and directives.
How is it used?
The routing configuration is defined as a set of fragments that are used to match the browser’s URL and select a component whose template is displayed as the content of an HTML element called router-outlet.
Are there any pitfalls or limitations?
The routing configuration can become unmanageable, especially if the URL schema is being defined gradually, on an ad hoc basis.
Are there any alternatives?
You don’t have to use the routing feature. You could achieve similar results by creating a component whose view selects the content to display to the user with the ngIf or ngSwitch directive, although this approach becomes more difficult than using routing as the size and complexity of an application increases.
Use URL navigation to select the content shown to users
Use URL routing
1–7
Navigate using an HTML element
Apply the routerLink attribute
8–10
Respond to route changes
Use the routing services to receive notifications
11
Include information in URLs
Use route parameters
12–18
Navigate using code
Use the Router service
19
Receive notifications of routing activity
Handle the routing events
20–21
Preparing the Example Project
This chapter uses the exampleApp project created in Chapter 22. Some changes are required to prepare the project for this chapter. The application is configured to display the state change events sent from the table component to the product component in two places: through the message service and in the form component’s template. These messages are no longer required, and Listing 25-1 removes the event display from the component’s template.
Disabling State Change Events in the core.module.ts File in the src/app/core Folder
Open a new command prompt, navigate to the exampleApp folder, and run the following command to start the server that provides the RESTful web server:
npm run json
Open a separate command prompt, navigate to the exampleApp folder, and run the following command to start the Angular development tools:
ng serve
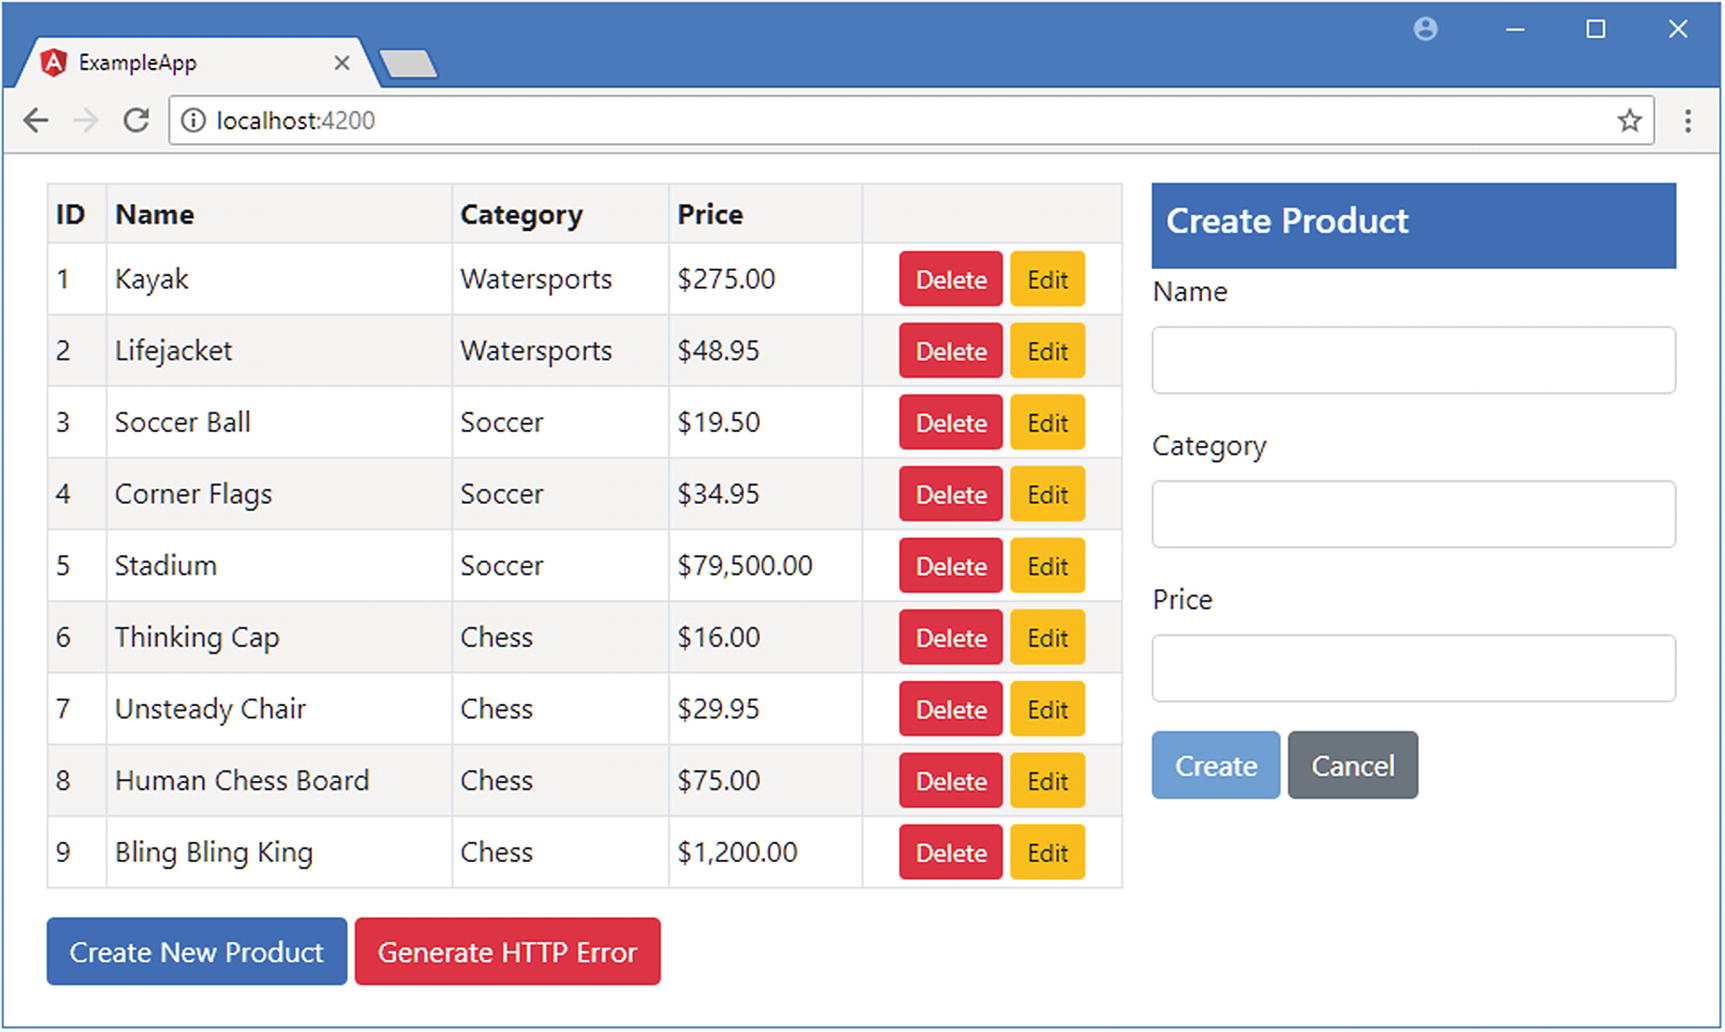
Open a new browser window and navigate to http://localhost:4200 to see the content shown in Figure 25-1.
Figure 25-1
Running the example application
Getting Star ted with Routing
At the moment, all the content in the application is visible to the user all of the time. For the example application, this means that both the table and the form are always visible and it is up to the user to keep track of which part of the application they are using for the task at hand.
That’s fine for a simple application, but it becomes unmanageable in a complex project, which can have many areas of functionality that would be overwhelming if they were all displayed at once.
URL routing adds structure to an application using a natural and well-understood aspect of web applications: the URL. In this section, I am going to introduce URL routing by applying it to the example application so that either the table or the form is visible, with the active component being chosen based on the user’s actions. This will provide a good basis for explaining how routing works and set the foundation for more advanced features.
Creating a Routing Configuration
The first step when applying routing is to define the routes, which are mappings between URLs and the components that will be displayed to the user. Routing configurations are conventionally defined in a file called app.routing.ts, defined in the src/app folder. I created this file and added the statements shown in Listing 25-3.
import { Routes, RouterModule } from "@angular/router";
import { TableComponent } from "./core/table.component";
import { FormComponent } from "./core/form.component";
The Contents of the app.routing.ts File in the src/app Folder
The Routes class defines a collection of routes, each of which tells Angular how to handle a specific URL. This example uses the most basic properties, where the path specifies the URL and the component property specifies the component that will be displayed to the user.
The path property is specified relative to the rest of the application, which means that the configuration in Listing 25-3 sets up the routes shown in Table 25-3.
Table 25-3
The Routes Created in the Example
URL
Displayed Component
http://localhost:4200/form/edit
FormComponent
http://localhost:4200/form/create
FormComponent
http://localhost:4200/
TableComponent
The routes are packaged into a module using the RouterModule.forRoot method. The forRoot method produces a module that includes the routing service. There is also a forChild method that doesn’t include the service, and that is demonstrated in Chapter 26, where I explain how to create routes for feature modules.
Although the path and component properties are the most commonly used when defining routes, there is a range of additional properties that can be used to define routes with advanced features. These properties are described in Table 25-4, along with details of where they are described.
Table 25-4
The Routes Properties Used to Define Routes
Name
Description
path
This property specifies the path for the route.
component
This property specifies the component that will be selected when the active URL matches the path.
pathMatch
This property tells Angular how to match the current URL to the path property. There are two allowed values: full, which requires the path value to completely match the URL, and prefix, which allows the path value to match the URL, even if the URL contains additional segments that are not part of the path value. This property is required when using the redirectTo property, as demonstrated in Chapter 26.
redirectTo
This property is used to create a route that redirects the browser to a different URL when activated. See Chapter 26 for details.
children
This property is used to specify child routes, which display additional components in nested router-outlet elements contained in the template of the active component, as demonstrated in Chapter 26.
outlet
This property is used to support multiple outlet elements, as described in Chapter 27.
resolve
This property is used to define work that must be completed before a route can be activated, as described in Chapter 27.
canActivate
This property is used to control when a route can be activated, as described in Chapter 27.
canActivateChild
This property is used to control when a child route can be activated, as described in Chapter 27.
canDeactivate
This property is used to control when a route can be deactivated so that a new route can be activated, as described in Chapter 27.
loadChildren
This property is used to configure a module that is loaded only when it is needed, as described in Chapter 27.
canLoad
This property is used to control when an on-demand module can be loaded.
Understanding Route Ordering
The order in which routes are defined is significant. Angular compares the URL to which the browser has navigated with the path property of each route in turn until it finds a match. This means that the most specific routes should be defined first, with the routes that follow decreasing in specificity. This isn’t a big deal for the routes in Listing 25-3, but it becomes significant when using route parameters (described in the “Using Route Parameters” section of this chapter) or adding child routes (described in Chapter 26).
If you find that your routing configuration doesn’t result in the behavior you expect, then the order in which the routes have been defined is the first thing to check.
Creating the Routing Component
When using routing, the root component is dedicated to managing the navigation between different parts of the application. This is the typical purpose of the app.component.ts file that was added to the project by the ng new command when it was created, and in Listing 25-4, I have updated its content for this use.
import { Component } from "@angular/core";
@Component({
selector: "app",
templateUrl: "./app.component.html"
})
export class AppComponent { }
Listing 25-4
Replacing the Contents of the app.component.ts File in the src/app Folder
This component is a vehicle for its template, which is the app.component.html file in the src/app folder. In Listing 25-5, I have replaced the default contents.
<paMessages></paMessages>
<router-outlet></router-outlet>
Listing 25-5
Replacing the Contents of the app.component.html File in the src/app File
The paMessages element displays any messages and errors in the application. For the purposes of routing, it is the router-outlet element—known as the outlet—that is important because it tells Angular that this is where the component matched by the routing configuration should be displayed.
Updating the Root Module
The next step is to update the root module so that the new root component is used to bootstrap the application, as shown in Listing 25-6, which also imports the module that contains the routing configuration.
import { BrowserModule } from '@angular/platform-browser';
import { NgModule } from '@angular/core';
import { ModelModule } from "./model/model.module";
import { CoreModule } from "./core/core.module";
import { TableComponent } from "./core/table.component";
import { FormComponent } from "./core/form.component";
import { MessageModule } from "./messages/message.module";
import { MessageComponent } from "./messages/message.component";
Configuring Routing in the index.html File in the src Folder
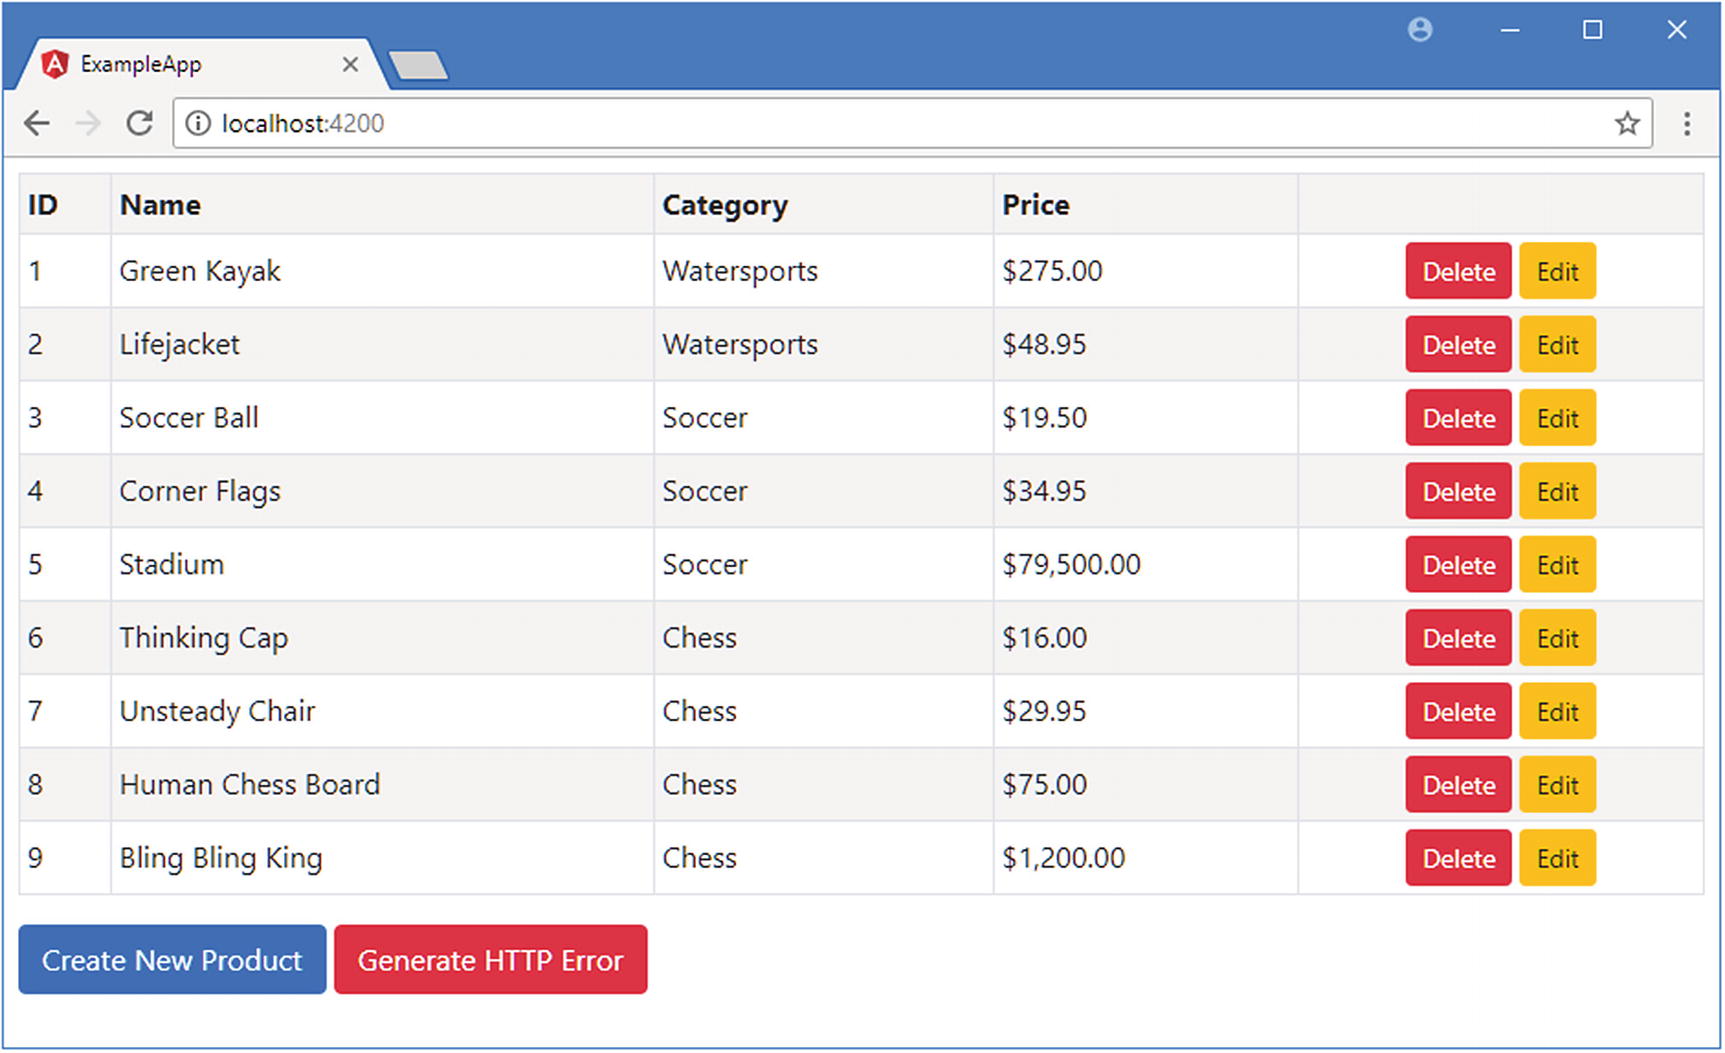
The app element applies the new root component, whose template contains the router-outlet element. When you save the changes and the browser reloads the application, you will see just the product table, as illustrated by Figure 25-2. The default URL for the application corresponds to the route that shows the product table.
Tip
You may need to stop the Angular development tools and start them again using the ng serve command for this example.
Figure 25-2
Using routing to display components to the user
Adding Navigation Links
The basic routing configuration is in place, but there is no way to navigate around the application: nothing happens when you click the Create New Product or Edit button.
The next step is to add links to the application that will change the browser’s URL and, in doing so, trigger a routing change that will display a different component to the user. Listing 25-8 adds these links to the table component’s template.
Adding Navigation Links in the table.component.html File in the src/app/core Folder
The routerLink attribute applies a directive from the routing package that performs the navigation change. This directive can be applied to any element, although it is typically applied to button and anchor (a) elements. The expression for the routerLink directive applied to the Edit buttons tells Angular to target the /form/edit route.
The routing links added to the table component’s template will allow the user to navigate to the form. The addition to the form component’s template shown in Listing 25-9 will allow the user to navigate back again using the Cancel button.
Adding a Navigation Link in the form.component.html File in the src/app/core Folder
The value assigned to the routerLink attribute targets the route that displays the product table. Listing 25-10 updates the feature module that contains the template so that it imports the RouterModule, which is the Angular module that contains the directive that selects the routerLink attribute.
import { NgModule } from "@angular/core";
import { BrowserModule } from "@angular/platform-browser";
import { FormsModule } from "@angular/forms";
import { ModelModule } from "../model/model.module";
import { TableComponent } from "./table.component";
import { FormComponent } from "./form.component";
import { SharedState, SHARED_STATE } from "./sharedState.model";
import { Subject } from "rxjs";
import { StatePipe } from "./state.pipe";
import { MessageModule } from "../messages/message.module";
import { MessageService } from "../messages/message.service";
import { Message } from "../messages/message.model";
import { Model } from "../model/repository.model";
Enabling the Routing Directive in the core.module.ts File in the src/app/core Folder
Understanding the Effect of Routing
When all the changes have been saved, you will be able to navigate around the application using the Edit, Create New Product, and Cancel buttons, as shown in Figure 25-3.
Figure 25-3
Using routes to navigate around the application
Not all the features in the application work yet, but this is a good time to explore the effect of adding routing to the application. Enter the root URL for the application (http://localhost:4200) and then click the Create New Product button. When you clicked the button, the Angular routing system changed the URL that the browser displays to this:
http://localhost:4200/form/create
If you watch the output from the development HTTP server during the transition, you will notice that no requests are received by the server for new content. This change is done entirely within the Angular application and does not produce any new HTTP requests.
The new URL is processed by the Angular routing system, which is able to match the new URL to this route from the app.routing.ts file.
The routing system takes into account the base element in the index.html file when it matches the URL to a route. The base element is configured with an href value of / that is combined with the path in the route to make a match when the URL is /form/create.
The component property tells the Angular routing system that it should display the FormComponent to the user. A new instance of the FormComponent class is created, and its template content is used as the content for the router-outlet element in the root component’s template.
If you click the Cancel button below the form, then the process is repeated, but this time, the browser returns to the root URL for the application, which is matched by the route whose path component is the empty string.
{ path: "", component: TableComponent }
This route tells Angular to display the TableComponent to the user. A new instance of the TableComponent class is created, and its template is used as the content of the router-outlet element, displaying the model data to the user.
This is the essence of routing: the browser’s URL changes, which causes the routing system to consult its configuration to determine which component should be displayed to the user. There are lots of options and features available, but this is the core purpose of routing, and you won’t go too far wrong if you keep this in mind.
THE PERILS OF CHANGING THE URL MANUALLY
The routerLink directive sets the URL using a JavaScript API that tells the browser that this is a change relative to the current document and not a change that requires an HTTP request to the server.
If you enter a URL that matches the routing system into the browser window, you will see an effect that looks like the expected change but is actually something else entirely. Keep an eye on the output from the development HTTP server while manually entering the following URL into the browser:
http://localhost:4200/form/create
Rather than handling the change within the Angular application, the browser sends an HTTP request to the server, which reloads the application. Once the application is loaded, the routing system inspects the browser’s URL, matches one of the routes in the configuration, and then displays the FormComponent.
The reason this works is that the development HTTP server will return the contents of the index.html file for URLs that don’t correspond to files on the disk. As an example, request this URL:
http://localhost:4200/this/does/not/exist
The browser will display an error because the request has provided the browser with the contents of the index.html file, which it has used to load and start the example Angular application. When the routing system inspects the URL, it finds no matching route and creates an error.
There are two important points to note. The first is that when you test your application’s routing configuration, you should check the HTTP requests that the browser is making because you will sometimes see the right result for the wrong reasons. On a fast machine, you may not even realize that the application has been reloaded and restarted by the browser.
Second, you must remember that the URL must be changed using the routerLink directive (or one of the similar features provided by the router module) and not manually, using the browser’s URL bar.
Finally, since users won’t know about the difference between programmatic and manual URL changes, your routing configuration should be able to deal with URLs that don’t correspond to routes, as described in Chapter 26.
Completing the Routing Implementation
Adding routing to the application is a good start, but a lot of the application features just don’t work. For example, clicking an Edit button displays the form, but it isn’t populated, and it doesn’t show the color cue that indicates editing. In the sections that follow, I use features provided by the routing system to finish wiring up the application so that everything works as expected.
Handling Route Changes in Components
The form component isn’t working properly because it isn’t being notified that the user has clicked a button to edit a product. This problem occurs because the routing system creates new instances of component classes only when it needs them, which means the FormComponent object is created only after the Edit button is clicked. If you click the Cancel button under the form and then click an Edit button in this table again, a second instance of the FormComponent will be created.
This leads to a timing issue in the way that the product component and the table component communicate, via a Reactive Extensions Subject. A Subject only passes on events to subscribers that arrive after the subscribe method has been called. The introduction of routing means that the FormComponent object is created after the event describing the edit operation has already been sent.
This problem could be solved by replacing the Subject with a BehaviorSubject, which sends the most recent event to subscribers when they call the subscribe method. But a more elegant approach—especially since this is a chapter on the routing system—is to use the URL to collaborate between components.
Angular provides a service that components can receive to get details of the current route. The relationship between the service and the types that it provides access to may seem complicated at first, but it will make sense as you see how the examples unfold and some of the different ways that routing can be used.
The class on which components declare a dependency is called ActivatedRoute. For the purposes of this section, it defines one important property, which is described in Table 25-5. There are other properties, too, which are described later in the chapter but which you can ignore for the moment.
Table 25-5
The ActivatedRoute Property
Name
Description
snapshot
This property returns an ActivatedRouteSnapshot object that describes the current route.
The snapshot property returns an instance of the ActivatedRouteSnapshot class, which provides information about the route that led to the current component being displayed to the user using the properties described in Table 25-6.
Table 25-6
The Basic ActivatedRouteSnapshot Properties
Name
Description
url
This property returns an array of UrlSegment objects, each of which describes a single segment in the URL that matched the current route.
params
This property returns a Params object, which describes the URL parameters, indexed by name.
queryParams
This property returns a Params object, which describes the URL query parameters, indexed by name.
fragment
This property returns a string containing the URL fragment.
The url property is the one that is most important for this example because it allows the component to inspect the segments of the current URL and extract the information from them required to perform an operation. The url property returns an array of UrlSegment objects, which provide the properties described in Table 25-7.
Table 25-7
The URLSegment Properties
Name
Description
path
This property returns a string that contains the segment value.
parameters
This property returns an indexed collection of parameters, as described in the “Using Route Parameters” section.
To determine what route has been activated by the user, the form component can declare a dependency on ActivatedRoute and then use the object it receives to inspect the segments of the URL, as shown in Listing 25-11.
import { Component, Inject } from "@angular/core";
import { NgForm } from "@angular/forms";
import { Product } from "../model/product.model";
import { Model } from "../model/repository.model";
import { MODES, SharedState, SHARED_STATE } from "./sharedState.model";
import { Observable } from "rxjs";
//import { filter, map, distinctUntilChanged, skipWhile } from "rxjs/operators";
Inspecting the Active Route in the form.component.ts File in the src/app/core Folder
The component no longer uses Reactive Extensions to receive events. Instead, it inspects the second segment of the active route’s URL to set the value of the editing property, which determines whether it should display its create or edit mode. If you click an Edit button in the table, you will now see the correct coloring displayed, as shown in Figure 25-4.
Figure 25-4
Using the active route in a component
Using Route Parameters
When I set up the routing configuration for the application, I defined two routes that targeted the form component, like this:
When Angular is trying to match a route to a URL, it looks at each segment in turn and checks to see that it matches the URL that is being navigated to. Both of these URLs are made up of static segments, which means they have to match the navigated URL exactly before Angular will activate the route.
Angular routes can be more flexible and include route parameters, which allow any value for a segment to match the corresponding segment in the navigated URL. This means routes that target the same component with similar URLs can be consolidated into a single route, as shown in Listing 25-12.
import { Routes, RouterModule } from "@angular/router";
import { TableComponent } from "./core/table.component";
import { FormComponent } from "./core/form.component";
Consolidating Routes in the app.routing.ts File in the src/app Folder
The second segment of the modified URL defines a route parameter, denoted by the colon (the : character) followed by a name. In this case, the route parameter is called mode. This route will match any URL that has two segments where the first segment is form, as summarized in Table 25-8. The content of the second segment will be assigned to a parameter called mode.
Table 25-8
URL Matching with the Route Parameter
URL
Result
http://localhost:4200/form
No match—too few segments
http://localhost:4200/form/create
Matches, with create assigned to the mode parameter
http://localhost:4200/form/london
Matches, with london assigned to the mode parameter
http://localhost:4200/product/edit
No match—the first segment is not form
http://localhost:4200/form/edit/1
No match—too many segments
Using route parameters make it simpler to handle routes programmatically because the value of the parameter can be obtained using its name, as shown in Listing 25-13.
import { Component, Inject } from "@angular/core";
import { NgForm } from "@angular/forms";
import { Product } from "../model/product.model";
import { Model } from "../model/repository.model";
Reading a Route Parameter in the form.component.ts File in the src/app/core Folder
The component doesn’t need to know the structure of the URL to get the information it needs. Instead, it can use the params property provided by the ActivatedRouteSnapshot class to get a collection of the parameter values, indexed by name. The component gets the value of the mode parameter and uses it to set the editing property.
Using Multiple Route Parameters
To tell the form component which product has been selected when the user clicks an Edit button, I need to use a second route parameter. Since Angular matches URLs based on the number of segments they contain, this means I need to split up the routes that target the form component again, as shown in Listing 25-14. This cycle of consolidating and then expanding routes is typical of most development projects as you increase the amount of information that is included in routed URLs to add functionality to the application.
import { Routes, RouterModule } from "@angular/router";
import { TableComponent } from "./core/table.component";
import { FormComponent } from "./core/form.component";
Adding a Route in the app.routing.ts File in the src/app Folder
The new route will match any URL that has three segments where the first segment is form. To create URLs that target this route, I need to use a different approach for the routerLink expressions in the template because I need to generate the third segment dynamically for each Edit button in the product table, as shown in Listing 25-15.
Generating Dynamic URLs in the table.component.html File in the src/app/core Folder
The routerLink attribute is now enclosed in square brackets, telling Angular that it should treat the attribute value as a data binding expression. The expression is set out as an array, with each element containing the value for one segment. The first two segments are literal strings and will be included in the target URL without modification. The third segment will be evaluated to include the id property value for the current Product object being processed by the ngIf directive, just like the other expressions in the template. The routerLink directive will combine the individual segments to create a URL such as /form/edit/2.
Listing 25-16 shows how the form component gets the value of the new route parameter and uses it to select the product that is to be edited.
import { Component, Inject } from "@angular/core";
import { NgForm } from "@angular/forms";
import { Product } from "../model/product.model";
import { Model } from "../model/repository.model";
Object.assign(this.product, model.getProduct(id) || new Product());
}
}
editing: boolean = false;
submitForm(form: NgForm) {
if (form.valid) {
this.model.saveProduct(this.product);
this.product = new Product();
form.reset();
}
}
resetForm() {
this.product = new Product();
}
}
Listing 25-16
Using the New Route Parameter in the form.component.ts File in the src/app/core Folder
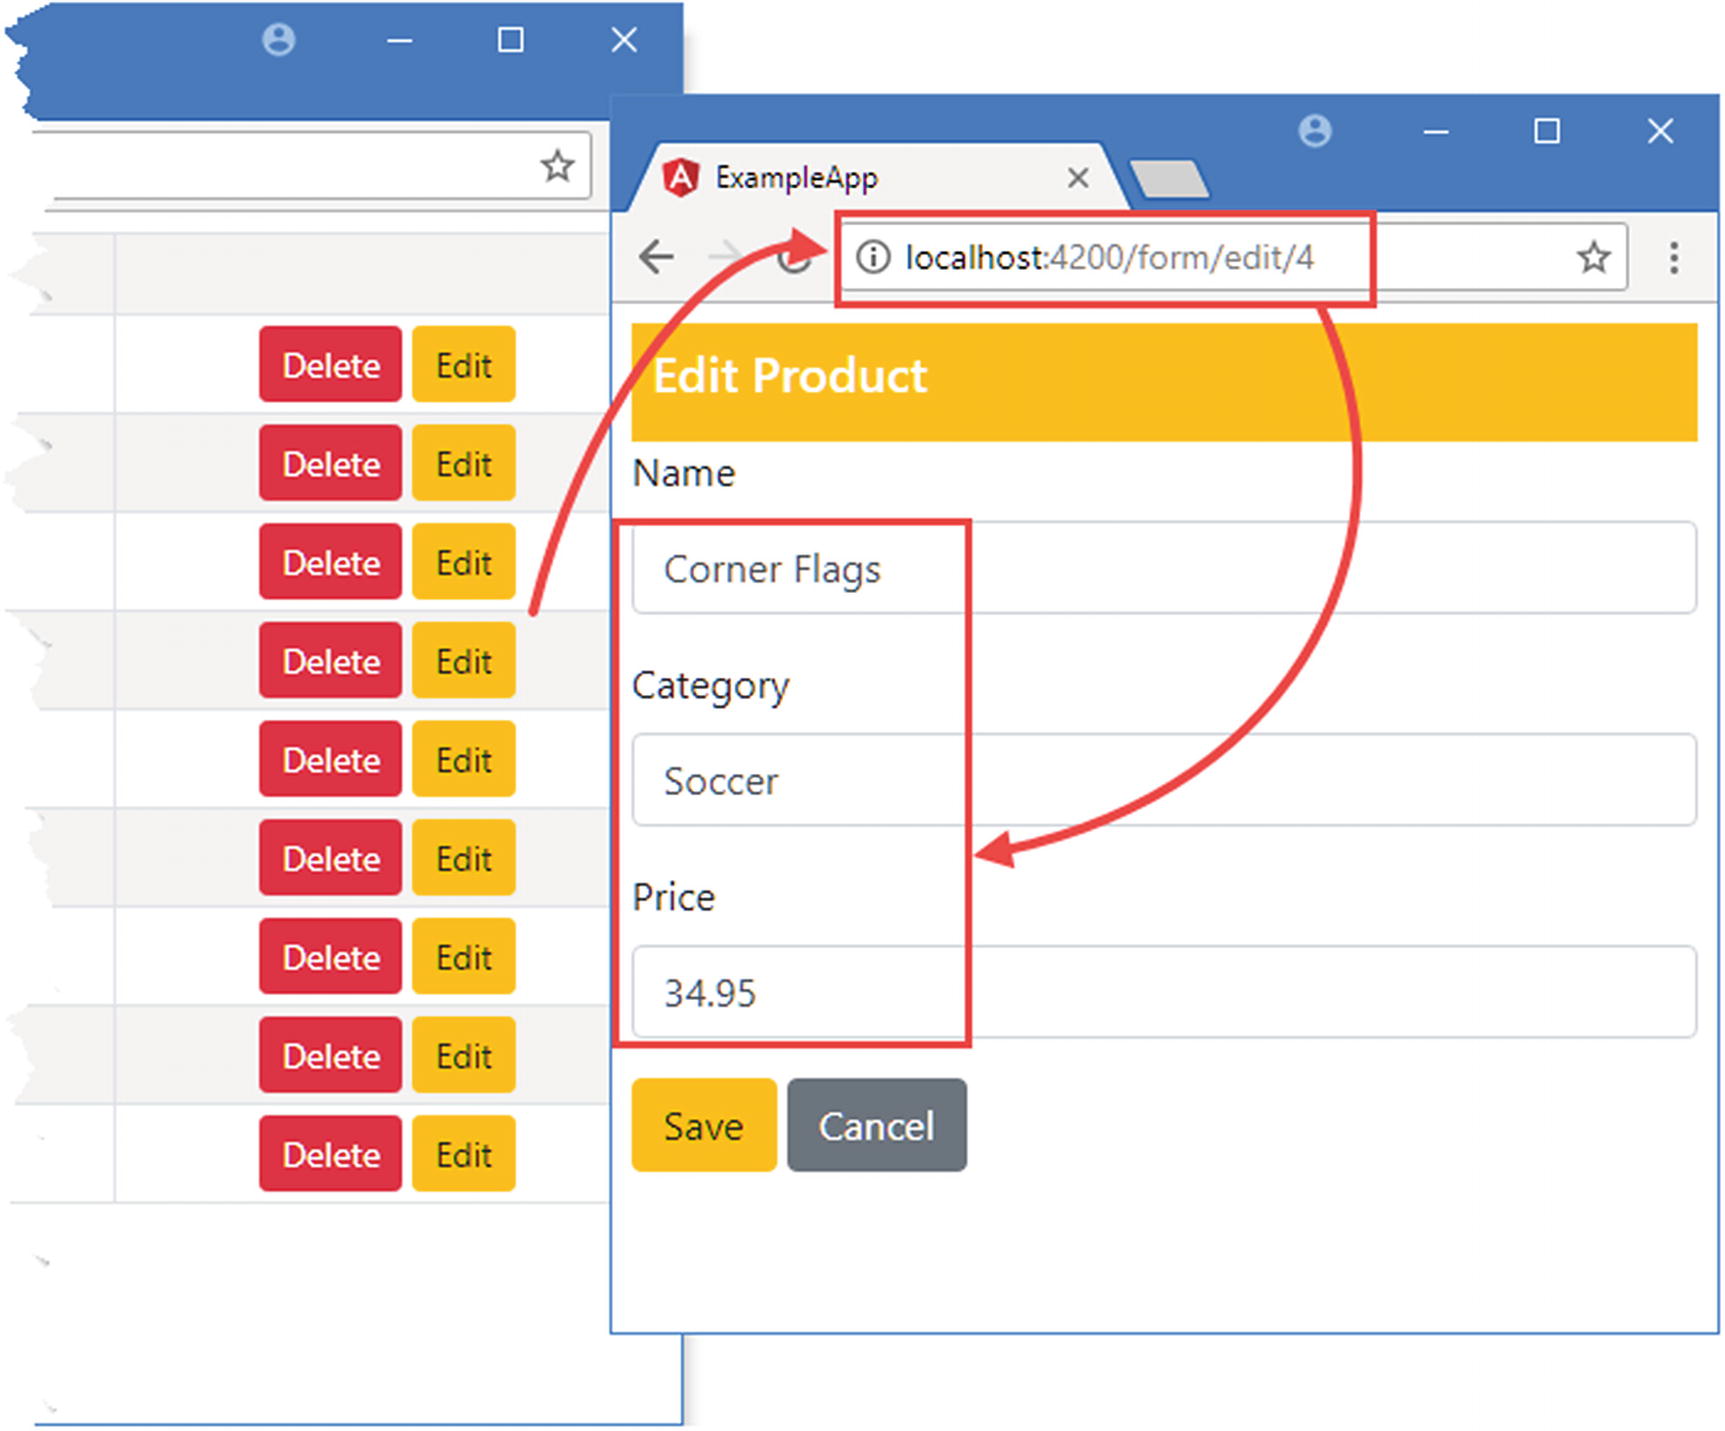
When the user clicks an Edit button, the routing URL that is activated tells the form component that an edit operation is required and which product is to be modified, allowing the form to be populated correctly, as shown in Figure 25-5.
Tip
Notice that I check to confirm that I have been able to retrieve a Product object from the data model in Listing 25-16 and create a new object if that isn’t the case. This is important because the data in the model is obtained asynchronously and may not have arrived by the time that the form component is displayed if the user requests the URL directly. This can also be a problem in development, where a change to the code in the application triggers a recompilation followed by a reload of whatever URL you navigated to before making the change. The result is an error as Angular tries to navigate directly to a route that you expected would not be required until after the data model had been populated. In Chapter 27, I explain how you can stop routes from being activated until a specific condition is true, such as the arrival of the data.
Figure 25-5
Using URLs segments to provide information
Using Optional Route Parameters
Optional route parameters allow URLs to include information to provide hints or guidance to the rest of the application, but this is not essential for the application to work.
This type of route parameter is expressed using URL matrix notation, which isn’t part of the specification for URLs but which browsers support nonetheless. Here is an example of a URL that has optional route parameters:
The optional route parameters are separated by semicolons (the ; character), and this URL includes optional parameters called name and price.
As a demonstration of how to use optional parameters, Listing 25-17 shows the addition of an optional route parameter that includes the object to be edited as part of the URL. This information isn’t essential because the form component can get data from the model, but receiving the data via the routing URL would avoid some work.
An Optional Route Parameter in the table.component.html File in the src/app/core Folder
The optional values are expressed as literal objects, where property names identify the optional parameter. In this example, there are name, category, and price properties, and their values are set using the object being processed by the ngIf directive. The optional parameters will produce a URL like this one:
Listing 25-18 shows how the form component checks to see whether the optional parameters are present. If they have been included in the URL, then the parameter values are used to avoid a request to the data model.
Object.assign(this.product, model.getProduct(id) || new Product());
}
}
}
...
Listing 25-18
Receiving Optional Parameters in the form.component.ts File in the src/app/core Folder
Optional route parameters are accessed in the same way as required parameters, and it is the responsibility of the component to check to see whether they are present and to proceed anyway if they are not part of the URL. In this case, the component is able to fall back to querying the data model if the URL does not contain the optional parameters it looks for.
Navigating in Code
Using the routerLink attribute makes it easy to set up navigation in templates, but applications will often need to initiate navigation on behalf of the user within a component or directive.
To give access to the routing system to building blocks such as directives and components, Angular provides the Router class, which is available as a service through dependency injection and whose most useful methods and properties are described in Table 25-9.
Table 25-9
Selected Router Methods and Properties
Name
Description
navigated
This boolean property returns true if there has been at least one navigation event and false otherwise.
url
This property returns the active URL.
isActive(url, exact)
This method returns true if the specified URL is the URL defined by the active route. The exact argument specified whether all the segments in the specified URL must match the current URL for the method to return true.
events
This property returns an Observable<Event> that can be used to monitor navigation changes. See the “Receiving Navigation Events” section for details.
navigateByUrl(url, extras)
This method navigates to the specified URL. The result of the method is a Promise, which resolves with true when the navigation is successful and false when it is not and which is rejected when there is an error.
navigate(commands, extras)
This method navigates using an array of segments. The extras object can be used to specify whether the change of URL is relative to the current route. The result of the method is a Promise, which resolves with true when the navigation is successful and false when it is not and which is rejected when there is an error.
The navigate and navigateByUrl methods make it easy to perform navigation inside a building block such as a component. Listing 25-19 shows the use of the Router in the form component to redirect the application back to the table after a product has been created or updated.
import { Component, Inject } from "@angular/core";
import { NgForm } from "@angular/forms";
import { Product } from "../model/product.model";
import { Model } from "../model/repository.model";
import { ActivatedRoute, Router } from "@angular/router";
Object.assign(this.product, model.getProduct(id) || new Product());
}
}
}
editing: boolean = false;
submitForm(form: NgForm) {
if (form.valid) {
this.model.saveProduct(this.product);
//this.product = new Product();
//form.reset();
this.router.navigateByUrl("/");
}
}
resetForm() {
this.product = new Product();
}
}
Listing 25-19
Navigating Programmatically in the form.component.ts File in the src/app/core Folder
The component receives the Router object as a constructor argument and uses it in the submitForm method to navigate back to the application’s root URL. The two statements that have been commented out in the submitForm method are no longer required because the routing system will destroy the form component once it is no longer on display, which means that resetting the form’s state is not required.
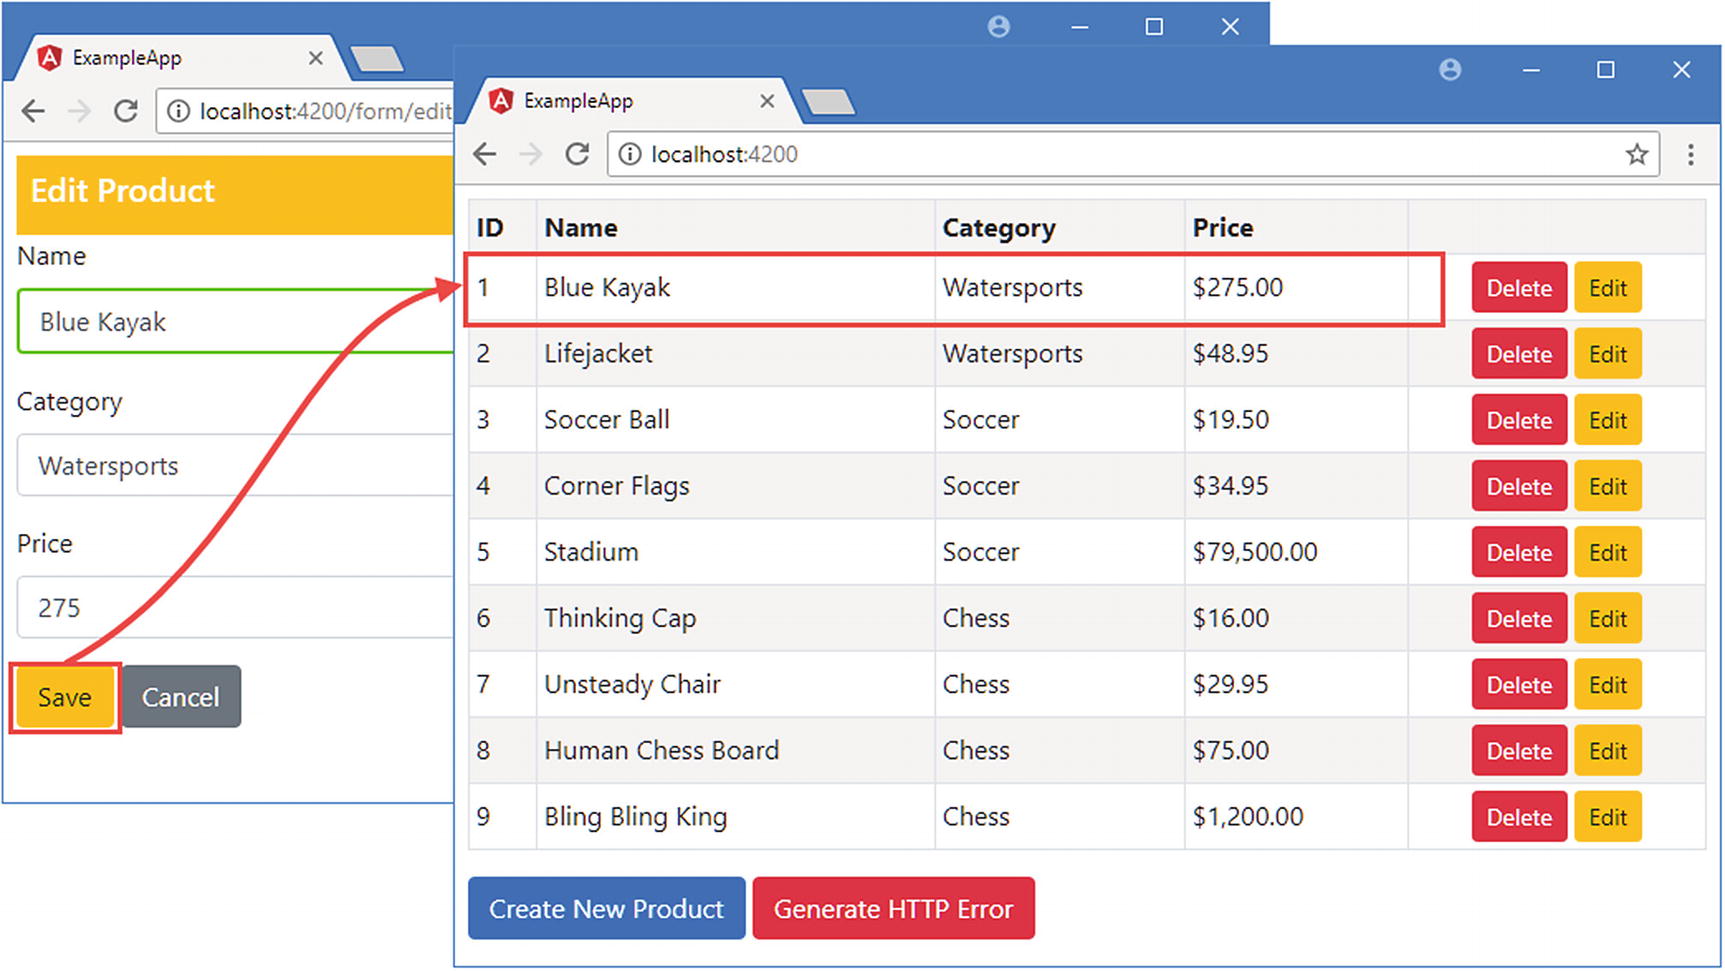
The result is that clicking the Save or Create button in the form will cause the application to display the product table, as shown in Figure 25-6.
Figure 25-6
Navigating programmatically
Receiving Navigation Events
In many applications, there will be components or directives that are not directly involved in the application’s navigation but that still need to know when navigation occurs. The example application contains an example in the message component, which displays notifications and errors to the user. This component always displays the most recent message, even when that information is stale and unlikely to be helpful to the user. To see the problem, click the Generate HTTP Error button and then click the Create New Product button or one of the Edit buttons; the error message remains on display even though you have navigated elsewhere in the application.
The events property defined by the Router class returns an Observable<Event>, which emits a sequence of Event objects that describe changes from the routing system. There are five types of event provided through the observer, as described in Table 25-10.
Table 25-10
The Types of Event Provided by the Router.events Observer
Name
Description
NavigationStart
This event is sent when the navigation process starts.
RoutesRecognized
This event is sent when the routing system matches the URL to a route.
NavigationEnd
This event is sent when the navigation process completes successfully.
NavigationError
This event is sent when the navigation process produces an error.
NavigationCancel
This event is sent when the navigation process is canceled.
All the event classes define an id property, which returns a number that is incremented each for each navigation, and a url property, which returns the target URL. The RoutesRecognized and NavigationEnd events also define a urlAfterRedirects property, which returns the URL that has been navigated to.
To address the issue with the messaging system, Listing 25-20 subscribes to the observer provided by the Router.events property and clears the message displayed to the user when the NavigationEnd or NavigationCancel event is received.
import { Component } from "@angular/core";
import { MessageService } from "./message.service";
import { Message } from "./message.model";
import { Observable } from "rxjs";
import { Router, NavigationEnd, NavigationCancel } from "@angular/router";
Responding to Events in the message.component.ts File in the src/app/messages Folder
The filter method is used to select one type of event from the observer, and the subscribe method updates the lastMessage property, which will clear the message displayed by the component. Listing 25-21 imports the routing functionality into the message module. (This isn’t required to make the application work since the root module already imports the routing feature, but it is good practice to have each module import all the features it requires.)
import { NgModule, ErrorHandler } from "@angular/core";
import { BrowserModule } from "@angular/platform-browser";
import { MessageComponent } from "./message.component";
import { MessageService } from "./message.service";
import { MessageErrorHandler } from "./errorHandler";
Importing the Routing Module in the message.module.ts File in the src/app/messages Folder
The result of these changes is that messages are shown to the user only until the next navigation event, as shown in Figure 25-7.
Figure 25-7
Responding to navigation events
Removing the Event Bindings and Supporting Code
One of the benefits of using the routing system is that it can simplify applications, replacing event bindings and the methods they invoke with navigation changes. The final change to complete the routing implementation is to remove the last traces of the previous mechanism that was used to coordinate between components. Listing 25-22 comments out the event bindings from the table component’s template, which were used to respond when the user clicked the Create New Product or Edit button. (The event binding for the Delete buttons is still required.)
Removing Event Bindings in the table.component.html File in the src/app/core Folder
Listing 25-23 shows the corresponding changes in the component, which remove the methods that the event bindings invoked and the dependency on the service that was used to signal when a product should be edited or created.
import { Component, Inject } from "@angular/core";
import { Product } from "../model/product.model";
import { Model } from "../model/repository.model";
//import { MODES, SharedState, SHARED_STATE } from "./sharedState.model";
Removing the Shared State Service in the core.module.ts File in the src/app/core Folder
The result is that the coordination between the table and form components is handled entirely through the routing system, which is now responsible for displaying the components and managing the navigation between them.
Summary
In this chapter, I introduced the Angular routing feature and demonstrated how to navigate to a URL in an application in order to select the content that is displayed to the user. I showed you how to create navigation links in templates, how to perform navigation in a component or directive, and how to respond to navigation changes programmatically. In the next chapter, I continue describing the Angular routing system.