© Adam Freeman 2018
Adam FreemanPro Angular 6https://doi.org/10.1007/978-1-4842-3649-9_27

27. Routing and Navigation: Part 3

Adam Freeman1 
(1)
London, UK
 
In this chapter, I continue to describe the Angular URL routing system, focusing on the most advanced features. I explain how to control route activation, how to load feature modules dynamically, and how to use multiple outlet elements in a template. Table 27-1 summarizes the chapter.
Table 27-1

Chapter Summary

Problem

Solution

Listing

Delay navigation until a task is complete

Use a route resolver

1–7

Prevent route activation

Use an activation guard

8–14

Prevent the user from navigating away from the current content

Use a deactivation guard

15–19

Defer loading a feature module until it is required

Create a dynamically loaded module

20–25

Control when a dynamically loaded module is used

Use a loading guard

26–28

Use routing to manage multiple router outlets

Use named outlets in the same template

29–34

Preparing the Example Project

For this chapter, I will continue using the exampleApp that was created in Chapter 22 and has been modified in each subsequent chapter. To prepare for this chapter, I have simplified the routing configuration, as shown in Listing 27-1.

Tip

You can download the example project for this chapter—and for all the other chapters in this book—from https://github.com/Apress/pro-angular-6 .

import { Routes, RouterModule } from "@angular/router";
import { TableComponent } from "./core/table.component";
import { FormComponent } from "./core/form.component";
import { NotFoundComponent } from "./core/notFound.component";
import { ProductCountComponent } from "./core/productCount.component";
import { CategoryCountComponent } from "./core/categoryCount.component";
const childRoutes: Routes = [
    { path: "products", component: ProductCountComponent },
    { path: "categories", component: CategoryCountComponent },
    { path: "", component: ProductCountComponent }
];
const routes: Routes = [
    { path: "form/:mode/:id", component: FormComponent },
    { path: "form/:mode", component: FormComponent },
    { path: "table", component: TableComponent, children: childRoutes },
    { path: "table/:category", component: TableComponent, children: childRoutes },
    { path: "", redirectTo: "/table", pathMatch: "full" },
    { path: "**", component: NotFoundComponent }
]
export const routing = RouterModule.forRoot(routes);
Listing 27-1

Simplifying the Routes in the app.routing.ts File in the src/app Folder

Open a new command prompt, navigate to the exampleApp folder, and run the following command to start the server that provides the RESTful web server:
npm run json
Open a separate command prompt, navigate to the exampleApp folder, and run the following command to start the Angular development tools:
ng serve
Open a new browser window and navigate to http://localhost:4200 to see the content shown in Figure 27-1.
../images/421542_3_En_27_Chapter/421542_3_En_27_Fig1_HTML.jpg
Figure 27-1

Running the example application

Guarding Routes

At the moment, the user can navigate to anywhere in the application at any time. This isn’t always a good idea, either because some parts of the application may not always be ready or because some parts of the application are restricted until specific actions are performed. To control the use of navigation, Angular supports guards, which are specified as part of the route configuration using the properties defined by the Routes class, described in Table 27-2.
Table 27-2

The Routes Properties for Guards

Name

Description

resolve

This property is used to specify guards that will delay route activation until some operation has been completed, such as loading data from a server.

canActivate

This property is used to specify the guards that will be used to determine whether a route can be activated.

canActivateChild

This property is used to specify the guards that will be used to determine whether a child route can be activated.

canDeactivate

This property is used to specify the guards that will be used to determine whether a route can be deactivated.

canLoad

This property is used to guard routes that load feature modules dynamically, as described in the “Loading Feature Modules Dynamically” section.

Delaying Navigation with a Resolver

A common reason for guarding routes is to ensure that the application has received the data that it requires before a route is activated. The example application loads data from the RESTful web service asynchronously, which means there can be a delay between the moment at which the browser is asked to send the HTTP request and the moment at which the response is received and the data is processed. You may not have noticed this delay as you have followed the examples because the browser and the web service are running on the same machine. In a deployed application, there is a much greater prospect of there being a delay, caused by network congestion, high server load, and a dozen other factors.

To simulate network congestion, Listing 27-2 modifies the RESTful data source class to introduce a delay after the response is received from the web service.
import { Injectable, Inject, InjectionToken } from "@angular/core";
import { HttpClient, HttpHeaders } from "@angular/common/http";
import { Observable, throwError } from "rxjs";
import { Product } from "./product.model";
import { catchError, delay } from "rxjs/operators";
export const REST_URL = new InjectionToken("rest_url");
@Injectable()
export class RestDataSource {
    constructor(private http: HttpClient,
        @Inject(REST_URL) private url: string) { }
    getData(): Observable<Product[]> {
        return this.sendRequest<Product[]>("GET", this.url);
    }
    saveProduct(product: Product): Observable<Product> {
        return this.sendRequest<Product>("POST", this.url, product);
    }
    updateProduct(product: Product): Observable<Product> {
        return this.sendRequest<Product>("PUT",
            `${this.url}/${product.id}`, product);
    }
    deleteProduct(id: number): Observable<Product> {
        return this.sendRequest<Product>("DELETE", `${this.url}/${id}`);
    }
    private sendRequest<T>(verb: string, url: string, body?: Product)
        : Observable<T> {
        let myHeaders = new HttpHeaders();
        myHeaders = myHeaders.set("Access-Key", "<secret>");
        myHeaders = myHeaders.set("Application-Names", ["exampleApp", "proAngular"]);
        return this.http.request<T>(verb, url, {
            body: body,
            headers: myHeaders
        })
        .pipe(delay(5000))
        .pipe(catchError((error: Response) =>
            throwError(`Network Error: ${error.statusText} (${error.status})`)));
    }
}
Listing 27-2

Adding a Delay in the rest.datasource.ts File in the src/app/model Folder

The delay is added using the Reactive Extensions delay method and is applied to create a five-second delay, which is long enough to create a noticeable pause without being too painful to wait for every time the application is reloaded. To change the delay, increase or decrease the argument for the delay method, which is expressed in milliseconds.

The effect of the delay is that the user is presented with an incomplete and confusing layout while the application is waiting for the data to load, as shown in Figure 27-2.

Note

The delay is applied to all HTTP requests, which means that if you create, edit, or delete a product, the change you have made will not be reflected in the product table for five seconds.
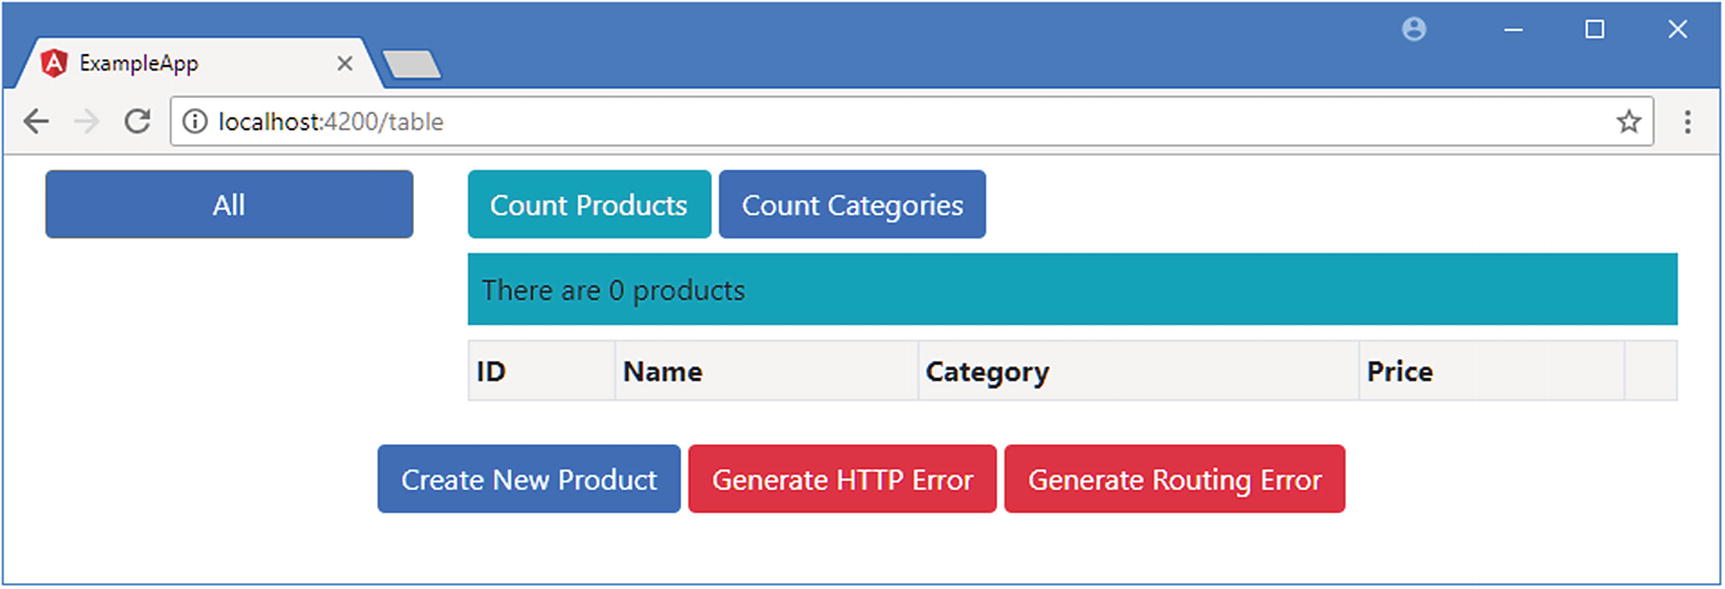
../images/421542_3_En_27_Chapter/421542_3_En_27_Fig2_HTML.jpg
Figure 27-2

Waiting for data

Creating a Resolver Service

A resolver is used to ensure that a task is performed before a route can be activated. To create a resolver, I added a file called model.resolver.ts in the src/app/model folder and defined the class shown in Listing 27-3.
import { Injectable } from "@angular/core";
import { ActivatedRouteSnapshot, RouterStateSnapshot } from "@angular/router";
import { Observable } from "rxjs";
import { Model } from "./repository.model"
import { RestDataSource } from "./rest.datasource";
import { Product } from "./product.model";
@Injectable()
export class ModelResolver {
    constructor(
        private model: Model,
        private dataSource: RestDataSource) { }
    resolve(route: ActivatedRouteSnapshot,
            state: RouterStateSnapshot): Observable<Product[]> {
        return this.model.getProducts().length == 0
            ? this.dataSource.getData() : null;
    }
}
Listing 27-3

The Contents of the model.resolver.ts File in the src/app/model Folder

Resolvers are classes that define a resolve method that accepts two arguments. The first argument is an ActivatedRouteSnapshot object, which describes the route that is being navigated to using the properties described in Chapter 25. The second argument is a RouterStateSnapshot object, which describes the current route through a single property called url. These arguments can be used to adapt the resolver to the navigation that is about to be performed, although neither is required by the resolver in the listing, which uses the same behavior regardless of the routes that are being navigated to and from.

Note

All of the guards described in this chapter can implement interfaces defined in the @angular/router module. For example, resolvers can implement an interface called Resolve. These interfaces are optional, and I have not used them in this chapter.

The resolve method can return three different types of result, as described in Table 27-3.
Table 27-3

The Result Types Allowed by the resolve Method

Result Type

Description

Observable<any>

The browser will activate the new route when the Observer emits an event.

Promise<any>

The browser will activate the new route when the Promise resolves.

Any other result

The browser will activate the new route as soon as the method produces a result.

The Observable and Promise results are useful when dealing with asynchronous operations, such as requesting data using an HTTP request. Angular waits until the asynchronous operation is complete before activating the new route. Any other result is interpreted as the result from a synchronous operation, and Angular will activate the new route immediately.

The resolver in Listing 27-3 uses its constructor to receive Model and RestDataSource objects via dependency injection. When the resolve method is called, it checks the number of objects in the data model to determine whether the HTTP request to the RESTful web service has completed. If there are no objects in the data model, the resolve method returns the Observable from the RestDataSource.getData method, which will emit an event when the HTTP request completes. Angular will subscribe to the Observable and delay activating the new route until it emits an event. The resolve method returns null if there are objects in the model, and since this is neither an Observable nor a Promise, Angular will activate the new route immediately.

Tip

Combining asynchronous and synchronous results means that the resolver will delay navigation only until the HTTP request completed and the data model has been populated. This is important because the resolve method will be called every time that the application tries to navigate to a route to which the resolver has been applied.

Registering the Resolver Service

The next step is to register the resolver as a service in its feature module, as shown in Listing 27-4.
import { NgModule } from "@angular/core";
import { Model } from "./repository.model";
import { HttpClientModule, HttpClientJsonpModule } from "@angular/common/http";
import { RestDataSource, REST_URL } from "./rest.datasource";
import { ModelResolver } from "./model.resolver";
@NgModule({
    imports: [HttpClientModule, HttpClientJsonpModule],
    providers: [Model, RestDataSource, ModelResolver,
        { provide: REST_URL, useValue: "http://localhost:3500/products" }]
})
export class ModelModule { }
Listing 27-4

Registering the Resolver in the model.module.ts File in the src/app/model Folder

Applying the Resolver

The resolver is applied to routes using the resolve property, as shown in Listing 27-5.
import { Routes, RouterModule } from "@angular/router";
import { TableComponent } from "./core/table.component";
import { FormComponent } from "./core/form.component";
import { NotFoundComponent } from "./core/notFound.component";
import { ProductCountComponent } from "./core/productCount.component";
import { CategoryCountComponent } from "./core/categoryCount.component";
import { ModelResolver } from "./model/model.resolver";
const childRoutes: Routes = [
    {   path: "",
        children: [{ path: "products", component: ProductCountComponent },
                   { path: "categories", component: CategoryCountComponent },
                   { path: "", component: ProductCountComponent }],
        resolve: { model: ModelResolver }
    }
];
const routes: Routes = [
    { path: "form/:mode/:id", component: FormComponent },
    { path: "form/:mode", component: FormComponent },
    { path: "table", component: TableComponent, children: childRoutes },
    { path: "table/:category", component: TableComponent, children: childRoutes },
    { path: "", redirectTo: "/table", pathMatch: "full" },
    { path: "**", component: NotFoundComponent }
]
export const routing = RouterModule.forRoot(routes);
Listing 27-5

Applying a Resolver in the app.routing.ts File in the src/app Folder

The resolve property accepts a map object whose property values are the resolver classes that will be applied to the route. (The property names do not matter.) I want to apply the resolver to all the views that display the product table, so to avoid duplication, I created a route with the resolve property and used it as the parent for the existing child routes.

Displaying Placeholder Content

Angular uses the resolver before activating any of the routes to which it has been applied, which prevents the user from seeing the product table until the model has been populated with the data from the RESTful web service. Sadly, that just means the user sees an empty window while the browser is waiting for the server to respond. To address this, Listing 27-6 enhances the resolver to use the message service to tell the user what is happening when the data is being loaded.
import { Injectable } from "@angular/core";
import { ActivatedRouteSnapshot, RouterStateSnapshot } from "@angular/router";
import { Observable } from "rxjs";
import { Model } from "./repository.model"
import { RestDataSource } from "./rest.datasource";
import { Product } from "./product.model";
import { MessageService } from "../messages/message.service";
import { Message } from "../messages/message.model";
@Injectable()
export class ModelResolver {
    constructor(
        private model: Model,
        private dataSource: RestDataSource,
        private messages: MessageService) { }
    resolve(route: ActivatedRouteSnapshot,
        state: RouterStateSnapshot): Observable<Product[]> {
        if (this.model.getProducts().length == 0) {
            this.messages.reportMessage(new Message("Loading data..."));
            return this.dataSource.getData();
        }
    }
}
Listing 27-6

Displaying a Message in the model.resolver.ts File in the src/app/model Folder

The component that displays the messages from the service clears its contents when it receives the NavigationEnd event, which means that the placeholder will be removed when the data has been loaded, as shown in Figure 27-3.
../images/421542_3_En_27_Chapter/421542_3_En_27_Fig3_HTML.jpg
Figure 27-3

Using a resolver to ensure data is loaded

Using a Resolver to Prevent URL Entry Problems

As I explained in Chapter 25, the development HTTP server will return the contents of the index.html file when it receives a request for a URL for which there is no corresponding file. Combined with the automatic browser reload functionality, it is easy to make a change in the project and have the browser reload a URL that causes the application to jump to a specific URL without going through the navigation steps that the application expects and that sets up the required state data.

To see an example of the problem, click one of the Edit buttons in the product table and then reload the browser page. The browser will request a URL like http://localhost:3500/form/edit/1, but this doesn’t have the expected effect because the component for the activated route attempts to retrieve an object from the model before the HTTP response from the RESTful server has been received. As a consequence, the form is empty, as shown in Figure 27-4.
../images/421542_3_En_27_Chapter/421542_3_En_27_Fig4_HTML.jpg
Figure 27-4

The effect of reloading an arbitrary URL

To avoid this problem, the resolver can be applied more broadly so that it protects other routes, as shown in Listing 27-7.
import { Routes, RouterModule } from "@angular/router";
import { TableComponent } from "./core/table.component";
import { FormComponent } from "./core/form.component";
import { NotFoundComponent } from "./core/notFound.component";
import { ProductCountComponent } from "./core/productCount.component";
import { CategoryCountComponent } from "./core/categoryCount.component";
import { ModelResolver } from "./model/model.resolver";
const childRoutes: Routes = [
    {
        path: "",
        children: [{ path: "products", component: ProductCountComponent },
                   { path: "categories", component: CategoryCountComponent },
                   { path: "", component: ProductCountComponent }],
        resolve: { model: ModelResolver }
    }
];
const routes: Routes = [
    {
        path: "form/:mode/:id", component: FormComponent,
        resolve: { model: ModelResolver }
    },
    {
        path: "form/:mode", component: FormComponent,
        resolve: { model: ModelResolver }
    },
    { path: "table", component: TableComponent, children: childRoutes },
    { path: "table/:category", component: TableComponent, children: childRoutes },
    { path: "", redirectTo: "/table", pathMatch: "full" },
    { path: "**", component: NotFoundComponent }
]
export const routing = RouterModule.forRoot(routes);
Listing 27-7

Applying the Resolver to Other Routes in the app.routing.ts File in the src/app Folder

Applying the ModelResolver class to the routes that target FormComponent prevents the problem shown in Figure 27-4. There are other ways to solve this problem, including the approach that I used in Chapter 8 for the SportsStore application, which uses the route guard feature described in the “Preventing Route Activation” section of this chapter.

Preventing Navigation with Guards

Resolvers are used to delay navigation while the application performs some prerequisite work, such as loading data. The other guards that Angular provides are used to control whether navigation can occur at all, which can be useful when you want to alert the user to prevent potentially unwanted operations (such as abandoning data edits) or limit access to parts of the application unless the application is in a specific state (such as when a user has been authenticated).

Many uses for route guards introduce an additional interaction with the user, either to gain explicit approval to perform an operation or to obtain additional data, such as authentication credentials. For this chapter, I am going to handle this kind of interaction by extending the message service so that messages can require user input. In Listing 27-8, I have added an optional responses constructor argument/property to the Message model class, which will allow messages to contain prompts to the user and callbacks that will be invoked when they are selected. The responses property is an array of TypeScript tuples, where the first value is the name of the response, which will be presented to the user, and the second value is the callback function, which will be passed the name as its argument.
export class Message {
    constructor(private text: string,
        private error: boolean = false,
        private responses?: [string, (string) => void][]) { }
}
Listing 27-8

Adding Responses in the message.model.ts File in the src/app/messages Folder

The only other change required to implement this feature is to present the response options to the user. Listing 27-9 adds button elements below the message text for each response. Clicking the buttons will invoke the callback function.
<div *ngIf="lastMessage"
     class="bg-info text-white p-2 text-center"
     [class.bg-danger]="lastMessage.error">
    <h4>{{lastMessage.text}}</h4>
</div>
<div class="text-center my-2">
    <button *ngFor="let resp of lastMessage?.responses; let i = index"
            (click)="resp[1](resp[0])"
            class="btn btn-primary m-2" [class.btn-secondary]="i > 0">
        {{resp[0]}}
    </button>
</div>
Listing 27-9

Presenting Responses in the message.component.html File in the src/app/core Folder

Preventing Route Activation

Guards can be used to prevent a route from being activated, helping to protect the application from entering an unwanted state or warning the user about the impact of performing an operation. To demonstrate, I am going to guard the /form/create URL to prevent the user from starting the process of creating a new product unless the user agrees to the application’s terms and conditions.

Guards for route activation are classes that define a method called canActivate, which receives the same ActivatedRouteSnapshot and RouterStateSnapshot arguments as resolvers. The canActivate method can be implemented to return three different result types, as described in Table 27-4.
Table 27-4

The Result Types Allowed by the canActivate Method

Result Type

Description

boolean

This type of result is useful when performing synchronous checks to see whether the route can be activated. A true result will activate the route, and a result of false will not, effectively ignoring the navigation request.

Observable<boolean>

This type of result is useful when performing asynchronous checks to see whether the route can be activated. Angular will wait until the Observable emits a value, which will be used to determine whether the route is activated. When using this kind of result, it is important to terminate the Observable by calling the complete method; otherwise, Angular will just keep waiting.

Promise<boolean>

This type of result is useful when performing asynchronous checks to see whether the route can be activated. Angular will wait until the Promise is resolved and activate the route if it yields true. If the Promise yields false, then the route will not be activated, effectively ignoring the navigation request.

To get started, I added a file called terms.guard.ts to the src/app folder and defined the class shown in Listing 27-10.
import { Injectable } from "@angular/core";
import {
    ActivatedRouteSnapshot, RouterStateSnapshot,
    Router
} from "@angular/router";
import { MessageService } from "./messages/message.service";
import { Message } from "./messages/message.model";
@Injectable()
export class TermsGuard {
    constructor(private messages: MessageService,
                private router: Router) { }
    canActivate(route: ActivatedRouteSnapshot, state: RouterStateSnapshot):
        Promise<boolean> | boolean {
        if (route.params["mode"] == "create") {
            return new Promise<boolean>((resolve) => {
                let responses: [string, () => void][]
                    = [["Yes", () => resolve(true)], ["No",  () => resolve(false)]];
                this.messages.reportMessage(
                    new Message("Do you accept the terms & conditions?",
                        false, responses));
            });
        } else {
            return true;
        }
    }
}
Listing 27-10

The Contents of the terms.guard.ts File in the src/app Folder

The canActivate method can return two different types of result. The first type is a boolean, which allows the guard to respond immediately for routes that it doesn’t need to protect, which in this case is any that lacks a parameter called mode whose value is create. If the URL matched by the route doesn’t contain this parameter, the canActivate method returns true, which tells Angular to activate the route. This is important because the edit and create features both rely on the same routes, and the guard should not interfere with edit operations.

The other type of result is a Promise<boolean>, which I have used instead of Observable<true> for variety. The Promise uses the modifications to the message service to solicit a response from the user, confirming they accept the (unspecified) terms and conditions. There are two possible responses from the user. If the user clicks the Yes button, then the Promise will resolve and yield true, which tells Angular to activate the route, displaying the form that is used to create a new product. The Promise will resolve and yield false if the user clicks the No button, which tells Angular to ignore the navigation request.

Listing 27-11 registers the TermsGuard as a service so that it can be used in the application’s routing configuration.
import { BrowserModule } from '@angular/platform-browser';
import { NgModule } from '@angular/core';
import { ModelModule } from "./model/model.module";
import { CoreModule } from "./core/core.module";
import { TableComponent } from "./core/table.component";
import { FormComponent } from "./core/form.component";
import { MessageModule } from "./messages/message.module";
import { MessageComponent } from "./messages/message.component";
import { AppComponent } from './app.component';
import { routing } from "./app.routing";
import { TermsGuard } from "./terms.guard"
@NgModule({
    imports: [BrowserModule, ModelModule, CoreModule, MessageModule, routing],
    declarations: [AppComponent],
    providers: [TermsGuard],
    bootstrap: [AppComponent]
})
export class AppModule { }
Listing 27-11

Registering the Guard as a Service in the app.module.ts File in the src/app Folder

Finally, Listing 27-12 applies the guard to the routing configuration. Activation guards are applied to a route using the canActivate property, which is assigned an array of guard services. The canActivate method of all the guards must return true (or return an Observable or Promise that eventually yields true) before Angular will activate the route.
import { Routes, RouterModule } from "@angular/router";
import { TableComponent } from "./core/table.component";
import { FormComponent } from "./core/form.component";
import { NotFoundComponent } from "./core/notFound.component";
import { ProductCountComponent } from "./core/productCount.component";
import { CategoryCountComponent } from "./core/categoryCount.component";
import { ModelResolver } from "./model/model.resolver";
import { TermsGuard } from "./terms.guard";
const childRoutes: Routes = [
    {
        path: "",
        children: [{ path: "products", component: ProductCountComponent },
                   { path: "categories", component: CategoryCountComponent },
                   { path: "", component: ProductCountComponent }],
        resolve: { model: ModelResolver }
    }
];
const routes: Routes = [
    {
        path: "form/:mode/:id", component: FormComponent,
        resolve: { model: ModelResolver }
    },
    {
        path: "form/:mode", component: FormComponent,
        resolve: { model: ModelResolver },
        canActivate: [TermsGuard]
    },
    { path: "table", component: TableComponent, children: childRoutes },
    { path: "table/:category", component: TableComponent, children: childRoutes },
    { path: "", redirectTo: "/table", pathMatch: "full" },
    { path: "**", component: NotFoundComponent }
]
export const routing = RouterModule.forRoot(routes);
Listing 27-12

Applying the Guard to a Route in the app.routing.ts File in the src/app Folder

The effect of creating and applying the activation guard is that the user is prompted when clicking the Create New Product button, as shown in Figure 27-5. If they respond by clicking the Yes button, then the navigation request will be completed, and Angular will activate the route that selects the form component, which will allow a new product to be created. If the user clicks the No button, then the navigation request will be canceled. In both cases, the routing system emits an event that is received by the component that displays the messages to the user, which clears its display and ensures that the user doesn’t see stale messages.
../images/421542_3_En_27_Chapter/421542_3_En_27_Fig5_HTML.jpg
Figure 27-5

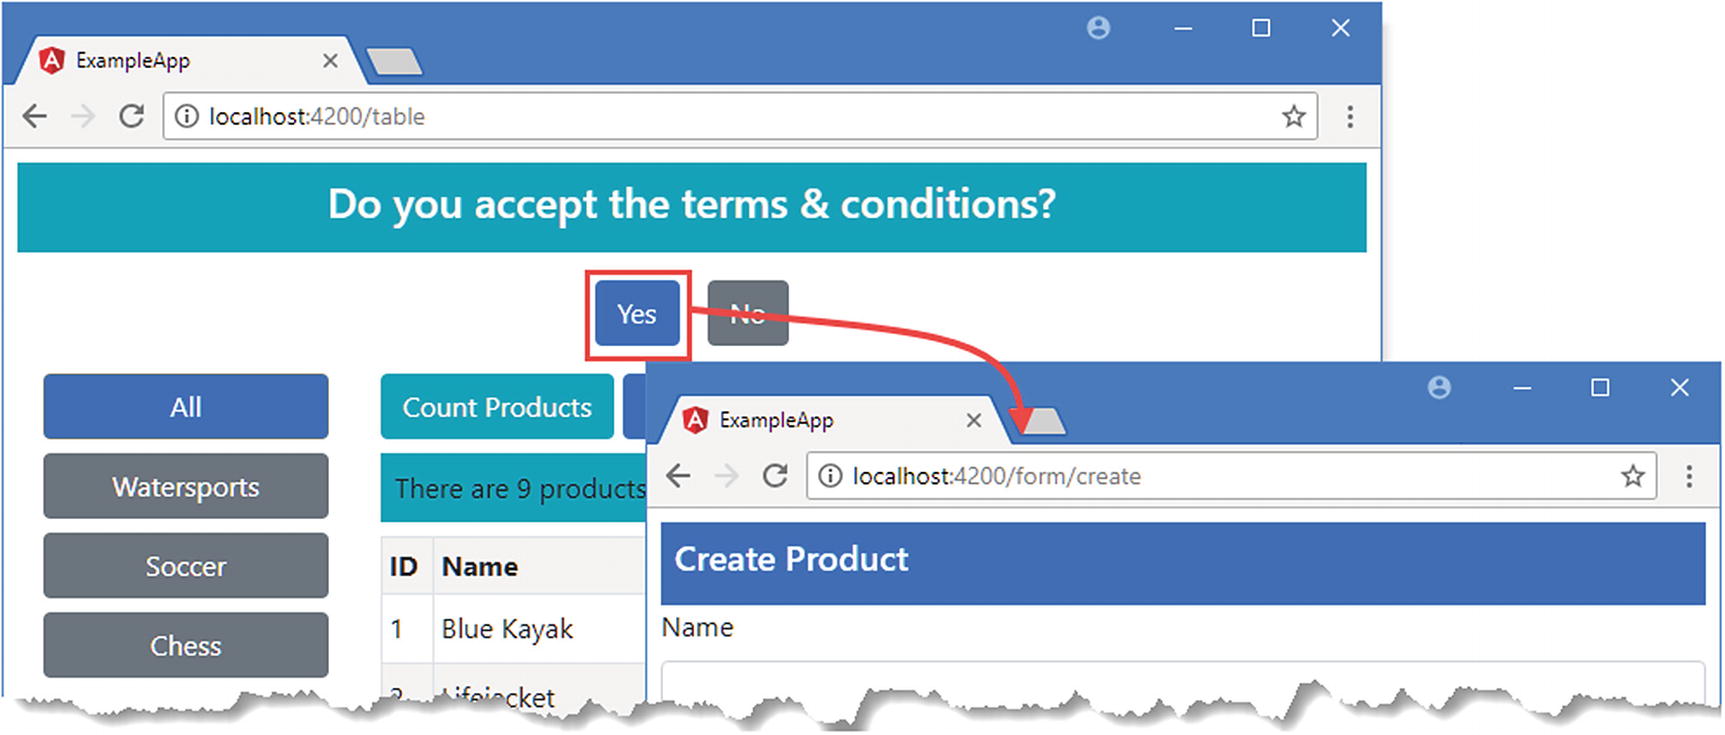
Guarding route activation

Consolidating Child Route Guards

If you have a set of child routes, you can guard against their activation using a child route guard, which is a class that defines a method called canActivateChild. The guard is applied to the parent route in the application’s configuration, and the canActivateChild method is called whenever any of the child routes are about to be activated. The method receives the same ActivatedRouteSnapshot and RouterStateSnapshot objects as the other guards and can return the set of result types described in Table 27-4.

This guard in this example is more readily dealt with by changing the configuration before implementing the canActivateChild method, as shown in Listing 27-13.
import { Routes, RouterModule } from "@angular/router";
import { TableComponent } from "./core/table.component";
import { FormComponent } from "./core/form.component";
import { NotFoundComponent } from "./core/notFound.component";
import { ProductCountComponent } from "./core/productCount.component";
import { CategoryCountComponent } from "./core/categoryCount.component";
import { ModelResolver } from "./model/model.resolver";
import { TermsGuard } from "./terms.guard";
const childRoutes: Routes = [
    {
        path: "",
        canActivateChild: [TermsGuard],
        children: [{ path: "products", component: ProductCountComponent },
                   { path: "categories", component: CategoryCountComponent },
                   { path: "", component: ProductCountComponent }],
        resolve: { model: ModelResolver }
    }
];
const routes: Routes = [
    {
        path: "form/:mode/:id", component: FormComponent,
        resolve: { model: ModelResolver }
    },
    {
        path: "form/:mode", component: FormComponent,
        resolve: { model: ModelResolver },
        canActivate: [TermsGuard]
    },
    { path: "table", component: TableComponent, children: childRoutes },
    { path: "table/:category", component: TableComponent, children: childRoutes },
    { path: "", redirectTo: "/table", pathMatch: "full" },
    { path: "**", component: NotFoundComponent }
]
export const routing = RouterModule.forRoot(routes);
Listing 27-13

Guarding Child Routes in the app.routing.ts File in the src/app Folder

Child route guards are applied to a route using the canActivateChild property, which is set to an array of service types that implement the canActivateChild method. This method will be called before Angular activates any of the route’s children. Listing 27-14 adds the canActivateChild method to the guard class from the previous section.
import { Injectable } from "@angular/core";
import {
    ActivatedRouteSnapshot, RouterStateSnapshot,
    Router
} from "@angular/router";
import { MessageService } from "./messages/message.service";
import { Message } from "./messages/message.model";
@Injectable()
export class TermsGuard {
    constructor(private messages: MessageService,
        private router: Router) { }
    canActivate(route: ActivatedRouteSnapshot, state: RouterStateSnapshot):
        Promise<boolean> | boolean {
        if (route.params["mode"] == "create") {
            return new Promise<boolean>((resolve, reject) => {
                let responses: [string, (string) => void][] = [
                    ["Yes", () => resolve(true)],
                    ["No", () => resolve(false)]
                ];
                this.messages.reportMessage(
                    new Message("Do you accept the terms & conditions?",
                        false, responses));
            });
        } else {
            return true;
        }
    }
    canActivateChild(route: ActivatedRouteSnapshot, state: RouterStateSnapshot):
        Promise<boolean> | boolean {
        if (route.url.length > 0
            && route.url[route.url.length - 1].path == "categories") {
            return new Promise<boolean>((resolve, reject) => {
                let responses: [string, (string) => void][] = [
                    ["Yes", () => resolve(true)],
                    ["No ", () => resolve(false)]
                ];
                this.messages.reportMessage(
                    new Message("Do you want to see the categories component?",
                        false, responses));
            });
        } else {
            return true;
        }
    }
}
Listing 27-14

Implementing Child Route Guards in the terms.guard.ts File in the src/app Folder

The guard only protects the categories child route and will return true immediately for any other route. The guard prompts the user using the message service but does something different if the user clicks the No button. In addition to rejecting the active route, the guard navigates to a different URL using the Router service, which is received as a constructor argument. This is a common pattern for authentication, when the user is redirected to a component that will solicit security credentials if a restricted operation is attempted. The example is simpler in this case, and the guard navigates to a sibling route that shows a different component. (You can see an example of using route guards for navigation in the SportsStore application in Chapter 9.)

To see the effect of the guard, click the Count Categories button, as shown in Figure 27-6. Responding to the prompt by clicking the Yes button will show the CategoryCountComponent, which displays the number of categories in the table. Clicking No will reject the active route and navigate to a route that displays the ProductCountComponent instead.

Note

Guards are applied only when the active route changes. So, for example, if you click the Count Categories button when the /table URL is active, then you will see the prompt, and clicking Yes will change the active route. But nothing will happen if you click the Count Categories button again because Angular doesn’t trigger a route change when the target route and the active route are the same.

../images/421542_3_En_27_Chapter/421542_3_En_27_Fig6_HTML.jpg
Figure 27-6

Guarding child routes

Preventing Route Deactivation

When you start working with routes, you will tend to focus on the way that routes are activated to respond to navigation and present new content to the user. But equally important is route deactivation, which occurs when the application navigates away from a route.

The most common use for deactivation guards is to prevent the user from navigating when there are unsaved edits to data. In this section, I will create a guard that warns the user when they are about to abandon unsaved changes when editing a product. In preparation for this, Listing 27-15 changes the FormComponent class to simplify the work of the guard.
import { Component, Inject } from "@angular/core";
import { NgForm } from "@angular/forms";
import { Product } from "../model/product.model";
import { Model } from "../model/repository.model";
import { ActivatedRoute, Router } from "@angular/router";
@Component({
    selector: "paForm",
    templateUrl: "form.component.html",
    styleUrls: ["form.component.css"]
})
export class FormComponent {
    product: Product = new Product();
    originalProduct = new Product();
    constructor(private model: Model, activeRoute: ActivatedRoute,
        private router: Router) {
        activeRoute.params.subscribe(params => {
            this.editing = params["mode"] == "edit";
            let id = params["id"];
            if (id != null) {
                Object.assign(this.product, model.getProduct(id) || new Product());
                Object.assign(this.originalProduct, this.product);
            }
        })
    }
    editing: boolean = false;
    submitForm(form: NgForm) {
        if (form.valid) {
            this.model.saveProduct(this.product);
            this.originalProduct = this.product;
            this.router.navigateByUrl("/");
        }
    }
    //resetForm() {
    //    this.product = new Product();
    //}
}
Listing 27-15

Preparing for the Guard in the form.component.ts File in the src/app/core Folder

When the component begins editing, it creates a copy of the Product object that it gets from the data model and assigns it to the originalProduct property. This property will be used by the deactivation guard to see whether there are unsaved edits. To prevent the guard from interrupting save operations, the originalProduct property is set to the editing product object in the submitForm method before the navigation request.

A corresponding change is required in the template so that the Cancel button doesn’t invoke the form’s reset event handler, as shown in Listing 27-16.
<div class="bg-primary text-white p-2" [class.bg-warning]="editing">
    <h5>{{editing  ? "Edit" : "Create"}} Product</h5>
</div>
<div *ngIf="editing" class="p-2">
    <button class="btn btn-secondary"
            [routerLink]="['/form', 'edit', model.getPreviousProductid(product.id)]">
        Previous
    </button>
    <button class="btn btn-secondary"
            [routerLink]="['/form', 'edit', model.getNextProductId(product.id)]">
        Next
    </button>
</div>
<form novalidate #form="ngForm" (ngSubmit)="submitForm(form)">
    <div class="form-group">
        <label>Name</label>
        <input class="form-control" name="name"
                [(ngModel)]="product.name" required />
    </div>
    <div class="form-group">
        <label>Category</label>
        <input class="form-control" name="category"
                [(ngModel)]="product.category" required />
    </div>
    <div class="form-group">
        <label>Price</label>
        <input class="form-control" name="price"
                [(ngModel)]="product.price"
                required pattern="^[0-9.]+$" />
    </div>
    <button type="submit" class="btn btn-primary"
            [class.btn-warning]="editing" [disabled]="form.invalid">
        {{editing ? "Save" : "Create"}}
    </button>
    <button type="button" class="btn btn-secondary" routerLink="/">Cancel</button>
</form>
Listing 27-16

Disabling Form Reset in the form.component.html File in the src/app/core Folder

To create the guard, I added a file called unsaved.guard.ts in the src/app/core folder and defined the class shown in Listing 27-17.
import { Injectable } from "@angular/core";
import {
    ActivatedRouteSnapshot, RouterStateSnapshot,
    Router
} from "@angular/router";
import { Observable, Subject } from "rxjs";
import { MessageService } from "../messages/message.service";
import { Message } from "../messages/message.model";
import { FormComponent } from "./form.component";
@Injectable()
export class UnsavedGuard {
    constructor(private messages: MessageService,
                private router: Router) { }
    canDeactivate(component: FormComponent, route: ActivatedRouteSnapshot,
        state: RouterStateSnapshot): Observable<boolean> | boolean {
        if (component.editing) {
            if (["name", "category", "price"]
                .some(prop => component.product[prop]
                    != component.originalProduct[prop])) {
                let subject = new Subject<boolean>();
                let responses: [string, (string) => void][] = [
                    ["Yes", () => {
                        subject.next(true);
                        subject.complete();
                    }],
                    ["No", () => {
                        this.router.navigateByUrl(this.router.url);
                        subject.next(false);
                        subject.complete();
                    }]
                ];
                this.messages.reportMessage(new Message("Discard Changes?",
                    true, responses));
                return subject;
            }
        }
        return true;
    }
}
Listing 27-17

The Contents of the unsaved.guard.ts File in the src/app/core Folder

Deactivation guards define a class called canDeactivate that receives three arguments: the component that is about to be deactivated and the ActivatedRouteSnapshot and RouteStateSnapshot objects. This guard checks to see whether there are unsaved edits in the component and prompts the user if there are. For variety, this guard uses an Observable<true>, implemented as a Subject<true>, instead of a Promise<true> to tell Angular whether it should activate the route, based on the response selected by the user.

Tip

Notice that I call the complete method on the Subject after calling the next method. Angular will wait indefinitely for the complete method is called, effectively freezing the application.

The next step is to register the guard as a service in the module that contains it, as shown in Listing 27-18.
import { NgModule } from "@angular/core";
import { BrowserModule } from "@angular/platform-browser";
import { FormsModule } from "@angular/forms";
import { ModelModule } from "../model/model.module";
import { TableComponent } from "./table.component";
import { FormComponent } from "./form.component";
import { Subject } from "rxjs";
import { StatePipe } from "./state.pipe";
import { MessageModule } from "../messages/message.module";
import { MessageService } from "../messages/message.service";
import { Message } from "../messages/message.model";
import { Model } from "../model/repository.model";
import { RouterModule } from "@angular/router";
import { ProductCountComponent } from "./productCount.component";
import { CategoryCountComponent } from "./categoryCount.component";
import { NotFoundComponent } from "./notFound.component";
import { UnsavedGuard } from "./unsaved.guard";
@NgModule({
    imports: [BrowserModule, FormsModule, ModelModule, MessageModule, RouterModule],
    declarations: [TableComponent, FormComponent, StatePipe,
        ProductCountComponent, CategoryCountComponent, NotFoundComponent],
    providers: [UnsavedGuard],
    exports: [ModelModule, TableComponent, FormComponent]
})
export class CoreModule { }
Listing 27-18

Registering the Guard as a Service in the core.module.ts File in the src/app/core Folder

Finally, Listing 27-19 applies the guard to the application’s routing configuration. Deactivation guards are applied to routes using the canDeactivate property, which is set to an array of guard services.
import { Routes, RouterModule } from "@angular/router";
import { TableComponent } from "./core/table.component";
import { FormComponent } from "./core/form.component";
import { NotFoundComponent } from "./core/notFound.component";
import { ProductCountComponent } from "./core/productCount.component";
import { CategoryCountComponent } from "./core/categoryCount.component";
import { ModelResolver } from "./model/model.resolver";
import { TermsGuard } from "./terms.guard";
import { UnsavedGuard } from "./core/unsaved.guard";
const childRoutes: Routes = [
    {
        path: "",
        canActivateChild: [TermsGuard],
        children: [{ path: "products", component: ProductCountComponent },
                   { path: "categories", component: CategoryCountComponent },
                   { path: "", component: ProductCountComponent }],
        resolve: { model: ModelResolver }
    }
];
const routes: Routes = [
    {
        path: "form/:mode/:id", component: FormComponent,
        resolve: { model: ModelResolver },
        canDeactivate: [UnsavedGuard]
    },
    {
        path: "form/:mode", component: FormComponent,
        resolve: { model: ModelResolver },
        canActivate: [TermsGuard]
    },
    { path: "table", component: TableComponent, children: childRoutes },
    { path: "table/:category", component: TableComponent, children: childRoutes },
    { path: "", redirectTo: "/table", pathMatch: "full" },
    { path: "**", component: NotFoundComponent }
]
export const routing = RouterModule.forRoot(routes);
Listing 27-19

Applying the Guard in the app.routing.ts File in the src/app Folder

To see the effect of the guard, click one of the Edit buttons in the table; edit the data in one of the text fields; and then click the Cancel, Next, or Previous button. The guard will prompt you before allowing Angular to activate the route you selected, as shown in Figure 27-7.
../images/421542_3_En_27_Chapter/421542_3_En_27_Fig7_HTML.jpg
Figure 27-7

Guarding route deactivation

Loading Feature Modules Dynamically

Angular supports loading feature modules only when they are required, known as dynamic loading or lazy loading. This can be useful for functionality that is unlikely to be required by all users. In the sections that follow, I create a simple feature module and demonstrate how to configure the application so that Angular will load the module only when the application navigates to a specific URL.

Note

Loading modules dynamically is a trade-off. The application will be smaller and faster to download for most users, improving their overall experience. But users who require the dynamically loaded features will have wait while Angular gets the module and its dependencies. The effect can be jarring because the user has no idea that some features have been loaded and others have not. When you create dynamically loaded modules, you are balancing improving the experience for some users against making it worse for others. Consider how your users fall into these groups and be careful not to degrade the experience of your most valuable and important customers.

Creating a Simple Feature Module

Dynamically loaded modules must contain only functionality that not all users will require. I can’t use the existing modules because they provide the core functionality for the application, which means that I need a new module for this part of the chapter. I started by creating a folder called ondemand in the src/app folder. To give the new module a component, I added a file called ondemand.component.ts in the example/app/ondemand folder and added the code shown in Listing 27-20.

Caution

It is important not to create dependencies between other parts of the application and the classes in the dynamically loaded module so that the JavaScript module loader doesn’t try to load the module before it is required.

import { Component } from "@angular/core";
@Component({
    selector: "ondemand",
    templateUrl: "ondemand.component.html"
})
export class OndemandComponent { }
Listing 27-20

The Contents of the ondemand.component.ts File in the src/app/ondemand Folder

To provide the component with a template, I added a file called ondemand.component.html and added the markup shown in Listing 27-21.
<div class="bg-primary text-white p-2">This is the ondemand component</div>
<button class="btn btn-primary m-2" routerLink="/" >Back</button>
Listing 27-21

The ondemand.component.html File in the src/app/ondemand Folder

The template contains a message that will make it obvious when the component is selected and that contains a button element that will navigate back to the application’s root URL when clicked.

To define the module, I added a file called ondemand.module.ts and added the code shown in Listing 27-22.
import { NgModule } from "@angular/core";
import { CommonModule } from "@angular/common";
import { OndemandComponent } from "./ondemand.component";
@NgModule({
    imports: [CommonModule],
    declarations: [OndemandComponent],
    exports: [OndemandComponent]
})
export class OndemandModule { }
Listing 27-22

The Contents of the ondemand.module.ts File in the src/app/ondemand Folder

The module imports the CommonModule functionality, which is used instead of the browser-specific BrowserModule to access the built-in directives in feature modules that are loaded on-demand.

Loading the Module Dynamically

There are two steps to set up dynamic loading a module. The first is to set up a routing configuration inside the feature module to provide the rules that will allow Angular to select a component when the module is loaded. Listing 27-23 adds a single route to the feature module.
import { NgModule } from "@angular/core";
import { CommonModule } from "@angular/common";
import { OndemandComponent } from "./ondemand.component";
import { RouterModule } from "@angular/router";
let routing = RouterModule.forChild([
    { path: "", component: OndemandComponent }
]);
@NgModule({
    imports: [CommonModule, routing],
    declarations: [OndemandComponent],
    exports: [OndemandComponent]
})
export class OndemandModule { }
Listing 27-23

Defining Routes in the ondemand.module.ts File in the src/app/ondemand Folder

Routes in dynamically loaded modules are defined using the same properties as in the main part of the application and can use all the same features, including child components, guards, and redirections. The route defined in the listing matches the empty path and selects the OndemandComponent for display.

One important difference is the method used to generate the module that contains the routing information, as follows:
...
let routing = RouterModule.forChild([
    { path: "", component: OndemandComponent }
]);
...

When I created the application-wide routing configuration, I used the RouterModule.forRoot method. This is the method that is used to set up the routes in the root module of the application. When creating dynamically loaded modules, the RouterModule.forChild method must be used; this method creates a routing configuration that is merged into the overall routing system when the module is loaded.

Creating a Route to Dynamically Load a Module

The second step to set up a dynamically loaded module is to create a route in the main part of the application that provides Angular with the module’s location, as shown in Listing 27-24.
import { Routes, RouterModule } from "@angular/router";
import { TableComponent } from "./core/table.component";
import { FormComponent } from "./core/form.component";
import { NotFoundComponent } from "./core/notFound.component";
import { ProductCountComponent } from "./core/productCount.component";
import { CategoryCountComponent } from "./core/categoryCount.component";
import { ModelResolver } from "./model/model.resolver";
import { TermsGuard } from "./terms.guard";
import { UnsavedGuard } from "./core/unsaved.guard";
const childRoutes: Routes = [
    {
        path: "",
        canActivateChild: [TermsGuard],
        children: [{ path: "products", component: ProductCountComponent },
                   { path: "categories", component: CategoryCountComponent },
                   { path: "", component: ProductCountComponent }],
        resolve: { model: ModelResolver }
    }
];
const routes: Routes = [
    {
        path: "ondemand",
        loadChildren: "./ondemand/ondemand.module#OndemandModule"
    },
    {
        path: "form/:mode/:id", component: FormComponent,
        resolve: { model: ModelResolver },
        canDeactivate: [UnsavedGuard]
    },
    {
        path: "form/:mode", component: FormComponent,
        resolve: { model: ModelResolver },
        canActivate: [TermsGuard]
    },
    { path: "table", component: TableComponent, children: childRoutes },
    { path: "table/:category", component: TableComponent, children: childRoutes },
    { path: "", redirectTo: "/table", pathMatch: "full" },
    { path: "**", component: NotFoundComponent }
]
export const routing = RouterModule.forRoot(routes);
Listing 27-24

Creating an On-Demand Route in the app.routing.ts File in the src/app Folder

The loadChildren property is used to provide Angular with details of how the module should be loaded. The value of the property is the path to the JavaScript file that contains the module (omitting the file extension), followed by a # character, followed by the name of the module class. The value in the listing tells Angular to load the OndemandModule class from the ondemand/ondemand.module file.

Using a Dynamically Loaded Module

All that remains is to add support for navigating to the URL that will activate the route for the on-demand module, as shown in Listing 27-25, which adds a button to the template for the table component.
<div class="container-fluid">
    <div class="row">
        <div class="col-3">
            <button class="btn btn-secondary btn-block"
                    routerLink="/table" routerLinkActive="bg-primary"
                    [routerLinkActiveOptions]="{exact: true}">
                All
            </button>
            <button *ngFor="let category of categories"
                    class="btn btn-secondary btn-block"
                    [routerLink]="['/table', category]"
                    routerLinkActive="bg-primary">
                {{category}}
            </button>
        </div>
        <div class="col-9">
                < !-- ...elements omitted for brevity... -->
        </div>
        <div class="col-12 p-2 text-center">
            <button class="btn btn-primary" routerLink="/form/create">
                Create New Product
            </button>
            <button class="btn btn-danger" (click)="deleteProduct(-1)">
                Generate HTTP Error
            </button>
            <button class="btn btn-danger" routerLink="/does/not/exist">
                Generate Routing Error
            </button>
            <button class="btn btn-danger" routerLink="/ondemand">
                Load Module
            </button>
        </div>
    </div>
</div>
Listing 27-25

Adding Navigation in the table.component.html File in the src/app/core Folder

No special measures are required to target a route that loads a module, and the Load Module button in the listing uses the standard routerLink attribute to navigate to the URL specified by the route added in Listing 27-24.

To see how dynamic module loading works, restart the Angular development tools using the following command in the exampleApp folder, which rebuilds the modules, including the on-demand one:
ng serve
Now use the browser’s developer tools to see the list of files that are loaded as the application starts. You won’t see HTTP requests for any of the files in the on-demand module until you click the Load Module button. When the button is clicked, Angular uses the routing configuration to load the module, inspect its routing configuration, and select the component that will be displayed to the user, as shown in Figure 27-8.
../images/421542_3_En_27_Chapter/421542_3_En_27_Fig8_HTML.jpg
Figure 27-8

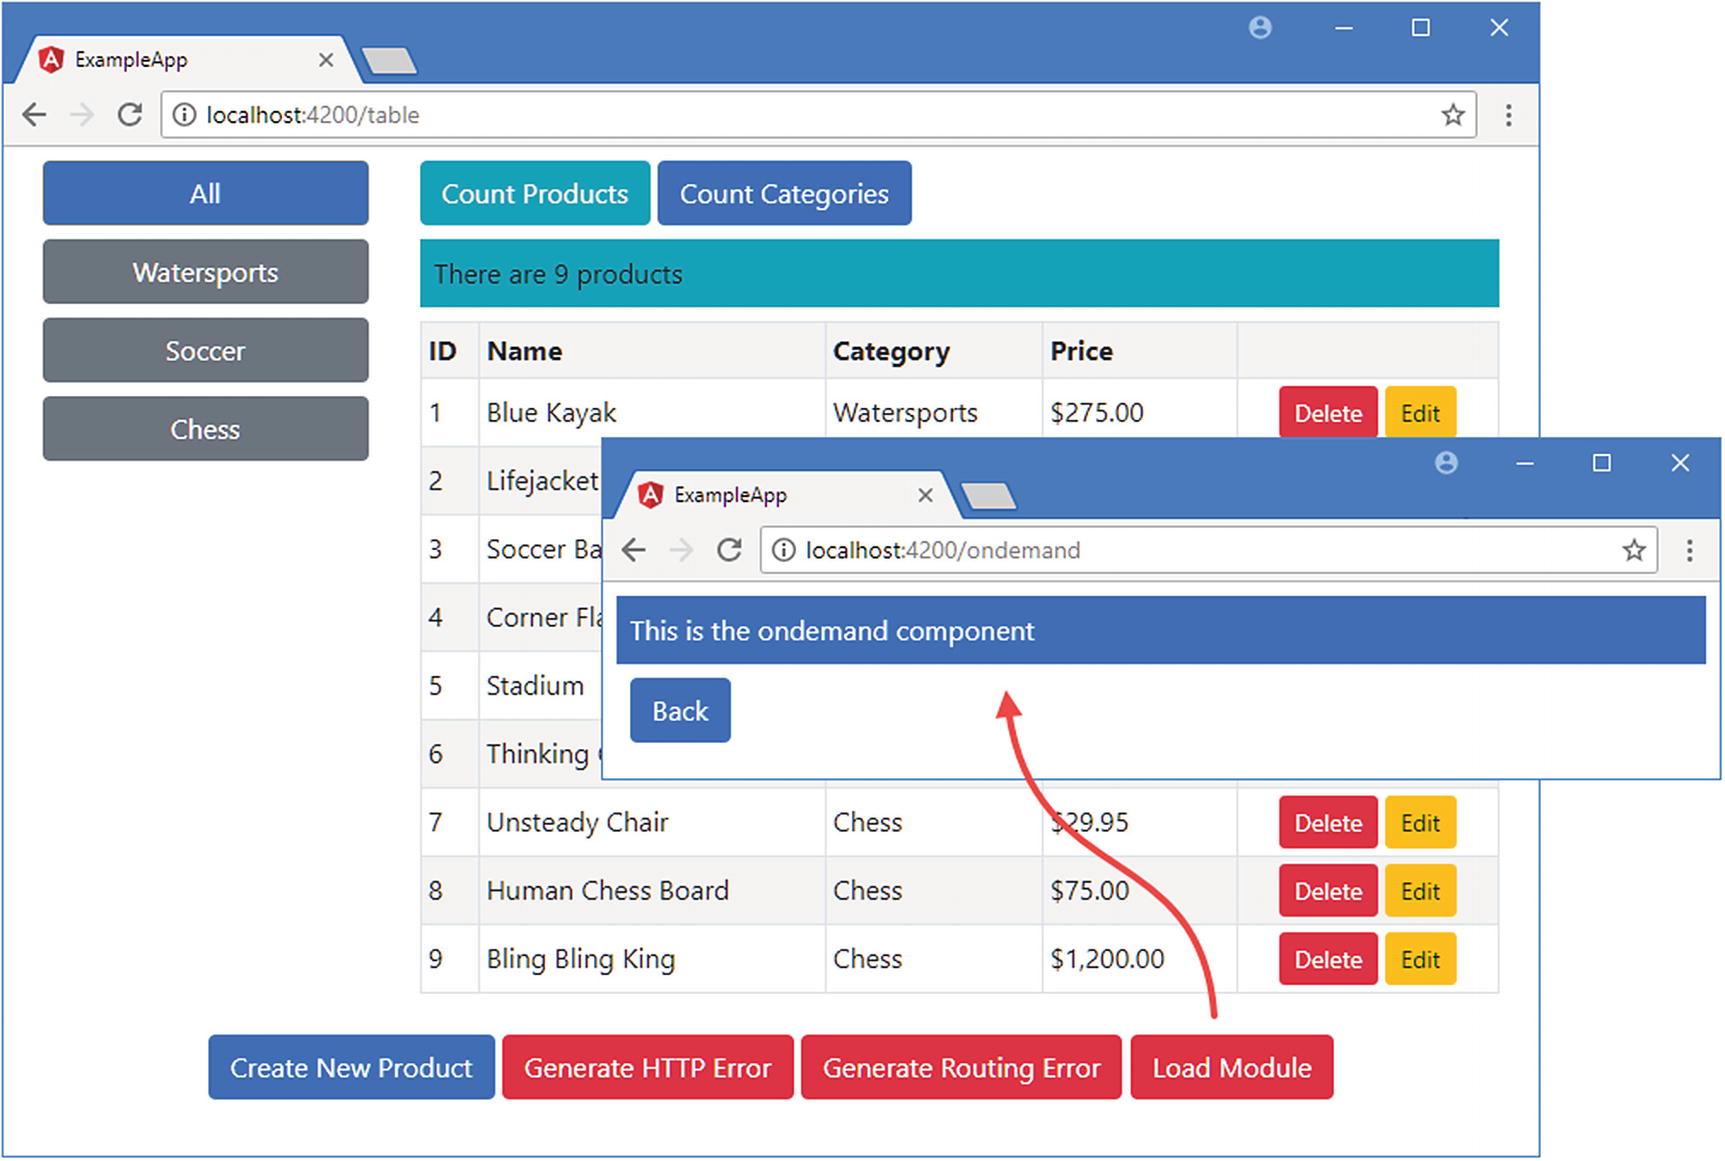
Loading a module dynamically

Guarding Dynamic Modules

You can guard against dynamically loading modules to ensure that they are loaded only when the application is in a specific state or when the user has explicitly agreed to wait while Angular does the loading (this latter option is typically used only for administration functions, where the user can be expected to have some understanding of how the application is structured).

The guard for the module must be defined in the main part of the application, so I added a file called load.guard.ts in the src/app folder and defined the class shown in Listing 27-26.
import { Injectable } from "@angular/core";
import { Route, Router } from "@angular/router";
import { MessageService } from "./messages/message.service";
import { Message } from "./messages/message.model";
@Injectable()
export class LoadGuard {
    private loaded: boolean = false;
    constructor(private messages: MessageService,
                private router: Router) { }
    canLoad(route: Route): Promise<boolean> | boolean {
        return this.loaded || new Promise<boolean>((resolve, reject) => {
            let responses: [string, (string) => void] [] = [
                ["Yes", () => {
                    this.loaded = true;
                    resolve(true);
                }],
                ["No", () => {
                    this.router.navigateByUrl(this.router.url);
                    resolve(false);
                }]
            ];
            this.messages.reportMessage(
                new Message("Do you want to load the module?",
                    false, responses));
        });
    }
}
Listing 27-26

The Contents of the load.guard.ts File in the src/app Folder

Dynamic loading guards are classes that implement a method called canLoad, which is invoked when Angular needs to activate the route it is applied to and which is provided with a Route object that describes the route.

The guard is required only when the URL that loads the module is first activated, so it defines a loaded property that is set to true when the module has been loaded so that subsequent requests are immediately approved. Otherwise, this guard follows the same pattern as earlier examples and returns a Promise that will be resolved when the user clicks one of the buttons displayed by the message service.

Listing 27-27 registers the guard as a service in the root module.
import { NgModule } from "@angular/core";
import { BrowserModule } from "@angular/platform-browser";
import { ModelModule } from "./model/model.module";
import { CoreModule } from "./core/core.module";
import { TableComponent } from "./core/table.component";
import { FormComponent } from "./core/form.component";
import { MessageModule } from "./messages/message.module";
import { MessageComponent } from "./messages/message.component";
import { routing } from "./app.routing";
import { AppComponent } from "./app.component";
import { TermsGuard } from "./terms.guard"
import { LoadGuard } from "./load.guard";
@NgModule({
    imports: [BrowserModule, CoreModule, MessageModule, routing],
    declarations: [AppComponent],
    providers: [TermsGuard, LoadGuard],
    bootstrap: [AppComponent]
})
export class AppModule { }
Listing 27-27

Registering the Guard as a Service in the app.module.ts File in the src/app Folder

Applying a Dynamic Loading Guard

Guards for dynamic loading are applied to routes using the canLoad property, which accepts an array of guard types. Listing 27-28 applies the LoadGuard class, which was defined in Listing 27-26, to the route that dynamically loads the module.
import { Routes, RouterModule } from "@angular/router";
import { TableComponent } from "./core/table.component";
import { FormComponent } from "./core/form.component";
import { NotFoundComponent } from "./core/notFound.component";
import { ProductCountComponent } from "./core/productCount.component";
import { CategoryCountComponent } from "./core/categoryCount.component";
import { ModelResolver } from "./model/model.resolver";
import { TermsGuard } from "./terms.guard";
import { UnsavedGuard } from "./core/unsaved.guard";
import { LoadGuard } from "./load.guard";
const childRoutes: Routes = [
    {
        path: "",
        canActivateChild: [TermsGuard],
        children: [{ path: "products", component: ProductCountComponent },
                   { path: "categories", component: CategoryCountComponent },
                   { path: "", component: ProductCountComponent }],
        resolve: { model: ModelResolver }
    }
];
const routes: Routes = [
    {
        path: "ondemand",
        loadChildren: "./ondemand/ondemand.module#OndemandModule",
        canLoad: [LoadGuard]
    },
    {
        path: "form/:mode/:id", component: FormComponent,
        resolve: { model: ModelResolver },
        canDeactivate: [UnsavedGuard]
    },
    {
        path: "form/:mode", component: FormComponent,
        resolve: { model: ModelResolver },
        canActivate: [TermsGuard]
    },
    { path: "table", component: TableComponent, children: childRoutes },
    { path: "table/:category", component: TableComponent, children: childRoutes },
    { path: "", redirectTo: "/table", pathMatch: "full" },
    { path: "**", component: NotFoundComponent }
]
export const routing = RouterModule.forRoot(routes);
Listing 27-28

Guarding the Route in the app.routing.ts File in the src/app Folder

The result is that the user is prompted to determine whether they want to load the module the first time that Angular tries to activate the route, as shown in Figure 27-9.
../images/421542_3_En_27_Chapter/421542_3_En_27_Fig9_HTML.jpg
Figure 27-9

Guarding dynamic loading

Targeting Named Outlets

A template can contain more than one router-outlet element, which allows a single URL to select multiple components to be displayed to the user.

To demonstrate this feature, I need to add two new components to the ondemand module. I started by creating a file called first.component.ts in the src/app/ondemand folder and using it to define the component shown in Listing 27-29.
import { Component } from "@angular/core";
@Component({
    selector: "first",
    template: `<div class="bg-primary text-white p-2">First Component</div>`
})
export class FirstComponent { }
Listing 27-29

The first.component.ts File in the src/app/ondemand Folder

This component uses an inline template to display a message whose purpose is simply to make it clear which component has been selected by the routing system. Next, I created a file called second.component.ts in the src/app/ondemand folder and created the component shown in Listing 27-30.
import { Component } from "@angular/core";
@Component({
    selector: "second",
    template: `<div class="bg-info text-white p-2">Second Component</div>`
})
export class SecondComponent { }
Listing 27-30

The second.component.ts File in the src/app/ondemand Folder

This component is almost identical to the one in Listing 27-29, differing only in the message that it displays through its inline template.

Creating Additional Outlet Elements

When you are using multiple outlet elements in the same template, Angular needs some way to tell them apart. This is done using the name attribute, which allows an outlet to be uniquely identified, as shown in Listing 27-31.
<div class="bg-primary text-white p-2">This is the ondemand component</div>
<div class="container-fluid">
    <div class="row">
        <div class="col-12 p-2">
            <router-outlet></router-outlet>
        </div>
    </div>
    <div class="row">
        <div class="col-6 p-2">
            <router-outlet name="left"></router-outlet>
        </div>
        <div class="col-6 p-2">
            <router-outlet name="right"></router-outlet>
        </div>
    </div>
</div>
<button class="btn btn-primary m-2" routerLink="/">Back</button>
Listing 27-31

Adding Outlets in the ondemand.component.html File in the src/app/ondemand Folder

The new elements create three new outlets. There can be at most one router-outlet element without a name element, which is known as the primary outlet. This is because omitting the name attribute has the same effect as applying it with a value of primary. All the routing examples so far in this book have relied on the primary outlet to display components to the user.

All other router-outlet elements must have a name element with a unique name. The names I have used in the listing are left and right because the classes applied to the div elements that contain the outlets use CSS to position these two outlets side by side.

The next step is to create a route that includes details of which component should be displayed in each outlet element, as shown in Listing 27-32. If Angular can’t find a route that matches a specific outlet, then no content will be shown in that element.
import { NgModule } from "@angular/core";
import { CommonModule } from "@angular/common";
import { OndemandComponent } from "./ondemand.component";
import { RouterModule } from "@angular/router";
import { FirstComponent } from "./first.component";
import { SecondComponent } from "./second.component";
let routing = RouterModule.forChild([
    {
        path: "",
        component: OndemandComponent,
        children: [
            { path: "",
              children: [
                   { outlet: "primary", path: "", component: FirstComponent, },
                   { outlet: "left", path: "", component: SecondComponent, },
                   { outlet: "right", path: "", component: SecondComponent, },
              ]},
        ]
    },
]);
@NgModule({
    imports: [CommonModule, routing],
    declarations: [OndemandComponent, FirstComponent, SecondComponent],
    exports: [OndemandComponent]
})
export class OndemandModule { }
Listing 27-32

Targeting Outlets in the ondemand.module.ts File in the src/app/ondemand Folder

The outlet property is used to specify the outlet element that the route applies to. The routing configuration in the listing matches the empty path for all three outlets and selects the newly created components for them: the primary outlet will display FirstComponent, and the left and right outlets will display SecondComponent, as shown in Figure 27-10. To see the effect yourself, click the Load Module button and click the Yes button when prompted.
../images/421542_3_En_27_Chapter/421542_3_En_27_Fig10_HTML.jpg
Figure 27-10

Using multiple router outlets

Tip

If you omit the outlet property, then Angular assumes that the route targets the primary outlet. I tend to include the outlet property on all routes to emphasize which routes match an outlet element.

When Angular activates the route, it looks for matches for each outlet. All three of the new outlets have routes that match the empty path, which allows Angular to present the components shown in the figure.

Navigating When Using Multiple Outlets

Changing the components that are displayed by each outlet means creating a new set of routes and then navigating to the URL that contains them. Listing 27-33 sets up a route that will match the path /ondemand/swap and that switches the components displayed by the three outlets.
import { NgModule } from "@angular/core";
import { CommonModule } from "@angular/common";
import { OndemandComponent } from "./ondemand.component";
import { RouterModule } from "@angular/router";
import { FirstComponent } from "./first.component";
import { SecondComponent } from "./second.component";
let routing = RouterModule.forChild([
    {
        path: "",
        component: OndemandComponent,
        children: [
            {
                path: "",
                children: [
                    { outlet: "primary", path: "", component: FirstComponent, },
                    { outlet: "left", path: "", component: SecondComponent, },
                    { outlet: "right", path: "", component: SecondComponent, },
                ]
            },
            {
                path: "swap",
                children: [
                    { outlet: "primary", path: "", component: SecondComponent, },
                    { outlet: "left", path: "", component: FirstComponent, },
                    { outlet: "right", path: "", component: FirstComponent, },
                ]
            },
        ]
    },
]);
@NgModule({
    imports: [CommonModule, routing],
    declarations: [OndemandComponent, FirstComponent, SecondComponent],
    exports: [OndemandComponent]
})
export class OndemandModule { }
Listing 27-33

Setting Routes for Outlets in the ondemand.module.ts File in the src/app/ondemand Folder

Listing 27-34 adds button elements to the component’s template that will navigate to the two sets of routes in Listing 27-33, alternating the set of components displayed to the user.
<div class="bg-primary text-white p-2">This is the ondemand component</div>
<div class="container-fluid">
    <div class="row">
        <div class="col-12 p-2">
            <router-outlet></router-outlet>
        </div>
    </div>
    <div class="row">
        <div class="col-6 p-2">
            <router-outlet name="left"></router-outlet>
        </div>
        <div class="col-6 p-2">
            <router-outlet name="right"></router-outlet>
        </div>
    </div>
</div>
<button class="btn btn-secondary m-2" routerLink="/ondemand">Normal</button>
<button class="btn btn-secondary m-2" routerLink="/ondemand/swap">Swap</button>
<button class="btn btn-primary m-2" routerLink="/">Back</button>
Listing 27-34

Navigating to Outlets in the ondemand.component.html File in the src/app/ondemand Folder

The result is that clicking the Swap and Normal button will navigate to routes whose children tell Angular which components should be displayed by each of the outlet elements, as illustrated by Figure 27-11.
../images/421542_3_En_27_Chapter/421542_3_En_27_Fig11_HTML.jpg
Figure 27-11

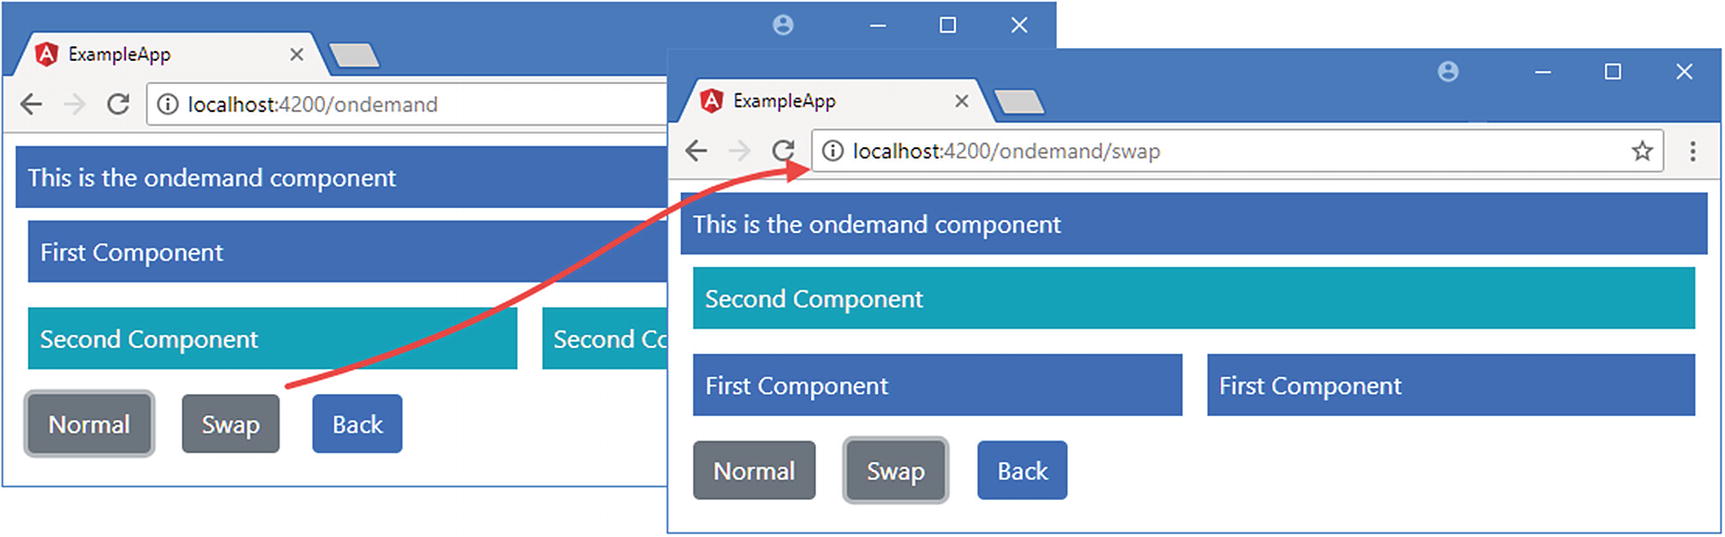
Using navigation to target multiple outlet elements

Summary

In this chapter, I finished describing the Angular URL routing features, explaining how to guard routes to control when a route is activated, how to load modules only when they are needed, and how to use multiple outlet elements to display components to the user. In the next chapter, I show you how to apply animations to Angular applications.

..................Content has been hidden....................

You can't read the all page of ebook, please click here login for view all page.
Reset
18.218.48.62