
![]()
Debugging Async with Visual Studio
Debugging multithreaded applications is often nontrivial. This is because they have multiple threads of execution running asynchronously and, to some degree, independently. These threads can sometimes interact in unexpected ways, causing your code to malfunction. However, exactly when the threads execute depends on the Windows thread scheduler. It is therefore possible that one instance of a program will run perfectly fine whereas another will crash—and the only thing that is different is how and when the different threads were scheduled.
Not only is identifying bugs harder with multithreaded applications, but the actual type of bug can be something you do not experience in a single-threaded application. Multithreaded applications are subject to whole new classes of bugs that can be confusing when first encountered. Let’s have a look at some of the potential issues.
Types of Multithreading Bugs
There are four main classes of bugs in multithreaded applications:
- data corruption
- race conditions
- deadlocks
- runaway threads
We’ve mentioned these over the course of the book, but what do they actually mean? Let’s look at the nature of these bugs before we move on to how Visual Studio can help you track them down and fix them.
Data Corruption
In Chapter 4 you looked at how non-atomic updates of shared data, when executed on multiple threads, can cause data corruption. On modern hardware it is fairly straightforward to demonstrate that this is happening by rapidly performing non-atomic increments of a value from more than one thread simultaneously. However, in most applications unsynchronized updates would only very occasionally collide, and so these kind of bugs are often hard to spot, with infrequent aberrant behavior that cannot be easily reproduced.
Race Conditions
A race condition is an issue in software where, depending on the sequencing of instructions on different threads, incorrect behavior may result. In some ways these are a superset of data corruption as data only get corrupted when two non-atomic updates interleave. Race conditions, however, go beyond data corruption to pure timing issues. For example, if you have a controller thread and a processing thread, the processing thread may be expecting the controller to have set up some execution parameters before it runs. However, without synchronization, the processor may start processing before the execution parameters have been set.
Deadlocks
Deadlocks (sometimes referred to as deadly embraces) occur when two or more threads need to acquire resources that, for some reason, cannot be released. As a result the affected threads block and will not continue execution. Sometimes deadlocks can be fairly obvious as the application freezes, but other kinds of deadlocks can be more difficult to detect.
Imagine a web application where different threads are executing requests. Assume that as part of the execution they have to obtain multiple, concurrent locks on synchronization objects. If one thread tries to get Lock A, then Lock B and another wants Lock B, then Lock A, then they will deadlock if the first thread gets Lock A and the second gets B, as neither will be able to proceed (see Figure 13-1).

Figure 13-1. Two threads deadlocking
Assume this deadlock is happening occasionally in the application, causing you to gradually lose request threads as they become stuck in deadlocks. The problem is that, in terms of visible symptoms, the web application will have occasional request timeouts and will generally just get slower and slower as you end up with fewer and fewer available request threads. Operations staff will spot that a reboot cures the problem but they will not be able to identify deadlocks as the underlying cause. The performance degradation could be deadlocks but could also be GC thrashing, network issues, large numbers of exceptions being thrown, and many other causes. This is why you should generally use timeouts when waiting for locks, as you will be able to proactively log that there is an issue.
Runaway Threads
A runaway thread is one that consumes a lot of CPU for no real benefit. A common cause is when a thread ends up in a tight processing loop due to a bug in the code (maybe a wait is being skipped, or the loop’s exit condition is never being hit). If you have a small number of cores available, then it is fairly obvious when this happens (assuming you are not trying to saturate the CPU with a parallel algorithm), as Task Manager will show a high-percentage CPU usage. When you have a large number of cores, however, it is far less obvious, as even with one core being consumed by the runaway thread, the overall machine load on a 16-core machine would be 6.25 percent, which is unlikely to raise alarm bells.
The Limitations of Using Visual Studio for Debugging
Visual Studio is a very powerful debugging tool, and shortly we will look at a number of features that can assist with debugging multithreaded applications. However, before we do, it is worth noting the limitations of using Visual Studio in this situation.
The Interactive Debugger
Although a very convenient tool in your debugging toolbox, an interactive debugger is quite invasive to program execution. As a result, particularly with timing-related issues, you may never be able to reproduce a bug inside a debugging session (at least not without taking explicit control of instruction ordering, as you will see hereafter).
It Works on My Machine
It is not uncommon for problems to occur in production that are very hard, if not impossible, to reproduce on a development machine. This happens for a variety of reasons: the hardware is different, the data volumes are different, or a different mix of software is executing on the machine. You are extremely unlikely to be able to install Visual Studio on the production machine, and even if you are allowed you shouldn’t. Visual Studio brings with it a lot of extra components and system DLLs that could alter the behavior of the production systems. In addition, even using remote debugging is going to be a problem, as the interactive debugger will halt execution of the production system. So in the case of production debugging, you need to take another approach, and that is covered in Chapter 14.
Multithreaded Visual Studio Debugging Basics
There are quite a few tools inside Visual Studio to help you debug multiple threads. However, before we get there we should go through a few basics of how the interactive debugger interacts with threads and what the most familiar tools show you.
Breakpoints and Threads
If you set a breakpoint on a line of code, then by default any thread that hits that breakpoint will halt execution. However, it is not only the thread that hit the breakpoint that halts in the debugger, but all of threads in the process will break. This makes sense as otherwise, while you are looking at various aspects of the program, values would be changing under your feet.
It is possible to add a filter to a breakpoint so that it only breaks on one or more specific threads. Right-click on the breakpoint and select Filter.... This will show the Breakpoint Filter dialog shown in Figure 13-2.
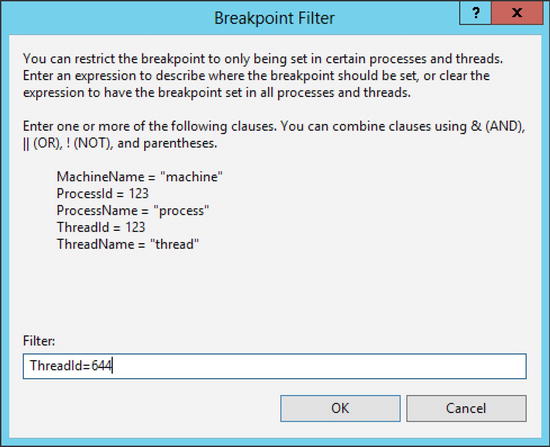
Figure 13-2. The Breakpoint Filter dialog
Not only can you restrict the breakpoint to specific threads, but also to specific processes and machines (useful if debugging multiple processes or multiple machines using remote debugging). Note that the ThreadId in the Breakpoint Filter dialog uses the unmanaged Windows thread id and not the .NET thread ManagedThreadId.
Now you are stopped on a breakpoint—what happens when you single-step using F10 or F11? At this point things get a bit trickier; the current thread will single-step, but all of the other threads will leap forward at full speed until the current thread breaks at the next instruction. This means that you can’t really use breakpoints, on their own, to control the sequencing of instructions across different threads.
Locals, Autos, and Watch Windows
The Locals, Autos, and Watch debug windows are for examining the state of variables. The Watch windows (you can have up to four of them) and the Locals and Autos show the values of variables in the context of the thread currently in scope. If, in the Watch windows, you are watching variables that are not applicable to the current thread, or are not in scope generally, the debugger will report that those variables are not recognized in the current context.
As you saw in Chapter 1, each thread has its own stack. This means the call stack is specific to a thread. The Call Stack window shows the call stack for the thread that is currently in focus. For much async work this is fairly straightforward, but in .NET 4.5 the C# team introduced the new async and await keywords (see Chapter 7), which create an issue for debugging. As Chapter 7 noted, async and await allow you to describe your intent with asynchrony while the compiler takes care of the mechanics for you. However, the debugger works against the compiled code rather than the source and will reflect the reality of execution. Consider the code in Listing 13-1. If you put a breakpoint on the second Console.WriteLine in RunWorkAsync (the line in bold) and then run in the debugger, what does the call stack look like?
Listing 13-1. A Simple Async Wait Using await
class Program
{
    static void Main(string[] args)
    {
        DoWork();

        Console.ReadLine();
    }

    static async Task RunWorkAsync()
    {
        Console.WriteLine("Starting work");

        await Task.Delay(2000);

        Console.WriteLine("background work complete");
    }

    static async Task DoWork()
    {
        await RunWorkAsync();

        Console.WriteLine("DoWork");
    }
}
Considering the amount of work the compiler has done behind the scenes, it is somewhat surprising that there appears to be very little on the call stack. You can see the default output in Figure 13-3. By default, a feature called Just My Code is enabled in the IDE, which provides a simplified view of the call stack.
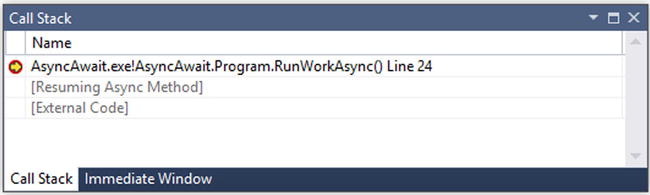
Figure 13-3. Async call stack with Just My Code enabled
Just My Code
Just My Code, as the name suggests, only shows you code that is in the solution you are debugging. Any external code is identified as such and hidden from you. If you look at the same call stack from Listing 13-1 with Just My Code enabled (Figure 13-4), you have a much cleaner picture of what is happening in your application. However, things aren’t perfect; the breakpoint is in a method that is in turn invoked by an asynchronous method. This level of indirection is lost in the Call Stack window.
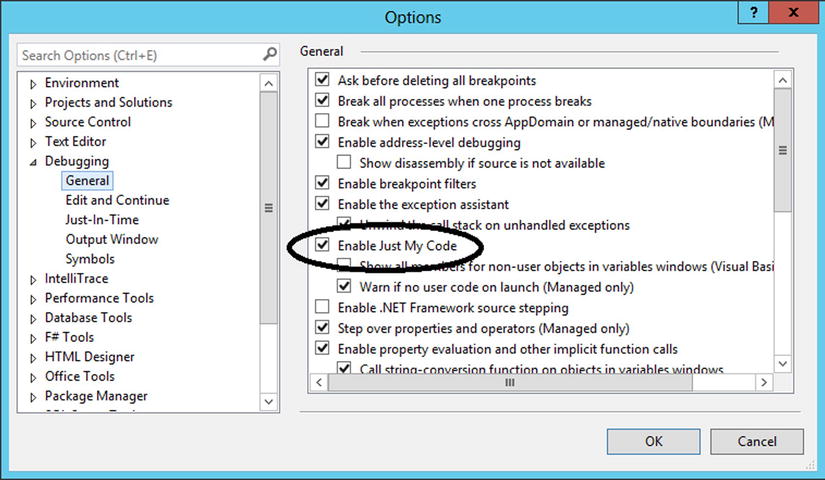
Figure 13-4. Changing the Just My Code settings
Just My Code can certainly help with clarity, but it can also obscure the cause of bugs in your code. For example, a thread blocked in Monitor.Enter could be an indication of a deadlock. Because Monitor.Enter is not part of your code, the call will be hidden if you have Just My Code enabled. In general, remember that Just My Code is a setting you can change if the feature will help or hinder the debugging task at hand. The toggle for this debugging setting is in the options under the Tools menu, in the Debugging section (Figure 13-4).
If you disable Just My Code, the Call Stack window now looks like Figure 13-5. This is because the compiler has done a lot of work to create the mechanics behind async and await, and the debugger will now show these mechanics. This unadulterated view contains a lot of information that is unlikely to be useful when trying to debug a problem in your code. You are seemingly now at an impasse: the Just My Code view oversimplifies and the view of the mechanics contains too much noise to help you understand what is actually going on. Luckily, Visual Studio 2013 and Windows 8.1 have added some clarity.
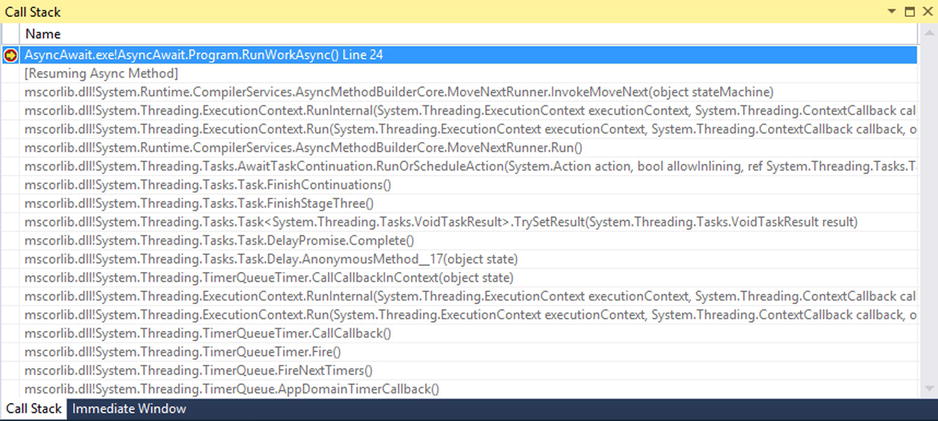
Figure 13-5. Async call stack without Just My Code
Improvements in Visual Studio 2013 and Windows 8.1
Visual Studio brings some improvement to the Call Stack window to show the missing level of indirection seen in Figure 13-3. Unfortunately, due to some required support at the operating system level, this improvement can only be seen when running on Windows 8.1 or Windows Server 2012 R2. Running the code from Listing 13-1 in this new environment gives you the call stack shown in Figure 13-6. Here you can see that the previous async call in DoWork is now also visible.
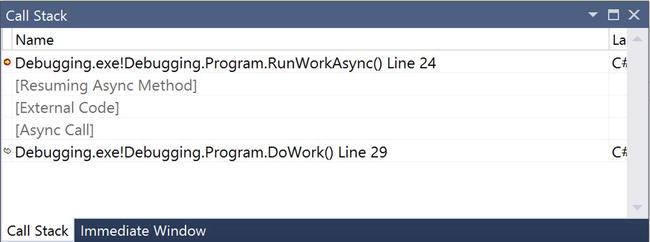
Figure 13-6. Improved async Call Stack window in Visual Studio 2013
The Threads Window
The Threads window has been a feature of managed debugging with Visual Studio since .NET 1.0. When the application is stopped in the debugger, the Threads window shows all of the threads currently running in the process. However, this is not limited to managed threads but all of the operating system threads. In Figure 13-7 you can see the call stack from the code in Listing 13-1. From the managed code perspective there are really only two interesting threads: those with the Managed IDs of 10 and 11. The rest of the threads are from the infrastructure controlling the managed execution in the debugger.
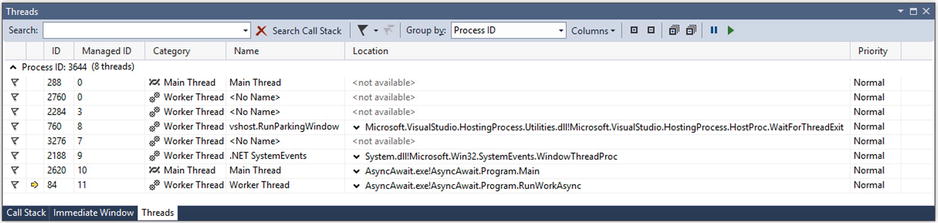
Figure 13-7. The Threads window in action
Flagging and Filtering
Although the picture is muddied by the infrastructure threads it is possible to filter out the ones that are concerned with your code. You can manually flag them by clicking on the flag symbol on the left of the thread’s row, or you can click the flag symbol on the Thread window’s toolbar. Once threads are flagged a double flag toolbar button becomes enabled, which will constrain the visible threads to only those that are flagged. You remove the flag on a thread by clicking the flag symbol on the left of the thread’s row again.
Freezing and Thawing
You saw earlier that, by their very nature, race conditions are difficult to reproduce reliably. Analyzing the different code paths and how they might be interleaved is an important step to creating a hypothesis for the cause of the bug, but how do you prove the hypothesis? You need to force a specific sequencing of operations that, hopefully, will display the same symptoms as the bug. But you also saw that simply setting a breakpoint on one thread will not give you precise control over the other threads as you step through the code.
On the context menu of a thread in the Threads window is the option to Freeze the thread. This means that the thread will not be scheduled until the thread is thawed using the Thaw option on the context menu of a frozen thread. If you freeze the threads that you do not want to advance, you can single-step just the current thread and then change the frozen and thawed threads to move the next thread of interest forward on its own. In the Threads window a frozen thread has a “pause” symbol beside it as shown in Figure 13-8.

Figure 13-8. A frozen thread in the Threads window
Although freezing and thawing threads does allow you to control, precisely, the sequencing of instruction execution on different threads, it is still very error prone in nontrivial situations.
![]() Caution Beware of freezing threads that are explicitly or implicitly holding locks. Your application may deadlock during debugging because the frozen thread will be unable to release its lock as it is not being scheduled.
Caution Beware of freezing threads that are explicitly or implicitly holding locks. Your application may deadlock during debugging because the frozen thread will be unable to release its lock as it is not being scheduled.
Debugging Tasks
As you have seen, the introduction of the Task abstraction in .NET 4.0 brought with it a lot of power, but also, it turns out, a new level of complexity for debugging. Now you have the ability to create asynchronous packages of code that may or may not be executing. Also, when you use a construct like Parallel.For you are not in control of Task creation, and so many tasks may be being created that you cannot directly see. Therefore, in Visual Studio 2010 new debugging tools were introduced to help visualize the world of Tasks. These tools have been refined in Visual Studio 2012 and 2013.
The Parallel Tasks / Tasks Window
Playing a role similar to the one that the Threads window does for threads, the Parallel Tasks window, introduced in Visual Studio 2010, allowed you to see all of the noncompleted tasks in the process—including those that had not been committed to a thread by the scheduler. In Visual Studio 2013 this debugging window has been renamed, simply, the Tasks window, and its functionality has been expanded. Figure 13-9 shows the Visual Studio 2013 Tasks window when a Parallel.ForEach is in progress. Notice that the one of the tasks has yet to be mapped to a thread and so is shown as Scheduled.
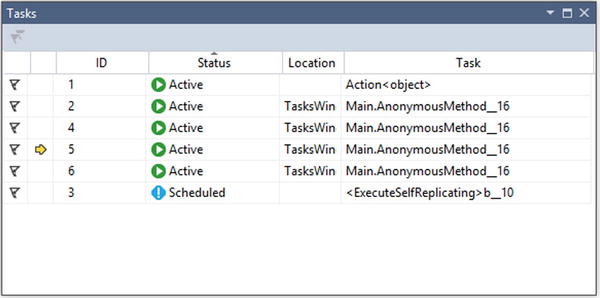
Figure 13-9. The Tasks window
When running on Windows 8.1 the Tasks window has even more information available, as can be seen in Figure 13-10. Here you get the start time relative to the start of the debugging session and how long the task has been running.
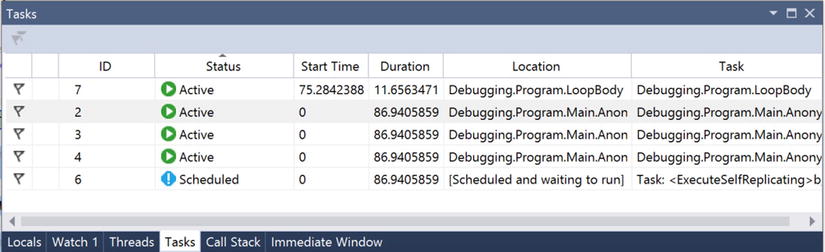
Figure 13-10. The Tasks window on Windows 8.1
If you look at the code from Listing 13-1 in the Tasks window, you see another striking difference between Visual Studio 2013 running on Windows 8 and Windows 8.1. On Windows 8 the Tasks window shows no tasks at all. However, the Tasks window on Windows 8.1 shows you some very useful information, as you can see in Figure 13-11. Here you can see a big difference between the Location column and the Task column. The Location column shows where the executing code is, and the Task column shows some context about the origins of the task.

Figure 13-11. Awaited operations on Windows 8.1
To give further context to a task, hovering the mouse over a task’s location shows the call stack for that task (Figure 13-12).
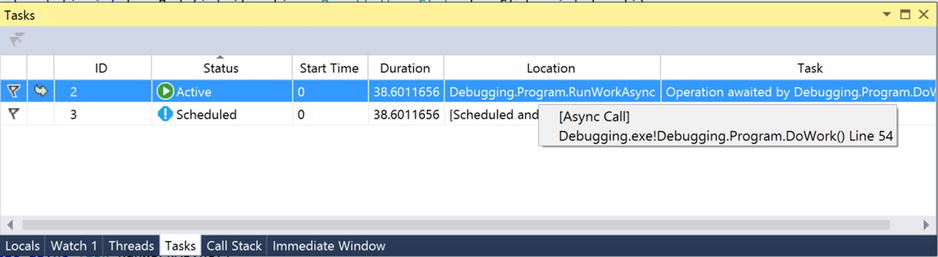
Figure 13-12. Showing the call stack in the Tasks window
One other useful feature of the Tasks window can be seen if you run the code in Listing 13-2. This code deliberately forces a deadlock by two tasks taking locks, then waiting for the other task’s lock.
Listing 13-2. Forcing a Deadlock
static void Main(string[] args)
{
    object guard1 = new object();
    object guard2 = new object();

    Task.Run(() =>
        {
            lock (guard1)
            {
                Thread.Sleep(10);
                lock (guard2)
                {
                }
            }
        });

        Task.Run(() =>
        {
            lock (guard2)
            {
                Thread.Sleep(10);
                lock (guard1)
                {
                }
            }
        });

    Console.ReadLine();
}
The Tasks window notices that the two tasks are deadlocked, as can be seen in Figure 13-13.
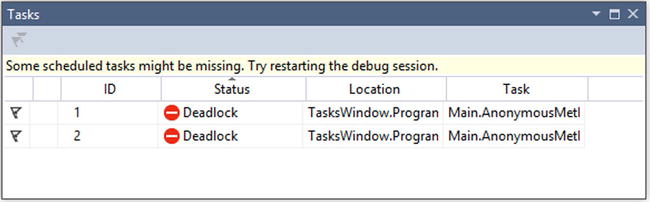
Figure 13-13. Tasks window showing a deadlock
The Parallel Stacks Window
The Tasks window shows a snapshot of what is happening in the process at this exact moment. To get a more historical view you can use the Parallel Stacks window. This shows, either in terms of threads or tasks, the origins of all executing code. Consider the code in Listing 13-3 with a breakpoint on the bold line of code in CreateChildWorker.
Listing 13-3. Application with Many Tasks
class Program
{
    static Dictionary<DataTarget, string[]> dataTargetMap =
                                         new Dictionary<DataTarget, string[]>();
    static void Main(string[] args)
    {
        PopulateMap();
        CheckForCancellation();
        PrintValues().Wait();
    }

    private static void CheckForCancellation()
    {
        // details omitted for brevity
    }

    private static void PopulateMap()
    {
        // details omitted for brevity
    }

    static string[] GetUrls(DataTarget target)
    {
        return dataTargetMap[target];
    }

    static async Task PrintValues()
    {
        List<Task> tasks = new List<Task>();
        for (int i = 0; i < 4; i++)
        {
            int locali = i;
            Task t = Task.Factory.StartNew(() =>
                {
                    DataTarget dataTarget = (DataTarget) locali;
                    long value = GetCurrentValue(dataTarget).Result;

                    Console.WriteLine("{0} : {1}", dataTarget, value);
                });

            tasks.Add(t);
        }
        await Task.WhenAll(tasks);
    }

    static async Task<long> GetCurrentValue(DataTarget dataTarget)
    {
        var bag = new ConcurrentBag<long>();
        Task parent = Task.Factory.StartNew(() =>
            {
                foreach (string url in GetUrls(dataTarget))
                {
                    CreateChildWorker(url, bag);
                }
            });

        await parent;

        return bag.Max(i => i);
    }

    private static void CreateChildWorker(string url, ConcurrentBag<long> bag)
    {
        WebRequest req = WebRequest.Create(url);
        Task.Factory.StartNew(() =>
            {
                WebResponse resp = req.GetResponse();
                bag.Add(resp.ContentLength);
            }, TaskCreationOptions.AttachedToParent);
    }
}

enum DataTarget
{
    DowJones,
    FTSE,
    NASDAQ,
    HangSeng
}
If you bring up the Parallel Stacks window, you will see something along the lines of Figure 13-14 with the various tasks running and their call stacks. You also see the relationship between the different tasks (which paths of execution spawned new tasks). However, here you see a limitation of Just My Code in that the “External Code” hides the full picture of what is going on.
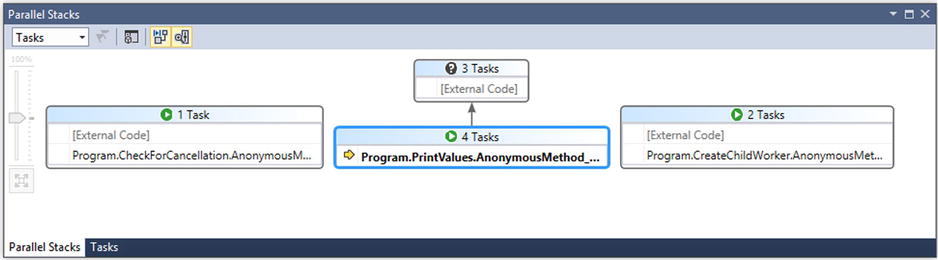
Figure 13-14. Parallel stacks in Task view using Just My Code
Turning off Just My Code shows you a far more comprehensive picture where you can see what the “External Code” execution relates to (Figure 13-15). Here you can see that two of the tasks are doing various web calls and three of the tasks are waiting to retrieve the results of other tasks they have spawned. The other thing to notice, generally, about the Parallel Stacks window in Task mode is that you get icons on each task showing the status of the task (running, blocked, deadlocked, etc.).
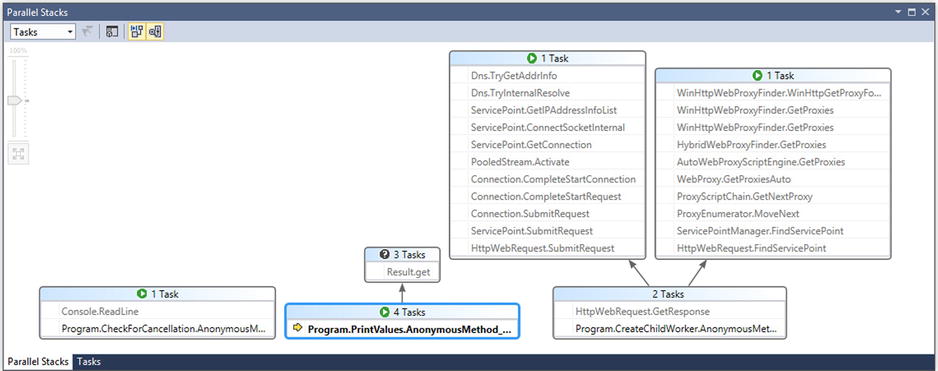
Figure 13-15. Parallel stacks in Task view without using Just My Code
In the Parallel Stacks window you can change the view from being task based to showing all of the threads in the process. This is achieved using the drop-down in the top right of the window. Especially when not using Just My Code, you get a very full picture of the state of the process including, potentially, what the finalizer thread is doing. Using this full threads view will often show a large amount of information, and so it is useful that the Parallel Stacks window has both zoom functionality and a navigation helper (Figure 13-16).
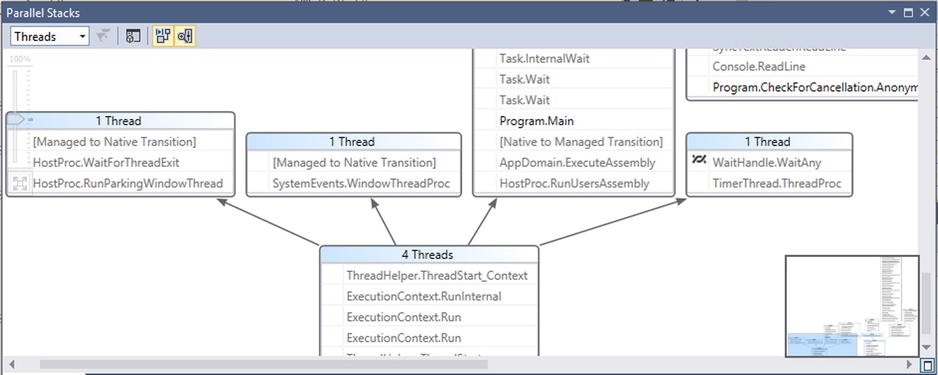
Figure 13-16. Parallel Stacks windows in Threads mode
The Concurrency Visualizer
So far we have talked about various ways of viewing an asynchronous application in terms of gaining insight into particular areas of behavior. The Concurrency Visualizer, first introduced in Visual Studio 2010, provides a more holistic view of the application while allowing you to drill down into the specifics where necessary. It is essentially a concurrency profiler (in fact it initially shipped as part of the built-in Visual Studio profiler), so you run it against an application and then examine, in a historical sense, the behavior of the application in terms of its use of multiple threads and cores.
Where you find the Concurrency Visualizer depends on which version of Visual Studio you are using. In Visual Studio 2010 it was packaged as part of the profiler in the Premium and Ultimate editions. In Visual Studio 2012 it had its own menu item in the Analyze menu in the Premium and Ultimate editions. In Visual 2013 it doesn’t come packaged in the out-of-the-box IDE, but is a download for all editions from the Visual Studio Gallery.
The Concurrency Visualizer distinguishes different states of a thread by color. Therefore, it is not the most photogenic component of Visual Studio for this medium. However, as Figure 13-17 shows (when converted to grayscale), it can highlight important information.

Figure 13-17. Thread contention in the Concurrency Visualizer
Figure 13-17 shows a situation where you have your code locking at a very coarse-grained level. Each thread has to wait for another to leave the lock before it can do its part of the work. In effect you have lost all of the benefits of concurrency in the name of making sure no data get corrupted.
The Concurrency Visualizer is a powerful tool that can show many things, including lack of CPU usage during parallelization, lock contention, threads waiting for I/O, and much more. As such it is an important tool for any async developer.
Summary
Visual Studio is a very powerful debugging tool for software development in general. It has many tools specifically designed to assist with multithreaded debugging and thus should never be dismissed as an aid in resolving issues with multithreaded code. In general, however, Visual Studio assumes you are able to attach an interactive debugger to resolve any bugs that you are seeing. This is not always practical:
- The system may be in production, and attaching an interactive debugger will halt the production system.
- Attaching an interactive debugger to an application is an invasive operation that will change the behavior of the application. With luck that change will not be significant, but all too often it is.
In both of these situations you need an alternative to interactive debugging, and that is the subject of the next chapter.