
Chapter 2
Understanding Core Data
Many developers, upon first seeing Core Data, deem Core Data and its classes a tangled mess of classes that impede, rather than enhance, data access. Perhaps they're Rails developers, used to making up method names to create dynamic finders and letting convention over configuration take care of the dirty work of data access. Maybe they're Java developers who have been annotating their Enterprise JavaBeans (EJBs) or hibernating their Plain Old Java Objects (POJOs). Whatever their backgrounds, many developers don't take naturally to the Core Data framework or its way of dealing with data, just as many developers squirm when first presented with Interface Builder and the live objects it creates when building user interfaces. We counsel you with patience and an open mind and assure you that the Core Data framework is no Rube Goldberg. The classes in the framework work together like Larry Bird's 1980s Boston Celtics in the half-court set, and when you understand them, you see their beauty and precision.
This chapter explains the classes in the Core Data framework, both individually and how they work together. Take the time to read about each class, to trace how they work together, and to type in and understand the examples.
Core Data Framework Classes
Chapter 1 guided you through the simple steps to get an application outfitted with Core Data. You saw bits of code, learned which classes to use, and discovered which methods and parameters to call and pass to make Core Data work. You faithfully, and perhaps somewhat blindly, followed Chapter 1's advice while perhaps wondering what was behind all the code, classes, methods, and parameters. Most developers reading the previous chapter probably wondered what would happen if they substituted a parameter value for another. A few of them probably even tried it. A small percentage of those who tried got something other than an explosion, and a percentage of them actually got what they thought they would get.
Edward Dijkstra, renowned computer scientist and recipient of the 1972 Turing Award for his work developing programming languages, spoke of elegance as a quality that decides between success and failure instead of being a dispensable luxury. Core Data not only solves the problem of object persistence but solves it elegantly. To achieve elegance in your code, you should understand Core Data and not just guess at how it works. After reading this chapter, you will understand in detail not only the structure of the Core Data framework but also that the framework solves a complicated problem with only a small set of classes, making the solution simple, clear, and elegant.
Throughout the chapter, you will build the class diagram that shows the classes involved in the framework and how they interact. You will also see that some classes belong to the Core Data framework and others are imported from other Cocoa frameworks such as the Foundation framework. In parallel with building the class diagram, you will build a small application in Xcode that deals with a fictitious company's organizational chart.
To follow along with this chapter, set up a blank iPhone application using the Single View Application template, as Figure 2–1 shows, and call it OrgChart.
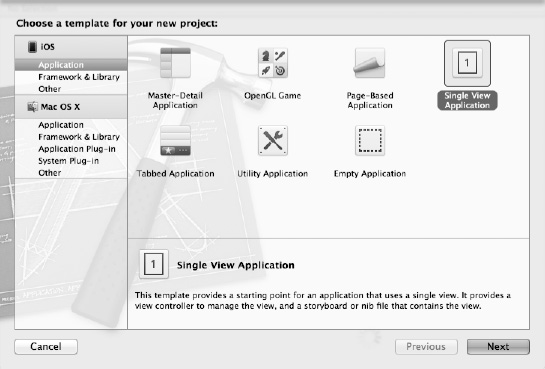
Figure 2–1. Create a new application in Xcode.
Add the Core Data framework to the project, as described in the “Adding Core Data to an Existing Project” section of Chapter 1. Your Xcode project should look like Figure 2–2. Launch the app and make sure it starts without crashing. It doesn't do anything other than display a gray screen, but that blank screen means you are set to continue building the rest of the Core Data–based application.

Figure 2–2. Xcode with a blank project, with Core Data added
Figure 2–3 depicts the classes of Core Data that you typically interact with. Chapter 1 talked about the managed object context, which is materialized by the NSManagedObjectContext class and contains references to managed objects of type NSManagedObject.

Figure 2–3. High-level overview
Your code stores data by adding managed objects to the context and retrieves data by using fetch requests implemented by the NSFetchRequest class. As shown in Chapter 1, the context is initialized using the persistent store coordinator, implemented by the NSPersistentStoreCoordinator class, and defined by the data model, implemented by the NSManagedObjectModel class. The remainder of this chapter deals with how these classes are created, how they interact, and how to use them.
The Model Definition Classes
As explained in Chapter 1, all Core Data applications require an object model. The model defines the entities to be persisted and their properties. Entities have three kinds of properties:
- Attributes
- Relationships
- Fetched properties
Table 2–1 shows the different classes and brief descriptions of their roles. Enumerating through the classes to better understand how the mechanics behind model instantiation work is an interesting exercise, but in practice creating the model in Xcode is typically done graphically without having to type a single line of code.
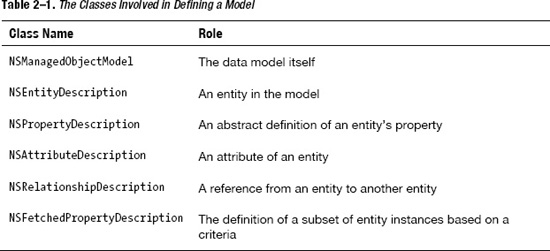
Figure 2–4 shows the relationships among the classes involved in defining a model. NSManagedObjectModel has references to zero or more NSEntityDescription objects. Each NSEntityDescription has references to zero or more NSPropertyDescription objects. NSPropertyDescription is an abstract class with three concrete implementations:
NSAttributeDescriptionNSRelationshipDescriptionNSFetchedPropertyDescription

Figure 2–4. The model definition classes
This small set of classes is enough to define any object model you will use when working on your Core Data projects. As explained in more detail in Chapter 1, you create the data model in Xcode by selecting File ![]()
New ![]()
New File in the menu and picking the type Data Model from the iOS Core Data templates. In this section, you will create a model that represents a company's organizational chart. In Xcode, create your model and call it OrgChart. In this data model, an organization has one person as the leader (the chief executive officer, or CEO). That leader has direct reports, which may or may not have direct reports of their own. For simplicity, say that a person has two attributes: a unique employee identifier and a name. You are finally ready to start defining the data model in Xcode.
Open the data model file, and add a new Organization entity. Like a person, an organization is defined by a unique identifier and a name, so add two attributes to the Organization entity. Attributes are scalar properties of an entity, which means that they are simple data holders that can contain a single value. The attribute types are defined in the NSAttributeType structure, and each type enforces certain data constraints over the entity. For instance, if the type of the attribute is integer, an error will occur if you try to put an alphanumeric value in that field. Table 2–2 lists the different types and their meanings.

NOTE: Chapter 5 expands on the Transformable type and how to use it. Transformable attributes are a way to tell Core Data that you want to use a nonsupported data type in your managed object and that you will help Core Data by providing code to transform the attribute data at persist time into a supported type.
Name the first attribute id and the second name. By default, the type of new attributes is set to Undefined, which purposely prevents the code from compiling in order to force you to set the type for each attribute. Organization identifiers are always going to be simple numbers, so use the type Integer 16 for the id attribute. Use the type String for the name attribute. At this point, your project should look like Figure 2–5.
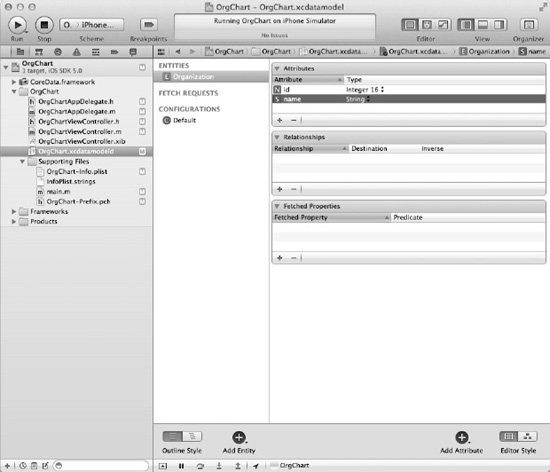
Figure 2–5. The project with the Organization entity
At this point, if the data model were to be loaded by a running program, it would be represented by the object graph shown in Figure 2–6.
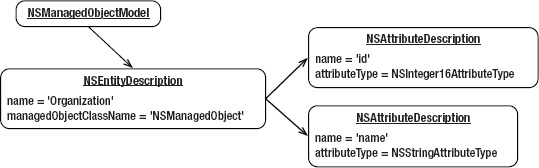
Figure 2–6. The organization model as objects
The graph shows that the managed object model, which is of type NSManagedObjectModel, points to an entity description, represented by an NSEntityDescription instance named Organization that uses an NSManagedObject for its managedObjectClassName property. This entity description has two attribute descriptions (type NSAttributeDescription). Each attribute description has two properties: name and attributeType. The first attribute description has the values id and NSInteger16AttributeType for its name and attributeType properties, respectively, while the second has the values name and NSStringAttributeType.
In the same manner that you created the Organization entity, create another entity named Person with two attributes: id and name. You can link the organization to its leader by creating a relationship from the Organization entity to the Person entity and call it leader. Once the two entities exist in Xcode, creating a relationship is as simple as selecting the source entity (Organization), clicking and holding the Add Attribute button until the drop-down menu appears, and selecting Add Relationship. Name the new relationship leader, and set Person as its destination. Now, add a relationship from Person to Person (yes, a relationship from the Person entity back to itself), and call it employees. This defines the relationship from a person to the person's subordinates. By default, Xcode creates one-to-one relationships, which means that a relationship left at the default links one source to one destination. Since one leader can manage many subordinates, the relationship between Person and Person should be a one-to-many relationship. To correct the relationship in Xcode, first show the attributes for the relationship by displaying Xcode's utilities panel by clicking the rightmost button above View in the toolbar of Xcode. Then, click to show the Data Model Inspector by clicking the rightmost button at the top of the utilities panel (see Figure 2–7).
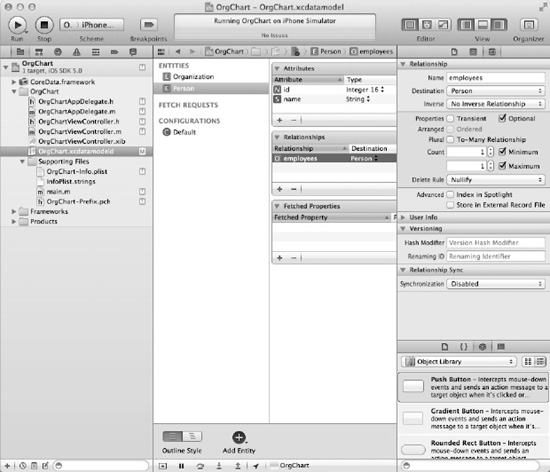
Figure 2–7. Showing the properties of a relationship
With the properties displayed, you can now change the employees relationship to one-to-many by checking the box beside To-Many Relationship, as shown in Figure 2–8.

Figure 2–8. One-to-many relationship
NOTE:In this chapter, we want to show you how a data model designed using the model editor is interpreted into Core Data classes. We have purposely taken shortcuts when creating the model. For more detailed information on how to create object models, please refer to Chapter 4.
NOTE:You may notice that Xcode complains about the two relationships you've created, warning you of a consistency error and a misconfigured property. Xcode complains about Core Data relationships without inverses, but this shouldn't be an issue in this application. The only impact the lack of the inverse relationships has is that you can't navigate the inverse relationships. You can safely ignore these warnings for the time being.
The current data model is illustrated in Figure 2–9, while Figure 2–10 shows how the data model definition would be loaded into live objects by Core Data.

Figure 2–9. The data model

Figure 2–10. The organization model with Person
Note that the object graph depicted in Figure 2–10 is not showing the object graph that Core Data stores. Instead, it is an illustration of how Core Data interprets the data model you created graphically as objects it can use to create the data store schema. The typical way of making Core Data load and interpret a data model into an NSManagedObjectModel is done by creating a URL to the data model using code like this:
NSURL *modelURL = [[NSBundle mainBundle] URLForResource:@"OrgChart" withExtension:@"momd"];
Then, you can pass that URL to the managed object model's intializer to create the model, which loads the object model description into memory. That code looks like this:
__managedObjectModel = [[NSManagedObjectModel alloc] initWithContentsOfURL:modelURL];
Knowing how models are represented as objects inside Core Data is generally not very useful unless you are interested in creating custom data stores or want to generate the data model programmatically at runtime. This would be analogous to programmatically creating UIViews rather than using Xcode's built-in user interface editor, Interface Builder. Having a deep understanding of how Core Data works, however, allows you to anticipate and avoid complex issues, troubleshoot bugs, and solve problems creatively and elegantly.
You have seen how the data model is represented as Core Data classes, but you have also seen that unless you get into really advanced uses of the framework, you will hardly ever need to interact directly with these classes. All the classes discussed so far in this chapter deal with describing the model. The remainder of the chapter deals exclusively with classes that represent either the data itself or the accessors to the data.
The Data Access Classes
You learned in Chapter 1 that the initialization of Core Data starts with loading the data model into the NSManagedObjectModel object. The previous section ran through an example of how NSManagedObjectModel represents that model as NSEntityDescription and NSPropertyDescription objects. The second step of the initialization sequence is to create and bind to the persistent store through the NSPersistentStoreCoordinator. Finally, the third step in the initialization sequence creates the NSManagedObjectContext that your code interacts with in order to store and retrieve data. To make things a bit clearer, Figure 2–11 shows the class diagram involved in representing the context and the underlying persistent store.

Figure 2–11. The managed object context object graph
Notice where the NSManagedObjectModel object sits in the class diagram in Figure 2–11. It is loaded and given to the persistent store coordinator (NSPersistentStoreCoordinator) so that the persistent store coordinator can figure out how to represent the data in the persistent stores. The persistent store coordinator acts as a mediator between the managed object context and the actual persistent stores where the data is written. Among other tasks, it manages the data migrations from one store to the other, through the migratePersistentStore: method.
The NSPersistentStoreCoordinator is initialized using the NSManagedObjectModel class. Once the coordinator object is allocated, it can load and register all the persistent stores. The following code demonstrates the initialization of the persistent store coordinator. It receives the managed object model in its initWithManagedObjectModel: method and then registers the persistent store by calling its addPersistentStoreWithType: method.
NSURL *storeURL = [[self applicationDocumentsDirectory] URLByAppendingPathComponent:@"OrgChart.sqlite"];


NSError *error = nil;

__persistentStoreCoordinator = [[NSPersistentStoreCoordinator alloc] initWithManagedObjectModel:[self managedObjectModel]];

if (![__persistentStoreCoordinator addPersistentStoreWithType:NSSQLiteStoreType configuration:nil URL:storeURL options:nil error:&error])

{

  NSLog(@"Unresolved error %@, %@", error, [error userInfo]);

  abort();

}
iOS offers three types of persistent stores by default, as shown in Table 2–3.

NOTE:Core Data on Mac OS X offers a fourth type (NSXMLStoreType) that uses XML files as the storage mechanism. This fourth type isn't available on iOS, presumably because of iDevices' slower processors and the processor-intensive nature of parsing XML. Parsing XML is possible on iDevices, however, as the existence of several iOS XML parsing libraries proves. Apple seems to have issued no official explanation for the absence of the XML store type on iOS.
Typical users will find themselves using the SQLite type, which stores the data into a SQLite database running on your iDevice, most often or even exclusively. You should be aware of and understand the other types, however, because different circumstances may warrant using the other types. As useless as an in-memory “persistent” store may sound, a classic use of the in-memory storage is to cache information fetched from a remote server and create a local copy of the data to limit bandwidth usage and the associated latencies. The data remains persistent on the remote server and can always be fetched again.
Once the persistent store coordinator is created, the managed object context can be initialized as an NSManagedObjectContext instance. The managed object context is responsible for coordinating what goes in and what comes out of the persistent store. This may sound like a trivial task, but consider the following challenges:
- If two threads ask for the same object, they must obtain a pointer to the same instance.
- If the same object is asked for several times, the context must be intelligent enough to not go hit the persistent store but instead return the object from its cache.
- The context should be able to keep changes to the persistent store to itself until a commit operation is requested.
NOTE:Apple strongly, and rightfully, discourages subclassing the NSManagedObjectContext because of the complexity of what it does and the opportunities for putting the context and the objects it manages into an unpredictable state.
Table 2–4 lists some methods used to retrieve, create, or delete data objects. Updating data is done on the data object by changing its properties directly. The context keeps track of every object it pulls out of the data store and is aware of any change you make so that changes can be persisted to the backing store.

Keep in mind that NSManagedObjectContext orchestrates data transfers both into and out of the persistent store and guarantees the consistency of the data objects. You should think carefully about the impacts of deleting managed objects. When deleting a managed object that has a relationship to other managed objects, Core Data has to decide what to do with the related objects. One of the properties of a relationship is the “Delete rule,” which is one of the four types of delete rules explained in Table 2–5. Table 2–5 calls the object being deleted the parent object and the objects that are at the end of a relationship the related objects.

In addition to controlling access to and from the persistent store, the managed object context allows undo and redo operations using the same paradigm used in user interface design. Table 2–6 lists the important methods used in dealing with undo and redo operations.

Chapter 5 discusses undoing and redoing Core Data operations.
The NSManagedObjectContext is the gateway into the persistent stores that all data objects must go through. To be able to keep track of the data, Core Data forces all data objects to inherit from the NSManagedObject class. You saw earlier in this chapter that NSEntityDescription instances define the data objects. NSManagedObject instances are the data objects. Core Data uses their entity descriptions to know what properties to access and what types to expect.
Managed objects support key-value coding, or name-value pairs, in order to give generic accessors to the data they contain. The simplest way of accessing data is through the valueForKey: method. Data can be put into the objects using the setValue:forKey: method. The key parameter is the name of the attribute from the data model.
- (id)valueForKey:(NSString *)key

- (void)setValue:(id)value forKey:(NSString *)key
Note that the valueForKey: method returns an instance of id, which is a generic type. The actual data type is dictated again by the data model and the type of attribute you specified. Refer to Table 2–2 for a list of these types.
NSManagedObject also provides several methods to help the NSManagedObjectContext determine whether anything has changed in the object. When the time comes to commit any changes, the context can ask the managed objects it keeps track of if they have changed. Apple strongly discourages you from overriding these methods in order to prevent interference with the commit sequence.
NOTE:Each instance of NSManagedObject keeps a reference to the context to which it belongs. This can also be an inexpensive way of keeping a reference to the context without having to pass it around all the time. As long as you have one of the managed objects, you can get back to the context.
To create a new NSManagedObject instance, you first create an appropriate NSEntityDescription instance from the entity name and the managed object context that knows about that entity. The NSEntityDescription instance provides the definition, or description, for the new NSManagedObject instance. You then send a message to the NSEntityDescription instance you just created to insert a new managed object into the context and return it to you. The code looks like this:
NSEntityDescription *entity = [NSEntityDescription entityForName:@"Organization"

inManagedObjectContext:managedObjectContext];

NSManagedObject *org = [NSEntityDescription insertNewObjectForEntityForName:[entity

name] inManagedObjectContext:managedObjectContext];
Once you create the managed object in the context, you can set its values. To set the name property of the NSManagedObject instance called org that the previous code creates, invoke the following code:
[org setValue:@"MyCompany, Inc." forKey:@"name"];
Key-Value Observing
You can take responsibility for discovering any changes made to managed objects by querying them. This approach is useful in cases when some event prompts a controller to do something with the managed objects. In many cases, however, having the managed objects themselves take responsibility to notify you when they change allows more efficiency and elegance in your design. To provide this notification service, the NSManagedObject class supports key-value observation to send notifications immediately before and after a value changes for a key. Key-value observation isn't a pattern specific to Core Data but is used throughout the Cocoa frameworks.
The two main methods involved in the notifications related to key-value observation are willChangeValueForKey: and didChangeValueForKey:. The first method is invoked immediately before the change and the latter immediately after the change. For an object observerObject to receive notifications from changes to the value of property theProperty occurring in a managed object managedObject, however, the observer object must first register with that object using code like this:
[managedObject addObserver:observerObject forKeyPath:@"theProperty"

options:(NSKeyValueObservingOptionNew | NSKeyValueObservingOptionOld) context:nil];
After registering, the observer will start receiving instant change notifications to the properties to which it is listening. This is an extremely useful mechanism to use when trying to keep a user interface in sync with the data it displays.
The Query Classes
So far in this chapter, you have seen how to initialize the Core Data infrastructure and how to interact with the objects it creates. This section deals with the basics of retrieving data by sending fetch requests. Fetch requests are, not surprisingly, instances of NSFetchRequest. What might be a little more surprising to you is that it is almost the only class in the class structure related to retrieving data that is a member of the Core Data framework. Most of the other classes involved in formulating a request to fetch data belong to the Foundation Cocoa framework, also used by all other Cocoa frameworks. Figure 2–12 shows the class diagram derived from NSFetchRequest.
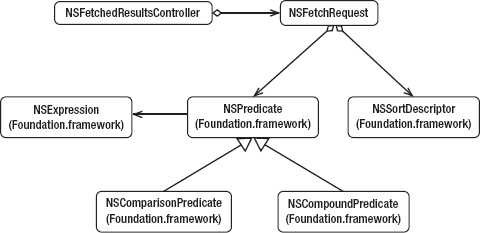
Figure 2–12. The NSFetchRequest class diagram
Fetch requests are composed of two main elements: an NSPredicate instance and an NSSortDescriptor instance. The NSPredicate helps filter the data by specifying constraints, and the NSSortDescriptor arranges the result set in a specific order. Both elements are optional, and if you don't specify them, your results aren't constrained if an NSPredicate isn't specified or aren't sorted if an NSSortDescriptor isn't specified.
Creating a simple request to retrieve all the organizations in your persistent store—unconstrained and unsorted—looks like this:
NSFetchRequest *fetchRequest = [[NSFetchRequest alloc] init];

NSEntityDescription *entity = [NSEntityDescription entityForName:@"Organization"

inManagedObjectContext:managedObjectContext];

[fetchRequest setEntity:entity];

NSArray* organizations = [managedObjectContext executeFetchRequest:fetchRequest

error:nil];
You first reserve the memory space for the request object. You then retrieve the entity description of the objects to retrieve from the context and set it into the request object. Finally, you execute the query in the managed object context by calling executeFetchRequest:.
Because you don't constrain the request with an NSPredicate instance, the organizations array contains instances of NSManagedObject that represent each of the organizations found in the persistent store. To filter the results and return only some of the organizations, use the NSPredicate class. To create a simple predicate that limits the results to organizations whose names contain the string "Inc.", you call NSPredicate's predicateWithFormat: method, passing the format string and the data that gets plugged into the format. You then add the predicate to the fetch request before executing the request in the managed object context. The code looks like this:
NSPredicate *predicate = [NSPredicate predicateWithFormat:@"name contains %@", @"Inc."];

[fetchRequest setPredicate:predicate];
To sort the result set alphabetically by the name of the organization, add a sort descriptor to the request prior to executing it.
NSSortDescriptor *sortByName = [[NSSortDescriptor alloc] initWithKey:@"name"

ascending:YES];

[fetchRequest setSortDescriptors:[NSArray arrayWithObject:sortByName]];
Chapter 6 goes much more in depth on how to use predicates for simple and complex queries and sort descriptors for sorting.
Figure 2–13 puts all the Core Data class diagrams you've seen in this chapter together into a single class diagram that shows you how all these classes fit in the framework.
Your user code, represented in the diagram by a stick figure, interacts chiefly with four classes:
NSManagedObject (1)NSManagedObjectContext (2)NSFetchRequest (3)NSFetchedResultsController (4)
Find these four classes, numbered 1–4, in the diagram in Figure 2–13 and use them as anchor points, and you should recognize the individual class diagrams you've worked through in this chapter. The one exception is NSFetchedResultsController (4), which works closely with iOS table views. We cover NSFetchedResultsController in Chapter 9.

Figure 2–13. The main Core Data classes
How the Classes Interact
You should now have a good understanding of the classes involved in interacting with Core Data and what is happening under the hood. This section expands on the OrgChart application created in the previous section to show some examples of interactions among Core Data classes. Like the previous section, this chapter maintains its focus at a relatively basic level. The goal for this chapter is to show how the classes play together. The rest of the book consists of chapters that take each concept (data manipulation, custom persistent store, performance enhancements, and so on) to much deeper levels.
The data model created in the previous section should look like the one in Figure 2–14.

Figure 2–14. The Organization data model
Both the Organization and Person entities use an attribute of type Integer 16 to serve as unique identifiers for each entity. Most programmers reading this have probably already thought about autoincrement and have been clicking around the Xcode user interface to find out by themselves how to enable autoincrement for the identifier attributes. If you're one of these programmers and you're back to reading this chapter, you probably became frustrated and have given up looking. The reason you couldn't find autoincrement is because it's not there. Core Data manages an object graph using real object references. It has no need for a unique autoincrement identifier that can be used as a primary key in the same sense it would be used in a relational database. If the persistent store happens to be a relational database like SQLite, the framework will probably use some autoincrement identifiers as primary keys. Regardless, you, as a Core Data user, should not have to worry about that; it's an implementation detail. We have purposely introduced the notion of identifiers in this example for two reasons:
- To raise the question of autoincrement.
- To show examples of how to manage numeric values with Core Data.
The person identifier is similar in meaning to a Social Security number. It isn't meant to autoincrement because it is an identifier computed outside the data store. In the Organization example, you simply derive the ID from an object hash. Although this doesn't guarantee uniqueness, it serves this application's purpose and is simple to implement.
NOTE:As a programmer, you should be careful not to focus too much on what you already know about databases. Core Data isn't a database; it's an object graph persistence framework. Its behavior is closer to an object-oriented database than a traditional relational database.
Listing 2–1 shows the header file for the application delegate class, OrgChartAppDelegate.h. You can see the three Core Data–related properties:
NSManagedObjectContext *managedObjectContextNSManagedObjectModel *managedObjectModelNSPersistentStoreCoordinator *persistentStoreCoordinator
You also see the declaration for a method to return the application's document directory, which is where the persistent store will live, and another declaration for a method, saveContext:, to save the managed object context. The implementation file, OrgChartAppDelegate.m, will define methods for each of these.
Listing 2–1. OrgChartAppDelegate.h
#import <UIKit/UIKit.h>

#import <CoreData/CoreData.h>


@class OrgChartViewController;


@interface OrgChartAppDelegate : UIResponder <UIApplicationDelegate>


@property (strong, nonatomic) UIWindow *window;

@property (strong, nonatomic) OrgChartViewController *viewController;

@property (readonly, strong, nonatomic) NSManagedObjectContext *managedObjectContext;

@property (readonly, strong, nonatomic) NSManagedObjectModel *managedObjectModel;

@property (readonly, strong, nonatomic) NSPersistentStoreCoordinator *persistentStoreCoordinator;


- (void)saveContext;

- (NSURL *)applicationDocumentsDirectory;


@end
In OrgChartAppDelegate.m, add @synthesize lines for the three Core Data-related properties from OrgChartAppDelegate.h, like this:
@synthesize managedObjectContext = __managedObjectContext;

@synthesize managedObjectModel = __managedObjectModel;

@synthesize persistentStoreCoordinator = __persistentStoreCoordinator;
You then write code for the accessors for the three Core Data-related properties. Each accessor first determines whether the object it's responsible for has been created. If it has, the accessor returns the object. If not, the accessor creates the object using the appropriate Core Data formula, creating any of the other member objects it requires, and returns it. The code in Listing 2–2 to add to OrgChartAppDelegate.m should look familiar.
Listing 2–2. Adding the Accessors for the Three Core Data-Related Properties
- (void)saveContext

{

  NSError *error = nil;

  NSManagedObjectContext *managedObjectContext = self.managedObjectContext;

  if (managedObjectContext != nil)

  {

    if ([managedObjectContext hasChanges] && ![managedObjectContext save:&error])

    {

      NSLog(@"Unresolved error %@, %@", error, [error userInfo]);

      abort();

    }

  }

}


#pragma mark - Core Data stack


/**

 Returns the managed object context for the application.

 If the context doesn't already exist, it is created and bound to the persistent store

coordinator for the application.

 */

- (NSManagedObjectContext *)managedObjectContext

{

  if (__managedObjectContext != nil)

  {

    return __managedObjectContext;

  }


  NSPersistentStoreCoordinator *coordinator = [self persistentStoreCoordinator];

  if (coordinator != nil)

  {

    __managedObjectContext = [[NSManagedObjectContext alloc] init];

    [__managedObjectContext setPersistentStoreCoordinator:coordinator];

  }

  return __managedObjectContext;

}


/**

 Returns the managed object model for the application.

 If the model doesn't already exist, it is created from the application's model.

 */

- (NSManagedObjectModel *)managedObjectModel

{

  if (__managedObjectModel != nil)

  {

    return __managedObjectModel;

  }

  NSURL *modelURL = [[NSBundle mainBundle] URLForResource:@"OrgChart"

withExtension:@"momd"];
__managedObjectModel = [[NSManagedObjectModel alloc] initWithContentsOfURL:modelURL];
return __managedObjectModel;
}
/**
Returns the persistent store coordinator for the application.
If the coordinator doesn't already exist, it is created and the application's store added to it.
*/
- (NSPersistentStoreCoordinator *)persistentStoreCoordinator
{
if (__persistentStoreCoordinator != nil)
{
return __persistentStoreCoordinator;
}
NSURL *storeURL = [[self applicationDocumentsDirectory]
URLByAppendingPathComponent:@"OrgChart.sqlite"];
NSError *error = nil;
__persistentStoreCoordinator = [[NSPersistentStoreCoordinator alloc]
initWithManagedObjectModel:[self managedObjectModel]];
if (![__persistentStoreCoordinator addPersistentStoreWithType:NSSQLiteStoreType
configuration:nil URL:storeURL options:nil error:&error])
{
NSLog(@"Unresolved error %@, %@", error, [error userInfo]);
abort();
}
return __persistentStoreCoordinator;
}
#pragma mark - Application's Documents directory
/**
Returns the URL to the application's Documents directory.
*/
- (NSURL *)applicationDocumentsDirectory
{
return [[[NSFileManager defaultManager] URLsForDirectory:NSDocumentDirectory
inDomains:NSUserDomainMask] lastObject];
}
Since this chapter focuses on how Core Data works, not on user interface design and development, the OrgChart application can remain content with a blank, gray screen. All its work will happen in the didFinishLaunchingWithOptions: method, and we show you how to use external tools to verify that Core Data persisted the objects appropriately.
Before you can read any data from the persistent store, you have to put it there. Change the didFinishLaunchingWithOptions: method to call a new method called createData:, like this:
- (BOOL)application:(UIApplication *)application

didFinishLaunchingWithOptions:(NSDictionary *)launchOptions

{

  [self createData];

  self.window = [[UIWindow alloc] initWithFrame:[[UIScreen mainScreen] bounds]];

  // Override point for customization after application launch.

  self.viewController = [[OrgChartViewController alloc]

initWithNibName:@"OrgChartViewController" bundle:nil];

  self.window.rootViewController = self.viewController;

  [self.window makeKeyAndVisible];

  return YES;

}
In OrgChartAppDelegate.h, declare the createData: method like this:
- (void)createData;
Now define the createData: method in OrgChartAppDelegate.m like this:
- (void)createData

{

}
Inside the createData: implementation, you create an organization and three employees. Start with the organization. Remember that the managed objects, as far as you're concerned, live in the managed object context. Don't worry about the persistent store; the managed object context takes care of managing the persistent store for you. You just create the managed object representing the organization and insert it into the managed object context using this code:
NSManagedObject *organization = [NSEntityDescription

insertNewObjectForEntityForName:@"Organization"

inManagedObjectContext:self.managedObjectContext];
You've now created an organization, but you've given it no name and no identifier. The name attribute is of type String, so set the name for the organization like this:
[organization setValue:@"MyCompany, Inc." forKey:@"name"];
The id attribute is of type Integer 16, which is a class. All Core Data attributes must have a class type, not a primitive type. To create the id attribute for the organization, create a primitive int from the hash of the name of the organization and then convert the primitive int into an NSNumber object, which can be used in the setValue:forKey: method. The code looks like this:
[organization setValue:[NSNumber numberWithInt:[@"MyCompany, Inc." hash]] forKey:@"id"];
NOTE:Core Data uses objects for attributes in order to comply with key-value coding requirements. Any primitive type should be converted into NSNumber to use the setValue:forKey: method.
The organization now has a name and an identifier, although the changes haven't yet been committed to the persistent store. The framework knows that you've altered an object that it's tracking and makes the necessary adjustments to the persistent store when the save: method is called to commit the context changes.
An organization without people accomplishes little, so create three people named John, Jane, and Bill using the same approach you used to create the organization: create a new managed object in the managed object context using the appropriately named entity description, and set the name and identifier values. The code looks like this:
NSManagedObject *john = [NSEntityDescription insertNewObjectForEntityForName:@"Person"

inManagedObjectContext:self.managedObjectContext];

[john setValue:@"John" forKey:@"name"];

[john setValue:[NSNumber numberWithInt:[@"John" hash]] forKey:@"id"];


NSManagedObject *jane = [NSEntityDescription insertNewObjectForEntityForName:@"Person"

inManagedObjectContext:self.managedObjectContext];

[jane setValue:@"Jane" forKey:@"name"];

[jane setValue:[NSNumber numberWithInt:[@"Jane" hash]] forKey:@"id"];


NSManagedObject *bill = [NSEntityDescription insertNewObjectForEntityForName:@"Person"

inManagedObjectContext:self.managedObjectContext];

[bill setValue:@"Bill" forKey:@"name"];

[bill setValue:[NSNumber numberWithInt:[@"Bill" hash]] forKey:@"id"];
You now have one organization and three unrelated people. The organizational chart should have John as the leader of the company, while Jane and Bill should report to John. The OrgChart application's data model has two types of relationships. The leader is a one-to-one relationship from Organization to Person, while the employees are set through a one-to-many relationship between Person and itself. Setting the value of the one-to-one relationship is surprisingly simple.
[organization setValue:john forKey:@"leader"];
Core Data knows that you are assigning a relationship value because it knows the data model and knows that leader represents a one-to-one relationship. Your code would not run if you were to pass a managed object with the wrong entity type as the value.
To assign Jane and Bill as John's subordinates, you have to assign values to the employees one-to-many relationship. Core Data returns the many side of a one-to-many relationship as a set (NSSet), which is an unordered collection of unique objects. For John's employees relationship, Core Data returns the set of the existing employees working for John if you call the valueForKey: method. Since you want to add objects to the set, however, call the mutableSetValueForKey: method, because it returns an NSMutableSet, which you can add to and delete from, instead of an immutable NSSet. Adding a new Person managed object to the returned NSMutableSet adds a new employee to the relationship. The code looks like this:
NSMutableSet *johnsEmployees = [john mutableSetValueForKey:@"employees"];

[johnsEmployees addObject:jane];

[johnsEmployees addObject:bill];
Once again, since you've modified the object graph of objects tracked by Core Data, you don't have to do anything else in order to help it manage the dependencies between the different pieces of data. Everything behaves just like you would expect from regular objects. Once again, though, the changes aren't committed until you save the managed object context, which you do using the saveContext: method you created.
[self saveContext];
This ends the contents of the createData: method. Run the application to create the data in your SQLite database. Again, you won't see anything in the iPhone simulator but a blank, gray screen. In the next section, we use other tools to verify that the OrgChart application added your data to the database.
SQLite Primer
Since the OrgChart application uses SQLite for its persistent store and you just created the store and put some data into it, you can use any SQLite viewing tool such as Base (http://menial.co.uk/software/base/), SQLite Database Browser (http://sqlitebrowser.sourceforge.net/) or SQLite Manager (http://code.google.com/p/sqlite-manager/) to view it. Be aware, however, that poking around a SQLite database that Core Data owns can create problems if you change the database from an external tool. The way Core Data manages a SQLite database is an implementation detail that could change. Further, you can mangle the data in ways that prevent Core Data from reading the data or properly reconstructing the object graph. Consider yourself warned. While developing applications, however, you can recover from a damaged database by deleting it and allowing your application to re-create it, so don't hesitate to jump into the database using a tool to debug your applications.
Despite the availability of graphical browsing tools, we recommend using the adequate command-line tool that's already installed on your Mac: sqlite3. On your Mac, open Terminal.app to get to the command prompt and change to the iPhone Simulator's deployment directory, like this:
cd ~/Library/Application Support/iPhone Simulator
To find the database file, named OrgChart.sqlite, use the find command:
find . -name "OrgChart.sqlite" –print
You should see output that looks something like this:
./5.0/Applications/E8654A34-8EC4-4EAF-B531-00A032DD5977/Documents/OrgChart.sqlite
The generated ID will differ from the previous example, and Apple has moved the relative path in the past and may do so again, so your path will vary from this. This is the relative path to your database file, so to open the database, pass that relative path to the sqlite3 executable, like this:
sqlite3 ./5.0/Applications/E8654A34-8EC4-4EAF-B531-

00A032DD5977/Documents/OrgChart.sqlite
Running this command will put you inside the SQLite shell. You can run SQL commands from this point until you exit the shell.
SQLite version 3.7.5

Enter ".help" for instructions

Enter SQL statements terminated with a ";"

sqlite>
One interesting command is the .schema command, which will display the SQL schema Core Data created to support your object model.
sqlite> .schema

CREATE TABLE ZORGANIZATION ( Z_PK INTEGER PRIMARY KEY, Z_ENT INTEGER, Z_OPT INTEGER, ZID

INTEGER, ZLEADER INTEGER, ZNAME VARCHAR );

CREATE TABLE ZPERSON ( Z_PK INTEGER PRIMARY KEY, Z_ENT INTEGER, Z_OPT INTEGER, ZID

INTEGER, Z2EMPLOYEES INTEGER, ZNAME VARCHAR );

CREATE TABLE Z_METADATA (Z_VERSION INTEGER PRIMARY KEY, Z_UUID VARCHAR(255), Z_PLIST

BLOB);

CREATE TABLE Z_PRIMARYKEY (Z_ENT INTEGER PRIMARY KEY, Z_NAME VARCHAR, Z_SUPER INTEGER,

Z_MAX INTEGER);

CREATE INDEX ZORGANIZATION_ZLEADER_INDEX ON ZORGANIZATION (ZLEADER);

CREATE INDEX ZPERSON_Z2EMPLOYEES_INDEX ON ZPERSON (Z2EMPLOYEES);

sqlite>
Note that the tables are not named exactly like your entities, the tables have more columns than your entities have attributes, and the database has extra tables not found in the Core Data data model. You can also see that Core Data took care of creating integer columns to be used as primary keys, and it manages their uniqueness. If you know SQLite well, you know that any column defined as INTEGER PRIMARY KEY will autoincrement, but the point is that you don't have to know that or even care. Core Data handles the uniqueness.
You should be able to decipher Core Data's code for mapping entities to tables and recognize the two tables that support the entities: ZORGANIZATION and ZPERSON. You can query the tables after running the OrgChart application and validate that the data is in fact stored in the database.
sqlite> select Z_PK, ZID, ZLEADER, ZNAME from ZORGANIZATION;

1|-19904|2|MyCompany, Inc.


sqlite> select Z_PK, ZID, Z2EMPLOYEES, ZNAME from ZPERSON;

1|6050|2|Jane

2|-28989||John

3|28151|2|Bill

sqlite>
The rows are fairly easy to read. You see the single organization you created, and its leader (ZLEADER) is the person where Z_PK=2 (John). John has no boss, but Jane and Bill have the same boss (Z2EMPLOYEES), and his Z_PK is 2 (John again, as expected).
To exit the SQLite shell, type .quit and press Enter.
sqlite> .quit
Reading the Data Using Core Data
In this chapter, you wrote data to a SQLite database using Core Data, and you used the sqlite3 command-line tool to read the data and confirm that it had been correctly stored in the persistent store. You can also use Core Data to read the data from the persistent store. Go back to Xcode, and open the OrgChartAppDelegate.m file to add methods for reading the data using Core Data.
Since the employees relationship is recursive (that is, the same source and destination entity), use a recursive method to display a person and their subordinates. The recursive displayPerson: method shown next accepts two parameters (the person to display and an indentation level) and recurses through a person's employees to print them at appropriate indentation levels. The code looks like this:
- (void)displayPerson:(NSManagedObject*)person withIndentation:(NSString*)indentation

{

  NSLog(@"%@Name: %@", indentation, [person valueForKey:@"name"]);


  // Increase the indentation for sub-levels

  indentation = [NSString stringWithFormat:@"%@  ", indentation];


  NSSet *employees = [person valueForKey:@"employees"];

  id employee;

  NSEnumerator *it = [employees objectEnumerator];

  while ((employee = [it nextObject]) != nil)

  {

    [self displayPerson:employee withIndentation:indentation];

  }

}
Now write a method that retrieves all the organizations from the context and displays them along with their leaders and the leaders' employees. The code is in Listing 2–3.
Listing 2–3. A Method for Reading the Data from the Database
- (void)readData

{

  NSManagedObjectContext *context = [self managedObjectContext];

  NSEntityDescription *orgEntity = [NSEntityDescription entityForName:@"Organization"

inManagedObjectContext:context];


  NSFetchRequest *fetchRequest = [[NSFetchRequest alloc] init];

  [fetchRequest setEntity:orgEntity];


  NSArray *organizations = [context executeFetchRequest:fetchRequest error:nil];


  id organization;

  NSEnumerator *it = [organizations objectEnumerator];

  while ((organization = [it nextObject]) != nil)

  {

    NSLog(@"Organization: %@", [organization valueForKey:@"name"]);
NSManagedObject *leader = [organization valueForKey:@"leader"];
[self displayPerson:leader withIndentation:@" "];
}
}
Add the method declarations to OrgChartAppDelegate.h to silence the compiler warnings.
- (void)readData;

- (void)displayPerson:(NSManagedObject *)person withIndentation:(NSString *)indentation;
Finally, alter the didFinishLaunchingWithOptions: method to call [self readData] instead of [self createData].
- (BOOL)application:(UIApplication *)application

didFinishLaunchingWithOptions:(NSDictionary *)launchOptions

{

  //[self createData];

  [self readData];

  self.window = [[UIWindow alloc] initWithFrame:[[UIScreen mainScreen] bounds]];

  // Override point for customization after application launch.

  self.viewController = [[OrgChartViewController alloc]

initWithNibName:@"OrgChartViewController" bundle:nil];

  self.window.rootViewController = self.viewController;

  [self.window makeKeyAndVisible];

  return YES;

}
Build and launch the application, and then look in the Debug log to see the following output, which shows the organization you created with John as it leader and also shows John's two subordinates:
2011-07-30 22:18:37.422 OrgChart[4460:f203] Organization: MyCompany, Inc.

2011-07-30 22:18:37.424 OrgChart[4460:f203]   Name: John

2011-07-30 22:18:37.425 OrgChart[4460:f203]     Name: Bill

2011-07-30 22:18:37.426 OrgChart[4460:f203]     Name: Jane
Feel free to experiment with the OrgChart application, altering the managed objects created in the createData: method and calling createData: to store your changes and readData: to verify your changes were written. You can delete the SQLite database file between runs and let the OrgChart application re-create it, or you can let multiple runs accumulate objects in the database. If you, for example, add a new person (Jack) as Jane's subordinate, then the OrgChart application's output would look like the following:
2011-07-30 22:22:21.858 OrgChart[4517:f203] Organization: MyCompany, Inc.

2011-07-30 22:22:21.860 OrgChart[4517:f203]   Name: John

2011-07-30 22:22:21.861 OrgChart[4517:f203]     Name: Bill

2011-07-30 22:22:21.861 OrgChart[4517:f203]     Name: Jane

2011-07-30 22:22:21.862 OrgChart[4517:f203]       Name: Jack
Jack works for Jane. Both Jane and Bill work for John. John is the company's leader.
Summary
By now the Core Data framework should look a lot less overwhelming to you. In this chapter, you explored the main classes involved in efficiently managing the persistence of entire object graphs without having to expose the user to complex graph algorithms and grueling C APIs in order to interact with certain databases. Using Core Data is comparable to driving a car without having to be a mechanic. The framework is able to represent object models and manage data object graphs with just about a dozen classes. The simplicity of the class structure is misleading. You have seen the power of Core Data—and this is only a beginning. As you dig deeper into the many configuration options, UI bindings, alternate persistent stores, and custom managed object classes, you will also see the elegance of Core Data.