
Chapter 7
Tuning Performance and Memory Usage
Lately, people have grown to hate hourglasses, spinning beach balls, and “Please Wait” pop-ups. Although giving a visual clue that the computer is working beats giving no such clue and letting customers think their computers have locked up, better still would be to never have episodes of slowness that make users wait. You may not always be able to achieve that goal, but you should always try.
Fetching and storing data in a persistent store can take a long time, especially when mounds of data are involved. This chapter assures that you understand how Core Data helps you—and how you must help yourself—to make sure you don’t pepper your users with “Please Wait” spinners or, worse, an unresponsive application that appears locked up while it retrieves or saves large object graphs. You will learn how to utilize the various tools and strategies, such as caching, faulting, and the Instruments application that comes with Xcode.
Building the Application for Testing
You need a way to complete performance testing so that you can verify results. This section walks you through building an application that will allow you to run various tests and see the results. The application, shown in Figure 7–1, presents a list of tests you can run in a standard picker view. To run a test, select it in the picker, click the Run Selected Test button, and wait for the results. After the test runs, you’ll see the start time, the stop time, the number of elapsed seconds for the test, and some text describing the results of the test.

Figure 7–1. The performance-tuning application
Creating the Core Data Project
Start by creating a new single view application with the Product option set to iPhone. Call it PerformanceTuning and add the Core Data framework. In your application delegate (PerformanceTuningAppDelegate), add a managed object context, a managed object model, and a persistent store coordinator, as well as a method for returning the application's document directory and a method for saving the managed object context. The following is the code for PerformanceTuningAppDelegate.h:
#import <UIKit/UIKit.h>

#import <CoreData/CoreData.h>


@class PerformanceTuningViewController;


@interface PerformanceTuningAppDelegate : UIResponder <UIApplicationDelegate>


@property (strong, nonatomic) IBOutlet UIWindow *window;

@property (strong, nonatomic) IBOutlet PerformanceTuningViewController *viewController;

@property (nonatomic, retain, readonly) NSManagedObjectContext *managedObjectContext;
@property (nonatomic, retain, readonly) NSManagedObjectModel *managedObjectModel;

@property (nonatomic, retain, readonly) NSPersistentStoreCoordinator

*persistentStoreCoordinator;


- (void)saveContext;

- (NSURL *)applicationDocumentsDirectory;


@end
Listing 7–1 shows the code for PerformanceTuningAppDelegate.m.
Listing 7–1. PerformanceTuningAppDelegate.m
#import "PerformanceTuningAppDelegate.h"

#import "PerformanceTuningViewController.h"


@implementation PerformanceTuningAppDelegate


@synthesize window=_window;

@synthesize viewController=_viewController;

@synthesize managedObjectContext=__managedObjectContext;

@synthesize managedObjectModel=__managedObjectModel;

@synthesize persistentStoreCoordinator=__persistentStoreCoordinator;


- (BOOL)application:(UIApplication *)application

didFinishLaunchingWithOptions:(NSDictionary *)launchOptions

{

    self.window = [[UIWindow alloc] initWithFrame:[[UIScreen mainScreen] bounds]];

    // Override point for customization after application launch.

  self.viewController = [[PerformanceTuningViewController alloc] initWithNibName:@"PerformanceTuningViewController" bundle:nil];

  self.window.rootViewController = self.viewController;

    [self.window makeKeyAndVisible];

    return YES;

}


- (void)applicationWillResignActive:(UIApplication *)application {

}


- (void)applicationDidEnterBackground:(UIApplication *)application {

}


- (void)applicationWillEnterForeground:(UIApplication *)application {

}


- (void)applicationDidBecomeActive:(UIApplication *)application {

}


- (void)applicationWillTerminate:(UIApplication *)application {

}


- (void)saveContext {

  NSError *error = nil;

  NSManagedObjectContext *managedObjectContext = self.managedObjectContext;

  if (managedObjectContext != nil) {

    if ([managedObjectContext hasChanges] && ![managedObjectContext save:&error]) {

      NSLog(@"Unresolved error %@, %@", error, [error userInfo]);
      abort();

    }

  }

}


#pragma mark - Core Data stack


/**

 Returns the managed object context for the application.

 If the context doesn't already exist, it is created and bound to the persistent store coordinator for the application.

 */

- (NSManagedObjectContext *)managedObjectContext {

  if (__managedObjectContext != nil) {

    return __managedObjectContext;

  }


  NSPersistentStoreCoordinator *coordinator = [self persistentStoreCoordinator];

  if (coordinator != nil) {

    __managedObjectContext = [[NSManagedObjectContext alloc] init];

    [__managedObjectContext setPersistentStoreCoordinator:coordinator];

  }

  return __managedObjectContext;

}


/**

 Returns the managed object model for the application.

 If the model doesn't already exist, it is created from the application's model.

 */

- (NSManagedObjectModel *)managedObjectModel {

  if (__managedObjectModel != nil) {

    return __managedObjectModel;

  }

  NSURL *modelURL = [[NSBundle mainBundle] URLForResource:@"PerformanceTuning" withExtension:@"momd"];

  __managedObjectModel = [[NSManagedObjectModel alloc] initWithContentsOfURL:modelURL];

  return __managedObjectModel;

}


/**

 Returns the persistent store coordinator for the application.

 If the coordinator doesn't already exist, it is created and the application's store added to it.

 */

- (NSPersistentStoreCoordinator *)persistentStoreCoordinator {

  if (__persistentStoreCoordinator != nil) {

    return __persistentStoreCoordinator;

  }


  NSURL *storeURL = [[self applicationDocumentsDirectory]

URLByAppendingPathComponent:@"PerformanceTuning.sqlite"];


  NSError *error = nil;
  __persistentStoreCoordinator = [[NSPersistentStoreCoordinator alloc] initWithManagedObjectModel:[self managedObjectModel]];

  if (![__persistentStoreCoordinator addPersistentStoreWithType:NSSQLiteStoreType configuration:nil URL:storeURL options:nil error:&error]) {

    NSLog(@"Unresolved error %@, %@", error, [error userInfo]);

    abort();

  }

  return __persistentStoreCoordinator;

}


#pragma mark - Application's Documents directory


/**

 Returns the URL to the application's Documents directory.

 */

- (NSURL *)applicationDocumentsDirectory {

  return [[[NSFileManager defaultManager] URLsForDirectory:NSDocumentDirectory inDomains:NSUserDomainMask] lastObject];

}


@end
Creating the Data Model and Data
The data model for this performance-testing application consists of three entities: Actor, Movie, and Studio. Actor and Movie have a many-to-many relationship, and Movie and Studio have a many-to-many relationship. Each entity has two attributes: name, of type String, and rating, of type Integer 16. Create your data model and call it PerformanceTuning.xcdatamodeld. Create entities for Actor, Movie, and Studio; give them each attributes called name of type String and rating of type Integer 16; and create optional to-many relationships between Actor and Movie and between Movie and Studio. Your completed data model should look like Figure 7–2.
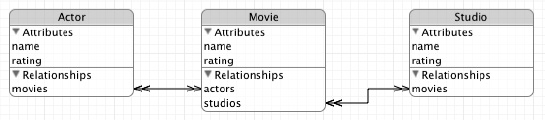
Figure 7–2. The performance-tuning data model
Now that you've completed your data model, it's time to stuff data into it. You want enough data to be able to do performance testing and differentiate between results, so the plan is to create 200 actors, 200 movies, and 200 studios, and then to relate each actor to each movie and vice versa and relate each movie to each studio and vice versa. When you're done, you'll have three tables with 200 rows each (Actor, Movie, and Studio) and two join tables with 40,000 rows each (Actor-to-Movie and Movie-to-Studio).
To insert the data, open the PerformanceTuningAppDelegate.h file, and declare two methods: one that loads the data into the persistent data store and the other that acts as a helper method to create an entity. The helper method takes two strings: the name of the entity to create and the value for the name attribute. For the rating attribute, the helper will insert a random number between one and ten. The two method declarations should look like this:
- (void)loadData;

- (NSManagedObject *)insertObjectForName:(NSString *)entityName withName:(NSString

*)name;
Now, open PerformanceTuningAppDelegate.m, and define those methods. The helper method creates the object within the specified entity type and then sets the value for the name attribute. It looks like this:
- (NSManagedObject *)insertObjectForName:(NSString *)entityName withName:(NSString *)name {

  NSManagedObjectContext *context = [self managedObjectContext];

  NSManagedObject *object = [NSEntityDescription

insertNewObjectForEntityForName:entityName inManagedObjectContext:context];

  [object setValue:name forKey:@"name"];

  [object setValue:[NSNumber numberWithInteger:((arc4random() % 10) + 1)]

forKey:@"rating"];

  return object;

}
The method to load the data, loadData:, first checks the persistent store to determine whether the data has already been loaded so that subsequent runs of the program don't compound the data store. If the data has not been created, the loadData: method creates 200 actors with names like Actor 1, Actor 2, and so on; 200 movies with names like Movie 1; and 200 studios with names like Studio 1. After creating all the objects, the code loops through all the movies and adds relationships to all the actors and to all the studios. Finally, loadData: saves the object graph to the persistent data store. The following is the complete implementation of the loadData method:
- (void)loadData {

  // Pull the movies. If we have 200, assume our db is set up.

  NSManagedObjectContext *context = [self managedObjectContext];

  NSFetchRequest *request = [[NSFetchRequest alloc] init];

  [request setEntity:[NSEntityDescription entityForName:@"Movie"

inManagedObjectContext:context]];

  NSArray *results = [context executeFetchRequest:request error:nil];

  if ([results count] != 200) {

    // Add 200 actors, movies, and studios

    for (int i = 1; i <= 200; i++) {

      [self insertObjectForName:@"Actor" withName:[NSString stringWithFormat:

@"Actor %d", i]];

      [self insertObjectForName:@"Movie" withName:[NSString stringWithFormat:

@"Movie %d", i]];

      [self insertObjectForName:@"Studio" withName:[NSString stringWithFormat:

@"Studio %d", i]];

    }
    // Relate all the actors and all the studios to all the movies

    NSManagedObjectContext *context = [self managedObjectContext];

    NSFetchRequest *request = [[NSFetchRequest alloc] init];

    [request setEntity:[NSEntityDescription entityForName:@"Movie"

inManagedObjectContext:context]];

    NSArray *results = [context executeFetchRequest:request error:nil];

    for (NSManagedObject *movie in results) {

      [request setEntity:[NSEntityDescription entityForName:@"Actor"

inManagedObjectContext:context]];

      NSArray *actors = [context executeFetchRequest:request error:nil];

      NSMutableSet *set = [movie mutableSetValueForKey:@"actors"];

      [set addObjectsFromArray:actors];


      [request setEntity:[NSEntityDescription entityForName:@"Studio"

inManagedObjectContext:context]];

      NSArray *studios = [context executeFetchRequest:request error:nil];

      set = [movie mutableSetValueForKey:@"studios"];

      [set addObjectsFromArray:studios];

    }

  }

[self saveContext];

}
Go to the application:didFinishLaunchingWithOptions: method, and add a call to your loadData: method before it displays the window and view so it looks like this:
- (BOOL)application:(UIApplication *)application didFinishLaunchingWithOptions:(NSDictionary *)launchOptions

{

  [self loadData];

  self.window = [[UIWindow alloc] initWithFrame:[[UIScreen mainScreen] bounds]];

  // Override point for customization after application launch.

  self.viewController = [[PerformanceTuningViewController alloc]

  initWithNibName:@"PerformanceTuningViewController" bundle:nil];

  self.window.rootViewController = self.viewController;

  [self.window makeKeyAndVisible];

  return YES;

}
Build and run the program to create your persistent data store.
Creating the Testing View
The application you're building will present a picker with a list of tests you can run and a button to launch the selected test. It will list the start time, the stop time, and the elapsed time for the test, as well as a string describing the results of the test. Start creating this user interface by opening the PerformanceTuningViewController.h file, declaring that it implements the protocols for your picker view, declaring fields for your user interface elements, and declaring a method to be called when someone clicks the Run Selected Test button. The following code contains the contents of PerformanceTuningViewController.h:
#import <UIKit/UIKit.h>
@interface PerformanceTuningViewController : UIViewController <UIPickerViewDataSource, UIPickerViewDelegate> {

  IBOutlet UILabel *startTime;

  IBOutlet UILabel *stopTime;

  IBOutlet UILabel *elapsedTime;

  IBOutlet UITextView *results;

  IBOutlet UIPickerView *testPicker;

}

@property (nonatomic, retain) UILabel *startTime;

@property (nonatomic, retain) UILabel *stopTime;

@property (nonatomic, retain) UILabel *elapsedTime;

@property (nonatomic, retain) UITextView *results;

@property (nonatomic, retain) UIPickerView *testPicker;


- (IBAction)runTest:(id)sender;


@end
In PerformanceTuningViewController.m, add @synthesize directives for your fields, stub implementations for the picker view protocols you promised to implement, and a stub implementation for runTest, like so:
@synthesize startTime, stopTime, elapsedTime, results, testPicker;


#pragma mark - UIPickerViewDataSource methods


- (NSInteger)numberOfComponentsInPickerView:(UIPickerView *)pickerView {

  return 1;

}


- (NSInteger)pickerView:(UIPickerView *)pickerView

numberOfRowsInComponent:(NSInteger)component {

  return 1;

}


#pragma mark - UIPickerViewDelegate methods


- (NSString *)pickerView:(UIPickerView *)pickerView titleForRow:(NSInteger)row

forComponent:(NSInteger)component {

  return @"Test";

}


#pragma mark - Run the test


- (IBAction)runTest:(id)sender {

}
Open the PerformanceTuningViewController.xib file, and start building the view. You want labels for Start Time, Stop Time, and Elapsed, as well as right-aligned labels to store the actual start time, stop time, and elapsed time; a Text View to store the results of any test that runs; a button for launching a test; and a picker view to show the available tests. Drag all those items to the screen, and arrange them so they look like Figure 7–3.
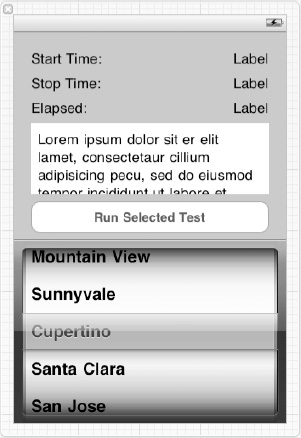
Figure 7–3. Building the view for the performance-tuning application
The next step is to wire all the controls to the fields you created in the PerformanceTuningViewController class. Ctrl+drag from the File's Owner icon to each of the labels for start time, stop time, and elapsed time (the right-aligned ones for displaying the actual times), and pick the appropriate outlet for each. Ctrl+drag from File's Owner to the Text View, and select results. Ctrl+drag from File's Owner to the picker view, select testPicker, and then Ctrl+drag twice from the picker view back to File's Owner: the first time select dataSource, and the second time select delegate. You'll know if you forget to do this, because the picker view won't appear when you run your application. Finally, Ctrl+drag from the Run Selected Test button to File's Owner, and select runTest: from the pop-up. Save everything, build your application, and run it. You should see something that looks like Figure 7–4.
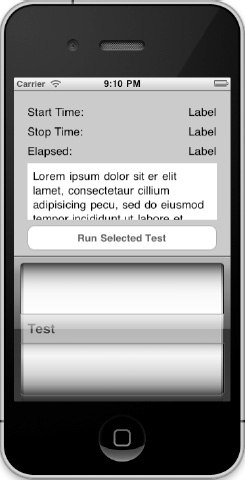
Figure 7–4. The first run of the performance-tuning application
Building the Testing Framework
The approach for adding tests for the performance testing application to run is to create an Objective-C protocol called PerformanceTest and then create an array of tests that all implement that protocol. The application will display the names of the tests in the picker view and execute the selected test when the user taps the Run Selected Test button. The protocol, then, requires two methods.
- One to return the name of the test for display in the picker view.
- One to execute the selected test in the application's managed object context.
To keep the project organized, create a new group under the PerformanceTuning folder (Ctrl+click PerformanceTuning and select New Group from the pop-up menu), and call it Tests. The tests you add throughout this chapter will go in this group. To create the protocol, select File ![]() New
New ![]() New File, select Cocoa Touch on the left and Objective-C protocol on the right, and click Next. Call the protocol
New File, select Cocoa Touch on the left and Objective-C protocol on the right, and click Next. Call the protocol PerformanceTest.h, and put it in the Tests group. Open PerformanceTest.h, and modify it to match the following code:
#import <Foundation/Foundation.h>

#import <CoreData/CoreData.h>


@protocol PerformanceTest <NSObject>


- (NSString *)name;

- (NSString *)runWithContext:(NSManagedObjectContext *)context;


@end
Before integrating the testing framework into the application, create a test (a “test” test, if you will) so that you have something to both see in the picker view and to run. The first test you create will retrieve all the movies, actors, and studios from the persistent store. Create a new Objective-C class called FetchAllMoviesActorsAndStudiosTest as a subclass of NSObject, and add it to the Tests group you just created. The following code is for the header file:
#import <Foundation/Foundation.h>

#import "PerformanceTest.h"


@interface FetchAllMoviesActorsAndStudiosTest : NSObject <PerformanceTest>


@end
Here is the code for the implementation file. Modify your file to look like this:
#import <CoreData/CoreData.h>

#import "FetchAllMoviesActorsAndStudiosTest.h"


@implementation FetchAllMoviesActorsAndStudiosTest


- (NSString *)name {

  return @"Fetch all test";

}


- (NSString *)runWithContext:(NSManagedObjectContext *)context {

  NSFetchRequest *request = [[NSFetchRequest alloc] init];

  [request setEntity:[NSEntityDescription entityForName:@"Movie"

inManagedObjectContext:context]];

  NSArray *results = [context executeFetchRequest:request error:nil];


  int actorsRead = 0, studiosRead = 0;

  for (NSManagedObject *movie in results) {

    actorsRead += [[movie valueForKey:@"actors"] count];

    studiosRead += [[movie valueForKey:@"studios"] count];

    [context refreshObject:movie mergeChanges:NO];

  }

  return [NSString stringWithFormat:@"Fetched %d actors and %d studios", actorsRead,

studiosRead];

}


@end
Adding the Testing Framework to the Application
Now you must modify the view controller to use the testing framework. Open PerformanceTuningViewController.h and add an instance of NSArray to hold the tests. The following code is the updated version of the file with the lines to add in bold. Save the file, and move on to PerformanceTuningViewController.m.
#import <UIKit/UIKit.h>


@interface PerformanceTuningViewController : UIViewController <UIPickerViewDataSource, UIPickerViewDelegate> {

  IBOutlet UILabel *startTime;

  IBOutlet UILabel *stopTime;

  IBOutlet UILabel *elapsedTime;

  IBOutlet UITextView *results;

  IBOutlet UIPickerView *testPicker;

  NSArray *tests;

}

@property (nonatomic, retain) UILabel *startTime;

@property (nonatomic, retain) UILabel *stopTime;

@property (nonatomic, retain) UILabel *elapsedTime;

@property (nonatomic, retain) UITextView *results;

@property (nonatomic, retain) UIPickerView *testPicker;

@property (nonatomic, retain) NSArray *tests;


- (IBAction)runTest:(id)sender;


@end
In PerformanceTuningViewController.m, add the new tests member to your @synthesize line, which now looks like this:
@synthesize startTime, stopTime, elapsedTime, results, testPicker, tests;
Add the following import statements to support the changes you're going to make to allow your new test, and the subsequent tests you build in this chapter, to run:
#import "PerformanceTuningAppDelegate.h"

#import "PerformanceTest.h"

#import "FetchAllMoviesActorsAndStudiosTest.h"
Now, create a viewDidLoad: method that blanks out the fields that tests will fill in after they run and adds the new test to the tests array. Your implementation should match this:
- (void)viewDidLoad {

  [super viewDidLoad];


  startTime.text = @"";

  stopTime.text = @"";

  elapsedTime.text = @"";

  results.text = @"";


  FetchAllMoviesActorsAndStudiosTest *famaasTest = [[FetchAllMoviesActorsAndStudiosTest alloc] init];

  self.tests = [[NSArray alloc] initWithObjects:famaasTest, nil];

}
Since you still have only one component to show in the picker view, you can leave the numberOfComponentsInPickerView: method alone and continue to allow it to return 1. Your pickerView:numberOfRowsInComponent: method, however, should return the number of tests in your tests array.
- (NSInteger)pickerView:(UIPickerView *)pickerView

numberOfRowsInComponent:(NSInteger)component {

  return [self.tests count];

}
The pickerView:titleForRow:forComponent: method allows you to use your new PerformanceTest protocol. This method should retrieve the test for the corresponding row from the tests array and return the name for the test so the picker view displays this name. The method should now look like this:
- (NSString *)pickerView:(UIPickerView *)pickerView titleForRow:(NSInteger)row forComponent:(NSInteger)component {

  id <PerformanceTest> test = [self.tests objectAtIndex:row];

  return [test name];

}
Finally, you must instruct the runTest: method to do the following:
- Get the managed object context from the application delegate.
- Determine which test is selected.
- Get the start time.
- Run the selected test.
- Get the stop time.
- Update the fields with the times and results.
That implementation looks like this:
- (IBAction)runTest:(id)sender {

  PerformanceTuningAppDelegate *delegate = (PerformanceTuningAppDelegate *)[[UIApplication sharedApplication] delegate];

  NSManagedObjectContext *context = [delegate managedObjectContext];

  id <PerformanceTest> test = [self.tests objectAtIndex:[testPicker selectedRowInComponent:0]];


  NSDate *start = [NSDate date];

  results.text = [test runWithContext:context];

  NSDate *stop  = [NSDate date];


  startTime.text = [start description];

  stopTime.text = [stop description];

  elapsedTime.text = [NSString stringWithFormat:@"%.03f seconds", [stop

timeIntervalSinceDate:start]];

}
You have completed the performance-tuning application—for now. As you work through this chapter, you will add tests to cover the scenarios you read about.
Running Your First Test
Build and run the application. One important thing to note is that you're loading a lot of data into the managed object context and stressing the memory handling of iOS. You will likely see some instability in the application throughout the chapter if you run a few tests in a row. When the application crashes, simply restart it and carry on.
When you run the application, you should see the iPhone Simulator with the screen shown in Figure 7–5. The only test you've created so far, “Fetch all test,” stands alone in the picker view, selected and ready for you to run. Click the Run Selected Test button, and wait. Be patient. You didn't add any spinners, progress indicators, or other feedback mechanisms to the user interface while it runs, so all you'll see for a few moments is that the button turns blue and stays that way, but the test will eventually complete, and you'll see something like Figure 7–6. You can see in Figure 7–6 that the test took 1.431 seconds to run on our machine.
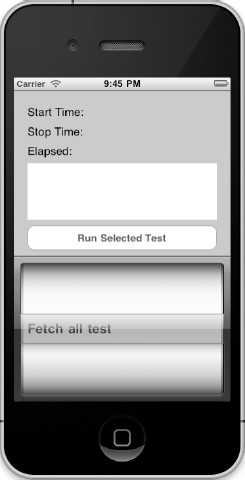
Figure 7–5. The performance-tuning application with a single test available
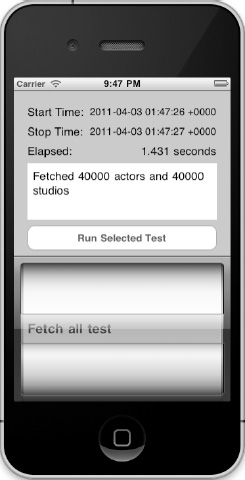
Figure 7–6. The performance-tuning application after running a test
The rest of this chapter explains the various performance considerations imposed by Core Data on iOS and the devices it runs on. As you learn these performance considerations, you'll add new tests to the application. Feel free to add your own tests as well to give the users of your applications the best possible experience.
Faulting
When you run SQL queries against a database, you know the depth and range of the data you're pulling. You know if you're joining tables, you know the columns you're pulling back, and, if you're careful, you can limit the number of rows you yank from the database into working memory. You may have to work harder to get data than you do with Core Data, but you have more control. You know about how much memory you're using to hold the data you fetch.
With Core Data, however, you've given up some amount of control in exchange for ease of use. With the Shapes application from Chapter 5, for example, each Polygon instance had a collection of vertices, which you accessed in an object-oriented, not a data-oriented, way. You didn't have to care whether Core Data pulled the vertex data from the database when the application started, when the polygon was loaded, or when you first accessed the vertices. Core Data cares, however, and attempts to delay loading data from the persistent store into the object graph until necessary, reducing both fetch time and memory usage. It does this using what's termed faults.
Think of a fault like a symlink on a Unix file system, which is not the actual file it points to nor does it contain the file's data. The symlink represents the file, though, and when called upon can get to the file and its data just as if it were the file itself. Like a symlink, a fault is a placeholder that can get to the persistent store's data. A fault can represent either a managed object or, when it represents a to-many relationship, a collection of managed objects. As a link to or a shadow of the data, a fault occupies much less memory than the actual data does. See Figure 7–7 for a depiction of a managed object and a fault. In this case, the managed object is an instance of Shape, and the fault points to the related collection of Vertex objects. The Shape is boldly depicted, representing the fact that it has been fetched from the persistent store and resides in memory. The vertices, however, are faint and grayed out, because they haven't been fetched from the persistent store and do not reside in memory.
Figure 7–7. A shape and its faulted vertices
Firing Faults
Core Data uses the term firing faults when it must pull the data from the persistent store that a fault points to and then put it into memory. Core Data has “fired” off a request to fetch data from the data store, and the fault has been “fired” from its job to represent the actual data. You cause a fault to fire any time you request a managed object's persistent data, whether through valueForKey: or through methods of a custom class that either return or access the object's persistent data. Methods that access a managed object's metadata and not any of the data stored in the persistent store don't fire a fault. This means you can query a managed object's class, hash, description, entity, and object ID, among other things, and not cause a fault to fire. For the complete list of which methods don't fire a fault, see Apple's documentation at http://developer.apple.com/library/ios/#documentation/Cocoa/Conceptual/CoreData/Articles/cdPerformance.html under the section “Faulting Behavior.”
Explicitly asking a managed object for its persistent data causes a fault to fire, but so does calling any methods or constructs that access persistent data from a managed object. You can, for example, access a collection through a managed object's relationships without causing a fault to fire. Sorting the collection, however, will fire a fault because any logical sorting will sort by some of the object's persistent data. The test you build later in this section demonstrates this behavior.
Faulting and Caching
We fibbed a bit when we said that firing faults fetches data from the persistent store. That's often true, but before Core Data treks all the way to the persistent store to retrieve data, it first checks its cache for the data it seeks. If Core Data finds its intended data in the cache, it pulls the data from cache and skips the longer trip to the persistent store. The “Caching” and “Expiring” sections discuss caching in more detail.
Refaulting
One way to take control of your application's persistent data and memory use is to turn managed objects back into faults, thereby relinquishing the memory its data was occupying. You turn objects back into faults by calling the managed object context's refreshObject:mergeChanges: method, passing the object you want to fault and NO for the mergeChanges: parameter. If, for example, you had a managed object called foo that you wanted to turn back into a fault, you would use code similar to this:
[context refreshObject:foo mergeChanges:NO];
After this call, foo is now a fault, and [foo isFault] returns YES. If you look at the code for the previous test, you'll see a call within the loop that iterates over all movie instances to turn each movie instance back into a fault.
[context refreshObject:movie mergeChanges:NO];
Understanding the mergeChanges: parameter is important. Passing NO, as the previous code does, throws away any changed data that has not yet been saved to the persistent store. Take care when doing this because you lose all data changes in this object you're faulting, and all the objects to which the faulted object relates are released. If any of the relationships have changed and the context is then saved, your faulted object is out of sync with its relationships and you have created data integrity issues in your persistent store.
NOTE: Because faulting an object by calling refreshObject:mergeChanges:NO releases relationships, you can use this to prune your object graph in memory. Faulting a movie in the PerformanceTuning application, for example, would release its 200 related actors and 200 related studios.
Passing YES to mergeChanges: doesn't fault the object. Instead, it reloads all the object's persistent data from the persistent store (or the last cached state) and then reapplies any changes that existed before the call to refreshObject: that have not yet been saved.
When you turn a managed object into a fault, Core Data sends the following two messages to the managed object:
willTurnIntoFault:before the object faultsdidTurnIntoFault:after the object faults
If you have implemented custom classes for your managed objects, you can implement either or both of these methods in your classes to perform some action on the object. Suppose, for example, that your custom managed object performs an expensive calculation on some persistent values and caches the result, and you want to nullify that cached result if the values it depends on aren't present. You could nullify the calculation in didTurnIntoFault:.
Building the Faulting Test
To test what you've learned about faulting in this section, build a test that will do the following:
- Retrieve the first movie from the persistent store.
- Grab an actor from that movie.
- Check whether the actor is a fault.
- Get the name of the actor.
- Check whether the actor is a fault.
- Turn the actor back into a fault.
- Check whether the actor is a fault.
To start, generate an Actor class from your data model that will represent the Actor entity. You can, if you want, create it manually. The following code is for the header file, Actor.h:
#import <Foundation/Foundation.h>

#import <CoreData/CoreData.h>


@interface Actor : NSManagedObject


@property (nonatomic, retain) NSString * name;

@property (nonatomic, retain) NSNumber * rating;

@property (nonatomic, retain) NSSet* movies;


@end


@interface Actor (CoreDataGeneratedAccessors)


- (void)addMoviesObject:(NSManagedObject *)value;

- (void)removeMoviesObject:(NSManagedObject *)value;

- (void)addMovies:(NSSet *)value;

- (void)removeMovies:(NSSet *)value;


@end
The following code shows the implementation file, Actor.m. In the implementation file, implement the methods willTurnIntoFault: and didTurnIntoFault:, so that you can verify that Core Data indeed does call these methods when you turn the object back into a fault. You don't do anything special in these methods but simply log that the events happened.
#import "Actor.h"


@implementation Actor

@dynamic name;

@dynamic rating;

@dynamic movies;


- (void)willTurnIntoFault {

  NSLog(@"Actor named %@ will turn into fault", self.name);

}


- (void)didTurnIntoFault {

  NSLog(@"Actor named %@ did turn into fault", self.name);

}


@end
Now, create a class called DidTurnIntoFaultTest that implements the PerformanceTest protocol. The following code is for DidTurnIntoFaultTest.h:
#import <Foundation/Foundation.h>

#import "PerformanceTest.h"


@interface DidTurnIntoFaultTest : NSObject <PerformanceTest>


@end
The following code is for DidTurnIntoFaultTest.m:
#import <CoreData/CoreData.h>

#import "DidTurnIntoFaultTest.h"

#import "Actor.h"


@implementation DidTurnIntoFaultTest


- (NSString *)name {

  return @"Did Turn Into Fault Test";

}


// Pull all the movies and verify that each of their actor objects are pointing to the same actors

- (NSString *)runWithContext:(NSManagedObjectContext *)context {

  NSString *result = nil;


  // Fetch the first movie

  NSFetchRequest *request = [[NSFetchRequest alloc] init];

  [request setEntity:[NSEntityDescription entityForName:@"Movie"

inManagedObjectContext:context]];

  NSPredicate *predicate = [NSPredicate predicateWithFormat:@"name = %@", @"Movie 1"];

  [request setPredicate:predicate];

  NSArray *results = [context executeFetchRequest:request error:nil];


  if ([results count] == 1) {
NSManagedObject *movie = (NSManagedObject *)[results objectAtIndex:0];
NSSet *actors = [movie valueForKey:@"actors"];
if ([actors count] != 200) {
result = @"Failed to find the 200 actors for the first movie";
} else {
// Get an actor
Actor *actor = (Actor *)[actors anyObject];
// Check if it's a fault
result = [actor isFault] ? @"Actor is a fault.
" : @"Actor is NOT a fault.
";
// Get its name and rating
result = [result stringByAppendingFormat:@"Actor is named %@
", actor.name];
result = [result stringByAppendingFormat:@"Actor has rating %d
", [actor.rating
integerValue]];
// Check if it's a fault
result = [result stringByAppendingString:[actor isFault] ?
@"Actor is a fault.
" : @"Actor is NOT a fault.
"];
// Turn actor back into a fault
result = [result stringByAppendingString:@"Turning actor back into a fault.
"];
[context refreshObject:actor mergeChanges:NO];
// Check if it's a fault
result = [result stringByAppendingString:[actor isFault] ?
@"Actor is a fault.
" : @"Actor is NOT a fault.
"];
}
} else {
result = @"Failed to fetch the first movie";
}
return result;
}
@end
Turn your attention to the runWithContext: method, which fetches the first movie from the persistent store. It then grabs any one of the actors related to that movie and checks to see whether this actor is a fault. Note that, although you have done nothing to this point in the code to cause a fault to fire for the actor, the actor may not be a fault at this point, depending on what you've been doing in the application before this point. The code then accesses the actor's name and checks again whether the actor is a fault. It won't be. The access to the name fired a fault, if it hadn't already been fired elsewhere. The code then turns the actor into a fault and verifies that the actor, indeed, is a fault.
To add your new test to the application, open PerformanceTuningViewController.m, make sure you import DidTurnIntoFaultTest.h, find the line in viewDidLoad: that adds the tests to the tests array, and add the new test, like this:
FetchAllMoviesActorsAndStudiosTest *famaasTest = [[FetchAllMoviesActorsAndStudiosTest alloc] init];

DidTurnIntoFaultTest *dtifTest = [[DidTurnIntoFaultTest alloc] init];

self.tests = [[NSArray alloc] initWithObjects:famaasTest, dtifTest, nil];
Build the application and run the test. You should see output similar to this:
Actor is a fault.

Actor is named Actor 42

Actor has rating 8

Actor is NOT a fault.

Turning actor back into a fault.

Actor is a fault.
Go back to Actor.m and comment out the willTurnIntoFault: and didTurnIntoFault: methods, as they and their calls to NSLog() can skew timing results for any other tests that use the Actor class.
Taking Control: Firing Faults on Purpose
This section on faulting began by explaining that you had more control over memory usage when you ran SQL queries yourself than you do by allowing Core Data to manage data fetches. Although true, you can exert some amount of control over Core Data's fault management by firing faults yourself. By firing faults yourself, you can avoid inefficient scenarios in which Core Data must fire several small faults to fetch your data, incurring several trips to the persistent store.
Core Data provides two means for optimizing the firing of faults:
- Batch faulting
- Prefetching
As a control group, create a test called SinglyFiringFaultTest. This test should fetch all the movies, loop through them one by one, and do the following:
- Access the
nameattribute so that a fault fires for this movie only. - Loop through all the related actors and access their
nameattributes, one at a time, so each access fires a fault. - Reset each actor so the next movie will have to fire faults for each actor.
- Do the same for all the related studios.
The following code is for SinglyFiringFaultTest.h:
#import <Foundation/Foundation.h>

#import "PerformanceTest.h"


@interface SinglyFiringFaultTest : NSObject <PerformanceTest>


@end
The following code is for SinglyFiringFaultTest.m:
#import <CoreData/CoreData.h>

#import "SinglyFiringFaultTest.h"
@implementation SinglyFiringFaultTest


- (NSString *)name {

  return @"Singly Firing Fault Test";

}


- (NSString *)runWithContext:(NSManagedObjectContext *)context {

  NSString *result = @"Singly Firing Fault Test Complete!";


  // Fetch all the movies

  NSFetchRequest *request = [[NSFetchRequest alloc] init];

  [request setEntity:[NSEntityDescription entityForName:@"Movie"

inManagedObjectContext:context]];

  NSArray *results = [context executeFetchRequest:request error:nil];


  // Loop through all the movies

  for (NSManagedObject *movie in results) {

    // Fire a fault just for this movie

    [movie valueForKey:@"name"];


    // Loop through all the actors for this movie

    for (NSManagedObject *actor in [movie valueForKey:@"actors"]) {

      // Fire a fault just for this actor

      [actor valueForKey:@"name"];


      // Put this actor back in fault so the next movie

      // will have to fire a fault

      [context refreshObject:actor mergeChanges:NO];

    }


    // Loop through all the studios for this movie

    for (NSManagedObject *studio in [movie valueForKey:@"studios"]) {

      // Fire a fault just for this studio

      [studio valueForKey:@"name"];


      // Put this studio back in fault so the next movie

      // will have to fire a fault

      [context refreshObject:studio mergeChanges:NO];

    }

  }

  return result;

}


@end
Create these files, and add an instance of SinglyFiringFaultTest to your tests array. Don't forget to import SinglyFiringFaultTest.h. Build the application, launch the simulator, and run the test. Running this test on our machine took about 2.2 seconds. By using prefetching, you should be able to improve on these results!
Prefetching
Similar to batch faulting, prefetching minimizes the number of times that Core Data has to fire faults and go fetch data. With prefetching, though, you tell Core Data when you perform a fetch to also fetch the related objects you specify. For example, using this chapter's data model, when you fetch the movies, you can tell Core Data to prefetch the related actors, studios, or both.
To prefetch related objects, call NSFetchRequest's setRelationshipKeyPathsForPrefetching: method, passing an array that contains the names of the relationships that you want Core Data to prefetch. To prefetch the related actors and studios when you fetch the movies, for example, use this code:
NSFetchRequest *request = [[NSFetchRequest alloc] init];

[request setEntity:[NSEntityDescription entityForName:@"Movie"

inManagedObjectContext:context]];

[request setRelationshipKeyPathsForPrefetching:[NSArray arrayWithObjects:@"actors",

@"studios", nil]];

NSArray *results = [context executeFetchRequest:request error:nil];
The line in bold instructs Core Data to prefetch all the related actors and studios when it fetches the movies.
Before testing this, recognize that your baseline numbers depend on turning each actor and studio back into a fault after triggering the fault to load the data for a given movie. You did this because each movie relates to the same 200 actors and the same 200 studios, so the only time the actors and movies would normally be faults would be for the first movie, not the remaining 199. Turning each actor and each studio back into a fault for each movie allows you to measure firing faults for each actor and studio for each movie.
Turning each actor and each studio back into a fault negates the performance gains offered by prefetching them, however, so you're not going to refault them. To get good comparison numbers, then, you must change the code for SinglyFiringFaultTest to not reset the Actor and Studio objects. Open SinglyFiringFaultTest.m, go to the runWithContext: method, and comment these two lines:
[context refreshObject:actor mergeChanges:NO];


[context refreshObject:studio mergeChanges:NO];
Launch the app, and rerun the test. On our machine, it takes about 1.9 seconds.
Now, create a new class called PreFetchFaultingTest, and implement the PerformanceTest protocol. This test will look similar to SinglyFiringFaultTest with two important differences:
- The fetch prefetches the actors and studios.
- The actors and studios aren't turned back into faults.
The following code is the header file:
#import <Foundation/Foundation.h>

#import "PerformanceTest.h"


@interface PreFetchFaultingTest : NSObject <PerformanceTest>


@end
The following is the implementation file:
#import <CoreData/CoreData.h>

#import "PreFetchFaultingTest.h"


@implementation PreFetchFaultingTest


- (NSString *)name {

  return @"Pre-fetch Faulting Test";

}


- (NSString *)runWithContext:(NSManagedObjectContext *)context {

  NSString *result = @"Pre-fetch Fault Test Complete!";


  // Fetch all the movies

  NSFetchRequest *request = [[NSFetchRequest alloc] init];

  [request setEntity:[NSEntityDescription entityForName:@"Movie"

inManagedObjectContext:context]];


  // Pre-fetch the actors and studios

  [request setRelationshipKeyPathsForPrefetching:[NSArray arrayWithObjects:@"actors",

@"studios", nil]];

  NSArray *results = [context executeFetchRequest:request error:nil];


  // Loop through all the movies

  for (NSManagedObject *movie in results) {

    // Fire a fault just for this movie

    [movie valueForKey:@"name"];


    // Loop through all the actors for this movie

    for (NSManagedObject *actor in [movie valueForKey:@"actors"]) {

      // Get the name for this actor

      [actor valueForKey:@"name"];

    }


    // Loop through all the studios for this movie

    for (NSManagedObject *studio in [movie valueForKey:@"studios"]) {

      // Get the name for this studio

      [studio valueForKey:@"name"];

    }

  }

  return result;

}


@end
This line of code sets up the prefetching for actors and studios:
[request setRelationshipKeyPathsForPrefetching:[NSArray arrayWithObjects:@"actors", @"studios", nil]];
Add this test to the tests array in the viewDidLoad: method of PerformanceTuningViewController, as you did the other tests. Build and run this test. Our results were about 0.6 seconds, which is about 70 percent faster than the 1.9 seconds the same test took without prefetching.
Caching
Regardless of target language or platform, most data persistence frameworks and libraries have an internal caching mechanism. Properly implemented caches provide opportunities for significant performance gains, especially for applications that need to retrieve the same data repeatedly. Core Data is no exception. The NSManagedObjectContext class serves as a built-in cache for the Core Data framework. When you retrieve an object from the backing persistent store, the context keeps a reference to it to track its changes. If you retrieve the object again, the context can give the caller the same object reference as it did in the first invocation.
The obvious trade-off that results from the use of caching is that, while improving performance, caching uses more memory. If no cache management scheme were in place to limit the memory usage of the cache, the cache could fill up with objects until the whole system collapses from lack of memory. To manage memory, the Core Data context has weak references to the managed objects it pulls out of the persistent store. This means that if the retain count of a managed object reaches zero because no other object has a reference to it, the managed object will be discarded. The exception to this rule is if the object has been modified in any way. In this case, the context keeps a strong reference (that is, sends a retain signal to the managed object) and keeps it until the context is either committed or rolled back, at which point it becomes a weak reference again.
NOTE: The default retain behavior can be changed by passing YES to the setRetainsRegisteredObjects: of NSManagedObjectContext. By passing YES, the context will retain all registered objects. The default behavior retains registered objects only when they are inserted, updated, deleted, or locked.
In this section, you will examine the difference between fetching objects from the persistent store or from the cache. You will build a test that does the following:
- Resets the managed object context to flush the cache.
- Retrieves all movies.
- Retrieves all actors for each movie.
- Displays the time it took to perform both retrievals.
- Retrieves all movies (this time the objects will be cached).
- Retrieves all actors for each movie.
- Displays the time it took to perform both retrievals.
To start, create a class called CacheTest, and add it to the Tests group in Xcode. Make sure that CacheTest implements the PerformanceTest protocol. The following code is for CacheTest.h:
#import <Foundation/Foundation.h>

#import "PerformanceTest.h"


@interface CacheTest : NSObject <PerformanceTest>


@end
The following code is for CacheTest.m:
#import "CacheTest.h"

#import "Actor.h"


@implementation CacheTest


- (NSString *)name {

  return @"Cache Test";

}


- (void)loadDataFromContext:(NSManagedObjectContext *)context {

  // Fetch all the movies and all actors

  NSFetchRequest *request = [[NSFetchRequest alloc] init];

  [request setEntity:[NSEntityDescription entityForName:@"Movie"

inManagedObjectContext:context]];

  NSArray *results = [context executeFetchRequest:request error:nil];


  // Fetch all the actors

  for (NSManagedObject *movie in results) {

    NSSet *actors = [movie valueForKey:@"actors"];

    for (Actor *actor in actors) {

      [actor valueForKey:@"name"];

    }


  }

}


// Pull all the movies and verify that each of their actor objects are pointing to the same actors

- (NSString *)runWithContext:(NSManagedObjectContext *)context {

  NSMutableString *result = [NSMutableString string];


  [context reset];  // Clear all potentially cached objects


  NSDate *startTest1 = [NSDate date];

  [self loadDataFromContext:context];

  NSDate *endTest1 = [NSDate date];
  NSTimeInterval test1 = [endTest1 timeIntervalSinceDate:startTest1];

  [result appendFormat:@"Without cache: %.2f s
", test1];


  NSDate *startTest2 = [NSDate date];

  [self loadDataFromContext:context];

  NSDate *endTest2 = [NSDate date];


  NSTimeInterval test2 = [endTest2 timeIntervalSinceDate:startTest2];

  [result appendFormat:@"With cache: %.2f s
", test2];


  return result;

}


@end
Let's examine the runWithContext: method. It does the same thing twice: fetch all the movies and all the actors. The first time, the cache is explicitly cleared using [context reset]. The second time, all the objects will be in the cache, and therefore the data will come back much faster. The loadDataFromContext: method is invoked to retrieve all the movies and then pulls every actor for each movie. You explicitly get the name property of the actors in order to force Core Data to load the property, firing a fault if necessary.
Add an instance of CacheTest to the tests array, build the application, and run the Cache Test test. The output of the application will look similar to Figure 7–8, with the cached version running significantly faster than the version without a cache.
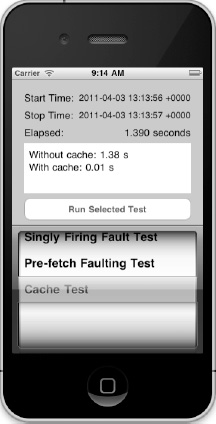
Figure 7–8. Measuring the difference between loading cached and noncached objects
If you reset the cache between the first and second tests using [context reset], then the time to execute the second test would be about the same as the first test. This is because the objects would all have to be retrieved from the persistent store again.
Expiring
Any time an application uses a cache, the question of cache expiration arises: when should objects in the cache expire and be reloaded from the persistent store? The difficulty in determining the expiration interval comes from juggling the performance gain obtained by caching objects for long intervals versus the extra memory consumption that entails and the potential staleness of the cached data. This section examines the trade-offs of the two possibilities for expiring the cache and freeing some memory.
Memory Consumption
As more and more objects are put into the cache, the memory usage increases. Even if a managed object is entirely faulted, a quick call to NSLog(@"%d", class_getInstanceSize(NSManagedObject.class)) will show that the allocated size of an unpopulated managed object is 48 bytes. This is because it holds references (that is, 4-byte pointers) to other objects such as the entity description, the context, and the object ID. Even without any actual data, a managed object occupies a minimum of 48 bytes. This is a best-case scenario because this approximation does not include the memory occupied by the unique object ID, which is populated. This means that if you have 100,000 managed objects in the cache, even faulted, you are using at least 5MB of memory for things other than your data. If you start fetching data without faulting, you can run into memory issues quickly.
The trick to this balancing act is to remove data from the cache when it's no longer needed or if you can afford to pay the price of retrieving the objects from the persistent store when you need them again.
Brute-Force Cache Expiration
If you don't care about losing all the managed objects, you can reset the context entirely. This is rarely the option you want to choose, but it is extremely efficient. NSManagedObjectContext has a reset method that will wipe the cache out in one swoop. Once you call [managedObjectContext reset], your memory footprint will be dramatically smaller, but you will have to pay the price of going to the persistent store if you want to retrieve any objects again. Please also understand that, as with any other kind of mass destruction mechanism, resetting the cache in the middle of a running application has serious side effects and collateral damage. For example, any managed object that you were using prior to the reset is now invalid. If you try to do anything with them, your efforts will be met with runtime errors.
Expiring the Cache Through Faulting
Faulting is a more subtle option, as the section on faulting explains. You can fault any managed object by calling [context refreshObject:managedObject mergeChanges:NO]. After this method call, the object is faulted, and therefore the memory it occupies in the cache is minimized, although not zero. A non-negligible advantage of this strategy, however, is that when the managed object is turned into a fault, any managed object it has a reference to (through relationships) is released. If those related managed objects have no other references to them, then they will be removed from the cache, further reducing the memory footprint. Faulting managed objects in this manner helps prune the entire object graph.
Uniquing
Both business and technology like to turn nouns into verbs, and the pseudoword uniquing testifies to this weakness. It attempts to define the action of making something unique or ensuring uniqueness. Usage suggests not only that Apple didn't invent the term but also that it predates Core Data. Apple embraces the term in its Core Data documentation, however, raising fears that one day Apple will call the action of listening to music iPodding.
The technology industry uses the term uniquing in conjunction with memory objects versus their representation in a data store. In “Core Java Data Objects” (Prentice Hall, 2003), it says that uniquing “ensures that no matter how many times a persistent object is found, it has only one in-memory representation. All references to the same persistent object within the scope of the same PersistenceManager instance reference the same in-memory object.”
Martin Fowler, in “Patterns of Enterprise Application Architecture” (Addison-Wesley Professional, 2005), gives it a less colorful, more descriptive, and more English-compliant name: identity map. He explains that an identity map “ensures that each object gets loaded only once by keeping every loaded object in a map.” Whatever you call it or however you describe it, uniquing means that Core Data conserves memory use by ensuring the uniqueness of each object in memory and that no two memory instances of an object point to the same instance in the persistent store.
Consider, for example, the Shapes application from Chapter 5. Each Shape instance has a relationship with two Canvas instances. When you run the Shapes application and reference the two Canvas instances through any Shape instances, you always get the same two Canvas instances, as Figure 7–9 depicts. If Core Data didn't use uniquing, you could find yourself in the scenario shown in Figure 7–10, where each Canvas instance is represented in memory several times, once for each Shape, and each Shape instance is represented in memory several times, once for each Canvas.
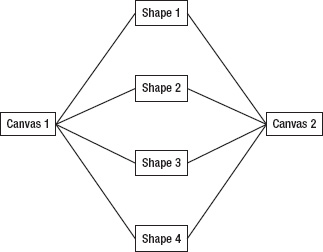
Figure 7–9. Uniquing shapes and canvases
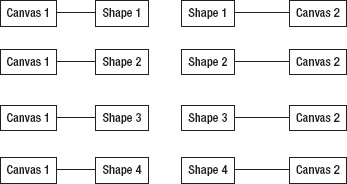
Figure 7–10. Nonuniquing shapes and canvases
Uniquing not only conserves memory but also eliminates data inconsistency issues. Think what could happen, for example, if Core Data didn't employ uniquing and the Shapes application had two memory instances of each shape (one for each canvas). Suppose that Canvas 1 changed the color of a shape to mauve and Canvas 2 changed the color of the shape to lime green. What color should the shape display? When the application stores the shape in the persistent store, what color should it save? You can imagine the data inconsistency bugs you'd have to track down if Core Data maintained more than one instance of each data object in memory.
Note that uniquing occurs within a single managed object context only, not across managed object contexts. The good news, however, is that Core Data's default behavior, which you can't change, is to unique. Uniquing comes free with Core Data.
To test uniquing, you'll create a test that fetches all the movies from the persistent store and then compares each of their related actors to each other movie's related actors. For the test to pass, the code must verify that only 200 Actor instances live in memory and that each movie points to the same 200 actors. To begin, create a new class called UniquingTest, which should implement the PerformanceTest protocol, like so:
#import <Foundation/Foundation.h>

#import "PerformanceTest.h"


@interface UniquingTest : NSObject <PerformanceTest>


@end
The implementation file, UniquingTest.m, fetches all the movies and iterates through them, pulling all the actors that relate to each one. The code sorts the actors so they're in a determined order so you can predictably compare instances. The first time through the loop (for the first movie), the code stores each of the actors in a reference array so that all subsequent loops have something to compare the actors against. Each subsequent loop, the code pulls the actors for the movie and compares them to the reference array. If just one actor doesn't match, the test fails. The code looks like this:
#import <CoreData/CoreData.h>

#import "UniquingTest.h"


@implementation UniquingTest


- (NSString *)name {

  return @"Uniquing test";

}


// Pull all the movies and verify that each of their actor objects are pointing to the same actors

- (NSString *)runWithContext:(NSManagedObjectContext *)context {

  NSString *result = @"Uniquing test passed";


  // Array to hold the actors for comparison purposes

  NSMutableArray *referenceActors = nil;


  // Sorting for the actors

  NSSortDescriptor *sortDescriptor = [[NSSortDescriptor alloc] initWithKey:@"name"

ascending:YES];

  NSArray *sortDescriptors = [[NSArray alloc] initWithObjects:sortDescriptor, nil];


  // Fetch all the movies

  NSFetchRequest *request = [[NSFetchRequest alloc] init];

  [request setEntity:[NSEntityDescription entityForName:@"Movie"

inManagedObjectContext:context]];

  NSArray *results = [context executeFetchRequest:request error:nil];


  // Go through each movie

  for (NSManagedObject *movie in results) {

    // Get the actors

    NSSet *actors = [movie mutableSetValueForKey:@"actors"];

    NSArray *sortedActors = [actors sortedArrayUsingDescriptors:sortDescriptors];


    if (referenceActors == nil) {

      // First time through; store the references

      referenceActors = [[NSMutableArray alloc] initWithArray:sortedActors];

    } else {

      for (int i = 0, n = [sortedActors count]; i < n; i++) {
        if ([sortedActors objectAtIndex:i] != [referenceActors objectAtIndex:i]) {

          result = [NSString stringWithFormat:@"Uniquing test failed; %@ != %@",

 [sortedActors objectAtIndex:i], [referenceActors objectAtIndex:i]];

          break;

        }

      }

    }

  }

  return result;

}


@end
To run this test, open PerformanceTuningViewController.m, and add an instance of UniquingTest to the tests array and an import for UniquingTest.h. Running the test should show that each actor exists only once in memory and that Core Data has used uniquing to reduce your application's memory footprint (see Figure 7–11).
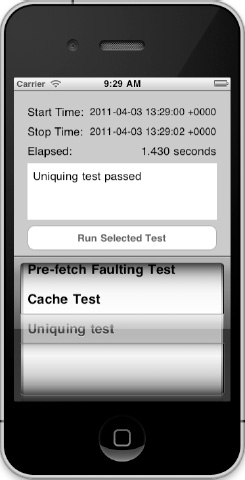
Figure 7–11. The results of the uniquing test
Improve Performance with Better Predicates
Despite the year in the movie title 2001: A Space Odyssey, we are still far away from our machines having the intelligence to respond with things like “I'm sorry, Dave. I'm afraid I can't do that.” As of the time of writing this book, programmers still have to do a lot of hand-holding to walk their machines through the process of doing what they are asked to do. This means that how you write your code determines how efficient it will be. There are often multiple ways to retrieve the same data, but the solution you use can significantly alter the performance of your application.
Using Faster Comparators
Generally speaking, string comparators perform slower than primitive comparators. When predicates are compounded using an OR operator, it is always more efficient to put the primitive comparators first because if they resolve to TRUE, then the rest of the comparators don't need to be evaluated. This is because “TRUE OR anything” is always true. A similar strategy can be used with AND-compounded predicates. In this case, if the first predicate fails, then the second will not be evaluated, because “FALSE AND anything” is always false.
To validate this, add a new test to your performance test application. You call the new class PredicatePerformanceTest. The following code is the header file:
#import <Foundation/Foundation.h>

#import "PerformanceTest.h"


@interface PredicatePerformanceTest : NSObject <PerformanceTest>


@end
This test consists of two fetch requests, which retrieve the same objects using an OR-compounded predicate. In the first test, the string comparator LIKE is used before the primitive comparator. In the second test, the comparators are permuted. Run each test 1,000 times in order to get significant timings in seconds; each time through the loop, the cache is reset to keep a clean context. The following code shows the implementation:
#import <CoreData/CoreData.h>

#import "PredicatePerformanceTest.h"


@implementation PredicatePerformanceTest


- (NSString *)name {

  return @"Predicate Performance Test";

}


- (NSString *)runWithContext:(NSManagedObjectContext *)context {

  NSMutableString *result = [NSMutableString string];

  NSFetchRequest *request;

  NSDate *startTest1 = [NSDate date];
  for (int i=0; i<1000; i++) {

    [context reset];

    request = [[NSFetchRequest alloc] init];

    [request setEntity:[NSEntityDescription entityForName:@"Movie"

inManagedObjectContext:context]];

    [request setPredicate:[NSPredicate predicateWithFormat:@"(name LIKE %@)

OR (rating < %d)", @"*c*or*", 5]];

    [context executeFetchRequest:request error:nil];

  }

  NSDate *endTest1 = [NSDate date];


  NSTimeInterval test1 = [endTest1 timeIntervalSinceDate:startTest1];

  [result appendFormat:@"Slow predicate: %.2f s
", test1];


  NSDate *startTest2 = [NSDate date];

  for (int i=0; i<1000; i++) {

    [context reset];

    request = [[NSFetchRequest alloc] init];

    [request setEntity:[NSEntityDescription entityForName:@"Movie"

inManagedObjectContext:context]];

    [request setPredicate:[NSPredicate predicateWithFormat:@"(rating < %d) OR (name

like %@)", 5, @"*c*or*"]];

    [context executeFetchRequest:request error:nil];

  }

  NSDate *endTest2 = [NSDate date];


  NSTimeInterval test2 = [endTest2 timeIntervalSinceDate:startTest2];

  [result appendFormat:@"Fast predicate: %.2f s
", test2];


  return result;

}


@end
To see the test in the user interface, open PerformanceTuningViewController.m, and add an instance of PredicatePerformanceTest to the tests array and an import for PredicatePerformanceTest.h.
Running the test will consistently show a significant timing difference between the two tests. Of course, the timings will differ depending on the performance of your machine, but here's an example run, with the fast predicate outperforming the slow predicate by over 25%:
Slow predicate: 1.21s

Fast predicate: 0.89s
Using Subqueries
You saw in the previous chapter how to use subqueries to help simplify the code. In this section, you add a test to show the difference between using subqueries and retrieving related data manually. Consider an example in which you want to find all actors from a movie that match certain criteria. To do this without using a subquery, you have to first fetch all the movies that match the criteria. You then have to iterate through each movie and extract the actors. You then go through the actors and add them to your result set, making sure you don't duplicate actors if they play in multiple movies. The manually subquerying test is shown here:
NSMutableDictionary *actorsMap = [NSMutableDictionary dictionary];

request = [[NSFetchRequest alloc] init];

[request setEntity:[NSEntityDescription entityForName:@"Movie"

inManagedObjectContext:context]];

[request setPredicate:[NSPredicate predicateWithFormat:@"(rating < %d) OR (name LIKE %@)", 5, @"*c*or*"]];

NSArray *movies = [context executeFetchRequest:request error:nil];


for (NSManagedObject *movie in movies) {

  NSSet *actorSet = [movie valueForKey:@"actors"];

  for (NSManagedObject *actor in actorSet) {

    [actorsMap setValue:actor forKey:[[[actor objectID] URIRepresentation] description]];

  }

}
In this implementation, the actorsMap dictionary contains all the actors. You keyed them by objectID in order to eliminate duplicates. The alternative to doing this is to use subqueries (please refer to Chapter 6 for more information on building subqueries). In this case, the subquery looks like this:
request = [[NSFetchRequest alloc] init];

[request setEntity:[NSEntityDescription entityForName:@"Actor"

inManagedObjectContext:context]];

[request setPredicate:[NSPredicate predicateWithFormat:@"(SUBQUERY(movies, $x, ($x.rating < %d) OR ($x.name LIKE %@)).@count > 0)", 5, @"*c*or*"]];


NSArray *actors = [context executeFetchRequest:request error:nil];
One of the major differences here is that you let the persistent store do all the work of retrieving the matching actors, which means that most of the results don't have to make it back up to the context layer of Core Data for you to post-process. With the subquery, you don't actually retrieve the movies, and the fetched request is set up to fetch actors directly. The manual option, on the other hand, has to fire faults to retrieve the actors after retrieving the movies.
To demonstrate this in a test, create a new class in your project called SubqueryTest. The header file is shown here:
#import <Foundation/Foundation.h>

#import "PerformanceTest.h"


@interface SubqueryTest : NSObject <PerformanceTest>


@end
The tests are implemented in SubqueryTest.m, like so:
#import <CoreData/CoreData.h>

#import "SubqueryTest.h"


@implementation SubqueryTest


- (NSString *)name {

  return @"Subquery Performance Test";

}


- (NSString *)runWithContext:(NSManagedObjectContext *)context {

  NSMutableString *result = [NSMutableString string];


  NSFetchRequest *request;


  int count = 0;


  [context reset];

  NSDate *startTest1 = [NSDate date];

  NSMutableDictionary *actorsMap = [NSMutableDictionary dictionary];

  request = [[NSFetchRequest alloc] init];

  [request setEntity:[NSEntityDescription entityForName:@"Movie"

inManagedObjectContext:context]];

  [request setPredicate:[NSPredicate predicateWithFormat:@"(rating < %d) OR (name LIKE

%@)", 5, @"*c*or*"]];

  NSArray *movies = [context executeFetchRequest:request error:nil];


  for (NSManagedObject *movie in movies) {

    NSSet *actorSet = [movie valueForKey:@"actors"];

    for (NSManagedObject *actor in actorSet) {

      [actorsMap setValue:actor forKey:[[[actor objectID] URIRepresentation] description]];

    }

  }


  count = [actorsMap count];


  NSDate *endTest1 = [NSDate date];


  NSTimeInterval test1 = [endTest1 timeIntervalSinceDate:startTest1];

  [result appendFormat:@"No subquery: %.2f s
", test1];

  [result appendFormat:@"Actors retrieved: %d
", count];


  [context reset];

  NSDate *startTest2 = [NSDate date];

  request = [[NSFetchRequest alloc] init];

  [request setEntity:[NSEntityDescription entityForName:@"Actor"

inManagedObjectContext:context]];

  [request setPredicate:[NSPredicate predicateWithFormat:@"(SUBQUERY(movies, $x, ($x.rating < %d) OR ($x.name LIKE %@)).@count > 0)", 5, @"*c*or*"]];


  NSArray *actors = [context executeFetchRequest:request error:nil];

  count = [actors count];
  NSDate *endTest2 = [NSDate date];


  NSTimeInterval test2 = [endTest2 timeIntervalSinceDate:startTest2];

  [result appendFormat:@"Subquery: %.2f s
", test2];

  [result appendFormat:@"Actors retrieved: %d
", count];


  return result;

}


@end
Open PerformanceTuningViewController.m, and add an instance of SubqueryTest to the tests array in order to be able to run the test. The test results—over 80% faster—are unequivocal.
No subquery: 0.74 s

Actors retrieved: 200

Subquery: 0.13 s

Actors retrieved: 200
How you write your predicates can have a profound effect on the performance of your application. You should always be mindful of what you are asking Core Data to do and how you can accomplish the same results with more efficient predicates.
Analyzing Performance
Although thinking things through before writing code and understanding the implications of things such as faulting, prefetching, and memory usage usually nets you solid code that performs well, you often need a nonbiased, objective opinion on how your application is performing. The least biased and most objective opinion on your application's performance comes from the computer it's running on, so asking your computer to measure the results of your application's Core Data interaction provides essential insight for optimizing performance.
Apple provides a tool called Instruments that allows you to measure several facets of an application, including Core Data–related items. This section shows how to use Instruments to measure the Core Data aspects of your application. We encourage you to explore the other measurements Instruments offers.
Launching Instruments
Although you can launch Instruments as you would any other application, Xcode provides a simpler way to launch it to run your application. From the Xcode menu, select Product ![]()
Profile. This launches Instruments and displays a dialog asking you what you want to profile, as shown in Figure 7–12.
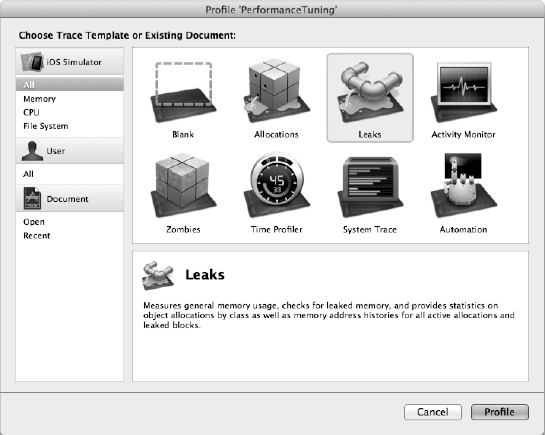
Figure 7–12. Instruments asking you to choose a template
Since Instruments offers no Core Data template for iOS, select the Blank template and click the Profile button. That opens the main Instruments window with a message asking you to drag recording instruments here from the Library, as Figure 7–13 shows.
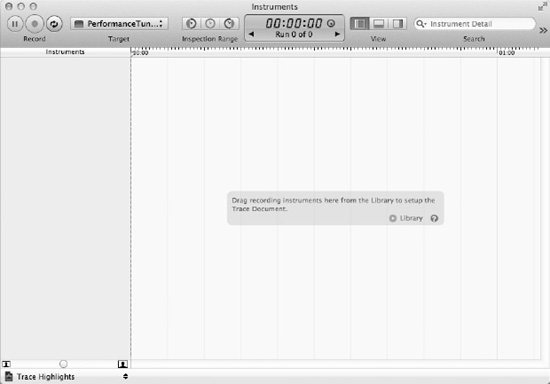
Figure 7–13. The main Instruments window
Click the arrow beside Library to display the library. You'll see four Core Data-related instruments among the palette of recording instruments, as shown in Figure 7–14. Drag all four of these to the left sidebar of the Instruments window so that it resembles Figure 7–15.
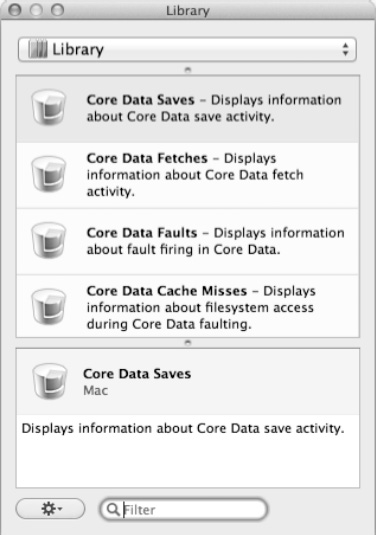
Figure 7–14. The Core Data recording instruments in the instrument library
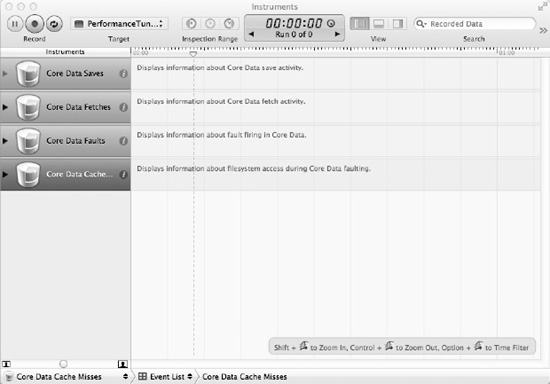
Figure 7–15. The main Instruments window with the Core Data recording instruments
Now that you've configured Instruments to record Core Data interactions, click the Record button at the top left of the Instruments window to launch the iOS Simulator and the PerformanceTuning application.
Understanding the Results
The Instruments window shows the Core Data measurements it's tracking, which include the following:
- Core Data saves
- Core Data fetches
- Core Data faults
- Core Data cache misses
Run any of the tests in the PerformanceTuning application—say, the Pre-fetch Faulting Test—and wait for the test to complete. When the test finishes, click the Stop button in the upper left of Instruments to stop the application and stop recording Core Data measurements. You can then review the results from your test to see information about saves, fetches, faults, and cache misses. You can save the results to the file system for further review by selecting File ![]()
Save As from the menu. You reopen them in Instruments using the standard File ![]()
Open menu item.
Figure 7–16 shows the Instruments window after running the Pre-fetch Faulting Test. You can see the fetch counts and fetch durations, which are in microseconds, for the Core Data fetches (you may have to jiggle the headers a bit to get everything to display). The code ran one fetch request against the Movie entity (Instruments lists the call for a fetch twice: once when the call starts and once when it finishes). The request, which took 450,700 microseconds, fetched 200 movies, which you can tell from the fetch entity, Movie, and the fetch count, 200.
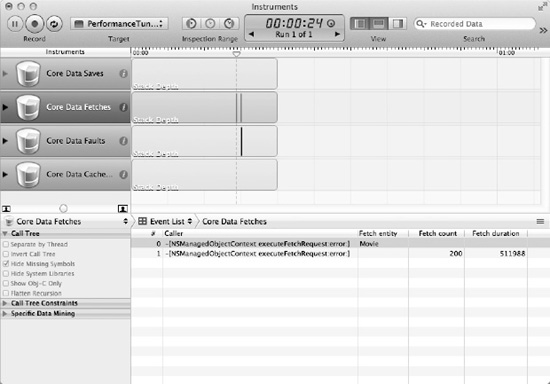
Figure 7–16. Results from the Pre-fetch Faulting Test
You can see the call tree for the fetch request by changing the drop-down in the middle of the window from Event List to Call Tree. You can reduce the navigation depth required to see the calls in your application's code by checking the box next to Hide System Libraries on the left of the window. Figure 7–17 shows the call tree for the fetch request. Using the call tree, you can determine which parts of your code are fetching data from your Core Data store.
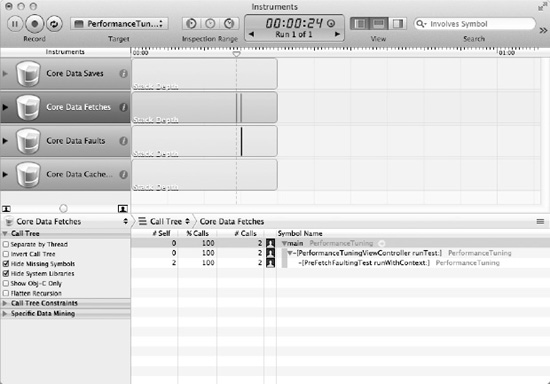
Figure 7–17. The call tree for the fetch request
This is just a taste of what Instruments can do for you to help you determine how your application is using Core Data and how it can lead you to places where Core Data performance is slow enough to warrant optimization efforts.
Summary
From uniquing to faulting to caching managed objects, Core Data performs a significant amount of data access performance optimization for you. These optimizations come free, without any extra effort on your part. You should be aware of the optimizations that Core Data provides, however, so that you make sure to work with, not against, them.
Not all Core Data performance gains come automatically, however. In this chapter, you learned how to use techniques such as prefetching and predicate optimization to squeeze all the performance from Core Data that you can for your applications. You also learned how to analyze your Core Data application using the Instruments application, so you can understand how your application is using Core Data and where the trouble spots are.
Other iOS programming books might do an excellent job showing you how to display a spinner and a “Please Wait” message when running long queries against your persistent store. This book shows you how to avoid the need for the spinner and “Please Wait” message entirely.