
Chapter 3
Storing Data: SQLite and Other Options
Chapter 2 explains the classes that comprise the Core Data framework and the interdependencies and precision with which they work together. The following chapters explain and demonstrate the flexibility of the framework to get the desired results, but the framework flexes only so far. The framework imposes a structure, order, and rigidity for putting data into and taking data out of a persistent store. You must work within that order and structure, doing things the Core Data way, to store and retrieve data reliably. Core Data's shackles fall off, however, when defining what the persistent store looks like or how it works. Though people tend to think that data “belongs” in a database and Apple both provides and defaults to a SQLite database for Core Data's persistent store, you have other options; your data can rest in whatever form you want. For most cases, you'll probably be happy with the default SQLite database, but this chapter discusses other options and where they may be useful.
In this chapter, you will build a simple application with two tables and a one-to-many relationship between them. Imagine you've volunteered to run a youth soccer league, and you're trying to keep track of the teams. In your data model, you have a Team table that tracks the team name and the uniform color and a Player table that tracks the first name, last name, and e-mail address for each player. One team has many players, and each player belongs to only one team. You build this application first for SQLite and then port it to each of the other options for your persistent store: in-memory and atomic (or custom) stores. Follow along, and feel free to store your data in SQLite or any other persistent store you can imagine.
Visualizing the User Interface
The League Manager application contains four screens:
- Team List
- Add/Edit Team
- Player List
- Add/Edit Player
The Team List screen lists all the teams stored in the application along with their jersey colors. It has a + button to add a team and an Edit button to delete a team. The screen looks like Figure 3–1.
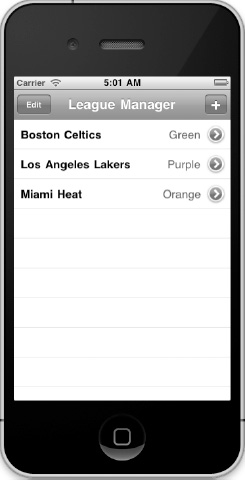
Figure 3–1. The Team List screen
The Add/Edit Team screen offers fields to type a team name and a jersey color. It looks like Figure 3–2. You display it by clicking the + button from the Team List screen to add a new team or by tapping on an existing team to edit the team name and jersey color for an existing team.

Figure 3–2. The Add/Edit Team screen
The Player List screen lists all the players for a particular team. You get to it by tapping the detail disclosure button beside any team. It has a + button for adding a new player and an Edit button for deleting a player, as you can see in Figure 3–3.

Figure 3–3. The Player List screen
Like the Add/Edit Team screen, the Add/Edit Player screen lets users add or edit players, offering the appropriate fields: first name, last name, and e-mail address. It looks like Figure 3–4. You display it by clicking the + button from the Player List screen to add a new player or by tapping on an existing player to edit that player's data.

Figure 3–4. The Add/Edit Player screen
Now that you know what you're building, let's get started.
Using SQLite as the Persistent Store
In this section, you will build the Core Data–based application that you'll use throughout this chapter to demonstrate different persistent store options. You start from Xcode's Core Data template and build upon the generated code to create an application that stores a bunch of teams and a bunch of players and allows users to maintain them. Don't get caught up in the application code or the user interface; instead, focus on the backing persistent store and its many forms.
To begin, launch Xcode, and choose File ![]()
New ![]()
New Project. Select Application under iOS on the left of the ensuing dialog box, and select Master-Detail Application on the right, as shown in Figure 3–5. Click the Next button. For the project options, type League Manager for the Product Name and book.coredata for the Company Identifier, and check the Use Core Data box, as shown in Figure 3–6.

Figure 3–5. Selecting the Master-Detail Application template

Figure 3–6. Naming the project and selecting to use Core Data
Save the project where you normally save projects.
The most interesting part of the League Manager application, at least for current purposes, is the data model. Understanding persistent stores depends on creating and understanding the proper data model, so step through this part carefully and precisely. Open the data model in Xcode by selecting League_Manager.xcdatamodeld. The right side of Xcode displays the generated data model, which has a single entity called Event with a single attribute called timeStamp. Delete the Event entity by selecting it and pressing your Delete key, which should give you an empty data model, as in Figure 3–7.

Figure 3–7. Empty data model
The League Manager data model calls for two entities: one to hold teams and one to hold players. For teams, you track two attributes: name and uniform color. For players, you track three: first name, last name, and e-mail address (so you can contact players about practices, games, and the schedule for orange-slice responsibilities). You also track which players play for a given team, as well as which team a given player plays for. Start by creating the Team entity: click the Add Entity button shown at the bottom of Xcode. (It may be labeled Add Fetch Request or Add Configuration; if so, click and hold to select Add Entity from the menu.) Xcode creates a new entity called Entity with the name conveniently highlighted so you can type Team and press Enter. Now click the Add Attribute button (it may be labeled Add Property or Add Fetched Property; if so, click and hold to select Add Attribute from the menu) and type name to name the new attribute. Note that you can also click the + button at the bottom of the Attributes section to add the attribute. Select String from the Type drop-down. Now create the second attribute, following the same steps, but name the attribute uniformColor, and select the String type. Your data model should look like Figure 3–8.

Before you can create the one-to-many relationship between teams and players, you must have players for teams to relate to. Create another entity called Player with three attributes, all of type String: firstName, lastName, and email. Your data model should now look like Figure 3–9.

Figure 3–9. Team and Player data model
Configuring the One-to-Many Relationship
To create the one-to-many relationship between the Team entity and the Player entity, select the Team entity, and click the + button below the Relationships section. Name this relationship players, and select Player from the Destination drop-down. In the Data Model Inspector view, leave the Optional check box selected. Select the To-Many Relationship check box; one team can have many players. For Delete Rule, select Cascade from the drop-down so that deleting a team deletes all its players. You cannot yet select the inverse relationship in the Inverse drop-down because you haven't created the inverse relationship yet. The Relationship information section should look like Figure 3–10.

Figure 3–10. Players relationship options
Next, create the relationship back from the Player entity to the Team entity by selecting the Player entity, adding a relationship, and calling it team. Select Team from the Destination column and “players” from the Inverse column. Leave the relationship options as the default. You should now be able to select the Team entity and verify that the “players” relationship has an inverse: “team.” Your Xcode window should look like Figure 3–11.

Figure 3–11. The complete League Manager data model
Building the User Interface
With the data model complete, League Manager now requires code to display the data. Xcode generated most of the code necessary to display the list of teams; the next task is to tweak the code, since it's prepared to show Event entities and the Event entity no longer exists in the data model. This code resides in MasterViewController.h and MasterViewController.m, so start by opening the MasterViewController.h file. Notice that it has two members: an NSManagedObjectContext instance and an NSFetchedResultsController instance. You could move the NSManagedObjectContext instance, which you recognize as the object context for your application, to your application's delegate (League_ManagerAppDelegate), but you'll leave it here for this simple application. The NSFetchedResultsController instance works with the table view to show your teams.
You need a method to add a team, so add one called insertTeamWithName: and declare it in MasterViewController.h. Also, the generated code saves the context in a couple of places, so adhere to the Don't Repeat Yourself (DRY) principle and move it all to one method called saveContext:. The code for MasterViewController.h now looks like this, with the new method declarations in bold:
#import <UIKit/UIKit.h>

#import <CoreData/CoreData.h>


@interface MasterViewController : UITableViewController <NSFetchedResultsControllerDelegate>


@property (strong, nonatomic) NSFetchedResultsController *fetchedResultsController;

@property (strong, nonatomic) NSManagedObjectContext *managedObjectContext;


- (void)insertTeamWithName:(NSString *)name uniformColor:(NSString *)uniformColor;

- (void)saveContext;


@end
Open the MasterViewController.m file, and adjust the view title in the initWithNibName:bundle: method that sets the title for the application. That line looks like this:
self.title = NSLocalizedString(@"League Manager", @"League Manager");
Now define the insertTeamWithName: method in MasterViewController.m. That method looks like this:
- (void)insertTeamWithName:(NSString *)name uniformColor:(NSString *)uniformColor {

  // Create a new instance of the entity managed by the fetched results controller.

  NSManagedObjectContext *context = [self.fetchedResultsController managedObjectContext];

  NSEntityDescription *entity = [[self.fetchedResultsController fetchRequest] entity];

  NSManagedObject *newManagedObject = [NSEntityDescription

insertNewObjectForEntityForName:[entity name] inManagedObjectContext:context];


  // Configure the new team

  [newManagedObject setValue:name forKey:@"name"];

  [newManagedObject setValue:uniformColor forKey:@"uniformColor"];


  // Save the context

  [self saveContext];

}
This code gets the managed object context from the application's fetchedResultsController and then inserts a new NSManagedObject instance into that managed object context. Notice that it doesn't specify that the new entity you're trying to insert is named Team. The name gets defined in the accessor for fetchedResultsController. The generated code used the name Event, so find the line in fetchedResultsController that looks like this
NSEntityDescription *entity = [NSEntityDescription entityForName:@"Event"

inManagedObjectContext:self.managedObjectContext];
and change it to this
NSEntityDescription *entity = [NSEntityDescription entityForName:@"Team"

inManagedObjectContext:self.managedObjectContext];
Also, you'll notice another vestige of the generated model in the fetchedResultsController method: a reference to the attribute called timeStamp, used for sorting the fetched results (Chapter 6 discusses sorting and how it works). Change to sort on the team name, ascending, so that this line
NSSortDescriptor *sortDescriptor = [[NSSortDescriptor alloc] initWithKey:@"timeStamp"

ascending:NO];
now looks like this
NSSortDescriptor *sortDescriptor = [[NSSortDescriptor alloc] initWithKey:@"name"

ascending:YES];
After creating the managed object representing the new team, the code in the insertTeamWithName: method sets its name and uniform color using the parameters passed:
[newManagedObject setValue:name forKey:@"name"];

[newManagedObject setValue:uniformColor forKey:@"uniformColor"];
Finally, the insertTeamWithName: method saves the object graph, including the new team, by calling the saveContext: method that you declared but haven't yet defined. You define it by cutting and pasting that bit of code from the now-superfluous insertNewObject: method that Xcode generated. After snipping that bit, delete the insertNewObject: method and define saveContext: like this:
- (void)saveContext {

  NSManagedObjectContext *context = [self.fetchedResultsController

managedObjectContext];

  NSError *error = nil;

  if (![context save:&error]) {

    /*

     Replace this implementation with code to handle the error appropriately.


     abort() causes the application to generate a crash log and terminate. You should

not use this function in a shipping application, although it may be useful during

development. If it is not possible to recover from the error, display an alert panel

that instructs the user to quit the application by pressing the Home button.

     */

    NSLog(@"Unresolved error %@, %@", error, [error userInfo]);

    abort();

  }

}
Leave the generated comment there to remind you that calling abort represents a decidedly un-user-friendly way to handle errors. Chapter 10 talks about appropriate error handling. Since you now have a method that you can reuse to save the context, replace the other instance of that code found in the commitEditingStyle: method, with a call to the new saveContext: method.
Configuring the Table
The table cells are still configured to show Event entities instead of Team entities. You want to show two pieces of information for a team in each table cell: the team's name and its uniform color. To accomplish this, first change the style of the cells created, as well as the CellIdentifier used, in the cellForRowAtIndexPath: method. Change this line
static NSString *CellIdentifier = @"Cell";
to this
static NSString *CellIdentifier = @"TeamCell";
and change the created table cells from style UITableViewCellStyleDefault to style UITableViewCellStyleValue1 so that this line
cell = [[UITableViewCell alloc] initWithStyle:UITableViewCellStyleDefault

reuseIdentifier:CellIdentifier];
looks like this
cell = [[UITableViewCell alloc] initWithStyle:UITableViewCellStyleValue1

reuseIdentifier:CellIdentifier];
The generated code has created a method called configureCell:atIndexPath: that's responsible for, well, configuring the cell. Change that method from configuring for Event entities to configuring for Team entities. You also want to be able to drill down from the team to see its players, so you add a detail disclosure button to each cell. The generated method looks like this:
- (void)configureCell:(UITableViewCell *)cell atIndexPath:(NSIndexPath *)indexPath {

  NSManagedObject *managedObject = [self.fetchedResultsController

objectAtIndexPath:indexPath];

  cell.textLabel.text = [[managedObject valueForKey:@"timeStamp"] description];

}
Change it to look like this:
- (void)configureCell:(UITableViewCell *)cell atIndexPath:(NSIndexPath *)indexPath {

  NSManagedObject *managedObject = [self.fetchedResultsController

objectAtIndexPath:indexPath];

  cell.textLabel.text = [[managedObject valueForKey:@"name"] description];

  cell.detailTextLabel.text = [[managedObject valueForKey:@"uniformColor"] description];

  cell.accessoryType = UITableViewCellAccessoryDetailDisclosureButton;

}
Creating a Team
The application doesn't do much yet. For example, you can't add a team or any players. This is a good time, though, to compile and run the application to make sure you're on track. If the application doesn't build or run at this point, go back and review your data model and your code to make sure it matches the code shown previously before proceeding.
The Master-Detail application template also creates a controller called DetailViewController. You could reuse this class, but since we want to display both team and players details, it is best to get rid of it and name the controllers appropriately. Remove the #import "DetailViewController.h" line at the top of MasterViewController.m. Find the tableView:didSelectRowAtIndexPath: method and empty it as shown below:
- (void)tableView:(UITableView *)tableView didSelectRowAtIndexPath:(NSIndexPath *)indexPath

{

}
You can then safely delete the three DetailViewController files (.h, .m and .xib).
If you run the application and tap the + button to add a team, you notice that the application crashes. The + button is still wired to the insertNewObject: method that you deleted. You need to wire it to a method that will allow you to create a new team. The design for creating a new team calls for a modal window that allows you to enter the name and uniform color for the team. You reuse this modal window for editing an existing team as well, which users can do by tapping the team's cell. Create this modal window by selecting File ![]()
New ![]()
New File from the Xcode menu, and select Cocoa Touch Class under iOS on the left and UIViewController subclass on the right, as Figure 3–12 shows, and click the Next button.

Figure 3–12. Adding a view controller for the new team
Name the class TeamViewController, make it a subclass of UIViewController, and check the “With XIB for user interface” box as Figure 3–13 shows, then click Next.

Figure 3–13. Choosing options for the view controller for the new team
Open the new header file (TeamViewController.h). In League Manager, the MasterViewController class controls the managed object context, so TeamViewController needs a reference to it and an accompanying initializer. Since you can use this controller to edit a team as well as create a new one, you allow calling code to pass a team object to edit, and you store a property for that and add it to the initializer. The user interface has two text fields, one for the team name and one for the uniform color, so TeamViewController needs properties for those fields. The user interface also has two buttons, Save and Cancel, so TeamViewController must have methods to wire to those buttons. Add all that up, and you get the TeamViewController.h shown in Listing 3–1.
Listing 3–1. TeamViewController.h
#import <UIKit/UIKit.h>


@class MasterViewController;


@interface TeamViewController : UIViewController {

  IBOutlet UITextField *name;

  IBOutlet UITextField *uniformColor;

  NSManagedObject *team;

  MasterViewController *masterController;

}

@property (nonatomic, retain) UITextField *name;

@property (nonatomic, retain) UITextField *uniformColor;

@property (nonatomic, retain) NSManagedObject *team;

@property (nonatomic, retain) MasterViewController *masterController;
- (IBAction)save:(id)sender;
- (IBAction)cancel:(id)sender;
- (id)initWithMasterController:(MasterViewController *)aMasterController team:
(NSManagedObject *)aTeam;
@end
Now open TeamViewController.m; import MasterViewController.h; delete the initWithNibName: method; add @synthesize lines for name, uniformColor, team, and masterController. Next, add a definition for the initWithMasterController: method that looks like this:
- (id)initWithMasterController:(MasterViewController *)aMasterController team:
(NSManagedObject *)aTeam {
if ((self = [super init])) {
self.masterController = aMasterController;
self.team = aTeam;
}
return self;
}
In the case in which users add a new team, the aTeam parameter will be nil, and the TeamViewController.m will own the responsibility to create it. In the case in which users edit an existing team, however, you must take the existing team's attribute values and put them into the appropriate text fields. Do that in the viewDidLoad: method, like this:
- (void)viewDidLoad {

  [super viewDidLoad];

  if (team != nil) {

    name.text = [team valueForKey:@"name"];

    uniformColor.text = [team valueForKey:@"uniformColor"];

  }

}
Finally, implement the save: and cancel: methods so that this controller can respond appropriately to when the user taps the Save or Cancel buttons. The save: method checks for a non-nil masterController instance and then determines whether to create a new team or edit an existing team by checking whether its team member is nil. If it's not nil, it updates the values for the existing team and asks the masterController member to save its context. If it is nil, it asks the MasterViewController instance to create a new team in the managed object context, passing the user-entered values for team name and uniform color. Finally, it dismisses itself. The method implementation looks like this:
- (IBAction)save:(id)sender {

  if (masterController != nil) {

    if (team != nil) {

      [team setValue:name.text forKey:@"name"];

      [team setValue:uniformColor.text forKey:@"uniformColor"];

      [masterController saveContext];

    } else {

      [masterController insertTeamWithName:name.text uniformColor:uniformColor.text];

    }

  }
[self dismissModalViewControllerAnimated:YES];
}
The cancel: method simply dismisses itself. The entire file should look like Listing 3–2.
Listing 3–2. TeamViewController.m
#import "TeamViewController.h"
#import "MasterViewController.h"
@implementation TeamViewController
@synthesize name;
@synthesize uniformColor;
@synthesize team;
@synthesize masterController;
- (id)initWithMasterController:(MasterViewController *)aMasterController team:
(NSManagedObject *)aTeam {
if ((self = [super init])) {
self.masterController = aMasterController;
self.team = aTeam;
}
return self;
}
- (void)didReceiveMemoryWarning {
[super didReceiveMemoryWarning];
}
#pragma mark - View lifecycle
- (void)viewDidLoad {
[super viewDidLoad];
if (team != nil) {
name.text = [team valueForKey:@"name"];
uniformColor.text = [team valueForKey:@"uniformColor"];
}
}
- (void)viewDidUnload {
[super viewDidUnload];
}
- (BOOL)shouldAutorotateToInterfaceOrientation:(UIInterfaceOrientation)interfaceOrientation {
return (interfaceOrientation == UIInterfaceOrientationPortrait);
}
#pragma mark - Button handlers
- (IBAction)save:(id)sender {
if (masterController != nil) {
if (team != nil) {
[team setValue:name.text forKey:@"name"]; [team setValue:uniformColor.text forKey:@"uniformColor"];
[masterController saveContext];
} else {
[masterController insertTeamWithName:name.text uniformColor:uniformColor.text];
}
}
  [self dismissModalViewControllerAnimated:YES];

}
- (IBAction)cancel:(id)sender {
[self dismissModalViewControllerAnimated:YES];
}
@end
With the code written to support the user interface, you're ready to build the labels, text fields, and buttons the users will interact with to create teams. Open TeamViewController.xib in Xcode. You should see a blank view. Drag two Label instances onto the view, and change them to read Team Name: and Uniform Color:. Drag two Text Field instances onto the view, and align them to the right of the Labels. Drag two Round Rect Button instances below the Label and Text Field controls, and change the labels on them to Save and Cancel. Your view should look like Figure 3–14.

Figure 3–14. Updated team view
Bind the Text Field instances to the appropriate TeamViewController members, name and uniformColor, by Ctrl+dragging from the File's Owner icon to the respective Text Field instances and selecting name or uniformColor from the pop-up menu as appropriate. Wire the buttons to the save: and cancel: methods by Ctrl+dragging from each button, in turn, to the File's Owner icon and selecting the appropriate method from the pop-up menu.
Before building and running the application, you must go back to MasterViewController and include code to display the team interface you just built. You display it in two scenarios: when users tap the + button to create a new team and when they tap the team in the table to edit it. Start by creating the method to respond to the + button tap. Declare a method called showTeamView: in MasterViewController.h:, like so:
- (void)showTeamView;
Go to MasterViewController.m, import TeamViewController.h, and add the definition for the showTeamView: method. This method creates a TeamViewController instance, initializing it with the MasterViewController instance and a nil team, so that the TeamViewController knows to create a new team if the user taps Save. The method should look like this:
- (void)showTeamView {

  TeamViewController *teamViewController = [[TeamViewController alloc]

initWithMasterController:self team:nil];

  [self presentModalViewController:teamViewController animated:YES];

}
Now you need to wire the + button to call this method. Go to the viewDidLoad: method, and change this line
UIBarButtonItem *addButton = [[UIBarButtonItem alloc] initWithBarButtonSystemItem:UIBarButtonSystemItemAdd target:self

action:@selector(insertNewObject)];
to this
UIBarButtonItem *addButton = [[UIBarButtonItem alloc] initWithBarButtonSystemItem:UIBarButtonSystemItemAdd target:self

action:@selector(showTeamView)];
The application should now be able to add teams, but before testing that, add the code to edit teams. This code should determine the tapped team by asking the fetchedResultsController which team was tapped, which it will determine using the indexPath passed to the didSelectRowAtIndexPath: method. This code then creates a TeamViewController instance and initializes it with the MasterViewController and the tapped team. Find the didSelectRowAtIndexPath: method, and add the code to edit the tapped team, like this:
- (void)tableView:(UITableView *)tableView didSelectRowAtIndexPath:(NSIndexPath *)indexPath {

  NSManagedObject *team = [[self fetchedResultsController] objectAtIndexPath:indexPath];

  TeamViewController *teamViewController = [[TeamViewController alloc]

initWithMasterController:self team:team];

  [self presentModalViewController:teamViewController animated:YES];

}
Build the application and run it. The application looks like it did the last time you ran it, as Figure 3–15 shows.

Figure 3–15. League Manager without any teams
Now, however, if you tap the + button, you see the screen to create a new team, as Figure 3–16 shows.
Go ahead and add a few teams, edit some teams, and delete some teams. You can close and relaunch the application, and you'll find the teams as they were when you quit the application—they're all being added to your SQLite data store. You will notice that the teams are sorted alphabetically by team name. Figure 3–17 shows some sample teams, with name and uniform color.
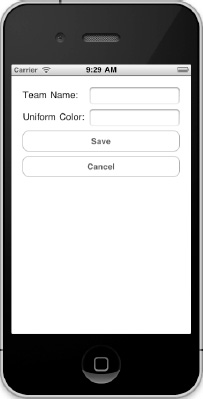
Figure 3–16. Adding a new team to League Manager

Figure 3–17. League Manager with teams
You might notice that you can create teams with blank names and uniform colors. If this were a real application, you would take steps to prevent users from creating teams with no name and perhaps with no uniform color. This chapter remains focused on the different persistent store options, however, so you've purposely left out any validation code. You'll notice that the player user interface created later in this chapter has no validation code either, so you can create blank players. Chapter 5 talks about how to validate data.
Quit the application and enjoy what you've accomplished thus far… and then realize that you've covered only the Team entity. You must still implement the Player user interface and entity to call the League Manager application complete!
The Player User Interface
To implement the Player user interface, you must have two views and their accompanying controllers: one to list the players for a team and one to add a new or edit an existing player. These controllers largely mirror the ones for Team, although they don't contain an NSFetchedResultsController or the rest of the Core Data classes that MasterViewController does. Instead, they delegate the Core Data interaction to MasterViewController.
Create the controller and view to list players for a team first. Add a new UIViewController subclass, making sure to select UITableViewController in the “Subclass of” drop-down and deselect “With XIB for user interface.” Call it PlayerListViewController, and then turn your attention to the file PlayerListViewController.h. This class lists players for a team, so it needs a reference to Team entity for which it manages players. Also, since it defers Core Data interaction to the MasterViewController class, it requires a reference to the MasterViewController. This controller will have a + button for adding a new player, so declare a method to respond to taps on that button called showPlayerView:. Finally, since it doesn't use an NSFetchedResultsController instance to sort the players, it must implement sorting for the players. To accomplish all this, you end up with a PlayerListViewController.h file that looks like Listing 3–3.
Listing 3–3. PlayerListViewController.h
#import <UIKit/UIKit.h>


@class MasterViewController;


@interface PlayerListViewController : UITableViewController {

  NSManagedObject *team;

  MasterViewController *masterController;

}

@property (nonatomic, retain) NSManagedObject *team;

@property (nonatomic, retain) MasterViewController *masterController;


- (id)initWithMasterController:(MasterViewController *)aMasterController team:

(NSManagedObject *)aTeam;

- (void)showPlayerView;
- (NSArray *)sortPlayers;
@end
You'll recognize pieces of MasterViewController.m in the PlayerListViewController.m file. Open the file, add an import for MasterViewController.h, and @synthesize lines for the team and masterController properties. Change the generated initWithStyle: method to an initWithMasterController: method that accepts those two properties and stores them that looks like this:
- (id)initWithMasterController:(MasterViewController *)aMasterController team:

(NSManagedObject *)aTeam {

  if ((self = [super init])) {

    self.masterController = aMasterController;

    self.team = aTeam;

  }

  return self;

}
Xcode generated a viewDidLoad: method for you. Add the following code to update the view title appropriately and to display a + button to add a player to the team. Since you haven't yet begun building the user interface for adding or editing a player, wire the + to a new method called showPlayerView: that you leave blank for now. Those two methods look like this:
- (void)viewDidLoad {

  [super viewDidLoad];


  self.title = @"Players";


  UIBarButtonItem *addButton = [[UIBarButtonItem alloc]

initWithBarButtonSystemItem:UIBarButtonSystemItemAdd target:self

action:@selector(showPlayerView)];

  self.navigationItem.rightBarButtonItem = addButton;

}


- (void)showPlayerView {

}
In the viewWillAppear: method, instruct the controller's table view to reload its data, like this:
- (void)viewWillAppear:(BOOL)animated {

  [super viewWillAppear:animated];

  [self.tableView reloadData];

}
If you want the table view to reload its data, you must tell the table view what data to load and display. The player list will display all the players for a team, sorted alphabetically, in a single section. To get the players for a team, call the team's valueForKey:@"players" method, which uses the “players” relationship from the data model to pull all the Player entities from the SQLite persistent store and returns them as an NSSet. The code to set up the single section and the number of rows for the table looks like this:
- (NSInteger)numberOfSectionsInTableView:(UITableView *)tableView {

  return 1;

}


- (NSInteger)tableView:(UITableView *)tableView numberOfRowsInSection:(NSInteger)section {

  return [(NSSet *)[team valueForKey:@"players"] count];

}
For the table cells, again use the UITableViewCellStyleValue1 to display text on the left (the first and last names of the player) and text on the right (the e-mail address). Change the generated cellForRowAtIndexPath: to look like this:
- (UITableViewCell *)tableView:(UITableView *)tableView

cellForRowAtIndexPath:(NSIndexPath *)indexPath {

  static NSString *CellIdentifier = @"PlayerCell";


  UITableViewCell *cell = [tableView dequeueReusableCellWithIdentifier:CellIdentifier];

  if (cell == nil) {

    cell = [[UITableViewCell alloc] initWithStyle:UITableViewCellStyleValue1

reuseIdentifier:CellIdentifier];

  }


  NSManagedObject *player = [[self sortPlayers] objectAtIndex:indexPath.row];

  cell.textLabel.text = [NSString stringWithFormat:@"%@ %@", [[player

valueForKey:@"firstName"] description], [[player valueForKey:@"lastName"] description]];

  cell.detailTextLabel.text = [[player valueForKey:@"email"] description];

  return cell;

}
Here you see a call to sortPlayers:. Recall that the “players” relationship on the “team” instance returns an NSSet, which not only has no sorting but also isn't indexable, because it has no deterministic order. The cellForRowAtIndexPath: method demands a cell for a specific index into the backing data, so no NSSet method can perform the task you need here: to return the appropriate cell for the table at this index path. Instead, you convert the NSSet to an NSArray sorted by players' last names using this sortPlayers: method, like so:
- (NSArray *)sortPlayers {

  NSSortDescriptor *sortLastNameDescriptor = [[NSSortDescriptor alloc]

initWithKey:@"lastName" ascending:YES];

  NSArray *sortDescriptors = [NSArray arrayWithObjects:sortLastNameDescriptor, nil];

  return [[(NSSet *)[team valueForKey:@"players"] allObjects]

sortedArrayUsingDescriptors:sortDescriptors];

}
To display the player list view for a team, go back to MasterViewController.m, and add a method to respond to taps on the detail disclosure buttons for teams. The method to implement is called accessoryButtonTappedForRowWithIndexPath:, and in this method you retrieve the tapped team from the fetched results controller, create a PlayerListViewController instance, initialize it with the master view controller and the tapped team, and show the controller. The code looks like this:
- (void)tableView:(UITableView *)tableView

accessoryButtonTappedForRowWithIndexPath:(NSIndexPath *)indexPath {
NSManagedObject *team = [self.fetchedResultsController objectAtIndexPath:indexPath];
PlayerListViewController *playerListViewController = [[PlayerListViewController
alloc] initWithMasterController:self team:team];
[self.navigationController pushViewController:playerListViewController animated:YES];
}
Add an import for PlayerListViewController.h to the top of MasterViewController.m, and you're ready to build and launch League Manager anew. You should see the teams you created before, but now when you tap the detail disclosure button for a team, you move to the Players list view, as in Figure 3–18. Since you as yet have no way to add players, the list is blank, and the + button does nothing.

Figure 3–18. Team with no players
Adding, Editing, and Deleting Players
The League Manager application is nearly complete; it lacks means only for adding, editing, and deleting players. To accomplish these tasks, create a new UIViewController subclass, select UIViewController in the “Subclass of” dropdown, and select “With XIB for user interface.” Call this controller PlayerViewController. It looks similar to the TeamViewController class and interface but has three fields: firstName, lastName, and email. It also has a reference to the MasterViewController instance so it can defer all Core Data storage and retrieval to that class. It has a member for the team this player belongs to, and it also has a reference to the player. If the player is nil, PlayerViewController knows to create a new player. Otherwise, it knows to edit the existing player object. The user interface has three buttons: one to save the player, one to cancel the operation (add or edit), and one to delete the player. Because you want to display a confirmation action sheet before actually deleting a player, you make PlayerViewController implement the UIActionSheetDelegate protocol. See Listing 3–4 for what PlayerViewController.h should look like.
Listing 3–4. PlayerViewController.h
#import <UIKit/UIKit.h>


@class MasterViewController;


@interface PlayerViewController : UIViewController <UIActionSheetDelegate> {

  IBOutlet UITextField *firstName;

  IBOutlet UITextField *lastName;

  IBOutlet UITextField *email;

  NSManagedObject *team;

  NSManagedObject *player;

  MasterViewController *masterController;

}

@property (nonatomic, retain) UITextField *firstName;

@property (nonatomic, retain) UITextField *lastName;

@property (nonatomic, retain) UITextField *email;

@property (nonatomic, retain) NSManagedObject *team;

@property (nonatomic, retain) NSManagedObject *player;

@property (nonatomic, retain) MasterViewController *masterController;


- (IBAction)save:(id)sender;

- (IBAction)cancel:(id)sender;

- (IBAction)confirmDelete:(id)sender;

- (id)initWithMasterController:(MasterViewController *)aMasterController team:

(NSManagedObject *)aTeam player:(NSManagedObject *)aPlayer;


@end
Now, open the PlayerViewController.m file, import MasterViewController.h, and add @synthesize lines for the various properties. Add the initWithMasterController: method declared in PlayerViewController.h to initialize this view controller with a MasterViewController instance, a team, and a possibly-nil player. That method looks like this:
- (id)initWithMasterController:(MasterViewController *)aMasterController team:

(NSManagedObject *)aTeam player:(NSManagedObject *)aPlayer {

  if ((self = [super init])) {

    self.masterController = aMasterController;

    self.team = aTeam;

    self.player = aPlayer;

  }

  return self;

}
Use the viewDidLoad: method to take the values from the player managed object, if non-nil, and put them in the firstName, lastName, and email fields. That method looks like this:
- (void)viewDidLoad {

  [super viewDidLoad];

  if (player != nil) {

    firstName.text = [player valueForKey:@"firstName"];

    lastName.text = [player valueForKey:@"lastName"];

    email.text = [player valueForKey:@"email"];

  }

}
Your next step is to add methods to respond to the three buttons. The save: and cancel: methods mirror the ones created for the TeamViewController class; they look like this:
- (IBAction)save:(id)sender {

  if (masterController != nil) {

    if (player != nil) {

      [player setValue:firstName.text forKey:@"firstName"];

      [player setValue:lastName.text forKey:@"lastName"];

      [player setValue:email.text forKey:@"email"];

      [masterController saveContext];

    } else {

      [masterController insertPlayerWithTeam:team firstName:firstName.text

lastName:lastName.text email:email.text];

    }

  }

  [self dismissModalViewControllerAnimated:YES];

}


- (IBAction)cancel:(id)sender {

  [self dismissModalViewControllerAnimated:YES];

}
The insertPlayerWithTeam: method in MasterViewController doesn't yet exist, so you'll create that in a moment. First, though, implement the confirmDelete: method for the Delete button in the user interface to call. This method doesn't delete the player right away but instead presents an action sheet requesting users to confirm their intentions. The implementation here first checks whether the player is not nil. In other words, you can delete only existing players. You really should show the Delete button only when editing a player, but in the interest of maintaining focus on Core Data, keep things simple and ignore Delete button presses when adding a player. The confirmDelete: method looks like this:
- (IBAction)confirmDelete:(id)sender {

  if (player != nil) {

    UIActionSheet *confirm = [[UIActionSheet alloc] initWithTitle:nil delegate:self

cancelButtonTitle:@"Cancel" destructiveButtonTitle:@"Delete Player"

otherButtonTitles:nil];

    confirm.actionSheetStyle = UIActionSheetStyleBlackTranslucent;

    [confirm showInView:self.view];

  }

  }
Note that you pass self as the delegate to the UIActionSheet's initialization method. The Cocoa framework will call the clickedButtonAtIndex: method of the delegate you pass, so implement that method. It checks to see whether the clicked button was the Delete button and then asks the master view controller to delete the player using a method, deletePlayer:, that you must create in MasterViewController. The clickedButtonAtIndex: method looks like this:
- (void)actionSheet:(UIActionSheet *)actionSheet

clickedButtonAtIndex:(NSInteger)buttonIndex {

  if (buttonIndex == 0 && masterController != nil) {

    // The Delete button was clicked

    [masterController deletePlayer:player];

    [self dismissModalViewControllerAnimated:YES];

  }

}
Now, move back to MasterViewController.h and declare the two methods, insertPlayerWithTeam: and deletePlayer:, that PlayerViewController calls. Those declarations look like this:
- (void)insertPlayerWithTeam:(NSManagedObject *)team firstName:(NSString *)firstName

lastName:(NSString *)lastName email:(NSString *)email;

- (void)deletePlayer:(NSManagedObject *)player;
Open MasterViewController.m, and define those two methods. The insertPlayerWithTeam: method looks similar to the insertTeamWithName: method, with some important differences. The insertTeamWithName: method takes advantage of the fetched results controller and its tie to Team entities, while Player entities have no tie to the fetched results controller. The insertPlayerWithTeam: method, then, creates a Player entity by explicitly passing the Player name to the insertNewObjectForEntityForName: method. It also must create the relationship to the appropriate Team entity by setting it as the value for the “team” key, which is what the relationship is called in the data model. The insertPlayerWithTeam: method looks like this:
- (void)insertPlayerWithTeam:(NSManagedObject *)team firstName:(NSString *)firstName lastName:(NSString *)lastName email:(NSString *)email {

  // Create the player

  NSManagedObjectContext *context = [self.fetchedResultsController

managedObjectContext];

  NSManagedObject *player = [NSEntityDescription

insertNewObjectForEntityForName:@"Player" inManagedObjectContext:context];

  [player setValue:firstName forKey:@"firstName"];

  [player setValue:lastName forKey:@"lastName"];

  [player setValue:email forKey:@"email"];

  [player setValue:team forKey:@"team"];


  // Save the context.

  [self saveContext];

}
The deletePlayer: method simply retrieves the managed object context, calls its deleteObject: method, passing in the Player managed object, and saves the managed object context. It looks like this:
- (void)deletePlayer:(NSManagedObject *)player {

  NSManagedObjectContext *context = [self.fetchedResultsController

managedObjectContext];

  [context deleteObject:player];

  [self saveContext];

}
The final step is to create the user interface and display it when users want to add or edit a player. Select PlayerViewController.xib, select the View icon, and drag three Label instances and three Text Field instances onto the view. Call the labels First Name:, Last Name:, and E-mail:. Connect the text fields to the appropriate properties. Drag three Round Rect Button instances to the view and call them Save, Cancel, and Delete, and wire them to the appropriate methods. Your view should look the one in Figure 3–19.

Figure 3–19. Player view
To display the Player view when users summon it, go to PlayerListViewController.m, import PlayerViewController.h, and find the empty showPlayerView: method you created earlier. In that method, you create a PlayerViewController instance; initialize it with the master view controller, the team, and a nil player so that the application will create a new player; and then show the view as a modal window. The code looks like this:
- (void)showPlayerView {

  PlayerViewController *playerViewController = [[PlayerViewController alloc]

initWithMasterController:masterController team:team player:nil];

  [self presentModalViewController:playerViewController animated:YES];

}
You also must make the application respond to taps on a player's cell so that users can edit or delete the selected player. Find the generated didSelectRowAtIndexPath: method, still in PlayerListViewController.m, and gut it. Replace its contents with code to get the tapped player from the sorted players array, create the player view controller, initialize it as before but this time with the selected player, and show the view. The method now looks like this:
- (void)tableView:(UITableView *)tableView didSelectRowAtIndexPath:(NSIndexPath *)indexPath {

  NSManagedObject *player = [[self sortPlayers] objectAtIndex:indexPath.row];

  PlayerViewController *playerViewController = [[PlayerViewController alloc] initWithMasterController:masterController team:team player:player];

  [self presentModalViewController:playerViewController animated:YES];

}
That finishes the League Manager application. Build and run it. Any teams you've added should still be shown, thanks to the SQLite persistent store. Drill down into the teams and add some players, delete some players, and edit some players. Try deleting teams as well, and watch the players disappear.
Seeing the Data in the Persistent Store
Chapter 2 shows how to use the sqlite3 command-line tool to browse the data in the SQLite Core Data persistent store. To finish the section on SQLite persistent stores, find your SQLite database (League_Manager.sqlite3), and launch sqlite3, passing the database, with a command like this:
sqlite3 ./5.0/Applications/CE79C20B-4CBF-47C3–9E7C-

9EC24FA22488/Documents/League_Manager.sqlite
Keep the League Manager application running in the iPhone Simulator so that you can bounce between the application and sqlite3 tool to see the effects on the database.
Start by showing the tables using the .tables command. Your output should look like this:
The ZPLAYER table holds the Player entities, and the ZTEAM table holds the Team entities. Create the three teams: Crew, with Blue uniforms; Fire, with Red uniforms, and Revolution, with Green uniforms. In the SQLite database, they look something like this, depending on how many teams you've created and deleted:
sqlite> select * from ZTEAM;

1|2|3|Crew|Blue

2|2|1|Fire|Red

3|2|1|Revolution|Green
The League Manager application has no players, as a quick check in the database shows:
sqlite> select * from ZPLAYER;
Drill into the Crew team and add three players: Jordan Gordon, Pat Sprat, and Bailey Staley. Refer to Figure 3–20 to see how to enter a player. After adding the three players, you should see them all in a list on the Players screen, as in Figure 3–21.

Figure 3–20 Adding a player

Rerun the select command on the ZPLAYER table. The output should look something like this:
sqlite> select * from ZPLAYER;

1|1|1|1|Jordan|Gordan|[email protected]

2|1|1|1|Pat|Sprat|[email protected]

3|1|1|1|Bailey|Staley|[email protected]
Now add another player, but this time to the Fire team. Call this player Terry Gary. Now, run a command to show each team with the players on it, like this:
sqlite> select ZTEAM.ZNAME, ZPLAYER.ZFIRSTNAME, ZPLAYER.ZLASTNAME from ZTEAM, ZPLAYER where ZTEAM.Z_PK = ZPLAYER.ZTEAM;

Crew|Jordan|Gordon

Crew|Pat|Sprat

Crew|Bailey|Staley

Fire|Terry|Gary
Now, delete Pat Sprat and rerun the same SQLite command. You should see output like this:
sqlite> select ZTEAM.ZNAME, ZPLAYER.ZFIRSTNAME, ZPLAYER.ZLASTNAME from ZTEAM, ZPLAYER

where ZTEAM.Z_PK = ZPLAYER.ZTEAM;
Crew|Jordan|Gordon
Crew|Bailey|Staley
Fire|Terry|Gary
Finally, delete the Fire team, and verify that not only has the Fire team been deleted, but also its only player, Terry Gary:
sqlite> select ZTEAM.ZNAME, ZPLAYER.ZFIRSTNAME, ZPLAYER.ZLASTNAME from ZTEAM, ZPLAYER

where ZTEAM.Z_PK = ZPLAYER.ZTEAM;

Crew|Jordan|Gordon

Crew|Bailey|Staley
The SQLite database proves to work in ways you understand. Feel free, as you're developing iOS applications, to peek into the SQLite database to gain a better understanding and appreciation for how Core Data works. Most of your data-backed applications will likely use SQLite databases, so understanding how they work with Core Data can help with troubleshooting issues or optimizing performance.
Using an In-Memory Persistent Store
In the previous section, you built a Core Data–based application that uses the default SQLite persistent store type. This section deals with an alternate type: the in-memory persistent store. Let's take a look at how to switch the store type before elaborating on why you would ever want to use this type of store.
Changing the store type Core Data uses for your application is as simple as specifying the new type when creating the persistent store coordinator in the application delegate. The code for the persistentStoreCoordinator: method in League_ManagerAppDelegate.m now looks like that in Listing 3–5, with the updated code in bold.
Listing 3–5. The persistentStoreCoordinator: Method in League_ManagerAppDelegate.m
- (NSPersistentStoreCoordinator *)persistentStoreCoordinator {

  if (__persistentStoreCoordinator != nil) {

    return __persistentStoreCoordinator;

  }


//  NSURL *storeURL = [[self applicationDocumentsDirectory] URLByAppendingPathComponent:@"League_Manager.sqlite"];


  NSError *error = nil;

  __persistentStoreCoordinator = [[NSPersistentStoreCoordinator alloc] initWithManagedObjectModel:[self managedObjectModel]];

  if (![__persistentStoreCoordinator addPersistentStoreWithType:NSInMemoryStoreType configuration:nil URL:nil options:nil error:&error]) {

    NSLog(@"Unresolved error %@, %@", error, [error userInfo]);

    abort();

  }


  return __persistentStoreCoordinator;

}
The data store has been switched to in-memory. The first thing to notice after launching the application again is that any data you previously had in your data store is gone. This happened because you switched the data store and didn't try to migrate the data from the old store to the new one. Chapter 8 explains how to migrate data between two persistent stores.
The life cycle of the in-memory data store starts when the Core Data stack is initialized and ends when the application stops.
NOTE: Since iOS4 and the introduction of multitasking to the iDevices, switching to another application does not necessarily terminate the currently running application. Instead, it goes into the background. The in-memory persistent store survives when an application is sent to the background so that the data is still around when the application comes back to the foreground.
When working on a data management framework and thinking about the different types of persistent stores that it should provide by default, an in-memory store isn't the first idea that comes to mind. Trying to come up with a good reason to use an in-memory store can be a challenge, but some legitimate reasons exist. For example, local caching of remote data can benefit from in-memory persistent stores. Consider a case in which your application is fed data from a remote server. If your application executes a lot of queries, good software engineering practices would prescribe the use of efficient data transfer. The remote server may transfer the data in compressed packages to your client application, which can then uncompress that data and store it in an in-memory store so that it can be efficiently queried. In this situation, you would want the data to be refreshed every time the application starts, or even periodically while the application runs, so losing the in-memory data store would be acceptable.
Figure 3–22 illustrates the start-up sequence of an application that caches remote information locally in an in-memory store.

Figure 3–22. Caching remote information locally
As you develop your Core Data–backed iOS applications, consider using in-memory data stores when applications don't require data persistence across invocations. Traditional applications, however, that require that users' data doesn't disappear simply because the application stopped running can't use this persistent store type.
Creating Your Own Custom Persistent Store
The principle of abstracting the persistent store implementation from the user forms the basis for the Core Data framework. This abstraction makes it possible to change the persistent store type among the different default types (NSSQLiteStoreType, NSInMemoryStoreType, NSBinaryStoreType) without changing more than a line of your code. In some cases, the default store types don't best accomplish what you are trying to achieve. The Core Data framework offers a hook for creating custom store types for these special cases. In this section, you create a new store type and use it with the League Manager application.
Before getting into the implementation itself, you should be aware that Core Data only allows you to create atomic store types. An atomic store is a store that writes its entire content all at once every time a save operation is executed. This effectively excludes the ability to create SQL-based store types that could be backed by a database other than SQLite where only the rows of data that are modified are affected in the database. In this section, you build a file-based custom store that will store its data in a comma-separated values (CSV) file except that you will use the pipe (|) symbol to separate values.
Custom data stores must extend the NSAtomicStore class (a subclass of NSPersistentStore) that provides the infrastructure necessary to hold the data. To get a better idea of how this works, picture two internal layers inside the Core Data framework, as shown in Figure 3–23. Users interact with the layer that contains NSManagedObjects and NSManagedObjectContext. The other layer performs the actual persistence and contains the persistent store coordinator and the persistent stores. In the case of custom stores, the persistence layer also contains NSAtomicStoreCacheNode, which contains objects that hold the data within this layer. The NSAtomicStoreCacheNode object is to the NSAtomicStore what the NSManagedObject is to the NSManagedObjectContext.

Figure 3–23. Two layers inside Core Data
Initializing the Custom Store
A new custom store is responsible for transferring data between the storage device and the NSAtomicStoreCacheNodes as well as transferring data between the NSManagedObjects and the NSAtomicStoreCacheNodes.
The first step to create a custom store is to add a class (or classes) to implement it. The custom store this section builds lives in one class called CustomStore. Use Xcode to add a new Objective-C class called CustomStore to the League Manager application, specifying that it's a subclass of NSAtomicStore. CustomStore.h starts out trivial: it extends NSAtomicStore as expected, as Listing 3–6 shows.
Listing 3–6. CustomStore.h
#import <Foundation/Foundation.h>


@interface CustomStore : NSAtomicStore {

}


@end
The implementation class, which starts out blank, must implement a few methods. It has accessors for its type and identifier, explained later in this section. It has an initializer that takes a persistent store coordinator and some other parameters. It also has a few other methods stubbed out that you'll implement as this section unfolds. See Listing 3–7.
Listing 3–7. CustomStore.m
#import "CustomStore.h"


@implementation CustomStore


#pragma mark - NSPersistentStore


- (NSString *)type {

  return [[self metadata] objectForKey:NSStoreTypeKey];

}


- (NSString *)identifier {

  return [[self metadata] objectForKey:NSStoreUUIDKey];

}


- (id)initWithPersistentStoreCoordinator:(NSPersistentStoreCoordinator *)coordinator

configurationName:(NSString *)configurationName URL:(NSURL *)url options:(NSDictionary

*)options {

    self = [super initWithPersistentStoreCoordinator:coordinator

configurationName:configurationName URL:url options:options];


  return self;

}


+ (NSDictionary *)metadataForPersistentStoreWithURL:(NSURL *)url error:(NSError **)error {

  return nil;

}


#pragma mark - NSAtomicStore


- (BOOL)load:(NSError **)error {

  return YES;

}
- (id)newReferenceObjectForManagedObject:(NSManagedObject *)managedObject {
return nil;
}
- (NSAtomicStoreCacheNode *)newCacheNodeForManagedObject:(NSManagedObject
*)managedObject {
return nil;
}
- (BOOL)save:(NSError **)error {
return YES;
}
-(void)updateCacheNode:(NSAtomicStoreCacheNode *)node fromManagedObject:
(NSManagedObject *)managedObject {
}
@end
All Core Data stores have supporting metadata that help the persistent store coordinator manage the different stores. The metadata is materialized in the NSPersistentStore class as an NSDictionary. Two data elements are of particular interest to a new data store: NSStoreTypeKey and NSStoreUUIDKey. The NSStoreTypeKey value must be a string that uniquely identifies the data store type, while the NSStoreUUIDKey must be a string that uniquely identifies the data store itself. To create unique identifiers, add a static utility method that creates and returns universally unique identifiers (UUIDs):
+ (NSString *)makeUUID {

  CFUUIDRef uuidRef = CFUUIDCreate(NULL);

  CFStringRef uuidStringRef = CFUUIDCreateString(NULL, uuidRef);

  CFRelease(uuidRef);

  NSString* uuid = [NSString stringWithString:( __bridge NSString *)uuidStringRef];

  CFRelease(uuidStringRef);

  return uuid;

}
In this chapter's example, two data files support the custom store. The first file, which has a .txt extension, contains the data itself, and the second file, which has a .plist extension, contains the metadata. For the problem of loading and saving the metadata, you will add a method to save the metadata and complete the implementation of metadataForPersistentStoreWithURL:error: to load the metadata.
Data stores are initialized relative to a base URL. In the CustomStore example, the URL points to the data file (the .txt file), and the metadata file URL is derived from the base URL by swapping the .txt extension for a .plist extension.
The writeMetadata:toURL: method takes the metadata NSDictionary and writes it to a file, like so:
+ (void)writeMetadata:(NSDictionary*)metadata toURL:(NSURL*)url {

  NSString *path = [[url relativePath] stringByAppendingString:@".plist"];

  [metadata writeToFile:path atomically:YES];

}
Loading the metadata is slightly more complicated because if the data store is new and the metadata file does not exist, the metadata file must be created along with an empty data file. Core Data expects a store type, and a store UUID from the metadata helps the persistent store coordinator deal with the custom store, so set those values for the NSStoreTypeKey and NSStoreUUIDKey. Find the metadataForPersistentStoreWithURL:error: method and change its contents to check for the existence of a metadata file and, if not found, to write one with the store type key and the UUID key, and also to write a blank data file, like in Listing 3–8.
Listing 3–8. The metadataForPersistentStoreWithURL:error: Method
+ (NSDictionary *)metadataForPersistentStoreWithURL:(NSURL *)url error:(NSError **)error {

  // Determine the filename for the metadata file

  NSString *path = [[url relativePath] stringByAppendingString:@".plist"];


  // If the metadata file doesn't exist, create it

  if(![[NSFileManager defaultManager] fileExistsAtPath:path]) {

    // Create a dictionary and store the store type key (CustomStore)

    // and the UUID key

    NSMutableDictionary *metadata = [NSMutableDictionary dictionary];

    [metadata setValue:@"CustomStore" forKey:NSStoreTypeKey];

    [metadata setValue:[CustomStore makeUUID] forKey:NSStoreUUIDKey];


    // Write the metadata to the .plist file

    [CustomStore writeMetadata:metadata toURL:url];


    // Write an empty data file

    [@"" writeToURL:url atomically:YES encoding:[NSString defaultCStringEncoding] error:nil];


    NSLog(@"Created new store at %@", path);

  }

  return [NSDictionary dictionaryWithContentsOfFile:path];

}
Armed with methods to retrieve the metadata and create a blank store, you can complete the initialization method, like so:
- (id)initWithPersistentStoreCoordinator:(NSPersistentStoreCoordinator *)coordinator

configurationName:(NSString *)configurationName URL:(NSURL *)url options:(NSDictionary

*)options {

  self = [super initWithPersistentStoreCoordinator:coordinator

configurationName:configurationName URL:url options:options];


  NSDictionary *metadata = [CustomStore metadataForPersistentStoreWithURL:[self URL]

error:nil];

  [self setMetadata:metadata];


  return self;

}
Mapping Between NSManagedObject and NSAtomicStoreCacheNode
To make the custom store function properly, you must provide implementations for three additional utility methods. The first one creates a new reference object for a given managed object. Reference objects represent unique identifiers for each NSAtomicStoreCacheNode (similar to a database primary key). A Reference object is to an NSAtomicStoreCacheNode what an NSObjectID is to an NSManagedObject. Since the custom data store has to manage data transfer between NSManagedObjects and NSAtomicCacheNodes, it must be able to create a reference object for a newly created managed object. For this, you use the UUID again.
- (id)newReferenceObjectForManagedObject:(NSManagedObject *)managedObject {

  NSString *uuid = [CustomStore makeUUID];

  return uuid;

}
The second method needed creates a new NSAtomicStoreCacheNode instance to match a newly created NSManagedObject. When a new NSManagedObject is added and needs to be persisted, the framework first gets a reference object using the newReferenceObjectForManagedObject: method. NSAtomicCache keeps track of the mapping between NSObjectIDs and reference objects. When Core Data persists a managed object into the persistent store, it calls the newCacheNodeForManagedObject: method, which, like its name indicates, creates a new NSAtomicStoreCacheNode that will serve as a peer to the NSManagedObject.
- (NSAtomicStoreCacheNode *)newCacheNodeForManagedObject:(NSManagedObject

*)managedObject {

  NSManagedObjectID *oid = [managedObject objectID];

  id referenceID = [self referenceObjectForObjectID:oid];


  NSAtomicStoreCacheNode* node = [self nodeForReferenceObject:referenceID

andObjectID:oid];

  [self updateCacheNode:node fromManagedObject:managedObject];

  return node;

}
The newCacheNodeForManagedObject: implementation looks up the reference object that was created for the managed object and creates a new cache node linked to that reference ID. Finally, the method copies the managed object's data into the node using the updateCacheNode:fromManagedObject: method. Your custom store also needs to provide an implementation for this third method, shown in Listing 3–9.
Listing 3–9. The updateCacheNode:fromManagedObject: Method
- (void)updateCacheNode:(NSAtomicStoreCacheNode *)node

fromManagedObject:(NSManagedObject *)managedObject {

  // Determine the entity for the managed object

  NSEntityDescription *entity = managedObject.entity;


  // Walk through all the attributes in the entity

  NSDictionary *attributes = [entity attributesByName];

  for (NSString *name in [attributes allKeys]) {

    // For each attribute, set the managed object's value into the node

    [node setValue:[managedObject valueForKey:name] forKey:name];

  }


  // Walk through all the relationships in the entity

  NSDictionary *relationships = [entity relationshipsByName];

  for (NSString *name in [relationships allKeys]) {

    id value = [managedObject valueForKey:name];

    // If this is a to-many relationship . . .

    if ([[relationships objectForKey:name] isToMany]) {
// . . . get all the destination objects
NSSet *set = (NSSet*)value;
NSMutableSet *data = [NSMutableSet set];
for (NSManagedObject *managedObject in set) {
// For each destination object in the relationship,
// add the cache node to the set
NSManagedObjectID *oid = [managedObject objectID];
id referenceID = [self referenceObjectForObjectID:oid];
NSAtomicStoreCacheNode* n = [self nodeForReferenceObject:referenceID andObjectID:oid];
[data addObject:n];
}
[node setValue:data forKey:name];
} else {
// This is a to-one relationship, so just get the single
// destination node for the relationship
NSManagedObject *managedObject = (NSManagedObject*)value;
NSManagedObjectID *oid = [managedObject objectID];
id referenceID = [self referenceObjectForObjectID:oid];
NSAtomicStoreCacheNode* n = [self nodeForReferenceObject:referenceID andObjectID:oid];
[node setValue:n forKey:name];
}
}
}
The implementation finds the entity description for the given managed object and uses it to iterate through attributes and relationships in order to copy their values into the node.
To keep track of cache nodes, create a utility method that, given a reference object, returns the matching NSAtomicStoreCacheNode if it exists or creates a new one.
- (NSAtomicStoreCacheNode *)nodeForReferenceObject:(id)reference

andObjectID:(NSManagedObjectID *)oid {

  NSAtomicStoreCacheNode *node = [nodeCacheRef objectForKey:reference];

  if (node == nil) {

    node = [[NSAtomicStoreCacheNode alloc] initWithObjectID:oid];

    [nodeCacheRef setObject:node forKey:reference];

  }

  return node;

}
The implementation of nodeForReferenceObject:andObjectID: uses a dictionary called nodeCacheRef, so declare it in the CustomStore.h header file, as Listing 3–10 shows.
Listing 3–10. CustomStore.h
#import <Foundation/Foundation.h>


@interface CustomStore : NSAtomicStore {

  NSMutableDictionary *nodeCacheRef;

}


@end
Initialize nodeCacheRef in the
initWithPersistentStoreCoordinator:configurationName:URL:options: method.
- (id)initWithPersistentStoreCoordinator:(NSPersistentStoreCoordinator *)coordinator

configurationName:(NSString *)configurationName URL:(NSURL *)url options:(NSDictionary

*)options {

  self = [super initWithPersistentStoreCoordinator:coordinator

configurationName:configurationName URL:url options:options];

  NSDictionary *metadata = [CustomStore metadataForPersistentStoreWithURL:[self URL]

error:nil];

  [self setMetadata:metadata];

  nodeCacheRef = [NSMutableDictionary dictionary];

  return self;

}
Serializing the Data
So far, all you've done is implement utility methods to deal with the metadata, initialize the data store, and perform the data transfer between NSManagedObject instances and NSAtomicStoreCacheNode instances. Until you implement the methods that read and write to the storage device, however, the custom store has no use. When extending NSAtomicStore, you are required to provide implementations for the load: and save: methods, which serve as the meat of the custom store implementation. In this example, start with the save: method. The code for the following save: method might seem overwhelming at first, but if you take time to follow the code, you will realize that it simply iterates through the cache nodes and writes attribute values into the file, followed by relationship values. Attribute values are converted into NSStrings and appended to the pipe-delimited file as key-value pairs in the form attributeName=value. Relationships work in a similar way except that the value written is not the destination node itself but its reference object as created by the newReferenceObjectForManagedObject: method. For one-to-many relationships, the code writes a comma-delimited list of reference objects. Listing 3–11 shows the save: method.
Listing 3–11. The save: Method
- (BOOL)save:(NSError **)error {

    NSURL *url = [self URL];


  // First update the metadata

  [CustomStore writeMetadata:[self metadata] toURL:url];


  NSString* dataFile = @"";

  // Then write the actual data

  NSSet *nodes = [self cacheNodes];

  NSAtomicStoreCacheNode *node;

  NSEnumerator *enumerator = [nodes objectEnumerator];


  // Enumerate through all the nodes

  while ((node = [enumerator nextObject]) != nil) {

    // Get the object ID and reference ID for each node

    NSManagedObjectID *oid = [node objectID];

    id referenceID = [self referenceObjectForObjectID:oid];
// Write the entity name and reference ID as the first two
// values in the row
NSEntityDescription *entity = [oid entity];
dataFile = [dataFile stringByAppendingFormat:@"%@|%@", entity.name, referenceID];
{ // Write all the attributes
NSDictionary *attributes = [entity attributesByName];
NSAttributeDescription *key = nil;
NSEnumerator *enumerator = [attributes objectEnumerator];
while ((key = [enumerator nextObject]) != nil) {
NSString *value = [node valueForKey:key.name];
if (value == nil) value = @"(null)";
dataFile = [dataFile stringByAppendingFormat:@"|%@=%@", key.name, value];
}
}
{ // Write all the relationships
NSDictionary *relationships = [entity relationshipsByName];
NSRelationshipDescription *key = nil;
NSEnumerator *enumerator = [relationships objectEnumerator];
while ((key = [enumerator nextObject]) != nil) {
id value = [node valueForKey:key.name];
if (value == nil) {
dataFile = [dataFile stringByAppendingFormat:@"|%@=%@", key.name, @"(null)"];
} else if (![key isToMany]) { // One-to-One
NSManagedObjectID *oid = [(NSAtomicStoreCacheNode*)value objectID];
id referenceID = [self referenceObjectForObjectID:oid];
dataFile = [dataFile stringByAppendingFormat:@"|%@=%@", key.name, referenceID];
} else { // One-to-Many
NSSet* set = (NSSet*)value;
if ([set count] == 0) {
dataFile = [dataFile stringByAppendingFormat:@"|%@=%@", key.name, @"(null)"];
} else {
NSString *list = @"";
for (NSAtomicStoreCacheNode *item in set) {
id referenceID = [self referenceObjectForObjectID:[item objectID]];
list = [list stringByAppendingFormat:@"%@,", referenceID];
}
list = [list substringToIndex:[list length]-1];
dataFile = [dataFile stringByAppendingFormat:@"|%@=%@", key.name, list];
}
}
}
}
// Add a new line to go to the next row for the next node
dataFile = [dataFile stringByAppendingString:@"
"];
}
// Write the file
NSString *path = [url relativePath];
[dataFile writeToFile:path atomically:YES encoding:[NSString defaultCStringEncoding] error:error]; return YES;
}
Each data record in the text file, represented in code by an NSAtomicStoreCacheNode instance, follows this format:
Entity Name|Reference
Object|attribute1=value1|attribute2=value2|...|relationship1=ref1,ref2,ref3|relationship
2=ref4|...
The load: method follows the same steps as the save: method but in reverse. It reads the data file line by line and, for each line, uses the first element to find the entity description, uses the second element as the node's reference object, and then iterates through the remaining elements to load the attributes and relationships. It uses these elements to reconstruct the NSAtomicStoreCacheNode instances; see Listing 3–12.
Listing 3–12. The load: Method
- (BOOL)load:(NSError **)error {
// Find the file to load from
NSURL* url = [self URL];
NSMutableSet *nodes = [NSMutableSet set];
NSString *path = [url relativePath];
if(![[NSFileManager defaultManager] fileExistsAtPath:path]) {
// File doesn't exist, so add an empty set and bail
[self addCacheNodes:nodes];
  return YES;

}
NSPersistentStoreCoordinator *coordinator = [self persistentStoreCoordinator];
// Load the entire file into an array, with each element
// containing one line from the file. Each element is then one
// node
NSString *fileString = [NSString stringWithContentsOfFile:path encoding:[NSString
defaultCStringEncoding] error:error];
NSArray *lines = [fileString componentsSeparatedByString:@"
"];
NSString *line;
// Enumerate through each line from the file
NSEnumerator *enumerator = [lines objectEnumerator];
while ((line = [enumerator nextObject]) != nil) {
// Split the fields into an array
NSArray *components = [line componentsSeparatedByString:@"|"];
// If you don't have at least an entity name and a reference ID,
// ignore this line
if ([components count] < 2) continue;
NSString *entityName = [components objectAtIndex:0];
NSString *pkey = [components objectAtIndex:1];
// Make the node
NSEntityDescription *entity = [[[coordinator managedObjectModel] entitiesByName]
valueForKeyPath:entityName];
if (entity != nil) {
NSManagedObjectID *oid = [self objectIDForEntity:entity referenceObject:pkey]; NSAtomicStoreCacheNode *node = [self nodeForReferenceObject:pkey andObjectID:oid];
// Get the attributes and relationships from the model
NSDictionary *attributes = [entity attributesByName];
NSDictionary *relationships = [entity relationshipsByName];
// Go through the rest of the fields
for (int i = 2; i < [components count]; i++) {
// Each field is a name/value pair, separated by an equals
// sign. Parse name and value
NSArray *entry = [[components objectAtIndex:i] componentsSeparatedByString:@"="];
NSString *key = [entry objectAtIndex:0];
if([attributes objectForKey:key] != nil) {
// Get the type of the attribute from the model
NSAttributeDescription *attributeDescription = [attributes objectForKey:key];
NSAttributeType type = [attributeDescription attributeType];
// Default value to type string
id dataValue = [entry objectAtIndex:1];
if ([(NSString*)dataValue compare:@"(null)"] == NSOrderedSame) {
continue;
}
// Convert the value to the proper data type
if ((type == NSInteger16AttributeType) || (type == NSInteger32AttributeType)
|| (type == NSInteger64AttributeType)) {
dataValue = [NSNumber numberWithInteger:[dataValue integerValue]];
} else if (type == NSDecimalAttributeType) {
dataValue = [NSDecimalNumber decimalNumberWithString:dataValue];
} else if (type == NSDoubleAttributeType) {
dataValue = [NSNumber numberWithDouble:[dataValue doubleValue]];
} else if (type == NSFloatAttributeType) {
dataValue = [NSNumber numberWithFloat:[dataValue floatValue]];
} else if (type == NSBooleanAttributeType) {
dataValue = [NSNumber numberWithBool:[dataValue intValue]];
} else if (type == NSDateAttributeType) {
NSDateFormatter *formatter = [[NSDateFormatter alloc] init];
[formatter setDateFormat:@"yyyy-MM-dd HH:mm:ss ZZZ"];
dataValue = [formatter dateFromString:dataValue];
} else if (type == NSBinaryDataAttributeType) {
// This implementation doesn't support binary data
// You could enhance this code to base64 encode and
// decode binary data to be able to support binary
// types.
NSLog(@"Binary type not supported");
}
// Set the converted value into the node
[node setValue:dataValue forKey:key];
} else if ([relationships objectForKey:key] != nil) { // See if it's a relationship
// Destination objects are comma-separated
NSArray *ids = [[entry objectAtIndex:1] componentsSeparatedByString:@","];
NSRelationshipDescription *relationship = [relationships objectForKey:key];
// If it's a to-many relationship . . . if ([relationship isToMany]) {
// . . . get the set of destination objects and
// iterate through them
NSMutableSet* set = [NSMutableSet set];
for (NSString *fKey in ids) {
if (fKey != nil && [fKey compare:@"(null)"] != NSOrderedSame) {
// Create the node for the destination object
NSManagedObjectID *oid = [self objectIDForEntity:[relationship destinationEntity] referenceObject:fKey];
NSAtomicStoreCacheNode *destinationNode = [self nodeForReferenceObject:fKey andObjectID:oid];
[set addObject:destinationNode];
}
}
// Store the set into the node
[node setValue:set forKey:key];
} else {
// This is a to-one relationship; check whether there's
// a destination object
NSString* fKey = [ids count] > 0 ? [ids objectAtIndex:0] : nil;
if (fKey != nil && [fKey compare:@"(null)"] != NSOrderedSame) {
// Set the destination into the node
NSManagedObjectID *oid = [self objectIDForEntity:[relationship destinationEntity] referenceObject:fKey];
NSAtomicStoreCacheNode *destinationNode = [self nodeForReferenceObject:fKey andObjectID:oid];
[node setValue:destinationNode forKey:key];
}
}
}
}
// Remember this node
[nodes addObject:node];
}
}
// Register all the nodes
[self addCacheNodes:nodes];
return YES;
}
Remember that although the text file stores the data as plain text, Core Data deals with objects. The code must check the data type of each attribute using the entity description and create the appropriate data object instance. For relationships, the code must use the store reference objects in order to either reuse existing nodes or create new ones if needed. To reuse existing nodes or create new ones, the load: method uses the previously implemented nodeForReferenceObject:andObjectID: method.
Before moving on from CustomStore.m, add declarations for the three utility methods you've created so the compiler won't complain. Because these methods aren't used outside the CustomStore class, you don't add them to the header file. The declarations look like this:
@interface CustomStore (private)


+ (void)writeMetadata:(NSDictionary*)metadata toURL:(NSURL*)url;

+ (NSString *)makeUUID;

- (NSAtomicStoreCacheNode*)nodeForReferenceObject:(id)referenceå andObjectID:(NSManagedObjectID*)oid;

@end
Add this code to the top of CustomStore.m, after the import for CustomStore.h and before the @implementation CustomStore line.
Using the Custom Store
The last step required to use the custom store with the League Manager application is to register it and use it when initializing the persistent store coordinator. This is all done in the application delegate (League_ManagerAppDelegate.m). First, add an import at the top of the class so that the implementation is aware of the CustomStore class.
#import "CustomStore.h"
Modify the application:didFinishLaunchingWithOptions: method to register the custom store when the application awakes.
- (BOOL)application:(UIApplication *)application

didFinishLaunchingWithOptions:(NSDictionary *)launchOptions

{

  [NSPersistentStoreCoordinator registerStoreClass:[CustomStore class]

forStoreType:@"CustomStore"];

  NSLog(@"Registered types:  %@", [NSPersistentStoreCoordinator registeredStoreTypes]);


    self.window = [[UIWindow alloc] initWithFrame:[[UIScreen mainScreen] bounds]];

    // Override point for customization after application launch.


  MasterViewController *controller = [[MasterViewController alloc] initWithNibName:@"MasterViewController" bundle:nil];

  self.navigationController = [[UINavigationController alloc] initWithRootViewController:controller];

  self.window.rootViewController = self.navigationController;

    [self.window makeKeyAndVisible];

    return YES;

}
Finally, alter the persistentStoreCoordinator: accessor to use the new custom store.
- (NSPersistentStoreCoordinator *)persistentStoreCoordinator {

  if (__persistentStoreCoordinator != nil) {

    return __persistentStoreCoordinator;

  }


  NSURL *storeURL = [[self applicationDocumentsDirectory] URLByAppendingPathComponent:@"League_Manager.txt"];


  NSError *error = nil;
__persistentStoreCoordinator = [[NSPersistentStoreCoordinator alloc] initWithManagedObjectModel:[self managedObjectModel]];
if (![__persistentStoreCoordinator addPersistentStoreWithType:@"CustomStore" configuration:nil URL:storeURL options:nil error:&error]) {
NSLog(@"Unresolved error %@, %@", error, [error userInfo]);
abort();
}
return __persistentStoreCoordinator;
}
At this point, you should be able to start the application, and it will use the new custom store. A file called League_Manager.txt will be created in the same directory where the League_Manager.sqlite database was when you first implemented it earlier in this chapter. Take the application for a spin, add a few teams and players, and then go check the League_Manager.txt data file using any text editor. Depending on the teams and players you create, the file will look something like this:
Player|5247F86F-0397-4814-9AF7-5F6946BE20C4|[email protected]|firstName=Rajon|lastName=Rondo|team=9F2662B9-3006-4B8D-BC43–EA68DB7AD037

Player|20C2D39C-D831-4AD7-9FE7-E1CE22D765E0|[email protected]|firstName=Tyson|lastName=Warner|team=3BBC1923–0EA7-485C-9516-3B993D30D0CE

Player|3E817374-2BE2-495F-8029-1698C34DE07F|[email protected]|firstName=LeBron|lastName=James|team=3BBC1923–0EA7-485C-9516-3B993D30D0CE

Player|7ABACD30-2586-4522-8369-0D104FE248AF|[email protected]|firstName=Chris|lastName=Bosh|team=3BBC1923–0EA7-485C-9516-3B993D30D0CE

Player|D14E8D95-FC94-48AA-BE9B-E20FC36B70EB|[email protected]|firstName=Dwyane|lastName=Wade|team=3BBC1923–0EA7-485C-9516-3B993D30D0CE

Team|3BBC1923–0EA7-485C-9516-3B993D30D0CE|name=Miami Heat|uniformColor=Red|players=3E817374-2BE2-495F-8029-1698C34DE07F,7ABACD30-2586-4522-8369-0D104FE248AF,D14E8D95-FC94-48AA-BE9B-E20FC36B70EB,20C2D39C-D831-4AD7-9FE7-E1CE22D765E0

Team|9F2662B9-3006-4B8D-BC43–EA68DB7AD037|name=Boston Celtics|uniformColor=Green|players=5247F86F-0397-4814-9AF7-5F6946BE20C4
In the data file, you can see two teams, Boston Celtics and Miami Heat, in the last two lines of the file. The entity name, “Team,” is the first field on each of those two rows. You see that the Boston Celtics has one player, as it has only one reference ID listed for the players relationship in the last field of its row. That reference ID listed for the players relationship matches the reference ID for Rajon Rondo, which is the second field in the first row of the file. You can also see the four players that represent the Miami Heat's future: LeBron James, Dwyane Wade, Chris Bosh, and Tyson Warner.
What About XML Persistent Stores?
Core Data offers another persistent store type, XML, on Mac OS X that you specify by passing NSXMLStoreType to your persistent store coordinator's addPersistentStoreWithType: method. Passing NSXMLStoreType when compiling for iOS, however, gives you a compiler error: 'NSXMLStoreType' undeclared. If you look in the Core Data header files for iOS, you'll find the following in NSPersistentStoreCoordinator.h:
// Persistent store types supported by Core Data:

COREDATA_EXTERN NSString * const NSSQLiteStoreType __OSX_AVAILABLE_STARTING(__MAC_10_4,

__IPHONE_3_0);

COREDATA_EXTERN NSString * const NSBinaryStoreType __OSX_AVAILABLE_STARTING(__MAC_10_4,

__IPHONE_3_0);

COREDATA_EXTERN NSString * const NSInMemoryStoreType __OSX_AVAILABLE_STARTING(__MAC_10_4, __IPHONE_3_0);
Indeed, NSXMLStoreType remains undeclared, though it's emphatically available for Mac OS X. To understand why, turn to Apple's developer documentation on Core Data Persistent Store Features, found at http://developer.apple.com/library/ios/#documentation/Cocoa/Conceptual/CoreData/Articles/cdPersistentStores.html, to read the following explanation for XML's exclusion on iOS:
iOS: The XML store is not available on iOS.
That's all you get, keeping Apple's reputation for secrecy intact. You're left, then, to speculate. Apple probably left XML off iOS's version of Core Data for a few reasons:
- Parsing XML can consume a lot of processor cycles, making an iDevice, with its slower processor relative to an iMac, Mac Pro, and so on, slower.
- Because parsing XML uses more processing power, it can consume more battery life.
- XML, with its characters, brackets, and metadata, generally consumes more storage space than binary file types.
- Apple likes to steer its developers toward solutions it deems better, rather than providing as many options as possible. XML is superfluous for Core Data persistence.
If you miss XML and want it available for your applications, you can write your own XML custom store. If you imagine a nice, nested XML document issuing from your complex data models, however, you will probably become frustrated in your attempts to create a custom XML persistent store type. Core Data relationships have their inverses, meaning that you really can't arbitrate parenthood among entities. In the League Manager data model, for example, should Team entity tags contain Player entity tags, because the team “owns” its players, or should it be the reverse? Do players own the teams they play for (as many superstar professional athletes have demonstrated)? If you pursue an XML custom data store, you'll find that you don't produce readable XML documents that make relationships clear, but rather XML documents with lots of peers that are fit only for Core Data's consumption. For example, if you port the same League Manager data model to a Mac OS X Core Data application that uses an XML persistent store and enter the same data for teams and players, Core Data produces the XML document shown in Listing 3–13.
Listing 3–13. XML from Porting the League Manager Data Model to a Mac OS X Core Data Application
<?xml version="1.0"?>

<!DOCTYPE database SYSTEM "file:///System/Library/DTDs/CoreData.dtd">


<database>

    <databaseInfo>

        <version>134481920</version>

        <UUID>45AD66DE-CC52-4B2B-931C-6ACA69BB5507</UUID>

        <nextObjectID>108</nextObjectID>

        <metadata>

            <plist version="1.0">

                <dict>

                    <key>NSPersistenceFrameworkVersion</key>

                    <integer>251</integer>

                    <key>NSStoreModelVersionHashes</key>

                    <dict>

                        <key>Player</key>

                        <data>

                            QRI+8jf5OXSA5dkydbK20isvHVrWhCAttsY9Yh4oUSQ=

                        </data>

                         <key>Team</key>

                        <data>

                            V/pOfHFixiAQ1Nb7Xlg2Xu4laNYWtrsg5Br1qtI9JMY=

                        </data>

                     </dict>

                    <key>NSStoreModelVersionHashesVersion</key>

                    <integer>3</integer>

                    <key>NSStoreModelVersionIdentifiers</key>

                    <array></array>

                </dict>

            </plist>

        </metadata>

    </databaseInfo>

    <object type="TEAM" id="z102">

        <attribute name="uniformcolor" type="string">Red</attribute>

        <attribute name="name" type="string">Fire</attribute>

        <relationship name="players" type="0/0" destination="PLAYER" idrefs="z103"></relationship>

    </object>

    <object type="PLAYER" id="z103">

        <attribute name="lastname" type="string">Gary</attribute>

        <attribute name="firstname" type="string">Terry</attribute>

        <attribute name="email" type="string">[email protected]</attribute>

        <relationship name="team" type="1/1" destination="TEAM" idrefs="z102"></relationship>

    </object>

    <object type="PLAYER" id="z104">

        <attribute name="lastname" type="string">Sprat</attribute>

        <attribute name="firstname" type="string">Pat</attribute>

        <attribute name="email" type="string">[email protected]</attribute>

        <relationship name="team" type="1/1" destination="TEAM" idrefs="z105"></relationship>

    </object>

    <object type="TEAM" id="z105">

        <attribute name="uniformcolor" type="string">Blue</attribute>

        <attribute name="name" type="string">Crew</attribute>
<relationship name="players" type="0/0" destination="PLAYER" idrefs="z107 z104 z106"></relationship>
</object>
<object type="PLAYER" id="z106">
<attribute name="lastname" type="string">Staley</attribute>
<attribute name="firstname" type="string">Bailey</attribute>
<attribute name="email" type="string">[email protected]</attribute>
<relationship name="team" type="1/1" destination="TEAM" idrefs="z105"></relationship>
</object>
<object type="PLAYER" id="z107">
<attribute name="lastname" type="string">Gordon</attribute>
<attribute name="firstname" type="string">Jordan</attribute>
<attribute name="email" type="string">[email protected]</attribute>
<relationship name="team" type="1/1" destination="TEAM" idrefs="z105"></relationship>
</object>
<object type="TEAM" id="z108">
<attribute name="uniformcolor" type="string">Green</attribute>
<attribute name="name" type="string">Revolution</attribute>
<relationship name="players" type="0/0" destination="PLAYER"></relationship>
</object>
</database>
Core Data makes no attempt to determine parentage between teams and players, nor does it create tags for the different entity types. It relies instead on tags called object with entity names specified as type attributes; moreover, it makes players and teams peers, which sounds like a recipe for lockouts and season cancellations.
Summary
SQLite claims on its home page, www.sqlite.org, that it “is the most widely deployed SQL database engine in the world.” It enjoys the backing of technology titans like Oracle, Mozilla, and Adobe. If you've spent much time in your career in typical corporate development roles, you probably feel like data belongs in a database. SQLite stores your data efficiently and compactly. It doesn't require atomically rewriting the persistent store every time you change it. It requires no custom coding to use it. Xcode generates all you need to get started with a SQLite-backed persistent store. Why wouldn't you use a SQLite database for all your Core Data persistent stores?
Well, you might. SQLite is probably the right choice for data storage for most, if not all, of your applications' data storage needs. You've learned in this chapter, however, that other options exist and that you can create your own store types optimized for your particular applications and data needs. Whether you're working with remote data that you should store only in memory, wanting to persist data into text files, or imagining some other scenario best served by some other custom data store type, understand that your data can live in places other than a SQLite database. Remember that you're free to store your data however you want, and Core Data will manage it for you appropriately.