
Chapter 10
Using Core Data in Advanced Applications
You can build a lot of cool apps without using the material in this chapter. Before you slam this book closed, however, we recommend you keep reading. This chapter contains material that addresses some advanced Core Data topics that your particular applications may require, especially if securing user data is important to your application. Follow along with this chapter to put some advanced Core Data tools in your toolbox.
In this chapter, we walk you through building an application that illustrates each of the topics we cover. You'll build the application incrementally and will be able to run the application at the end of each section so you can see that section's advanced feature working. Because each section builds on the previous ones, you shouldn't try to skip any sections.
The application you build in this chapter, called MyStash, stores both passwords and notes. By the time you're done building it, the passwords will all be safely encrypted. The notes, by default, aren't encrypted, but you can choose to encrypt individual notes. The passwords and notes live in separate databases, though they share the same data model. When you're done, you can make a few tweaks to the code, add an enticing icon, and who knows? You may have an App Store hit on your hands!
Creating an Application for Note and Password Storage and Encryption
To begin creating the application that you'll work with throughout this chapter, create a new Xcode project called MyStash. Choose the Empty Application template, as shown in Figure 10–1, and click Next. Type MyStash for Product Name, check Use Core Data, and set Device Family to iPhone (see Figure 10–2). Click Next, select the directory to save your project in, and click Create.
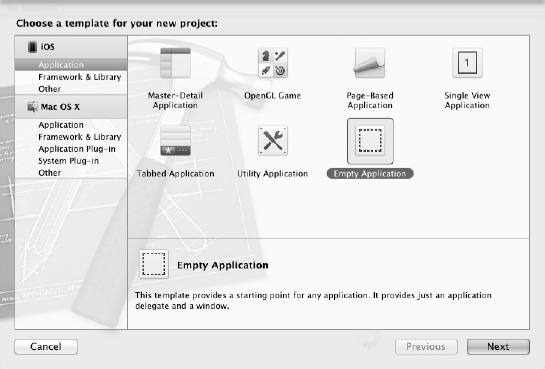
Figure 10–1. Selecting the Empty Application template

Figure 10–2. Setting up the MyStash project
You can build and run your application now to view a blank, white screen. You have neither data nor a means to view that data. You'll start by adding data to the application.
Setting Up the Data Model
The MyStash data model will have two entities: one to hold notes and one to hold passwords for systems (such as web sites). Open the data model, and create an entity called Note and another called System. Add two attributes to the Note entity:
title(type String)body(type String)
Add three attributes to the System entity:
name(type String)userId(type String)password(type String)
Your data model should look like Figure 10–3.
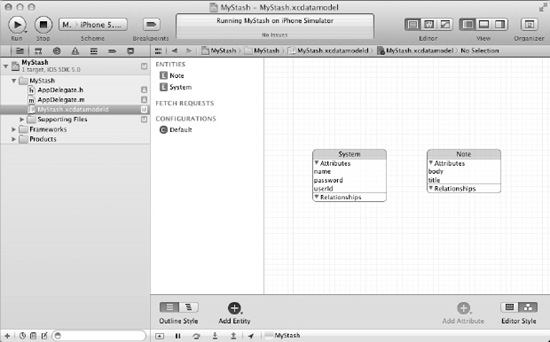
Figure 10–3. The MyStash data model
Once again, you can build and run the application, but all you'll see is a blank screen. In the next section, you add a rudimentary interface. Actually adding, editing, and deleting data, however, won't happen until you piece the user interface together in the next sections in this chapter.
Setting Up the Tab Bar Controller
The MyStash application uses two tabs to swap between Notes view and Passwords view. This means you need to add a tab bar controller to the main window. Open AppDelegate.h, and add a UITabBarController property.
@property (strong, nonatomic) UITabBarController *tabBarController;
Now, open the file AppDelegate.m, and add a @synthesize line for the tab bar controller.
@synthesize tabBarController = _tabBarController;
In the application:didFinishLaunchingWithOptions: method, add the tab bar controller to the main window so that method now looks like this:
- (BOOL)application:(UIApplication *)application

didFinishLaunchingWithOptions:(NSDictionary *)launchOptions

{

  self.window = [[UIWindow alloc] initWithFrame:[[UIScreen mainScreen] bounds]];

  self.window.backgroundColor = [UIColor whiteColor];


  self.tabBarController = [[UITabBarController alloc] init];

  [self.window addSubview:self.tabBarController.view];


  [self.window makeKeyAndVisible];

  return YES;

}
Build and run the app to see the tab bar controller, albeit small, added at the bottom of the screen, as shown in Figure 10–4.
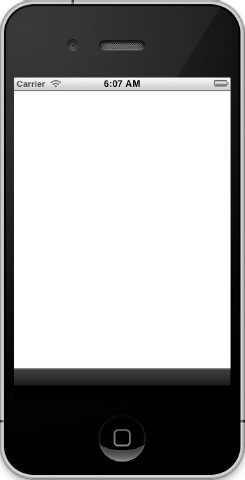
Figure 10–4. MyStash with a tab bar
Adding the Tab
To add the tab for the Notes view, create a new UIViewController subclass called NoteListViewController (see Figure 10–6). On the next screen, be sure to make it a subclass of UITableViewController and uncheck With XIB for user interface, as shown in Figure 10–5.
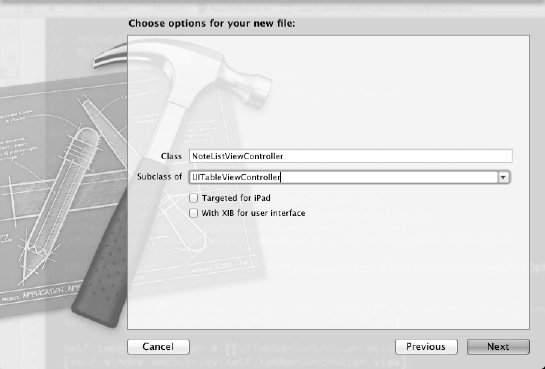
Figure 10–5. Adding the view class for the Notes view
Open NoteListViewController.m, find the initWithStyle: method, and in it, add a title and an image for the tab, like this:
- (id)initWithStyle:(UITableViewStyle)style

{

  self = [super initWithStyle:style];

  if (self) {

    self.title = @"Notes";

    self.tabBarItem.image = [UIImage imageNamed:@"note"];

  }

  return self;

}
For the tab images, grab four files from the downloaded source code for this book:
note.pngpassword.png[email protected][email protected]
Alternatively, you can create your own. The iPhone 4 versions (*@2x.png) should be about 60 pixels by 60 pixels, and the regular versions should be about 30 pixels by 30 pixels. Make them have a transparent background with a black image.
However you get the four images, add them to your project in a new group called Images, as in Figure 10–6.
Figure 10–6. The tab images added to the project
Now, add the Notes tab to the tab bar controller in the application delegate. Open AppDelegate.m, and add an import for the Note List view.
#import "NoteListViewController.h"
Then, in the application:didFinishLaunchingWithOptions: method, create an instance of NoteListViewController, wrap it in an instance of UINavigationController, and add it to the tab bar controller. The updated method looks like this:
- (BOOL)application:(UIApplication *)application

didFinishLaunchingWithOptions:(NSDictionary *)launchOptions

{

  self.window = [[UIWindow alloc] initWithFrame:[[UIScreen mainScreen] bounds]];

  self.window.backgroundColor = [UIColor whiteColor];


  self.tabBarController = [[UITabBarController alloc] init];

  [self.window addSubview:self.tabBarController.view];


  // Add the note list tab

  NoteListViewController *noteListViewController = [[NoteListViewController alloc]

initWithStyle:UITableViewStylePlain];

  UINavigationController *navNoteList = [[UINavigationController alloc]

initWithRootViewController:noteListViewController];

  [self.tabBarController setViewControllers:[NSArray arrayWithObjects:navNoteList,

nil]];


  [self.window makeKeyAndVisible];

  return YES;

}
Now you can build and run the application, and you see the view has a single tab (the one for Notes), as shown in Figure 10–7.
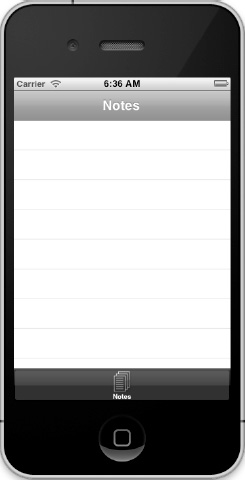
Figure 10–7. The MyStash application with a single tab
You still need the tab for passwords, so make another view controller, patterned after the one for notes. Once again, select “UIViewController subclass,” further specialize it as a “UITableViewController subclass,” and call it PasswordListViewController. Open the PasswordListViewController.m file, find the initWithStyle: method, and use it to add a title and an icon for the tab.
- (id)initWithStyle:(UITableViewStyle)style

{

  self = [super initWithStyle:style];

  if (self) {

    self.title = @"Passwords";

    self.tabBarItem.image = [UIImage imageNamed:@"password"];

  }

  return self;

}
Go back to the AppDelegate.m file and add an import for the password list view controller.
In that same file, update the application:didFinishLaunchingWithOptions: method to add the Passwords tab to the tab bar controller.
- (BOOL)application:(UIApplication *)application

didFinishLaunchingWithOptions:(NSDictionary *)launchOptions

{

  self.window = [[UIWindow alloc] initWithFrame:[[UIScreen mainScreen] bounds]];

  self.window.backgroundColor = [UIColor whiteColor];


  self.tabBarController = [[UITabBarController alloc] init];

  [self.window addSubview:self.tabBarController.view];


  // Add the note list tab

  NoteListViewController *noteListViewController = [[NoteListViewController alloc]

initWithStyle:UITableViewStylePlain];

  UINavigationController *navNoteList = [[UINavigationController alloc]

initWithRootViewController:noteListViewController];


  // Add the password list tab

  PasswordListViewController *passwordListViewController =

[[PasswordListViewController alloc] initWithStyle:UITableViewStylePlain];

  UINavigationController *navPasswordList = [[UINavigationController alloc]

initWithRootViewController:passwordListViewController];


  [self.tabBarController setViewControllers:[NSArray arrayWithObjects:navNoteList,

navPasswordList, nil]];


  [self.window makeKeyAndVisible];

  return YES;

}
Now, when you build and run the MyStash application, you should see two tabs: one for notes and one for passwords, as Figure 10–8 shows. You now have the bare-bones MyStash application built; you'll add the advanced features in the rest of the chapter!
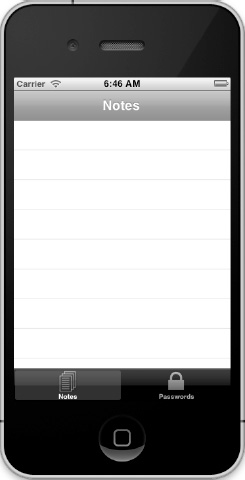
Figure 10–8. The MyStash application with two tabs
Incorporating NSFetchedResultsController into MyStash
If you run the MyStash application now, you see the expected tabs for notes and passwords. You can't add any notes or passwords, however, and you couldn't see them if you somehow added them. In the previous chapter, you've learned how to use the NSFetchedResultsController class to display data in a table. In this section, you apply the same technique to display notes and passwords using two instances of NSFetchedResultsController (one for notes and one for passwords).
Creating the Fetched Results Controller
To create fetched results controllers to display notes and passwords, start by declaring a fetched results controller and a managed object context in NoteListViewController.h, shown in Listing 10–1, and in PasswordListViewController.h, shown in Listing 10-2. You'll notice that you also declare that both controllers implement the NSFetchedResultsControllerDelegate protocol.
Listing 10–1. NoteListViewController.h
#import <UIKit/UIKit.h>


@interface NoteListViewController : UITableViewController

<NSFetchedResultsControllerDelegate>


@property (strong, nonatomic) NSFetchedResultsController *fetchedResultsController;

@property (strong, nonatomic) NSManagedObjectContext *managedObjectContext;


@end
Listing 10–2. PasswordListViewController.h
#import <UIKit/UIKit.h>


@interface PasswordListViewController : UITableViewController

<NSFetchedResultsControllerDelegate>


@property (strong, nonatomic) NSFetchedResultsController *fetchedResultsController;

@property (strong, nonatomic) NSManagedObjectContext *managedObjectContext;


@end
The next step is to initialize the NSFetchedResultsController instances. Once again, you initialize the instances in the accessors for the fetchedResultsController members. Start with NoteListViewController.m and add @synthesize lines for your two new members, like this:
@synthesize fetchedResultsController;

@synthesize managedObjectContext;
Next, add the fetchedResultsController: accessor method shown in Listing 10–3.
Listing 10–3. The fetchedResultsController: accessor
#pragma mark -

#pragma mark Fetched results controller


- (NSFetchedResultsController *)fetchedResultsController

{

  if (fetchedResultsController != nil)

  {

    return fetchedResultsController;

  }


  // Create the fetch request for the entity.

  NSFetchRequest *fetchRequest = [[NSFetchRequest alloc] init];

  NSEntityDescription *entity = [NSEntityDescription entityForName:@"Note"

inManagedObjectContext:self.managedObjectContext];

  [fetchRequest setEntity:entity];


  // Set the batch size

  [fetchRequest setFetchBatchSize:20];


  // Sort by note title, ascending
  NSSortDescriptor *sortDescriptor = [[NSSortDescriptor alloc] initWithKey:@"title"

ascending:YES];

  NSArray *sortDescriptors = [[NSArray alloc] initWithObjects:sortDescriptor, nil];

  [fetchRequest setSortDescriptors:sortDescriptors];


  // Create the fetched results controller using the

  // fetch request we just created, and with the managed

  // object context member, and set this controller to

  // be the delegate

  NSFetchedResultsController *aFetchedResultsController = [[NSFetchedResultsController

alloc] initWithFetchRequest:fetchRequest managedObjectContext:managedObjectContext
sectionNameKeyPath:nil cacheName:@"Note"];

  aFetchedResultsController.delegate = self;

  self.fetchedResultsController = aFetchedResultsController;


  // Fetch the results into the fetched results controller

  NSError *error = nil;

  if (![[self fetchedResultsController] performFetch:&error])

  {

    NSLog(@"Unresolved error %@, %@", error, [error userInfo]);

    abort();

  }

  return fetchedResultsController;

}
Add the same @synthesize lines and the same method to PasswordListViewController.m, changing both the entity name and the cache name from Note to System to match the data model. Also, change the attribute used for the sort descriptor from title to name.
Your controllers can now create their fetched results controllers. The next step is to implement the NSFetchedResultsControllerDelegate protocol. Add the code in Listing 10–4 to both NoteListViewController.m and PasswordListViewController.m.
Listing 10–4. The NSFetchedResultsControllerDelegate protocol methods
#pragma mark -

#pragma mark Fetched results controller delegate


- (void)controllerWillChangeContent:(NSFetchedResultsController *)controller

{

  [self.tableView beginUpdates];

}


- (void)controllerDidChangeContent:(NSFetchedResultsController *)controller

{

  [self.tableView endUpdates];

}


- (void)controller:(NSFetchedResultsController *)controller didChangeSection:(id

<NSFetchedResultsSectionInfo>)sectionInfo atIndex:(NSUInteger)sectionIndex

forChangeType:(NSFetchedResultsChangeType)type

{
  switch(type)

  {

    case NSFetchedResultsChangeInsert:

      [self.tableView insertSections:[NSIndexSet indexSetWithIndex:sectionIndex]

withRowAnimation:UITableViewRowAnimationFade];

      break;

    case NSFetchedResultsChangeDelete:

      [self.tableView deleteSections:[NSIndexSet indexSetWithIndex:sectionIndex]

withRowAnimation:UITableViewRowAnimationFade];

      break;

  }

}
Incorporating the Fetched Results Controllers into the Tables
The last step is to delegate calls from the UITableViewController to the FetchedResultsController. Edit the following methods in both NoteListViewController.m and PasswordListViewController.m to match the content shown in Listing 10–5.
Listing 10–5. Delegating calls to the FetchedResultsController
- (NSInteger)numberOfSectionsInTableView:(UITableView *)tableView

{

  return [[self.fetchedResultsController sections] count];

}


- (NSInteger)tableView:(UITableView *)tableView numberOfRowsInSection:(NSInteger)section {

  id <NSFetchedResultsSectionInfo> sectionInfo = [[fetchedResultsController sections]

  objectAtIndex:section];

  return [sectionInfo numberOfObjects];

}


- (UITableViewCell *)tableView:(UITableView *)tableView

cellForRowAtIndexPath:(NSIndexPath *)indexPath

{

  static NSString *CellIdentifier = @"NoteCell";


  UITableViewCell *cell = [tableView dequeueReusableCellWithIdentifier:CellIdentifier];

  if (cell == nil)

  {

    cell = [[UITableViewCell alloc] initWithStyle:UITableViewCellStyleDefault

reuseIdentifier:CellIdentifier];

  }

  [self configureCell:cell atIndexPath:indexPath];

  return cell;

}


- (void)controller:(NSFetchedResultsController *)controller didChangeObject:(id)

anObject atIndexPath:(NSIndexPath *)indexPathÉ

ÉforChangeType:(NSFetchedResultsChangeType)type newIndexPath:(NSIndexPath *)newIndexPath

{

  switch(type)
  {

    case NSFetchedResultsChangeInsert:

      [self.tableView insertRowsAtIndexPaths:[NSArray arrayWithObject:newIndexPath]

withRowAnimation:UITableViewRowAnimationFade];

      break;

    case NSFetchedResultsChangeDelete:

      [self.tableView deleteRowsAtIndexPaths:[NSArray arrayWithObject:indexPath]

withRowAnimation:UITableViewRowAnimationFade];

      break;

    case NSFetchedResultsChangeUpdate:

      [self configureCell:[self.tableView cellForRowAtIndexPath:indexPath]

atIndexPath:indexPath];

      break;

    case NSFetchedResultsChangeMove:

      [self.tableView deleteRowsAtIndexPaths:[NSArray arrayWithObject:indexPath]

withRowAnimation:UITableViewRowAnimationFade];

      [self.tableView insertRowsAtIndexPaths:[NSArray arrayWithObject:newIndexPath]

withRowAnimation:UITableViewRowAnimationFade];

      break;

  }

}
For PasswordListViewController.m, change the value for CellIdentifier to PasswordCell.
static NSString *CellIdentifier = @"PasswordCell";
It's time to finally implement the configureCell: method for each controller. Start with NoteViewController.m, and add at the top, before the line that says @implementation NoteListViewController, a private category that declares a configureCell: method on the NoteListViewController interface. That code looks like this:
@interface NoteListViewController()

- (void)configureCell:(UITableViewCell *)cell atIndexPath:(NSIndexPath *)indexPath;

@end
Inside the implementation, add an implementation of this method that configures the cell to display the note's text attribute. The interesting thing to note in this method is that you don't have to parse out the section and row from the passed index path. The fetched results controller knows how to work with an index path and uses the section and row indices it contains to return the correct managed object. Here is the method:
- (void)configureCell:(UITableViewCell *)cell atIndexPath:(NSIndexPath *)indexPath

{

  NSManagedObject *note = [self.fetchedResultsController objectAtIndexPath:indexPath];

  cell.textLabel.text = [note valueForKey:@"title"];

}
These lines of code are similar but different for PasswordListViewController.m. They obviously declare the configureCell: method on the PasswordListViewController interface, not the NoteListViewController interface, and the configureCell: implementation displays the name attribute of the managed object. The lines look like this:
@interface PasswordListViewController(private)

- (void)configureCell:(UITableViewCell *)cell atIndexPath:(NSIndexPath *)indexPath;

@end


- (void)configureCell:(UITableViewCell *)cell atIndexPath:(NSIndexPath *)indexPath

{

  NSManagedObject *system = [self.fetchedResultsController objectAtIndexPath:indexPath];

  cell.textLabel.text = [system valueForKey:@"name"];

}
The last method in the table view data source methods that you need to update is the tableView:CommitEditingStyle:forRowAtIndexPath: method, which is called when a user moves or deletes a row. In the MyStash application, the users can't move either notes or passwords, but they can delete them. Add the methods in Listing 10–6 to both controllers' implementation files and declare saveContext: in both header files.
Listing 10–6. Methods for deleting rows
- (void)tableView:(UITableView *)tableView
commitEditingStyle:(UITableViewCellEditingStyle)editingStyle
forRowAtIndexPath:(NSIndexPath *)indexPath
{
if (editingStyle == UITableViewCellEditingStyleDelete)
{
[[self.fetchedResultsController managedObjectContext]
deleteObject:[self.fetchedResultsController objectAtIndexPath:indexPath]];
[self saveContext];
}
}
- (void)saveContext
{
NSError *error = nil;
if(![[self.fetchedResultsController managedObjectContext] save:&error])
{
NSLog(@"Unresolved error %@, %@", error, [error userInfo]);
abort();
}
}
Be sure to add the saveContext: declaration to both NoteListViewController.h and PasswordListViewController.h:
-(void)saveContext;
To finish incorporating the fetched results controllers into the MyStash application, you must provide the managed object contexts for the two view controllers. Open AppDelegate.m, find the application:didFinishLaunchingWithOptions: method, and set each controller's managed object context member right after initializing it. The two lines to add are as follows:
noteListViewController.managedObjectContext = self.managedObjectContext;

. . .

passwordListViewController.managedObjectContext = self.managedObjectContext;
Creating the Interface for Adding and Editing Notes and Passwords
The MyStash application can now display and delete notes and passwords, but you can't yet add or edit any notes or passwords. This next part walks you through adding interfaces to add and edit notes and passwords. You'll create one modal for notes and a different modal for passwords, and MyStash will use the same modal for both adding and editing.
Start with the interface for adding and editing notes. Create a UIViewController subclass called NoteViewController, and make sure only the “With XIB for user interface” option is selected. This creates three files:
NoteViewController.h- NoteViewController.m
- NoteViewController.xib
Open NoteViewController.h. You'll add the following:
- A text field to allow users to enter the note's title.
- A Text view to hold the body of the note.
- A pointer to the parent controller so you can ask the parent to save any new note.
- A managed object that represents the current note, so the user can edit an existing note. If the current note is
nil, the code will create a new one. - An initializer that receives the parent controller and the note object.
- A method that responds to the user dismissing the modal with the Save button.
- A method that responds to the user dismissing the modal with the Cancel button.
NoteListViewController.h should match Listing 10–7.
Listing 10–7. NoteListViewController.h
@class NoteListViewController;


@interface NoteViewController : UIViewController

{

  UITextField *titleField;

  UITextView *body;

  NoteListViewController *parentController;

  NSManagedObject *note;

}

@property (strong, nonatomic) IBOutlet UITextField *titleField;
@property (strong, nonatomic) IBOutlet UITextView *body;

@property (strong, nonatomic) NoteListViewController *parentController;

@property (strong, nonatomic) NSManagedObject *note;


- (id)initWithParentController:(NoteListViewController *)parentController note:(NSManagedObject *)note;

- (IBAction)save:(id)sender;

- (IBAction)cancel:(id)sender;


@end
The implementation file for the Note view, NoteViewController.m, is shown next, in Listing 10–8. Note the following:
- The initialization method stores the parent
NoteListViewControllerinstance and the specifiedNSManagedObjectinstance. - When the view loads and the
viewDidLoad:method is called, the code checks whether thenotemanaged object isnil. If it is, the code sets the body text to “Type text here . . .” so that users know what to do. If it's notnil, the code takes the values from the managed object and puts them into the user interface fields. - The
save:method checks again if it's editing an existing note or adding a new one. If it's editing an existing note, it updates thenotemanaged object with the values the user entered and asks the parent controller to save the context. If it's creating a new note, it asks the parent controller to insert a new note object, passing the user-entered values. Either way, it then dismisses the modal. - The
cancel:method simply dismisses the modal, discarding any user input.
Listing 10–8. NoteViewController.m
#import "NoteViewController.h"

#import "NoteListViewController.h"


@implementation NoteViewController


@synthesize titleField, body, parentController, note;


- (id)initWithParentController:(NoteListViewController *)parentController_

note:(NSManagedObject *)note_

{

  if ((self = [super init]))

  {

    self.parentController = parentController_;

    self.note = note_;

  }

  return self;

}


- (void)viewDidLoad
{

  [super viewDidLoad];

  if (note != nil)

  {

    titleField.text = [note valueForKey:@"title"];

    body.text = [note valueForKey:@"body"];

  }

  else

  {

    body.text = @"Type text here . . .";

  }

}


- (void)viewDidUnload

{

  self.titleField = nil;

  self.body = nil;

  [super viewDidUnload];

}


- (IBAction)save:(id)sender

{

  if (parentController != nil)

  {

    if (note != nil)

    {

      [note setValue:titleField.text forKey:@"title"];

      [note setValue:body.text forKey:@"body"];

      [parentController saveContext];

    }

    else

    {

      [parentController insertNoteWithTitle:titleField.text body:body.text];

    }

  }

  [self dismissModalViewControllerAnimated:YES];

}


- (IBAction)cancel:(id)sender

{

  [self dismissModalViewControllerAnimated:YES];

}


@end
Note that you haven't yet implemented the insertNoteWithTitle:body: method in NoteListViewController, so this file won't yet compile.
Next, you must create the actual user interface that the NoteViewController instance controls. Select the NoteViewController.xib file to open it in Interface Builder. Perform the following steps:
- Drag a Navigation Bar onto the view, and align it with the top edge of the view. Change its title to Note.
- Drag two Bar Button Items onto the navigation bar—one on the left and one on the right.
- Change the labels on the two Bar Button items you just added—the one on the left to Cancel and the one on the right to Save.
- Ctrl+drag from the Cancel Bar Button Item to the File's Owner icon and select
cancel:from the pop-up menu. - Ctrl+drag from the Save Bar Button Item to the File's Owner icon and select
save:from the pop-up menu. - Drag a Label onto the top left of the view, below the navigation bar, and change its text to Title:.
- Drag a Text Field onto the view, to the right of the Title: label.
- Drag a Text View onto the view, below the Title: label, and make it fill the rest of the view.
- Ctrl+drag from the File's Owner icon to the text field, and select titleField from the pop-up menu.
- Ctrl+drag from the File's Owner icon to the Text view, and select body from the pop-up menu.
Figure 10–9 shows what your view should look like when you're done. Make sure you follow all the previous steps, including wiring the buttons to the action methods you created (save: and cancel:) and the user interface components to the appropriate variables.
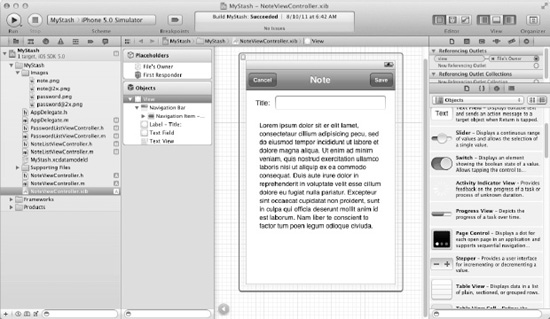
Figure 10–9. Setting up the single note view
All that's left for the MyStash application to be able to add and edit notes is to display this modal in response to two user actions from the Note List view.
- Tap the + button to add a new note.
- Tap the note's title in the list to edit that note.
Open NoteListViewController.h, and add the following two method declarations: one to show the modal when the user clicks the + button and one to insert a new note:
- (void)showNoteView;

- (void)insertNoteWithTitle:(NSString *)title body:(NSString *)body;
Open NoteListViewController.m, import NoteViewController.h, and add definitions for those two methods. The first, showNoteView:, allocates an instance of NoteViewController and initializes it with the parent view controller and a nil note so that a new note will be created. The second, insertNoteWithTitle:, is the method that NoteViewController calls when the user saves a new note. Listing 10–9 shows these two methods.
Listing 10–9. Methods for creating a note
- (void)showNoteView
{
NoteViewController *noteViewController = [[NoteViewController alloc]
initWithParentController:self note:nil];
[self presentModalViewController:noteViewController animated:YES];
}
- (void)insertNoteWithTitle:(NSString *)title body:(NSString *)body
{

  NSManagedObjectContext *context = [fetchedResultsController managedObjectContext];

  NSEntityDescription *entity = [[fetchedResultsController fetchRequest] entity];

  NSManagedObject *newNote = [NSEntityDescription

insertNewObjectForEntityForName:[entity name] inManagedObjectContext:context];


  [newNote setValue:title forKey:@"title"];

  [newNote setValue:body forKey:@"body"];


  [self saveContext];

}
Now, you need to add the + button and the Edit button to the note list interface. Go to the viewDidLoad: method, and add the Edit button on the left and the + button on the right. Wire the + button to the showNoteView action. Listing 10–10 shows the code.
Listing 10–10. Adding buttons in viewDidLoad:
- (void)viewDidLoad

{

  [super viewDidLoad];


  // Set up the edit and add buttons.

  self.navigationItem.leftBarButtonItem = self.editButtonItem;


  UIBarButtonItem *addButton = [[UIBarButtonItem alloc]

initWithBarButtonSystemItem:UIBarButtonSystemItemAdd target:self

action:@selector(showNoteView)];

  self.navigationItem.rightBarButtonItem = addButton;

}
All that remains is to add support for editing a note. When the user taps an existing note, the tableView:didSelectRowAtIndexPath: method is called. In that method, grab the note that corresponds to the indexPath parameter, and then allocate and initialize a NoteViewController instance. This time, you pass the note managed object so that the existing note is edited. The method is shown in Listing 10–11.
Listing 10–11. Displaying a note when tapped
- (void)tableView:(UITableView *)tableView didSelectRowAtIndexPath:(NSIndexPath

*)indexPath

{

  NSManagedObject *note = [[self fetchedResultsController] objectAtIndexPath:indexPath];


  NoteViewController *noteViewController = [[NoteViewController alloc]

initWithParentController:self note:note];

  [self presentModalViewController:noteViewController animated:YES];

}
Build and run the application. You will see a blank screen, as before, but now you can click the + button to add a note. If you do, you'll see the screen shown in Figure 10–10. Type in a note, and click Save. Your new note should appear in the List view, as Figure 10–11 shows.
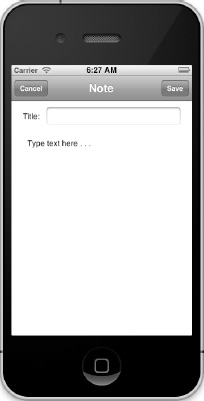
Figure 10–10. A new blank note
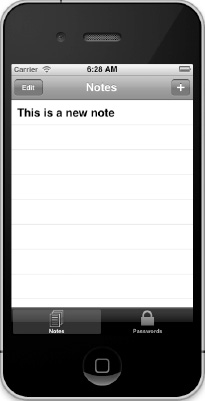
Figure 10–11. The Note List view with a note added
You can tap the note, and it will appear for you to edit. You can edit it and save the changes, or you can cancel and no changes will be saved. From the Notes List view, you can tap the Edit button to delete any notes, as Figure 10–12 shows. Tap the Done button to leave edit mode.

Figure 10–12. The Notes List View in edit mode
To complete this phase of the MyStash application, you must create the interface for adding and editing passwords. Again, create a new UIViewController subclass with an XIB for the user interface and call it PasswordViewController. The code looks very much like the code for the NoteViewController, but with different fields that are appropriate to the System entity in the data model. Listing 10–12 shows the code for PasswordViewController.h:
Listing 10–12. PasswordViewController.h
@class PasswordListViewController;


@interface PasswordViewController : UIViewController

{

  UITextField *name;

  UITextField *userId;

  UITextField *password;
  PasswordListViewController *parentController;

  NSManagedObject *system;

}

@property (strong, nonatomic) IBOutlet UITextField *name;

@property (strong, nonatomic) IBOutlet UITextField *userId;

@property (strong, nonatomic) IBOutlet UITextField *password;

@property (strong, nonatomic) PasswordListViewController *parentController;

@property (strong, nonatomic) NSManagedObject *system;


- (id)initWithParentController:(PasswordListViewController *)parentController system:(NSManagedObject *)system;

- (IBAction)save:(id)sender;

- (IBAction)cancel:(id)sender;


@end
Listing 10–13 contains the code for PasswordViewController.m.
Listing 10–13. PasswordViewController.m
#import "PasswordViewController.h"

#import "PasswordListViewController.h"


@implementation PasswordViewController


@synthesize name, userId, password, parentController, system;


- (id)initWithParentController:(PasswordListViewController *)parentController_

system:(NSManagedObject *)system_ {

  if ((self = [super init]))

  {

    self.parentController = parentController_;

    self.system = system_;

  }

  return self;

}


- (void)viewDidLoad

{

  [super viewDidLoad];

  if (system != nil)

  {

    name.text = [system valueForKey:@"name"];

    userId.text = [system valueForKey:@"userId"];

    password.text = [system valueForKey:@"password"];

  }

}


- (void)viewDidUnload

{

  self.name = nil;

  self.userId = nil;

  self.password = nil;

  [super viewDidUnload];
}


- (IBAction)save:(id)sender

{

  if (parentController != nil)

  {

    if (system != nil)

    {

      [system setValue:name.text forKey:@"name"];

      [system setValue:userId.text forKey:@"userId"];

      [system setValue:password.text forKey:@"password"];

      [parentController saveContext];

    }

    else

    {

      [parentController insertPasswordWithName:name.text userId:userId.text

password:password.text];

    }

  }

  [self dismissModalViewControllerAnimated:YES];

}


- (IBAction)cancel:(id)sender

{

  [self dismissModalViewControllerAnimated:YES];

}


@end
Again, this won't compile, because you haven't implemented the insertPasswordWithName:userId:password: method in PasswordListViewController yet.
The user interface for the Password view looks similar to, but different from, the Note view. The steps to follow, then, are similar to the ones you followed for the Note view. Open PasswordViewController.xib and follow these steps:
- Drag a Navigation Bar onto the view, and align it with the top edge of the view. Change its title to Password.
- Drag two Bar Button Items onto the navigation bar—one on the left and one on the right.
- Change the labels on the two Bar Button items you just added—the one on the left to Cancel and the one on the right to Save.
- Ctrl+drag from the Cancel Bar Button Item to the File's Owner icon and select
cancel:from the pop-up menu. - Ctrl+drag from the Save Bar Button Item to the File's Owner icon, and select
save:from the pop-up menu. - Drag a Label onto the top left of the view, below the navigation bar, and change its text to System:.
- Drag a Text Field onto the view, below the System: label, and make it span the width of the view.
- Drag another Label onto the view, below the text field you just added, and change its text to User ID:.
- Drag a Text Field onto the view, below the User ID: label, and make it span the width of the view.
- Drag another Label onto the view, below the text field you just added, and change its text to Password:.
- Drag a Text Field onto the view, below the Password: label, and make it span the width of the view.
- Ctrl+drag from the File's Owner icon to the text field below System:, and select name from the pop-up menu.
- Ctrl+drag from the File's Owner icon to the text field below User ID:, and select userId from the pop-up menu.
- Ctrl+drag from the File's Owner icon to the text field below Password:, and select password from the pop-up menu.
When you finish, the view should look like Figure 10–13.
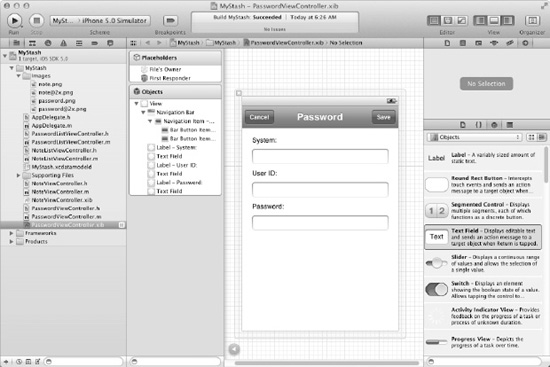
Figure 10–13. The configured Password view
The remaining steps are to update the PasswordListViewController class, as you did NoteListViewController, to show the password modal when adding or editing a password. Open PasswordListViewController.h, and add these two method declarations:
- (void)showPasswordView;

- (void)insertPasswordWithName:(NSString *)name userId:(NSString *)userId

password:(NSString *)password;
In PasswordListViewController.m, import PasswordViewController.h, and add the code in Listing 10–14.
Listing 10–14. Methods for adding and editing a password
- (void)showPasswordView
{
PasswordViewController *passwordViewController = [[PasswordViewController alloc]
initWithParentController:self system:nil];
[self presentModalViewController:passwordViewController animated:YES];
}
- (void)insertPasswordWithName:(NSString *)name userId:(NSString *)userId
password:(NSString *)password
{
NSManagedObjectContext *context = [fetchedResultsController managedObjectContext];
NSEntityDescription *entity = [[fetchedResultsController fetchRequest] entity];
NSManagedObject *newPassword = [NSEntityDescription
insertNewObjectForEntityForName:[entity name] inManagedObjectContext:context];
[newPassword setValue:name forKey:@"name"];
[newPassword setValue:userId forKey:@"userId"];
[newPassword setValue:password forKey:@"password"];
[self saveContext];
}
Change the viewDidLoad: method to match Listing 10–15.
Listing 10–15. The updated viewDidLoad: method
- (void)viewDidLoad
{
[super viewDidLoad];
self.navigationItem.leftBarButtonItem = self.editButtonItem;
UIBarButtonItem *addButton = [[UIBarButtonItem alloc]
initWithBarButtonSystemItem:UIBarButtonSystemItemAdd target:self
action:@selector(showPasswordView)];
self.navigationItem.rightBarButtonItem = addButton;
}
Finally, update the tableView:didSelectRowAtIndexPath: method to match the code in Listing 10–16.
Listing 10–16. The updated tableView:didSelectRowAtIndexPath: method
- (void)tableView:(UITableView *)tableView didSelectRowAtIndexPath:(NSIndexPath *)indexPath

{

  NSManagedObject *system = [[self fetchedResultsController]

objectAtIndexPath:indexPath];


  PasswordViewController *passwordViewController = [[PasswordViewController alloc]

initWithParentController:self system:system];

  [self presentModalViewController:passwordViewController animated:YES];

}
This phase of the MyStash application is now complete. You can add, edit, and delete notes and passwords. Build and run the application now and add a new password. When you tap the + button on the Passwords tab, you should see the modal for adding a new password, as Figure 10–14 shows. Add a few passwords, and you should see them appear in the List view, as depicted in Figure 10–15.
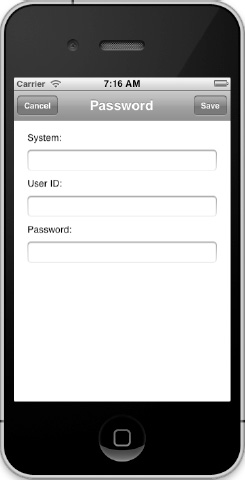
Figure 10–14. Entering a new password
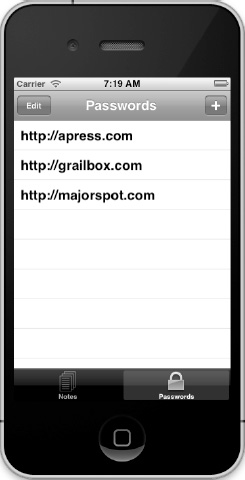
Figure 10–15. The Password List view with three entries
All the notes and passwords you create in the MyStash application live in the same persistent store. Read the next section to understand how to spread this data across multiple persistent stores.
Splitting Data Across Multiple Persistent Stores
Up to this point in the book, you have always associated a data model with a single persistent store. You may have cases, however, that would benefit from splitting the model into multiple stores. When multiple persistent stores are involved, Core Data is able to dispatch the entities to persist to the proper store and rebuild object graphs spawning across multiple stores. The role of the NSPersistentStoreCoordinator is to manage the multiple stores and make them appear to the Core Data API user as if they were a single store.
The MyStash data model contains both notes and passwords. When you run the MyStash application, all notes and passwords are stored in the MyStash.sqlite persistent store. Suppose, though, that you want to split the persistent store into two so that notes are stored in the Notes.sqlite persistent store and passwords go into the Passwords.sqlite persistent store. Figure 10–16 illustrates the split, showing where each type of managed object is persisted.
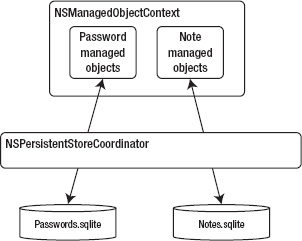
Figure 10–16. Persistent store split
Using Model Configurations
A Core Data model defines entities and their relationships in order to specify how data should be laid out, but it can also stipulate where the data should be written. To specify where data should be written, Core Data uses what's called configurations. Each entity can be associated with one or more configurations, and when a persistent store is created for a configuration, only the entities linked to that configuration are included in the persistence operation. In your example, you'll create two configurations. The first one will contain notes, and the second will store passwords.
In Xcode, open the MyStash.xcdatamodel model. Select the default configuration (below the list of Entities). It displays all the entities associated with that configuration, as shown in Figure 10–17. Initially, only the default configuration exists, which contains both the Note and the System entities. Click and hold the Add Entity button at the bottom of the Xcode window, select Add Configuration from the menu, and add a configuration called Notes. Repeat the process to create another configuration called Passwords.
The Notes configuration currently has no associated entities. To add the Note entity to the associated list of entities, select the Notes entity, and then drag it to the Entities list for that configuration, as shown in Figure 10–18. To add the System entity to the Passwords configuration, drag the System entity to the Passwords configuration, as shown in Figure 10–19.
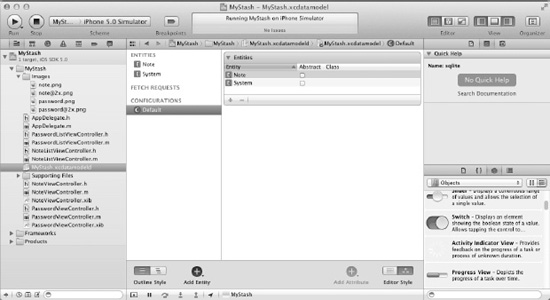
Figure 10–17. The default configuration

Figure 10–18. Adding the Note entity to the Notes configuration
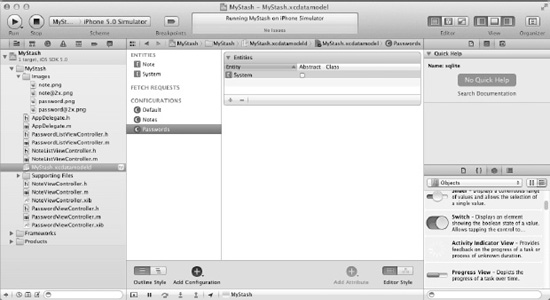
Figure 10–19. The System entity added to the Passwords configuration
You have now prepared your model for the persistent store split. All that is left to do is to create the persistent stores using the new configurations. For this, open AppDelegate.m, and change the persistentStoreCoordinator: method to match Listing 10–17.
Listing 10–17. The updated persistentStoreCoordinator: accessor
- (NSPersistentStoreCoordinator *)persistentStoreCoordinator
{
if (__persistentStoreCoordinator != nil)
{
return __persistentStoreCoordinator;
}
__persistentStoreCoordinator = [[NSPersistentStoreCoordinator alloc]
initWithManagedObjectModel:[self managedObjectModel]];
{
// Create the Notes persistent store
NSURL *noteStoreURL = [[self applicationDocumentsDirectory]
URLByAppendingPathComponent:@"Notes.sqlite"];
NSError *error = nil;
if (![__persistentStoreCoordinator addPersistentStoreWithType:NSSQLiteStoreType
configuration:@"Notes" URL:noteStoreURL options:nil error:&error])
{
NSLog(@"Unresolved error %@, %@", error, [error userInfo]);
abort();
}
}
{
// Create the Passwords persistent store
NSURL *passwordStoreURL = [[self applicationDocumentsDirectory]
URLByAppendingPathComponent:@"Passwords.sqlite"];
NSError *error = nil;
if (![__persistentStoreCoordinator addPersistentStoreWithType:NSSQLiteStoreType
configuration:@"Passwords" URL:passwordStoreURL options:nil error:&error])
{
NSLog(@"Unresolved error %@, %@", error, [error userInfo]);
abort();
}
}
return __persistentStoreCoordinator;
}
Instead of creating a single store, you created two persistent stores in an almost identical manner. The only difference is that you explicitly named the configuration for the store to use, instead of passing nil for the configuration parameter. For Passwords.sqlite, you use the Passwords configuration, while the Notes.sqlite persistent store uses the Notes configuration.
This is a good time to take a deserved break and launch the application. Add a new note as well as a new password entry to verify that it works. To your dismay, you don't notice any difference. But rejoice because this is exactly what you were aiming for: a change in the underlying persistent store structure shouldn't affect the rest of the MyStash application. Be content that the app still works even though you've completely changed how data is stored. To see the difference, you need to pop the hood open and take a look at the SQLite databases. Open a Terminal window, and go find your data stores using the following command:
find ~/Library/Application Support/iPhone Simulator/ -name "*.sqlite"
You will see your two new databases listed there, Notes.sqlite and Passwords.sqlite. If you open the Notes.sqlite database and run the .schema command, you will see the entire model, but although you can see that the note has been saved correctly, the System table does not contain any data.
sqlite> .schema

CREATE TABLE ZNOTE ( Z_PK INTEGER PRIMARY KEY, Z_ENT INTEGER, Z_OPT INTEGER, ZBODY VARCHAR, ZTITLE VARCHAR );

CREATE TABLE ZSYSTEM ( Z_PK INTEGER PRIMARY KEY, Z_ENT INTEGER, Z_OPT INTEGER, ZNAME VARCHAR, ZPASSWORD VARCHAR, ZUSERID VARCHAR );

CREATE TABLE Z_METADATA (Z_VERSION INTEGER PRIMARY KEY, Z_UUID VARCHAR(255), Z_PLIST BLOB);

CREATE TABLE Z_PRIMARYKEY (Z_ENT INTEGER PRIMARY KEY, Z_NAME VARCHAR, Z_SUPER INTEGER, Z_MAX INTEGER);

sqlite> select * from ZNOTE;

1|1|1|This is the note's body|This is a note

sqlite> select * from ZSYSTEM;

sqlite>
Now do the same procedure on the Passwords.sqlite database. The opposite is true: the table for the System entity is populated but not the Note.
sqlite> .schema
CREATE TABLE ZNOTE ( Z_PK INTEGER PRIMARY KEY, Z_ENT INTEGER, Z_OPT INTEGER, ZBODY VARCHAR, ZTITLE VARCHAR );

CREATE TABLE ZSYSTEM ( Z_PK INTEGER PRIMARY KEY, Z_ENT INTEGER, Z_OPT INTEGER, ZNAME VARCHAR, ZPASSWORD VARCHAR, ZUSERID VARCHAR );

CREATE TABLE Z_METADATA (Z_VERSION INTEGER PRIMARY KEY, Z_UUID VARCHAR(255), Z_PLIST BLOB);

CREATE TABLE Z_PRIMARYKEY (Z_ENT INTEGER PRIMARY KEY, Z_NAME VARCHAR, Z_SUPER INTEGER, Z_MAX INTEGER);

sqlite> select * from ZNOTE;

sqlite> select * from ZSYSTEM;

1|2|1|My Secure System|mypassword|myuserid

sqlite>
You have successfully split your data model into two persistent stores. The next section explains a situation in which this might be useful.
Adding Encryption
Data encryption is a big deal for any application that requires storage of sensitive information. Core Data does not do much to help you with this task, but it doesn't stand in your way, either. Securing data follows two schools of thought, and you may choose to adhere to either one based on your own needs and requirements. These two schools are either to encrypt the entire database file or to just encrypt selected fields within your data store. The next sections explain both options.
Persistent Store Encryption Using Data Protection
One of the security options that was deployed with the iPhone 3GS is hardware-level disk encryption. Apple calls it data protection. When enabled, it encrypts a portion of your disk when the device is locked and is automatically decrypted when the device is unlocked.
For data protection to work, it must be manually enabled. Keep in mind that this is hardware-level disk encryption and therefore it works only on the device itself, not on the iPhone Simulator. To enable it, open the iPhone settings, and navigate to Settings ![]()
General ![]()
Passcode Lock. Enable the passcode if not enabled yet. The bottom of the page will display “Data protection is enabled,” as illustrated in Figure 10–20, if everything is properly set up.
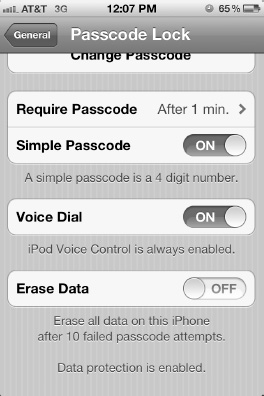
Figure 10–20. Enabling data protection on the device
From a programming standpoint, the work involved in encrypting your database is surprisingly simple. When creating the persistent store, you simply need to set the right attribute on the database file and let iOS do the rest. Open AppDelegate.m, and change the implementation of the persistentStoreCoordinator: to add the proper file attribute to encrypt the password database, as shown in Listing 10–18.
Listing 10–18. Encrypting the password database
- (NSPersistentStoreCoordinator *)persistentStoreCoordinator {
...
{
// Create the Passwords persistent store
NSURL *passwordStoreURL = [[self applicationDocumentsDirectory]
URLByAppendingPathComponent:@"Passwords.sqlite"];
NSError *error = nil;
if (![__persistentStoreCoordinator addPersistentStoreWithType:NSSQLiteStoreType
configuration:@"Passwords" URL:passwordStoreURL options:nil error:&error])
{
NSLog(@"Unresolved error %@, %@", error, [error userInfo]);
abort();
}
// Encrypt the password database
NSDictionary *fileAttributes = [NSDictionary
dictionaryWithObject:NSFileProtectionComplete forKey:NSFileProtectionKey];
if (![[NSFileManager defaultManager] setAttributes:fileAttributes
ofItemAtPath:[passwordStoreURL path] error:&error])
{
      NSLog(@"Unresolved error with password store encryption %@, %@", error, [error

userInfo]);

      abort();

    }

  }

  ...

}
When you run your application on a device that has data protection enabled, the Passwords.sqlite database file will be automatically encrypted when the device is locked. This method is cheap to implement, but understand that once the device is unlocked, the file is automatically decrypted so the database is as secure as the phone. If someone can guess the passcode, the database will be accessible, especially if the phone is jailbroken (that is, root access is available). Another inconvenience with this method is that for very large databases, the time it takes to unlock and start your application might be rather large since a huge file will need to be decrypted before it can be used.
Data Encryption
The other alternative to data security is to encrypt the data as you put it in the database. This is a case when you encrypt only what you want to secure. Let's assume that you want to be able to secure notes in the database.
Using Encryption
iOS comes with an encryption library. To make encryption easier, you add a new category to the NSData class. In Xcode, create a new Objective-C category, as shown in Figure 10–21. Enter Encryption for Category and NSData for Category on, as shown in Figure 10–22. This creates a category called NSData+Encryption and adds it to your project. Since encryption algorithms lie outside the scope of this book, we don't dig into how this category works, but simply give you the source in Listing 10–18 (NSData+Encryption.h) and Listing 10–19 (NSData+Encryption.m).
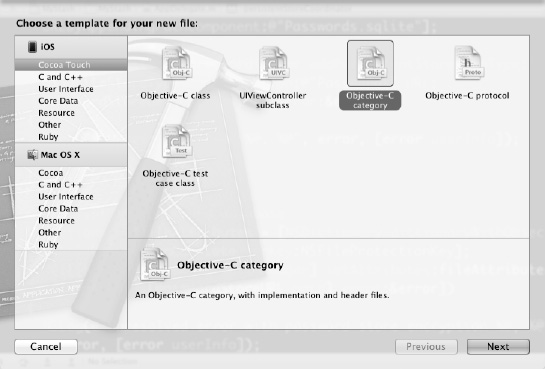
Figure 10–21. Creating an Objective-C category

Figure 10–22. Creating the NSData+Encryption category
Listing 10–18. NSData+Encryption.h
#import <Foundation/Foundation.h>


@interface NSData (Encryption)

- (NSData *)encryptWithKey:(NSString *)key;

- (NSData *)decryptWithKey:(NSString *)key;

@end
Listing 10–19. NSData+Encryption.m
#import <CommonCrypto/CommonCryptor.h>

#import "NSData+Encryption.h"


@implementation NSData (Encryption)


- (NSData *)transpose:(NSString *)_key forOperation:(int)operation

{

  // Make sure the key is big enough or else add zeros

  char key[kCCKeySizeAES256+1];

  bzero(key, sizeof(key));


  // Populate the key into the character array

  [_key getCString:key maxLength:sizeof(key) encoding:NSUTF8StringEncoding];


  size_t allocatedSize = self.length + kCCBlockSizeAES128;

  void *output = malloc(allocatedSize);


  size_t actualSize = 0;

  CCCryptorStatus resultCode = CCCrypt(operation, kCCAlgorithmAES128,

kCCOptionPKCS7Padding, key, kCCKeySizeAES256, nil, self.bytes, self.length, output,

allocatedSize, &actualSize);

  if (resultCode != kCCSuccess)

  {

    // Free the output buffer

    free(output);

    return nil;

  }


  return [NSData dataWithBytesNoCopy:output length:actualSize];

}


- (NSData *)encryptWithKey:(NSString *)key

{

  return [self transpose:key forOperation:kCCEncrypt];

}


- (NSData *)decryptWithKey:(NSString *)key

{

  return [self transpose:key forOperation:kCCDecrypt];

}


@end
This category adds two methods to the NSData class that will allow you to obtain an encrypted and decrypted version of its binary content.
Automatically Encrypting Fields
To support encrypted data, you modify the data model to use Transformable instead of String as the data type for the body attribute of the Note entity. Set the transformer name to EncryptedStringTransformer, which is a class you'll write next, as illustrated in Figure 10–23.
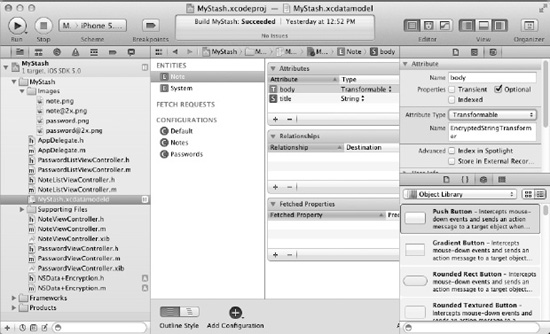
Figure 10–23. The body attribute with the Transformable data type
The role of the transformer is to encrypt/decrypt data as it goes into and comes out of the persistent store so that the rest of the application does not need to worry or know about encryption.
Create a new Objective-C class called EncryptedStringTransformer and make it a subclass of NSValueTransformer. Listing 10–20 shows the code for EncryptedStringTransformer.h, which is just as Xcode generated it.
Listing 10–20. EncryptedStringTransformer.h
#import <Foundation/Foundation.h>


@interface EncryptedStringTransformer : NSValueTransformer


@end
Implement the transformer as shown in Listing 10–21. This class uses the NSData+Encryption category to do all the encryption and decryption, so the implementation is simple and consists of transforming the clear text to encrypted data and vice versa.
Listing 10–21. EncryptedStringTransformer.m
#import "EncryptedStringTransformer.h"

#import "NSData+Encryption.h"


@implementation EncryptedStringTransformer


+ (Class)transformedValueClass

{

  return [NSString class];

}


+ (BOOL)allowsReverseTransformation

{

  return YES;

}


- (id)transformedValue:(id)value

{

  if (value == nil)

    return nil;


  NSData *clearData = [value dataUsingEncoding:NSUTF8StringEncoding];

  return [clearData encryptWithKey:@"secret"];

}


- (id)reverseTransformedValue:(id)value

{

  if (value == nil)

    return nil;


  NSData *data = [value decryptWithKey:@"secret"];


  return [[NSString alloc] initWithData:data encoding:NSUTF8StringEncoding];

}


@end
NOTE: For the sake of simplicity, we took the liberty of using the same string (“secret”) as the encryption password in the transformer. Obviously, this defies the notion of secured encryption since anyone can have access to the password. We leave it up to you to change that password and/or make it a user-configurable variable.
Testing the Encryption
Unlike the previous section where you couldn't see the hardware-level encryption since it occurred only when the device was locked, with data encryption you can enjoy the peace of mind of verifying that your data is encrypted. Since your model isn't versioned, you will need to reset the simulator before launching.
Launch the application and add a new note, as shown in Figure 10–24.
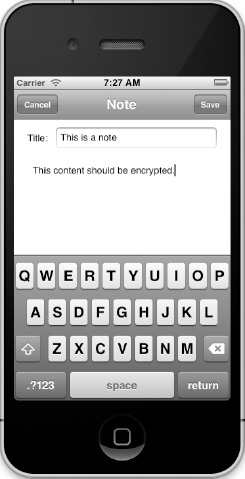
Figure 10–24. Adding a new encrypted note
We know you really enjoy running the MyStash app, but we need to ask you to put the toy down and take a look at the Notes.sqlite data store. Displaying the data in the ZNOTE table shows the following encrypted data:
sqlite> select * from ZNOTE;

1|1|1|This is a note|??<??H.K?എi?ҍ ?^??Gh???;ܺ=??X?C^?????
Of course, if you relaunch the application, the data will be decrypted properly before being displayed on the user interface. With this encryption strategy, you are in complete control of the data security. Regardless of whether the user has enabled data protection or not, the data is encrypted. If the device is stolen and unlocked, the data will still be encrypted.
Sending Notifications When Data Changes
On Mac OS X, Core Data provides UI bindings that allow you to link your data directly to your user interface. With iOS, however, Core Data currently offers no UI bindings; the closest thing you have is the NSFetchedResultsController. When using that controller is not an option, you have to rely on your own coding, with some help from the Key-Value Observing (KVO) mechanism. Since NSManagedObject is Key-Value Coding (KVC) compliant, all the usual principles of KVO can be applied, and notifications can be fired on data modifications. The KVO model is very simple and decentralized, with only two objects at play: the observer and the observed. The observer must be registered with the observed object and the observed object is responsible for firing notifications when its data changes. Thanks to the default implementation of NSManagedObject, firing notifications is automatically handled for you.
To illustrate how to use notifications, you'll create an example in which an observer outputs an acknowledgment that it has received a change notification when the name attribute of the System entity is modified. For simplicity, you output directly to the application console. In a real application, the KVO mechanism could be used to automatically update user interface elements.
Registering an Observer
To receive change notifications, the observer must be registered with the observed object using the addObserver:forKeyPath:options:context: method. The registration is valid for a given key path only, which means it is valid only for the named attribute or relationship. The advantage is that it gives you a very fine level of control over what notifications fire.
The options give you an even finer level of granularity by specifying what information you want to receive in your notifications. Table 10-1 shows the options, which can be combined with a bitwise OR.
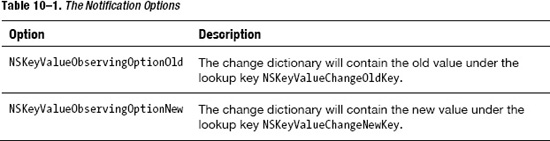
In MyStash, you will add an observer for the System entities. Open PasswordListViewController.m, and edit the configureCell:atIndexPath: method to add the observer, as shown in Listing 10–22.
Listing 10–22. Adding an observer for changes to name
- (void)configureCell:(UITableViewCell *)cell atIndexPath:(NSIndexPath *)indexPath

{

  NSManagedObject *system = [self.fetchedResultsController objectAtIndexPath:indexPath];

  cell.textLabel.text = [system valueForKey:@"name"];


  // Register this object for KVO
  [system addObserver:self forKeyPath:@"name" options:NSKeyValueObservingOptionOld |

NSKeyValueObservingOptionNew context:nil];

}
In this case, you are registering the PasswordListViewController as an observer of the name attribute that wants to receive the old and new values when the attribute for this managed object is modified.
Receiving the Notifications
To receive notifications, the observer must provide an implementation for the observeValueForKeyPath:ofObject:change:context: method. This is the method that is called when a registered notification is fired. Since PasswordListViewController is the observer, you add the method in PasswordListViewController.m, as shown in Listing 10–23.
Listing 10–23. Observing a change notification
- (void)observeValueForKeyPath:(NSString *)keyPath ofObject:(id)object

                        change:(NSDictionary *)change context:(void *)context

{

  NSLog(@"Changed value for %@: %@ -> %@", keyPath,

        [change objectForKey:NSKeyValueChangeOldKey],

        [change objectForKey:NSKeyValueChangeNewKey]);

}
The change dictionary contains the modifications. Since you asked for both the old and new values when you registered the observer, you can extract both values from the dictionary.
Launch the application, and open the output console. Edit an existing password by changing the system name, and then save the change. You will see output in the console to show that the notification was received, like so:
2011-08-20 07:46:35.047 MyStash[11493:f503] Changed value for name: TouchPad -> iPad
Note that the change doesn't happen until you save the change and the context is saved.
The KVO mechanism provides you a simple way to respond to changes in your application's data.
Seeding Data
A question we hear often concerns how to distribute a persistent store that already contains some data. Many applications, for example, include a list of values for the user to pick from to categorize the data they enter, and developers need to populate the data store with those values. You can approach this problem in several ways, including creating a SQLite database yourself and distributing that with your application instead of allowing Core Data to create the database itself, but this approach has its drawbacks, especially if a future version of your application augments this list of values. You really shouldn't overwrite the user's database file with a new, otherwise blank one that has more values in its list.
What, then, is a simple approach that allows for future change? If you've been following along with the examples in this book, you've already preloaded data into your data stores many times. Think about all the applications in this book that don't have user interfaces and how you got data into those. That's right: you created managed objects in code and then saved the managed object context. If you extend this approach a bit with a version to identify the data that's been loaded, you can easily determine in code whether to add more values in the future. In this section, you learn how to seed data into a Core Data–created persistent store in a way that allows you to change the preseeded data in future versions of your application.
Adding Categories to Passwords
To demonstrate seeding a list of values in the data store, you'll add a category to the passwords in the MyStash application. Open the data model for MyStash, and add an entity named Category with a nonoptional attribute of type String called name. Add this new entity to the Passwords configuration. Add a to-many relationship called systems that has the System entity as its destination, and add an inverse relationship called category to the System entity.
To support versioning, add another entity called List with two non-optional attributes: a String called name and an Integer 16 called version. Add it to the Passwords configuration.
Your data model should look like Figure 10–25.

Figure 10–25. The updated MyStash data model for seeding data
Add the following three method declarations to AppDelegate.h: one to load the data, one to save the context, and a helper to create a Category managed object:
- (void)loadData;

- (void)saveContext;

- (NSManagedObject *)addCategoryWithName:(NSString *)name;
Add a call to the loadData: method in AppDelegate.m, in the application:didFinishLaunchingWithOptions: method, as the first line in that method.
Then, implement the method. It should do the following:
- Fetch the version number for the
categoryentry in theListentity, creating the entry if it doesn't exist. - Based on the version number, determine which category managed objects to create and create them.
- Update the version number.
- Save the managed object context.
The code for the loadData: is shown in Listing 10–24.
Listing 10–24. The loadData: implementation
#pragma mark - Seed Data


- (void)loadData

{

  // Get the version object for "category"

  NSManagedObjectContext *context = [self managedObjectContext];

  NSFetchRequest *request = [[NSFetchRequest alloc] init];

  [request setEntity:[NSEntityDescription entityForName:@"List"

inManagedObjectContext:context]];

  [request setPredicate:[NSPredicate predicateWithFormat:@"name = 'category'"]];

  NSArray *results = [context executeFetchRequest:request error:nil];


  // Get the version number. If it doesn't exist, create it and set version to 0

  NSManagedObject *categoryVersion = nil;

  NSInteger version = 0;

  if ([results count] > 0)

  {

    categoryVersion = (NSManagedObject *)[results objectAtIndex:0];

    version = [(NSNumber *)[categoryVersion valueForKey:@"version"] intValue];

  }

  else

  {

    categoryVersion = [NSEntityDescription insertNewObjectForEntityForName:@"List"

inManagedObjectContext:context];

    [categoryVersion setValue:@"category" forKey:@"name"];

    [categoryVersion setValue:[NSNumber numberWithInt:0] forKey:@"version"];

  }


  // Create the categories to get to the latest version
  if (version < 1)

  {

    [self addCategoryWithName:@"Web Site"];

    [self addCategoryWithName:@"Desktop Software"];

  }


  // Update the version number and save the context

  [categoryVersion setValue:[NSNumber numberWithInt:1] forKey:@"version"];

  [self saveContext];

}
You can see that the code fetches the entry for category in the List entity and creates it if it doesn't exist. It pulls the version number for that entry to determine which version of the category list has been loaded. The first time you run this, the version will be set to zero. The code then adds the categories it should based on the version number and updates the version number to the latest so that subsequent runs won't append data that has already been loaded.
NOTE: For the purpose of demonstrating the mechanism, we coded our seed data by hand. In a real application, you should consider pulling the lists from some text file or CSV file.
Listing 10–25 shows the helper method for adding categories, addCategoryWithName:, which simply inserts a Category entity with the specified name into the managed object context.
Listing 10–25. Method to add a category
- (NSManagedObject *)addCategoryWithName:(NSString *)name

{

  NSManagedObject *category = [NSEntityDescription insertNewObjectForEntityForName:@"Category" inManagedObjectContext:[self

managedObjectContext]];

  [category setValue:name forKey:@"name"];

  return category;

}
Build and run the application, and then open Passwords.sqlite using sqlite3. If you run the .schema command, you'll see that the new tables for Category and List are present.
CREATE TABLE ZCATEGORY ( Z_PK INTEGER PRIMARY KEY, Z_ENT INTEGER, Z_OPT INTEGER, ZNAME VARCHAR );

CREATE TABLE ZLIST ( Z_PK INTEGER PRIMARY KEY, Z_ENT INTEGER, Z_OPT INTEGER, ZVERSION INTEGER, ZNAME VARCHAR );
The version number for the category list has been created.
sqlite> select zversion from zlist where zname='category';

1
Finally, the expected categories have been loaded.
sqlite> select * from zcategory;

1|1|1|Web Site

2|1|1|Desktop Software
You have successfully seeded your data store with category values. You can quit and rerun the application, and you'll notice that your versioning prevents these values from reloading and duplicating what's already been loaded.
Creating a New Version of Seeded Data
Suppose you want to add credit card PINs as a category. Adding a version to this code is simple. You simple add another if statement, guarded by the new version number, and change the version number that's written to the database. You want to add the entries cumulatively so that if you're running the application for the first time, you get the categories for both versions 1 and 2, but if you're already at version 1, the code loads only the values for version 2. Finally, you update the version number in the data store to reflect the version currently loaded. Listing 10–26 shows the updated code in the loadData: method.
Listing 10–26. Adding version 2 of the seeded data
- (void)loadData

{

  ...

  // Create the categories to get to the latest version

  if (version < 1)

  {

    [self addCategoryWithName:@"Web Site"];

    [self addCategoryWithName:@"Desktop Software"];

  }

  if (version < 2)

  {

    [self addCategoryWithName:@"Credit Card PIN"];

  }


  // Update the version number and save the context

  [categoryVersion setValue:[NSNumber numberWithInt:2] forKey:@"version"];

  [self saveContext];

}
We haven't updated the MyStash user interface to use the categories—we leave that as an exercise for you.
Error Handling
When you ask Xcode to generate a Core Data application for you, it creates boilerplate code for every vital aspect of talking to your Core Data persistent store. This code is more than adequate for setting up your persistent store coordinator, your managed object context, and your managed object model. In fact, if you go back to a non–Core Data project and add Core Data support, you'll do well to drop in the same code, just as Xcode generates it, to manage Core Data interaction. The code is production-ready.
That is, it is production-ready except in one aspect: error handling.
The Xcode-generated code alerts you to this shortcoming with a comment that says this:
/*

Replace this implementation with code to handle the error appropriately.


abort() causes the application to generate a crash log and terminate. You should not use this function in a shipping application, although it may be useful during development. If it is not possible to recover from the error, display an alert panel that instructs the user to quit the application by pressing the Home button.


Typical reasons for an error here include:

* The persistent store is not accessible;

* The schema for the persistent store is incompatible with current managed object model.

Check the error message to determine what the actual problem was.


If the persistent store is not accessible, there is typically something wrong with the file path. Often, a file URL is pointing into the application's resources directory instead of a writeable directory.


If you encounter schema incompatibility errors during development, you can reduce their frequency by:

* Simply deleting the existing store:

[[NSFileManager defaultManager] removeItemAtURL:storeURL error:nil]


* Performing automatic lightweight migration by passing the following dictionary as the options parameter:

[NSDictionary dictionaryWithObjectsAndKeys:[NSNumber numberWithBool:YES], NSMigratePersistentStoresAutomaticallyOption, [NSNumber numberWithBool:YES], NSInferMappingModelAutomaticallyOption, nil];


Lightweight migration will only work for a limited set of schema changes; consult "Core Data Model Versioning and Data Migration Programming Guide" for details.


*/
The Xcode-generated implementation logs the error and aborts the application, which is a decidedly unfriendly approach. All users see when this happens is your application abruptly disappearing, without any clue as to why. If this happens in a shipping application, you'll get poor reviews and low sales.
Happily, however, you don't have to fall into this trap of logging and crashing. In this section, you will explore strategies for handling errors in Core Data. No one strategy is the best, but this section should spark ideas for your specific applications and audiences and help you devise an error-handling strategy that makes sense.
Errors in Core Data can be divided into two major categories:
- Errors in normal Core Data operations
- Validation errors
The next sections will discuss strategies for handling both types of errors.
Handling Core Data Operational Errors
All the examples in this book respond to any Core Data errors using the default, Xcode-generated error-handling code, dutifully outputting the error message to Xcode's console and aborting the application. This approach has two advantages.
- It helps diagnose issues during development and debugging.
- It's easy to implement.
These advantages help only you as developer, however, and do nothing good for the application's users. Before you publically release an application that uses Core Data, you should design and implement a better strategy for responding to errors. The good news is that the strategy needn't be large or difficult to implement, because your options for how to respond are limited. Although applications are all different, in most cases you won't be able to recover from a Core Data error and should probably follow Apple's advice, represented in the previous comment: display an alert and instruct the user to close the application. Doing this explains to users what happened and gives them control over when to terminate the app. It's not much control, but hey—it's better than just having the app disappear.
Virtually all Core Data operational errors should be caught during development, so careful testing of your app should prevent these scenarios. Dealing with them, however, is simple: just follow Apple's advice from the comment. To add error handling code to the MyStash application, declare a method in AppDelegate.h for showing the alert:
- (void)showCoreDataError;
Then, add the implementation to AppDelegate.m. You can quibble with the wording, but remember that error messages aren't a paean to the muses, and the longer the message, the less likely it will be read. Listing 10–27 contains an implementation with a short and simple message—with only an extraneous exclamation mark to plead with the user to read it:
Listing 10–27. A method to show a Core Data error
- (void)showCoreDataError

{

  UIAlertView *alert = [[UIAlertView alloc] initWithTitle:@"Error!" message:@"MyStash

can't continue.
Press the Home button to close MyStash." delegate:nil

cancelButtonTitle:@"OK" otherButtonTitles: nil];

  [alert show];

}
Now, change the persistentStoreCoordinator: accessor method to use this new method instead of logging and aborting. Listing 10–28 shows the updates to persistentStoreCoordinator:.
Listing 10–28. The updated persistentStoreCoordinator: method
- (NSPersistentStoreCoordinator *)persistentStoreCoordinator

{

  if (__persistentStoreCoordinator != nil)
{
return __persistentStoreCoordinator;
}
__persistentStoreCoordinator = [[NSPersistentStoreCoordinator alloc]
initWithManagedObjectModel:[self managedObjectModel]];
{
// Create the Notes persistent store
NSURL *noteStoreURL = [[self applicationDocumentsDirectory]
URLByAppendingPathComponent:@"Notes.sqlite"];
NSError *error = nil;
if (![__persistentStoreCoordinator addPersistentStoreWithType:NSSQLiteStoreType
configuration:@"Notes" URL:noteStoreURL options:nil error:&error])
{
[self showCoreDataError];
}
}
{
// Create the Passwords persistent store
NSURL *passwordStoreURL = [[self applicationDocumentsDirectory]
URLByAppendingPathComponent:@"Passwords.sqlite"];
NSError *error = nil;
if (![__persistentStoreCoordinator addPersistentStoreWithType:NSSQLiteStoreType
configuration:@"Passwords" URL:passwordStoreURL options:nil error:&error])
{
[self showCoreDataError];
}
// Encrypt the password database
NSDictionary *fileAttributes = [NSDictionary
dictionaryWithObject:NSFileProtectionComplete forKey:NSFileProtectionKey];
if (![[NSFileManager defaultManager] setAttributes:fileAttributes
ofItemAtPath:[passwordStoreURL path] error:&error])
{
[self showCoreDataError];
}
}
return __persistentStoreCoordinator;
}
To force this error to display, run the MyStash application, and then close it. Go to the data model, add an attribute called foo of type String to the Note entity, and then run the application again. The persistent store coordinator will be unable to open the data store because the model no longer matches, and your new error message will display, as shown in Figure 10–26.
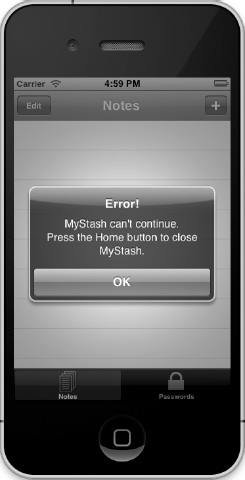
Figure 10–1a. Handling a Core Data error
That's probably the best you can do to handle unexpected errors. The next section, however, talks about handling expected errors: validation errors.
Handling Validation Errors
If you've configured any properties in your Core Data model with any validation parameters and you allow users to input values that don't automatically meet those validation parameters, you can expect to have validation errors. As you learned in Chapter 4, you can stipulate validation parameters on the properties of the entities in your data model. Validations ensure the integrity of your data; Core Data won't store anything you've proclaimed invalid into the persistent store. Just because you've created the validation rules, however, doesn't mean that users are aware of them—or that they know that they can violate them. If you leave the Xcode-generated error handling in place, users won't know they've violated the validation rules even after they input invalid data. All that will happen is that your application will crash, logging a long stack trace that the users will never see. Bewildered users will be left with a crashing application, and they won't know why or how to prevent its occurrence. Instead of crashing when users enter invalid data, you should instead alert users and give them an opportunity to correct the data.
Validation on the database side can be a controversial topic, and for good reason. You can protect your data's integrity at its source by putting your validation rules in the data model, but you've probably made your coding tasks more difficult. Validation rules in your data model are one of those things that sound good in concept but prove less desirable in practice. Can you imagine, for example, using Oracle to do field validation on a web application? Yes, you can do it, but other approaches are probably simpler, more user-friendly, and architecturally superior. Validating user-entered values in code, or even designing user interfaces that prevent invalid entry altogether, makes your job easier and users' experiences better.
Having said that, however, we'll go ahead and outline a possible strategy for handling validation errors. Don't say we didn't warn you, though.
Detecting that users have entered invalid data is simple: just inspect the NSError object that you pass to the managed object context's save: method if an error occurs. The NSError object contains the error code that caused the save: method to fail, and if that code matches one of the Core Data validation error codes shown in Table 10-2, you know that some part of the data you attempted to save was invalid. You can use NSError's userInfo dictionary to look up more information about what caused the error. Note that if multiple errors occurred, the error code is 1560, NSValidationMultipleErrorsError, and the userInfo dictionary holds the rest of the error codes in the key called NSDetailedErrorsKey.
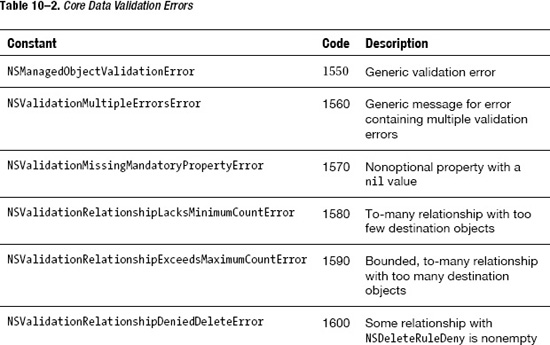
You can choose to implement an error-handling routine that's familiar with your data model and thus checks only for certain errors, or you can write a generic error handling routine that will handle any of the validation errors that occur. Though a generic routine scales better and should continue to work no matter the changes to your data model, a more specific error-handling routine may allow you to be more helpful to your users in your messaging and responses. Neither is the correct answer—the choice is yours for how you want to approach validation error handling.
To write a truly generic validation error handling routine would be a lot of work. One thing to consider is that the NSError object contains a lot of information about the error that occurred, but not necessarily enough information to tell the user why the validation failed. Imagine, for example, that you have an entity Foo with an attribute bar that must be at least five characters long. If the user enters “abc” for bar, you'll get an NSError message that tells you the error code (1670), the entity (Foo), the attribute (bar), and the value (abc) that failed validation. The NSError object doesn't tell you why abc is too short—it contains no information that bar requires at least five characters. To arrive at that, you'd have to ask the Foo entity for the NSPropertyDescription for the bar attribute, get the validation predicates for that property description, and walk through the predicates to see what the minimum length is for bar. It's a noble goal but tedious and usually overkill. This is one place where violating DRY and letting your code know something about the data model might be a better answer.
One other strange thing to consider when using validations in your data model is that they aren't enforced when you create a managed object; they're enforced only when you try to save the managed object context that the managed object lives in. This makes sense if you think it through, since creating a managed object and populating its properties happens in multiple steps. First, you create the object in the context, and then you set its attributes and relationships. So, for example, if you were creating the managed object for the Foo entity in the previous paragraph, you'd write code like this:
NSManagedObject *foo = [NSEntityDescription insertNewObjectForEntityForName:@"Foo"

inManagedObjectContext:[self managedObjectContext]]; // foo is invalid at this point;

bar has fewer than five characters

[foo setValue:@"abcde" forKey:@"bar"];
The managed object foo is created and lives in the managed object context in an invalid state, but the managed object context ignores that. The next line of code makes the foo managed object valid, but it won't be validated until the managed object context is saved.
Handling Validation Errors in MyStash
In this section, you implement a validation error handling routine for the MyStash application. It's generic in that it doesn't have any knowledge of which attributes have validation rules, but specific in that it doesn't handle all the validation errors—just the ones that you know you set on the model. Before doing that, however, you need to add some validation rules to MyStash's data model. Make the following changes to the userId attribute of the System entity:
- Set Min Length to 3.
- Set Max Length to 10.
- Set the regular expression to allow only letters and numbers:
[A-Za-z0-9]*.
The attribute fields should match Figure 10–27. Save the data model. Now you're ready to implement the validation error-handling routine.
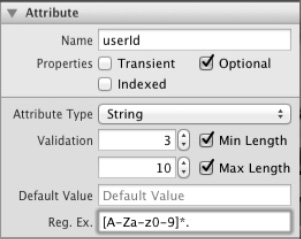
Figure 10–27. Setting validations on the userId attribute of System
Implementing the Validation Error Handling Routine
The validation error handling routine you write should accept a pointer to an NSError object and return an NSString that contains the error messages, separated by line feeds. Open PasswordListViewController.h, and declare the routine.
- (NSString *)validationErrorText:(NSError *)error;
The routine itself, which goes in PasswordListViewController.m, creates a mutable string to hold all the error messages. It then creates an array that holds all the errors, which can be multiple errors or a single error. It then iterates through all the errors, gets the property name that was in error, and, depending on the error code, forms a proper error message. Notice that some knowledge of the model (the minimum and maximum lengths, 3 and 10) is hardcoded, because the error objects don't have that information. Listing 10–29 contains the validationErrorText: implementation.
Listing 10–29. A method for producing error text from an NSError object
#pragma mark - Validation Error Handling


- (NSString *)validationErrorText:(NSError *)error

{

  // Create a string to hold all the error messages

  NSMutableString *errorText = [NSMutableString stringWithCapacity:100];


  // Determine whether we're dealing with a single error or multiples, and put them all

  // in an array

  NSArray *errors = [error code] == NSValidationMultipleErrorsError ? [[error

userInfo] objectForKey:NSDetailedErrorsKey] : [NSArray arrayWithObject:error];


  // Iterate through the errors

  for (NSError *err in errors)

  {

    // Get the property that had a validation error

    NSString *propName = [[err userInfo] objectForKey:@"NSValidationErrorKey"];

    NSString *message;

    // Form an appropriate error message

    switch ([err code])

    {

      case NSValidationMissingMandatoryPropertyError:

        message = [NSString stringWithFormat:@"%@ required", propName];

        break;

      case NSValidationStringTooShortError:

        message = [NSString stringWithFormat:@"%@ must be at least %d characters",

propName, 3];

        break;

      case NSValidationStringTooLongError:

        message = [NSString stringWithFormat:@"%@ can't be longer than %d characters",

propName, 10];

        break;

      case NSValidationStringPatternMatchingError:

        message = [NSString stringWithFormat:@"%@ can contain only letters and

numbers", propName];
        break;

      default:

        message = @"Unknown error. Press Home button to halt.";

        break;

    }

    // Separate the error messages with line feeds

    if ([errorText length] > 0)

    {

      [errorText appendString:@"
"];

    }

    [errorText appendString:message];

  }

  return errorText;

}
You have a fair amount of jiggling to do to the code to incorporate this routine into the application. Start in PasswordListViewController.h, and change the return types for two methods, for reasons that will become apparent in a few moments. Change insertPasswordWithName: to return an NSManagedObject*, and change saveContext: to return an NSString*, as shown in Listing 10–30.
Listing 10–30. Updating return types in PasswordListViewController.h
- (NSManagedObject *)insertPasswordWithName:(NSString *)name userId:(NSString *)userId

password:(NSString *)password;

- (NSString *)saveContext;
The reason insertPasswordWithName: must now return an NSManagedObject* is that you may have to delete the managed object this method creates. Consider the following sequence of events:
- User taps + to create a new password.
- User enters invalid data.
- User taps Save. A new managed object is created in the context, but saving the context fails.
- User dismisses the alert that complains of invalid data.
- User taps Cancel.
If you don't have a handle to the newly created object so you can delete it, in this scenario the invalid object would still exist in the managed object context, and subsequent saves would fail without recourse. Listing 10–31 shows the updated insertPasswordWithName: method that returns the managed object. It also shows the updated saveContext: method, which will now return the error text if the save fails. Otherwise, it will return nil.
Listing 10–31. The initWithPasswordWithName: and saveContext: methods
- (NSManagedObject *)insertPasswordWithName:(NSString *)name userId:(NSString *)userId

password:(NSString *)password

{

  NSManagedObjectContext *context = [fetchedResultsController managedObjectContext];
  NSEntityDescription *entity = [[fetchedResultsController fetchRequest] entity];

  NSManagedObject *newPassword = [NSEntityDescription

insertNewObjectForEntityForName:[entity name] inManagedObjectContext:context];


  [newPassword setValue:name forKey:@"name"];

  [newPassword setValue:userId forKey:@"userId"];

  [newPassword setValue:password forKey:@"password"];


  return newPassword;

}


- (NSString *)saveContext

{

  NSString *errorText = nil;

  NSError *error = nil;

  if (![[self.fetchedResultsController managedObjectContext] save:&error])

  {

    errorText = [self validationErrorText:error];

  }

  return errorText;

}
The only thing that has to change in the PasswordViewController class is the implementation of the save: method. Remember how simple and clean it used to be? Well, it's simple no more. Users can now do things like edit an existing system entry, change some values so they're invalid, tap Save (which updates the values on the object), and then tap Cancel after dismissing the alert. You must change this method to undo any changes if anything doesn't pass validation, so you save state before you make any changes so you can restore the state if any errors occur. If any errors occur, show the alert and don't dismiss the modal. Listing 10–32 shows the new save: method.
Listing 10–32. The updated save: method
- (IBAction)save:(id)sender

{

  NSString *errorText = nil;


  // Create variables to store pre-change state, so we can back out if

  // validation errors occur

  NSManagedObject *tempSystem = nil;

  NSString *tempName = nil;

  NSString *tempUserId = nil;

  NSString *tempPassword = nil;


  if (parentController != nil)

  {

    if (system != nil)

    {

      // User is editing an existing system. Store its current values

      tempName = [NSString stringWithString:(NSString *)[system valueForKey:@"name"]];

      tempUserId = [NSString stringWithString:(NSString *)[system

valueForKey:@"userId"]];

      tempPassword = [NSString stringWithString:(NSString *)[system

valueForKey:@"password"]];
// Update with the new values
[system setValue:name.text forKey:@"name"];
[system setValue:userId.text forKey:@"userId"];
[system setValue:password.text forKey:@"password"];
}
else
{
// User is adding a new system. Create the new managed object but keep
// a pointer to it
tempSystem = [parentController insertPasswordWithName:name.text
userId:userId.text password:password.text];
}
// Save the context and gather any validation errors
errorText = [parentController saveContext];
}
if (errorText != nil)
{
// Validation error occurred. Show an alert.
UIAlertView *alert = [[UIAlertView alloc] initWithTitle:@"Error!"
message:errorText delegate:nil cancelButtonTitle:@"OK" otherButtonTitles:nil];
[alert show];
// Because we had errors and the context didn't save, undo any changes
// this method made
if (tempSystem != nil)
{
// We added an object, so delete it
[[parentController.fetchedResultsController managedObjectContext]
deleteObject:tempSystem];
}
else
{
// We edited an object, so restore it to how it was
[system setValue:tempName forKey:@"name"];
[system setValue:tempUserId forKey:@"userId"];
[system setValue:tempPassword forKey:@"password"];
}
}
else
{
// Successful save! Dismiss the modal only on success
[self dismissModalViewControllerAnimated:YES];
}
}
Whew! That was an awful lot of work to move validations to the data model. As you explore this way to do validations, you'll probably agree that designing better user interfaces (for example, enabling the Save button only when the userId field contains valid data) or validating values in code is a better approach.
If you run this application, tap to add a new password, and enter more than ten characters (including punctuation) in the User ID field, you'll see the fruits of your validation labor, as shown in Figure 10–28.
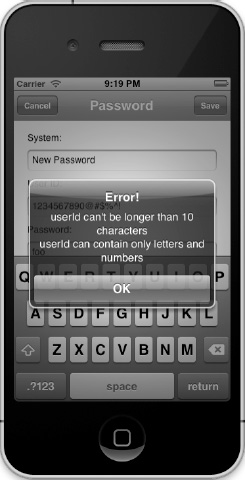
Figure 10–28. Setting validations on the userId attribute of System
Summary
In this chapter, you explored several advanced topics relating to Core Data. Some you'll most likely use, like error handling and validation, in many of your applications. Some, like encryption, you might use only occasionally.
As you've worked through this book, you've learned the breadth and depth of Core Data. You learned how much work Core Data does for you, and you learned what work you must do to properly interact with the Core Data framework. We hope you've enjoyed reading this book as much as we enjoyed writing it, and we look forward to hearing from you as you use Core Data in your applications!