How to set up or take over a tenant
Understanding the different tenant settings
Tenant level roles
A tenant is a logical container that sits within the Office 365 data center and contains the users, subscriptions, and licenses used by an organization. Power BI is one of many subscriptions that reside inside the tenant. Therefore, many settings required to manage Power BI exist at the tenant level. Most of these settings are available within the tenant settings tab in the Power BI admin portal. However, some settings get defined outside of Power BI. As these settings apply to the entire organization, it becomes critical to ensure that these settings are correctly configured and that access to these settings is restricted to authorized users only.
Creating and configuring the tenant
Assigning administration roles
Tenant-level settings
Creating and configuring a tenant
Power BI is not the only subscription found within a tenant. Other subscriptions such as Office 365 or Power Apps are also likely to be in the tenant. Therefore, the role of creating and administering the tenant does not belong to the Business Intelligence team. This role may belong to a core infrastructure team or to a team dedicated to the management of the organization’s Microsoft tenant. We will refer to the tenant administrator. In a small organization, it is possible that the tenant and Power BI administrators are the same person or that the role is shared among a small team. If Power BI is the first subscription used by such an organization, it is likely that you, as the Power BI administrator, will need to guide the tenant creation process.
A managed tenant already exists: If the organization is already using Office 365, then it is likely that the tenant is already managed. Many of the configuration choices will have been made.
No tenant exists: Power BI has been a fantastic growth product for Microsoft, and for many organizations, Power BI may be the first time they have consumed a Microsoft cloud product. Such an organization would therefore not have a tenant in place and would need to create one before getting started.
A tenant exists, but no administrator has been declared: It is possible that users within the organization have begun to use Power BI without a managed tenant being created first; this is simple to do as Microsoft allows the creation of Power BI accounts to be created using only an email address. This results in an unmanaged (also called a shadow) tenant being created. Before being able to effectively administer the tenant, you would first need to declare an administrator for this tenant.
If the tenant has already been created and administered, then there are no further actions required, and you can move onto the next section on assigning administration roles. If, on the other hand, a tenant has not been created or no administrator has been declared, then there are several steps required to set this up. Then either a tenant needs to be created or needs to be taken over by the administrator. The following two sections will describe at a high level how this can be done.
Creating a new Office 365 tenant
If your organization is new to Office 365, then the first task is to create a tenant. Each tenant is assigned a unique DNS entry of the form TenantName.onmicrosoft.com. This name must be unique, but don’t panic if it does not align with your organization’s name or domain; you will be able to assign your organization’s domain to the tenant at a later stage by assigning one or more custom DNS names to the tenant. All this can be done during or shortly after the creation of the tenant.
The easiest way to set up a tenant is to sign your organization up for an Office 365 trial. During this process, the region in which the tenant is located will be chosen. This is a crucial decision as it will affect not only where your data is stored but also the legislation that will affect the tenant. Choosing the wrong region can also result in higher costs associated with moving data between your data centers and the tenant. You are not given a list of data centers to choose from but rather the country that is used during signup.
It is not easy and may not even be possible to move a tenant once it has been created.
Once the tenant has been created, you will be able to log into it using a yourUserName@YourTenantName.onmicrosoft.com. After logging into the portal, you will be able to assign a custom domain to the tenant and will then be able to login using your regular email address. Behind the scenes, what this has done is created a new Azure Active Directory. It is possible to synchronize the users between your on-premises active directory and your new Azure Active Directory, but that is outside the scope of this book.
For detailed instructions on how to add a domain, see https://docs.microsoft.com/en-us/microsoft-365/admin/setup/add-domain.
Taking over a shadow tenant
If a tenant was created automatically by a user signing up for a free trial using their organization email address, then the tenant already exists. When this happens, no users will be assigned the administrator role for the tenant.
A tenant without an administrator is called a shadow tenant. An administrator can take ownership of such a tenant by navigating to https://portal.ofice365.com and logging into the portal using their work email address. If you have not done this before, you will be prompted to create an account. Once signed into the portal, you would select the admin option on the top left or by browsing to https://admin.microsoft.com/. If no administrator has been declared for the tenant, then this page will simply ask if you would like to become the administrator for this tenant. To complete this process, you need to prove that you are in control of the domain by creating a txt record in the DNS settings for this domain. After this process is complete, you will be the administrator for the tenant. Having this administrator role assigned is essential because only the administrator has the necessary rights to assign other administrator rights.
Assigning administration roles
Once the administrator of the tenant has been identified, then we can begin to assign the required permissions. As this book focuses only on Power BI administration and not an administration of the entire tenant, we will only discuss the roles critical for this.
Global admin: The Global admin role is the highest level setting in Office 365, and there is no setting or function that such a user cannot modify. Such modifications include deleting users, reports, and entire workspaces. For this reason, the Global admin role should be given to as few people as possible.
Create a separate user account to be assigned to the Global administrator role. This account should not be used for any other purpose other than managing the tenant. Azure Active Directory which will be discussed later can also be used to prevent the unauthorized use of this account. We will discuss how to lock down this and other accounts in Chapter 12 on security.
Global viewer: The Global viewer role is a role that has the ability to view all settings in the tenant but not to change them. This is a preferred role for both administrators and roles such as “Risk and Compliance” or “Internal audit” who are tasked with ensuring conformance to the group policy but do not have authority to make changes. Using this role permission can be granted to teams in a governance or audit role that need to validate the configuration without being able to change it.
Power BI admin: The Power BI admin role is a superuser role only applicable to the Power BI subscription. The role includes the ability to change Power BI tenant settings and create and delete workspaces; however they cannot create users or assign and remove licenses.

Enabling Global admin role
With an Office 365 tenant and an administrator now in place, the Power BI administrator can begin to set the appropriate administration settings in Power BI admin portal.
Power BI admin portal
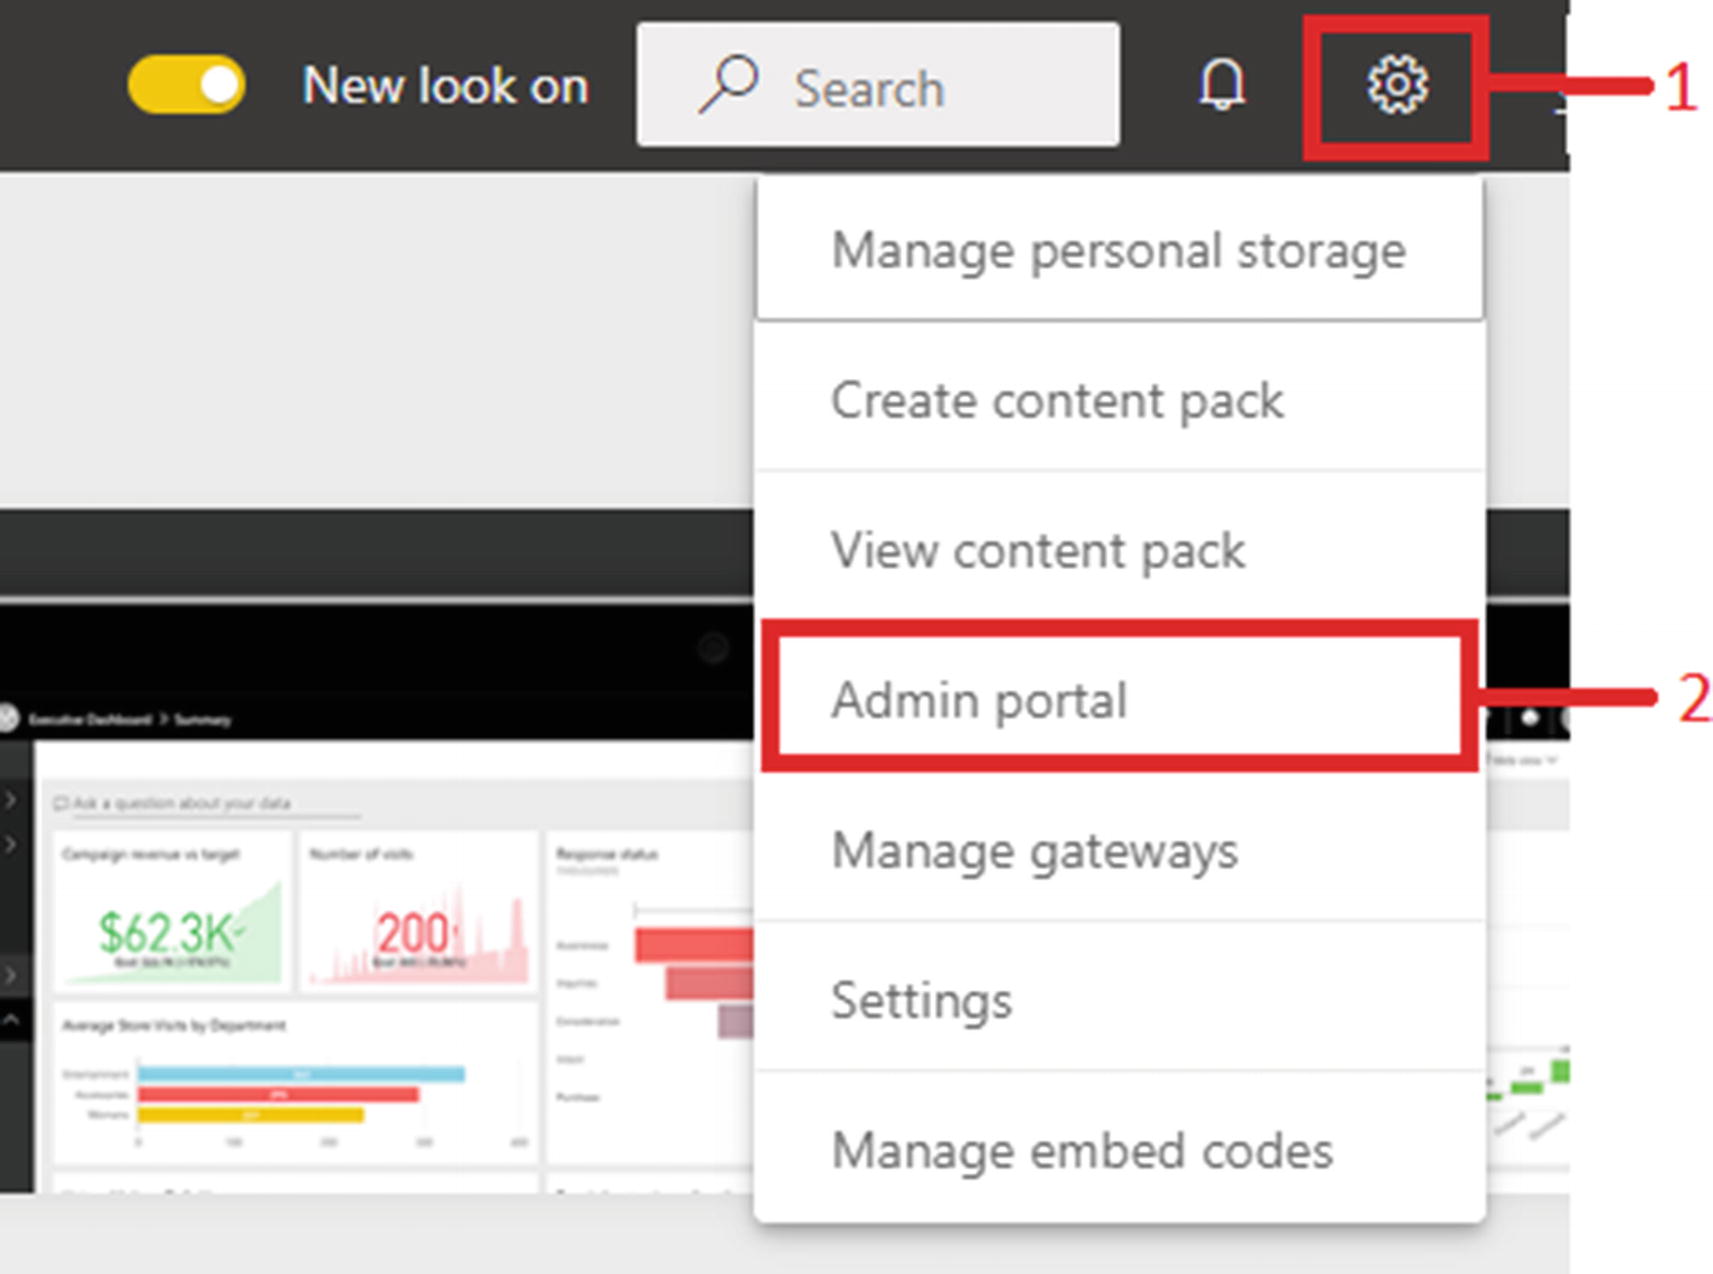
Accessing the Power BI admin page
Within this portal, there are several options to be configured; we will look through many of these options and discuss some of the things that you want to consider when making these settings.
Usage metrics
The Usage metrics is a great tool to quickly get an overview of the most popular reports and most active users. While this is great for a small team with few users and reports, the usage metrics report does not provide the necessary depth required to manage the system effectively. In Chapter 16 we will discuss how to do more advanced monitoring.
Users
The Power BI administrator role does not include the ability to create new users or assign licenses to users. To perform these tasks, one would need to access the Office 365 administration portal and have sufficient rights to perform these tasks. This page simply provides a redirect to the admin center. The management of users is discussed more deeply in Chapter 12.
Audit logs
Auditing in Office 365 is performed at the tenant level. Similar to the users’ page mentioned earlier, this page simply provides a redirect to the Office 365 Security and Compliance portal. The Power BI admin role will not be sufficient to access this portal, so a Global admin or similar roles are required. These audit logs are a key tool in the monitoring of the system and will be discussed in greater detail in Chapter 16.
Tenant settings
The tenant settings are where we set the policies for the entire organization. The tenant settings page has 40+ different settings at the time of writing. The following is a quick summary of the major categories and critical settings that we think are important to highlight.
Help and support settings
Publish “Get Help” information: If your organization would like to provide custom help resources or to redirect users to a different channel when they need to make requests, then this can be done by enabling this setting option and providing alternative resources. While the default help options are well done, being able to redirect users to your own organizational helpdesk or request portal can be invaluable.
Receive email notifications for service outages or incidents: In the rare event that there are issues in the Power BI Service, a mail can be sent to a designated security group. Incident response can then deal with the disruption according to your organization’s own policies. It is recommended that this be set to a small group of people who can better determine the appropriate actions to be taken.
Workspace settings
Create workspaces: In a true self-service environment, users would create workspaces as they are required. This however can lead to many workspaces being created. These workspaces may also be duplicates of other workspaces and may not conform to the naming convention. Using this setting, the ability to create workspaces can be restricted to certain groups or opened up to the whole organization. It is recommended that this setting be disabled with only certain users given permissions to create new workspaces.
Users always have their own personal workspaces to create content should they need to; sharing directly from these workspaces should be discouraged.
Use datasets across workspaces: It is possible for reports in one workspace to access the datasets in other workspaces. The ability to access datasets across workspaces allows for significant reuse of existing work. When combined with certified datasets, this can become a powerful feature allowing for faster report creation. Great care and governance however needs to be applied as any change to the underlying dataset may break reports in workspaces that the dataset owner may not be aware of.
Information protection
Connect Power BI to Microsoft Information Protection sensitivity labels: Microsoft Information Protection is a new feature of Power BI (still in preview at the time of writing) that allows datasets and reports to be tagged as containing sensitive information. Group policies can then determine the extent that this information can be shared or exported.
Export and sharing
Share content with external users: Azure B2B (Busines to Business) allows users from outside of the organization to access reports; this was a significant development as it was one of the drivers behind the misuse of the “Publish to web” feature. By allowing external users to connect using their own Microsoft accounts, this also removed the need to create a user account in the organization’s Azure Active Directory for these third-party users. By adding these users as guest accounts within your Azure Active Directory, Power BI is also able to use their Power BI license. This can result in significant savings as it removes the need to license these individuals again, although this can still be done if required. Adding guest accounts will be covered further in Chapter 12 on security.
Publish to web: Publish to web is one of the features that require the most care; many security breaches have been unintentionally caused, often by well-meaning individuals looking to share reports or information with people outside of the organization. These well-meaning users mistakenly believed that only people with the link would be able to access the report. Microsoft has made several changes to how this functionality works, including turning this feature off by default. Administrators can turn this feature on for restricted groups where appropriate.
Export data: Most visuals in Power BI support the ability to export the summarized or underlying data to either a CSV or Excel file. This can be useful for users who would like to see the underlying data, or use it for further downstream manipulation. When this feature was first released, only CSV files were supported with Excel files being added later; because of this, there is a separate function to control the ability to export to excel.
Export to Excel: Export to Excel allows the underlying result set of a visual to be exported to an Excel file; this is similar to export CSV. However, this will generate an XLSX file and also supports a higher number of rows that can be exported (150 000 as of Match 2020) opposed to the 3000 in CSV format.
Export reports to PowerPoint presentations or PDF documents: Power BI can also export to PowerPoint and PDF; this exports a snapshot of the visuals only, and all underlying data and interactivity will be removed.
Export reports as image files: At the time of writing, this was still a preview feature; this will allow users to render the report as an image file. This is often preferred by users who would like to add the report into another tool.
Print dashboards and reports: Power BI exports can also be printed; when enabled, report browsers will be able to select the print dialog and print the page.
Certification: In Chapter 15 we will discuss certification of datasets. This feature allows the organization to “certify” datasets and reports as vetted and approved for use in the organization. This option will enable you to restrict the certification of datasets to designated groups and to provide a link to documentation for the datasets.
Allow external guest users to edit and manage content in the organization: It is possible to allow an external guest account to edit and manage reports. By default, it is recommended that this setting be turned off. However, if your organization uses third-party developers to develop Power BI content, then enabling this feature allows them to edit reports and other artifacts.
Email subscriptions: Email subscriptions are an effective way for users to receive an extract of a report on a set schedule. It should be remembered that emails are an unsecured channel, and users can forward this information to unauthorized individuals. For this reason, one needs to refer to the organization’s governance policy to determine the appropriate setting for this.
Featured content: In Power BI, certain reports, dashboards, or apps can be highlighted to make them visible on the landing page of other users. We discuss this feature later in this chapter, but if your organization would like to use this feature, then it must be enabled first.
Content packs and app settings
Content packs and apps are a great way of packaging content to users without giving them direct access to the workspace.
Content packs have been deprecated and should no longer be created, but they may still be in use within your organization.
Publish content packs and apps to the entire organization: This setting restricts the users who are able to create and publish content packs and apps. As we discussed in Chapter 5, apps should be used as part of your Power BI Application Life Cycle Management process. Therefore the ability to create apps should be restricted to the development team.
Create template organizational content packs and apps: Template apps allow Power BI developers to build Power BI apps and deploy to other Power BI workspaces for use by other departments within the organization. The ability to create template apps should be locked down to the development team.
Push apps to end users: The discoverability of new reports in Power BI can sometimes be a challenge. The Push apps to end user function allows apps to be automatically installed for users without them needing to install the app form themselves. This can be an effective means of ensuring that users receive a default set of apps already installed.
Integration settings
Use Analyze in Excel with on-premises datasets: Analyze in Excel allows users to connect to a model hosted in the Power BI Service. If this model is backed by an on-premises analysis services database, then using this feature would result in unnecessary network movement as the user would be able to create a direct connection to analysis service from excel, removing the need to direct traffic over the open Internet resulting in higher latencies and increased bandwidth usage.
Use global search for Power BI: Global search allows users, using the search bar, to search for data within the organization; this spans not only to Power BI but all subscriptions. This can be a powerful way to make content discoverable.
Customize visual settings
Add and use custom visuals: The administrator can restrict the use of custom visuals to specific groups or allow all or no users to access these settings. It is a good idea to limit the visuals and as part of the governance process provide a set of approved visuals to the organization; this can be important from both a security and performance issue as well as supporting a standard look and feel across all reports.
Allow only Certified custom visuals: It is also possible to limit the custom visuals to only those that have been certified by Microsoft. This is a recommended setting for any organization working with sensitive data.
Audit and usage settings
Usage metrics for content creators: The Power BI Service can also collect and display usage metrics for reports and dashboards. This can be invaluable for the report developers, so it should and is enabled by default.
Per-user data in usage metrics for content creators: Usage metrics can be set up to include the identity of report viewers; this may expose sensitive data to the report creators. Therefore, your organization’s governance policy needs to determine if this data is made available to content creators.
Dashboard settings
Web content on dashboard tiles: The web content dashboard tile allows users to embed HTML code into a dashboard. This can be helpful in adding additional functionality; however, the introduction of external code into the portal can create a security challenge. Therefore, consider restricting this feature.
Data classification for dashboards: As we were able to classify reports, we can also classify dashboards as containing sensitive data; this will prevent the export or sharing of data.
Developer settings
Power BI is sometimes referred to as a low-to-no code solution; this is because, with little or no coding knowledge, users can create rich reports. However, it is often useful to extend the capabilities of Power BI through other solutions; this can be done by allowing external tools or services to access Power BI or host content.
This does not refer to Power BI embedded, which is a Platform As A Service (PAAS) service where developers can integrate Power BI directly into their solutions.
Embed content in apps: This feature allows dashboards and reports to be inserted into other SaaS applications such as SharePoint or Teams. Allowing for these Power BI reports to be placed inline with other business applications allows them to be more easily discovered and used.
Allow service principals to use Power BI APIs: In Chapter 15, we will discuss many of the tools available to aid the Power BI administrator; this includes functionality that is not available using the portal. A service principal is an identity within the Azure Active Directory that can be granted permission to perform specified actions without the need for users to log into the portal using their credentials. If you or anyone in the organization intend to use these APIs using a service principal, then this feature needs to be enabled. We will discuss what a service principal is and why we would want to use it in Chapter 12.
Dataflow settings
Create and use dataflows: This single setting enables or disables the creation and use of dataflows. It is not possible to limit the ability to create dataflows to designated groups.
Template app settings
Publish Template Apps: The ability to create app workspaces to develop app solutions for distribution to clients outside of the organization. This type of functionality should only be enabled to Power BI developers who are creating content that will be shared or sold to other organizations. While it is enabled by default, consider disabling this option if your organization does not distribute Template Apps.
Install Template Apps: Template apps created outside of your organization can also be installed. If your organization does make use of Template Apps, then this would need to be enabled but should be restricted to a controlled group.
Install Template Apps not listed in AppSource: If Template Apps are supported, it is a good idea to consider only apps that have been listed in AppSource, which is a Microsoft repository of applications.
Q&A
Review questions: The questions asked in the report can be made available to the dataset owner; this can be useful in determining if the report is useful or if further refinement is required.
Capacity settings
The management of capacities is a detailed topic and will be discussed in greater detail in Chapter 10.
Embed codes
The Publish to web feature allows users to share content outside of the organization without the need for a Power BI license or any user authentication. As there is no authentication, all other security measures that were put in place to protect data are effectively ignored. Earlier in this chapter, we discussed the tenant-level setting that allows this feature to be disabled or restricted. If Publish to web has been enabled, then this screen provides a list of all currently published reports and who published them. It is a good practice to periodically review the currently published reports to ensure that this public sharing is appropriate. Reports that should not be shared using this feature can be revoked.
Organizational visuals
Power BI supports a rich collection of visuals out of the box and can be extended through the use of custom visuals; the Power BI market place has several visuals that can be incorporated into reports. It is possible for administrators to restrict the visuals used; this would generally be done for one of two reasons. Some visuals, such as mapping visuals, make external calls to third-party APIs. Depending on the type of data being transmitted, this may be a violation of the organization’s governance policy, or even laws such as GDPR. Secondly, restricting visuals to a subset of visuals leads to a more consistent report experience within the organization.
Dataflow settings
Dataflows are a capability within Power BI that allows data to be ingested into a staging area. This setting allows the administrator to use custom storage using Azure DataLake store Gen 2. We will discuss the administration of data, including dataflows, more in Chapter 13.
Workspaces
Workspace administration is another important topic that is worthy of its own chapter. In Chapter 11, we examine the correct administration of Power BI workspaces.
Custom branding
Logo: A corporate logo can be configured; this image must be of the specified size (200x300); this logo is placed in the upper left-hand corner, replacing the Power BI Logo.
Cover image: The cover image can be replaced with a company banner; like the logo this image has to be a specific size (1920x160).
- Theme color: The top banner can have its color set to align with the corporate brand giving the Power BI portal the appearance of being part or your organization’s corporate web portal.
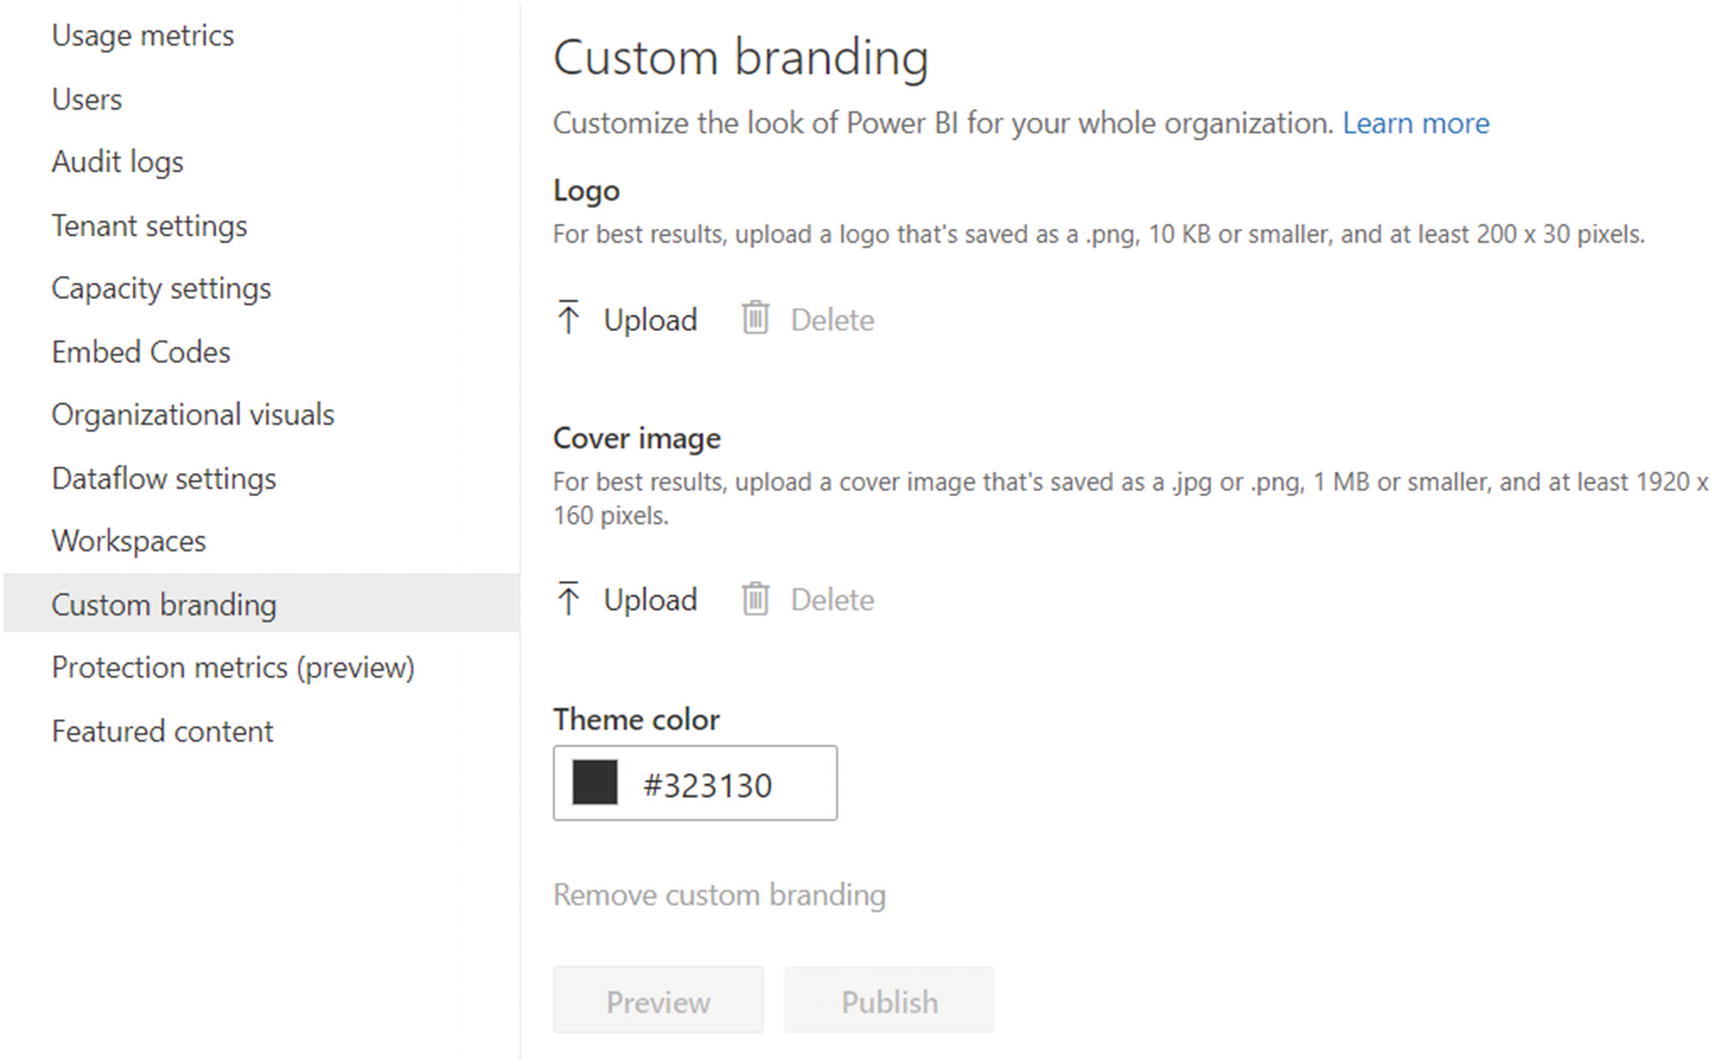 Figure 9-3
Power BI custom branding configuration
Featured content
If the allow featured content setting has been enabled, then reports and dashboards that have been selected to be featured are listed here. Content will only be featured to users who have access to the content, so there is no risk of a security breach occurring from the use of this feature.
Summary
In this chapter, we reviewed a number of the settings available to the administrator to help them to secure their Power BI environment. In the following chapter, we will look at how capacities can be administered.
Call to action (TBD)
Identify who the administrator for your tenant is.
Ensure the Power BI admin role is assigned appropriately.
Align tenant settings with your organization’s Power BI governance documents.
Document current settings and changes to those settings.
Monitor use of Publish to web.