How to deploy and manage datasets and dataflows
Configure data refreshes
Enable large models in Power BI Premium
Enable and use the XMLA endpoint
Publishing to the service
Configuring data sources
Refreshing data
Managing access
Promoting and certifying data
In this chapter, we discuss some of these key administration activities as they relate to Power BI datasets and dataflows.
Power BI datasets
Power BI datasets, also referred to as the Power BI model, consist of tables, relationships, calculations, formatting, and data. Datasets are created in Power BI Desktop together with a report as part of a single PBIX. When a report is published to the Power BI Service, the dataset is included as part of that deployment, assuming that the report was not built on a dataset that has already been published to the power BI service. These reports are sometimes referred to as lean reports as they do not contain an embedded data model. Once the PBIX file has been published, the model gets separated from the report, and both will inherit the name of the PBIX file. It is possible to change the name of the report but not the dataset.
Publishing to the service
Depending on the deployment policy of your organization, the job of publishing Power BI artifacts may become the responsibility of an administration or operations team. This separation of duties can play an essential role in ensuring that a well-governed Power BI environment is maintained.
You can read more about deployment processes in Chapter 5.
Publishing using Power BI Desktop
Uploading from the portal
Publishing using APIs
Publishing using the XMLA endpoint
Publishing using Power BI Desktop

Before the PBIX can be published to the service using the Desktop application, all changes must first be saved. After selecting the Publish button, a dialog window is displayed, listing all workspaces that the user has permission to publish to. Once the workspace has been selected, the process will first ensure that there is no existing report with that name; if the report name already exists, you will be asked if you want to overwrite the published file or cancel. The PBIX is then uploaded to the service. This may take some time if the model is large. Once Power BI Desktop has completed the upload, a dialog is displayed that confirms the upload is complete along with a link to the report.
Uploading from the portal

Uploading a PIBX file using the portal
Using this option, the administrator must ensure that they are in the correct workspace before uploading the report.
Publishing using the REST APIs or PowerShell Cmdlets
Manual deployments may be appropriate for small organizations with few reports, but in any large organization with many reports and datasets, an automated approach to these deployments is preferable. The Power BI Service provides REST APIs that can be used to perform many operations including the publishing of PBIX files. Many of these functions are also available as PowerShell Cmdlets. Chapter 15 discusses these APIs in more detail.
Using these automated tools, it is possible to upload many reports in a consistent manner. These automation options can also be integrated with many of the automated deployment tools that your organization may already use.
Publishing using the XMLA endpoint
If your organization uses Power BI Premium, it is also possible to create and modify datasets directly using the new XMLA endpoint functionality. This endpoint is discussed in more detail later in this chapter. The XMLA endpoint exposes the underlying Analysis Services service, allowing traditional tools such as Visual Studio or Tabular Editor to make changes to the model. This is the preferred way to deploy large models as this approach may not force the upload of all data, making it a faster way to apply changes.
Keeping data up-to-date
Configure data sources and gateways for the dataset
Invoke data refresh
Configuring data sources

Data source configuration for datasets
There are three important tabs on this menu.
Gateway connections

Selecting an On-premises data gateway
Gateways are discussed in greater detail in Chapter 14.
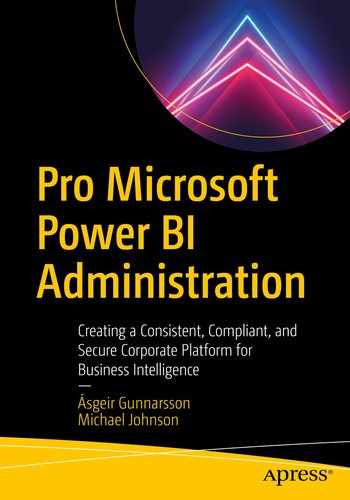
Data source credentials
Updating data source credentials
Parameters

Using parameters to configure source database
When in development these parameters would point to the development servers, but when deployed to a production workspace, these parameter values would then point to the production data sources.
Once the data sources and gateway have been correctly configured, the next step is to refresh the data.
Data refreshes
For reports that use import mode to remain up-to-date, the data in those models must be refreshed. How these refreshes are scheduled is determined by the size, frequency, and method of change.
Manual refresh

Manually refreshing a Power BI dataset
This option may be appropriate for data sources that are not expected to be refreshed often or have a data source that is not consistently online.
Scheduled refresh
Refreshing datasets manually is not a sustainable practice when your users require constant up-to-date data. For this Power BI supports scheduled refreshes. Scheduled refresh can be configured to trigger refreshes multiple times per day. The capacity type determines the number of times a dataset can be refreshed. Datasets inside of a shared capacity can be refreshed up to 8 times per day. Datasets published to Premium workspaces can be refreshed up to 48 times per day.

Creating a refresh schedule
Warning While it is be possible to process the model every 30 minutes, careful attention needs to be paid the added load that these refreshes place on the source systems, as these refreshes can cause high resource usage. If this is the case, then as the administrator, you may want to recommend the use of incremental refresh.
Automated refresh
Some data sources may not support refreshes at set times during the day. For example, if your organization runs a large end-of-day process that completes at inconsistent time intervals, then it is not possible to know when the best time to schedule the load is. In this case, it is possible to invoke a dataset refresh using the Power BI APIs. Using the APIs it is possible to include the Power BI dataset refresh as a step in your ETL process. This ensures that the refresh happens as soon as new data is available, while not being called repetitively or before the data is ready.
Incremental refresh
Incremental refresh is a feature in Power BI that allows tables to be split into smaller sections called partitions. These partitions can then be selectively processed; how these partitions are selected is defined using an incremental refresh policy.
An incremental refresh policy cannot be created once a dataset has been published to the service and needs to be created using Power BI Desktop. Creating this policy may be the responsibility of the Power BI developers.
Smaller volumes of data retrieved mean faster data refreshes.
A shorter refresh period results in more reliable refreshes with fewer timeouts.
Fewer rows loaded during refreshes results in lower impacts on source systems.
Incremental refresh cannot be used on every data source, and there are a few limitations.
Table must include a date or datetime field.
Refreshes can only work on dates in the past.
The data source should support Query-folding such as SQL server.
For step by step instructions on how to set up Incremental refresh, see https://docs.microsoft.com/en-us/power-bi/admin/service-premium-incremental-refresh.
Alerting

Configure Failure notifications
It is also possible to send such notifications using the APIs by passing the list of user to be notified. See Chapter 15 for more on the Power BI APIs.
XMLA endpoint

Enabling the XML endpoint
There are many reasons why an organization would want to enable the XMLA endpoint. We look at some of the features that the XMLA endpoint enables.
Read-only XMLA endpoint
Using the read-only XMLA endpoint , it is possible to use several common tools to connect directly to the dataset; tools such as SQL Management Studio can be used to query the metadata of the database. More practically, other reporting tools that support XMLA can query the model directly. Such tools include Excel and Tableau, allowing business users to continue using the tools that they know while supporting a single version of the truth across the enterprise. When using the XMLA endpoint, authentication is still managed through Azure Active Directory, and users still need to be given access to the underlying workspace.

Getting workspace connection
Read-write XML endpoint
SQL Server Management Studio : Management Studio is often used by SQL Server administrators and developers to connect to and manage SQL Server environments. Management Studio can be used to perform tasks such as exploring the dataset, returning metadata about the model such as its size, creating and deleting partitions, as well as procession partitions.
SQL Server profiler : Profiler can be used to connect to Power BI workspaces and monitor the activities taking place. This can be used to help troubleshoot performance problems.
Visual Studio : For years Visual Studio has been the primary tool used to develop any Microsoft Business Intelligence solution, including multi-dimensional and tabular models providing an easy-to-use graphical interface.
Tabular Editor : Tabular Editor is an open-source application that makes developing models easy, including automation and tests. Tabular Editor can also be used to deploy changes to the model without always requiring the model to be re-uploaded or refreshed.
DAX Studio : DAX studio is another third-party tool developed to primarily write and test DAX queries. DAX Studio includes tools to help understand the performance and resource usage of measures.
PowerShell : Administrators can use PowerShell to automate the creation and processing of partitions to manage custom refresh scenarios.
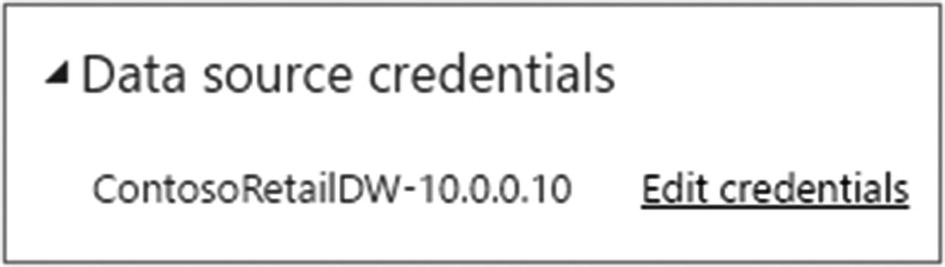
Large data models in Power BI Premium
Maximum dataset size per SKU

Memory limits per Premium SKU

Enabling large datasets using PowerShell
When large datasets are enabled, the file upload sizes are still limited to the sizes listed in Figure 13-12. However, refreshes on that dataset are supported up until the max memory size for the capacity. For this reason, it is recommended that large datasets be combined with an incremental refresh or custom partitioning.
Managing access
Controlling access to data is an essential administrative function; datasets can contain data that is sensitive and must not be accessible by unauthorized users. There are two primary mechanisms that we use to secure data. The first is by limiting users to workspaces or workspace apps that require access. Secondly, row-level security is used to prevent legitimate users from accessing data that they should not view, such as limiting a sales agent from seeing the sales of other agents.

Enabling cross workspace datasets

Adding a user to a dataset
Allow recipients to reshare the artifact: This allows users who have been granted access to reshare this access with others. Resharing may be appropriate in a smaller organization, but should not be delegated in more controlled environments where there is usually a formal process to request access.
Allow recipients to build new content from the underlying dataset: With this option enabled, users can build new reports connected to the data model, this setting would be required for Power BI report developers who need to reuse existing datasets.
Power BI dataflows
Like Power BI datasets, Power BI dataflows are a way to moving data into the Power BI Service. However, unlike datasets, Power BI reports cannot be built directly against dataflows. Instead, dataflows provide an easy-to-use self-service data preparation process that allows for the creation of standardized entities that can be reused as the source for multiple datasets.
Consolidate and standardize repeated data transformations
Reduce impact on source systems
Uses the Common Data Model to create standardized entities
The development process for Power BI dataflows differs somewhat from that of Power BI datasets. The only supported development environment for dataflows is Power Query online, which is a web-enabled version of the Power Query editor that we see in Power BI Desktop. The code to import datasets is identical, and it is even possible to copy and paste the code directly from Power BI Desktop into a dataflow.
When Power BI dataflows ingest data, the data is not loaded directly into a dataset. Instead the data is landed as a CSV file together with metadata about the data, its source query and its storage location. By default, the data is stored within the Power BI Service and is not accessible through any other mechanism. This can be changed to allow the storage of dataflows within an Azure Data Lake Storage Gen 2 account that is linked to the organization’s Azure account.
Configuring dataflows to use external storage
Extend the amount of storage available for dataflows
Access the dataflow storage directly through other tools such as Azure machine learning
Create CDM folders using external tools such as data factory, data bricks, or any other tool
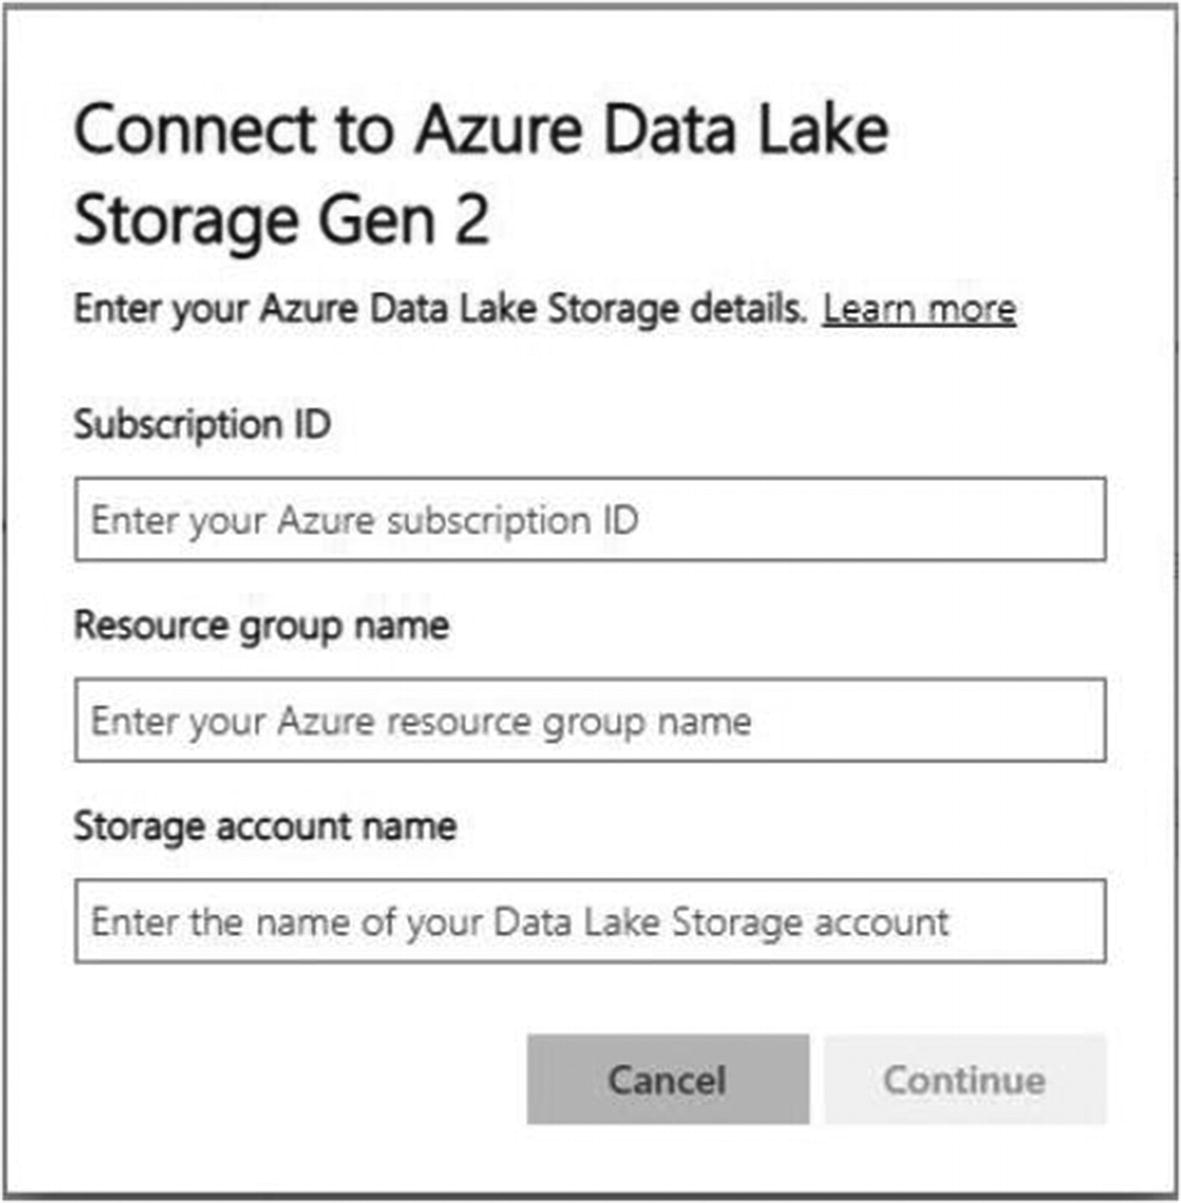
Configuring ADLS details
Subscription ID
Resource Group
Storage Account
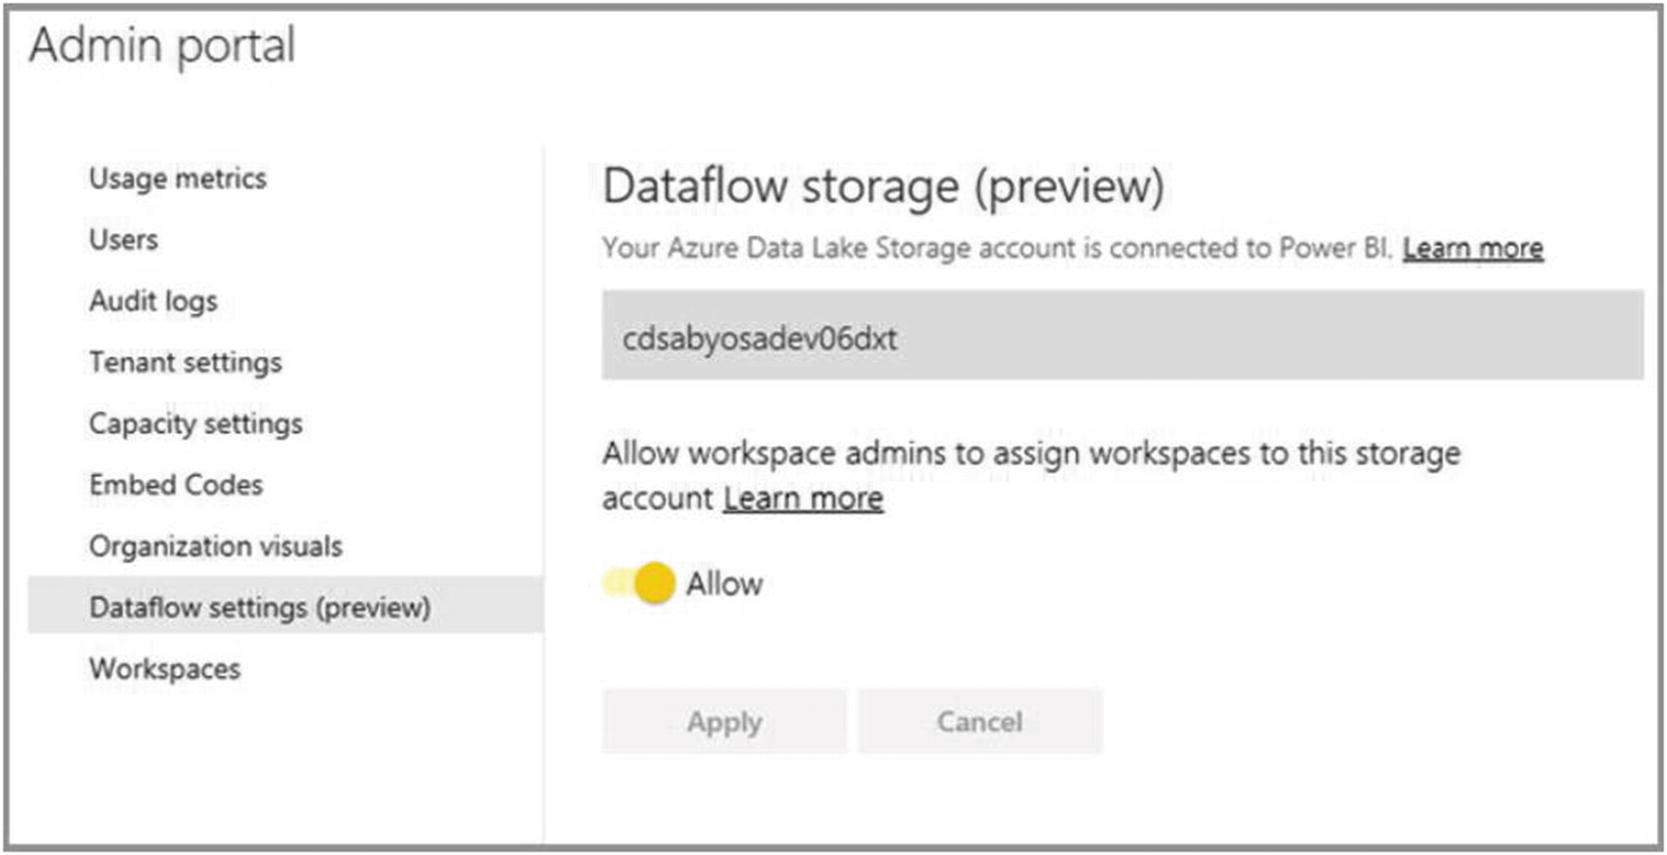
Allowing workspace admins to use the storage account
For detailed instructions on how to set up external storage, see https://docs.microsoft.com/en-us/power-bi/transform-model/service-dataflows-connect-azure-data-lake-storage-gen2.
Enhanced compute engine
Faster loads
Using Query directly against dataflows

Configure enhanced compute engine
In addition to enabling the enhanced compute engine, you also need to set the container size, this is the container that executes the enhanced compute engine process. If this process is given too little memory, then there will be a large amount of paging between the container and disk, which results in slower dataflows.
Publishing dataflows
Unlike Power BI reports and datasets, dataflows are authored in the Power BI Service using Power Query Online. Suppose the dataflow needs to be moved from one environment to another. For example, when moving the dataflow from development to production, the dataflow can first be exported to a JSON file that contains definitions for the entities as well as the M code for those data sources. It is important to note that, like the PIBX file, there are no credentials stored in the file.

Exporting a dataflow to a .json file
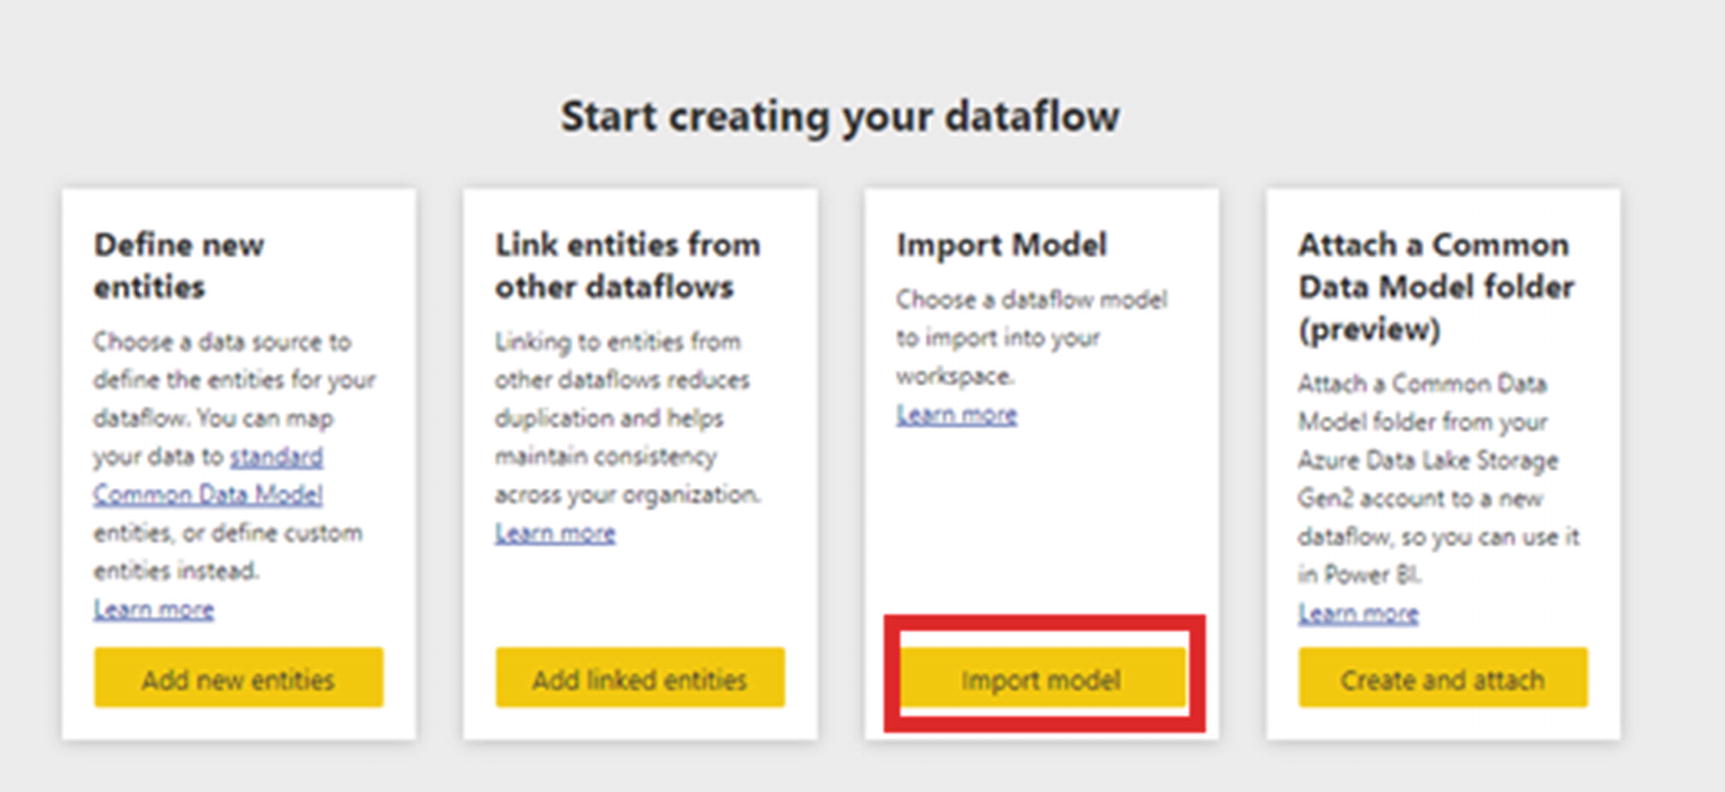
Uploading a dataflow model
After importing the model, you will then be directed to the settings page for the model where you can supply missing credential details and select a gateway as you would for a newly published dataset.
Refreshing dataflows
Manual refresh
Scheduled refresh
Automated refresh
Incremental refresh
The only significant difference between refreshing datasets and dataflows comes from incremental refreshes. Incremental refresh is only available for dataflows when using Power BI Premium.
Endorsing datasets or dataflows
To increase the visibility, use, and trust of datasets and dataflows, Power BI introduced the ability to mark these items as either promoted or certified. It is not possible to make a dataset as both certified and promoted simultaneously.
Promotion

Promoting a dataset
As a Power BI administrator, you would want to monitor the use of this functionality to ensure that it is not being abused, as promoting too many or even all datasets would have the same effect as not promoting them at all. To manage this, a policy on the use of this feature and how long a dataset or dataflow should be promoted should be decided.
Certification

Enabling certification of datasets
URL for documentation: You can provide a link to a knowledge repository such as SharePoint, confluence, or even a workflow tool where users can find out more about getting their datasets certified.
Apply to: It is possible to specify who can certify datasets and dataflows. It is not recommended that you enable this for the entire organization. The second option is to specify a list of security groups that are either able to or prohibited from using this functionality. It is important to note that this requires security groups and Office 365 groups; otherwise individuals cannot be captured here like other options in the Power BI admin portal.
The key to this setting is having a formal process that developers need to go through to certify their datasets. This process could be as informal as sending an email to the members of the certification team, or the creation workflows to manage this process.
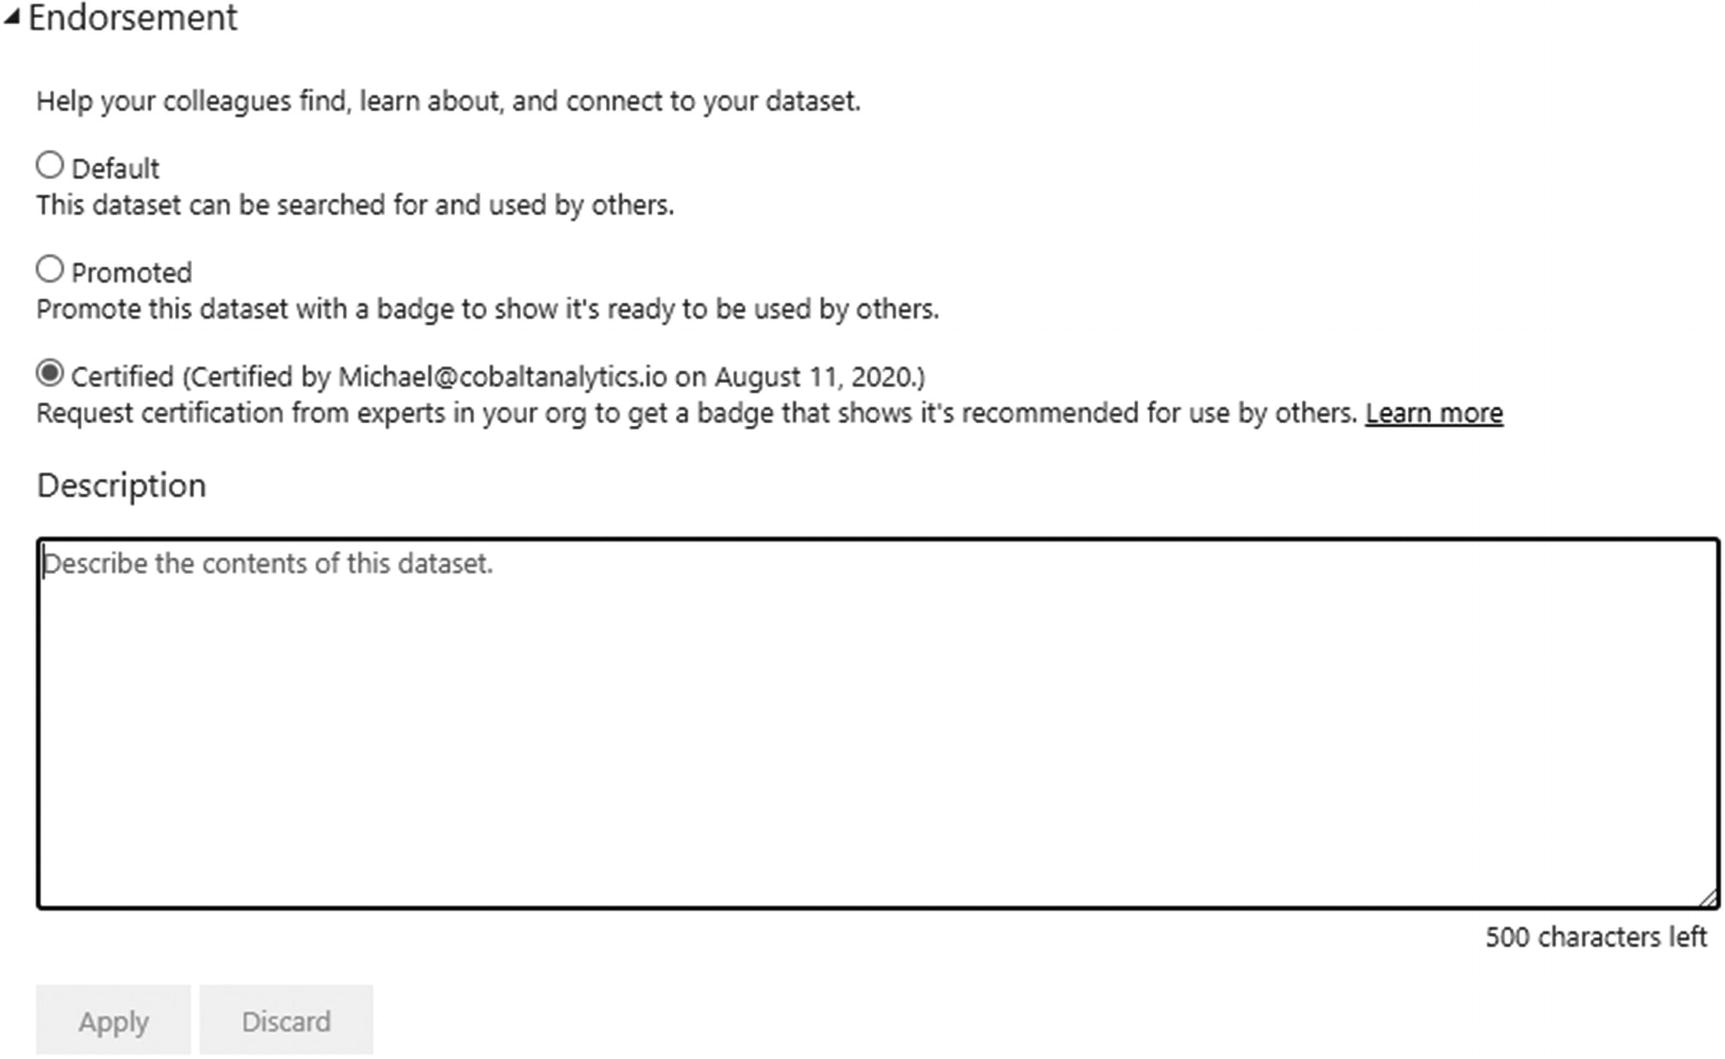
Certifying a dataset
Once certified, the dataset will appear at the top of the search list when browsing available datasets.
Certification and promotion is a great way to enhance the usage and trust in the datasets and dataflows built by your organization.
Summary
Ensuring that the data is accessible and up-to-date
Ensuring that the impact on the source system is acceptable and does not affect the operations of the organization.
There are many tools available to the administrator to help ensure the availability of data.
Next, we look at the On-premises data gateway that is used to connect the Power BI Service to your on-premises data sources.
Call to action
Formalize deployment and monitoring process for datasets and dataflows
Ensure appropriate refresh schedules for datasets and dataflows.
Configure external storage for dataflows to enable new enhanced data preparation functionality.
Monitor for large data refreshes and evaluate if incremental refresh is possible.