
Oracle Fusion Applications installation has so far been one of the biggest hurdles for many Fusion Apps enthusiasts from learning this new generation of applications. This is true mainly for two reasons—high configuration of the required hardware and the complex installation process. As far as the hardware is concerned, you can purchase your own hardware or lease remotely hosted servers from various cloud server providers like Amazon, Oracle IaaS, Rackspace, and others. Once the hardware is in place, rest assured that if you follow these few chapters of Oracle Fusion Applications installation, you will be able to host your own instance of Oracle Fusion Applications for learning, evaluation, and later, for a production environment. Avoid skipping any of these sections, since the tasks mentioned here are the minimum list of activities required for a successful installation. Although these steps are tailored for Oracle Fusion Applications 11g Release 7, 8, and 9, there will be only a few differences. I will mention important differences in the installation between various releases at each appropriate step.
Introduction to the Provisioning Process
Oracle Fusion Applications installation consists of a number of subtasks, but we can mainly classify these tasks into two major groups. The installation media used for both of the following sections is the same, as it contains all the required software for the overall provisioning process.
Oracle Identity Management provisioning
Fusion Applications provisioning
We will always start with Identity Management provisioning followed by Fusion Applications provisioning since the latter requires the presence of Identity Management infrastructure to seed identity data and policies. The Fusion Applications provisioning process has evolved a lot in recent releases. The earlier releases involved a lot of manual tasks that have been automated in the recent releases. In the recent versions of Oracle Fusion Applications, we can see a lot of similarities between the Identity Management and Fusion Applications provisioning processes. Before starting the installation, let’s first discuss the concepts of the provisioning process and the overall installation orchestration.
Understanding Installation Orchestration
Oracle Fusion Applications provisioning uses the Apache ANT foundation to orchestrate the installation process instead of using the traditional make utility used in other application suites installation. Apache ANT is a modern automation tool that uses various XML build files for controlled execution of any set of tasks. The advantage of ANT is that it’s based on a selection of products and topology the installer will utilize various build files and control codes to smoothly provision the IDM or FA environment. Another major advantage of using Apache ANT-based orchestration is that it understands dependencies between phases, actions, and action groups. The XMLs provide verbose information on activities being performed, which simplifies troubleshooting issues with the installation. ANT does not pose any technology limitation and supports building of Java or non-Java applications.
The main orchestration build XML file contains the overall flow of the installation while every phase of installation will utilize specific XML files for particular stages or products like Common, Business Intelligence, and so on. Each XML file contains a set of execution targets. Each target contains a set of actions to be completed with parameters, including timeout, error condition actions, and so on. Actions can include a range of tasks including file system commands, Java executions, compilations, and custom code execution (including C, C++, and validations), among many other possible tasks. The installation utilizes status and restart files in case it needs to be restarted for any reason.
Once we go through the actual provisioning phases and installation troubleshooting sections, you will have a clearer idea of how the installation progresses at each phase.
Classification of Hosts for an Installation
You can classify the hosts in any selected topology in following categories. With the exception of the DMZ host, all these host roles are available in any topology including a single-tier topology. A host can have one or more of these roles based on the selected topology. For example, in the single-tier architecture, the IDM and FA hosts will have each of these three roles, namely primordial host, primary host, and secondary host.
Regardless of the number of nodes in the architecture, the installation will run the appropriate phases on each of these three hosts. Don’t be surprised if you see the Configure Secondary Nodes phase being run during the provisioning phase even on a single-tier topology. This is because certain generic actions are performed only during this phase in order to make sure that all nodes in topology have already been configured. Each phase will run the appropriate set of actions on the same host, so there will not be an overlap of actions. Let’s now review the classification of the hosts in various topologies:
Primordial host: In any selected topology there will be only one primordial host regardless of the total number of nodes in the architecture. In the case of Fusion Applications provisioning, the server that hosts the administration server of the common domain will be considered the primordial host. For Identity Management provisioning, the node that runs the installer and shares the disk with other hosts is considered the primordial host. Even in high-availability architecture there will be only one primary administration server host that will act as the primordial host. The concept of the primordial host in Fusion Applications is similar to the administration/patching node in the E-Business Suite.
Tip
The installer assumes that the host on which response file is being created is the primordial host, so make sure to create/modify the response file only from the primordial host.
Primary host: There will one primary host for each WebLogic domain. There could be multiple primary hosts in a selected topology if the domains are installed on multiple nodes. In this case, the host that contains the administration server for a product family domain will act as the primary host for that particular domain.
Secondary host: There can be one or more secondary hosts for each domain depending on the number of servers where the managed servers of a particular domain are configured. In most topologies, there will be none or one secondary host. If the managed servers of a particular domain span across multiple hosts, secondary host will always be distinct from the primary host even if the primary host also contains some managed servers.
DMZ host (optional): If the selected topology has web servers in the DMZ (the demilitarized zone) then this server will host the Oracle HTTP server on non-shared disks. This server will be in a restricted zone behind a firewall.
Figure 3-1 shows how example hosts act as primordial, primary, secondary hosts, or a combination of them.
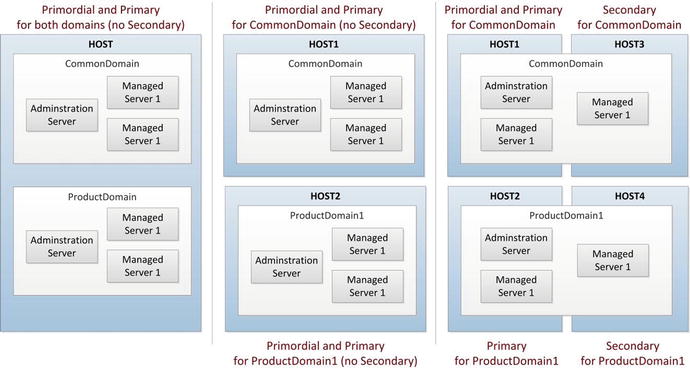
Figure 3-1. Examples of primordial, primary, and secondary hosts in various topologies
Supported Component Versions
Table 3-1 shows the supported minimum component versions for Oracle Fusion Applications installation as of Oracle Fusion Applications 11.1.9 release. Refer to Oracle’s certification matrix when new releases become available in the future.
Table 3-1. Minimum Required Component Versions for Fusion Applications
Component | Fusion Applications Release 8 | Fusion Applications Release 9+ |
|---|---|---|
Oracle Database | 11.2.0.4.0 / 11.2.0.3.0 | 11.2.0.4.0 |
Oracle Real Application Clusters | 11.2.0.4.0 / 11.2.0.3.0 | 11.2.0.4.0 |
Oracle WebLogic Server | 10.3.6.0.0 | 10.3.6.0.0 |
Oracle Identity Management | 11.1.1.7.0 | 11.1.1.7.0 |
Let’s begin with the example topology that we will use for this installation. Depending on the topology you selected, some minor steps can vary but we will make sure to include all possible differences while explaining each step. You may notice some tips or cautions. Pay special attention to those tips to simplify your installation and reduce the number of errors encountered.
Selected Topology for the Installation
For the purpose of the guided installation in this book, we are going to use a two-tier topology with four nodes since the web is a light component and does not require a dedicated server for the demo installation. The Identity Management instance will use two nodes—IDMHOST and IDMDBHOST—while the Fusion Applications instance will use two nodes—FAHOST and FADBHOST. The operating system on the nodes is Oracle Enterprise Linux (now called Oracle Linux), 64-bit version.
Figure 3-2 shows the topology we have selected for this installation. If you are provisioning an enterprise topology, you may see additional web nodes, a DMZ node, and network components like a load balancer, a firewall, a proxy, and so on. We will discuss each of these during the relevant provisioning sections.

Figure 3-2. Fusion Applications environment topology selected for this installation
Let’s look at the components that we are going to provision on each of these nodes. Table 3-2 shows the technical components to be installed and configured on each of the four nodes during this installation.
Table 3-2. Hosts in the Selected Topology
Host | Role | Components |
|---|---|---|
IDMHOST | Identity Management Application Node | IDM Oracle HTTP Server instance Oracle Internet Directory instance Oracle Virtual Directory instance IDM WebLogic Domain IDM Administration Server Oracle Access Manager Oracle Identity Manager Oracle Directory Service Manager Oracle Identity Federation IDM SOA Server |
IDMDBHOST | Identity Management Database Node | IDM Oracle Database |
FAHOST | Fusion Applications Application Node | FA Oracle HTTP Server instance Common (Setup) Domain BI Domain All Product families WebLogic Domains Standalone components like IIR (for CRM) |
FADBHOST | Fusion Applications Database Node | FA Oracle Database |
Note that even after IDMHOST and IDMDBHOST are installed and configured, we will always need them up and running during the Fusion Applications nodes installation. The FA provisioning process will seed identity and policy data in OID and related database tables. During the FA nodes provisioning, make sure to monitor the performance of IDM related nodes as well. You may see a spike in IDM nodes’ CPU usage, especially during the configure or postconfigure phases of FA provisioning, which load seed data in identity and policy stores. A performance issue in IDM nodes can result in errors during FA nodes provisioning due to timeout and related events.
Also note that network connectivity between IDM and FA nodes is not interrupted during any point in time during Fusion Applications provisioning, since it may result in failure of respective provisioning phase on FA nodes. However, if the IDM nodes are not reachable or slow for some reason and the FA provisioning fails, the framework provides reliable cleanup and restore methods to restart the failed phase. We will look at this mechanism in the relevant sections.
Fusion Applications Provisioning Steps
In this section we will look at the steps required for provisioning Identity Management and Fusion Applications components. Since we are categorizing the large number of steps in two major groups, we will first look at the steps involved in Identity Management provisioning followed by the Fusion Applications counterpart. Later we will look at the dependencies between these steps and will see how we can save time by combining independent tasks.
Provisioning Steps for Identity Management Components
Oracle has been constantly improving the Fusion Applications provisioning experience since the first release and those who have been working on it from earlier releases would know that the current provisioning processes is much more seamless compared to earlier versions. As far as Identity Management provisioning is concerned, the major shift in the installation process came after Fusion Applications 11g, release 7 along with Oracle Identity Management version 11.1.1.7. Until then the Identity Management installation included a manual process of installing, configuring, patching, and integrating IDM components in order to prepare the infrastructure for the Oracle Fusion Applications installation. From Fusion Applications Release 7 onward, Oracle provides the IDM provisioning framework or the IDM Lifecycle Management Tools (IDM LCM) to transparently provision Identity Management without going through the tedious manual process, which was prone to errors. We will briefly discuss the installers included with pre-11.1.7 Fusion Applications releases and then will focus on the current provisioning process through the Provisioning wizard.
IDM Provisioning Steps for Earlier Versions of Fusion Applications
Since all new releases of Oracle Fusion Applications now include the IDM provisioning framework and that is the recommended process of IDM provisioning, we will only quickly overview the manual process. This method was followed for Fusion Applications release 11.1.6 and earlier, which included Identity Management version up to 11.1.1.6. For new releases of Oracle Fusion Applications, you need to skip to the next section. Reading this section will help you understand what goes on behind the scenes and better understand the provisioning process phases. Also if your organization has specific requirements for earlier releases, these steps may give you an overview of the tasks involved.
1. Install the Oracle database for the Oracle Identity Management infrastructure
Installing an Oracle database is a prerequisite to provisioning the Identity Management components. In older releases there is no installer included specifically for the Identity Management database so we need to manually create a database before proceeding to the next step.
2. Run Repository Creation Utility (RCU) for the Oracle Identity Management components
Once the database is created we need to create an Oracle Identity Management repository in the database. This step is required to create required tablespaces, schemas, and packages in the blank database. It also loads seed data related to the Identity Management components once the schema objects are created.
3. Install the Oracle Identity and Access Management Components
Once the Oracle Identity Management database is installed and the repository is created, we will go ahead and install the Identity and Access Management components on the IDM primary host. This includes the following steps:
a. Install JDK.
b. Install Oracle HTTP Server.
c. Patch Oracle HTTP Server (for Fusion Applications Release 11.1.4 or earlier).
d. Install Oracle WebLogic Server.
e. Install Oracle Identity Management (Oracle Internet Directory, Oracle Virtual Directory, Oracle Directory Integration Platform, Oracle Identity Federation, and so on).
f. Patch Oracle Identity Management (for Fusion Applications Release 11.1.4 or earlier).
g. Install SOA suite.
h. Install Oracle Identity and Access Manager.
4. Apply mandatory patches.
We need to apply additional mandatory patches as part of this step. The required patches at the time of release are included in the installation repository. But there might be additional patches to be downloaded and applied at the time of installation based on latest release notes.
a. Apply database PSU 11.2.0.3.4 if not already applied.
b. Apply WebLogic Server patches using Smart Update.
c. Apply Identity Management patches.
d. Patch Common Oracle home.
e. Apply IAM (Identity and Access Management) patches.
f. Apply SOA patches.
g. Apply Oracle HTTP Server patches.
5. Configure the Oracle Identity and Access Management components.
Next we need to create a new WebLogic domain for Identity Management (IDMDomain) and then extend the same to include OIM, OAM, SOA, ODSM, and so on, and optionally configure the Oracle Virtual Directory. The configure stage includes the following activities:
a. Provision the OIM login modules to the WebLogic Server library and create wlfullclient.jar file.
b. Configure web tier.
c. Create WebLogic domain for Identity Management (IDMDomain).
d. Extend the domain to include Oracle Internet Directory.
e. Prepare identity and policy stores.
f. Extend the domain to include the Oracle Directory Service Manager.
g. Extend the domain to include the Oracle Virtual Directory (optional).
h. Configure Oracle Access Manager.
i. Configure Oracle Identity Manager and SOA.
j. Configure HTTP aliases for OAM, OIM, SOA, and ODSM.
k. Prepare OIM to reconcile from ID store.
l. Post-configure tasks.
6. Integrate Oracle Identity Manager (OIM) and Oracle Access Manager (OAM).
At this stage we need to install and configure WebGate for the access manager and integrate the components to communicate with each other. Later, we need to configure the components with Oracle HTTP server using aliases to redirect the HTTP requests to the appropriate managed server.
a. Update existing LDAP users with the required object classes.
b. Integrate Oracle Access Manager with Oracle Identity Manager.
c. Assign Administrator Groups and Roles.
d. Add Admin role to the OAMAdministrators group.
e. Update WebLogic servers boot.properties files to include encrypted usernames and passwords.
f. Install WebGate.
g. Deploy WebGate to Oracle HTTP Server.
h. Apply WebGate patches.
IDM Provisioning Steps for Fusion Applications 11.1.7 or Later
As mentioned earlier, beginning from Fusion Applications 11.1.7, the installer includes IDM provisioning framework or IDM lifecycle tools, which eliminate the need for most of the manual steps for IDM provisioning. The previous steps give you a fair idea about what to expect as a result of the provisioning wizard. Let’s now look at the list of IDM provisioning steps for Fusion Applications 11, Release 7 (11.1.7) or later.
1. Prepare the host operating system on all nodes in the topology.
2. Install the Oracle 11g database (Identity Management database).
3. Run the Repository Creation Utility (RCU) for Oracle Identity Management.
4. Install the Identity Management Provisioning wizard.
5. Create the IDM provisioning response file.
6. Provision Identity Management.
7. Perform post-provisioning configuration.
Figure 3-3 shows the steps mentioned previously along with the dependencies. We will discuss each of these steps in detail in Chapters 4-7.

Figure 3-3. Oracle Identity Management provisioning steps
Tip
We can also run some steps of FA installation in parallel to IDM installation, which are independent of each other. Refer to next section for the list of steps, which can be run in parallel to save installation time.
Provisioning Steps for Fusion Applications Components
Unlike Identity Management provisioning, the Fusion Applications provisioning process has remained nearly same since the initial releases, but the overall process has matured a lot over last few releases. The overall provisioning experience is better and the provisioning success rate is much better as well. For example, the failure recovery has improved a lot in recent releases and the false errors have reduced. We will mention every important change compared to earlier releases in every applicable sections. The following is the list of steps required for provisioning Fusion Applications components.
1. Prepare the host operating system on all nodes in the topology.
2. Install the Fusion Applications provisioning framework on all nodes in the selected topology.
3. Prepare the Fusion Applications database.
4. Install the Oracle 11g database (Fusion Applications DB).
5. Run the Fusion Applications Repository Creation Utility.
6. Create the Fusion Applications provisioning response file.
7. Provision the Fusion Applications environment.
Figure 3-4 shows the dependency diagram with the sequence of the provisioning steps, which suggests that each of these steps must be done serially, only after the previous step completes.

Figure 3-4. Fusion Applications provisioning steps
Note
The Fusion Applications provisioning response file was called the provisioning plan in earlier releases of Fusion Applications before Oracle Fusion Applications 11g, Release 4. The term “provisioning plan” is no longer used. All command-line parameters related to provisioning plan are now deprecated.
Dependencies Between IDM and FA Provisioning Steps
If you look at the overall provisioning process, including the Identity Management and Fusion Applications nodes, the complete picture looks as shown in Figure 3-5. This figure allows you to understand the overall dependency for end-to-end major steps of the provisioning process.

Figure 3-5. Fusion Applications provisioning dependency diagram (IDM and FA nodes)
Figure 3-5 shows a very interesting aspect of Fusion Applications provisioning. You may think that Oracle Fusion Applications provisioning is a serial process and all the steps must be done one at a time. Do we need to wait for all previous steps to complete before proceeding to the next step? The answer is, not always. Each step in the provisioning process is dependent on one or more steps. But we are performing provisioning on two distinct node categories, namely IDM and FA. So there are some steps that do not require all previous tasks to be completed on other nodes. This gives you an opportunity to parallelize a lot of tasks. This makes the overall provisioning process a mix of serial and parallel activities.
Consider this important tip to speed up the overall Fusion Applications installation process. Refer to Figure 3-5 and you will see the dependent tasks for each step are shown by connecting an arrow between the dependent tasks. Some steps—for example, Prepare Operating System and Network—are not dependent on any other tasks. So we can perform this operation on all nodes at same time. There are two advantages to this. You will save a lot of time by skipping all previous steps between these tasks and you will be doing similar tasks on each node, so you can maintain the flow and reduces the chances of error.
Similarly, you can prepare the IDM and FA databases in parallel as these steps are not dependent on each other. This applies to database installation and to running the Repository Creation Utilities. Since the Fusion Applications database RCU takes longer, you can start these processes and let them run in parallel. This will save a lot of time in the overall provisioning process.
An important point to note about the parallel activities is that all the other steps must be complete before you can proceed with Fusion Applications Response File creation and the provisioning the Fusion Applications nodes. So when you are about to start the Fusion Applications Response File creation, you must have a fully configured Identity Management instance and Fusion Applications Database with repository loaded already. Although we say that Fusion Applications provisioning is dependent on Identity Management infrastructure, the actual dependency starts from Response File creation step and all previous steps on FA nodes can be completed independently of the IDM nodes.
Creating the Installation Repository
Oracle Fusion Applications installation media includes all the required software installers, including Oracle database, Identity Management, and Fusion Applications components. The installation files can be downloaded from Oracle Software delivery cloud for the supported platforms.
Note
We are using Oracle Enterprise Linux (now called Oracle Linux) 64-bit as the operating system for all the examples in this book, including the installation steps. Download the installation media for your selected platform only.
The installation media comes in several ZIP files. You will need an unzip program installed in the host from where you create the installation repository. The repository should be created on a shared location so that all the nodes, including database, IDM, and FA can access it during the course of installation. The repository can be safely removed after the installation is complete. The repository location will be referred to as REPOSITORY_LOCATION in the installation steps. For example, we have created a directory named /stage on a network file server where we will unzip the media files. The same directory will be mounted on all nodes as /stage for the purpose of this installation demonstration.
Tip
Keep the repository location name short, especially with Windows hosts. The installer repository has deep levels of subdirectories and files that sometimes cross the 255 character limit on Windows hosts. There are at least two files in the installer media that have a path length very close to 255 characters. Ignoring this will result in failure of the provisioning process and it is difficult to locate the installation error. The error message is not clear enough to mention the specific missing file. It’s best to use a short path like /stage instead of something like /fusion/apps/1119/stage.
Directory Structure of the Installation Repository
Once the installer repository is created, you can mount the same installer root directory to each node and each provisioning process will use certain subdirectories. In order to better understand the directory structure of Installation Repository, let’s divide the subdirectories into two main groups. The first group is related to Identity Management provisioning while second is related to Fusion Applications provisioning. This will help you understand the role of each important directory within the installation repository. We will see them one by one in the following section.
Identity Management-Specific Directories
Figure 3-6 shows some of the important directories used during provisioning of Identity Management nodes. We will show similar directory structures for the important directories required for Fusion Applications nodes in next section.

Figure 3-6. Important directories of the installation repository (specific to IDM installation)
Let’s start with the top-level directories mentioned in Figure 3-6 and their importance in overall provisioning of Oracle Fusion Applications.
Installers: This is the base directory for all the component’s setup files. While creating a provisioning response file or at the time of the actual provisioning, the wizard checks for the presence of this directory under the repository location. If this directory is not present directly under the staging location, the installer will throw an error.
jdk6: This directory contains the required version of JDK software that can be used as a temporary JAVA_HOME directory until JDK is installed on the host. There is another directory named jdk under the main installers directory as well (not shown in the diagram) and it contains the JDK software in ZIP format. You can unzip the installers/jdk/jdk6.zip directory to your host to create a permanent JAVA_HOME for your instance.
Let’s look at the important subdirectories under installers, which are related to the Identity Management installation.
idm: Contains the Oracle Identity Management installer for creating the IDM home, which contains Oracle Internet Directory, Oracle Virtual Directory, Oracle Directory Integration Services and so on. These components are created and configured during the Identity Management provisioning process.
iamsuite: Contains the Oracle Identity and Access Management installer to create OIM home, which contains the Oracle Identity Manager and Oracle Access Manager.
soa: Contains the Oracle SOA Suite installation files. SOA provides components required for orchestrating, deploying, and managing services into SOA composite applications and business processes.
webtier: Contains the Oracle HTTP Server installation files. Oracle HTTP Server constitutes the web tier of the Oracle Identity Management environment.
webgate: Contains Oracle WebGate installation files. The WebGate plugin accepts requests from the Oracle HTTP server and forwards them to Oracle Access Manager for protected pages authorization.
oracle_common: Contains the Oracle Common home-related patches. The patches are applied on oracle_common home under Fusion middleware home directory. With earlier versions of Identity Management installers, we had to apply these patches manually but now these are automatically applied as part of the Identity Management Provisioning wizard.
weblogic: Contains the Oracle WebLogic Server installation files. WebLogic is the Application Server of Oracle Fusion middleware used in Identity Management.
smart_update: Contains Oracle WebLogic Server patches and patching utility. The Fusion Applications provisioning process automatically applies all required patches so you need not manually invoke the patching utility for the WebLogic servers.
pltsec: Contains patches related to Oracle Internet Directory (OID), Oracle Virtual Directory (OVD), and OID Tools. These are also applied automatically while provisioning through Identity Management lifecycle tools.
idmlcm: Contains Identity Management lifecycle tool installation files.
fmw_rcu: Contains the Repository Creation utility for Identity Management database and related dump files. This must be installed prior to starting the Identity Management provisioning process.
Fusion Applications-Specific Directories
In this section we will look at the important directories of the common installation repository from Fusion Applications provisioning point of view. Since you will be using the same installation repository root directory for both IDM and FA provisioning, even after Identity Management provisioning is complete, you should not remove the Identity Management-related directories from the repository. This is because there are a lot of files that are used by both installations. If you are not using shared location for installation repository between IDM and FA nodes then make sure to follow the same guidelines for creating the repository on Fusion Applications nodes, including the maximum character length for the base directory name.
Figure 3-7 shows the important directories with respect to Fusion Applications provisioning.

Figure 3-7. Important directories of the installation repository (specific to Fusion Applications)
We have already seen the top-level directories installers and jdk6 in the previous section. Now we will look at the important subdirectories under the installers directory, which are specific to Fusion Applications provisioning. I will classify them under four main categories based on their role in the installation.
1. Fusion Applications product-related directories.
fusionapps: Contains the Fusion Applications Product Families. The products are installed under the applications subdirectory within the fusionapps directory. It contains the EAR files that are deployed on the respective WebLogic managed servers of the product domains.
bishiphome: Contains Fusion Middleware Oracle Business Intelligence installation files. Oracle BI provides integrated reporting and analytics functionality to Oracle Fusion Applications. Oracle BI acts as the default reporting server for Fusion Applications, replacing all report servers of the E-Business Suite.
biappsshiphome: Contains Fusion Middleware Oracle Business Intelligence Applications installation files. Note that OBIA software is copied only to the Oracle BI home directory as biapps during Fusion Applications provisioning but it is not configured. In order to use and license Oracle Business Intelligence applications, you must manually install and configure time after Fusion Applications provisioning has completed.
iir: Contains Informatica Identity Resolution product installation files. IIR gets configured only when you are provisioning any products from the Oracle CRM family. IIR is the data quality engine for Fusion CRM, which allows you to match and search identity data and duplicate records. It also provides data-cleansing features.
osn: Contains Oracle Social Network installation files. OSN provides context-based real-time communication and sharing capabilities to Oracle Fusion Applications. OSNDomain is created and configured only when the Oracle Social Network is installed.
ses: Contains Secure Enterprise Search installation files. SES is installed and configured on all Fusion product domains and provides a secure search functionality across all the applications.
bhd: Contains Bounce Handling Daemon installation files for the Fusion Customer Relationship Management (CRM) email marketing server. BHD keeps track of the email messages sent through email marketing server, which cannot be delivered by parsing the returned emails and records the reason for email bounce.
gop: Contains Global Order Promising installation files for the Fusion Supply Chain Management (SCM). This allows the organization to accurately promise the quick delivery of orders considering all the constraints in the distributed global supply chain.
2. Oracle Fusion middleware related directories.
webtier: Contains the Oracle HTTP Server installation files. Oracle HTTP Server constitutes the web tier of the Oracle Fusion Applications environment. The Oracle HTTP server is based on the Apache HTTP Server with enhancements to facilitate load balancing and provides better integration with WebLogic and other products.
webgate: Contains Oracle WebGate installation files. The WebGate plugin accepts requests from Oracle HTTP server and forwards them to Oracle Access Manager for protected pages authorization.
wc: Contains the Oracle WebCenter installation files. WebCenter replaces traditional Oracle Portal pages and provides a service-oriented dashboard to Oracle Fusion Applications users. The WebCenter Spaces component also allows users and groups to collaborate with each other.
weblogic: Contains the Oracle WebLogic Server installation files. WebLogic is the Application Server of Oracle Fusion middleware used in Fusion Applications and replaces any earlier versions of Oracle Applications Servers used in EBS. The product families have their dedicated WebLogic domains to effectively manage, control, and utilize WebLogic server capabilities for each of the Fusion Applications products.
smart_update: Contains the Oracle WebLogic Server patches and patching utility. The Fusion Applications provisioning process automatically applies all required patches so you don’t have to manually invoke the patching utility for WebLogic servers.
soa: Contains the Oracle SOA Suite installation files. SOA provides components required for orchestrating, deploying, and managing services into SOA composite applications and business processes.
odi: Contains the Oracle Data Integrator installation files. ODI is used for high-performance data loads, data extracts, and batch processing for Oracle Fusion Applications.
oracle_common: Contains patches for Common Oracle home under the Fusion Applications home directory. The Provisioning wizard automatically applies the required patches from this directory during installation.
3. Oracle database-related directories.
database: Contains the Oracle Database software installation files along with the templates for the blank Fusion Applications starter database. It also contains the patches and PSUs required for upgrading the database to supported release for Fusion Applications. All the patches are applied along with database installation through Fusion Applications provisioning framework.
dbclient: Contains Oracle Client release 11gR1 (11.1.0.7 until recent releases) specifically for Oracle Fusion middleware components. Since the database version is higher, the 11gR1 client software is installed separately with this release under Applications Base Directory.
4. RCUs and RUPs related to installation or upgrade.
apps_rcu: Contains the Repository Creation Utility for Fusion Applications database and related dump files for repository creation. This is required to be installed prior to starting the provisioning process. It is also used during upgrade process on non-Linux environments to manually load schemas related to new or modified products from previous releases.
crm_rcu: Contains the Oracle CRM Sales Predictor Repository Creation utility (RCU). It creates sales predictor-related data warehouse database objects provided OBIA is already configured.
biapps_rcu: Contains the Business Intelligence Applications Suite Repository Creation Utility (RCU). This is used to create the Business Analytics Warehouse and BI applications components schemas.
fsrcu: Contains the Repository Creation Utility (RCU) for the Functional Setup Manager component. This is also required during the upgrade process on non-Linux environments to manually load the FS repository in the database.
tmrcu: Contains the Repository Creation Utility (RCU) for the Topology Manager component. This is also required during the upgrade process on non-Linux environments to manually load the topology manager repository in the database.
farup: Contains the upgrade orchestrator utility for upgrading Oracle Fusion Applications from previous releases to the current release. The invocation of the upgrade process has changed in recent releases. Now it contains a subdirectory called orchestration under the upgrade directory. This directory contains the orchestration.zip file that contains the Fusion Applications upgrade utility.
Preparing the Hosts Operating System
Before we begin the installation, we need to make sure that a supported operating system is installed and the required system parameters are set. We will discuss a few important settings here but refer to the latest Fusion Applications Release Notes as well as the Certification Matrix to see the list of supported operating systems and parameters.
Note
It is recommended to use physical nodes for database servers. Application and web servers can be on supported virtualization platforms.
We are going to use Oracle Enterprise Linux (OEL) 5, 64-bit as the base operating system for this installation. OEL 6 is also supported but at this moment the IDM Provisioning wizard has some issues with specific versions of OEL 6. This examples uses OEL 5. Follow these steps on all nodes in the selected topology, including IDM host, IDM DB host, FA host, and FA DB host to keep the operating system parameters in sync for ease of troubleshooting.
Tip
If you have enabled firewall or SE Linux during the Linux operating system installation, make sure to allow all required ports and applications manually before starting the installation.
Preparing Network and Name Resolution
If you are using DNS in your environment then you must make sure that all servers have proper the DNS client setup completed and the hosts can resolve names. Make sure to add entries in your internal DNS server for all the nodes in the selected topology, in this case idmhost, idmdbhost, fahost, and fadbhost.
In addition to hostnames, if you are planning to use Network Load Balancer (NLB) or Virtual IPs (VIP) for your installation (you will see the list of VIPs that can be configured during installation) then you must register those in your internal DNS as well as external DNS (if the URLs are going to be accessed from external IPs). The load balancer also needs to be configured to receive inbound connections on specific ports and forwarded to appropriate servers on the same or different ports. The session persistence policy also needs to be set accordingly on the load balancer.
If you are not using DNS to resolve hostnames then make sure all your nodes /etc/hosts file includes entries for idmhost and fahost as well as database hosts idmdbhost and fadbhost. In the /etc/hosts file you must keep the Fully Qualified Hostname first followed by the regular hostname. Keeping the fully qualified name after the regular hostname will cause issues during the provisioning process. Java-based installation wizards initiated from clients will not be able to display the progress log on the screen due to a known bug. Hence it is very important to have the host entry in the following syntax.
<IP address> <Fully Qualified hostname> <hostname>
A typical /etc/hosts file in this environment will look like this. It includes all four nodes and IP addresses so they can communicate with each other.
[root@idmhost ∼]# more /etc/hosts
127.0.0.1 localhost.localdomain localhost
#::1 localhost6.localdomain6 localhost6
10.26.12.141 idmhost.paramlabs.com idmhost
10.26.12.151 idmdbhost.paramlabs.com idmdbhost
10.26.12.161 fahost.paramlabs.com fahost
10.26.12.171 fadbhost.paramlabs.com fadbhost
Tip
Even if you are using a single-tier topology and hosting database and middleware on same node, we recommend you have two extra entries in the hosts file for the same IPs. In the future, if you want to move the database to a different server, you can easily do it since the installed configuration uses a dedicated DB hostname and never uses IP.
If you are not using DNS resolution, comment out following entries in the /etc/resolve.conf file to speed up name resolution directly through the hosts file. If this is not done then you may apparently find slowness in the SSH login screen where it will wait longer before prompting for credentials. Ignore this step if DNS is being used in your environment. Let’s look at this file after the change is done.
[root@idmhost ∼]# cat /etc/resolv.conf
# search paramlabs.com
Preparing Storage
Make sure to configure the disk and swap space on each node as per the requirements specified in the previous chapter. Make sure the shared file system is mounted on each node except DMZ. You can either prepare the installation repository locally on the /stage directory or if you have prepared it on another machine then you can mount the directory on your local server as follows.
[root@idmhost ∼]# mkdir /stage
[root@idmhost ∼]# mount -t nfs <fileserver>:stage /stage
Make sure you can see the installer directories.
[root@idmhost ∼]# ls -l /stage
drwxrwxrwx 1 root root 8192 Oct 24 03:02 installers
drwxrwxrwx 1 root root 4096 Oct 24 03:03 jdk6
For Database hosts, make sure tmpfs size is more than the size you want to keep for the database SGA and PGA. We can check the current size of tmpfs using the df -h command. To make any changes to tmpfs size, you need to add/modify the same in the /etc/fstab file.
[root@idmdbhost ∼]# cp -p /etc/fstab /etc/fstab.bak
[root@idmdbhost ∼]# vi /etc/fstab
Change the values as follows (only if it is less than SGA and PGA size or the memory_target value). You need to restart the host in order for these parameters to come into effect.
[root@idmhost ∼]# grep tmpfs /etc/fstab
tmpfs /dev/shm tmpfs size=8G 0 0
Similarly for FADBHOST (Fusion Applications Database Host), keep the tmpfs size to a much higher value.
Note
If this size is less than memory_target then you will get the following error:
ORA-00845: MEMORY_TARGET not supported on this system
Installing Required Operating System Packages
Depending on your operating system, the installer may require a specific list of packages to be installed as a prerequisite. You can either refer to latest release notes or simply go ahead with the installation wizard, which will prompt you to install the missing packages. You can save time by preparing the list of missing packages in advance by manually running the prerequisite check from the installer repository. The following is the command-line syntax for checking the prerequisites before installing the provisioning framework.
For the database host:
<REPOSITORY_LOCATION>/installer/database/Disk1/runInstaller -executePrereqs -silent
This will generate output at <home>/oraInventory/logs/installActions<timestamp>.log.
For the application host:
<REPOSITORY_LOCATION>/installer/<product>/Disk1/runInstaller -sv -jreLoc <REPOSITORY_LOCATION>/jdk6
This will generate the output at <home>/oraInventory/logs/install<timestamp>.log. Review the relevant log and look for the section with "Check Name: Packages". It will look as follows.
Check Name:Packages
Check Description:This is a prerequisite condition to test whether the packages recommended for installing the product are available on the system.
Checking for binutils-2.17.50.0.6; found binutils-2.17.50.0.6-20.el5_8.3-x86_64. Passed
Checking for compat-libstdc++-33-3.2.3-x86_64; found compat-libstdc++-33-3.2.3-61-x86_64. Passed
Checking for compat-libstdc++-33-3.2.3-i386; found compat-libstdc++-33-3.2.3-61-i386. Passed
Checking for elfutils-libelf-0.125; found elfutils-libelf-0.137-3.el5-x86_64. Passed
Checking for elfutils-libelf-devel-0.125; found elfutils-libelf-devel-0.137-3.el5-x86_64. Passed
Checking for gcc-4.1.1; found gcc-4.1.2-54.el5-x86_64. Passed
Checking for gcc-c++-4.1.1; found gcc-c++-4.1.2-54.el5-x86_64. Passed
Checking for glibc-2.5-12-x86_64; found glibc-2.5-107-x86_64. Passed
Checking for glibc-2.5-12-i686; found glibc-2.5-107-i686. Passed
Checking for glibc-common-2.5; found glibc-common-2.5-107-x86_64. Passed
Checking for glibc-devel-2.5-x86_64; found glibc-devel-2.5-107-x86_64. Passed
Checking for glibc-devel-2.5-12-i386; found glibc-devel-2.5-107-i386. Passed
Checking for libaio-0.3.106-x86_64; found libaio-0.3.106-5-x86_64. Passed
Checking for libaio-0.3.106-i386; found libaio-0.3.106-5-i386. Passed
Checking for libaio-devel-0.3.106; found libaio-devel-0.3.106-5-i386. Passed
Checking for libgcc-4.1.1-x86_64; found libgcc-4.1.2-54.el5-x86_64. Passed
Checking for libgcc-4.1.1-i386; found libgcc-4.1.2-54.el5-i386. Passed
Checking for libstdc++-4.1.1-x86_64; found libstdc++-4.1.2-54.el5-x86_64. Passed
Checking for libstdc++-4.1.1-i386; found libstdc++-4.1.2-54.el5-i386. Passed
Checking for libstdc++-devel-4.1.1; found libstdc++-devel-4.1.2-54.el5-i386. Passed
Checking for make-3.81; found make-1:3.81-3.el5-x86_64. Passed
Checking for sysstat-7.0.0; found sysstat-7.0.2-12.0.1.el5-x86_64. Passed
Check complete. The overall result of this check is: Passed
If any package is missing, you may find these lines:
Checking for glibc-devel-2.5-12-i386; Not found. Failed <<<<
Compile a list of all such failed checks and then manually install these packages/RPMs from the operating system installer media.
Tip
If you are using Oracle Enterprise Linux, it is recommended to install oracle-validated-<version>.el5.<platform> for OEL 5 and oracle-rdbms-server-<version>-preinstall RPM packages to automatically set the required kernel configuration, OS groups, and so on. During the Linux installation you may use the Customize Now option followed by selecting the Servers on left panel and System Administration tools on the right side. Select the Oracle Validated or Oracle Pre-installation RPM packages. If you have already installed Linux, you can manually install the RPM with from the OEL media.
Creating Operating System Users and Groups
Let’s create a Fusion installation owner user. Oracle validated setup RPM has already created dba and oinstall groups along with default oracle user. Here we will create a new user named fusion, which will be the owner of the Fusion Applications software directories. We are keeping the same name for all nodes here for ease of understanding. Using the same username also helps to access files from shared disk on different nodes. Let’s create OS groups called dba and oinstall first if they are not already created.
[root@idmhost ∼]# groupadd dba
[root@idmhost ∼]# groupadd oinstall
Now let’s create the fusion software owner user. This user needs to be member of the dba and oinstall OS groups.
[root@idmhost ∼]# useradd fusion -g dba -G oinstall
Create a password for the fusion user.
[root@idmhost ∼]# passwd fusion
Changing password for user fusion.
New UNIX password:
Retype new UNIX password:
passwd: all authentication tokens updated successfully.
Configuring Required Kernel Parameters
This section discusses some important kernel parameters and their minimum required values. Note that these parameters can have higher values depending on your tuning exercises. Use root user to make any kernel parameter changes.
Although we have installed Oracle-validated RPM packages, the username we have used is different than what Oracle creates as part of the package. Hence we need to add following lines in the /etc/security/limits.conf file for the new user. Make a backup of the /etc/security/limits.conf file first.
[root@idmhost ∼]# cp -p /etc/security/limits.conf /etc/security/limits.conf.bak
Add the following the values in the file /etc/security/limits.conf as follows:
fusion soft nofile 327679
fusion hard nofile 327679
Also make sure UsePAM is set to Yes in the /etc/ssh/sshd_config file. If not, back up the file and change it. In our case it is already set so there is no need to modify anything.
Edit /proc/sys/fs/file-max and set it to 6553600. The change will become effective immediately but will not persist after a reboot. So we need to add the set fs.file-max = 6553600 in /etc/sysctl.conf file to make the change permanent. In our case this value is already higher than the required, so no action is necessary.
Now we need to make sure that the max user process is set to at least 16384. Let’s check the current value first.
[root@idmhost ∼]# ulimit -u
24064
The output should be 16384 or more so in this case there is no further action is necessary. If the number is less than the required, we need to change the max user processes. If required, modify the /etc/security/limits.conf file as follows:
fusion soft nproc 16384
fusion hard nproc 16384
Because in this case the value is already more than 16384, we will leave it unchanged.
Now make sure that the ip_local_port_range value is 32768 to 61000. First check the existing value.
[root@idmhost ∼]# cat /proc/sys/net/ipv4/ip_local_port_range
9000 65500
Now let’s change as per the requirement.
[root@idmhost ∼]# echo "32768 61000" > /proc/sys/net/ipv4/ip_local_port_range
To confirm the change, run the following command.
[root@idmhost ∼]# cat /proc/sys/net/ipv4/ip_local_port_range
32768 61000
To make this change persistent across reboots, change the value of net.ipv4.ip_local_port_range in /etc/sysctl.conf to the previous values. Let’s check the values after modification.
[root@idmhost ∼]# grep 61000 /etc/sysctl.conf
net.ipv4.ip_local_port_range = 32768 61000
Before you install the Oracle database using the Provisioning wizard, ensure that the value of the kernel parameter shmmax on the database host is greater than the value of the SGA’s (System Global Area) memory size.
If you used the Fusion Applications provisioning framework to create a starter database for the IDM database as well, the value of SGA memory (sga_target) is 9 GB in the default Database Configuration Assistant (DBCA) template for the starter database. For manual installation, you would have already set the value of SGA as per your requirement. Ensure that shmmax > (shmall * shmmni) > SGA memory, where shmmax, shmall, and shmmni are the kernel parameters.
For example, to retrieve the values of these kernel parameters on Linux, use the following command:
[root@idmhost ∼]# /sbin/sysctl -a | grep shm
kernel.shmmax = 4398046511104
kernel.shmall = 1073741824
kernel.shmmni = 4096
vm.hugetlb_shm_group = 0
Use the following command to set the value of a kernel parameter.
[root@idmhost ∼]# /sbin/sysctl -w sys.kernel.shmmax=value
Finally, make sure that the Linux host has sufficient entropy values (more than 1000). To check the current value, execute the following command.
[root@idmhost ∼]# cat /proc/sys/kernel/random/entropy_avail
If the output is less than 1000 then run following command as the root user to increase the value.
[root@idmhost ∼]# rngd -r /dev/urandom -o /dev/random
Note
For the Solaris operating system, you must set memory limits for each user in the /etc/project file to higher value. Otherwise, the user processes throw out-of-memory errors despite the fact that the memory is not fully utilized. This is the default behavior of the Solaris operating system, so make sure to allocate a high-memory limit for the fusion user in the /etc/project file.
Preparing Operating System for the Remaining Nodes
Remember to repeat the complete process for all the other nodes in the selected topology. Since the operating system related parameters are the same (except a few differences mentioned earlier), I will not repeat the same information again. This section serves as a reminder for setting up the remaining nodes operating system, network and storage only.
At the end of this section you should be able to reach each of the nodes in the topology from every other node. This includes network reachability as well as opening firewall ports if your environment utilizes firewall across the web, application, and database tiers. Note all the ports during the installation process and make sure to work with the network security team to open each of the required firewall ports between the nodes.
Make sure that you do the same steps on both databases as well as the application nodes. This concludes our operating system configuration for all nodes.
Summary
This chapter provides an overview of the Fusion Applications provisioning process. You should now understand the concepts of the orchestration process and the role of each node during the provisioning process. You’ve seen how the provisioning steps are grouped between Identity Management and Fusion Applications components. You have also seen the dependencies between the IDM and FA provisioning steps.
We learned about the topology selected for this example installation and also the components that will be installed and configured on each of the nodes in the selected topology. We have also seen how to prepare the operating system, network, and storage for each of the nodes. You now also know how to create an installation staging directory and the structure of Fusion Applications installation repository. In Chapters 4-7, you will learn how to prepare an Identity Management environment required for a Fusion Applications instance. Chapters 8-10 will demonstrate the Fusion Applications components provisioning processes.