This chapter will provide a step-by-step walkthrough of creating a basic solution using Microsoft BizTalk RFID and the Contoso device simulator. It will demonstrate the essential end user activities—managing RFID devices and implementing an event processing pipeline.
Overview
This section will provide a walkthrough of building a basic RFID application using BizTalk RFID. It will demonstrate the basic concepts and building blocks, including device providers, devices, processes, and event handlers. It is intended as a quick start to familiarize you with the various components of BizTalk RFID and how they can be applied to implement RFID-enabled solutions.
Our first end-to-end RFID solution, Hello RFID, will implement a basic scenario: capturing data generated by tags passing through a portal reader. It will not address filtering, workflow, I/O, or similar comprehensive features found in real-world applications, as these will be covered in later chapters.
As shown in Figure 3-1, the application will consist of a simulated reader (instead of a real RFID reader—using the simulator that ships out of the box with BizTalk RFID) feeding tag information into a database through BizTalk RFID. The rest of this chapter will walk through how to bring together all of these moving parts into a coherent solution.

Figure 3-1. Hello RFID overview
Using the Device Simulator
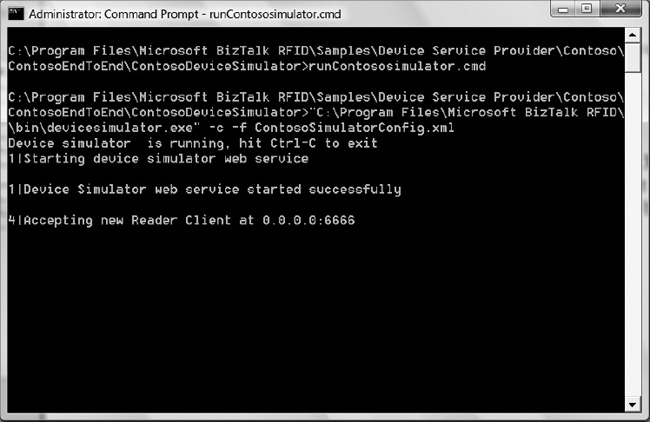
The device simulator that ships with Microsoft BizTalk RFID provides basic simulation functionality, including generating tag reads and responding to commands (such as writing data to tags or changing I/O ports). It is a console application with a low level of interactivity (i.e., it dumps information into a console window, but is controlled through a configuration file rather than a runtime interface). Exercise 3-1 shows you how to start the device simulator.
Exercise 3-1. Starting the Device Simulator
Starting from the baseline configuration, the device simulator can be tweaked to enable other types of scenarios and tag generation patterns. This is done by manipulating the reader and behavior setting configuration files.
Configuring Settings
A sample configuration file for the device simulator is shown in Listing 3-1. It consists of the header section (defining the number of devices) and a set of device sections (which provide the configuration for the network bindings and behavior module).
Listing 3-1. Device Simulator Configuration File
<?xml version="1.0" encoding="utf-8" ?>

<profile>

<section name="NumberOfDevices">

    <entry name="DeviceCount">1</entry>

</section>

<section name="DeviceInformation_1">

<entry name="DeviceName">ContosoTestDevice</entry>

<entry name="ConnectionType">TCPIP</entry>

<entry name="IpAddress">0.0.0.0</entry>

<entry name="PortNumber">6666</entry>

<entry name="ProviderId">Contoso</entry>

<entry name="NotificationDataFile">ContosoNotificationConfig.xml</entry>

<entry name="DeviceTranslatorAssemblyPath">

     Microsoft.Rfid.Test.ContosoDeviceTranslator.dll

</entry>

<entry name="DeviceTranslatorConfigFile"></entry>

</section>

</profile>
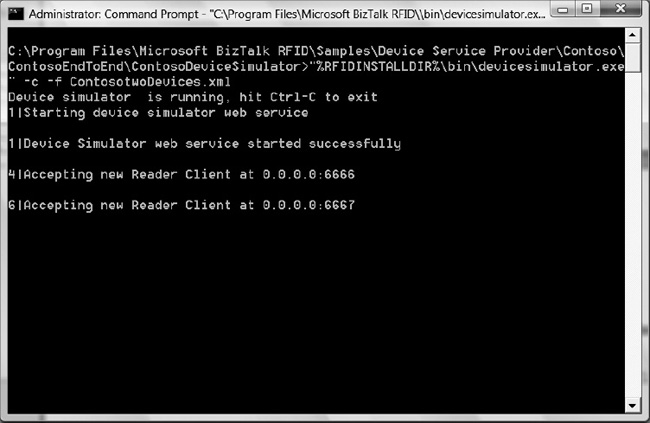
Modification of this file allows configuration of multiple simulated readers with varying setups (depending on the targeted scenario—i.e., number of readers, network paths, etc.). Exercise 3-2 shows you how to modify the simulator for two devices.
![]() Note The
Note The 0.0.0.0 IP address in the preceding file means “Use all available IP addresses.”
Exercise 3-2. Modifying the Simulator for Two Devices
Configuring Notifications
A separate configuration file configures the behavior of the simulator in the context of which events get raised by the simulator (i.e., which tags it “reads”). A sample configuration file for the ContosoDeviceTranslator behavior module (the default) is displayed in Listing 3-3.
Listing 3-3. ContosoTwoReader.xml Contents
<?xml version="1.0" encoding="utf-8" ?>

<profile>

<section name="Notification">

    <entry name="TimePeriod">10000</entry>

    <entry name="Distribution">EXPONENTIAL</entry>

    <entry name="NotificationErrorRate">0</entry>

    <entry name="WaitAfterNotification">1000</entry>

    <entry name="InitialDelay">100</entry>

    <entry name="Duplicate_Elimination_Time">0</entry>

    <entry name="InfiniteNotification">FALSE</entry>

    <entry name="ContinuousDataSection">1</entry>

    <entry name="DiscreteDataSection">0</entry>

</section>

<section name="Continuous Data Section 1">

    <entry name="StartingData">1000</entry>

    <entry name="TotalData">10000</entry>

    <entry name="TagType">1</entry>

    <entry name="TagData">SampleTagData</entry>

    <entry name="TagSource">Antenna1</entry>

    <entry name="DelayTime">1</entry>

</section>

</profile>
Following are some of the key sections that configure how notifications are sent:
TimePeriod: The minimum time (in milliseconds) between two tag events
InitialDelay: The time delay before posting the first tag
Duplicate_Elimination_Time: The minimum time delay between posting a tag event and posting another tag event with the same tag ID
InfiniteNotification: If set totrue, allows tags to be sent continuously
Distribution, NotificationErrorRate, and WaitAfterNotification are not meant to be end user configurable. Do not modify these variables.
Notifications can be configured in either a discrete or a continuous set. The primary continuous configuration variables are as follows:
StartingData: The initial tag ID. Subsequent tag IDs will increment from this value.
TotalData: The total number of tags to send. IfInfiniteNotificationis set totrue, after this number of tag events has been raised, the cycle will start again.
TagType: The numeric tag type used in the raised events.
TagData: The starting tag data field. Subsequent tag data values will increment from this value.
TagSource: The “source” (or antenna) from which these events will be raised.Exercise 3-3 presents an example of modifying the simulator behavior.
Exercise 3-3. Modifying the Simulator Behavior
Creating a Device in BizTalk RFID
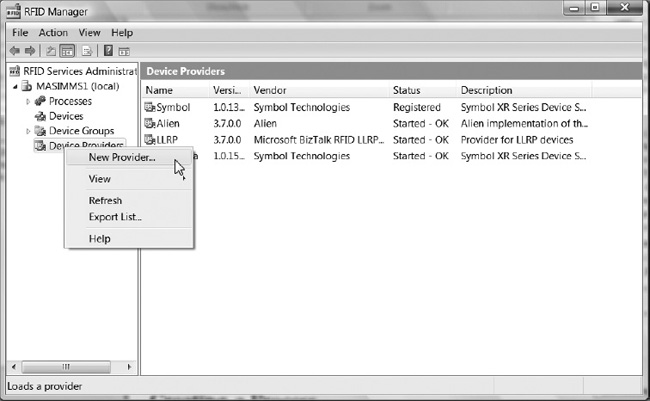
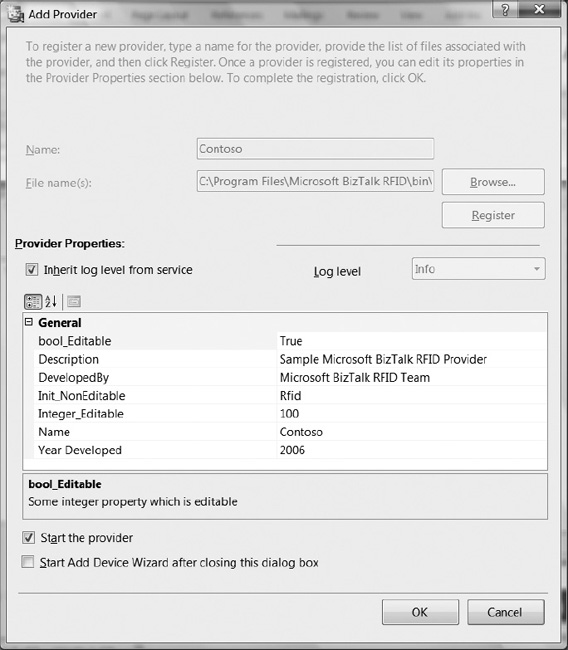
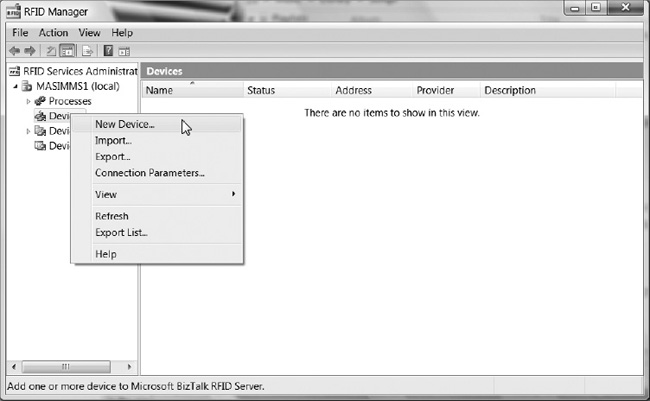
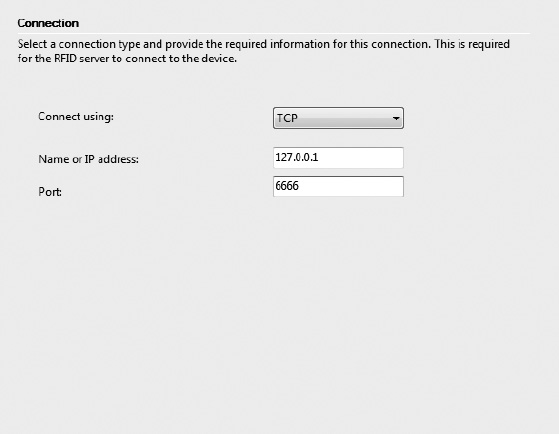
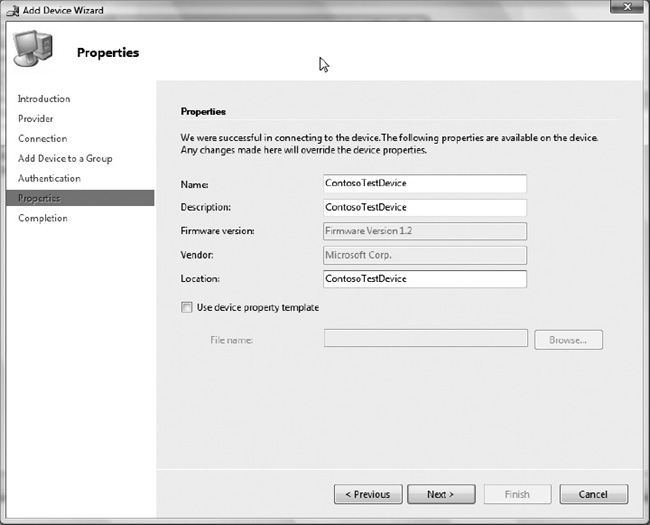
Now that we’ve established a simulated device to which to connect, the next step is to configure BizTalk RFID to recognize and connect to that device. This will take part in two stages: adding the (Contoso) simulator provider (Exercise 3-4) and adding that device to BizTalk RFID (Exercise 3-5).
Exercise 3-4. Adding the Simulator Provider
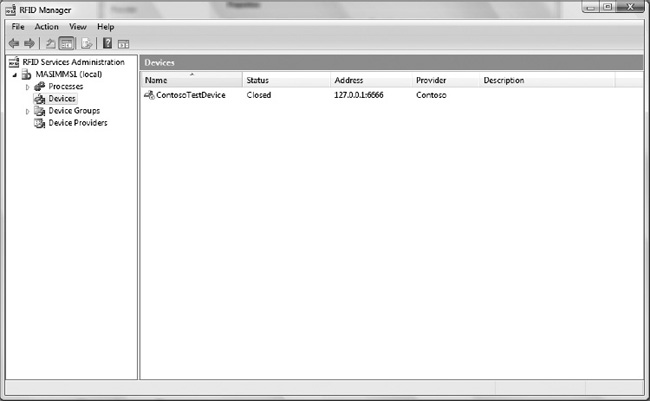
Exercise 3-5. Creating a Device in BizTalk RFID
Creating a Process
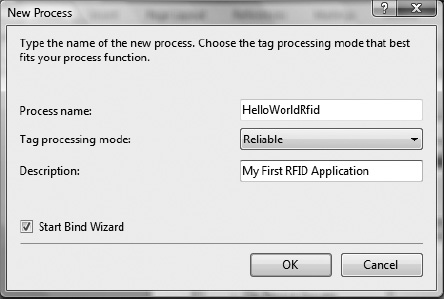
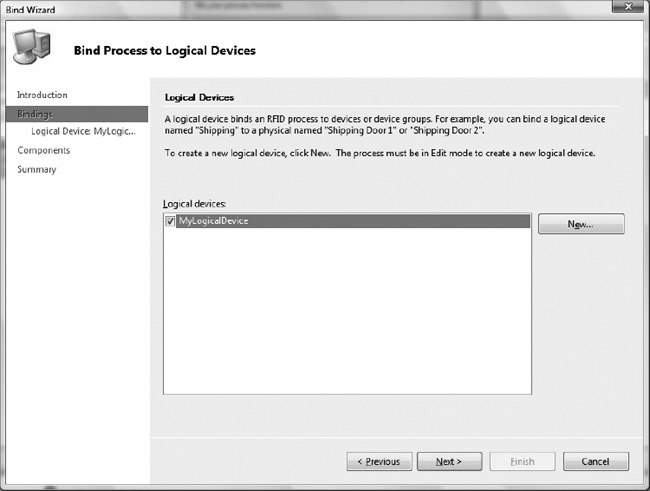
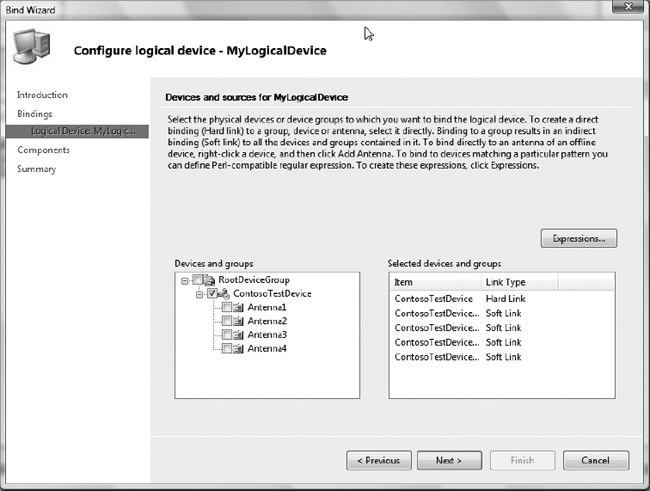
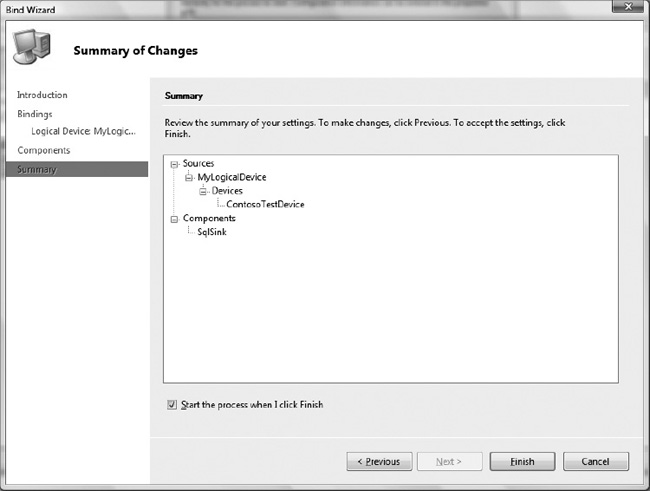
In the previous two sections, you set up the device simulator and created a device binding for it in BizTalk RFID. The final piece of setting up our first BizTalk RFID application involves binding the device into a process, and is explored in Exercise 3-6.
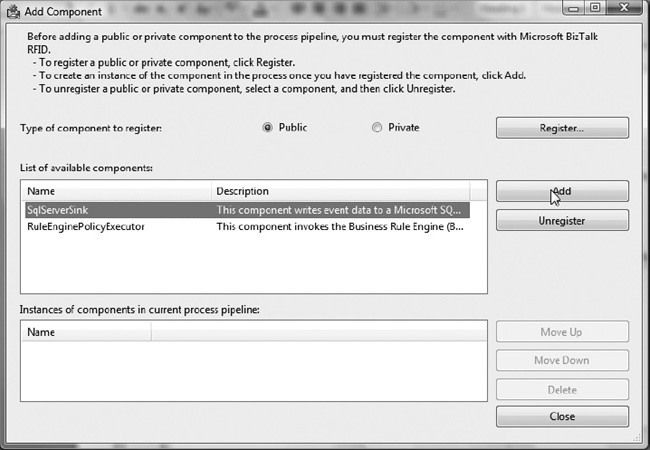
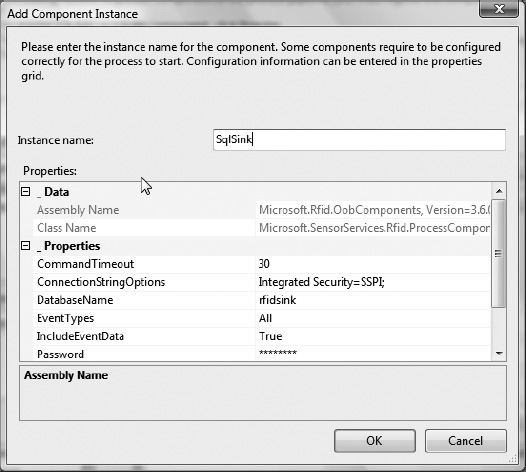
This will tell BizTalk RFID to automatically establish a connection to the device and store received tag events in a SQL Server database (using the SqlServerSink event handler).
Exercise 3-6. Creating a Process in BizTalk RFID
Conclusion
After reviewing the basics of RFID technology and BizTalk RFID, in this chapter you developed your first end-to-end application. Using RFID Manager to configure providers, devices, and processes, you captured a stream of information flowing from the RFID device simulator and captured it in a SQL Server database. The following list describes the key components of the end-to-end application developed in this chapter:
- RFID Manager is the primary graphical interface, used to configure providers, devices, and processes.
- BizTalk RFID ships with a basic simulator, the Contoso device simulator, which allows you to simulate basic scenarios involving one or more readers. The Contoso device simulator does not have a graphical interface, and is configured by modifying a pair of XML files.
- Device providers are the “drivers” of the BizTalk RFID world. In order to connect to a vendor’s RFID hardware, you will first need a compatible provider for that hardware. Multiple providers (and multiple versions of a vendor’s provider) can be run concurrently.
- BizTalk RFID devices consist of a device provider, transport information (such as the IP address and connection port), and credentials (typically a username and password).
- Device groups are used to associate physical readers matching a particular characteristic, such as management location or device type.
- Logical devices are used to associate physical readers with logical constructs, such as a location zone or entry portal (e.g., Dock Door A).
- BizTalk RFID processes combine a set of logical devices, which are composed of a set of physical devices and sources, with a set of event handler components that filter, shape, and forward tag events and other information received from the devices.
Building on the hands-on foundation of creating your first end-to-end application, the next chapter will dive into the features and functions of RFID Manager.
CASE STUDY: SIMPLE BUSINESS INTELLIGENCE THROUGH TAG TRACKING
Industry: Retail.
Overview: A high-cost-technology company tracks its inventory by collecting tag reads as merchandise leaves the store. Items over a certain price point have an RFID tag placed on them. As these items leave the store, either after purchase, after return to the manufacturer, or after theft, their tags are read and kept in a centralized database. Numerous reports are generated from this data, including a simple dashboard report that is kept on the screen at all times. This report enables the management and sales associates to make immediate decisions around real-time discounts available for customers. For example, if the report indicates that a certain number of items have left the store on any given day, sales associates can begin to offer larger discount incentives to sell additional items on that same day.
Results: With basic business intelligence available to the organization as a whole, employees can interact more intelligently with customers. Due to the high value of the items being sold, this RFID infrastructure pays for itself through increased sales performance based on visibility into inventory.
