
Testing: everyone's favorite part of programming. The funny thing is, like most things in life, once you get good at it, testing actually is fun. It allows you to be more productive. It provides a safety net for you to try new things. Programmatic tests also give you a test bed to try new technologies (most companies don't mind if you want to try something new in the tests but mind greatly if you try it in code that's going to production). You've spent the previous 10 chapters writing code without the ability to prove that any of it works. This chapter looks at how to exercise your code in a variety of ways so you can not only prove that it works as designed, but also provide a safety net for when you change it.
This chapter covers the following topics:
Unit tests with JUnit and Mockito: You begin with a high-level overview of the JUnit and Mockito frameworks. Although you move past JUnit's base functionality in the later parts of the chapter, the concepts that Spring has incorporated into its testing apparatus are based in the JUnit conventions, so knowing them helps you understand what is going on in the more advanced tests. The chapter also covers how the mock object framework Mockito can help you unit-test the components you develop for your batch processes.
Integration testing with Spring's test framework: Spring has done to testing what it's done to most other harder Java tasks: made it easy. It provides a collection of classes that allow you to easily test interactions with your various resources (databases, files, and so on) with minimal overhead. You learn how to use the Spring testing components to test various aspects of your Spring Batch jobs.
The most fundamental aspect of testing begins with unit testing, so the discussion begins there.
Probably the easiest to write and perhaps the most valuable, unit tests are the most overlooked type of testing. Although the development done in this book hasn't taken a test-driven approach for a number of reasons, you're encouraged to do so in your own development. As a proven way to improve not only the quality of the software you produce but also the overall productivity of any individual developer and a team as a whole, the code encased in these tests is some of the most valuable you can produce. This section looks at how to use JUnit and Mockito to unit-test the components you develop for your batch processes.
What is a unit test? It's a test of a single, isolated component in a repeatable way. Let's break down that definition to understand how it applies to what you're trying to do:
A test of a single: One. Unit tests are intended to test the smallest building blocks of your application. A single method is typically the scope of a unit test.
Isolated: Dependencies can wreak havoc on the testing of a system. Yet all systems have dependencies. The goal of a unit test isn't to test your integration with each of these dependencies, but to instead test how your component works by itself.
In a repeatable way: When you fire up a browser and click through your application, it isn't a repeatable exercise. You may enter different data each time. You may click the buttons in a slightly different order. Unit tests should be able to repeat the exact same scenario time and time again. This allows you to use them to regression-test as you make changes in your system.
The frameworks you use to execute the isolated testing of your components in a repeatable way are JUnit, Mockito, and the Spring framework. The first two are common, multipurpose frameworks that are useful for creating unit tests for your code. The Spring test utilities are helpful for testing more broad concerns including the integration of the different layers and even testing job execution from end to end (from a service or Spring Batch component to the database and back).
Considered the gold standard for testing frameworks in Java,[34] JUnit is a simple framework that provides the ability to unit-test Java classes in a standard way. Whereas most frameworks you work with require add-ons to things like your IDE and build process, Maven and most Java IDEs have JUnit support built in with no additional configuration required. Entire books have been written on the topic of testing and using frameworks like JUnit, but it's important to quickly review these concepts. This section looks at JUnit and its most commonly used features.
The current version of JUnit as of the writing of this book is JUnit 4.8.2. Although each revision contains marginal improvements and bug fixes, the last major revision of the framework was the move from JUnit 3 to JUnit 4, which introduced annotations to configure test cases. Test cases? Let's step back a minute and go over how JUnit test are structured.
JUnit tests are broken down into what are called test cases. Each test case is intended to test a particular piece of functionality, with the common divisor being at the class level. The common practice is to have at least one test case for each class. A test case is nothing more than a Java class configured with JUnit annotations to be executed by JUnit. In a test case exist both test methods and methods that are executed to set preconditions and clean up post conditions after each test or group of tests. Listing 12-1 shows a very basic JUnit test case.
Example 12.1. A Basic JUnit Test Case
package com.apress.springbatch.chapter12;

import org.junit.Test;
import static org.junit.Assert.*;

public class StringTest {
@Test
public void testStringEquals() {
String michael = "Michael";
String michael2 = michael;
String michael3 = new String("Michael");
String michael4 = "Michael";
assertTrue(michael == michael2);
assertFalse(michael == michael3);
assertTrue(michael.equals(michael2));
assertTrue(michael.equals(michael3));
assertTrue(michael == michael4);
assertTrue(michael.equals(michael4));
}
}There is nothing fancy about the unit test in Listing 12-1. All it does is prove that using == when comparing Strings isn't the same as using the .equals method. However, let's walk through the different pieces of the test. First, a JUnit test case a regular POJO. You aren't required to extend any particular class, and the only requirement that JUnit has for your class is that it have a no argument constructor.
In each test, you have one or more test methods (one in this case). Each test method is required to be public, to be void, and to take zero arguments. To indicate that a method is a test method to be executed by JUnit, you use the @Test annotation. JUnit executes each method annotated with the @Test annotation once during the execution of a given test.
The last piece of StringTest are the assert methods used in the test method. The test method has a simple flow. It begins by setting up the conditions required for this test, and then it executes the tests and validates the results at the same time using JUnit's assert methods. The methods of the org.junit.Assert class are used to validate the results of a given test scenario. In the case of StringTest in Listing 12-1, you're validating that calling the .equals method on a String object compares the contents of the string, whereas using == to compare two strings verifies that they're the same instance only.
Although this test is helpful, there are a couple other useful annotations that you should know about when using JUnit. The first two are related to the JUnit test lifecycle. JUnit allows you to configure methods to run before each test method and after each test method so that you can set up generic preconditions and do basic cleanup after each execution. To execute a method before each test method, you use the @Before annotation; @After indicates that the method should be executed after each test method.[35] Just like any test method, the @Before (setUp) and @After (tearDown) marked methods are required to be public, be void, and take no arguments. Typically, you create a new instance of an object to be tested in the method marked with @Before to prevent any residual effects from one test having an effect on another test. Figure 12-1 shows the lifecycle of a JUnit test case using the @Before, @Test, and @After annotations.
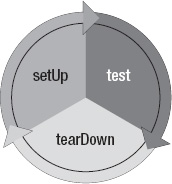
As Figure 12-1 shows, JUnit executes those three methods in sequence for each method identified with the @Test annotation until all the test methods in the test case have been executed. Listing 12-2 shows an example test case using all three of the discussed annotations.
Example 12.2. Test of Foo
package com.apress.springbatch.chapter12;

import static org.junit.Assert.assertEquals;
import static org.junit.Assert.assertNotNull;

import org.junit.After;
import org.junit.Before;
import org.junit.Test;

public class FooTest {

    private Foo fooInstance;

    @Before
    public void setUp() {
        fooInstance = new Foo();
    }

    @Test
    public void testBar() {
        String results = fooInstance.bar();

        assertNotNull("Results were null", results);
        assertEquals("The test was not a success", "success", results);
    }

    @After
    public void tearDown() {
        fooInstance.close();
    }
}
JUnit provides a number of other variants on these features, including @BeforeClass to execute one-time setup for all the test methods in a given test class, @Ignore to indicate test methods and classes to skip, and @RunWith to indicate a class to run your test case other than the default used by JUnit. However, those are outside of the scope of this book. The goal of this section is to give you the tools required to be able to test your batch processes. Using just the @Before, @Test, and @After annotations along with the assert methods available on JUnit's Assert class, you can test the vast majority of scenarios required.
But there is a small catch. The earlier unit-test definition said that unit testing is the testing of components in isolation. How can you test a data access object (DAO) using JUnit when it depends on JDBC and a database? How about testing an ItemStream, which requires you to use Spring Batch components as some of its parameters? Mock objects fill this void, and you look at those next.
It would be very easy to write software like the String object tested earlier, which has no dependencies. However, most systems are complex. Batch jobs can require dozens or more classes and depend on external systems including application servers, JMS middleware, and databases, just to name a few. All these moving parts can be difficult to manage and provide interactions that are outside the scope of a unit test. For example, when you want to test the business logic for one of your ItemProcessors, do you really need to test that Spring Batch is saving the context correctly to your database? That is outside the scope of a unit test. Don't get this wrong—that does need to be tested, and you look at it later in this chapter. However, to test your business logic, you don't need to exercise the various dependencies that your production system interacts with. You use mock objects to replace these dependencies in your testing environment and exercise your business logic without being effected by outside dependencies.
Note
Stubs are not mock objects. Stubs are hard coded implementations that are used in testing where mock objects are reusable constructs that allow the definition of the required behavior at run time.
Let's take a minute to call out that mock objects aren't stubs. Stubs are implementations that you write to replace various pieces of an application. Stubs contain hard-coded logic intended to mimic a particular behavior during execution. They aren't mock objects (no matter what they're named in your project)!
How do mock objects work? There are essentially two different approaches most mock object frameworks take: proxy based and class remapping. Because proxy-based mock objects are not only the most popular but the easiest to use, let's look at them first.
A proxy object is an object that is used to take the place of a real object. In the case of mock objects, a proxy object is used to imitate the real object your code is dependent on. You create a proxy object with the mocking framework and then set it on the object using either a setter or constructor. This points out an inherent issue with mocking using proxy objects: you have to be able to set up the dependency through an external means. In other words, you can't create the dependency by calling new MyObject() in your method, because there is no way to mock the object created by calling new MyObject().[36] This is one of the reasons Dependency Injection frameworks like Spring have taken off—they allow you to inject your proxy objects without modifying any code.
The second form of mocking is to remap the class file in the class loader. The mocking framework JMockit is the only framework I'm aware of that currently exploits this ability for mock objects. The concept is relatively new (because JDK 1.5 although JMockit supports JDK 1.4 thru other means as well) and is provided by the new java.lang.instrument.Insturmentation interface. You tell the classloader to remap the reference to the class file it loads. So, let's say you have a class MyDependency with the corresponding .class file MyDependency.class, and you want to mock it to use MyMock instead. By using this type of mock objects, you actually remap in the classloader the reference from MyDependency to MyMock.class. This allows you to mock objects that are created by using the new operator. Although this approach provides more power than the proxy-object approach because of its ability to inject literally any implementation into the classloader, it's also harder and more confusing to get going given the knowledge of classloaders you need in order to be able to use all its features.
Mockito is a popular proxy-based mock-object framework that provides a large amount of flexibility coupled with an expressive syntax. It allows you to create easy-to-understand unit tests with relative ease. Let's take a look.
Around 2008, with EasyMock as the dominant mocking framework, a couple of guys took a look at the framework and asked some questions. EasyMock is a proxy-based mock-object framework that requires the model, record, play, and verify. First you record the behavior you need. Then you execute the functionality under test, and finally you verify all the executions that you previously recorded. However, why do you need to define all the possible interactions for an object to go through? And why do you need to confirm that all the interactions occurred? Mockito allows you to mock the behaviors you care about and verify only the behaviors that matter. In this section you look at some of the functionality available with Mockito and use it to test Spring Batch components.
Although JUnit is included by default any time you use Maven as your build system, for you to use Mockito, you need to add its dependency. Listing 12-3 shows the dependency required for Mockito.
Example 12.3. Maven Dependency for Mocktio
...
<dependency>
    <groupId>org.mockito</groupId>
    <artifactId>mockito-all</artifactId>
    <version>1.8.5</version>
    <scope>test</scope>
</dependency>
...
To see how Mockito works, let's look at one of the classes you developed for the statement job in Chapter 10. The CustomerStatementReader you created to build the Statement object is a prime candidate to use mock objects, with its dependencies on an external ItemReader as well as a DAO. To refresh your memory, Listing 12-4 shows the code from that ItemReader.
Example 12.4. CustomerStatementReader
package com.apress.springbatch.statement.reader;

import org.springframework.batch.item.ItemReader;
import org.springframework.batch.item.ParseException;
import org.springframework.batch.item.UnexpectedInputException;

import com.apress.springbatch.statement.dao.TickerDao;
import com.apress.springbatch.statement.domain.Customer;
import com.apress.springbatch.statement.domain.Statement;

public class CustomerStatementReader implements ItemReader<Statement> {

    private ItemReader<Customer> customerReader;
    private TickerDao tickerDao;

    public Statement read() throws Exception, UnexpectedInputException,
            ParseException {

        Customer customer = customerReader.read();

        if(customer == null) {
            return null;
        } else {
            Statement statement = new Statement();

            statement.setCustomer(customer);
            statement.setSecurityTotal(
                tickerDao.getTotalValueForCustomer(customer.getId()));
            statement.setStocks(tickerDao.getStocksForCustomer(customer.getId()));

            return statement;
        }
    }

    public void setCustomerReader(ItemReader<Customer> customerReader) {
        this.customerReader = customerReader;
    }

    public void setTickerDao(TickerDao tickerDao) {
        this.tickerDao = tickerDao;
    }
}
The method you're testing for this class is obviously read(). This method requires two external dependencies: an instance of an ItemReader (remember, you used a JdbcCursorItemReader in the actual job) and a reference to your TickerDao. To test this method, you have two test methods, one for each of the method's two execution branches (one for when the customer is null and one for when it isn't).
To start this test, let's create the test-case class and the @Before method so your objects are built for later use. Listing 12-5 shows the test case with the setup method identified with the @Before annotation and three class attributes.
Example 12.5. CustomerStatementReaderTest
package com.apress.springbatch.statement.reader;
import static org.junit.Assert.assertEquals;
import static org.junit.Assert.assertNull;
import static org.mockito.Mockito.when;

import java.math.BigDecimal;
import java.util.ArrayList;

import org.junit.Before;
import org.junit.Test;
import org.mockito.Mock;
import org.mockito.MockitoAnnotations;
import org.springframework.batch.item.ItemReader;

import com.apress.springbatch.statement.dao.TickerDao;
import com.apress.springbatch.statement.domain.Customer;
import com.apress.springbatch.statement.domain.Statement;
import com.apress.springbatch.statement.domain.Transaction;

public class CustomerStatementReaderTest {

    private CustomerStatementReader reader;
    @Mock
    private TickerDao tickerDao;
    @Mock
    private ItemReader<Customer> customerReader;

    @Before
    public void setUp() {
        MockitoAnnotations.initMocks(this);

        reader = new CustomerStatementReader();
        reader.setCustomerReader(customerReader);
        reader.setTickerDao(tickerDao);
    }
    ...
}
The three attributes of the test class are the class under test (CustomerStatementReader) and the two dependencies (TickerDao and the ItemReader). By using the @Mock annotation, you tell Mockito that these attributes should be mocked for your test. When the test is executed, Mockito creates a proxy for each of these for your test to use.
In the setup method, you do two things. First you initialize the mocks with Mockito's MockitoAnnotations.initMocks method. This method initializes all the objects you previously indicated with a mock object for you to use. This is a quick and easy way to create the mock objects you need in the future.
The next thing you do in the setup method is create a new instance of the class to test. By creating this class here, you can be sure that each test method contains a clean instance of the class under test. This prevents any residual state in the test object from one method from having an impact on your other test methods. After you create CustomerStatementReader, you inject the mock objects the same way Spring would do it for you on bootstrapping the application.
Because you now have a new instance of the object under test and a fresh set of mock objects to satisfy your dependencies on the Spring Batch framework as well as the database, you can write your test methods. The first one, which tests when no customers are returned from the delegate, is very easy; see Listing 12-6.
Example 12.6. testReadNoCustomers()
...
@Test
public void testReadNoCustomers() throws Exception {
        assertNull(reader.read());
    }
...
Wait, that's it? What happened? There is a lot more happening under the covers of this extremely simple test method than meets the eye. When you execute this method, CustomerStatementReader's read method is called. In there, Mockito returns null when the mock ItemReader's read method is called on line 40. By default, if you don't tell Mockito what to return when a method is called on a mock object, it returns a type-appropriate value (null for objects, false for booleans, −1 for ints, and so on). Because you want your mock object to return null for this test, you don't need to tell Mockito to do anything for you. Aftre Mockito returns null from the ItemReader you injected, the logic returns null as required. Your test verifies that the reader returns null with JUnit's Assert.assertNull method.
The second test method you need to write for the read method of CustomerStatementReader tests that the Statement object is being built correctly when a customer is returned. In this scenario, because you aren't working with a database, you need to tell Mockito what to return when tickerDao.getTotalValueForCustomer and tickerDao.getStocksForCustomer are called with the customer's id. Listing 12-7 shows the code for the testReadWithCustomer method.
Example 12.7. testReadWtihCustomer
...
@SuppressWarnings("serial")
@Test
    public void testReadWithCustomer() throws Exception {
        Customer customer = new Customer();
        customer.setId(5l);

        when(customerReader.read()).thenReturn(customer);
        when(tickerDao.getTotalValueForCustomer(5l)).thenReturn(
                new BigDecimal("500.00"));
        when(tickerDao.getStocksForCustomer(5l)).thenReturn(
                new ArrayList<Transaction>() {
                    {
                        add(new Transaction());
                    }
                });

        Statement result = reader.read();

        assertEquals(customer, result.getCustomer());
        assertEquals(500.00, result.getSecurityTotal().doubleValue(), 0);
        assertEquals(1, result.getStocks().size());
    }
...
The testReadWithCustomer method is a good example of how to work with Mockito. You begin by creating any data you need. In this case, you create the Customer object that your mock objects returns. Then you tell Mockito what to return for each of the calls you care about: the call to customerReader.read() and the two calls to tickerDao. In the listing, you set the customer id to be 5 and tell Mockito to expect that 5 is the customer id passed to the two tickerDao calls. To tell this to Mockito, you use the Mockito.when method to record what method call you care about. Only when these scenarios occur does Mockito return what you specify in the thenReturn call.
With the mocks setup, you then execute the method you're testing (reader.read() in this case). With the results you receive from that method call, you can verify that your Statement object is built as you expect based on the data it received.
How does this provide you with a safety net? Simple. Let's say that you change CustomerStatementReader to pass the id of the account instead of the id of the customer to one of the tickerDao calls. The test fails if this occurs, indicating to you that a change that is incompatible with your expectations has occurred and needs to be addressed.
Unit tests are the foundation of a solid system. They not only provide the ability to make the changes you need without fear, but also force you to keep your code concise and serve as executable documentation for your system. However, you don't build a foundation just to look at it. You build on top of it. In the next section, you expand your testing capabilities.
The previous section discussed unit tests and their benefits. Unit tests, however useful they are, do have their limits. Integration testing takes your automated testing to the next level by bootstrapping your application and running it with the same dependencies you tried so hard to extract previously. This section looks at how to use Spring's integration test facilities to test interactions with various Spring beans, databases, and finally batch resources.
Integration testing is about testing different pieces talking to each other. Does the DAO get wired correctly, and is the Hibernate mapping correct so you can save the data you need? Does your service retrieve the correct beans from a given factory? These and other cases are tested when you write integration tests. But how do you do that without having to set up all the infrastructure and make sure that infrastructure is available everywhere you want to run these tests? Luckily, you don't have to.
The two primary use cases for integration testing with the core Spring integration-testing facilities are to test database interaction and to test Spring bean interaction (was a service wired up correctly, and so on). To test this, let's look at the TickerDao you mocked in the unit tests previously (CustomerStatementReader). However, this time, you let Spring wire up TickerDao itself, and you use an in-memory instance of HSQLDB[37] as your database so that you can execute the tests anywhere, anytime. HSQLDB is a 100% Java implemented database that is great for integration testing because it's lightweight to spool up an instance. To get started, let's look at how to configure your test environment.
To isolate your test execution from external resource requirements (specific database servers, and so on), you should configure a couple of things. Specifically, you should use a test configuration for your database that creates an instance of HSQLDB for you in memory. To do that, you need to do the following:
Update your POM file to include the HSQLDB database drivers.
Refactor the inclusion of Spring context files to allow for easier overriding of configurations for testing.
Configure test-specific properties.
Let's get started by adding the HSQLDB drivers to your POM file.[38] The specific dependency you need to add is shown in Listing 12-8.
Example 12.8. HSQLDB's Database Driver Dependency
...
<dependency>
    <groupId>hsqldb</groupId>
    <artifactId>hsqldb</artifactId>
    <version>1.8.0.7</version>
</dependency>
...
The next step is to do a bit of refactoring. Up to this point, you've structured your Spring configuration files in a way that works great for batch jobs. You've put common components in the launch-context.xml file and had a job-specific XML file for each job after that. However, you run into an issue here: you currently have the properties hard-coded in launch-context.xml to be batch.properties, which is configured for MySQL.
To make this more flexible, you restructure the XML files so that there are three instead of two. The first is the normal launch-context.xml file without the placeholderProperties bean. The second is the normal statementJob.xml file without the import statement for the launch-context.xml file. The new file you create joins the three and configures the properties file location. Listing 12-9 shows the contents of the new configuration file, job-context.xml.
Example 12.9. job-context.xml
<?xml version="1.0" encoding="UTF-8"?>
<beans xmlns="http://www.springframework.org/schema/beans"
  xmlns:xsi="http://www.w3.org/2001/XMLSchema-instance"
  xmlns:context="http://www.springframework.org/schema/context"
  xsi:schemaLocation="http://www.springframework.org/schema/beans
    http://www.springframework.org/schema/beans/spring-beans-3.0.xsd
    http://www.springframework.org/schema/context
http://www.springframework.org/schema/context/spring-context-3.0.xsd">
<import resource="classpath*:/launch-context.xml"/>
<import resource="classpath*:/jobs/statementJob.xml"/>
<bean id="placeholderProperties"
class="org.springframework.beans.factory.config.PropertyPlaceholderConfigurer">
<property name="location" value="classpath:batch.properties" />
<property name="systemPropertiesModeName"
value="SYSTEM_PROPERTIES_MODE_OVERRIDE" />
<property name="ignoreUnresolvablePlaceholders" value="true" />
<property name="order" value="1" />
</bean>
<bean id="dataSourceInitializer"
class="org.springframework.jdbc.datasource.init.DataSourceInitializer">
<property name="dataSource" ref="dataSource"/>
<property name="enabled" value="true"/>
<property name="databasePopulator">
<bean class="org.springframework.jdbc.datasource.init.ResourceDatabasePopulator">
<property name="continueOnError" value="false"/>
<property name="ignoreFailedDrops" value="false"/>
<property name="sqlScriptEncoding" value="UTF-8"/>
<property name="scripts">
<list>
<value type="org.springframework.core.io.Resource">classpath:schema.sql</value>
</list>
</property>
</bean>
</property>
</bean>
</beans>The advantage of this configuration structure is that you can override it in test. The job-context.xml file is located in your <PROJECT>/src/main/resources directory. In <PROJECT>/src/test/resources, you create an identical file called test-context.xml. However, instead of referring to batch.properties for the location, you refer to test-batch.properties. The other addition to the test-context.xml file is the configuration of a utility that comes with Spring 3 that is a huge help in integration testing: DataSourceIntializer.
The test-batch.properties file mentioned earlier contains the required information for your HSQLDB instance and is located in the same directory as test-context.xml. Listing 12-10 shows the contents of test-batch.properties.
Example 12.10. test-batch.properties
batch.jdbc.driver=org.hsqldb.jdbcDriver
batch.jdbc.url=jdbc:hsqldb:mem:testdb;sql.enforce_strict_size=true
batch.jdbc.user=sa
batch.jdbc.password=
batch.schema=
batch.schema.script=org/springframework/batch/core/schema-hsqldb.sql
The test-batch.properties file defines the information used by the datasource to connect to your database as well as a list of scripts to execute on startup. In this case, the HSQLDB connection information is very straightforward, and you have two scripts to run on startup: schema-hsqldb.sql creates the Spring Batch tables for you, and schema.sql creates the statement tables.
With the test environment configured, you can begin to write your first integration test. The next section looks at how to write an integration test for TickerDao.
Writing an integration test with Spring is very simple. You need to do three things:
Tell Spring the location from which to load your context.
Extend
AbstractTransactionalJUnit4SpringContextTests(yes, that really is the name of the class) to get the transactional help that Spring provides.Tell Spring what values to wire.
After you've done these three things, you can use your code just as if it was in your application. Let's start by telling Spring the location from which to load your context. To do this, you use Spring's @ContextConfiguration annotation at the class level. For your purposes, this annotation takes a single attribute, location, which tells Spring where to find the test-context.xml file.
One of the main advantages of using the Spring testing infrastructure is the transaction benefits it provides. It can be very helpful to be able to run a test in a transaction that rolls back after each test method is executed. This way, your database begins and ends each test case in the exact same state. By extending Spring's AbstractTransactionalJUnit4SpringContextTests class, you get that functionality with no further work. Listing 12-11 shows the shell of the integration test with the context location configured and the shell extending the correct class.
Example 12.11. TickerDaoIntegrationTest Shell
package com.apress.springbatch.statement.dao;

import org.springframework.beans.factory.annotation.Autowired;
import org.springframework.test.context.ContextConfiguration;
import
  org.springframework.test.context.junit4.AbstractTransactionalJUnit4SpringContextTests;

@ContextConfiguration(locations = {"/test-context.xml"})
public class TickerDaoIntegrationTest extends
    AbstractTransactionalJUnit4SpringContextTests {

    ...
}
Now, because you're going to test TickerDao (the TickerDaoJdbc class, to be exact), you need Spring to wire it up and inject it into your test so it's available. To do this, you use Spring's @Autowired annotation to identify any class attribute that you want Spring to wire for you. Because all you need for this test is for TickerDao itself to be wired, that is all you need to indicate to Spring.
The rest of an integration test with Spring is the same as it would be if it was a unit test. You prepare any data required for the test, execute the code being tested, and finally use JUnit's assertions to validate what happened. The code in Listing 12-12 tests the saving and retrieving of a ticker using TickerDao.
Example 12.12. Testing the Saving and Retrieving of a Ticker Using TickerDao
package com.apress.springbatch.statement.dao;

import static org.junit.Assert.assertEquals;
import static org.junit.Assert.assertNotNull;
import static org.junit.Assert.assertTrue;

import java.math.BigDecimal;

import org.junit.Test;
import org.springframework.beans.factory.annotation.Autowired;
import org.springframework.test.context.ContextConfiguration;
import
  org.springframework.test.context.junit4.AbstractTransactionalJUnit4SpringContextTests;

import com.apress.springbatch.statement.domain.Ticker;

@ContextConfiguration(locations = {"/test-context.xml"})
public class TickerDaoIntegrationTest extends
    AbstractTransactionalJUnit4SpringContextTests {

    @Autowired
    private TickerDao tickerDao;

    @Test
    public void testTickerSaveRoundTrip() {
        Ticker ticker = new Ticker();
        ticker.setPrice(new BigDecimal("222.22"));
        ticker.setTicker("MTM");

        tickerDao.saveTicker(ticker);

        Ticker result = tickerDao.findTickerBySymbol("MTM");

        assertNotNull(result);
        assertEquals(222.22, result.getPrice().doubleValue(), 0);
        assertEquals("MTM", result.getTicker());
        assertTrue(result.getId() >= 0);
    }
}
The test shown in Listing 12-12 begins by creating a new Ticker object to be saved. You then use the tickerDao provided by Spring to save it and subsequently retrieve it. Finally, you validate that the data you saved matches the data that was retrieved and that the id was set, signifying that it truly was saved to the database.
When you execute this test, a new instance of HSQLDB is launched, the database schema is created, and your objects are bootstrapped and injected, all prior the execution of the test method. The test method is executed in its own transaction, which is rolled back at the end of the test, leaving the database pristine for the next test method to be executed.
Integration tests like testTickerSaveRoundTrip can be hugely valuable when you're developing a system. The ability to determine if things are being wired correctly, if SQL is correct, and even if the order of operations between components of a system is correct can provide considerable security when you're dealing with complex systems.
The final piece of testing with Spring Batch is testing the Spring Batch components themselves. ItemReaders, steps, and even entire jobs can be tested with the tools provided by Spring. The final section of this chapter looks at how to use those components and test pieces of your batch process.
Although the ability to test components like a DAO or a service is definitely needed when you're working with robust batch jobs, working with the Spring Batch framework introduces a collection of additional complexities into your code that need to be addressed in order to build a robust test suite. This section looks at how to handle testing Spring Batch–specific components, including elements that depend on custom scopes, Spring Batch steps, and even complete jobs.
As you've seen in many examples throughout this book, the step scope defined by Spring Batch for your Spring Beans is a very helpful tool. However, when you're writing integration tests for components that use the step scope, you run into an issue: if you're executing those components outside the scope of a step, how do those dependencies get resolved? In this section, you look at the two ways Spring Batch offers to simulate that a bean is being executed in the scope of a step.
You've seen in the past how using the step scope allows Spring Batch to inject runtime values from the job and/or step context into your beans. Previous examples include the injection of an input or output file name, or criteria for a particular database query. In each of those examples, Spring Batch obtains the values from the JobExecution or the StepExecution. If you aren't running the job in a step, you don't have either of those executions. Spring Batch provides two different ways to emulate the execution in a step so that those values can be injected. The first approach uses a TestExecutionListener.
TestExecutionListener is a Spring API that allows you to define things to occur before or after a test method. Unlike using JUnit's @Before and @After annotations, using Spring's TestExecutionListener allows you to inject behavior across all the methods in a test case in a more reusable way. Although Spring provides three useful implementations of the TestExecutionListener interface (DependencyInjectionTestExecutionListener, DirtiesContextTestExecutionListener, and TransactionalTestExecutionListener), Spring Batch provides one that handles what you're looking for: StepScopeTestExecutionListener.
StepScopeTestExecutionListener provides two features you need. First, it uses a factory method from your test case to obtain a StepExecution and uses the one returned as the context for the current test method. Second, it provides a StepContext for the life of each test method. Figure 12-2 shows the flow of a test being executed using StepScopeTestExecutionListener.

As you can see, the factory method you create in the test case (getStepExecution) is called before each test method to obtain a new StepExecution. If there is no factory method, Spring Batch uses a default StepExecution.
To test this, you configure a FlatFileItemReader to obtain the location of the file to read from the jobParameters. First let's look at the configuration of the ItemReader to test and the resource you use (see Listing 12-13).
Example 12.13. Car File's ItemReader Configuration
...
<beans:bean id="carFileReader"
  class="org.springframework.batch.item.file.FlatFileItemReader" scope="step">
  <beans:property name="resource" value="#{jobParameters[carFile]}"/>
  <beans:property name="lineMapper">
    <beans:bean
      class="org.springframework.batch.item.file.mapping.PassThroughLineMapper"/>
  </beans:property>
</beans:bean>
...
Listing 12-13 is a simple FlatFileItemReader that is configured to use the step scope so you can set the name of the input file at runtime via the job parameters. To test this ItemReader, you begin the same way you did with TickerDaoIntegrationTest by telling Spring the location of the context configuration using the @ContextConfiguration annotation. However, with this test, you expand the use of annotations to include the following:
@TestExecutionListeners: Using DependencyInjectionTestExecutionListener eliminates the need to extend any specific class from Spring to obtain the ability to have your beans wired and injected via Spring. StepScopeTestExecutionListener callsgetStepExecutionto obtain a StepExecution complete with any parameters that Spring Batch would inject for you.@RunWith: The listeners in the previous item are a Spring concept unknown to JUnit. So, you need to use Spring's test runner instead of the standard JUnit one.
For this test to work, you need a test file for the ItemReader to read. For test purposes, it's a good idea to include any test files in the <PROJECT>/src/test/resources directory so they're available wherever the tests are run. In this case, you include a CSV file named carfile.csv in the directory <project_home>/src/test/resources/data. The contents of the file are shown in Listing 12-14.
Example 12.14. carFile.csv
1987,Nissan,Sentra
1991,Plymouth,Laser
1995,Mercury,Cougar
2000,Infiniti,QX4
2001,Infiniti,QX4
With the environment configured using the same contexts you used in the previous example and the new ItemReader configured as well as a sample input file supplied for testing, you can put together the integration test. This integration test loops through the file, reading each line until the file is complete (five times, in this case). You verify that each record is returned until the final (sixth) call to the reader is null, indicating the input has been exhausted. Listing 12-15 shows the integration test.
Example 12.15. CarFileReaderIntegrationTest
package com.apress.springbatch.chapter12;

import static org.junit.Assert.assertEquals;
import static org.junit.Assert.assertNull;

import java.util.ArrayList;
import java.util.List;

import org.junit.Test;
import org.junit.runner.RunWith;
import org.springframework.batch.core.JobParameters;
import org.springframework.batch.core.JobParametersBuilder;
import org.springframework.batch.core.StepExecution;
import org.springframework.batch.item.ExecutionContext;
import org.springframework.batch.item.ItemReader;
import org.springframework.batch.item.ItemStream;
import org.springframework.batch.test.MetaDataInstanceFactory;
import org.springframework.batch.test.StepScopeTestExecutionListener;
import org.springframework.beans.factory.annotation.Autowired;
import org.springframework.test.context.ContextConfiguration;
import org.springframework.test.context.TestExecutionListeners;
import org.springframework.test.context.junit4.SpringJUnit4ClassRunner;
import org.springframework.test.context.support.DependencyInjectionTestExecutionListener;

@ContextConfiguration(locations = { "/test-context.xml" })
@TestExecutionListeners({ DependencyInjectionTestExecutionListener.class,
        StepScopeTestExecutionListener.class })
@RunWith(SpringJUnit4ClassRunner.class)
public class CarFileReaderIntegrationTest {

    @Autowired
    private ItemReader<String> carFileReader;

    @SuppressWarnings("serial")
    private List<String> records = new ArrayList<String>() {{
        add("1987,Nissan,Sentra");
        add("1991,Plymouth,Laser");
        add("1995,Mercury,Cougar");
        add("2000,Infiniti,QX4");
        add("2001,Infiniti,QX4");
    }};

    public StepExecution getStepExecution() {
        JobParameters jobParams = new JobParametersBuilder().addString(
                "carFile", "classpath:/data/carfile.txt").toJobParameters();

        return MetaDataInstanceFactory.createStepExecution(jobParams);
    }
@Test
public void testCarFileReader() throws Exception {
((ItemStream) carFileReader).open(new ExecutionContext());
for(int i = 0; i < 5; i++) {
assertEquals(carFileReader.read(), records.get(i));
}
assertNull(carFileReader.read());
}
}CarFileReaderIntegrationTest uses a facility you haven't seen up to now. MetaDataInstanceFactory is a class provided by Spring Batch for creating mocks of the Spring Batch domain objects. Under most situations, I would strongly recommend using just Mockito to limit the coupling between your unit tests and Spring; but in this case, things are a bit different.
Spring Batch requires a StepExecution object. However, what it does with it is rather complex, and to mock that with Mockito would require you to have knowledge of the inner workings of Spring Batch. This type of situation isn't something you want to mock using Mockito, so you use Spring's MetaDataInstanceFactory to create the mock instead.
As mentioned earlier, there are two ways to test a Spring Batch component that is defined in the step scope. The first, being the listener approach you just saw, is non-invasive and lets you apply the step scope to all the test methods in your test case. But if you only need it for one or two of the test methods in your test case, Spring Batch provides a utility to wrap your execution in a step. Testing the same component, carFileReader, you can execute it in the scope of a step by using StepScopeTestUtils. Listing 12-16 shows the unit test updated to use StepScopeTestUtils instead of the listeners to simulate a step.
Example 12.16. Using StepScopeTestUtils
package com.apress.springbatch.chapter12;

import static org.junit.Assert.assertEquals;

import java.util.concurrent.Callable;

import org.junit.Test;
import org.junit.runner.RunWith;
import org.springframework.batch.core.JobParameters;
import org.springframework.batch.core.JobParametersBuilder;
import org.springframework.batch.core.StepExecution;
import org.springframework.batch.item.ExecutionContext;
import org.springframework.batch.item.ItemReader;
import org.springframework.batch.item.ItemStream;
import org.springframework.batch.test.MetaDataInstanceFactory;
import org.springframework.batch.test.StepScopeTestUtils;
import org.springframework.beans.factory.annotation.Autowired;
import org.springframework.test.context.ContextConfiguration;
import org.springframework.test.context.TestExecutionListeners;
import org.springframework.test.context.junit4.SpringJUnit4ClassRunner;
import
  org.springframework.test.context.support.DependencyInjectionTestExecutionListener;
@ContextConfiguration(locations = { "/test-context.xml" })
@TestExecutionListeners({ DependencyInjectionTestExecutionListener.class })
@RunWith(SpringJUnit4ClassRunner.class)
public class CarFileReaderIntegrationTest {

    @Autowired
    private ItemReader<String> carFileReader;

    public StepExecution getStepExecution() {
        JobParameters jobParams = new JobParametersBuilder().addString(
                "carFile", "classpath:/data/carfile.txt").toJobParameters();

        return MetaDataInstanceFactory.createStepExecution(jobParams);
    }

    @Test
    public void testCarFileReader() throws Exception {
        StepExecution execution = getStepExecution();

        Integer readCount =
            StepScopeTestUtils.doInStepScope(execution, new Callable<Integer>() {

            @Override
            public Integer call() throws Exception {
                ((ItemStream) carFileReader).open(new ExecutionContext());

                int i = 0;

                while(carFileReader.read() != null) { i++; }

                return i;
            }
        });

        assertEquals(readCount.intValue(), 5);
    }
}
The StepScopeTestUtils object contains a single utility method called doInStepScope, as shown in Listing 12-16. This method accepts a StepExecution and a Callable implementation. When the test is executed, StepScopeTestUtils addresses the runtime injection, as Spring Batch normally would, and then executes the Callable implementation, returning the result. In this case, the Callable implementation counts the number of records in your test file and returns the number for you to validate that it's correct.
Integration tests of this nature can be very useful to test custom developed components such as custom ItemReaders and ItemWriters. However, as you can see, the value of testing Spring Batch's own components is minimal at best. Rest assured, it has test coverage for these very things. Instead, it may be more useful to test your batch jobs by executing an entire step. The next section looks at the tools Spring Batch provides to make that happen.
Jobs are broken into steps. This book has established that. Each step is an independent piece of functionality that can be executed with minimal impact on other steps. Because of the inherent decoupling of steps with a batch job, steps become prime candidates for testing. In this section, you look at how to test a Spring Batch step in its entirety.
In the step scope–based examples in the previous section, you tested the ItemReader of a job that reads in a file and writes out the exact same file. This single-step job is the job you use now to demonstrate how to test the execution of a single step in Spring Batch. To begin, let's look at the configuration for the job; Listing 12-17 has the XML for the entire carJob.
Example 12.17. carJob.xml
<?xml version="1.0" encoding="UTF-8"?>
<beans:beans xmlns="http://www.springframework.org/schema/batch"
  xmlns:beans="http://www.springframework.org/schema/beans"
  xmlns:util="http://www.springframework.org/schema/beans"
  xmlns:xsi="http://www.w3.org/2001/XMLSchema-instance"
  xsi:schemaLocation="http://www.springframework.org/schema/beans
    http://www.springframework.org/schema/beans/spring-beans-3.0.xsd
    http://www.springframework.org/schema/util
    http://www.springframework.org/schema/util/spring-util.xsd
    http://www.springframework.org/schema/batch
    http://www.springframework.org/schema/batch/spring-batch-2.1.xsd">

  <beans:bean id="carFileReader"
    class="org.springframework.batch.item.file.FlatFileItemReader" scope="step">
    <beans:property name="resource" value="#{jobParameters[carFile]}"/>
    <beans:property name="lineMapper">
      <beans:bean
        class="org.springframework.batch.item.file.mapping.PassThroughLineMapper"/>
    </beans:property>
  </beans:bean>

  <beans:bean id="carFileWriter"
    class="org.springframework.batch.item.file.FlatFileItemWriter" scope="step">
    <beans:property name="resource" value="#{jobParameters[outputFile]}"/>
    <beans:property name="lineAggregator">
      <beans:bean
        class="org.springframework.batch.item.file.transform.PassThroughLineAggregator"/>
    </beans:property>
  </beans:bean>

  <job id="carJob">
    <step id="carProcessingStep">
      <tasklet>
        <chunk reader="carFileReader" writer="carFileWriter" commit-interval="10"/>
      </tasklet>
    </step>
  </job>
</beans:beans>
carJob uses a FlatFileItemReader to read in a file whose location is passed in at runtime via the job parameters. It passes the input to a FlatFileItemWriter that writes the output to a file whose location is also provided at runtime via the job parameters. These two components are used in a single step to make up your job.
To execute this step via an integration test, the test is structured very much like CarFileReaderIntegrationTest shown in Listing 12-17. You use annotations to tell Spring where to find your context configuration files and what to inject, and you configure the test to be executed via SpringJUnit4ClassRunner. You even build your own JobParameters object to pass in to the job. But that is where the similarities end.
To execute a step, you use another utility provided by Spring Batch: JobLauncherTestUtils. This utility class provides a number of methods for launching both steps and jobs in a variety of ways (with parameters, without parameters, with an execution context, without, and so on). When you execute a step, you receive the JobExecution back, in which you can inspect what happened in the job. Listing 12-18 has the code to test carProcessingStep.
Example 12.18. Testing carProcessingStep
package com.apress.springbatch.chapter12;

import static org.junit.Assert.assertEquals;
import static org.springframework.batch.test.AssertFile.assertFileEquals;

import org.junit.Test;
import org.junit.runner.RunWith;
import org.springframework.batch.core.BatchStatus;
import org.springframework.batch.core.ExitStatus;
import org.springframework.batch.core.JobExecution;
import org.springframework.batch.core.JobParameters;
import org.springframework.batch.core.JobParametersBuilder;
import org.springframework.batch.core.StepExecution;
import org.springframework.batch.test.JobLauncherTestUtils;
import org.springframework.beans.factory.annotation.Autowired;
import org.springframework.core.io.ClassPathResource;
import org.springframework.core.io.FileSystemResource;
import org.springframework.test.context.ContextConfiguration;
import org.springframework.test.context.TestExecutionListeners;
import org.springframework.test.context.junit4.SpringJUnit4ClassRunner;
import
  org.springframework.test.context.support.DependencyInjectionTestExecutionListener;

@ContextConfiguration(locations = { "/test-context.xml" })
@TestExecutionListeners({ DependencyInjectionTestExecutionListener.class })
@RunWith(SpringJUnit4ClassRunner.class)
public class CarProcessingStepIntegrationTest {

    private static final String OUTPUT_FILE = "/"
            + System.getProperty("java.io.tmpdir") + "carOutput.txt";
    private static final String INPUT_FILE = "/data/carfile.txt";
    @Autowired
    private JobLauncherTestUtils jobLauncherUtils;
@Test
public void testCarProcessingStep() throws Exception {
assertEquals(BatchStatus.COMPLETED,
jobLauncherUtils.launchStep("carProcessingStep", getParams())
.getStatus());
assertFileEquals(new ClassPathResource(INPUT_FILE),
new FileSystemResource(OUTPUT_FILE));
}
private JobParameters getParams() {
return new JobParametersBuilder().addString("carFile", INPUT_FILE)
.addString("outputFile", "file:/" + OUTPUT_FILE)
.toJobParameters();
}
}As mentioned, the structure of this test should be familiar. It's the same as you've used for the past few tests. However, a few aspects are interesting for this test. First is the bean jobLauncherUtils. This is the utility class mentioned earlier. Spring autowires it into your test and autowires its own dependencies to things like a datasource as well as a job launcher. Because of JobLauncherTestUtils' need to be autowired, you need to be sure to add it to your test-context.xml file. Listing 12-19 shows the contents of the test-context.xml file for this test.
Example 12.19. test-context.xml
<?xml version="1.0" encoding="UTF-8"?>
<beans xmlns="http://www.springframework.org/schema/beans"
  xmlns:xsi="http://www.w3.org/2001/XMLSchema-instance"
  xmlns:context="http://www.springframework.org/schema/context"
  xmlns:util="http://www.springframework.org/schema/beans"
  xsi:schemaLocation="http://www.springframework.org/schema/beans
    http://www.springframework.org/schema/beans/spring-beans-3.0.xsd
    http://www.springframework.org/schema/util
    http://www.springframework.org/schema/util/spring-util.xsd
    http://www.springframework.org/schema/context
    http://www.springframework.org/schema/context/spring-context-2.5.xsd">

  <import resource="launch-context.xml"/>
  <import resource="jobs/carJob.xml"/>

  <bean id="placeholderProperties"
    class="org.springframework.beans.factory.config.PropertyPlaceholderConfigurer">
    <property name="location" value="classpath:test-batch.properties" />
    <property name="systemPropertiesModeName"
      value="SYSTEM_PROPERTIES_MODE_OVERRIDE" />
    <property name="ignoreUnresolvablePlaceholders" value="true" />
    <property name="order" value="1" />
  </bean>

  <bean id="jobLauncherUtils" class="org.springframework.batch.test.JobLauncherTestUtils"/>
<bean id="dataSourceInitializer"
class="org.springframework.jdbc.datasource.init.DataSourceInitializer">
<property name="dataSource" ref="dataSource"/>
<property name="enabled" value="true"/>
<property name="databasePopulator">
<bean class="org.springframework.jdbc.datasource.init.ResourceDatabasePopulator">
<property name="continueOnError" value="false"/>
<property name="ignoreFailedDrops" value="false"/>
<property name="sqlScriptEncoding" value="UTF-8"/>
<property name="scripts">
<list>
<value type="org.springframework.core.io.Resource">
${batch.schema.script}
</value>
</list>
</property>
</bean>
</property>
</bean>
</beans>With JobLauncherTestUtils wired up, you use it to execute your step in the test's testCarProcessingStep method. On completion of executing the step, you verify two things: using the regular JUnit assertions, you verify that the step completed successfully; and you verify that the file that was created is the same as the one read in. Using JUnit to do something like this would be a very painful exercise; but because file manipulation is at the core of the Spring Batch framework, Spring Batch includes the ability to assert that two files are the same. The AssertFile utility class lets you compare two files in their entirety or just the line counts of two files. This is a very helpful tool in your testing arsenal.
The only thing left that you could possibly test is the entire job. In the next section, you move to true functional testing and test a batch job from end to end.
Testing an entire job can be a daunting task. Some jobs, as you've seen, can be quite complex and require setup that isn't easy to do. However, the benefits of being able to automate the execution and result verification can't be ignored. Thus you're strongly encouraged to attempt to automate testing at this level whenever possible. This section looks at how to use JobLauncherTestUtils to execute an entire job for testing purposes.
In this example you use the same carJob as in the previous section, but this time you test the entire job instead of the encompassing step. To do so, the JobLauncherTestUtils class is again your friend and does all the hard work. Because you have only a single job configured in your context, all you need to do to execute the job is call JobLauncherTestUtils' launchJob() method. In this case, you call the variant that accepts a JobParameters object so you can pass in the locations of the input and output files you wish to process.
The launchJob() method returns a JobExecution object. This, as you know from Chapter 4, gives you access to just about everything that happened during the run of your job. You can check the ExitStatus of the job and each step, and you can verify the number of items read, processed, written, skipped, and so on by each step. The list goes on. The importance of being able to programmatically test jobs at this level with the ease that Spring Batch provides can't be overstated. Listing 12-20 shows the test method for testing carJob as a whole.
Example 12.20. Testing carJob
...
    @Test
    public void testCarJob() throws Exception {
        JobExecution execution = jobLauncherUtils.launchJob(getParams());

        assertEquals(ExitStatus.COMPLETED, execution.getExitStatus());

        StepExecution stepExecution =
            execution.getStepExecutions().iterator().next();
        assertEquals(ExitStatus.COMPLETED, stepExecution.getExitStatus());
        assertEquals(5, stepExecution.getReadCount());
        assertEquals(5, stepExecution.getWriteCount());

        assertFileEquals(new ClassPathResource(INPUT_FILE),
                new FileSystemResource(OUTPUT_FILE));
    }

    private JobParameters getParams() {
        return new JobParametersBuilder().addString("carFile", INPUT_FILE)
                .addString("outputFile", "file:/" + OUTPUT_FILE)
                .toJobParameters();
    }
...
As Listing 12-20 shows, executing your job requires only a single line of code. From there, you're able to verify the ExitStatus of the job, any steps in the job, and the read and write count for those steps, and also assert that the results of the job match what you expected.
From unit-testing a single method in any component in your system all the way to executing batch jobs programmatically, you've covered the vast majority of testing scenarios you may encounter as a batch programmer. This chapter began with an overview of the JUnit test framework and the Mockito mock-object frameworks for unit testing. You then explored integration testing using the classes and annotations provided by Spring, including executing tests in transactions. Finally, you looked at Spring Batch–specific testing by executing components that are defined in the step scope, individual steps in jobs, and finally the entire job.
[34] Or at least it won the Betamax versus VHS wars against frameworks like TestNG and others.
[35] These methods were called setUp and tearDown in previous versions of JUnit.
[36] This isn't 100% true. PowerMock lets you mock the new operator. You can find more information on PowerMock athttp://code.google.com/p/powermock/.
[37] It's important to note that using JDBC and switching database types can be difficult due to differences in implemting SQL between databases. In this case, the only difference should be the create statements, for which you can use separate scripts.
[38] For the record, if you're using the POM file that comes with the Spring Batch CLI Archetype, you don't need to do this—the drivers are already included for Spring Batch's own testing. However, because you've used MySQL for all examples thus far, you may need to add them back.