
Normally, you don't have to think about how to run an application in Java. If you have a web application, you run it in some form of container. To run the application, you start the container, which starts the application. If you want to run a stand-alone Java program, you either create an executable jar file or call the class directly. In either case you might write a shell script to launch the process.
However, running a batch job is different. This is partially because a batch job can be run either as a thread within an existing process (as it has been up to now) or within the main execution thread. It can be run within a container or as a stand-alone process. You can start a JVM with each execution, or you can have a JVM loaded and call into it via something like JMX to launch the job (as you did in Chapter 5).
You also have the consideration of what should happen when things go wrong and your job stops. Does the entire job need to be rerun, or can you start at the step where it left off? If the step is processing a million rows, do they all need to be reprocessed, or can you restart at the chunk where the error occurred?
With all this to think about when running a batch job, this chapter covers how to start a job in a variety of environments. It discusses the different job runners provided with the Spring Batch framework, as well as integrating the starting and running of jobs with a container like Tomcat and a scheduler like Quartz.
Running a job isn't all you learn about here. You also see how to programmatically stop a job once it has begun in a way that allows it to be restarted. Finally, you finish this chapter by seeing what it takes to be able to restart a job.
In the chapters up to now, you've almost exclusively run a job each time you start a JVM. However, when you execute a job as you have been with SimpleJobLauncher, things are a little more complex than meets the eye. This section looks at what happens when you launch a job via the SimpleJobLauncher. You then take a detailed look at all the job runners and launchers Spring Batch provides. You see how to execute jobs in a variety of environments, including from within a servlet container, using the Spring Batch Admin administration application and via the open source scheduler Quartz.
When you think about launching a batch job in Spring Batch, you may think that what is happening is Spring Batch executing the job as part of the main execution thread. When it finishes, the process ends. However, it isn't that simple. The org.springframework.batch.core.launch.JobLauncher interface, which is responsible for the work of starting a job, can be implemented in a number of ways, exposing any number of execution options (web, JMX, command line, and so on).
Because the JobLauncher interface doesn't guarantee whether a job is run synchronously or asynchronously, SimpleJobLauncher (the only JobLauncher implementation provided by Spring Batch) leaves it up to the developer by running the job in Spring's TaskExecutor. By default, SimpleJobLauncher uses Spring's SyncTaskExecutor, which executes the job in the current thread. Although this is ok in many instances, this option is a limiting factor for the number of jobs you run within a single JVM.
Let's look at how SimpleJobLauncher is configured. Listing 6-1 shows its configuration with the optional taskExecutor property set. This property allows you, as said previously, to specify the algorithm used for launching jobs. In this case, you're using Spring's SimpleAsyncTaskExecutor to launch the job in a new thread. However, you can easily configure this to use ThreadPoolTaskExecutor to control the number of threads available
Example 6.1. SimpleJobLauncher Configured with a Task Executor
<bean id="taskExecutor"
    class="org.springframework.core.task.SimpleAsyncTaskExecutor"/>

<bean id="jobLauncher"
    class="org.springframework.batch.core.launch.support.SimpleJobLauncher">
    <property name="jobRepository" ref="jobRepository" />
    <property name="taskExecutor" ref="taskExecutor"/>
</bean>
Although the JobLauncher kicks off the job and defines how it's run (synchronously, asynchronously, in a thread pool, and so on), it's the job runner that you interact with when you want to launch a job (as you did in the last chapter's JMX job runner). Next you look at the two job runners that Spring Batch provides out of the box: CommandLineJobRunner and JobRegistryBackgroundJobRunner.
When you look at the Spring Batch API, although theoretically there are many ways to run a job (launch it via a servlet, the command line, JMX, and so on), the framework provides only the two runners org.springframework.batch.core.launch.support.CommandLineJobRunner and org.springframework.batch.core.launch.support.JobRegistryBackgroundJobRunner. All other options—servlet, JMX, and so forth—must be custom developed. Let's look at how CommandLineJobRunner and JobRegistryBackgroundJobRunner are used and why, starting with CommandLineJobRunner.
CommandLineJobRunner is the runner you've been using up to now. It serves as an interface for your batch processes via the command line. It's useful for calling jobs from either a terminal or, more commonly, shell scripts. It provides four features:
When you call CommandLineJobRunner from a command line or script, there are three required parameters and four optional ones, as detailed in Table 6-1.
Table 6.1. CommandLineJobRunner Parameters
Parameter | Use |
|---|---|
| Provides the path to the |
| Tells Spring Batch to execute the last failed execution for the job identified |
| Stops an already running |
| Tells Spring Batch to abandon a previously stopped execution |
| Increments the required parameter in the sequence configured by the |
| Gives the name or id of the job as it's specified in the |
| Specifies a list of |
Although you've used CommandLineJobRunner almost exclusively to execute jobs up to now, as you can see, there is more that this small tool can do for you. The path to your job's XML file, and the -next and job parameter options, should all be familiar because they have been covered previously.
The build process you've been using with the Project Object Model (POM) included in simple-cli builds a jar file with CommandLineJobRunner configured as the main class. To use it, you need the jar file in a directory with a lib folder containing all dependencies. If you look at the <project_home>/target/ directory, you see the jar file that has been built along with the lib directory with the required dependencies; however, the name may not be the most intuitive (for example, spring-batch-simple-cli-2.1.3.RELEASE.jar). To update the build process to build a more appropriate jar name, you can change the POM file to generate your artifact with the appropriate name. Listing 6-2 shows the POM update that changes the name of the jar to helloWorld.jar.
Example 6.2. Renaming the Maven Artifact to helloWorld.jar
...
<build>
    <finalName>helloWorld</finalName>
    ...
</build>
...
With your jar file named something that makes sense for your application (helloWorld in this case), you can run the job using the jar file itself from the <project_home>/target directory. Listing 6-3 shows an example of how to run the HelloWorld job you've been running up to now using the Java command.
Example 6.3. Basic Call to CommandLineJobRunner Contained in helloWorld.jar
java –jar helloWorld.jar jobs/helloWorld.xml helloWorldJob
You pass two parameters in: the path to the job's configuration and the name of the job to run. Using the –next parameter (from Chapter 4), as shown in Listing 6-4, invokes any configured JobParametersIncrementers.
Example 6.4. Using the –next Parameter
java -jar helloWorld.jar jobs/helloWorld.xml helloWorldJob -next
Although Table 6-1 shows seven parameters are available for CommandLineJobRunner, this chapter only covers the four you have for now. Later in this chapter, you revisit CommandLineJobRunner and see how to stop, abandon, and restart jobs with it. For now, you move on to the other job runner that Spring Batch provides: JobRegistryBackgroundJobRunner.
JobRegistryBackgroundJobRunner actually isn't a job runner at all. You don't execute jobs through this runner as you do CommandLineJobRunner. Instead, this class is intended to be used to bootstrap Spring and build a JobRegistry for others to consume. In Chapter 5, you wrote your own version of a class that has a similar function to bootstrap Spring and your jobs for the JMXJobRunner.
But you didn't have to write your own.org.springframework.batch.core.launch.support.JobRegistryBackgroundJobRunner is a command-line interface, like CommandLineJobRunner. However, instead of running a job that is specified, this job runner takes a list of configuration files. Once the configuration files have been bootstrapped, JobRegistryBackgroundJobRunner pauses until a key is pressed.
Let's look at an example of how this works. To start, back to the JMXJobRunner example from Chapter 5. Up to now, you've linked the job XML file (<project_home>/src/main/resources/jobs/helloWorld.xml) with the main or parent application context (<project_home>/src/main/resources/launch-context.xml). When using a JobRegistry, however, this isn't typically the case. The reason is that when a JobRegistry is loaded, the jobs aren't executed immediately. Instead, you load all possible jobs that can be executed into a Map that so they can be launched at any time. To configure your job correctly, you need to remove a single line: the import of the launch-context.xml file in the helloWorld.xml file. You do this to prevent a circular reference. If you leave the reference to the launch-context.xml file in your helloWorld.xml file, the JobRegistryBackgroundJobRunner will load launch-context.xml and then load the jobs in helloWorld.xml. Because launch-context.xml is already loaded at that point, you don't want or need to load it again.
The other modification you need to do is to remove the AutomaticJobRegistrar bean from launch-context.xml. JobRegistryBackgroundJobRunner takes two parameters from the command line: a base configuration (called the parent) that contains all general components including things like the JobRepository, JobLauncher, and so on; and a list of configuration files containing the jobs you want to run. JobRegistryBackgroundJobRunner registers the jobs it finds in the configuration you pass, so there is no need for AutomaticJobRegistrar.
Note
Passing in a configuration that has a job that has already been referenced leads to a DuplicateJobException being thrown.
Instead of using the Batch class you wrote in the previous chapter, you use JobRegistryBackgroundJobRunner to bootstrap your job. Because JobRegistryBackgroundJobRunner is included in the spring-batch-core jar file (the main Spring Batch dependency), the only change you need to make to execute the jar file with JobRegistryBackgroundJobRunner is to change the POM file to reference JobRegistryBackgroundJobRunner as the main class. Listing 6-5 highlights the change.
Example 6.5. Changing the Main Class in pom.xml
<plugin>
    <groupId>org.apache.maven.plugins</groupId>
    <artifactId>maven-jar-plugin</artifactId>
    <configuration>
        <archive>
            <index>false</index>
            <manifest>
                <mainClass>
org.springframework.batch.core.launch.support.JobRegistryBackgroundJobRunner
                </mainClass>
                <addClasspath>true</addClasspath>
                <classpathPrefix>lib/</classpathPrefix>
            </manifest>
            <manifestFile>
                ${project.build.outputDirectory}/META-INF/MANIFEST.MF
            </manifestFile>
        </archive>
    </configuration>
</plugin>
That small change in pom.xml is all that you need to make to be able to execute the jar file using JobRegistryBackgroundJobRunner. When the jar file is rebuilt, you can execute it with the command in Listing 6-6.
Example 6.6. Executing JobRegistryBackgroundJobRunner
java -jar helloWorld.jar launch-context.xml jobs/helloWorld.xml
Notice that you don't specify the name of the job you want to be run on the command line as you have in the past. The reason is that you're only bootstrapping Spring and Spring Batch with this command and not initiating the execution of a job. When you execute the jar, you see your normal Spring bootstrap output, finishing with what is shown in Listing 6-7 Then the application waits. And waits. It continues to run until either it's killed or the JobRegistryBackgroundJobRunner.stop() method is called programmatically. With the process now running, you can use JConsole as you did in Chapter 5 to execute the job.
Example 6.7. Output from JobRegistryBackgroundJobRunner
2011-04-30 01:36:24,105 DEBUG main
[org.springframework.batch.core.configuration.support.ClassPathXmlApplication
ContextFactory$ResourceXmlApplicationContext] - <Unable to locate
LifecycleProcessor with name 'lifecycleProcessor': using default
[org.springframework.context.support.DefaultLifecycleProcessor@d3ade7]>

2011-04-30 01:36:24,106 DEBUG main
[org.springframework.batch.core.configuration.support.DefaultJobLoader] –
<Registering job: helloWorldJob from context:
org.springframework.batch.core.configuration.support.ClassPathXmlApplicationC
ontextFactory$ResourceXmlApplicationContext@1c6a99d>

Started application. Interrupt (CTRL-C) or call
JobRegistryBackgroundJobRunner.stop() to exit.
JobRegistryBackgroundJobRunner is a useful tool for bootstrapping Spring and your jobs from a command line without executing them immediately. This is a much more typical scenario found in production-like environments. However, most production environments don't fire up a Java process and let it run and kick off jobs by hand. Instead, jobs are scheduled. They may be run in a servlet container for consistency of deployment, and they may need to be managed by the Spring Admin project. The next section covers how to do all that.
Spring Batch is an excellent tool to develop batch processes, but it's rarely administered on its own. Enterprises need the ability for batch jobs to be administered by operations teams. They need to be able to deploy jobs in a consistent way for the enterprise. They need to be able to start, stop, and schedule jobs in a way that doesn't require programming (typically through an enterprise scheduler of some kind). This section looks at how to schedule batch jobs with the open source scheduler Quartz, how to deploy Spring Batch jobs in the Tomcat servlet container, and finally how to start jobs with the administration tool Spring Batch Admin.
Many enterprise schedulers are available. They range from the crude but very effective crontab to enterprise automation platforms that can run into the millions of dollars. The scheduler you use here is an open source scheduler called Quartz (www.quartz-scheduler.org/). This scheduler is commonly used in Java environments of all sizes. In addition to its power and solid community support, it has an established history of Spring integration that is helpful in executing jobs.
Given the scope of Quartz, this book won't cover all of it here. However, a brief introduction to how it works and how it integrates with Spring is warranted. Figure 6-1 shows the components of Quartz and their relationships.

As you can see, Quartz has three main components: a scheduler, a job, and a trigger. A scheduler, which is obtained from a SchedulerFactory, serves as a registry of JobDetails (a reference to a Quartz job) and triggers and is responsible for executing a job when its associated trigger fires. A job is a unit of work that can be executed. A trigger defines when a job is to be run. When a trigger fires, telling Quartz to execute a job, a JobDetails object is created to define the individual execution of the job.
Does this sound familiar? It should. The model of defining a job and a JobDetails object is very similar to the way Spring Batch defines a job and a JobInstance. In order to integrate Quartz with your Spring Batch process, you need to do the following:
To show how Quartz can be used to periodically execute a job, let's create a new job, deleteFilesJob, that empties a directory each time it runs. This is a common practice with batch jobs or any instance where data is stored and needs to be periodically removed (database purges, and so on). In this case, you're deleting all files in a temporary directory.
You begin by adding the required dependencies to your POM file. In this case, there are three new dependencies. The first is the Quartz framework itself. The second dependency you add is for the spring-context-support artifact. This package from Spring provides the classes required to integrate Quartz easily with Spring. Finally, to help with some of the configuration hoops you're jumping through for this example, you include the Apache Commons Collections library. The configuration for the dependency is found in Listing 6-8.
Example 6.8. Adding the Quartz-Related Dependencies to the POM
<dependency>
    <groupId>org.springframework</groupId>
    <artifactId>spring-context-support</artifactId>
    <version>${spring.framework.version}</version>
</dependency>
<dependency>
    <groupId>org.quartz-scheduler</groupId>
    <artifactId>quartz</artifactId>
    <version>1.8.3 /version>
</dependency>
<dependency>
    <groupId>commons-collections</groupId>
    <artifactId>commons-collections</artifactId>
    <version>3.2.1</version>
</dependency>
The configuration in Listing 6-8 assumes you're using the POM file that is included in the Spring Batch project. If you aren't, you need to include the version number in place of the property provided.
With the appropriate code now available on your classpath, you can write SpringBatchQuartzJobLauncher. Before you write the code, however, let's talk about what it's going to do. In this case, SpringBatchQuartzJobLauncher takes the place of JMXJobLauncher from Chapter 5 and then some. JMXJobLauncher didn't accept any job parameters as part of the job execution. For this example, your job requires two parameters: the path to the directory you wish to empty and the age of a file that you want to delete. For the sake of simplicity, you delete all files that haven't been modified for the given period of time.
Not only can your Quartz job runner accept incoming parameters, but to prevent the job from not being able to be run more than once, you use Spring Batch's parameter-incrementer functionality (discussed in Chapter 4) to have a unique set of parameters with each run. Listing 6-9 shows SpringBatchQuartzJobLauncher in its entirety.
Example 6.9. SpringBatchQuartzJobLauncher
package com.apress.springbatch.chapter6;

import java.util.List;
import java.util.Map;

import org.quartz.JobExecutionContext;
import org.quartz.JobExecutionException;
import org.slf4j.Logger;
import org.slf4j.LoggerFactory;
import org.springframework.batch.core.Job;
import org.springframework.batch.core.JobInstance;
import org.springframework.batch.core.JobParameter;
import org.springframework.batch.core.JobParameters;
import org.springframework.batch.core.JobParametersBuilder;
import org.springframework.batch.core.JobParametersIncrementer;
import org.springframework.batch.core.configuration.JobLocator;
import org.springframework.batch.core.explore.JobExplorer;
import org.springframework.batch.core.launch.JobLauncher;
import org.springframework.batch.core.launch.JobParametersNotFoundException;
import org.springframework.scheduling.quartz.QuartzJobBean;

public class SpringBatchQuartzJobLauncher extends QuartzJobBean {

    private JobLauncher jobLauncher;
    private JobLocator jobLocator;
    private JobExplorer jobExplorer;
    private Map<String, String> jobParameters;
    public static final String JOB_NAME = "jobName";

    private static final Logger log = LoggerFactory
            .getLogger(SpringBatchQuartzJobLauncher.class);

    @Override
    @SuppressWarnings("unchecked")
    protected void executeInternal(JobExecutionContext context)
throws JobExecutionException {
Map<String, Object> jobDataMap = context.getMergedJobDataMap();
String jobName = (String) jobDataMap.get(JOB_NAME);
try {
Job job = jobLocator.getJob(jobName);
JobParameters allParams = translateParams(job, jobParameters);
jobLauncher.run(job, allParams);
} catch (Exception e) {
log.error("Could not execute job.", e);
}
}
private JobParameters translateParams(Job job,
Map<String, String> params)
throws Exception {
JobParametersBuilder builder = new JobParametersBuilder();
JobParameters incrementedParams = getNextJobParameters(job);
for (Map.Entry<String, JobParameter> param :
incrementedParams.getParameters().entrySet()) {
builder.addParameter(param.getKey(), param.getValue());
}
for (Map.Entry<String, String> param : params.entrySet()) {
builder.addString(param.getKey(), param.getValue());
}
return builder.toJobParameters();
}
private JobParameters getNextJobParameters(Job job)
throws JobParametersNotFoundException {
String jobIdentifier = job.getName();
JobParameters jobParameters;
List<JobInstance> lastInstances =
jobExplorer.getJobInstances(jobIdentifier, 0, 1);
JobParametersIncrementer incrementer =
job.getJobParametersIncrementer();
if (incrementer == null) {
throw new JobParametersNotFoundException(
"No job parameters incrementer found for job="
+ jobIdentifier);
}
if (lastInstances.isEmpty()) {
jobParameters = incrementer.getNext(new JobParameters());
if (jobParameters == null) {
throw new JobParametersNotFoundException("No bootstrap parameters found from incrementer for job="
+ jobIdentifier);
}
} else {
jobParameters = incrementer.getNext(lastInstances.get(0)
.getJobParameters());
}
return jobParameters;
}
public void setJobLauncher(JobLauncher jobLauncher) {
this.jobLauncher = jobLauncher;
}
public void setJobLocator(JobLocator jobLocator) {
this.jobLocator = jobLocator;
}
public void setJobParameters(Map<String, String> jobParameters) {
this.jobParameters = jobParameters;
}
public void setJobExplorer(JobExplorer jobExplorer) {
this.jobExplorer = jobExplorer;
}
}As you look over this code, notice that there are many clashes in class names between Quartz and Spring Batch. To understand what is going on, let's start by looking at the execution environment's structure. You have a single class that extends Spring's QuartzJobBean. This implementation of Quartz's org.quartz.Job interface is a helpful class that allows you to implement only the pieces of logic that pertain to your work, leaving the manipulation of the scheduler and so on to Spring. In this case, you override the executeInternal method from which to execute the job.
Within the executeInternal method, you begin by obtaining the JobDataMap, which is a Map of parameters you pass in to the Quartz job via your Spring configuration (you look at the configuration after this class is covered). This Map contains all the dependencies that are injected into the SpringBatchQuartzJobLauncher class as well as any additional parameters you may want to reference. In this case, you want to reference one other parameter: the name of the job.
With the name of the job obtained, you use the JobLocator to retrieve the Spring Batch job from the JobRegistry. Before you can execute the job you need to convert the parameters passed via Spring as a Map of <String, String> into a Spring Batch JobParameters collection. Once that is complete, you can execute the job using the JobLauncher.
Notice that the actual execution of the job in this class doesn't take much in the way of code. The vast majority of this class is dedicated to the conversion and incrementing of the job's parameters. The other two methods, translateParams and getNextJobParameters are used to translate the parameters you receive from Spring into JobParameters and call the configured parameter incrementer.
translateParams begins by creating an instance of Spring Batch's org.springframework.batch.core.JobParametersBuilder. This class is used to take key value pairs and convert them into JobParameter instances. To begin the conversion, you call the getNextJobParameters[16] method to increment any parameters that are required to be incremented. Because that process returns a JobParameters instance, you then add those parameters to the JobParametersBuilder you're currently working with. With the incremented parameters added, you add the Spring-passed parameters. In this case, you know they're all Strings, and you can simplify the code accordingly.
With SpringBatchQuartzJobLauncher written, you can move on to writing the tasklet that is the base of this job. In this case, you have a simple tasklet (similar to the HelloWorld tasklet you wrote in Chapter 2) that deletes all files in a specified directory that haven't been modified in longer than a given period of time. Listing 6-10 shows the code to accomplish this.
Example 6.10. DeleteFilesTasklet
package com.apress.springbatch.chapter6;

import java.io.File;
import java.util.Date;
import java.util.Map;

import org.springframework.batch.core.StepContribution;
import org.springframework.batch.core.scope.context.ChunkContext;
import org.springframework.batch.core.step.tasklet.Tasklet;
import org.springframework.batch.repeat.RepeatStatus;

public class DeleteFilesTasklet implements Tasklet {

    public RepeatStatus execute(StepContribution step, ChunkContext chunk)
            throws Exception {
        Map<String, Object> params =
            chunk.getStepContext().getJobParameters();
        String path = (String) params.get("path");
        Long age = Long.valueOf((String) params.get("age"));

        File tempDirectory = new File(path);

        File[] files = tempDirectory.listFiles();

        Date now = new Date();
        long oldesttime = now.getTime() - age;

        for (File file : files) {
            if (file.lastModified() < oldesttime) {
                file.delete();
            }
        }
return RepeatStatus.FINISHED;
}
}The code for DeleteFilesTasklet in Listing 6-10 shouldn't come as any surprise. In implementing the Tasklet interface, you implement the execute method to do all your work. For DeleteFilesTasklet's work, you need to know where to delete the files from and how long they have been idle. When you have that information, you can proceed with deleting the files.
The first three lines of the execute method retrieve the job parameters so you can get the path to the directory from which you're to delete the files (path) and the time in milliseconds that a file hasn't been modified (age). When you have the job parameters, you can open a directory and delete all files or directories that meet your requirements. With processing complete, you return RepeatStatus.FINISHED to tell Spring Batch that the step has completed.
All you have left to do to make this happen is the configuration. Again, you're using the JobRegistryBackgroundJobRunner, so the configuration files are separate: launch-context.xml is located in the <project_home>/src/main/resources directory, and deleteFilesJob.xml is in <project_home>/src/main/resources/jobs. Looking at the deleteFilesJob.xml file first, in Listing 6-11, shows you the configuration for the job itself.
Example 6.11. deleteFilesJob.xml
<?xml version="1.0" encoding="UTF-8"?>
<beans:beans xmlns="http://www.springframework.org/schema/batch"
    xmlns:beans="http://www.springframework.org/schema/beans"
    xmlns:xsi="http://www.w3.org/2001/XMLSchema-instance"
    xsi:schemaLocation="http://www.springframework.org/schema/beans
        http://www.springframework.org/schema/beans/spring-beans-3.0.xsd
        http://www.springframework.org/schema/batch
        http://www.springframework.org/schema/batch/spring-batch-2.1.xsd">

    <beans:bean id="deleteFilesTasklet"
        class="com.apress.springbatch.chapter6.DeleteFilesTasklet" />

    <step id="deleteFilesStep">
        <tasklet ref="deleteFilesTasklet" />
    </step>

    <beans:bean id="idIncrementer"
     class="org.springframework.batch.core.launch.support.RunIdIncrementer"/>

    <job id="deleteFilesJob" incrementer="idIncrementer">
        <step id="step1" parent="deleteFilesStep" />
    </job>
</beans:beans>
As with your other jobs, you define the tasklet itself, then have a step that uses the tasklet, and then finish with the definition of the job, a single step that deletes the files when the job runs. The only additional piece of configuration this job receives is the addition of RunIdIncrementer, as discussed in Chapter 4, so you can run this job via Quartz multiple times without having to change the job parameters.
launch-context.xml consists mostly of the usual Spring Batch suspects, as shown in Listing 6-12. You need to add just three beans to make the Quartz interaction work: jobDetail, cronTrigger, and schedule.
Example 6.12. Updates to launch-context.xml
...

<bean id="jobDetail"
    class="org.springframework.scheduling.quartz.JobDetailBean">
    <property name="jobClass"
       value="com.apress.springbatch.chapter6.SpringBatchQuartzJobLauncher"/>
    <property name="jobDataAsMap">
        <map>
            <entry key="jobName" value="deleteFilesJob" />
            <entry key="jobLocator" value-ref="jobRegistry" />
            <entry key="jobLauncher" value-ref="jobLauncher" />
            <entry key="jobExplorer" value-ref="jobExplorer"/>
            <entry key="jobParameters">
                <map>
                    <entry key="path" value="${batch.temp.dir}" />
                    <entry key="age" value="${batch.temp.age}" />
                </map>
            </entry>
        </map>
    </property>
</bean>

<bean id="cronTrigger"
    class="org.springframework.scheduling.quartz.CronTriggerBean">
    <property name="jobDetail" ref="jobDetail" />
    <property name="cronExpression" value="0/10 * * * * ?" />
</bean>

<bean id="schedule"
    class="org.springframework.scheduling.quartz.SchedulerFactoryBean">
    <property name="triggers" ref="cronTrigger"/>
</bean>
...
The first bean of consequence in launch-context.xml for the Quartz example is the jobDetail bean. Here is where you configure SpringBatchQuartzJobLauncher. It's important to note how the relationship between Spring's JobDetailBean and the SpringBatchQuartzJobLauncher bean is used. You configure a JobDetailBean as a Spring bean in launch-context.xml. Each time your Quartz job is executed, the JobDetailBean creates a new instance of SpringBatchQuartzJobLauncher. When configuring the JobDetailBean, jobDetail, you set two properties:
jobClass: This is the class that is instantiated and executed each time the Quartz job runs.jobDataAsMap: ThisMapis a collection of all the objects that are injected intoSpringBatchQuartzJobLauncherand any other parameters the Quartz job needs to run (the location of the files to be deleted and how old they need to be to be).
When the Quartz job is triggered and Spring creates a new instance of SpringBatchQuartzJobLauncher, Spring uses jobDataAsMap to inject any required dependencies as required. In this case, you inject the location of the files to be deleted and how old they need to be.
The second bean to look at in launch-context.xml is the cronTrigger bean. You saw earlier how Quartz uses a trigger to determine when to execute the job. The trigger you're using here determines when to run based on a cron string. To configure the trigger, you create a org.springframework.scheduling.quartz.CronTriggerBean with two dependencies: jobDetail references the job Detail bean, and cronExpression is the cron string used to determine when the job runs. In this case, you execute deleteFilesJob once every 10 seconds.
The final bean to configure is the one that does all the work: the scheduler. Using Spring's org.springframework.scheduling.quartz.SchedulerFactoryBean, you register your trigger with the scheduler. From there, Spring and Quartz take care of the rest.
To get things started, use JobRegistryBackgroundJobRunner to bootstrap the process. Launching this process using the command in Listing 6-13, you bootstrap Spring, register deleteFilesJob in the JobRegistry, and start Quartz. With Quartz running, the job executes every 10 seconds as configured.
Example 6.13. Executing the Job via Quartz
java -jar deleteFiles.jar launch-context.xml jobs/deleteFilesJob.xml
Running jobs via Quartz or another scheduler is a common way to administer batch processes in an enterprise. Another common aspect of running jobs in an enterprise is the way they're deployed. Given that many enterprises deploy all or most Java applications to containers of some kind, you should look at how Spring Batch processes can be run in a container.
Unlike web applications, batch processes don't require a container to execute. You can build robust and completely independent batch jobs using readily available frameworks for things like database-connection pooling, transaction management, and JMS without the need of an application server or servlet container. That being said, however, there are just as many reasons to run a job in a container as not.
In an enterprise, there is typically a more robust base of expertise around the configuration and deployment of container-based applications, where plain Java applications deployed as a collection of jar files may cause some operations teams pause. Also, resources like database connections (and their security), JMS queues, and so on may be easier to manage with a standardized configuration within a container. Let's look at how to deploy and execute jobs from within Tomcat.
Although the ability to configure a large number of resources through the application server is possible with Spring, their configuration is outside of the scope of this book. Instead, you focus on bootstrapping a Spring Batch JobRegistry with the required jobs and triggering their execution.
Bootstrapping the job registry from within a container is easier than what you've been doing up to now. Instead of relying on CommandLineJobRunner or JobRegistryBackgroundJobRunner for a main method and to bootstrap your process, Tomcat serves as the means of starting the Java process, and you can use standard web techniques to bootstrap Spring Batch in your container.
Let's look at how to deploy deleteFilesJob to Tomcat. There are four steps:
Update the POM file to a package application as a war file instead of a jar.
Add the required Spring web-related dependencies to your POM file.
Create
web.xmlin a new directory<project_home>/src/main/webapp/WEB-INFwithContextLoaderListenerto bootstrap Spring.Configure
AutomaticJobRegistrarto register the jobs with the JobRegistry.
You start by updating the POM file. In order for Spring to be bootstrapped in a servlet container like Tomcat, you need to add the Spring framework's web dependencies. Listing 6-14 shows how to configure the additional dependencies required for this job including Spring's web module, SLF4J, and log4j.
Example 6.14. Additional Dependencies for pom.xml
<dependency>
    <groupId>org.springframework</groupId>
    <artifactId>spring-web</artifactId>
    <version>${spring.framework.version}</version>
</dependency>
<dependency>
    <groupId>org.slf4j</groupId>
    <artifactId>slf4j-log4j12</artifactId>
    <version>1.5.8</version>
</dependency>
<dependency>
    <groupId>log4j</groupId>
    <artifactId>log4j</artifactId>
    <version>1.2.14</version>
</dependency>
Instead of creating a jar file for you to execute independently, you want to create a war file that you can deploy to Tomcat. To do this, you need to update the packaging in your POM file from jar to war. You also replace the reference to maven-jar-plugin with maven-war-plugin. Listing 6-15 shows how to configure the POM file so your application is packaged correctly.
Example 6.15. Revised pom.xml
<plugin>
    <artifactId>maven-war-plugin</artifactId>
    <version>2.1-beta-1</version>
    <configuration>
        <attachClasses>true</attachClasses>
        <warName>deleteFiles</warName>
    </configuration>
</plugin>
As Listing 6-15 shows, configuring Maven to generate your war file is very easy. Unfortunately, the changes to the pom.xml file won't work until you create a web.xml file and put it in the correct place. For web.xml, you configure a single listener, Spring's org.springframework.web.context.ContextLoaderListener. It bootstraps Spring as well as the JobRegistry for you. Listing 6-16 shows the web.xml file.
Example 6.16. web.xml
<?xml version="1.0" encoding="UTF-8"?>
<!DOCTYPE web-app PUBLIC
    "-//Sun Microsystems, Inc.//DTD Web Application 2.3//EN"
    "http://java.sun.com/dtd/web-app_2_3.dtd">
<web-app>
    <display-name>Spring Batch Webapp</display-name>
    <description>A web application that wraps Spring Batch jobs</description>

    <context-param>
        <param-name>contextConfigLocation</param-name>
        <param-value>classpath:launch-context.xml</param-value>
    </context-param>

    <listener>
        <listener-class>
            org.springframework.web.context.ContextLoaderListener
        </listener-class>
    </listener>
</web-app>
The web.xml file exists in the <project_home>/src/main/webapp/WEB-INF/ directory. With the POM file updated and the web.xml file defined in the correct place, you can generate a war file using the standard mvn clean install.
Now that you have a working war file, let's configure AutomaticJobRegistrar to register the jobs on startup in your JobRegistry. Just as in previous examples, AutomaticJobRegistrar is configured to register all jobs that are listed in the /jobs/ directory of your classpath. From there, you can use Quartz as you did earlier in this chapter to launch the job. Listing 6-17 shows launch-context.xml configured with both the previous Quartz configuration and AutomaticJobRegistrar.
Example 6.17. Updates to launch-context.xml
...
<bean
    class="org.springframework.batch.core.configuration.support.
AutomaticJobRegistrar">
    <property name="applicationContextFactories">
        <bean
            class="org.springframework.batch.core.configuration.support.
ClasspathXmlApplicationContextsFactoryBean">
            <property name="resources"
                value="classpath*:/jobs/deleteFilesJob.xml" />
        </bean>
    </property>
    <property name="jobLoader">
        <bean class="org.springframework.batch.core.configuration.support.
DefaultJobLoader">
            <property name="jobRegistry" ref="jobRegistry" />
        </bean>
    </property>
</bean> ...
With the job configured and built, all you need to do is deploy it on a Tomcat server. When you copy the war file to <TOMCAT_HOME>/webapps and start up the server by executing the ./startup.sh command in <TOMCAT_HOME>/bin, the application starts and the job is executed every 10 seconds via Quartz. How do you know it's running? You can confirm that files are being deleted as expected and validate the output in the <TOMCAT_HOME>/logs/catalina.out file as shown in Listing 6-18.
Example 6.18. Job Output in catalina.out
2011-01-04 21:07:50,103 DEBUG SimpleAsyncTaskExecutor-2
[org.springframework.batch.core.job.AbstractJob] - <Job execution complete:
JobExecution: id=151, startTime=Tue Jan 04 21:07:50 CST 2011, endTime=null,
lastUpdated=Tue Jan 04 21:07:50 CST 2011, status=COMPLETED,
exitStatus=exitCode=COMPLETED;exitDescription=, job=[JobInstance: id=144,
JobParameters=[{age=9000, run.id=49, path=/Users/mminella/temp}],
Job=[deleteFilesJob]]>

2011-01-04 21:07:50,105 INFO SimpleAsyncTaskExecutor-2
[org.springframework.batch.core.launch.support.SimpleJobLauncher] - <Job:
[FlowJob: [name=deleteFilesJob]] completed with the following parameters:
[{age=9000, run.id=49, path=/Users/mminella/temp}] and the following status:

[COMPLETED]>
Running Spring Batch jobs in a container provides a number of advantages in an enterprise environment including standardized packaging and deployment and more robust management options. Another aspect of running a job in an enterprise environment is the ability to monitor and administer a job by operations. Let's look at how you can use the Spring Batch Admin project to launch jobs.
Spring Batch Admin is a recent addition to how Spring Batch works. It's less an administration tool and more an administration framework. Having gone 1.0 in early 2010, it's still evolving in its capabilities and its role in the Spring family. However, it's a useful tool that can not only put a web interface onto the JobRepository but also allow the execution of jobs via a web interface.
To look at Spring Batch Admin, add it to the existing deleteFiles application. Because you already have the structure to deploy jobs via Tomcat, adding Spring Batch Admin provides a web interface for you to view the JobRepository as well as administer jobs (start, stop, and so on). It's important to note that you don't need to package jobs with Spring Batch Admin to be able to browse Spring Batch's JobRepository—you only need to manage their execution.
To add Spring Batch Admin to your application, do the following:
Update your POM file to include the required jar files in your war file.
Update
web.xmlto include the elements required to bootstrap Spring Batch Admin.Move the
launch-context.xmlfile so it's used by Spring Batch Admin to override its components.
With Spring Batch, if you haven't noticed, the POM file that comes with the sample project you've been working with builds with Spring version 2.5.6. Obviously, this is an older version of Spring. Spring Batch runs fine with the newer Spring 3.0.x; and because Spring Batch Admin requires a newer version of Spring, your first update to the POM file is to update the version of Spring you're using to 3.0.5.RELEASE, as shown in Listing 6-19.
Example 6.19. Updated Properties in pom.xml
... <properties><maven.test.failure.ignore>true</maven.test.failure.ignore><spring.framework.version>3.0.5.RELEASE</spring.framework.version><spring.batch.version>2.1.2.RELEASE</spring.batch.version> <dependency.locations.enabled>false</dependency.locations.enabled> </properties> ...
You need to make one other version change, to the AspectJ dependencies. Instead of the 1.5.4 dependencies that your shell came with, you need to use the newer 1.6.6 version. Finally, add the dependencies to the Spring Batch Admin jar files. Listing 6-20 shows the new and updated dependencies in pom.xml.
Example 6.20. New and Updated Dependencies
...
<dependency>
    <groupId>org.aspectj</groupId>
    <artifactId>aspectjrt</artifactId>
    <version>1.6.6</version>
</dependency>
<dependency>
    <groupId>org.aspectj</groupId>
    <artifactId>aspectjweaver</artifactId>
    <version>1.6.6</version>
</dependency>
<dependency>
    <groupId>org.springframework.batch</groupId>
    <artifactId>spring-batch-admin-manager</artifactId>
    <version>1.2.0.RELEASE</version>
</dependency>
<dependency>
    <groupId>org.springframework.batch</groupId>
    <artifactId>spring-batch-admin-resources</artifactId>
    <version>1.2.0.RELEASE</version>
</dependency>
<dependency>
    <groupId>org.springframework.batch</groupId>
    <artifactId>spring-batch-integration</artifactId>
    <version>1.2.0.RELEASE</version>
</dependency> ...
Now that the project has the correct dependencies and versions, you can update web.xml. For the deleteFilesJob you used earlier, you had a single listener, Spring's ContextLoaderListener, that you used to bootstrap the Spring configuration. For Spring Batch Admin, you need a few more things, as shown in Listing 6-21.
Example 6.21. Updated web.xml
<?xml version="1.0" encoding="UTF-8"?>
<!DOCTYPE web-app PUBLIC
    "-//Sun Microsystems, Inc.//DTD Web Application 2.3//EN"
    "http://java.sun.com/dtd/web-app_2_3.dtd">
<web-app>
    <display-name>Spring Batch Webapp</display-name>
    <description>A web application that wraps Spring Batch jobs</description>

    <context-param>
        <param-name>contextConfigLocation</param-name>
        <param-value>
  classpath*:/org/springframework/batch/admin/web/resources/webapp-config.xml
        </param-value>
    </context-param>

    <filter>
        <filter-name>hiddenHttpMethodFilter</filter-name>
        <filter-class>
            org.springframework.web.filter.HiddenHttpMethodFilter
        </filter-class>
    </filter>

    <filter-mapping>
        <filter-name>hiddenHttpMethodFilter</filter-name>
        <url-pattern>/*</url-pattern>
    </filter-mapping>

    <listener>
        <listener-class>
            org.springframework.web.context.ContextLoaderListener
        </listener-class>
    </listener>

    <servlet>
        <servlet-name>Batch Servlet</servlet-name>
        <servlet-class>
            org.springframework.web.servlet.DispatcherServlet
        </servlet-class>
        <init-param>
            <param-name>contextConfigLocation</param-name>
            <param-value>
 classpath*:/org/springframework/batch/admin/web/resources/servlet-config.xml
</param-value>
</init-param>
<load-on-startup>1</load-on-startup>
</servlet>
<servlet-mapping>
<servlet-name>Batch Servlet</servlet-name>
<url-pattern>/*</url-pattern>
</servlet-mapping>
</web-app>From the beginning of the web.xml file shown in Listing 6-21, you have the display name and description for your application. After that, you configure the location of the base Spring context configuration. In this case, you're using one that is included in the spring-batch-admin-resources-1.2.0.RELEASE jar file, webapp-config.xml. This file contains the beans required for Spring Batch Admin to run and also provides a facility for you to override and extend any of the components you wish.
The next two elements, which configure hiddenHttpMethodFilter, are used as a workaround for browsers that don't support all of the standard HTTP methods.[17] Because Spring Batch Admin exposes a number of features via a RESTful API, it uses this filter to support a common technique for indicating the HTTP method being invoked via a request header.
You configure ContextLoaderListener next to bootstrap Spring as in any normal Spring-based web application. Finally, you have the servlet that does the heavy lifting for the Spring Batch Admin application. As with most Spring-based web applications, you use org.springframework.web.servlet.DispatcherServlet to direct requests to beans as configured. In this case, Spring Batch Admin comes with a configuration (again found in the spring-batch-admin-resources −1.2.0.RELEASE.jar) servlet-config.xml that contains the required mappings.
The last piece of the Spring Batch Admin puzzle is to move launch-context.xml. You may be wondering why you need to move it. The reason is that the Spring Batch Admin application has an embedded configuration for a number of beans that you've already configured by default (JobExplorer, JobRepository, a datasource, and so on). However, it also provides you the ability to override those configurations by placing the overriding configurations in the <WAR_ROOT>/META-INF/spring/batch/override directory of your war file. In this case, the easy way to handle the overrides you want is to move launch-context.xml from the <PROJECT_ROOT>/src/main/resources directory to the <PROJECT_ROOT>/src/main/resources/META-INF/spring/batch/override directory. When Spring Batch Admin launches, it uses your configurations over the defaults provided.
All that is left is to build your war file and deploy it to Tomcat just as you did previously. Using the mvn clean install command, you end up with a war file that you can drop into Tomcat's webapps directory and start Tomcat. With Tomcat running, fire up a browser and navigate to http://localhost:8080/deleteFiles to see the administration application as shown in Figure 6-2.
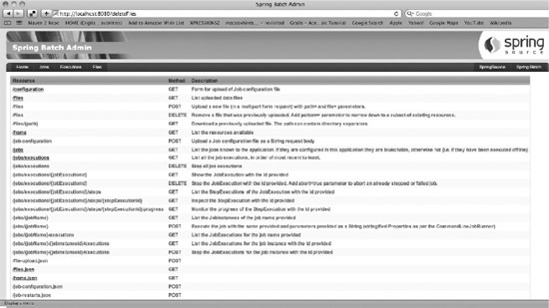
The home page of the Spring Batch Admin application shows a listing of the REST APIs available. The tabs across the top let you access the jobs that have been executed in the JobRepository, see what JobExecutions have occurred or are currently running, and upload new configuration files.
To look at the jobs you've run in the past as well as any you can administer from Spring Batch Admin, click the Jobs tab. Doing so takes you to a page like that shown in Figure 6-3.
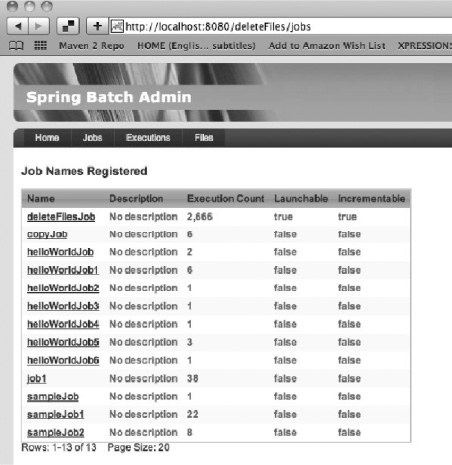
The Jobs page lists all the jobs that appear in the JobRepository. The number of times each job has been executed, whether the job can be executed through the current configuration, and whether it has a JobParametersIncrementer configured or not are all displayed on this page. Notice in this example that deleteFilesJob has been executed 2,666 times (every 10 seconds adds up quickly). deleteFilesJob is also the only job that is launchable, so click that link to see how to execute it.
The page for deleteFilesJob, shown in Figure 6-4, starts with the controls required to execute the job, including a button to launch the job and a text box populated with the job parameters from the last run. In the case of deleteFilesJob, because it has a JobParametersIncrementer configured, you can pass the same parameters to the job; Spring Batch handles incrementing the run.id parameter so you have a unique JobInstance.
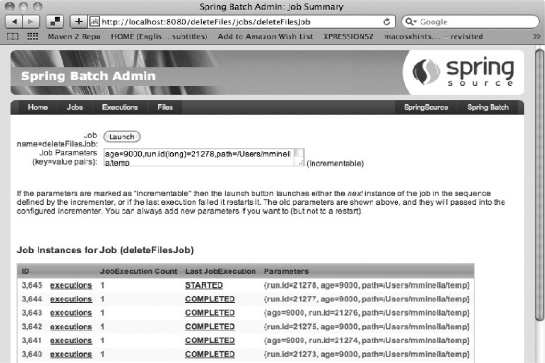
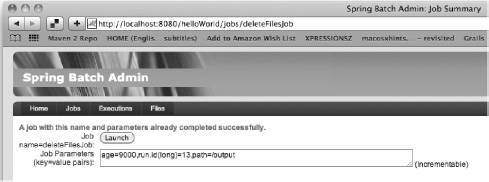
To execute deleteFilesJob from this page, all you need to do is click the Launch button. Spring Batch executes the JobParametersIncrementer so that everything works. If you launch a job with a duplicate set of parameters, an error is displayed, and no JobInstance or JobExecution is created, as shown in Figure 6-5.
As you've seen, there are a number of ways to launch a Spring Batch job: via CommandLineJobRunner at the command line, using another protocol like JMX and a custom job runner as you saw in Chapter 5, using a scheduler like Quartz, or even using the Spring Batch Admin web application. However, and pardon the pun, starting a job is only the beginning. How a job ends can have a big impact on a number of things. The next section looks at the different ways a Spring Batch job can end and how those scenarios affect how you configure or execute jobs.
A job can stop for a number of reasons, each of which has its own affect on what happens next. It can run to completion naturally (as all the examples have up to this point). You can programmatically stop the execution of a job during processing for some reason. You can stop a job externally (say, someone realizes something is wrong, and they need to stop the job to fix it). And of course, although you may never admit it, errors can occur that cause a job to stop execution. This section looks at how each of these scenarios plays out using Spring Batch and your options for what to do when each occurs. Let's begin with the most basic: a job running to its natural completion.
Up to this point, all of your jobs have run to their natural completion. That is, each job has run all of its steps until they returned a COMPLETED status and the job itself returned an exit code of COMPLETED. What does this mean for a job?
As you've seen, a job can't be executed with the same parameter values more than once successfully. This is the successfully part of that statement. When a job has been run to the COMPLETED exit code, a new JobInstance can't be created using the same JobParameters again. This is important to note because it dictates how you execute jobs. You've used the JobParametersIncrementer to increment parameters based on their run, which is a good idea, especially in jobs that are run based on a schedule of some kind. For example, if you have a job that is run daily, developing a JobParametersIncrementer implementation that increments a timestamp as a parameter makes sense. That way, each time the job is executed via the schedule, you use the –next flag to increment the job accordingly. If anything occurred that caused the job to not run to its natural completion, you could execute the job without the –next flag, providing the same parameters (you see how to restart jobs later in this chapter).
Not all jobs execute to their natural ending every time. There are situations when you want to stop a job based on something that happens during processing (an integrity check at the end of a step fails, for example). In cases like this, you want to stop the job programmatically. The next section goes over this technique.
Batch processing requires a series of checks and balances to be effective. When you're dealing with large amounts of data, you need to be able to validate what is happening as things are processing. It's one thing for a user to update their profile with the wrong address on a web application. That affects one user. However, what if your job is to import a file containing 1 million records, and the import step completes after importing only 10,000? Something is wrong, and you need to fix it before the job goes any further. This section looks at how to stop a job programmatically. First you look at a more real-world example of using the <stop> tag introduced in Chapter 4; you join its use with some new attributes in order to restart the job. You also look at how to set a flag to end a job.
To begin, let's look at constructing a job that is configured to stop using the <stop> tag and how where to restart is addressed. Let's create a three-step job to process a file:
Import a simple transaction file (
transaction.csv). Each transaction consists of an account number, a timestamp, and an amount (positive is a credit, negative is a debit). The file ends with a single summary record containing the number of records in the file.After importing the transactions into a transaction table, apply them to a separate account summary table that consists of the account number and the current account balance.
Generate a summary file (
summary.csv) that lists the account number and balance for each account.
Looking at these steps from a design perspective, you want to validate that the number of records you import matches the summary file before applying the transactions to each user's account. This integrity check can save you many hours of recovery and reprocessing when dealing with large amounts of data.
To start this job, let's look at the file formats and data model. The file format for this job is simple comma-separated value (CSV) files. This lets you easily configure the appropriate readers and writers with no code. Listing 6-22 shows example record formats for each of the two files you're using (transaction.csv and summary.csv, respectively).
Example 6.22. Sample Records for Each of the Two Files
Transaction file:
3985729387,2010-01-08 12:15:26,523.65
3985729387,2010-01-08 1:28:58,-25.93
2

Summary File:
3985729387,497.72
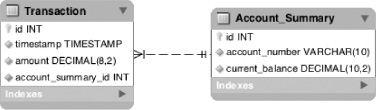
For this example, you also keep the data model simple, consisting of only two tables: Transaction and Account_Summary. Figure 6-6 shows the data model.
To create the job, begin with a fresh copy of the Spring Batch shell from the zip distribution as covered in previous chapters. With your project set up, configure batch.properties to use your MySQL instance as you have up to now.
When the boilerplate shell is ready to go, you can configure the job. Create a new file, transactionJob.xml, in the <PROJECT_HOME>/src/main/resources/jobs directory, and configure the job as shown in Listing 6-23.
Example 6.23. transactionJob.xml
<?xml version="1.0" encoding="UTF-8"?>
<beans:beans xmlns="http://www.springframework.org/schema/batch"
xmlns:beans="http://www.springframework.org/schema/beans"
    xmlns:util="http://www.springframework.org/schema/beans"
    xmlns:xsi="http://www.w3.org/2001/XMLSchema-instance"
    xsi:schemaLocation="http://www.springframework.org/schema/beans
        http://www.springframework.org/schema/beans/spring-beans-3.0.xsd
        http://www.springframework.org/schema/util
        http://www.springframework.org/schema/util/spring-util.xsd
        http://www.springframework.org/schema/batch
        http://www.springframework.org/schema/batch/spring-batch-2.1.xsd">

    <beans:import resource="../launch-context.xml"/>

    <beans:bean id="transactionFile"
        class="org.springframework.core.io.FileSystemResource" scope="step">
        <beans:constructor-arg value="#{jobParameters[transactionFile]}"/>
    </beans:bean>

    <beans:bean id="transactionFileReader"
        class="com.apress.springbatch.chapter6.TransactionReader">
        <beans:property name="fieldSetReader" ref="fileItemReader"/>
    </beans:bean>

    <beans:bean id="fileItemReader"
        class="org.springframework.batch.item.file.FlatFileItemReader">
        <beans:property name="resource" ref="transactionFile" />
        <beans:property name="lineMapper">
            <beans:bean
               class="org.springframework.batch.item.file.mapping.
DefaultLineMapper">
                <beans:property name="lineTokenizer">
                    <beans:bean
                        class="org.springframework.batch.item.file.transform.
DelimitedLineTokenizer">
                        <beans:property name="delimiter" value=","/>
                    </beans:bean>
                </beans:property>
                <beans:property name="fieldSetMapper">
                    <beans:bean
                        class="org.springframework.batch.item.file.mapping.
PassThroughFieldSetMapper" />
                </beans:property>
            </beans:bean>
        </beans:property>
    </beans:bean>

    <beans:bean id="transactionWriter"
        class="org.springframework.batch.item.database.JdbcBatchItemWriter">
        <beans:property name="assertUpdates" value="true" />
        <beans:property name="itemSqlParameterSourceProvider">
            <beans:bean class="org.springframework.batch.item.database.
BeanPropertyItemSqlParameterSourceProvider" />
        </beans:property>
<beans:property name="sql" value="INSERT INTO TRANSACTION
(ACCOUNT_SUMMARY_ID, TIMESTAMP, AMOUNT) VALUES ((SELECT ID FROM
ACCOUNT_SUMMARY WHERE ACCOUNT_NUMBER = :accountNumber), :timestamp, :amount)"
/>
<beans:property name="dataSource" ref="dataSource" />
</beans:bean>
<step id="importTransactionFileStep">
<tasklet allow-start-if-complete="true">
<chunk reader="transactionFileReader" writer="transactionWriter"
commit-interval="100">
<streams>
<stream ref="fileItemReader"/>
</streams>
</chunk>
<listeners>
<listener ref="transactionFileReader"/>
</listeners>
</tasklet>
</step>
...The first step of this job consists of the input file, two ItemReaders (one to do the actual file work and another to apply some interpretation) and an ItemWriter. The configuration begins with the definition of the input file, a wrapper for the FlatFileItemReader used to read the file itself and the related FlatFileItemReader. (Chapters 7 and 9 cover ItemReaders and ItemWriters, respectively.) All you need to worry about for this example is that this is the configuration for the input file and the way you read it. The reason for the wrapper is twofold. First, it's used to determine whether the record is a regular transaction record or the summary record at the end of the file. Second, it's used as a StepListener to determine whether the correct number of records were processed. If they were, no changes to ExitStatus are made. If the number of records doesn't match the summary record of your file, ExitStatus is changed to return STOPPED. The code for this is covered later in this section. It's important to note that the tasklet for this step is configured with the allow-start-if-complete attribute set to true. By configuring the step in this way, when the job is stopped for any reason, the job can reexecute this step even if it has been successfully completed. By default, this value is false; and if the step was successfully completed, it would be skipped on a retry.
The configuration of the transactionJob continues in Listing 6-24, where you configure the second step (applyTransactionStep) and its components.
Example 6.24. Configuration of applyTransactionStep and Its Components
...
<beans:bean id="accountSummaryReader"
    class="org.springframework.batch.item.database.JdbcCursorItemReader">
    <beans:property name="dataSource" ref="dataSource"/>
    <beans:property name="sql" value="select account_number, current_balance
from account_summary a where a.id in (select distinct t.account_summary_id
from transaction t) order by a.account_number"/>
    <beans:property name="rowMapper">
        <beans:bean
            class="com.apress.springbatch.chapter6.AccountSummaryRowMapper"/>
    </beans:property>
</beans:bean>
<beans:bean id="transactionDao"
class="com.apress.springbatch.chapter6.TransactionDaoImpl">
<beans:property name="dataSource" ref="dataSource"/>
</beans:bean>
<beans:bean id="transactionApplierProcessor"
class="com.apress.springbatch.chapter6.TransactionApplierProcessor">
<beans:property name="transactionDao" ref="transactionDao"/>
</beans:bean>
<beans:bean id="accountSummaryUpdater"
class="org.springframework.batch.item.database.JdbcBatchItemWriter">
<beans:property name="assertUpdates" value="true" />
<beans:property name="itemSqlParameterSourceProvider">
<beans:bean class="org.springframework.batch.item.database.
BeanPropertyItemSqlParameterSourceProvider" />
</beans:property>
<beans:property name="sql" value="UPDATE ACCOUNT_SUMMARY SET
CURRENT_BALANCE = :currentBalance WHERE ACCOUNT_NUMBER = :accountNumber" />
<step id="applyTransactionsStep">
<tasklet>
<chunk reader="accountSummaryReader"
processor="transactionApplierProcessor"
writer="accountSummaryUpdater" commit-interval="100"/>
</tasklet>
</step>
...The second step of this job applies the transactions to the user's account. The configuration for this step begins with the ItemReader you use to read the account summary records from the database. As each item is read, you update the currentBalance field with each of the transactions you imported in the previous step in the transactionApplierProcessor. This ItemProcessor uses a data access object (DAO) to look up the transactions for the account as they're processed. Finally, the account is updated with the new currentBalance value using the accountSummaryUpdater ItemWriter. The configuration for the step itself links the ItemReader, ItemProcessor, and ItemWriter together at the end of Listing 6-24.
The last step in the job, generateAccountSummaryStep, consists of the same accountSummaryReader configured in Listing 6-24, but it adds a new ItemWriter that writes the summary file. Listing 6-25 shows the configuration of the new ItemWriter and the related step.
Example 6.25. generateAccountSummaryStep Configuration
...
<beans:bean id="summaryFile"
    class="org.springframework.core.io.FileSystemResource" scope="step">
    <beans:constructor-arg value="#{jobParameters[summaryFile]}"/>
</beans:bean>

<beans:bean id="accountSummaryWriter"
    class="org.springframework.batch.item.file.FlatFileItemWriter"
scope="step">
<beans:property name="lineAggregator">
<beans:bean
class="org.springframework.batch.item.file.transform.
DelimitedLineAggregator">
<beans:property name="delimiter" value=","/>
<beans:property name="fieldExtractor">
<beans:bean
class="org.springframework.batch.item.file.transform.
BeanWrapperFieldExtractor">
<beans:property name="names"
value="accountNumber,currentBalance"/>
</beans:bean>
</beans:property>
</beans:bean>
</beans:property>
<beans:property name="resource" ref="summaryFile" />
</beans:bean>
<step id="generateAccountSummaryStep">
<tasklet>
<chunk reader="accountSummaryReader" writer="accountSummaryWriter"
commit-interval="100"/>
</tasklet>
</step>
...With all the steps configured, you can finally configure the job itself. In the job, you configure the three steps as discussed. However, for step1, if the step returns STOPPED, you stop the job. If the job is restarted, it reexecutes step1. If step1 returns any other successful value, the job continues with step2 and finally step3. Listing 6-26 shows the configuration for this logic using the <stop> tag.
Example 6.26. a Job Using the <stop> Tag
...
    <job id="transactionJob">
        <step id="step1" parent="importTransactionFileStep">
            <stop on="STOPPED" restart="step1"/>
            <next on="*" to="step2"/>
        </step>
        <step id="step2" parent="applyTransactionsStep" next="step3"/>
        <step id="step3" parent="generateAccountSummaryStep"/>
    </job>
</beans:beans>
How do you perform the check to be sure you read in the correct number of records? In this case, you develop a custom reader that also serves as a step listener. The code in Listing 6-27 shows how the reader reads in all the records and keeps a count of how many are read in. When the step is complete, the listener validates that the number of records read in matches the number of records expected. If they match, the ExitStatus that was determined by the regular processing is returned. If they don't match, you override the ExitStatus by returning your own ExitStatus.STOPPED value.
Example 6.27. TransactionReader.java
package com.apress.springbatch.chapter6;

import org.springframework.batch.core.ExitStatus;
import org.springframework.batch.core.StepExecution;
import org.springframework.batch.core.annotation.AfterStep;
import org.springframework.batch.item.ItemReader;
import org.springframework.batch.item.NonTransientResourceException;
import org.springframework.batch.item.ParseException;
import org.springframework.batch.item.UnexpectedInputException;
import org.springframework.batch.item.file.transform.FieldSet;

public class TransactionReader implements ItemReader<Object> {

    private ItemReader<FieldSet> fieldSetReader;
    private int recordCount = 0;
    private int expectedRecordCount = 0;

    public Object read() throws Exception,
                                UnexpectedInputException,
                                ParseException,
                                NonTransientResourceException {
        Transaction record = process(fieldSetReader.read());

        return record;
    }

    private Transaction process(FieldSet fieldSet) {
        Transaction result = null;

        if(fieldSet.getFieldCount() > 1) {
            result = new Transaction();
            result.setAccountNumber(fieldSet.readString(0));
            result.setTimestamp(fieldSet.readDate(1, "yyyy-MM-DD HH:mm:ss"));
            result.setAmount(fieldSet.readDouble(2));

            recordCount++;
        } else {
            expectedRecordCount = fieldSet.readInt(0);
        }

        return result;
    }

    public void setFieldSetReader(ItemReader<FieldSet> fieldSetReader) {
        this.fieldSetReader = fieldSetReader;
    }

    @AfterStep
    public ExitStatus afterStep(StepExecution execution) {
if(recordCount == expectedRecordCount) {
return execution.getExitStatus();
} else {
return ExitStatus.STOPPED;
}
}
}For the job to execute, four other classes are required: Transaction, AccountSummary, TransactionApplierProcessor, and TransactionDaoImpl. The first two, Transaction and AccountSummary, are nothing more than the POJOs used to represent the two record formats. Transaction has four fields to represent both the transaction input file record format and its related Transaction database table format. The fields represented in the Transaction class are as follows:
id: Anintrepresenting the primary key for the databaseaccountNumber: AStringrepresenting the account number for the transaction as found in the transaction input filetimestamp: Ajava.util.Daterepresenting the timestamp as found in the transaction input fileamount: Adoublerepresenting the amount of the transaction as found in the transaction input file
The AccountSummary class represents the format of the Account_Summary database table and the subsequent accountSummary output file. The fields found in the AccountSummary class (with the appropriate getters and setters) are as follows:
The other two classes are related to step2 of the job. This step applies each of the transactions to its appropriate account's balance. To do this, the step reads in each of account that has any transactions associated with it, loads all the related transactions, updates the record, and writes the updated record to the database. The reader and writer for this step are declared in the XML from Listing 6-19, but the processor is something you have to write yourself. Listing 6-28 shows the ItemProcessor, TransactionApplierProcessor.
Example 6.28. TransactionApplierProcessor
package com.apress.springbatch.chapter6;

import java.util.List;

import org.springframework.batch.item.ItemProcessor;

public class TransactionApplierProcessor implements
        ItemProcessor<AccountSummary, AccountSummary> {

    private TransactionDao transactionDao;
public AccountSummary process(AccountSummary summary) throws Exception {
List<Transaction> transactions = transactionDao
.getTransactionsByAccountNumber(summary.getAccountNumber());
for (Transaction transaction : transactions) {
summary.setCurrentBalance(summary.getCurrentBalance()
+ transaction.getAmount());
}
return summary;
}
public void setTransactionDao(TransactionDao transactionDao) {
this.transactionDao = transactionDao;
}
}As Listing 6-28 shows, to apply the transactions to each of the account summary records, you load all of the Transactions related to AccountSummary's account number. From there, you loop through the Transactions, adjusting the current balance by each transaction's amount before returning the AccountSummary to be updated in the database.
The final piece of the puzzle for this job is TransactionDaoImpl, as shown in Listing 6-29. Using Spring's org.springframework.jdbc.core.JdbcTemplate, you query the Transaction table for Transaction records that are associated with the requested account number.
Example 6.29. TransactionDaoImpl
package com.apress.springbatch.chapter6;

import java.sql.ResultSet;
import java.sql.SQLException;
import java.util.List;

import org.springframework.jdbc.core.JdbcTemplate;
import org.springframework.jdbc.core.RowMapper;

public class TransactionDaoImpl extends JdbcTemplate implements TransactionDao {

    @SuppressWarnings("unchecked")
    @Override
    public List<Transaction> getTransactionsByAccountNumber(
                                                    String accountNumber) {
        return query(
                "select t.id, t.timestamp, t.amount from transaction t " +
                "inner join account_summary a on a.id = t.account_summary_" +
                "id where a.account_number = ?",
                new Object[] { accountNumber },
                new RowMapper() {
                    public Object mapRow(ResultSet rs, int rowNum)
                                                    throws SQLException{
                        Transaction trans = new Transaction();
                        trans.setAmount(rs.getDouble("amount"));
trans.setTimestamp(rs.getDate("timestamp"));
return trans;
}
}
);
}
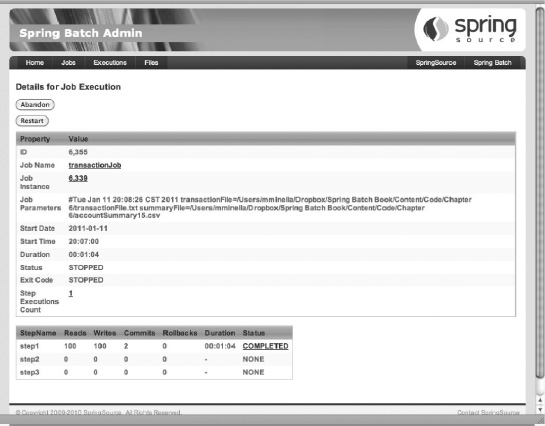
}Now, execute the job twice. The first time, execute the job with a transaction.csv that has an invalid integrity record. In other words, you run the job with an input file of 100 records plus an integrity record at the end. The integrity record is any number other than 100; here you use the number 20. When the job executes, the StepListener validates that the number of records you read in (100) doesn't match the number expected (20) and returns the value ExitStatus.STOPPED, stopping the job. You can see the results of the first run via Spring Batch Admin in Figure 6-7.
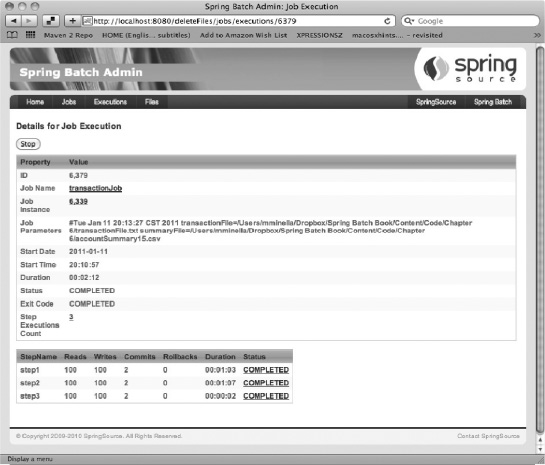
When the job stops, delete the contents of the Transaction table and update your transaction file to have 100 records and an integrity record say 100 as well. This time, when you execute the job, as Figure 6-8 shows, it runs to completion successfully.
Using the <stop> tag along with configuring the ability to reexecute steps in the job is a useful way to allow for issues to be fixed based on checks in the execution of a job. In the next section, you refactor the listener to use the StepExecution.setTerminateOnly() method to communicate to Spring Batch to end the job.
In the transactionJob example, you manually handled stopping the job by using the ExitStatus of a StepListener and the configured transitions in the job. Although this approach works, it requires you to specially configure the job's transitions and override the step's ExitStatus.
There is a slightly cleaner approach. In the StepListener, you have access to the StepExecution. With this, as you see in Listing 6-30, you can call the StepExecution.setTerminateOnly() method. This method sets a flag that tells Spring Batch to end after the step is complete.
Example 6.30. TransactionReader with setTerminateOnly() Call
package com.apress.springbatch.chapter6;
import org.springframework.batch.core.ExitStatus;
import org.springframework.batch.core.StepExecution;
import org.springframework.batch.core.annotation.AfterStep;
import org.springframework.batch.item.ItemReader;
import org.springframework.batch.item.NonTransientResourceException;
import org.springframework.batch.item.ParseException;
import org.springframework.batch.item.UnexpectedInputException;
import org.springframework.batch.item.file.transform.FieldSet;

public class TransactionReader implements ItemReader<Object> {

    private ItemReader<FieldSet> fieldSetReader;
    private int recordCount = 0;
    private int expectedRecordCount = 0;

    public Object read() throws Exception, UnexpectedInputException,
                              ParseException, NonTransientResourceException {
        Transaction record = process(fieldSetReader.read());

        return record;
    }

    private Transaction process(FieldSet fieldSet) {
        Transaction result = null;

        if(fieldSet.getFieldCount() > 1) {
            result = new Transaction();
            result.setAccountNumber(fieldSet.readString(0));
            result.setTimestamp(fieldSet.readDate(1, "yyyy-MM-DD HH:mm:ss"));
            result.setAmount(fieldSet.readDouble(2));

            recordCount++;
        } else {
            expectedRecordCount = fieldSet.readInt(0);
        }

        return result;
    }

    public void setFieldSetReader(ItemReader<FieldSet> fieldSetReader) {
        this.fieldSetReader = fieldSetReader;
    }

    @AfterStep
    public ExitStatus afterStep(StepExecution execution) {
        if(recordCount != expectedRecordCount) {
            execution.setTerminateOnly();
        }

        return execution.getExitStatus();
}}Although the code is only marginally cleaner (you eliminate the else statement—that's it), the configuration becomes cleaner as well by allowing you to remove the configuration required for the transitions. Listing 6-31 shows the updated job configuration.
Example 6.31. Reconfigured transactionJob
...
<job id="transactionJob">
    <step id="step1" parent="importTransactionFileStep" next="step2"/>
    <step id="step2" parent="applyTransactionsStep" next="step3"/>
    <step id="step3" parent="generateAccountSummaryStep"/>
</job>
...
You can now execute the job again with the same test (running it the first time with an incorrect number of records in the transaction file and then a second time with the correct number) and see the same results. The only difference is in the output of the job on the console. Instead of the job returning a STOPPED status, Spring Batch throws a JobInterruptedException, as shown in Listing 6-32.
Example 6.32. Results of the First Execution of your updated job
2011-01-11 20:08:04,724 ERROR
[org.springframework.batch.core.job.AbstractJob] - <Encountered interruption
executing job>

org.springframework.batch.core.JobInterruptedException: Step requested
termination: StepExecution: id=6379, version=4, name=step1, status=COMPLETED,
exitStatus=COMPLETED, readCount=100, filterCount=0, writeCount=100
readSkipCount=0, writeSkipCount=0, processSkipCount=0, commitCount=2,
rollbackCount=0, exitDescription=
       at
org.springframework.batch.core.job.flow.JobFlowExecutor.executeStep(JobFlowExecutor.java:67)
       at
org.springframework.batch.core.job.flow.support.state.StepState.handle(StepState.java:60)
       at
org.springframework.batch.core.job.flow.support.SimpleFlow.resume(SimpleFlow.java:144)
       at
org.springframework.batch.core.job.flow.support.SimpleFlow.start(SimpleFlow.java:124)
       at org.springframework.batch.core.job.flow.FlowJob.doExecute(FlowJob.java:135)
       at org.springframework.batch.core.job.AbstractJob.execute(AbstractJob.java:281)
       at
org.springframework.batch.core.launch.support.SimpleJobLauncher$1.run(SimpleJ
obLauncher.java:120)
       at org.springframework.core.task.SyncTaskExecutor.execute(SyncTaskExecutor.java:49)
       at
org.springframework.batch.core.launch.support.SimpleJobLauncher.run(SimpleJob
Launcher.java:114)
       at
org.springframework.batch.core.launch.support.CommandLineJobRunner.start(Comm
andLineJobRunner.java:348)
at
org.springframework.batch.core.launch.support.CommandLineJobRunner.main(Comma
ndLineJobRunner.java:565)
2011-01-11 20:08:04,727 INFO
[org.springframework.batch.core.launch.support.SimpleJobLauncher] - <Job:
[FlowJob: [name=transactionJob]] completed with the following parameters:
[{transactionFile=/Users/mminella/Dropbox/Spring Batch
Book/Content/Code/Chapter 6/transactionFile.txt,
summaryFile=/Users/mminella/Dropbox/Spring Batch Book/Content/Code/Chapter
6/accountSummary15.csv}] and the following status: [STOPPED]>Stopping a job programmatically is an important tool when you're designing batch jobs. Unfortunately, not all batch jobs are perfect, and you sometimes need to shut down a job when it's running. The next section discusses the ways you can stop a Spring Batch job without doing a kill −9 on the process.
There aren't many worse feelings. You've done your homework. You've run your tests, and all looks good. You start the job, which you know will take hours to complete. Only a couple of minutes later, you realize that you made a mistake and you need to stop the job—but you can't just kill it. You need it to end gracefully so your database and processing are left in a state that can be restarted. Luckily for you, the authors of Spring Batch have gone through your pain and have developed a couple of ways to stop an already running job. The two you look at here are using Spring Batch Admin and CommandLineJobRunner. Let's start with Spring Batch Admin.
Having an instance of Spring Batch Admin pointed at your JobRepository is by far the easiest way to stop jobs. To see this in action, start the transactionJob job with a large transaction file (100 records in this case). With the job running, if you go to the page for the job's execution, as shown in Figure 6-9, you see a Stop button in the upper-left corner.
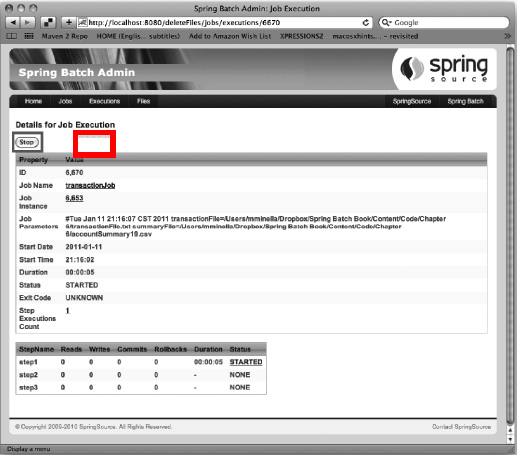
When you click the Stop button, Spring Batch throws a JobInterruptedException, stopping the job. It's important to note what happens here. With the way you have the job configured, the chunk that is currently being processed when the Stop button is clicked is rolled back. When the job is restarted, Spring Batch uses the previous job's various ExecutionContexts (job and step) to determine where it was in the processing of step1 and restart where it left off. Figure 6-10 shows how the first time the job was executed, 50 records were processed in step1; the second time the job was executed, the second 50 records were processed.
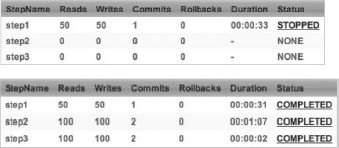
Clicking a button. It's hard to think of a simpler way to stop a job. The next technique, although not as easy, doesn't require you to deploy anything else for it to work.
Earlier in this chapter, you saw that a number of command-line options are available for CommandLineJobRunner that you haven't explored yet. Two of them are related to stopping and restarting jobs. This section looks at how to stop and restart jobs with CommandLineJobRunner.
When you execute jobs via CommandLineJobRunner, you build a jar file and execute it via the standard Java –jar command, as covered earlier. When a job is running, you can stop it gracefully by executing the command shown in Listing 6-33.
Example 6.33. Calling CommandLineJobRunner to Stop a Job
java -jar transactionJob.jar jobs/transactionJob.xml 7007 –stop
The command should look similar to all the others you've used. You call the executable jar file (transactionJob.jar in this case) that has CommandLineJobRunner configured as its main class in META-INF. CommandLineJobRunner requires two parameters: the path to an XML file that defines a job and either a job name (as it's been called up to now) or a job execution id. In this case, you're passing it the job execution id (7007 is the id for this execution, as found in the BATCH_JOB_EXECUTION table or via Spring Batch Admin) to specify which job execution to stop. If you choose to pass in the job name in this situation, all running instances of the job are stopped.
After a job is stopped this way, how do you restart it? One of the other options for CommandLineJobRunner should give you a hint. There is a –restart option that you haven't seen yet. As you can guess, you can restart execution with the same command you used to stop it, changing only –stop to –restart, as shown in Listing 6-34.
Example 6.34. Calling CommandLineJobRunner to Restart a Stopped Job
java -jar transactionJob.jar jobs/transactionJob.xml 7007 –restart
Starting, stopping, and restarting a job from the command line are common occurrences. Up to this point, this chapter has talked about stopping jobs in a way that occurs by your choice: you choose to stop the job programmatically, or you choose to stop the job via Spring Batch Admin. However, some situations are outside of your control. Errors occur. The next section discusses how stopping a job works when an Exception is thrown.
No job is perfect—not even yours. Errors happen. You may receive bad data. You may forget one null check that causes a NullPointerException at the worst of times. How you handle errors using Spring Batch is important. This section discusses the options for what to do when an exception is thrown during your batch job and how to implement them.
It should come as little surprise that the default behavior of Spring Batch is probably the safest: stopping the job and rolling back the current chunk. This is one of the driving concepts of chunk-based processing. It allows you to commit the work you've successfully completed and pick up where you left off when you restart.
By default, Spring Batch considers a step and job failed when any exception is thrown. You can see this in action by tweaking TransactionReader as shown in Listing 6-35. In this case, you throw a org.springframework.batch.item.ParseException after reading 510 records, stopping the job in a Failed status.
Example 6.35. Transaction Reader Set Up to Throw an Exception
package com.apress.springbatch.chapter6;

import org.springframework.batch.core.ExitStatus;
import org.springframework.batch.core.StepExecution;
import org.springframework.batch.core.annotation.AfterStep;
import org.springframework.batch.item.ItemReader;
import org.springframework.batch.item.NonTransientResourceException;
import org.springframework.batch.item.ParseException;
import org.springframework.batch.item.UnexpectedInputException;
import org.springframework.batch.item.file.transform.FieldSet;

public class TransactionReader implements ItemReader<Object> {

    private ItemReader<FieldSet> fieldSetReader;
    private int recordCount = 0;

    public Object read() throws Exception, UnexpectedInputException,
                            ParseException, NonTransientResourceException {

        if(recordCount == 510) {
            throw new ParseException("This isn't what I hoped to happen");
        }

        Transaction record = process(fieldSetReader.read());

        return record;
    }

    private Transaction process(FieldSet fieldSet) {
        Transaction result = null;

        result = new Transaction();
        result.setAccountNumber(fieldSet.readString(0));
        result.setTimestamp(fieldSet.readDate(1, "yyyy-MM-DD HH:mm:ss"));
        result.setAmount(fieldSet.readDouble(2));

        recordCount++;

        return result;
    }

    public void setFieldSetReader(ItemReader<FieldSet> fieldSetReader) {
        this.fieldSetReader = fieldSetReader;
}
@AfterStep
public ExitStatus afterStep(StepExecution execution) {
return execution.getExitStatus();
}
}With no other configuration changes from the previous runs, when you execute transactionJob, it throws a ParseException after it reads the record 510 of the transaction file. After this exception is thrown, Spring Batch considers the step and job failed. If you look at the job execution in Spring Batch Admin and click the FAILED status of step1, you're shown statistics about the job as it ran as well as the exception that caused the failure. Figure 6-11 shows the result of this execution.
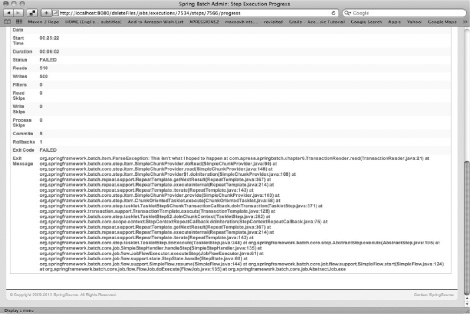
There is a big difference between the examples of stopping via StepExecution and stopping the job with an exception. That difference is the state in which the job is left. In the StepExecution example, the job was stopped after a step is complete in the STOPPED ExitStatus. In the exception case, the step didn't finish. In fact, it was part way through the step when the exception was thrown. Because of this, the step and job are labeled with the ExitStatus FAILED.
When a step is identified as FAILED, Spring Batch doesn't start the step over from the beginning. Instead, Spring Batch is smart enough to remember what chunk you were on when the exception was thrown. When you restart the job, Spring Batch picks up at the chunk it left off on. As an example, let's say the job is processing chunk 5 of 10, with each chunk consisting of 5 items. An exception is thrown on the fourth item of the second chunk. Items 1–4 of the current chunk are rolled back, and when you restart, Spring Batch skips chunks one and two.
Although Spring Batch's default method of handling an exception is to stop the job in the failed status, there are other options at your disposal. Because most of those depend on input/output-specific scenarios, the next few chapters cover them together with I/O.
Spring Batch provides many facilities to address stopping and restarting a job, as you've seen. However, it's up to you to determine what can and can't be restarted. If you have a batch process that imports a file in the first step, and that job fails in the second step, you probably don't want to reimport the file. There are scenarios where you may only want to retry a step a given number of times. This section looks at how to configure a job to be restartable and how to control how it's restarted.
All the jobs up to now could be executed again if they failed or were stopped. This is the default behavior for Spring Batch. But what if you have a job that can't be rerun? You give it one try, and if it works, great. If not, you don't run it again. Spring Batch provides the ability to configure jobs to not be restartable using the restartable attribute of the job tag.
If you look at the transactionJob configuration, by default the restartable attribute is true. However, if you choose to configure it to be false, as shown in Listing 6-36, then when the job fails or is stopped for any reason, you won't be able to reexecute it.
Example 6.36. transactionJob Configured to Not Be Restartable
...
<job id="transactionJob" restartable="false">
    <step id="step1" parent="importTransactionFileStep" next="step2"/>
    <step id="step2" parent="applyTransactionsStep" next="step3"/>
    <step id="step3" parent="generateAccountSummaryStep"/>
</job>
...
Now if you attempt to run the job after a failure, you're told by Spring Batch that the JobInstance already exists and isn't restartable, as shown in Listing 6-37.
Example 6.37. Results from Reexecuting a Non-Restartable Job
2011-01-13 19:50:30,559 ERROR
[org.springframework.batch.core.launch.support.CommandLineJobRunner] - <Job
Terminated in error: JobInstance already exists and is not restartable>

org.springframework.batch.core.repository.JobRestartException: JobInstance
already exists and is not restartable
       at org.springframework.batch.core.launch.support.SimpleJobLauncher.run(SimpleJob
Launcher.java:97)
       at org.springframework.batch.core.launch.support.CommandLineJobRunner.start(Comm
andLineJobRunner.java:348)
       at org.springframework.batch.core.launch.support.CommandLineJobRunner.main(Comma
ndLineJobRunner.java:565)
Being able to execute a job once or else may be a bit extreme for some scenarios. Spring Batch also lets you configure the number of times a job can be run, as you see next.
There can be situations where a job doesn't run successfully for some reason outside of your control. Say for example that the job downloads a file from a web site as one of its steps, and the web site is down. If the download fails the first time, it may work if you try again in 10 minutes. However, you probably don't want to try that download indefinitely. Because of this, you may want to configure the job so it can be executed only five times. After the fifth time, it can't be rerun any more.
Spring Batch provides this facility at the step level instead of the job level. Again, looking at the transactionJob example, if you only want to attempt to import an input file twice, you modify the step configuration as in Listing 6-38.
Example 6.38. Allowing the File Import to Be Attempted Only Once
...
<step id="importTransactionFileStep">
    <tasklet start-limit="2">
        <chunk reader="transactionFileReader" writer="transactionWriter"
            commit-interval="10">
            <streams>
                <stream ref="fileItemReader"/>
            </streams>
        </chunk>
        <listeners>
            <listener ref="transactionFileReader"/>
        </listeners>
    </tasklet>
</step>...
In this case, if you attempt to restart this job more than once, because the start-limit attribute has been configured to 2, you can't reexecute this job. The initial run takes up one attempt you're allowed allowing you one other try. You receive an org.springframework.batch.core.StartLimitExceededException, as shown in Listing 6-39, if you attempt to execute the job again.
Example 6.39. Results from Reexecuting transactionJob More Than Once
2011-01-13 20:10:05,127 ERROR
[org.springframework.batch.core.job.AbstractJob] - <Encountered fatal error
executing job>

org.springframework.batch.core.JobExecutionException: Flow execution ended
unexpectedly
       at org.springframework.batch.core.job.flow.FlowJob.doExecute(FlowJob.java:141)
       at org.springframework.batch.core.job.AbstractJob.execute(AbstractJob.java:281)
       at
org.springframework.batch.core.launch.support.SimpleJobLauncher$1.run(SimpleJ
obLauncher.java:120)
       at org.springframework.core.task.SyncTaskExecutor.execute(SyncTaskExecutor.java:49)
       at
org.springframework.batch.core.launch.support.SimpleJobLauncher.run(SimpleJob
Launcher.java:114)
at
org.springframework.batch.core.launch.support.CommandLineJobRunner.start(Comm
andLineJobRunner.java:348)
at
org.springframework.batch.core.launch.support.CommandLineJobRunner.main(Comma
ndLineJobRunner.java:565)
Caused by: org.springframework.batch.core.job.flow.FlowExecutionException:
Ended flow=transactionJob at state=transactionJob.step1 with exception
at
org.springframework.batch.core.job.flow.support.SimpleFlow.resume(SimpleFlow.
java:152)
at
org.springframework.batch.core.job.flow.support.SimpleFlow.start(SimpleFlow.j
ava:124)
at
org.springframework.batch.core.job.flow.FlowJob.doExecute(FlowJob.java:135)
... 6 more
Caused by: org.springframework.batch.core.StartLimitExceededException:
Maximum start limit exceeded for step: step1StartMax: 1
at
org.springframework.batch.core.job.SimpleStepHandler.shouldStart(SimpleStepHa
ndler.java:216)
at
org.springframework.batch.core.job.SimpleStepHandler.handleStep(SimpleStepHan
dler.java:117)
at
org.springframework.batch.core.job.flow.JobFlowExecutor.executeStep(JobFlowEx
ecutor.java:61)
at
org.springframework.batch.core.job.flow.support.state.StepState.handle(StepSt
ate.java:60)
at
org.springframework.batch.core.job.flow.support.SimpleFlow.resume(SimpleFlow.
java:144)
... 8 moreThe last configuration aspect that you can use when determining what should happen when your batch job is reexecuted, you've seen before: the allow-start-if-complete attribute.
One of Spring Batch's features (or detriments, depending on how you choose to look at it) is that the framework allows you to execute a job only once successfully with the same parameters. There is no way around this. However, that rule doesn't necessarily apply to steps.
You can override the framework's default configuration and execute a step that has been completed more than once. You did it previously using transactionJob. To tell the framework that you want to be able to reexecute a step even if it has been completed, you use the allow-start-if-complete attribute of the tasklet. Listing 6-40 shows an example.
Example 6.40. Configuring a Step to Be Reexecuted if Complete
...
<step id="importTransactionFileStep">
    <tasklet allow-start-if-complete="true">
        <chunk reader="transactionFileReader" writer="transactionWriter"
            commit-interval="10">
            <streams>
                <stream ref="fileItemReader"/>
            </streams>
        </chunk>
        <listeners>
            <listener ref="transactionFileReader"/>
        </listeners>
    </tasklet>
</step>
In this case, when the step is executed for the second time within a job that failed or was stopped on the previous execution, the step starts over. Because it completed the previous time, there is no middle ground at which to restart, which is why it begins again at the beginning.
Note
If the job has the ExitStatus of COMPLETE, the JobInstance can't be rerun regardless of whether you configure all the steps to allow-start-if-complete="true".
When you're configuring batch processes, Spring Batch offers many different options for stopping and restarting jobs. Some scenarios can have the full job reexecuted. Others can be tried again, but only a given number of times. And some can't be restarted at all. However, it's you, the developer, who must design your batch jobs in a way that is safe for your scenario.
Starting or stopping a program isn't a topic that typically gets much press. But as you've seen, controlling the execution of a Spring Batch process provides many options. And when you think about the variety of scenarios that must be supported by batch processes, those options make sense.
The next section of this book covers the meat of the framework: ItemReaders, ItemProcessors, and ItemWriters.
[16] The source code of the getNextJobParameters method comes from Spring Batch's CommandLineJobRunner. Unfortunately, there is no standard way of starting a job that requires parameters and incremented parameters (JobOperator calls an incrementer but doesn't accept parameters, and JobLauncher takes parameters but doesn't call an incrementer).
[17] Most modern browsers only support HTTP POST and GET, but true RESTful implementations require the support of PUT and DELETE as well.