
The IRS processed over 236 million tax returns in 2010. Atlanta's Hartsfield-Jackson airport handled nearly 90 million passengers in 2010. Facebook has more than 45 million status updates a day. Apple sold more than 1.7 million iPhone 4s in its first three days of availability. The amount of data the world generates every day is staggering. It used to be that as the data increased, so did the processors to process it. If your app wasn't fast enough, you could wait a year and buy a new server, and all was fine.
But that isn't the case anymore. CPUs aren't getting faster at nearly the rate they used to. Instead, by adding cores instead of transistors to a single core, CPUs are getting better at parallel processing instead of becoming faster at a single task. The developers behind Spring Batch understand this and made parallel processing one of the primary focuses of the framework. This chapter looks at the following:
Profiling batch jobs: You see a process for profiling your batch jobs so that the optimization decisions you make positively impact your performance and not the other way around.
Evaluating each of the scalability options in Spring Batch: Spring Batch provides a number of different scalability options, each of which is reviewed in detail.
Michael A. Jackson put forth the best two rules of optimization in his 1975 book Principals of Program Design:
Rule 1. Don't do it.
Rule 2 (for experts only). Don't do it yet.
The idea behind this is simple. Software changes over the course of its development. Because of this, it's virtually impossible to make accurate decisions about how to design a system until the system has been developed. After the system has been developed, you can test it for performance bottlenecks and address those as required. By not taking this approach, you risk being described by my second most favorite quote on optimization, this one by W. A. Wulf:
More computing sins are committed in the name of efficiency (without necessarily achieving it) than for any other single reason—including blind stupidity.
To profile any Java application there are many options, ranging from free to very expensive. However, one of the best free options is included in the Java Virtual Machine (JVM): VisualVM. This is the tool you can use to profile batch jobs. Before you begin profiling your jobs, let's take a quick tour of the VisualVM tool.
Oracle's VisualVM is a tool that gives you insights into what is going on in your JVM. As JConsole's big brother, VisualVM provides not only JMX administration like JConsole but also information about CPU and memory usage, method execution times, as well as thread management and garbage collection. This section looks at the capabilities of the VisualVM tool.
Before you can try VisualVM, you have to install it. If you're running an Oracle distribution of the JDK version greater than version 6 update 7, then you've already installed it because it comes with the JDK. If you're running a different version of Java, you can obtain VisualVM from Oracle directly at http://visualvm.java.net/download.html.
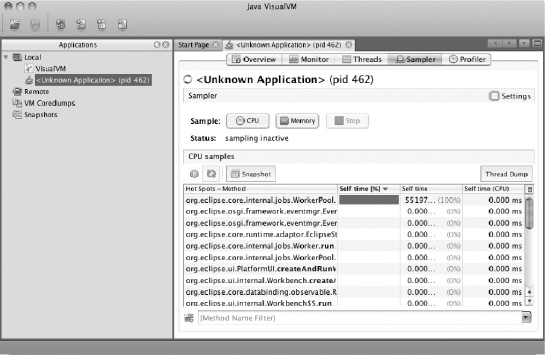
With VisualVM installed, you can launch it. VisualVM greets you with a menu on the left and a Start Page on the right, as shown in Figure 11-1.
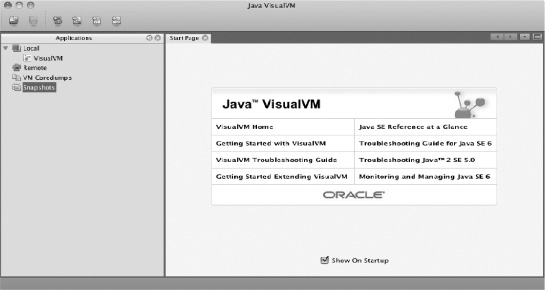
The menu on the left is broken into four sections: Local and Remote are where you find applications that you can connect to, to profile. When you start VisualVM, because it's itself a Java application, it appears in the Local section. Below the Local and Remote sections are where you can load either Java VM coredumps that you've collected previously that you want to analyze; or snapshots, which are the state of a VM at a certain point in time that you can capture using VisualVM. To see some of the capabilities of the VisualVM tool, let's connect VisualVM to an instance of Eclipse.
When you first connect to a running JVM, VisualVM displays the screen shown in Figure 11-2.
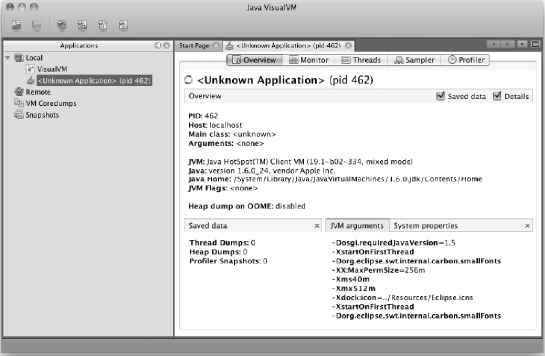
Along the top of the screen are five tabs:
Overview: Provides an overview of the Java application running, including the main class, application name, process id, and arguments passed into the JVM on startup.
Monitor: Displays charts showing CPU utilization, memory utilization (both heap and PermGen), the number of classes loaded, and the number of live and daemon threads. The Monitor tab also lets you perform garbage collection as well as generate a heap dump for later analysis.
Threads: Displays information about all threads the application has launched and what they're doing (running, sleeping, waiting, or monitoring). This data is shown in either timeline, table, or detail form.
Sampler: Allows you to take a sample of the CPU utilization and memory allocation for your application as well as take snapshots. CPU shows what methods are taking how long to run. Memory utilization shows what classes are taking how much memory.
Profiler: Looks and feels similar to the Sampler tab, but lets you profile the CPU and memory utilization as well as save snapshots of the current state each of these two resources is currently in. You can also compare multiple snapshots.
In addition to the tabs, Overview shows you information about the current Java process that is being analyzed including process id, the host the process is running on, JVM arguments, as well as the full list of system properties the JVM knows.
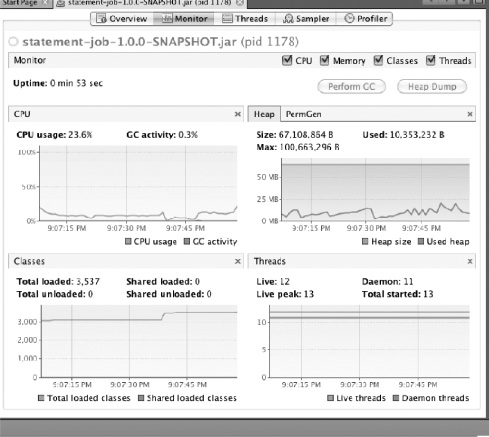
The second tab is the Monitor tab, as shown in Figure 11-3.
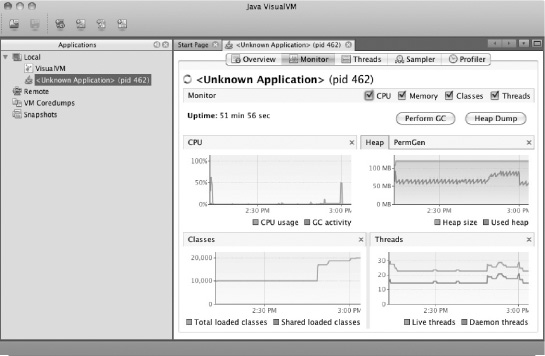
The Monitor tab is where you view the state of the JVM from a memory and CPU perspective as a whole. The other tabs are more useful when you're determining the cause of a problem identified in the Monitor tab (if you keep running out of memory or the CPU is pegged for some reason). All the charts on the Monitor tab are resizable, and they can be hidden as required.
The next tab available in VisualVM is the Threads tab, displayed in Figure 11-4.
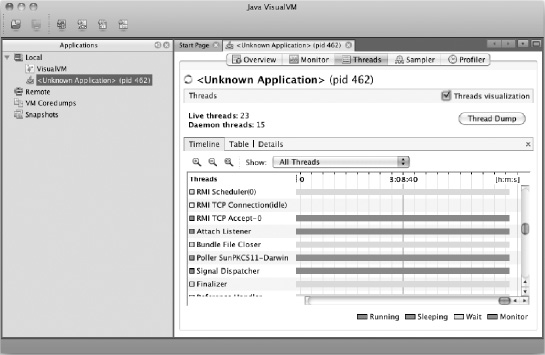
All Java applications are multithreaded. At the least, you have the main execution thread and an additional thread for garbage collection. However, most Java applications spawn many additional threads for various reasons. This tab allows you to see information about the various threads your application has spawned and what they're doing. Figure 11-4 shows the data as a timeline, but the data is also available as a table and as detailed graphs for each thread.
The last two tabs are pretty similar. The first, as shown in Figure 11-5, is the Sampler tab.
In both tabs, you're presented with the same screen, which includes CPU and Memory buttons as well as a Stop button. To begin sampling either CPU execution by method or memory footprint by class, click the appropriate button. The tables update periodically with the current state of the VM VisualVM is studying. The difference between the two tabs is that the Profiler tab can execute garbage collections and save the data it has collected, but the sampler tab can't.
VisualVM is a powerful and extendable tool. Many plug-ins are available to extend the feature set provided out of the box. You can add things like the ability to view the stack trace of currently executing threads with the Thread Inspector plug-in, visual garbage collection with the Visual GC plug-in, and access to MBeans via the MBean browser, to extend VisualVM's already powerful suite of tools.
Now that you have an idea of what Oracle's VisualVM can do, let's see how you can use it to profile Spring Batch applications.
When you profile your applications, you're typically looking at one of two things: how hard the CPU is working and where, and how much memory is being used and on what. The first questions, how hard the CPU is working and where, relate to what your CPU is working on. Is your job computationally difficult? Is your CPU using a lot of its effort in places other than your business logic—for example, is it spending more time working on parsing files than actually doing the calculations you want it to? The second set of questions revolves around memory. Are you using most if not all of the available memory? If so, what is taking up all the memory? Do you have a Hibernate object that isn't lazily loading a collection, which is causing the issues? This section looks at how to see where resources are being used in your Spring Batch applications.
It would be nice to have a straightforward checklist of things to check when you're profiling applications. But it just isn't that easy. Profiling an application can, at times, feel more like an art than a science. This section walks through how to obtain data related to the performance of your applications and their utilization of the CPU.
When you look at how a CPU is performing within your application, you typically use the measure of time to determine the hot spots (the areas that aren't performing to your expectations). What areas is the CPU working in the most? For example, if you have an infinite loop somewhere in your code, the CPU will spend a large amount of time there after it's triggered. However, if everything is running fine, you can expect to see either no bottlenecks or at bottlenecks that you would expect (I/O is typically the bottleneck of most modern systems).
To view the CPU profiling functionality at work, let's use the statement job that you completed in the last chapter. This job consists of six steps and interacts with the Internet, files, and a database. Figure 11-6 shows from a high level what the job does as it's currently configured.

To execute the job, you use the command java -jar statement-job-1.0.0-SNAPSHOT.jar jobs/statementJob.xml statementJob –next. After you've launched the job, it appears in the VisualVM menu on the left under Local. To connect to it, all you need to do is double-click it.
Now that you've connected to the running statement job, you can begin to look at how things operate within it. Let's first look at the Monitor tab to see how busy the CPU is in the first place. After running the statement job with a customer transaction file containing 100 customers and more than 20,000 transactions, you can see that the CPU utilization for this job is minimal. Figure 11-7 shows the charts from the Monitor tab after a run of the job.
As Figure 11-7 shows, the statement job isn't a CPU-intensive process. In fact, if you look at the memory profile, the job isn't very memory intensive either. However, you can easily change that. If you add a small loop into the ItemProcessor used in step 4 (PricingTiersItemProcessor) you can quickly make your CPU busy. Listing 11-1 shows the loop you add.
Example 11.1. Using PricingTiersItemProcessor to Calculate Prime Numbers
package com.apress.springbatch.statement.processor;

import java.math.BigInteger;

import org.springframework.batch.item.ItemProcessor;

import com.apress.springbatch.statement.domain.AccountTransactionQuantity;
import com.apress.springbatch.statement.domain.PricingTier;

public class PricingTierItemProcessor implements
    ItemProcessor<AccountTransactionQuantity, AccountTransactionQuantity> {

    public AccountTransactionQuantity process(AccountTransactionQuantity atq)
            throws Exception {
for(int i = 0; i < 1000000; i++){
new BigInteger(String.valueOf(i)).isProbablePrime(0);
}
if(atq.getTransactionCount() <= 1000) {
atq.setTier(PricingTier.I);
} else if(atq.getTransactionCount() > 1000 &&
atq.getTransactionCount() <= 100000) {
atq.setTier(PricingTier.II);
} else if(atq.getTransactionCount() > 100000 &&
atq.getTransactionCount() <= 1000000) {
atq.setTier(PricingTier.III);
} else {
atq.setTier(PricingTier.IV);
}
return atq;
}
}Obviously the loop you added to calculate all the prime numbers between 0 and 1 million as shown in Listing 11-1 is unlikely to end up in your code. But it's exactly the type of accidental looping that could cause a catastrophic impact on the performance of a batch job over the course of processing millions of transactions. Figure 11-8 shows the impact this small loop makes on CPU utilization, according to VirtualVM.

That is quite a spike for three lines of code. This job went from barely using the CPU at all to pushing it to 50% utilized for that step. But if you didn't know what caused that spike, where would you look next?
With a spike identified like this, the next place to look is in the Sampler tab. By rerunning the job under the same conditions, you can see what individual methods show up as hot spots in the job's execution. In this case, after you begin running the job, the method that stands out immediately is com.mysql.jdbc.util.ReadAheadInputStream.fill(). This class is used by the MySQL driver to read from your database. As you saw previously, I/O is typically the main bottleneck for processing in today's business systems, so seeing this class take up the majority of the CPU should come as no surprise. However, at the same time that the spike on the Monitor tab begins, a new class quickly climbs through the ranks of the list of methods using a lot of CPU: com.apress.springbatch.statement.processor.PricingTierItemProcessor.process(). By the end of the job, this method has taken up 32.6% of all the CPU time required to execute this job, as shown in Figure 11-9.
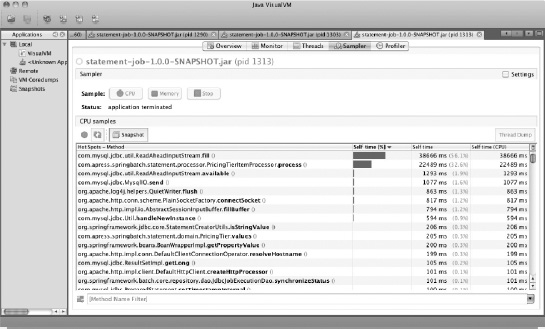
When you come across a scenario like this, a better way to view what is eating up CPU execution time is to filter the list by the package name you're using for your code. In this case, you can filter the list on com.apress.springbatch.statement to see what classes take up what percentage of the total CPU utilization. Under this filter, the culprit becomes crystal clear in this example: the PricingTierItemProcessor.process() method and the 32.6% of the CPU time it takes up.. The next highest on the list takes up 0.3% (com.apress.springbatch.statement.domain.PricingTier.values()). At this point, you have all the information you can get from the tool, and it's time to begin digging through the code to determine what in PricingTierItemProcessor.process() is using so much CPU.
Simple, isn't it? Not really. Although the process used here is what you would use to narrow down an issue in any system, the issue is rarely this easy to track down. However, using VisualVM you can progressively narrow down where the issue is in your job. CPU utilization isn't the only piece of performance. The next section looks at how to profile memory using VisualVM.
Although CPU utilization may seem like the place you're most likely to see issues, the truth is that it is my experience that memory issues are more likely to pop up in your software. The reason is that you use a number of frameworks that do things behind the scenes. When you use these frameworks incorrectly, large numbers of objects can be created without any indication that it has occurred until you run out of memory completely. This section looks at how to profile memory usage using VisualVM.
To look at how to profile memory, let's tweak the same PricingTierItemProcessor you did previously. However, this time instead of taking up processing time, you update it to simulate creating a collection that is out of control. Although the code example may not be what you see in real-world systems, accidentally creating collections that are larger than you expect is a common reason for memory issues. Listing 11-2 shows the code for the updated PricingTierItemProcessor.
Example 11.2. PricingTierItemProcessor with a Memory Leak
package com.apress.springbatch.statement.processor;

import java.util.ArrayList;
import java.util.List;

import org.springframework.batch.item.ItemProcessor;

import com.apress.springbatch.statement.domain.AccountTransactionQuantity;
import com.apress.springbatch.statement.domain.PricingTier;

public class PricingTierItemProcessor implements
    ItemProcessor<AccountTransactionQuantity, AccountTransactionQuantity> {

    private List<PricingTier> accountsProcessed = new ArrayList<PricingTier>();

    public AccountTransactionQuantity process(AccountTransactionQuantity atq)
            throws Exception {

        if(atq.getTransactionCount() <= 1000) {
            atq.setTier(PricingTier.I);
        } else if(atq.getTransactionCount() > 1000 && atq.getTransactionCount() <= 100000) {
            atq.setTier(PricingTier.II);
        } else if(atq.getTransactionCount() > 100000 &&
                  atq.getTransactionCount() <= 1000000) {
            atq.setTier(PricingTier.III);
        } else {
            atq.setTier(PricingTier.IV);
        }

        for(int i = 0; i <atq.getTransactionCount() * 750; i++) {
            accountsProcessed.add(atq.getTier());
        }

        return atq;
    }
}
In the version shown in Listing 11-2, you're creating a List of objects that will exist past the currently processing chunk. Under normal processing, most of the objects involved in a given chunk are garbage-collected when the chunk is complete, keeping the memory footprint in check. By doing something like what you have in this example, you would expect the memory footprint to grow out of control.
When you run the statement job with this bug and profile it using VisualVM, you can see that things quickly get out of hand from a memory perspective; an OutOfMemoryException is thrown midway through the step. Figure 11-10 shows the VisualVM Monitor tab a run of the statement job with the memory leak.
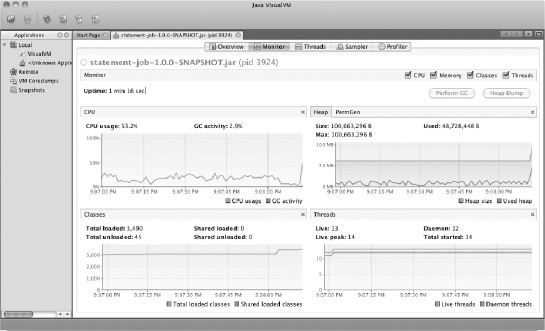
Notice at the very end of the memory graph in the upper-right corner of Figure 11-10 that memory usage spikes, causing the OutOfMemoryException. But how do you know what caused the spike? If you didn't know, the Sampler tab might be able to shed some light.
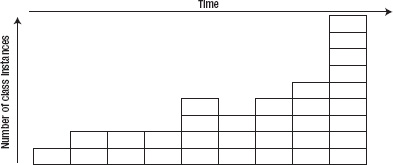
You've seen before that the Sampler tab can show what method calls are using up CPU, but it can also tell you what objects are taking up precious memory. To see that, begin by executing your job as you have previously. When it's running, connect to the process using VisualVM and go to the Sampler tab. To determine the cause of a memory leak, you need to determine what changes as the memory usage occurs. For example, in Figure 11-11, each block represents a class instance. The higher the blocks are stacked in each column, the more instances are in memory. Each column represents a snapshot in time within the JVM. When the program begins, the number of instances created is small (one in this case); this number slowly rises over time, occasionally declining when garbage collection occurs. Finally it spikes at the end to nine instances. This is the type of increase in memory usage you look for with VisualVM.
To view this type of change in your batch jobs, you can use VisualVM's snapshot feature. As a job runs, click the Snapshot button in the middle of the screen. VisualVM records the exact state of the JVM when you take that snapshot. You can compare this with other snapshots to determine what changes. Typically, the change indicates the location of the issue. If it isn't the smoking gun, it's definitely where you should start looking.
The ability to scale batch jobs isn't a requirement to be able to address performance bugs as discussed in the previous sections of this chapter. On the contrary, jobs that have bugs like those discussed typically don't scale no matter what you do. Instead, you need to address the issues within your application before applying the scalability features that Spring Batch or any framework provides. When you have a system with none of these issues, the features that Spring Batch offers to scale it beyond a single-threaded, single-JVM approach are some of the strongest of any framework. You spend the rest of this chapter looking at how to use Spring Batch's scalability features.
In an enterprise, when things are going well, data gets big. More customers. More transactions. More site hits. More, more, more. Your batch jobs need to be able to keep up. Spring Batch was designed from the ground up to be highly scalable, to fit the needs of both small batch jobs and large enterprise-scale batch infrastructures. This section looks at the four different approaches Spring Batch takes for scaling batch jobs beyond the default flow: multithreaded steps, parallel steps, remote chunking, and partitioning.
When a step is processed, by default it's processed in a single thread. Although a multithreaded step is the easiest way to parallelize a job's execution, as with all multithreaded environments there are aspects you need to consider when using it. This section looks at Spring Batch's multithreaded step and how to use it safely in your batch jobs.
Spring Batch's multithreaded step concept allows a batch job to use Spring's org.springframework.core.task.TaskExecutor abstraction to execute each chunk in its own thread. Figure 11-12 shows an example of how processing works when using the multithreaded step.
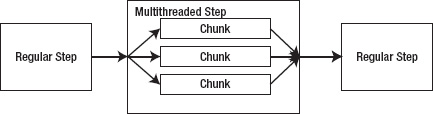
As Figure 11-12 shows, any step in a job can be configured to perform within a threadpool, processing each chunk independently. As chunks are processed, Spring Batch keeps track of what is done accordingly. If an error occurs in any one of the threads, the job's processing is rolled back or terminated per the regular Spring Batch functionality.
To configure a step to execute in a multithreaded manor, all you need to do is configure a reference to a TaskExecutor for the given step. If you use the statement job as an example, Listing 11-3 shows how to configure the calculateTransactionFees step (step 5) to be a multithreaded step.
Example 11.3. calculateTransactionFees as a Multithreaded Step
...
<step id="calculateTransactionFees">
  <tasklet task-executor="taskExecutor">
    <chunk reader="transactionPricingItemReader" processor="feesItemProcessor"
      writer="applyFeeWriter" commit-interval="100"/>
  </tasklet>
</step>

<beans:bean id="taskExecutor"
  class="org.springframework.core.task.SimpleAsyncTaskExecutor">
  <beans:property name="concurrencyLimit" value="10"/>
</beans:bean>
...
As Listing 11-3 shows, all that is required to add the power of Spring's multithreading capabilities to a step in your job is to define a TaskExecutor implementation (you use org.springframework.core.task.SimpleAsyncTaskExecutor in this example) and reference it in your step. When you execute the statement job, Spring creates a threadpool of 10 threads, executing each chunk in a different thread or 10 chunks in parallel. As you can imagine, this can be a powerful addition to most jobs.
But there is a catch when working with multithreaded steps. Most ItemReaders provided by Spring Batch are stateful. Spring Batch uses this state when it restarts a job so it knows where processing left off. However, in a multithreaded environment, objects that maintain state in a way that is accessible to multiple threads (not synchronized, and so on) can run into issues of threads overwriting each other's state.
To get around the issue of state, you use the concept of staging the records to be processed in your batch run. The concept is quite simple. Before the step begins, you tag all the records in a way that identifies them as the records to be processed in the current batch run (or JobInstance) using a StepListener. The tagging can be by either updating a special column or columns on the database field or copying the records into a staging table. Then, the ItemReader reads the records that were tagged at the beginning of the step normally. As each chunk completes, you use an ItemWriteListener to update the records you just processed as having been processed.
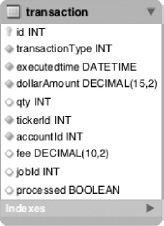
To apply this concept to the statement job's calculateTransactionFees step, you begin by adding two columns to the transaction table: jobId and processed. The jobId stores the run.id of the current run of the statement job. The second column is a boolean with the value true if the record has been processed and false if it hasn't. Figure 11-13 shows the updated table definition.
In order to put the columns to use, you need to create a StepListener to update the records you process with the jobId and set the processed flag to false for the records you process. To do this, you create a StepListener called StagingStepListener that updates these columns on whatever table you configure as well as reuse it for other tables. Listing 11-4 shows the code for the StagingStepListener.
Example 11.4. StagingStepListener
package com.apress.springbatch.statement.listener;
import org.springframework.batch.core.StepListener;
import org.springframework.batch.core.annotation.BeforeStep;
import org.springframework.jdbc.core.JdbcTemplate;

public class StagingStepListener extends JdbcTemplate implements StepListener {

    private String SQL = " set jobId = ?, processed = false ";
    private String tableName;
    private String whereClause = "";
    private long jobId;

    @BeforeStep
    public void stageRecords() {
        update("update " + tableName + SQL + whereClause, new Object [] {jobId});
    }

    public void setTableName(String tableName) {
        this.tableName = tableName;
    }
public void setJobId(long jobId) {
this.jobId = jobId;
}
public void setWhereClause(String whereClause) {
if(whereClause != null) {
this.whereClause = whereClause;
}
}
}As you can see, the StepListener in Listing 11-4 updates all the records you identify with the job id you pass in to be processed by your step. On the other end of the step is the ItemWriteListener. This listener interface is called either before or after (here, after) a chunk is written. The method afterWrite takes the same list of items that were previously written by the ItemWriter. Using this lets you update the staged records to be flagged as processed. Listing 11-5 shows the code for this listener.
Example 11.5. StagingChunkUpdater
package com.apress.springbatch.statement.listener;

import java.util.List;

import org.springframework.batch.core.ItemWriteListener;
import org.springframework.jdbc.core.JdbcTemplate;

import com.apress.springbatch.statement.domain.AccountTransaction;

public class StagingChunkUpdater extends JdbcTemplate implements
    ItemWriteListener<AccountTransaction> {

    private String SQL = " set processed = true ";
    private String tableName;
    private String whereClause = "";

    public void beforeWrite(List<? extends AccountTransaction> items) {
    }

    public void afterWrite(List<? extends AccountTransaction> items) {
        for (AccountTransaction accountTransaction : items) {
            update("update " + tableName + SQL + whereClause,
                         new Object[] {accountTransaction.getId()});
        }
    }

    public void onWriteError(Exception exception,
            List<? extends AccountTransaction> items) {
    }

    public void setTableName(String tableName) {
        this.tableName = tableName;
}
public void setWhereClause(String whereClause) {
this.whereClause = whereClause;
}
}As chunks are processed, regardless of the thread, StagingChunkUpdater updates the items to be flagged as processed. You still need to do two things. First, you need to update the configuration to use the new listeners; and second, you need to update the query used for this step's ItemReader to include jobId and the processed flag in its criteria. Listing 11-6 shows the updated configuration including the updated ItemReader, the new staging listeners, and the updated calculateTransactionFees step.
Example 11.6. Configuration for the Multithreaded Step with Staging Listeners
...
<beans:bean id="transactionPricingItemReader"
  class="org.springframework.batch.item.database.JdbcCursorItemReader" scope="step">
  <beans:property name="dataSource" ref="dataSource"/>
  <beans:property name="sql" value="select a.id as accountId, a.accountNumber,
     t.id as transactionId, t.qty, tk.ticker, a.tier, t.executedTime, t.dollarAmount from
     account a inner join transaction t on a.id = t.account_id inner join ticker tk on
     t.tickerId = tk.id and t.processed = false and t.jobId = #{jobParameters[run.id]}
     order by t.executedTime"/>
  <beans:property name="rowMapper" ref="transactionPricingRowMapper"/>
</beans:bean>

<beans:bean id="transactionPricingRowMapper"
  class="com.apress.springbatch.statement.reader.AccountTransactionRowMapper"/>

<step id="calculateTransactionFees">
  <tasklet task-executor="taskExecutor">
    <chunk reader="transactionPricingItemReader" processor="feesItemProcessor"
      writer="applyFeeWriter" commit-interval="100"/>
    <listeners>
      <listener ref="stagingStepListener"/>
      <listener ref="stagingChunkUpdater"/>
    </listeners>
  </tasklet>
</step>

<beans:bean id="stagingStepListener"
  class="com.apress.springbatch.statement.listener.StagingStepListener" scope="step">
<beans:property name="dataSource" ref="dataSource"/>
<beans:property name="tableName" value="transaction"/>
<beans:property name="whereClause"
value="where jobId is null and processed is null"/>
<beans:property name="jobId" value="#{jobParameters[run.id]}"/>
</beans:bean>
<beans:bean id="stagingChunkUpdater"
class="com.apress.springbatch.statement.listener.StagingChunkUpdater" scope="step">
<beans:property name="dataSource" ref="dataSource"/>
<beans:property name="tableName" value="transaction"/>
<beans:property name="whereClause" value="where id = ?"/>
</beans:bean>
<beans:bean id="taskExecutor"
class="org.springframework.core.task.SimpleAsyncTaskExecutor">
<beans:property name="concurrencyLimit" value="10"/>
</beans:bean>
...By taking the staged-record approach, you allow Spring Batch to not worry about the state of the step because it's maintained separately. Unfortunately, this solution still isn't perfect because it's only practical when you're using input sources that can be managed this way (databases are the typical use case). Flat files can't be managed in a staged manner. In the end, however, most input situations can be addressed in a way that allows for multithreaded processing.
Multithreaded steps provide the ability to process chunks of items within the same step of a job in parallel, but sometimes it's also helpful to be able to execute entire steps in parallel. Take for example importing multiple files that have no relationship to each other. There is no reason for one import to need to wait for the other import to complete before it begins. Spring Batch's ability to execute steps and even flows (reusable groups of steps) in parallel allows you to improve overall throughput on a job. This section looks at how to use Spring Batch's parallel steps and flows to improve the overall performance of your jobs.
If you think about submitting an order online, a number of things need to happen before the item is put into the box and handed to the postman to be delivered to your door. You need to store the order. Payment needs to be confirmed. Inventory needs to be validated. Pick lists need to be generated for the item to be obtained from a warehouse and packed. But not all these pieces of work need to be performed in order. As an example of parallel processing, let's look at a job that receives an order, imports it into a database, and then in parallel verifies payment and inventory. If both are available, the order is processed. Figure 11-14 shows a diagram of the process flow for this sample job.
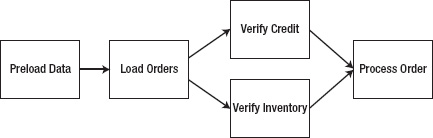
This is a four-step job. Step 1 prepopulates a JMS queue with data to be read in step 2.[31] Although you can use any number of input options, using JMS for order delivery is a realistic option for the real world; so, this example uses it. Step 2 reads from a JMS queue and saves the database so that if an issue occurs during future processing, you won't lose the order. From there, you execute two different steps in parallel. One step validates that funds are available for the purchase. The second verifies inventory with an inventory system. If both of those checks are successful, the order is processed and the pick slip for the warehouse is generated.
To begin working through this job, let's look at the object model. Specifically, there are three domain classes: Customer, Order, and OrderItem, as shown in Figure 11-15.
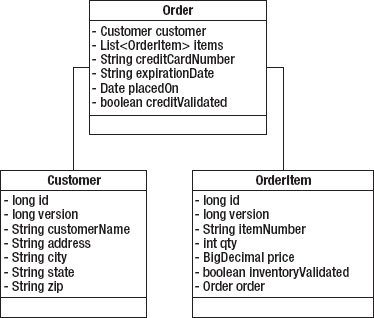
An Order, as shown in Figure 11-15, consists of a Customer, order-specific information (mostly payment information), and a list of OrderItems. Each item the customer is purchasing has an OrderItem entry in the list containing item-specific information including item number and quantity ordered.
To make this job work, you need to write a small amount of code. Specifically:
OrderGenerator: ItemReader that generates the sample orders for your jobCreditService/InventoryService: Services used as ItemProcessors to validate the user's credit and validate that you have the inventory to process the orderPickListFormatter: Line aggregator that generates the format required for the picklists you generate
Since you can't do much without the orders you will process, Step 1 of your job is to generate orders for processing. The next section discusses the code and configuration required to make this happen.
Without a storefront to sell things, you will need to build your own orders for processing. To do that, you will create an ItemReader implementation that generates random orders based upon hard coded data. While you wouldn't do this in production, it will allow you to setup the data required to test the rest of your job. In this section we will code and configure the components required to generate test data.
Let's start by looking at the OrderGenerator ItemReader implementation. To generate test files for most of the jobs in this book, I wrote Ruby scripts (included in the book's source code) to generate data much faster than I could do it by hand. This class isn't much more than a Java equivalent of those Ruby scripts. Listing 11-7 shows the code for the OrderGenerator.
Example 11.7. OrderGenerator
package com.apress.springbatch.chapter11processor;

import java.math.BigDecimal;
import java.text.DateFormat;
import java.text.SimpleDateFormat;
import java.util.ArrayList;
import java.util.Date;
import java.util.List;
import java.util.Random;

import org.springframework.batch.item.ItemReader;

import com.apress.springbatch.chapter11.domain.Customer;
import com.apress.springbatch.chapter11.domain.Order;
import com.apress.springbatch.chapter11.domain.OrderItem;

public class OrderGenerator implements ItemReader<Order> {

    private static final String [] STREETS = {"Second", "Third", "Fourth", "Park", "Fifth"};
    private static final String[] CITIES = {"Franklin", "Clinton", "Springfield",
        "Greenville"};
    private static final String[] FIRST_NAME = {"Jacob", "Ethan", "Michael", "Alexander"};
    private static final String[] LAST_NAME = {"Smith", "Jones", "Thompson", "Williams"};
    private static final String[] STATES = {"AL", "AK", "AZ", "AR", "CA", "CO", "CT", "DE"};

    private Random generator = new Random();
    private DateFormat formatter = new SimpleDateFormat("MM/yy");
    private int counter = 0;

    public Order read() throws Exception {
        if(counter < 100) {
            Order curOrder = new Order();

            curOrder.setCreditCardNumber(String.valueOf(generator.nextLong()));
curOrder.setCustomer(buildCustomer());
curOrder.setExpirationDate(formatter.format(new Date()));
curOrder.setPlacedOn(new Date());
curOrder.setItems(buildItems(curOrder));
counter ++;
return curOrder;
} else {
return null;
}
}
private List<OrderItem> buildItems(Order order) {
List<OrderItem> items = new ArrayList<OrderItem>();
int total = 0;
while(total <= 0) {
total = generator.nextInt(10);
}
for(int i = 0; i < total; i++) {
OrderItem item = new OrderItem();
item.setItemNumber(String.format("%09d", generator.nextLong()));
item.setPrice(BigDecimal.valueOf(generator.nextDouble()));
item.setQty(generator.nextInt(5));
item.setOrder(order);
items.add(item);
}
return items;
}
private Customer buildCustomer() {
Customer customer = new Customer();
customer.setAddress(generator.nextInt(999) + " " +
STREETS[counter % STREETS.length]);
customer.setCity(CITIES[counter % CITIES.length]);
customer.setCustomerName(FIRST_NAME[counter % FIRST_NAME.length] + " " +
LAST_NAME[counter % LAST_NAME.length]);
customer.setState(STATES[counter % STATES.length]);
customer.setZip(String.format("%05d", generator.nextInt(99999)));
return customer;
}
}The OrderGenerator code is pretty simple. You build an Order object, populate the Customer and generate a few OrderItems, and send it on its way. When you use Spring Batch to set up your data like this, you can easily run a variety of test scenarios.
To put this class to use, you need to begin building your job. Because the first step consists only of generating Orders using OrderGenerator and writing them to a JMS queue, you can wire all that up and test it without needing to go any further. Listing 11-8 shows the configuration of the job as a single-step job that generates data and puts it on the queue for future steps to pick up.
Example 11.8. Parallel Job Configured in parallelJob.xml with the First Step Configured
<?xml version="1.0" encoding="UTF-8"?>
<beans:beans xmlns="http://www.springframework.org/schema/batch"
  xmlns:beans="http://www.springframework.org/schema/beans"
  xmlns:util="http://www.springframework.org/schema/beans"
  xmlns:xsi="http://www.w3.org/2001/XMLSchema-instance"
  xsi:schemaLocation="http://www.springframework.org/schema/beans
     http://www.springframework.org/schema/beans/spring-beans-3.0.xsd
    http://www.springframework.org/schema/util
    http://www.springframework.org/schema/util/spring-util.xsd
    http://www.springframework.org/schema/batch
    http://www.springframework.org/schema/batch/spring-batch-2.1.xsd">

  <beans:import resource="../launch-context.xml"/>

  <beans:bean id="jmsWriter" class="org.springframework.batch.item.jms.JmsItemWriter">
    <beans:property name="jmsTemplate" ref="jmsTemplate"/>
  </beans:bean>

  <beans:bean id="dataGenerator"
    class="com.apress.springbatch.chapter11.processor.OrderGenerator"/>

  <step id="preloadDataStep">
    <tasklet>
      <chunk reader="dataGenerator" writer="jmsWriter" commit-interval="10"/>
    </tasklet>
  </step>

  <job id="parallelJob">
    <step id="step1" parent="preloadDataStep"/>
  </job>
</beans:beans>
Although the job itself is now configured, you need to make a couple of small tweaks to launch-context.xml and your POM file for this job. Specifically, you need to configure JMS support and Hibernate support (you use Hibernate for this job to simplify storing the object hierarchy) in launch-context.xml and add the appropriate dependencies to your POM file.[32]
Let's update the POM file first. Listing 11-9 shows the additional dependencies for ActiveMQ and Spring's JMS support as well as the Hibernate dependencies and Spring's ORM supporting modules.
Example 11.9. Updating the POM File to Support JMS and Hibernate
...
<dependency>
  <groupId>org.springframework</groupId>
  <artifactId>spring-jms</artifactId>
  <version>${spring.framework.version}</version>
</dependency>
<dependency>
  <groupId>org.springframework</groupId>
  <artifactId>spring-orm</artifactId>
  <version>${spring.framework.version}</version>
</dependency>
<dependency>
  <groupId>org.hibernate</groupId>
  <artifactId>hibernate-core</artifactId>
  <version>3.3.0.SP1</version>
</dependency>
<dependency>
  <groupId>org.hibernate</groupId>
  <artifactId>hibernate-entitymanager</artifactId>
  <optional>true</optional>
  <version>3.3.2.GA</version>
</dependency>
<dependency>
  <groupId>org.hibernate</groupId>
  <artifactId>hibernate-annotations</artifactId>
  <optional>true</optional>
  <version>3.4.0.GA</version>
</dependency>
<dependency>
  <groupId>org.apache.activemq</groupId>
  <artifactId>activemq-core</artifactId>
  <version>5.4.2</version>
  <exclusions>
    <exclusion>
      <groupId>org.apache.activemq</groupId>
      <artifactId>activeio-core</artifactId>
    </exclusion>
  </exclusions>
</dependency>
    ...
With the POM file updated, you can update launch-context.xml. The updates required are the configuration of the JMS resources (connection factory, destination, and JmsTemplate) as well as the Hibernate resources (a SessionFactory and updated transaction manager). Listing 11-10 shows the launch-context.xml file for this job.
Example 11.10. launch-context.xml
<?xml version="1.0" encoding="UTF-8"?>
<beans xmlns="http://www.springframework.org/schema/beans"
  xmlns:p="http://www.springframework.org/schema/p"
  xmlns:xsi="http://www.w3.org/2001/XMLSchema-instance"
xsi:schemaLocation="http://www.springframework.org/schema/beans
    http://www.springframework.org/schema/beans/spring-beans-3.0.xsd">

  <bean id="jobOperator"
    class="org.springframework.batch.core.launch.support.SimpleJobOperator"
    p:jobLauncher-ref="jobLauncher" p:jobExplorer-ref="jobExplorer"
    p:jobRepository-ref="jobRepository" p:jobRegistry-ref="jobRegistry" />

  <bean id="jobExplorer"
    class="org.springframework.batch.core.explore.support.JobExplorerFactoryBean"
    p:dataSource-ref="dataSource" />

  <bean id="jobRegistry"
     class="org.springframework.batch.core.configuration.support.MapJobRegistry" />

  <bean class="org.springframework.batch.core.configuration.support.JobRegistryBeanPostProcessor">
    <property name="jobRegistry" ref="jobRegistry"/>
  </bean>

  <bean id="jobLauncher" class="org.springframework.batch.core.launch.support.SimpleJobLauncher">
    <property name="jobRepository" ref="jobRepository" />
  </bean>

  <bean id="jobRepository"
    class="org.springframework.batch.core.repository.support.JobRepositoryFactoryBean"
    p:dataSource-ref="dataSource" p:transactionManager-ref="transactionManager" />

  <bean id="jmsConnectionFactory" class="org.apache.activemq.ActiveMQConnectionFactory">
    <property name="brokerURL" value="vm://localhost"/>
  </bean>

  <bean id="jmsTemplate" class="org.springframework.jms.core.JmsTemplate">
    <property name="connectionFactory" ref="jmsConnectionFactory"/>
    <property name="defaultDestination" ref="destination"/>
    <property name="receiveTimeout" value="5000"/>
  </bean>

  <bean id="destination" class="org.apache.activemq.command.ActiveMQQueue">
    <constructor-arg value="orderQueue"/>
  </bean>

  <bean id="dataSource" class="org.apache.commons.dbcp.BasicDataSource">
    <property name="driverClassName" value="${batch.jdbc.driver}" />
    <property name="url" value="${batch.jdbc.url}" />
    <property name="username" value="${batch.jdbc.user}" />
    <property name="password" value="${batch.jdbc.password}" />
  </bean>

  <bean id="sessionFactory" class="org.springframework.orm.hibernate3.LocalSessionFactoryBean">
<property name="dataSource" ref="dataSource" />
<property name="configLocation">
<value>classpath:hibernate.cfg.xml</value>
</property>
<property name="configurationClass">
<value>org.hibernate.cfg.AnnotationConfiguration</value>
</property>
<property name="hibernateProperties">
<props>
<prop key="hibernate.show_sql">false</prop>
<prop key="hibernate.format_sql">false</prop>
<prop key="hibernate.hbm2ddl.auto">update</prop>
<prop key="hibernate.dialect">org.hibernate.dialect.MySQLDialect</prop>
</props>
</property>
</bean>
<bean id="transactionManager"
class="org.springframework.orm.hibernate3.HibernateTransactionManager"
lazy-init="true">
<property name="sessionFactory" ref="sessionFactory" />
</bean>
<bean id="placeholderProperties"
class="org.springframework.beans.factory.config.PropertyPlaceholderConfigurer">
<property name="location" value="classpath:batch.properties" />
<property name="systemPropertiesModeName"
value="SYSTEM_PROPERTIES_MODE_OVERRIDE" />
<property name="ignoreUnresolvablePlaceholders" value="true" />
<property name="order" value="1" />
</bean>
</beans>As you can see, the vast majority of launch-context.xml is the default. The main changes are the addition of the JMS resources and Hibernate resources at the end. Note the TransactionManager configured by default has been replaced with the one you're using for this job.
The last piece of configuration that you need to do in order for the pieces of this job to work together is the hibernate.cfg.xml file. Because you're using annotations to do the mapping, the hibernate.cfg.xml file is nothing more than a list of classes that are mapped. Listing 11-11 contains the source of the file for this example.
Example 11.11. hibernate.cfg.xml
<!DOCTYPE hibernate-configuration PUBLIC
  "-//Hibernate/Hibernate Configuration DTD 3.0//EN"
  "http://hibernate.sourceforge.net/hibernate-configuration-3.0.dtd">

<hibernate-configuration>
  <session-factory>
    <mapping class="com.apress.springbatch.chapter11.domain.Customer"/>
    <mapping class="com.apress.springbatch.chapter11.domain.Order"/>
    <mapping class="com.apress.springbatch.chapter11.domain.OrderItem"/>
  </session-factory>
</hibernate-configuration>
When you build and run the job as is, you can confirm that 100 items are read and 100 items are written (as specified in the OrderGenerator class) to your JMS queue using either the JobRepository directly or checking in Spring Batch Admin. In either case, you're ready to begin building the batch job that does the work.
The first step real step of the job (step 2 in actuality) reads orders from the JMS queue and stores them in your database for further processing. This step, like many before, consists only of XML configuration. You need to configure a JMSItemReader to obtain the orders from the queue and a HibernateItemWriter to store the objects in your database. However, before you look at the configuration for the ItemReader and ItemWriter, Listing 11-12 has the code for the Customer, Order, and OrderItem objects, showing their Hibernate mappings.
Example 11.12. Hibernate Mappings for Customer, Order, and OrderItem
Customer
package com.apress.springbatch.chapter11.domain;

import java.io.Serializable;

import javax.persistence.Entity;
import javax.persistence.GeneratedValue;
import javax.persistence.GenerationType;
import javax.persistence.Id;
import javax.persistence.Table;
import javax.persistence.Version;

@Entity
@Table(name="customers")
public class Customer implements Serializable{

    private static final long serialVersionUID = 1L;

    @Id
@GeneratedValue(strategy = GenerationType.IDENTITY)
private long id;
@Version
private long version;
private String customerName;
private String address;
private String city;
private String state;
private String zip;
// Accessors go here
...
}
Order
package com.apress.springbatch.chapter11.domain;
import java.io.Serializable;
import java.util.Date;
import java.util.List;
import javax.persistence.CascadeType;
import javax.persistence.Entity;
import javax.persistence.FetchType;
import javax.persistence.GeneratedValue;
import javax.persistence.GenerationType;
import javax.persistence.Id;
import javax.persistence.ManyToOne;
import javax.persistence.OneToMany;
import javax.persistence.Table;
import javax.persistence.Version;
@Entity
@Table(name="orders")
public class Order implements Serializable{
private static final long serialVersionUID = 1L;
@Id
@GeneratedValue(strategy = GenerationType.IDENTITY)
private long id;
@Version
private long version;
@ManyToOne(cascade = CascadeType.ALL)
private Customer customer;
private String creditCardNumber;
private String expirationDate;
@OneToMany(cascade = CascadeType.ALL, mappedBy="order", fetch = FetchType.LAZY)
private List<OrderItem> items;private Date placedOn;
private Boolean creditValidated;
// Accessors go here
...
}
OrderItem
package com.apress.springbatch.chapter11.domain;
import java.io.Serializable;
import java.math.BigDecimal;
import javax.persistence.Entity;
import javax.persistence.GeneratedValue;
import javax.persistence.GenerationType;
import javax.persistence.Id;
import javax.persistence.ManyToOne;
import javax.persistence.Table;
import javax.persistence.Version;
@Entity
@Table(name="orderItems")
public class OrderItem implements Serializable{
private static final long serialVersionUID = 1L;
@Id
@GeneratedValue(strategy = GenerationType.IDENTITY)
private long id;
@Version
private long version;
private String itemNumber;
private int qty;
private BigDecimal price;
private Boolean inventoryValidated;
@ManyToOne
private Order order;
// Accessors go here
...
}The annotations are the final piece of the baseline configuration of your JMS and database resources. Now you can configure step 2 of the job to read orders from the JMS queue and save them in your database. Listing 11-13 shows the configuration for step 2 of the parallel job.
Example 11.13. Step 2 of ParallelJob
...
<beans:bean id="jmsReader" class="org.springframework.batch.item.jms.JmsItemReader">
  <beans:property name="jmsTemplate" ref="jmsTemplate"/>
</beans:bean>

<beans:bean id="orderWriter"
  class="org.springframework.batch.item.database.HibernateItemWriter">
  <beans:property name="sessionFactory" ref="sessionFactory"/>
</beans:bean>

<step id="batchOrderProcessingStep">
  <tasklet>
    <chunk reader="jmsReader" writer="orderWriter" commit-interval="10"/>
  </tasklet>
</step>

<job id="parallelJob">
  <step id="step1" parent="preloadDataStep" next="step2"/>
  <step id="step2" parent="batchOrderProcessingStep"/>
</job>
...
Next, you need to verify that the customer's credit card will go through and that you have the inventory to fulfill the order. Because these functions aren't directly related, you can do them in parallel to improve the overall throughput of the job. You'll look at how these steps are configured next.
To execute steps in parallel, Spring Batch again uses Spring's TaskExecutor. In this case, each flow is executed in its own thread, allowing you to execute multiple flows in parallel. To configure this, you use Spring Batch's split tag. The split tag takes three required attributes:
id: The id of the element.task-executor: A reference to the TaskExecutor implementation that Spring Batch uses to manage the threading used for your parallel processing.next: Tells Spring Batch what step to execute once all the flows complete successfully. Asplittag wraps multiple steps into a single pseudostep; if any of the flows fails in its execution, the other steps running at the same time complete and then the job fails when parallel processing was to end.
It's important to note that the execution order of a job using split is similar to that of a regular job. In a regular job, a step doesn't complete until all the items are processed for the step and the next step doesn't begin until the previous one is completed. Using split, the step after the split isn't executed until all the flows configured within the split have been completed.
Note
The step after a split isn't executed until all the flows within a split are completed.
In order to do the credit verification and inventory checking required in this job, you can develop a couple of high-tech services to perform the checking for you. You use each of these services as ItemProcessors in your steps. First let's look at CreditServiceImpl, which is responsible for verifying that the customer's credit card will go through. Listing 11-14 shows the code related to this process.
Example 11.14. CreditServiceImpl
package com.apress.springbatch.chapter11.service.impl;

import com.apress.springbatch.chapter11.domain.Order;
import com.apress.springbatch.chapter11.service.CreditService;

public class CreditServiceImpl implements CreditService {

@Override
public Order validateCharge(Order order) {
        if(order.getId() % 3 == 0) {
            order.setCreditValidated(true);
        } else {
            order.setCreditValidated(false);
        }

        return order;
    }
}
Because you don't actually process orders here, it doesn't make much sense to validate that credit cards go through. Instead, the service approves a third of the orders. Because CreditServiceImpl has a simplistic approach to verifying funds, you can imagine that InventoryServiceImpl has a similar approach to making sure you have the product on hand to fulfill the order. Listing 11-15 shows the code to verify that you have the inventory for each OrderItem.
Example 11.15. InventoryServiceImpl
package com.apress.springbatch.chapter11.service.impl;

import com.apress.springbatch.chapter11.domain.OrderItem;
import com.apress.springbatch.chapter11.service.InventoryService;

public class InventoryServiceImpl implements InventoryService {

    @Override
    public OrderItem validateInventory(OrderItem item) {
        if(item.getId() % 2 == 0) {
            item.setInventoryValidated(true);
        } else {
item.setInventoryValidated(false);
}
return item;
}
}Now that the business processing is written, let's configure these two services to run in parallel. To do that, as mentioned earlier, you use Spring Batch's split tag along with the SimpleAsyncTaskExecutor provided with Spring to handle thread management. Listing 11-16 shows the configuration for the steps you run in parallel.
Example 11.16. Configuration of Parallel Steps
...
<beans:bean id="taskExecutor"
  class="org.springframework.core.task.SimpleAsyncTaskExecutor"/>

<beans:bean id="orderItemReader"
  class="org.springframework.batch.item.database.HibernateCursorItemReader"
  scope="step">
  <beans:property name="sessionFactory" ref="sessionFactory"/>
  <beans:property name="queryString" value="from OrderItem where inventoryValidated is null"/>
</beans:bean>

<beans:bean id="orderReader"
  class="org.springframework.batch.item.database.HibernateCursorItemReader"
  scope="step">
  <beans:property name="sessionFactory" ref="sessionFactory"/>
  <beans:property name="queryString" value="from Order where creditValidated is null"/>
</beans:bean>

<beans:bean id="orderWriter"
  class="org.springframework.batch.item.database.HibernateItemWriter">
  <beans:property name="sessionFactory" ref="sessionFactory"/>
</beans:bean>

<beans:bean id="creditService"
  class="com.apress.springbatch.chapter11.service.impl.CreditServiceImpl"/>

<beans:bean id="creditVerificationProcessor"
  class="org.springframework.batch.item.adapter.ItemProcessorAdapter">
  <beans:property name="targetObject" ref="creditService"/>
<beans:property name="targetMethod" value="validateCharge"/>
</beans:bean>

<beans:bean id="inventoryService"
  class="com.apress.springbatch.chapter11.service.impl.InventoryServiceImpl"/>

<beans:bean id="inventoryVerificationProcessor"
  class="org.springframework.batch.item.adapter.ItemProcessorAdapter">
  <beans:property name="targetObject" ref="inventoryService"/>
<beans:property name="targetMethod" value="validateInventory"/>
</beans:bean>

<step id="creditVerificationStep">
  <tasklet>
    <chunk reader="orderReader" processor="creditVerificationProcessor"
      writer="orderWriter" commit-interval="10"/>
  </tasklet>
</step>

<step id="inventoryVerificationStep">
  <tasklet>
    <chunk reader="orderItemReader" processor="inventoryVerificationProcessor"
      writer="orderWriter" commit-interval="10"/>
  </tasklet>
</step>

<job id="parallelJob">
  <step id="step1" parent="preloadDataStep" next="step2"/>
  <step id="step2" parent="batchOrderProcessingStep" next="parallelProcessing"/>
  <split id="parallelProcessing" task-executor="taskExecutor">
    <flow>
      <step id="step3" parent="creditVerificationStep"/>
    </flow>
    <flow>
      <step id="step4" parent="inventoryVerificationStep"/>
    </flow>
  </split>
</job>
...
Listing 11-16 shows the configuration of the required ItemReaders and ItemWriters as you would expect as well as creditService and inventoryService. You use ItemProcessorAdapter to turn your services into ItemProcessors and finally wire up each of the steps. It's in the job itself that things get interesting for this example.
Within parallelJob, you begin with step 1, which points to step 2 (via the next attribute). However, step 2 doesn't point to a step in the next attribute. Instead, it points to the split tag. Within the split tag, you define two flows: one for the credit-card verification (using creditVerificationStep) and one for inventory verification (using inventoryVerificationStep). These two flows are executed at the same time. The parallelProcessing "step" is considered complete when both steps have completed.
That's it for the parallel processing aspect of the job. The final step, generation of the pick lists is executed once the split pseudostep is complete. In the next section you will look at the required code for the step and how that step is configured.
The final piece of the puzzle for this job is to write out picklists for the warehouse to pull the items. In this case, you generate one picklist for each order that passed the credit-verification step (creditValidated = true) and for which all the OrderItems in the order passed the inventory check (inventoryValidated = true). For this you have a HibernateCursorItemReader that reads only the appropriate orders and passes them to a MultiResourceItemWriter so that each picklist is contained within its own file. For this final step, you need to write a small amount of code in the LineAggregator for the writer because you need to loop over the OrderItems in the order. Listing 11-17 shows the code for the LineAggregator, PickListFormatter.
Example 11.17. PickListFormatter
package com.apress.springbatch.chapter11.writer;

import org.springframework.batch.item.file.transform.LineAggregator;

import com.apress.springbatch.chapter11.domain.Order;
import com.apress.springbatch.chapter11.domain.OrderItem;

public class PickListFormatter implements LineAggregator<Order> {

    public String aggregate(Order order) {
        StringBuilder builder = new StringBuilder();

        builder.append("Items to pick
");

        if(order.getItems() != null) {
            for (OrderItem item : order.getItems()) {
                builder.append(item.getItemNumber() + ":" + item.getQty() + "
");
            }
        } else {
            builder.append("No items to pick");
        }

        return builder.toString();
    }
}
Because all you need to do is write a small header ("Items to pick") and then list the item numbers and the quantity to pick, this LineAggregator is very simple to code. The configuration for the final step consists of adding the new step to the job and pointing the split tag to the step after both flows have completed. Listing 11-18 shows the configuration of the final step and the completed job.
Example 11.18. The Completed parallelJob Configuration
...
<beans:bean id="validatedOrderItemReader"
  class="org.springframework.batch.item.database.HibernateCursorItemReader"
  scope="step">
  <beans:property name="sessionFactory" ref="sessionFactory"/>
  <beans:property name="queryString"
    value="from Order as o where o.creditValidated = true and not exists
(from OrderItem oi where oi.order = o and oi.inventoryValidated = false)"/>
  <beans:property name="useStatelessSession" value="false"/>
</beans:bean>
<beans:bean id="outputFile" class="org.springframework.core.io.FileSystemResource"
scope="step">
<beans:constructor-arg value="#{jobParameters[outputFile]}"/>
</beans:bean>
<beans:bean id="pickListFormatter"
class="com.apress.springbatch.chapter11.writer.PickListFormatter"/>
<beans:bean id="pickListOutputWriter"
class="org.springframework.batch.item.file.FlatFileItemWriter">
<beans:property name="lineAggregator" ref="pickListFormatter"/>
</beans:bean>
<beans:bean id="pickListWriter"
class="org.springframework.batch.item.file.MultiResourceItemWriter">
<beans:property name="resource" ref="outputFile"/>
<beans:property name="delegate" ref="pickListOutputWriter"/>
<beans:property name="itemCountLimitPerResource" value="1"/>
</beans:bean>
<step id="processOrderStep">
<tasklet>
<chunk reader="validatedOrderItemReader" writer="pickListWriter"
commit-interval="1"/>
</tasklet>
</step>
<job id="parallelJob">
<step id="step1" parent="preloadDataStep" next="step2"/>
<step id="step2" parent="batchOrderProcessingStep" next="parallelProcessing"/>
<split id="parallelProcessing" task-executor="taskExecutor" next="step5">
<flow>
<step id="step3" parent="creditVerificationStep"/>
</flow>
<flow>
<step id="step4" parent="inventoryVerificationStep"/>
</flow>
</split>
<step id="step5" parent="processOrderStep"/>
</job>
...Obviously, when you run this job, the output will vary given that the orders are randomly generated. However, for any given run, a couple of picklists are generated. Listing 11-19 shows the output of a picklist generated from the batch job.
As you can see, developing jobs that use parallel processing using Spring Batch is typically as simple as updating some XML. However, these approaches have limits. Up to this point, you've used only a single JVM. Because of that, you're restricted to the CPU and memory available on the box on which you start the job. But what about more complex scenarios where things are computationally hard? And how can you take advantage of server clusters to improve throughput? The next two sections look at how to scale Spring Batch jobs past a single JVM.
Java's multithreading abilities allow very high-performance software to be developed. But there is a limit to what any single JVM can do. Let's begin to look at ways to spread out the processing of a given task to many computers. The largest example of this type of distributed computing is the SETI@home project. SETI (Search for Extraterrestrial Intelligence) takes signals it records from radio telescopes and divides them in to small chunks of work. To analyze the work, SETI offers a screensaver that anyone can download onto their computer. The screensaver analyzes the data downloaded from SETI and returns the results. As of the writing of this book, the SETI@home project has had more than 5.2 million participants providing over 2 million years of aggregate computing time. The only way to scale to numbers like this is to get more computers involved.
Although you probably won't need to scale to the levels of SETI@home, the fact remains that the amount of data you need to process will probably at least tax the limits of a single JVM and may be prohibitively large to process in the time window you have. This section looks at how to use Spring Batch's remote chunking functionality to extend processing past what a single JVM can do.
Spring Batch provides two ways to scale beyond a single JVM. Remote chunking reads data locally, sends it to a remote JVM for processing, and then receives the results back in the original JVM for writing. This type of scaling outside of a single JVM is useful only when item processing is the bottleneck in your process. If input or output is the bottleneck, this type of scaling only makes things worse. There are a couple things to consider before using remote chunking as your method for scaling batch processing:
Processing needs to be the bottleneck: Because reading and writing are completed in the master JVM, in order for remote chunking to be of any benefit, the cost of sending data to the slaves for processing must be less than the benefit received from parallelizing the processing.
Guaranteed delivery is required: Because Spring Batch doesn't maintain any type of information about who is processing what, if one of the slaves goes down during processing, Spring Batch has no way to know what data is in play. Thus a persisted form of communication (typically JMS) is required.
Remote chunking takes advantage of two additional Spring projects. The Spring Integration project is an extension of the Spring project that is intended to provide lightweight messaging in Spring applications as well as adapters for interacting with remote applications via messaging. In the case of remote chunking, you use its adapters to interact with slave nodes via JMS. The other project that remote chunking relies on is the Spring Batch Integration project. This subproject of the Spring Batch Admin project contains classes to implement features including remote chunking and partitioning as well as other integration patterns that are still in development. Although Spring Batch Integration is currently a subproject of the Spring Batch Admin project, the long-term intent is to break it out once the community has grown enough.
To implement remote chunking in your jobs, you use the helper project contained in Spring Batch Admin called Spring Batch Integration. This project is still young and growing in the community. Once it's mature enough, it will be branched into its own independent project. Until then, it has a number of helpful resources for your scalability needs.
To configure a job using remote chunking, you begin with a normally configured job that contains a step that you want to execute remotely. Spring Batch allows you to add this functionality with no changes to the configuration of the job itself. Instead, you hijack the ItemProcessor of the step to be remotely processed and insert an instance of a ChunkHandler implementation (provided by Spring Batch Integration). The org.springframework.batch.integration.chunk.ChunkHandler interface has a single method, handleChunk, that works just like the ItemProcessor interface. However, instead of actually doing the work for a given item, the ChunkHandler implementation sends the item to be processed remotely and listens for the response. When the item returns, it's written normally by the local ItemWriter. Figure 11-16 shows the structure of a step that is using remote chunking.
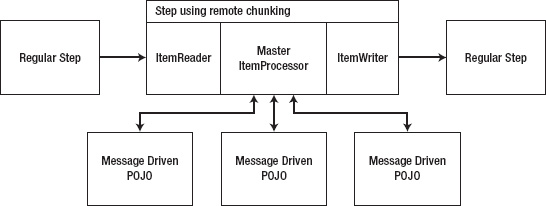
As Figure 11-16 shows, any one of the steps in a job can be configured to do its processing via remote chunking. When you configure a given step, that step's ItemProcessor is replaced with a ChunkHandler, as mentioned previously. That ChunkHandler's implementation uses a special writer (org.springframework.batch.integration.chunk.ChunkMessageChannelItemWriter) to write the items to the queue. The slaves are nothing more than message-driven POJOs that execute your business logic. When the processing is completed, the output of the ItemProcessor is sent back to the ChunkHandler and passed on to the real ItemWriter.
For this example, you update a table of customer information with the longitude and latitude of the address each customer has on file. These coordinates are useful for using most mapping APIs on the Web to display a marker for a given point. To do obtain the geocoding for your customers, you call a web service, sending it the address information and receiving the customer's longitude and latitude to be saved.
The potential for a bottleneck exists when you call to a web service you don't control, so you use remote chunking to process this step. To begin, let's make a list of the items you need to address in this job:
Write the Java for the job: This job requires only a small amount of code. Specifically, you need to develop a domain object (
Customer), a RowMapper implementation to map the customer data you retrieve as input from the database to your customer objects, an ItemProcessor to handle the web service call, and a class with amainmethod (discussed later).Configure the basic job: The use of remote chunking doesn't require any change to the way you configure a job, so you should create a fully operational job before adding remote chunking to it.
Update the POM file with integration dependencies: Because remote chunking requires a couple of additional dependencies, you need to update your POM file to include them.
Configure remote chunking: Finally you configure the job to have remote workers to help process your customers.
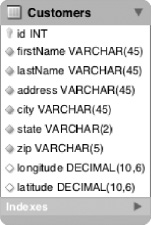
Before you get to the code, let's review the data model for this example. The Customers table is the same as the one used in various other examples in this book. The only additions are the two new columns for the longitude and latitude. Figure 11-17 shows the updated table format.
With the data model defined, let's look at the Java code required. None of the code contains anything specific to remote chunking, and that is by design. Adding remote chunking is something you can do with no impact on the way your job is developed. The domain object for this project, Customer, contains all the fields you would expect; see Listing 11-20.
Example 11.20. Customer.java
package com.apress.springbatch.chapter11.domain;

import java.io.Serializable;

public class Customer implements Serializable{
private static final long serialVersionUID = 1L;
private long id;
private String firstName;
private String lastName;
private String address;
private String city;
private String state;
private String zip;
private Double longitude;
private Double latitude;
// Accessors go here
...
@Override
public String toString() {
return firstName + " " + lastName + " lives at " +
address + "," + city + " " + state + "," + zip;
}
}The two things to note about the Customer class are that it implements the java.io.Serializable interface so that it can be serialized and sent over the JMS queues you're using, and that you override the toString method with something useful so you can see who is processed by what slave nodes later.
The next object to code is the RowMapper implementation that maps the data from the Customers table in Figure 11-17 to the Customer object. Listing 11-21 shows the code for CustomerRowMapper.
Example 11.21. CustomerRowMapper
package com.apress.springbatch.chapter11.jdbc;

import java.sql.ResultSet;
import java.sql.SQLException;

import org.springframework.jdbc.core.RowMapper;

import com.apress.springbatch.chapter11.domain.Customer;

public class CustomerRowMapper implements RowMapper<Customer> {

    public Customer mapRow(ResultSet rs, int arg1) throws SQLException {
        Customer cust = new Customer();

        cust.setAddress(rs.getString("address"));
        cust.setCity(rs.getString("city"));
        cust.setFirstName(rs.getString("firstName"));
        cust.setId(rs.getLong("id"));
        cust.setLastName(rs.getString("lastName"));
        cust.setState(rs.getString("state"));
        cust.setZip(rs.getString("zip"));
        cust.setLongitude(rs.getDouble("longitude"));
        cust.setLatitude(rs.getDouble("latitude"));
return cust;
}
}Because the object and table are both straightforward, the RowMapper consists of nothing more than moving each column from the result set to its related customer attribute.
The final piece of the job is the ItemProcessor you use to call the web service and geocode customers' addresses. Most of this code matches the code you used in the statement job previously to obtain stock prices. Using HttpClient, you build a GET request and parse the comma-delimited results into the customer's latitude and longitude. Listing 11-22 shows the code for GeocodingItemProcessor.
Example 11.22. GeocodingItemProcessor
package com.apress.springbatch.chapter11.processor;

import java.net.URLEncoder;

import org.apache.commons.io.IOUtils;
import org.apache.commons.lang.StringUtils;
import org.apache.http.HttpEntity;
import org.apache.http.HttpResponse;
import org.apache.http.client.HttpClient;
import org.apache.http.client.methods.HttpGet;
import org.apache.http.impl.client.DefaultHttpClient;
import org.springframework.batch.item.ItemProcessor;

import com.apress.springbatch.chapter11.domain.Customer;

public class GeocodingItemProcessor implements ItemProcessor<Customer, Customer> {

    private static final String COMMA = ",";
    private static final String UTF_8 = "UTF-8";
    private String url;

    public Customer process(Customer customer) throws Exception {
        System.out.println("******** I'm going to process " + customer);
        HttpClient client = new DefaultHttpClient();

        String address = buildAddress(customer);

        if(address == null) {
            return null;
        }

        HttpGet get = new HttpGet(url + "?q=" + address);

        HttpResponse response = client.execute(get);

        HttpEntity entity = response.getEntity();

        String coordinantes = IOUtils.toString(entity.getContent());
coordinantes = StringUtils.strip(coordinantes);
if(coordinantes.length() > 0) {
String [] values = coordinantes.split(COMMA);
customer.setLongitude(Double.valueOf(values[0]));
customer.setLatitude(Double.valueOf(values[1]));
}
return customer;
}
private String buildAddress(Customer customer) throws Exception {
if(customer.getCity() == null && customer.getZip() == null) {
return null;
} else {
StringBuilder address = new StringBuilder();
address.append(
StringUtils.defaultIfEmpty(
URLEncoder.encode(customer.getCity(), UTF_8) + COMMA, ""));
address.append(
StringUtils.defaultIfEmpty(
URLEncoder.encode(customer.getState(), UTF_8) + COMMA, ""));
address.append(
StringUtils.defaultIfEmpty(
URLEncoder.encode(customer.getZip(), UTF_8) + COMMA, ""));
return address.substring(0, address.length() - 1);
}
}
public void setUrl(String url) {
this.url = url;
}
}Although GeocodingItemProcessor doesn't contain anything truly unusual that you haven't seen already, look at the first line of the process method. You call System.out.println on each customer so that when you run the job, you can see where each customer is processed. This way, you can see in the output of each console who processed what items.
The rest of the code consists of the construction of the HTTP GET request you send to obtain each customer's longitude and latitude. That's all the coding you need to do for the batch job. You need another class for the remote-chunking piece, but you look at that in a bit. For now, let's configure the job and make sure it works before you attempt to tackle the added complexity of remote chunking.
To configure the job, you start with a JdbcCursorItemReader that selects all customers that have null for either longitude or latitude. That reader requires a RowMapper, which is configured next. Then, you configure the ItemProcessor that does the heavy lifting of determining the customer's coordinates. The service you use to geocode the addresses is called TinyGeocoder. You provide the URL to the service as the ItemProcessor's only dependency. Next is the ItemWriter, a JdbcBatchItemWriter in this job. In this case, you update the customer records, setting the longitude and latitude for each item as required. The job configuration to assemble these elements wraps up the configuration. Listing 11-23 shows the configuration for this job.
Example 11.23. Configuration for geocodingJob in geocodingJob.xml
<?xml version="1.0" encoding="UTF-8"?>
<beans:beans xmlns="http://www.springframework.org/schema/batch"
  xmlns:beans="http://www.springframework.org/schema/beans"
  xmlns:xsi="http://www.w3.org/2001/XMLSchema-instance"
  xsi:schemaLocation="http://www.springframework.org/schema/beans
    http://www.springframework.org/schema/beans/spring-beans-3.0.xsd
    http://www.springframework.org/schema/batch
    http://www.springframework.org/schema/batch/spring-batch-2.1.xsd">

  <beans:import resource="../launch-context.xml"/>

  <beans:bean id="customerReader"
    class="org.springframework.batch.item.database.JdbcCursorItemReader">
    <beans:property name="dataSource" ref="dataSource"/>
    <beans:property name="sql"
      value="select * from customers where longitude is null or latitude is null"/>
    <beans:property name="rowMapper" ref="customerRowMapper"/>
  </beans:bean>

  <beans:bean id="customerRowMapper"
    class="com.apress.springbatch.chapter11.jdbc.CustomerRowMapper"/>

  <beans:bean id="geocoder"
    class="com.apress.springbatch.chapter11.processor.GeocodingItemProcessor">
    <beans:property name="url" value="http://tinygeocoder.com/create-api.php"/>
  </beans:bean>

  <beans:bean id="customerImportWriter"
    class="org.springframework.batch.item.database.JdbcBatchItemWriter">
    <beans:property name="dataSource" ref="dataSource"/>
    <beans:property name="sql" value="update customers set longitude = :longitude,
latitude = :latitude where id = :id"/>
    <beans:property name="itemSqlParameterSourceProvider">
      <beans:bean class="org.springframework.batch.item.database.
BeanPropertyItemSqlParameterSourceProvider"/>
    </beans:property>
  </beans:bean>

  <job id="geocodingJob">
    <step id="step1">
      <tasklet>
        <chunk reader="customerReader" processor="geocoder" writer="customerImportWriter"
          commit-interval="1"/>
      </tasklet>
    </step>
  </job>
</beans:beans>
At this point, you can build and execute the job as you would any other job, and it works fine. However, because you want to add remote chunking to this job, you need to make a couple of additions to the project. As mentioned previously, you need to add dependencies to the POM file, write one more Java class, and configure the pieces required for remote chunking.
To start, let's add the new dependencies to your POM file. These dependencies are for the Spring Integration project (www.springsource.org/spring-integration); Spring Integration's JMS module; the Spring Batch Integration subproject (http://static.springsource.org/spring-batch/trunk/spring-batch-integration/); the Apache HttpClient project (http://hc.apache.org/httpcomponents-client-ga/) to handle your web service calls; and ActiveMQ, which serves as the JMS implementation for this job. Listing 11-24 shows the additional dependencies[33] added to the POM file.
Example 11.24. Remote Chunking's Additional Dependencies
...
<dependency>
  <groupId>org.springframework.integration</groupId>
  <artifactId>spring-integration-core</artifactId>
  <version>${spring.integration.version}</version>
</dependency>
<dependency>
  <groupId>org.springframework.integration</groupId>
  <artifactId>spring-integration-jms</artifactId>
  <version>${spring.integration.version}</version>
</dependency>
<dependency>
  <groupId>org.springframework.batch</groupId>
  <artifactId>spring-batch-integration</artifactId>
  <version>${spring.batch-integration.version}</version>
</dependency>
<dependency>
  <groupId>org.apache.httpcomponents</groupId>
  <artifactId>httpclient</artifactId>
  <version>4.1</version>
</dependency>
<dependency>
  <groupId>org.apache.activemq</groupId>
  <artifactId>activemq-core</artifactId>
  <version>5.4.2</version>
  <exclusions>
    <exclusion>
      <groupId>org.apache.activemq</groupId>
      <artifactId>activeio-core</artifactId>
    </exclusion>
  </exclusions>
</dependency>
...
There is one additional thing you need to do. This project has two artifacts: the normal jar file from which you run jobs and a jar file that you launch for each of your slave JVMs. The only difference between the two is the main class you use. By default, your jar files are created with the CommandLineJobRunner defined as the main class, and this works fine for the jar file from which you execute the job. However, in the other JVMs, you don't want to execute the job; instead, you want to bootstrap Spring and register your listeners to be able to process any items that come their way. For this other jar file, you create a main class that bootstraps Spring for you and then blocks so that it doesn't shut down.
But what does this new jar file have to do with your POM file? Because the POM file specifies the main class that your jar file is configured to execute, you want to make it more versatile for you to generate the two jar files. To do this, you define two profiles: one for each of the two artifacts you generate. You use these profiles to define the main class that's configured for each of the jar files you generate. Creating these profiles consists of two steps: deleting the reference to the maven-jar-plugin in the build section of the POM file, and then adding your profiles. One is named listener and is used to build the jar file for your slave JVMs. The other is called batch, is the default profile, and configures the jar file to use CommandLineJobRunner as the jar file's main class. Listing 11-25 shows the new profile configurations.
Example 11.25. Maven Profiles Used to Generate Both Required Artifacts
...
<profiles>
  <profile>
    <id>listener</id>
    <build>
      <finalName>remote-chunking-1.0-listener-SNAPSHOT</finalName>
      <plugins>
        <plugin>
          <groupId>org.apache.maven.plugins</groupId>
          <artifactId>maven-jar-plugin</artifactId>
          <configuration>
            <archive>
              <index>false</index>
              <manifest>
                <mainClass>com.apress.springbatch.chapter11.main.Geocoder</mainClass>
                <addClasspath>true</addClasspath>
                <classpathPrefix>lib/</classpathPrefix>
              </manifest>
              <manifestFile>${project.build.outputDirectory}/META-INF/MANIFEST.MF</manifestFile>
            </archive>
          </configuration>
        </plugin>
      </plugins>
    </build>
  </profile>
  <profile>
    <id>batch</id>
    <activation>
      <activeByDefault>true</activeByDefault>
    </activation>
<build>
<plugins>
<plugin>
<groupId>org.apache.maven.plugins</groupId>
<artifactId>maven-jar-plugin</artifactId>
<configuration>
<archive>
<index>false</index>
<manifest>
<mainClass>
org.springframework.batch.core.launch.support.CommandLineJobRunner
</mainClass>
<addClasspath>true</addClasspath>
<classpathPrefix>lib/</classpathPrefix>
</manifest>
<manifestFile>${project.build.outputDirectory}/META-INF/MANIFEST.MF</manifestFile>
</archive>
</configuration>
</plugin>
</plugins>
</build>
</profile>
</profiles>
...To build your artifacts, you use the standard mvn clean install command for the main jar file because the batch profile has been configured to be active by default. To build the slave jar file, invoke the listener profile using the mvn clean install -P listener command. In order for the listener profile to work, however, you need to write the Geocoder class; see Listing 11-26.
Example 11.26. Geocoder
package com.apress.springbatch.chapter11.main;

import org.springframework.context.support.ClassPathXmlApplicationContext;

public class Geocoder {

    /**
     * @param args
     */
    public static void main(String[] args) throws Exception {
        new ClassPathXmlApplicationContext("/jobs/geocodeJob.xml");
        System.in.read();
    }
}
As you can see in Listing 11-26, all the Geocoder class does is load your context and block by calling System.in.read(). This keeps the application up and running until you decide to kill it. Because you can build your two jar files at this point, let's look at what it takes to add remote chunking to the application.
The additional configuration consists of adding the following nine new beans to the geocodeJob.xml file:
chunkHandler: This is a factory bean used to create the ChunkHandler that replaces the ItemProcessor in the step in question. It also does the replacement for you.chunkWriter: This bean is a special writer used to send items out to the listening slave nodes for processing. It also listens for the responses and takes them off the inbound queue for the ItemWriter to complete processing.messageGateway: This is the MessagingTemplate from Spring Integration that the chunkWriter uses to do the JMS calls.requestsandincoming: These are the incoming and outgoing message channels for the chunkWriter.A JMS outbound channel adapter: This bean adapts your Spring Integration channel to the physical outbound request's JMS queue.
headerExtractor: Because Spring Integration channels are in-memory concepts, you run the risk of losing messages if one of the end points goes down. Spring Integration addresses this by implementing a redelivery system. This header extractor extracts the related header and sets it on theorg.springframework.batch.integration.chunk.ChunkResponseso that your job knows whether this was the original response.replies: This is the Spring Integration channel used to send the processed item back from the slave node to the master job.listenerContainer: This is the definition of the message listener that acts as the slave elements and processes each of the messages sent out by the master job.
As you can see, this example includes a number of moving parts. Although it looks like a long list, the configuration isn't that bad. Listing 11-27 shows the configuration for geocodingJob.
Example 11.27. gecodingJob Configured with Remote Chunking
<?xml version="1.0" encoding="UTF-8"?>
<beans:beans xmlns="http://www.springframework.org/schema/batch"
  xmlns:beans="http://www.springframework.org/schema/beans"
  xmlns:int-jms="http://www.springframework.org/schema/integration/jms"
  xmlns:int="http://www.springframework.org/schema/integration"
  xmlns:jms="http://www.springframework.org/schema/jms"
  xmlns:xsi="http://www.w3.org/2001/XMLSchema-instance"
  xsi:schemaLocation="http://www.springframework.org/schema/beans
    http://www.springframework.org/schema/beans/spring-beans-3.0.xsd
    http://www.springframework.org/schema/integration/jms
    http://www.springframework.org/schema/integration/jms/spring-integration-jms.xsd
    http://www.springframework.org/schema/integration
    http://www.springframework.org/schema/integration/spring-integration-2.0.xsd
    http://www.springframework.org/schema/jms
    http://www.springframework.org/schema/jms/spring-jms-3.0.xsd
    http://www.springframework.org/schema/batch
http://www.springframework.org/schema/batch/spring-batch-2.1.xsd">
...
<beans:bean id="chunkHandler"
class="org.springframework.batch.integration.chunk.RemoteChunkHandlerFactoryBean">
<beans:property name="chunkWriter" ref="chunkWriter" />
<beans:property name="step" ref="step1" />
</beans:bean>
<beans:bean id="chunkWriter"
class="org.springframework.batch.integration.chunk.ChunkMessageChannelItemWriter"
scope="step">
<beans:property name="messagingOperations" ref="messagingGateway" />
<beans:property name="replyChannel" ref="replies" />
<beans:property name="maxWaitTimeouts" value="10"/>
</beans:bean>
<beans:bean id="messagingGateway"
class="org.springframework.integration.core.MessagingTemplate">
<beans:property name="defaultChannel" ref="requests"/>
<beans:property name="receiveTimeout" value="1000"/>
</beans:bean>
<int:channel id="requests" />
<int:channel id="incoming" />
<int-jms:outbound-channel-adapter connection-factory="connectionFactory"
channel="requests" destination-name="requests" />
<int:transformer input-channel="incoming" output-channel="replies"
ref="headerExtractor" method="extract" />
<beans:bean id="headerExtractor"
class="org.springframework.batch.integration.chunk.JmsRedeliveredExtractor" />
<int:channel id="replies">
<int:queue />
<int:interceptors>
<beans:bean id="pollerInterceptor"
class="org.springframework.batch.integration.chunk.MessageSourcePollerInterceptor">
<beans:property name="messageSource">
<beans:bean class="org.springframework.integration.jms.JmsDestinationPollingSource">
<beans:constructor-arg>
<beans:bean class="org.springframework.jms.core.JmsTemplate">
<beans:property name="connectionFactory" ref="connectionFactory" />
<beans:property name="defaultDestinationName" value="replies" />
<beans:property name="receiveTimeout" value="1000" />
</beans:bean>
</beans:constructor-arg>
</beans:bean>
</beans:property>
<beans:property name="channel" ref="incoming" /></beans:bean>
</int:interceptors>
</int:channel>
<jms:listener-container connection-factory="connectionFactory"
transaction-manager="transactionManager" acknowledge="transacted">
<jms:listener destination="requests" ref="chunkHandler"
response-destination="replies" method="handleChunk"/>
</jms:listener-container>
</beans:beans>The configuration for the remote-chunking piece of the example begins with the ChunkHandler. It's configured as an instance of org.springframework.batch.integration.chunk.RemoteChunkHandlerFactoryBean, which creates an instance of a ChunkHandler and injects it into the step you configure as its ItemProcessor. The other dependency the RemoteChunkHandler has is the ChunkWriter, which is the next bean configured.
The ChunkWriter, as you saw previously, is a specially created writer used to send the items out to the slave listeners to be processed and listen for the items to come back as processing completes. This class requires three dependencies: a reference to a MessageTemplate to perform the required JMS functions, the name of the reply channel (because the request channel is the default for the MessageTemplate), and the maximum timeout errors it can accept before considering the job a failure (10 in this case). If, during execution of the job, the number of timeouts you configure is reached, the step is marked as a failure.
The messageGateway bean is an instance of Spring Integration's org.springframework.integration.core.MessageTemplate and is used to do the heavy lifting with regard to JMS functions in remote chunking. You define the outgoing channel (requests) as defaultChannel and specify a timeout value for how long to wait when listening for replies.
The requests channel is an in-memory representation of a queue. Spring Integration uses channels to abstract the concept of messaging from an application to let you use either real JMS queues or lighter-weight in-memory messaging. In this case, you back this up with a real JMS queue later in the configuration. Just as the requests channel sends items from your job to the slave nodes, the incoming channel receives the results.
To back up the requests channel with a true JMS queue, you use Spring Integration's outbound channel adapter. This adapter takes all interactions done with the channel and persists them to the queue you configure. In order for it to work, you need to specify a connection factory for it to connect with your JMS queues, tell it what channel to get the items from, and specify the name of the queue to put it on.
As you process messages from remote servers, a number of things can happen, such as timeouts or various nodes going down. Because of this, an item is flagged as redelivered if it has been delivered more than once for any reason. What you do with it from there depends on a number of business conditions (whether this a restart, and so on). However, to obtain that redelivered flag, you use a Spring Integration transformer. This transformer takes the messages from one channel (incoming), applies some form of logic (the extract method of the headerExtractor bean, in this case), and places them on another channel (replies, in this case).
With all the communication configured as well as the components used in your job, the only thing left to configure are the slave workers. Each slave in this case is nothing more than a message-driven POJO, configured using Spring Integration's listener container and listener. The listener container is used to pull messages off of the queue and put replies back on it. For each message it receives, the listener itself is called.
That's it! The explanation may seem a bit overwhelming, but to run this example, you build the two artifacts discussed earlier: one for the slave JVMs and one for the job. To test all the pieces, you need to start at least three things:
ActiveMQ: In order for your JVMs to communicate with each other, you need to run the ActiveMQ server. You can download it from
http://apache.activemq.org. From ActiveMQ'sbindirectory, execute theactiveMqscript to launch the server.Slave JVMs: You can start as many of these as you wish. These are the JVMs that execute the ItemProcessor on each item the slave reads off of the queue. To start the slave JVMs, execute the command
java –jar remote-chunking-0.0.1-listener-SNAPSHOT.jarfor each of the slaves you wish to run.The job: The last step of launching this job is to execute the jar file that is configured to execute the job. You execute it like any other job, with the command
java –jar remote-chunking-0.0.1-SNAPSHOT.jar jobs/geocodeJob.xml geocodingJob.
Spring Batch takes care of the rest!
But how do you know that your slaves did some of the work? The proof is in the output. The first place to look is the database, where the longitude and latitude for each customer should now be populated. Above and beyond that, each slave node as well as the JVM in which the job was run has output statements showing who was processed at each node. Listing 11-28 shows an example of the output from one of the slaves.
Example 11.28. Results of geocodingJob
2011-04-11 21:49:31,668 DEBUG
org.springframework.jms.listener.DefaultMessageListenerContainer#0-1
[org.springframework.batch.integration.chunk.ChunkProcessorChunkHandler] - <Handling chunk:
ChunkRequest: jobId=8573, sequence=9, contribution=[StepContribution: read=0,
written=0,filtered=0, readSkips=0, writeSkips=0, processSkips=0, exitStatus=EXECUTING], item count=1>

("******** I'm going to process Merideth Gray lives at 303 W Comstock Street,Seattle
WA,98119
2011-04-11 21:49:31,971 DEBUG
org.springframework.jms.listener.DefaultMessageListenerContainer#0-1
[org.springframework.batch.item.database.JdbcBatchItemWriter] - <Executing batch with 1
items.>
You may notice that not only are the slave nodes processing your items, but the local JVM that is executing the job is also processing items. The reason is in your configuration. Because the job's configuration contains the information for the listener, the local JVM has a listener processing items just like any other slave. This is a good thing because there is rarely a reason to completely offload all the processing to other nodes, while the JVM executing your batch job sits doing nothing other than listening for results.
Remote chunking is a great way to spread the cost of processing items across multiple JVMs. It has the benefits of requiring no changes to your job configuration and using dumb workers (workers with no knowledge of Spring Batch or your job's database, and so on). But keep in mind that durable communication like JMS is required, and this approach can't provide any benefits for jobs where the bottleneck exists in the input or output phase of the step.
In situations where offloading just the ItemProcessor's work isn't enough (situations when I/O is the bottleneck, for example), Spring Batch has one other option up its sleeve: partitioning. You look at partitioning and how you can use it to scale your jobs in the next section.
Although remote chunking is useful when you're working with a process that has a bottleneck in the processing of items, most of the time the bottleneck exists in the input and output. Interacting with a database or reading files typically is where performance and scalability concerns come into play. To help with that, Spring Batch provides the ability for multiple workers to execute complete steps. The entire ItemReader, ItemProcessor, and ItemWriter interaction can be offloaded to slave workers. This section looks at what partitioning is and how to configure jobs to take advantage of this powerful Spring Batch feature.
Partitioning is a concept where a master step farms out work to any number of listening slave steps for processing. This may sound very similar to remote chunking (and it is), but there are some key differences. First, the slave nodes aren't message-driven POJOs as they are with remote chunking. The slaves in partitioning are Spring Batch steps, each complete with its own reader, processor, and writer. Because they're full Spring Batch steps, partitioning offers a couple of unique benefits over a remote-chunking implementation.
The first advantage of partitioning over remote chunking is that you don't need a guaranteed delivery system (JMS for example). Each step maintains its own state just like any other Spring Batch step. Currently, the Spring Batch Integration project uses Spring Integration's channels to abstract out the communication mechanism so you can use anything Spring Integration supports.
The second advantage is that you don't need to develop custom components. Because the slave is a regular Spring Batch step, there is almost nothing special you need to code (there is one extra class, a Partitioner implementation you see later).
But even with these advantages, you need to keep a couple of things in mind. First, remote steps need to be able to communicate with your job repository. Because each slave is a true Spring Batch step, it has its own StepExecution and maintains its state in the database like any other step. In addition, the input and output need to be accessible from all the slave nodes. With remote chunking, the master handles all input and output, so the data can be centralized. But with partitioning, slaves are responsible for their own input and output. Thus some forms of I/O lend themselves more toward partitioning than others (databases are typically easier than files, for example).
To see the structural difference between remote chunking and partitioning, Figure 11-18 shows how a job using partitioning is structured.
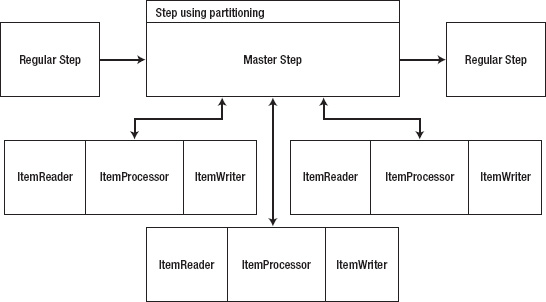
As you can see, the master job step is responsible for dividing the work into partitions to be processed by each of the slaves. It then sends a message consisting of a StepExecution to be consumed by the slaves; this describes what to process. Unlike remote chunking, where the data is sent remotely, partitioning only describes the data to be processed by the slave. For example, the master step may determine a range of database ids to process for each partition and send that out. Once each slave has completed the work requested, it returns the StepExecution, updated with the results of the step for the master to interpret. When all the partitions have been successfully completed, the step is considered complete, and the job continues. If any of the partitions fail, the step is considered failed, and the job stops.
To look at how partitioning works in a job, let's reuse the geocoding job you used in the remote-chunking example, but refactor it to use partitioning. Its single step is now executed remotely in a number of JVMs. Because most of the code is the same, let's start by looking at the one new class that partitioning requires: an implementation of the Partitioner interface.
The org.springframework.batch.core.partition.support.Partitioner interface has a single method, partition(int gridSize), which returns a Map of partition names as the keys and a StepExecution as the value. Each of the StepExecutions in the Map contains the information the slave steps need in order to know what to do. In this case, you store two properties in the StepExecution for each slave: the start id for the customers to process and an end id. Listing 11-29 shows the code for ColumnRangePartitioner.
Example 11.29. ColumnRangePartitioner
package com.apress.springbatch.chapter11.partition;

import java.util.HashMap;
import java.util.Map;

import org.springframework.batch.core.partition.support.Partitioner;
import org.springframework.batch.item.ExecutionContext;
import org.springframework.jdbc.core.JdbcTemplate;

public class ColumnRangePartitioner extends JdbcTemplate implements Partitioner {

    private String column;
    private String table;
    private int gridSize;

    public Map<String, ExecutionContext> partition(int arg0) {
        int min = queryForInt("SELECT MIN(" + column + ") from "
                + table);
        int max = queryForInt("SELECT MAX(" + column + ") from "
                + table);
        int targetSize = (max - min) / gridSize;

        Map<String, ExecutionContext> result = new HashMap<String, ExecutionContext>();
        int number = 0;
        int start = min;
        int end = start + targetSize - 1;

        while (start <= max) {

            ExecutionContext value = new ExecutionContext();
            result.put("partition" + number, value);

            if (end >= max) {
                end = max;
            }
            value.putInt("minValue", start);
            value.putInt("maxValue", end);

            start += targetSize;
            end += targetSize;
            number++;
        }

        return result;
    }

    public void setColumn(String column) {
        this.column = column;
    }

    public void setTable(String table) {
        this.table = table;
    }

    public void setGridSize(int gridSize) {
        this.gridSize = gridSize;
    }
}
The partition method obtains the min and the max ids in the Customers table (you configure the table name and column name in the XML). From there, you divide that range based on the number of slaves you have and create a StepExecution with the min and max id to be processed. When all the StepExecutions are created and saved in the Map, you return the Map.
ColumnRangePartitioner is the only new class you need to write to use partitioning in your job. The other required changes are in the configuration. Before you look at the configuration, let's talk about how the flow of the messages occurs. Figure 11-19 shows how each message is processed.
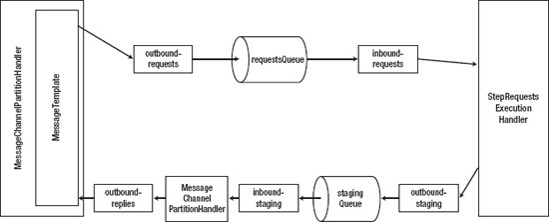
The job is configured with a new type of step. Up to this point, you've been using tasklet steps to execute your code. For a step to be partitioned, you use a partition step. This type of step, unlike a tasklet step that configures a chunk of processing, configures how to partition a step (via the Partitioner implementation) and a handler that is responsible for sending the messages to the slaves and receiving the responses.
Note
Communication with remote workers in partitioned processing doesn't need to be transactional or have guaranteed delivery.
The Spring Batch Integration project provides an implementation of the PartitionHandler interface called MessageChannelPartitionHandler. This class uses Spring Integration channels as the form of communication to eliminate any dependencies on a particular type of communication. For this example, you use JMS. The communication consists of three queues: a request queue for the master step to send out the work requests, a staging queue on which the slave steps reply, and a reply queue to send the consolidated reply back to the master. There are two queues on the way back because each step replies with the StepExecution from that step. You use an aggregator to consolidate all the responses into a single list of StepExecutions so they can be processed at once.
Let's look at the configuration for geocodingJob using partitioning; see Listing 11-30.
Example 11.30. geocodingJob Using Partitioning Configured in geocodeJob.xml
<?xml version="1.0" encoding="UTF-8"?>
<beans:beans xmlns="http://www.springframework.org/schema/batch"
  xmlns:beans="http://www.springframework.org/schema/beans"
  xmlns:int-jms="http://www.springframework.org/schema/integration/jms"
  xmlns:int="http://www.springframework.org/schema/integration"
  xmlns:jms="http://www.springframework.org/schema/jms"
  xmlns:xsi="http://www.w3.org/2001/XMLSchema-instance"
  xmlns:task="http://www.springframework.org/schema/task"
  xsi:schemaLocation="http://www.springframework.org/schema/beans
    http://www.springframework.org/schema/beans/spring-beans-3.0.xsd
    http://www.springframework.org/schema/integration/jms
    http://www.springframework.org/schema/integration/jms/spring-integration-jms-2.0.xsd
    http://www.springframework.org/schema/integration
    http://www.springframework.org/schema/integration/spring-integration-2.0.xsd
    http://www.springframework.org/schema/jms
    http://www.springframework.org/schema/jms/spring-jms-3.0.xsd
    http://www.springframework.org/schema/task
    http://www.springframework.org/schema/task/spring-task-3.0.xsd
    http://www.springframework.org/schema/batch
    http://www.springframework.org/schema/batch/spring-batch-2.1.xsd">

  <beans:import resource="../launch-context.xml"/>

  <job id="geocodingJob">
    <step id="step1.master">
      <partition partitioner="partitioner" handler="partitionHandler"/>
    </step>
  </job>

  <beans:bean id="partitioner"
    class="com.apress.springbatch.chapter11.partition.ColumnRangePartitioner">
    <beans:property name="dataSource" ref="dataSource"/>
    <beans:property name="column" value="id"/>
    <beans:property name="table" value="customers"/>
    <beans:property name="gridSize" value="3"/>
  </beans:bean>

  <step id="step1">
    <tasklet>
      <chunk reader="customerReader" processor="geocoder" writer="customerImportWriter"
        commit-interval="1"/>
    </tasklet>
  </step>

  <beans:bean id="customerReader"
    class="org.springframework.batch.item.database.JdbcCursorItemReader" scope="step">
    <beans:property name="dataSource" ref="dataSource"/>
    <beans:property name="sql">
      <beans:value><![CDATA[
select * from customers where id >= ? and id <= ?
]]></beans:value>
</beans:property>
<beans:property name="preparedStatementSetter">
<beans:bean
class="org.springframework.batch.core.resource.ListPreparedStatementSetter">
<beans:property name="parameters">
<beans:list>
<beans:value>#{stepExecutionContext[minValue]}</beans:value>
<beans:value>#{stepExecutionContext[maxValue]}</beans:value>
</beans:list>
</beans:property>
</beans:bean>
</beans:property>
<beans:property name="rowMapper" ref="customerRowMapper"/>
</beans:bean>
<beans:bean id="customerRowMapper"
class="com.apress.springbatch.chapter11.jdbc.CustomerRowMapper"/>
<beans:bean id="geocoder"
class="com.apress.springbatch.chapter11.processor.GeocodingItemProcessor">
<beans:property name="url" value="http://tinygeocoder.com/create-api.php"/>
</beans:bean>
<beans:bean id="customerImportWriter"
class="org.springframework.batch.item.database.JdbcBatchItemWriter">
<beans:property name="dataSource" ref="dataSource"/>
<beans:property name="sql"
value="update customers set longitude = :longitude, latitude = :latitude where id = :id"/>
<beans:property name="itemSqlParameterSourceProvider">
<beans:bean class="org.springframework.batch.item.database.
BeanPropertyItemSqlParameterSourceProvider"/>
</beans:property>
</beans:bean>
<beans:bean id="partitionHandler" class="org.springframework.batch.integration.partition.
MessageChannelPartitionHandler">
<beans:property name="stepName" value="step1"/>
<beans:property name="gridSize" value="3"/>
<beans:property name="replyChannel" ref="outbound-replies"/>
<beans:property name="messagingOperations">
<beans:bean class="org.springframework.integration.core.MessagingTemplate">
<beans:property name="defaultChannel" ref="outbound-requests"/>
<beans:property name="receiveTimeout" value="100000"/>
</beans:bean>
</beans:property>
</beans:bean>
<int:channel id="outbound-requests"/>
<int-jms:outbound-channel-adapter connection-factory="connectionFactory"destination="requestsQueue" channel="outbound-requests"/>
<int:channel id="inbound-requests"/>
<int-jms:message-driven-channel-adapter connection-factory="connectionFactory"
destination="requestsQueue" channel="inbound-requests"/>
<beans:bean id="stepExecutionRequestHandler"
class="org.springframework.batch.integration.partition.StepExecutionRequestHandler">
<beans:property name="jobExplorer" ref="jobExplorer"/>
<beans:property name="stepLocator" ref="stepLocator"/>
</beans:bean>
<int:service-activator ref="stepExecutionRequestHandler"
input-channel="inbound-requests" output-channel="outbound-staging"/>
<int:channel id="outbound-staging"/>
<int-jms:outbound-channel-adapter connection-factory="connectionFactory"
destination="stagingQueue" channel="outbound-staging"/>
<int:channel id="inbound-staging"/>
<int-jms:message-driven-channel-adapter connection-factory="connectionFactory"
destination="stagingQueue" channel="inbound-staging"/>
<int:aggregator ref="partitionHandler" input-channel="inbound-staging"
output-channel="outbound-replies"/>
<int:channel id="outbound-replies">
<int:queue />
</int:channel>
</beans:beans>The configuration for the job begins with the job itself. Although the name and the step's name are the same here as they were in the remote-chunking example, what this step does is quite different. Step1.master serves as the master step, which doles out work to the slaves and aggregates the resulting statuses to determine whether the step was successful. The partition step for step1.master requires two dependencies: an implementation of the Partitioner interface to divide the work into partitions and a PartitionHandler to do the work of sending out the messages to the slaves and receiving the results.
ColumnRangePartitioner is the implementation of the Partitioner interface that you're using for this example. As you saw in Listing 11-29, ColumnRangePartitioner extends Spring's JdbcTemplate, so it depends on a DataSource implementation as well as the required table and column to use for partitioning and the number of slaves (gridSize) so you can divide the work appropriately.
The step that is configured after the partitioner is the exact same step used in the remote-chunking example. But this step is run as your slave worker as opposed to within the context of a job. Along with the configuration of the step, you configure its ItemReader and required RowMapper implementation (customerReader and customerRowMapper), an ItemProcessor (geocoder), and an ItemWriter (customerImportWriter).
Next, you move on to the configuration of the beans related to partitioning. Because the PartitionHandler is the center of the processing for a partitioned step, let's begin with it. org.springframework.batch.integration.partition.MessageChannelPartitionHandler requires four dependencies:
stepName: The name of the step to be remotely executed by the slave processes. In this case, it's thestep1step.gridSize: The number of slaves involved in the processing of the partitioned step. You run three JVMs, so you have three slaves.replyChannel: WhereMessageChannelPartitionHandlerlistens for incoming replies from the remotely executed steps.messagingOperations: A MessageTemplate configured with the requests queue as the default channel.MessageChannelPartitionHandleruses this to send outgoing messages to the slave JVMs as well as listen for incoming messages.
After MessageChannelPartitionHandler, you configure the channels you use for communication. Five channels are involved in this example: an inbound and an outbound channel on each of the two queues and a channel for the final aggregated message. Each outbound channel puts messages on the queues; the inbound channels receive messages from each queue. The following channels and adapters are configured for this job:
outbound-requests: This channel puts the requests for each partition on the request queue. You use a JMS outbound channel adapter to take the messages from the Spring Integration channel and put them on the JMS queue.inbound-requests: This channel receives the messages put on the requests queue. A message-driven channel adapter pulls the messages off the JMS queue and puts them in this channel.outbound-staging: When a step has been processed, the response from an individual step is staged in this channel, which is then persisted to the staging queue. Again, a JMS outbound channel adapter persists the messages to the JMS staging queue.inbound-staging: Messages received from the staging queue are placed in this channel via a message-driven channel adapter, to be aggregated together into a single message for processing byMessageChannelPartitionHandler.outbound-replies: This is the single channel used to transport the aggregated step results back toMessageChannelPartitionHandler.
You're already putting messages onto the outbound-requests channel and receiving them with the outbound-replies channel with MessageChannelPartitionHandler. To execute the job when you receive a message, you use the next bean that is configured: StepExecutionRequestHandler.
StepExecutionRequestHandler takes the StepExecution you created in the ColumnRangePartitioner and executes the step you've requested with that StepExecution. Because it's a message-driven POJO, you use Spring Integration's service activator to execute it as messages are received. The two dependencies with which StepExecutionRequestHandler is configured are references to a JobExplorer and a StepLocator. Both are used to locate and execute the step.
The last thing to configure is a Spring Integration aggregator. You use this because MessageChannelPartitionHandler expects a single message containing a list of StepExecutions in return for sending out all the individual StepExecutions to worker JVMs. Because MessageChannelPartitionHandler requires the consolidated input, it's what provides the method to do the aggregation, as you can see in the configuration.
Before you consider the configuration finished, let's examine a couple of elements in the launch-context.xml file, shown in Listing 11-31.
Example 11.31. launch-context.xml
<?xml version="1.0" encoding="UTF-8"?>
<beans xmlns="http://www.springframework.org/schema/beans"
  xmlns:p="http://www.springframework.org/schema/p"
  xmlns:xsi="http://www.w3.org/2001/XMLSchema-instance"
  xmlns:amq="http://activemq.apache.org/schema/core"
  xsi:schemaLocation="http://www.springframework.org/schema/beans
    http://www.springframework.org/schema/beans/spring-beans-3.0.xsd
    http://activemq.apache.org/schema/core
    http://activemq.apache.org/schema/core/activemq-core-5.4.2.xsd ">

  <bean id="jobOperator"
    class="org.springframework.batch.core.launch.support.SimpleJobOperator"
    p:jobLauncher-ref="jobLauncher" p:jobExplorer-ref="jobExplorer"
    p:jobRepository-ref="jobRepository" p:jobRegistry-ref="jobRegistry" />

  <bean id="jobExplorer"
    class="org.springframework.batch.core.explore.support.JobExplorerFactoryBean"
    p:dataSource-ref="dataSource" />

  <bean id="jobRegistry"
    class="org.springframework.batch.core.configuration.support.MapJobRegistry" />

  <bean
class="org.springframework.batch.core.configuration.support.JobRegistryBeanPostProcessor">
    <property name="jobRegistry" ref="jobRegistry"/>
  </bean>

  <bean id="jobLauncher"
    class="org.springframework.batch.core.launch.support.SimpleJobLauncher">
    <property name="jobRepository" ref="jobRepository" />
  </bean>

  <bean id="stepLocator"
    class="org.springframework.batch.integration.partition.BeanFactoryStepLocator" />

  <bean id="jobRepository"
    class="org.springframework.batch.core.repository.support.JobRepositoryFactoryBean"
    p:dataSource-ref="dataSource" p:transactionManager-ref="transactionManager" />

  <bean id="jmsConnectionFactory" class="org.apache.activemq.ActiveMQConnectionFactory">
    <property name="brokerURL" value="vm://localhost"/>
  </bean>

  <bean id="jmsTemplate" class="org.springframework.jms.core.JmsTemplate">
    <property name="connectionFactory" ref="jmsConnectionFactory"/>
    <property name="defaultDestination" ref="destination"/>
    <property name="receiveTimeout" value="5000"/>
  </bean>
<bean id="destination" class="org.apache.activemq.command.ActiveMQQueue">
<constructor-arg value="orderQueue"/>
</bean>
<bean id="dataSource" class="org.apache.commons.dbcp.BasicDataSource">
<property name="driverClassName" value="${batch.jdbc.driver}" />
<property name="url" value="${batch.jdbc.url}" />
<property name="username" value="${batch.jdbc.user}" />
<property name="password" value="${batch.jdbc.password}" />
</bean>
<bean id="sessionFactory"
class="org.springframework.orm.hibernate3.LocalSessionFactoryBean">
<property name="dataSource" ref="dataSource" />
<property name="configLocation">
<value>classpath:hibernate.cfg.xml</value>
</property>
<property name="configurationClass">
<value>org.hibernate.cfg.AnnotationConfiguration</value>
</property>
<property name="hibernateProperties">
<props>
<prop key="hibernate.show_sql">false</prop>
<prop key="hibernate.format_sql">false</prop>
<prop key="hibernate.hbm2ddl.auto">update</prop>
<prop key="hibernate.dialect">org.hibernate.dialect.MySQLDialect</prop>
</props>
</property>
</bean>
<bean id="transactionManager"
class="org.springframework.orm.hibernate3.HibernateTransactionManager"
lazy-init="true">
<property name="sessionFactory" ref="sessionFactory" />
</bean>
<amq:queue id="requestsQueue"
physicalName="com.apress.springbatch.chapter11.partition.requests"/>
<amq:queue id="stagingQueue"
physicalName="com.apress.springbatch.chapter11.partition.staging"/>
<amq:queue id="repliesQueue"
physicalName="com.apress.springbatch.chapter11.partition.replies"/>
<bean id="placeholderProperties"
class="org.springframework.beans.factory.config.PropertyPlaceholderConfigurer">
<property name="location" value="classpath:batch.properties" />
<property name="systemPropertiesModeName"
value="SYSTEM_PROPERTIES_MODE_OVERRIDE" />
<property name="ignoreUnresolvablePlaceholders" value="true" />
<property name="order" value="1" />
</bean>
</beans>Most of the launch-context.xml file should look familiar from other examples. However, let's call out a couple of beans specifically. The first is stepLocator. This instance of BeanFactoryStepLocator is used to query the current bean factory for any beans of type Step. For partitioning, Spring Batch uses it to find the remote step configurations located in remote Spring containers.
The other piece of the launch-context.xml file you need to look at is the configuration of the queues themselves. This example uses three ActiveMQ JMS queues. Fortunately, the ActiveMQ XSD makes it easy to configure them. All you need to do is configure the bean id and the physical name for each of the queues.
The configuration is now complete. Just as in the remote-chunking example, you use two Maven profiles to construct the two jar files required for this example. First, build using the mvn clean install –P listener command to create the jar file used by each of the worker JVMs. To build the jar file you use to execute the job, use the default profile via mvn clean install.
To execute the job, you need to execute three Java processes. The first two serve as the slave nodes for the job; execute them by running java –jar partitioning-0.0.1-listener-SNAPSHOT.jar using the jar you created with the –P listener option. With both of those nodes running, you can run the job with the command java –jar partitioning-0.0.1-SNAPSHOT.jar jobs/geocodeJob.xml geocodingJob. When the job completes, you can verify the results by looking at the Customers table in the database and verifying that everyone in the table has longitude and latitude values saved.
Using partitioning as a way to scale a Spring Batch job is a great way to take advantage of the computing power of multiple servers. This approach is different than remote chunking, but it provides its own set of benefits for remote processing.
One of the primary reasons for using Spring Batch is its ability to scale without having a large impact on your existing code base. Although you could write any of these features yourself, none of them are easy to implement well, and it doesn't make sense to reinvent the wheel. Spring Batch provides an excellent set of ways to scale jobs with a number of options.
This chapter looked at how to profile jobs to obtain information about where bottlenecks exist. You then worked through examples of each of the four options Spring Batch provides for scalability: parallel steps, multithreaded steps, remote chunking, and partitioning.
[31] This first step probably doesn't make much sense in the grand scheme of things. It obviously won't go into your production jobs. Instead, it's a great way to build test data prior to the execution of a job.
[32] See Chapters 7 and 9 to learn more about using Hibernate and JMS in your jobs.
[33] For this example, you're using Spring 3.0.5.RELEASE, Spring Batch 2.1.7.RELEASE, Spring Batch Integration 1.2.0.RELEASE, and Spring Integration 2.0.3.RELEASE.