
In Chapter 2, you created your first job. You walked through the configuration of a job and steps, executed the job, and configured a database to store your job repository. In that "Hello, World!" example, you began to scratch the surface of what jobs and steps are in Spring Batch. This chapter continues to explore jobs and steps at a much deeper level. You begin by learning what a job and a step are in relation to the Spring Batch framework.
From there, you dive into great detail about what happens when jobs or steps are executed, from loading them and validating that they're valid to running all the way through their completion. Then, you dig into some code, see the various parts of jobs and steps that you can configure, and learn best practices along the way. Finally, you see how different pieces of the batch puzzle can pass data to each other via the various scopes involved in a Spring Batch process.
Although you dive deep into steps in this chapter, the largest parts of a step are their readers and writers, which aren't covered here. Chapters 7 and 9 explore the input and output functionality available in Spring Batch. This chapter keeps the I/O aspects of each step as simple as possible so you can focus on the intricacies of steps in a job.
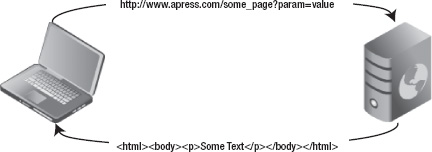
With the proliferation of web applications, you may have become used to the idea of an application being broken up into requests and responses. Each request contains the data for a single unique piece of processing that occurs. The result of the request is typically a view of some kind being returned to the user. A web application can be made up of dozens to literally hundreds of unique interactions like this, each structured the same way, as shown in Figure 4-1.
Yet when you think about batch jobs, you're really talking about a collection of actions. The term flow[8] is a good way to describe a job. Using the web application example again, think about how the checkout process of a shopping cart application works. When you click Check Out with items in your cart, you're walked through a series of steps: register or sign in, confirm shipping address, enter billing information, confirm order, submit order. This flow is similar to what a job is.
For the purpose of this book, a job is defined as a unique, ordered list of steps that can be executed from start to finish independently. Let's break down this definition so you can get a better understanding of what you're working with:
Unique: Jobs in Spring Batch are configured via XML similar to how beans are configured using the core Spring framework and are reusable as a result. You can execute a job as many times as you need to with the same configuration. Because of this there is no reason to define the same job multiple times.
Ordered list of steps:[9] Going back to the checkout flow example, the order of the steps matter. You can't validate your shipping address if you haven't registered one in the first place. You can't execute the checkout process if your shopping cart is empty. The order of steps in your job is important. You can't generate a customer's statement until their transactions have been imported into your system. You can't calculate the balance of an account until you've calculated all of your fees. You structure jobs in a sequence that allows all steps to be executed in a logical order.
Can be executed from start to finish: Chapter 1 defined a batch process as a process that can run without additional interaction to some form of completion. A job is a series of steps that can be executed without external dependencies. You don't structure a job so that the third step is to wait until a file is sent to a directory to be processed. Instead, you have a job begin when the file has arrived.
Independently: Each batch job should be able to execute without external dependencies affecting it. This doesn't mean a job can't have dependencies. On the contrary, there are not many practical jobs (except "Hello, World") that don't have external dependencies. However, the job should be able to manage those dependencies. If a file isn't there, it handles the error gracefully. It doesn't wait for a file to be delivered (that's the responsibility of a scheduler, and so on). A job can handle all elements of the process it's defined to do.
As a comparison, Figure 4-2 shows how a batch process executes versus the web application in Figure 4-1.

As you can see in Figure 4-2, a batch process is executed with all of the input available for it as it runs. There are no user interactions. Each step is executed to completion against a dataset before the next step is executed. Before you dig deeply into how to configure the various features of a job in Spring Batch, let's talk about a job's execution lifecycle.
When a job is executed, it goes through a lifecycle. Knowledge of this lifecycle is important as you structure your jobs and understand what is happening as they run. When you define a job in XML, what you're really doing is providing the blueprint for a job. Just like writing the code for a Java class is like defining a blueprint for the JVM from which to create an instance, your XML definition of a job is a blueprint for Spring Batch to create an instance of your job.
The execution of a job begins with a job runner. The job runner is intended to execute the job requested by name with the parameters passed. Spring Batch provides two job runners:
CommandLineJobRunner: This job runner is intended to be used from a script or directly from the command line. When used, theCommandLineJobRunnerbootstraps Spring and executes the job requested with the parameters passed.JobRegistryBackgroundJobRunner: When using a scheduler like Quartz or a JMX hook to execute a job, typically Spring is bootstrapped and the Java process is live before the job is to be executed. In this case, aJobRegistryis created when Spring is bootstrapped containing the jobs available to run. TheJobRegistryBackgroundJobRunneris used to create theJobRegistry.
CommandLineJobRunner and JobRegistryBackgroundJobRunner (both located in the org.springframework.batch.core.launch.support package) are the two job runners provided by the framework. You used CommandLineJobRunner in Chapter 2 to run the "Hello, World!" job, and you continue to use it through out the book.
Although the job runner is what you use to interface with Spring Batch, it's not a standard piece of the framework. There is no JobRunner interface because each scenario would require a different implementation (although both of the two job runners provided by Spring Batch use main methods to start). Instead, the true entrance into the framework's execute is an implementation of the org.springframework.batch.core.launch.JobLauncher interface.
Spring Batch provides a single JobLauncher, the org.springframework.batch.core.launch.support.SimpleJobLauncher. This class uses the TaskExecutor interface from Core Spring to execute the requested job. You see in a bit at how this is configured, but it's important to note that there are multiple ways to configure the org.springframework.core.task.TaskExecutor in Spring. If an org.springframwork.core.task.SyncTaskExecutor is used, the job is executed in the same thread as the JobLauncher. Any other option executes the job in its own thread.

When a batch job is run, an org.springframework.batch.core.JobInstance is created. A JobInstance represents a logical run of the job and is identified by the job name and the parameters passed to the job for this run. A run of the job is different than an attempt at executing the job. If you have a job that is expected to run daily, you would have it configured once in your XML (defining the blueprint). Each day you would have a new run or JobInstance because you pass a new set of parameters into the job (one of which is the date). Each JobInstance would be considered complete when it has an attempt or JobExecution that has successfully completed.
Note
A JobInstance can only be executed once to a successful completion. Because a JobInstance is identified by the job name and parameters passed in, this means you can only run a job once with the same parameters.
You're probably wondering how Spring Batch knows the state of a JobInstance from attempt to attempt. In Chapter 2, you took a look at the job repository, and in it there was a batch_job_instance table. This table is the base from which all other tables are derived. It's the batch_job_instance and batch_job_params that identify a JobInstance (the batch_job_instance.job_key is actually a hash of the name and parameters).
An is an actual attempt to run the job. If a job runs from start to finish the first time, there is only one JobExecution related to a given JobInstance. If a job ends in an error state after the first run, a new JobExecution is created each time an attempt is made to run the JobInstance (by passing in the same parameters to the same job). For each JobExecution that Spring Batch creates for your job, a record in the batch_job_execution table is created. As the JobExecution executes, its state is maintained in the batch_job_execution_context as well. This allows Spring Batch to restart a job at the correct point if an error occurs.
Enough about theory. Let's get into some code. This section digs into the various ways to configure a job. As mentioned in Chapter 2, as with all of Spring, Spring Batch configurations are done via XML. With that in mind, one of the very welcome features added to Spring Batch 2 was the addition of a batch XSD to make configuration of batch jobs more concise.
Note
A good best practice is to configure each job in its own XML file named after the name of the job.
Listing 4-1 shows the shell of a basic Spring Batch job. For the record, this isn't a valid job. A job in Spring Batch is required to have at least one step or be declared abstract.[10] In any case, the focus here is on the job and not the steps, so you add steps to the job later in this chapter.
You used this format in Chapter 2's "Hello, World!" job, and it should look familiar to anyone who has used Spring before. Just like most other extensions of the Spring framework, you configure beans like any other use of Spring and have an XSD that defines domain-specific tags. In this case, you include the XSD for Spring Batch in the beans tag.
Example 4.1. basicJob.xml
<?xml version="1.0" encoding="UTF-8"?>
<beans xmlns:batch="http://www.springframework.org/schema/batch"
       xmlns="http://www.springframework.org/schema/beans"
       xmlns:xsi="http://www.w3.org/2001/XMLSchema-instance"
       xsi:schemaLocation="http://www.springframework.org/schema/beans
           http://www.springframework.org/schema/beans/spring-beans-3.0.xsd
           http://www.springframework.org/schema/batch
           http://www.springframework.org/schema/batch/spring-batch-2.1.xsd">

    <import resource="../launch-context.xml"/>

    <batch:job id="basicJob">
        ...
    </batch:job>
</beans>
The first piece of the basicJob.xml file after the beans tag is an import for the launch-context.xml file, which is located in the src/main/resources directory of your project. You used this file in Chapter 2 without really going into it, so let's look at it now. Listing 4-2 shows launch-context.xml. Notice that this launch-context.xml is a significantly slimmed-down version of what came out of the zip file. This book discusses the rest of the file as you use its parts in future chapters. For now, let's focus on the pieces that you need to make Spring Batch work.
Example 4.2. launch-context.xml
<?xml version="1.0" encoding="UTF-8"?>
<beans xmlns="http://www.springframework.org/schema/beans"
       xmlns:p="http://www.springframework.org/schema/p"
       xmlns:xsi="http://www.w3.org/2001/XMLSchema-instance"
       xsi:schemaLocation="http://www.springframework.org/schema/beans
           http://www.springframework.org/schema/beans/spring-beans-3.0.xsd">

    <bean id="dataSource" class="org.apache.commons.dbcp.BasicDataSource">
        <property name="driverClassName" value="${batch.jdbc.driver}" />
        <property name="url" value="${batch.jdbc.url}" />
        <property name="username" value="${batch.jdbc.user}" />
<property name="password" value="${batch.jdbc.password}" />
</bean>
<bean id="transactionManager"
class="org.springframework.jdbc.datasource.DataSourceTransactionManager"
lazy-init="true">
<property name="dataSource" ref="dataSource" />
</bean>
<bean id="placeholderProperties"
class="org.springframework.beans.factory.config.PropertyPlaceholderConfigure"
>
<property name="location" value="classpath:batch.properties" />
<property name="systemPropertiesModeName"
value="SYSTEM_PROPERTIES_MODE_OVERRIDE" />
<property name="ignoreUnresolvablePlaceholders" value="true" />
<property name="order" value="1" />
</bean>
<bean id="jobRepository"
class="org.springframework.batch.core.repository.support.JobRepositoryFactoryBean"
p:dataSource-ref="dataSource" p:transactionManager-ref="transactionManager" />
<bean id="jobLauncher"
class="org.springframework.batch.core.launch.support.SimpleJobLauncher">
<property name="jobRepository" ref="jobRepository" />
</bean>
</beans>launch-context.xml has most of the elements discussed in the previous section and their dependencies. It starts with a datasource. You use standard Spring configuration to configure a datasource that Spring Batch uses to access the job repository and that is also available for any other database access your batch processes may require. It's important to note that the database used by Spring Batch for the JobRepository isn't required to be the same as the schema (or schemas) used for business processing.
transactionManager also is configured in this file. Transaction processing is important in batch jobs given that you process large volumes of data in chunks and each chunk being committed at once. This again is a standard configuration using core Spring components.
Notice that you're using properties to specify values that may change from environment to environment. After transactionManager, you configure Spring's PropertyPlaceholderConfigurer to handle the population of these properties at runtime. You're using the batch.properties file to specify the values, which is included in the source provided in the zip file.
Next you have jobRepository. This is the first Spring Batch component you're going to configure in the launch-context.xml file. jobRepository is used to maintain the state of the job and each step for Spring Batch. In this case, you're configuring the handle that the framework uses to perform CRUD operations on the database. Chapter 5 goes over some advanced configurations of jobRepository including changing schema prefixes, and so on. This example configuration provides its two required dependencies: a datasource and a transaction manager.
The last piece of launch-context.xml you have here is the jobLauncher bean. As the previous section said, the job launcher is the gateway into Spring Batch framework from an execution standpoint. It is configured with the jobRepository as a dependency.
With the common components defined, let's go back to basicJob.xml. With regard to configuration, 90% of the configuration of a job is the ordered definition of the steps, which is covered later in this chapter. Note about the basicJob that you haven't configured any reference to a job repository or a transaction manager. This is because by default, Spring uses the jobRepository with the name jobRepository and the transaction manager named transactionManager. You see how to specifically configure these elements in Chapter 5, which discusses using JobRepository and its metadata.
Most of the options related to configuring a job are related to execution, so you see those later when you cover job execution. However, there is one instance when you can alter the job configuration that makes sense to discuss here: the use of inheritance.
Like most other object-oriented aspects of programming, the Spring Batch framework allows you to configure common aspects of your jobs once and then extend the base job with other jobs. Those other jobs inherit the properties of the job they're extending. But there are some caveats to inheritance in Spring Batch. Spring Batch allows the inheritance of all job-level configurations from job to job. This is an important point. You can't define a job that has common steps you can inherit. Things you're allowed to inherit are the ability to restart a job, job listeners, and a validator for any parameters passed in. To do so, you do two things: declare the parent job abstract and specify it as the parent job in any job that wants to inherit functionality from it.
Listing 4-3 configures a parent job to be restartable[11] and then extends it with sampleJob. Because sampleJob extends baseJob, it's also restartable. Listing 4-4 shows how you can configure an abstract job that has a parameter validator configured and extend it to inherit the validator as well.
Example 4.3. inheritanceJob.xml with Job Inheritance
<job id="baseJob" abstract="true" restartable="true">
</job>

<job id="inheritanceJob" parent="baseJob">
    ...
</job>
Example 4.4. Parameter Validator Inheritance
<job id="baseJob" abstract="true" restartable="true">
    <validator ref="myParameterValidator"/>
</job>

<job id="sampleJob1" parent="baseJob">
    ...
</job>
Although most of a job's configuration can be inherited from a parent job, not all of it is. Following is a list of the things you can define in a parent job that are inherited by its children:
Restartable: Specifies whether a job is restartable or not
A parameter incrementer: Increments job parameters with each
JobExecutionListeners: Any job-level listeners
Job parameter validator: Validates that the parameters passed to a job meet any requirements
All of these concepts are new and are discussed later in this chapter. For now, all you need to be aware of is that when these values are set on an abstract job, any job extending the parent job inherits them. Things the child doesn't inherit include step configurations, step flows, and decisions. These must be defined in any job using them.
Inheritance can be helpful not only to consolidate the configuration of common attributes but also to standardize how certain things are done. Because the last example began looking at parameters and their validation, that seems like a logical next topic.
You've read a few times that a JobInstance is identified by the job name and the parameters passed into the job. You also know that because of that, you can't run the same job more than once with the same parameters. If you do, you receive an org.springframework.batch.core.launch.JobInstanceAlreadyCompleteException telling you that if you'd like to run the job again, you need to change the parameters (as shown in Listing 4-5).
Example 4.5. What Happens When You Try to Run a Job Twice with the Same Parameters
2010-11-28 21:06:03,598 ERROR
org.springframework.batch.core.launch.support.CommandLineJobRunner.main()
[org.springframework.batch.core.launch.support.CommandLineJobRunner] - <Job Terminated in
error: A job instance already exists and is complete for parameters={}.  If you want to run
this job again, change the parameters.>
org.springframework.batch.core.repository.JobInstanceAlreadyCompleteException: A job instance
already exists and is complete for parameters={}.  If you want to run this job again, change
the parameters.
       at
org.springframework.batch.core.repository.support.SimpleJobRepository.createJobExecution(Simpl
eJobRepository.java:122)
       at sun.reflect.NativeMethodAccessorImpl.invoke0(Native Method)
...
So how do you pass parameters to your jobs? Spring Batch allows you not only to pass parameters to your jobs but also to automatically increment them[12] or validate them before your job runs. You start by looking at how to pass parameters to your jobs.
Passing parameters to your job depends on how you're calling your job. One of the functions of the job runner is to create an instance of org.springframework.batch.core.JobParameters and pass it to the JobLauncher for execution. This makes sense because the way you pass parameters is different if you launch a job from a command line than if you launch your job from a Quartz scheduler. Because you've been using CommandLineJobRunner up to now, let's start there.
Passing parameters to CommandLineJobRunner is as simple as passing key=value pairs on the command line. Listing 4-6 shows how to pass parameters to a job using the way you've been calling jobs up to this point.
Example 4.6. Passing Parameters to the CommandLineJobRunner
java -jar sample-application-0.0.1-SNAPSHOT.jar jobs/sampleJob.xml sampleJob name=Michael
In Listing 4-6, you pass one parameter, name. When you pass parameter into your batch job, your job runner creates an instance of JobParameters, which serves as a container for all the parameters the job received.
JobParameters isn't much more than a wrapper for a java.util.Map<String, JobParameter> object. Notice that although you're passing in Strings in this example, the value of the Map is an org.springframework.batch.core.JobParameter instance. The reason for this is type. Spring Batch provides for type conversion of parameters, and with that, type-specific accessors on the JobParameter class. If you specify the type of parameter to be a long, it's available as a java.lang.Long. String, Double, and java.util.Date are all available out of the box for conversion. In order to utilize the conversions, you tell Spring Batch the parameter type in parentheses after the parameter name, as shown in Listing 4-7. Notice that Spring Batch requires that the name of each be all lowercase.
Example 4.7. Specifying the Type of a Parameter
java -jar sample-application-0.0.1-SNAPSHOT.jar jobs/sampleJob.xml sampleJob
param1(string)=Spring param2(long)=33
To view what parameters have been passed into your job, you can look in the job repository. Chapter 2 noted that there is a table for job parameters called batch_job_params, but because you didn't pass any parameters to your job, it was empty. If you explore the table after executing the examples in Listings 4-6 and 4-7, you should see what is shown in Table 4-1.
Table 4.1. Contents of BATCH_JOB_PARAMS
JOB_ INSTANCE_ ID | TYPE_CD | KEY_NAME | STRING_VAL | DATE_VAL | LONG_VAL | DOUBLE_VAL |
|---|---|---|---|---|---|---|
|
|
|
| |||
|
|
|
| |||
|
|
|
|
Now that you know how to get parameters into your batch jobs, how do you access them once you have them? If you take a quick look at the ItemReader, ItemProcessor, ItemWriter, and Tasklet interfaces, you quickly notice that all the methods of interest don't receive a JobParameters instance as one of their parameters. There are a few different options depending on where you're attempting to access the parameter:
ChunkContext: If you look at theHelloWorldtasklet, you see that theexecutemethod receives two parameters. The first parameter isorg.springframework.batch.core.StepContribution, which contains information about where you are in the step (write count, read count, and so on). The second parameter is an instance ofChunkContext. It provides the state of the job at the point of execution. If you're in a tasklet, it contains any information about the chunk you're processing. Information about that chunk includes information about the step and job. As you might guess,ChunkContexthas a reference toorg.springframework.batch.core.scope.context.StepContext, which contains yourJobParameters.Late binding: For any piece of the framework that isn't a tasklet, the easiest way to get a handle on a parameter is to inject it via the Spring Configuration. Given that
JobParametersare immutable, binding them during bootstrapping makes perfect sense.
Listing 4-8 shows an updated HelloWorld tasklet that utilizes a name parameter in the output as an example of how to access parameters from ChunkContext.
Example 4.8. Accessing JobParameters in a Tasklet
package com.apress.springbatch.chapter4;

import org.springframework.batch.core.StepContribution;
import org.springframework.batch.core.scope.context.ChunkContext;
import org.springframework.batch.core.step.tasklet.Tasklet;
import org.springframework.batch.repeat.RepeatStatus;
import org.springframework.batch.item.ExecutionContext;

 public class HelloWorld implements Tasklet {
    private static final String HELLO_WORLD = "Hello, %s";
public RepeatStatus execute( StepContribution step,
ChunkContext context ) throws Exception {
String name =
(String) context.getStepContext().getJobParameters().get("name");
System.out.println( String.format(HELLO_WORLD, name) );
return RepeatStatus.FINISHED;
}
}Although Spring Batch stores the job parameters in an instance of the JobParameter class, when you obtain the parameters this way getJobParameters() returns a Map<String, Object>. Because of this, the previous cast is required.
Listing 4-9 shows how to use Spring's late binding to inject job parameters into components without having to reference any of the JobParameters code. Besides the use of Spring's EL (Expression Language) to pass in the value, any bean that is going to be configured with late binding is required to have the scope set to step.
Example 4.9. Obtaining Job Parameters via Late Binding
<bean id="helloWorld" class="com.apress.springbatch.chapter4.HelloWorld"
    scope="step">
    <property name="name" value="#{jobParameters[name]}"/>
</bean>
It's important to note that in order for the configuration in Listing 4-9 to work, the HelloWorld class needs to be updated to accept the new parameter. Listing 4-10 shows the updated code for this method of parameter association.
Example 4.10. Updated HelloWorld Tasklet
package com.apress.springbatch.chapter4;

import org.springframework.batch.core.StepContribution;
import org.springframework.batch.core.scope.context.ChunkContext;
import org.springframework.batch.core.step.tasklet.Tasklet;
import org.springframework.batch.repeat.RepeatStatus;
import org.springframework.batch.item.ExecutionContext;

public class HelloWorld implements Tasklet {

    private static final String HELLO_WORLD = "Hello, %s";

    private String name;

    public RepeatStatus execute( StepContribution step,
                                 ChunkContext context ) throws Exception {
        String name =
           (String) context.getStepContext().getJobParameters().get("name");
        System.out.println( String.format(HELLO_WORLD, name) );
        return RepeatStatus.FINISHED;
    }
public void setName(String newName) {
name = newName;
}
public String getName() {
return name;
}
}With the ability to pass parameters into your jobs as well as put them to use, two parameter-specific pieces of functionality are built into the Spring Batch framework that the chapter discusses next: parameter validation and the ability to increment a given parameter with each run. Let's start with parameter validation because it's been alluded to in previous examples.
Whenever a piece of software obtains outside input, it's a good idea to be sure the input is valid for what you're expecting. The web world uses client-side JavaScript as well as various server-side frameworks to validate user input, and validation of batch parameters is no different. Fortunately, Spring has made it very easy to validate job parameters. To do so, you just need to implement the org.springframework.batch.core.JobParametersValidator interface and configure your implementation in your job. Listing 4-11 shows an example of a job parameter validator in Spring Batch.
Example 4.11. A Parameter Validator that Validates the Parameter Name Is a String
package com.apress.springbatch.chapter4;

import java.util.Map;
import org.springframework.batch.core.*;
import org.apache.commons.lang.StringUtils;

public class ParameterValidator implements JobParametersValidator{

    public void validate(JobParameters params) throws
        JobParametersInvalidException {
        String name = params.getString("name");
        if(!StringUtils.isAlpha(name)) {
            throw new
                JobParametersInvalidException("Name is not alphabetic");
        }
    }
}
As you can see, the method of consequence is the validate method. Because this method is void, the validation is considered passing as long as a JobParametersInvalidException isn't thrown. In this example, if you pass the name 4566, the exception is thrown and the job completes with a status of COMPLETED. This is important to note. Just because the parameters you passed in weren't valid doesn't mean the job didn't complete correctly. In the case where invalid parameters are passed, the job is marked as COMPLETED because it did all valid processing for the input it received. And when you think about this, it makes sense. A JobInstance is identified by the job name and the parameters passed into the job. If you pass in invalid parameters, you don't want to repeat that, so it's ok to declare the job completed.
In addition to implementing your own custom parameter validator as you did earlier, Spring Batch offers a validator to confirm that all the required parameters have been passed: org.springframework.batch.core.job.DefaultJobParametersValidator. To use it, you configure it the same way you would your custom validator. DefaultJobParametersValidator has two optional dependencies: requiredKeys and optionalKeys. Both are String arrays that take in a list of parameter names that are either required or are the only optional parameters allowed. Listing 4-12 shows two configurations for DefaultJobParametersValidator as well as how to add it to your job.
Example 4.12. DefaultJobParametersValidator Configuration in parameterValidatorJob.xml
<beans:bean id="requiredParamValidator"
    class="org.springframework.batch.core.job.DefaultJobParametersValidator">
    <beans:property name="requiredKeys" value="batch.name,batch.runDate"/>
</beans:bean>

<beans:bean id="optionalParamValidator"
    class="org.springframework.batch.core.job.DefaultJobParametersValidator">
    <beans:property name="requiredKeys" value="batch.name,batch.runDate"/>
    <beans:property name="optionalKeys" value="batch.address"/>
</beans:bean>

<job id="parameterValidatorJob">
    ...
    <validator ref="requiredParamValidator"/>
</job>
If you use requiredParamValidator, your job throws an exception if you don't pass the parameters batch.name and batch.runDate. You're allowed to pass more parameters in if required, but those two can't be null. On the other hand, if you use optionalParamValidator, the job once again throws an exception if batch.name and batch.runDate aren't passed to the job, but it also throws an exception if any parameters in addition to batch.address are passed. The difference between the two validators is that the first one can accept any parameters in addition to the required ones. The second one can only accept the three specified. In either case, if the invalid scenario occurs, a JobParametersInvalidException is thrown and the job is marked as completed as previously discussed.
Up to now, you've been running under the limitation that a job can only be run once with a given set of parameters. If you've been following along with the examples, you've probably hit what happens if you attempt to run the same job twice with the same parameters as shown in Listing 4-5. However, there is a small loophole: using JobParametersIncrementer.
org.springframework.batch.core.JobParametersIncrementer is an interface that Spring Batch provides to allow you to uniquely generate parameters for a given job. You can add a timestamp to each run. You may have some other business logic that requires a parameter to be incremented with each run. The framework provides a single implementation of the interface, which increments a single long parameter with the default name run.id.
Listing 4-13 shows how to configure a JobParametersIncrementer for your job by adding the reference to the job.
Example 4.13. Using a JobParametersIncrementer in a Job
<beans:bean id="idIncrementer"
    class="org.springframework.batch.core.launch.support.RunIdIncrementer"/>

<job id="baseJob" incrementer="idIncrementer">
    ...
</job>
Once you've configured JobParametersIncrementer (the framework provides org.springframework.batch.core.launch.support.RunIdIncrementer in this case), there are two more things you need to do to make this work. First you need to add the configuration for a JobExplorer implementation. Chapter 5 goes into detail about what JobExplorer is and how to use it. For now, just know that Spring Batch needs it to increment parameters. Listing 4-14 shows the configuration, but it's already configured in the launch-context.xml that is included in the zip file distribution.
Example 4.14. Configuration for JobExplorer
<bean id="jobExplorer"
class="org.springframework.batch.core.explore.support.JobExplorerFactoryBean">
    <property name="dataSource" ref="dataSource"/>
</bean>
The last piece of the puzzle to use a JobParametersIncrementer affects how you call your job. When you want to increment a parameter, you need to add the parameter –next to the command when you call your job. This tells Spring Batch to use the incrementer as required.
Now when you run your job with the command in Listing 4-15, you can run it as many times as you want with the same parameters.
Example 4.15. Command to Run a Job and Increment Parameters
java –jar sample-application-0.0.1-SNAPSHOT.jar jobs/sampleJob.xml
sampleJob name=Michael -next
In fact, go ahead and give it a try. When you've run the sampleJob three or four times, look in the batch_job_params table and see how Spring Batch is executing your job with two parameters: one String named name with the value Michael, and one long named run.id. run.id's value changes each time, increasing by one with each execution.
You saw earlier that you may want to have a parameter be a timestamp with each run of the job. This is common in jobs that run once a day. To do so, you need to create your own implementation of JobParametersIncrementer. The configuration and execution are the same as before. However, instead of using RunIdIncrementer, you use DailyJobTimestamper, the code for which is in Listing 4-16.
Example 4.16. DailyJobTimestamper.java
package com.apress.springbatch.chapter4;

import org.springframework.batch.core.JobParameters;
import org.springframework.batch.core.JobParametersBuilder;
import org.springframework.batch.core.JobParametersIncrementer;

import java.util.Date;

import org.apache.commons.lang.time.DateUtils;
public class DailyJobTimestamper implements JobParametersIncrementer {

/**
* Increment the current.date parameter.
*/
public JobParameters getNext( JobParameters parameters ) {
Date today = new Date();

if ( parameters != null && !parameters.isEmpty() ) {
Date oldDate = parameters.getDate( "current.date", new Date() );
today = DateUtils.addDays(oldDate, 1);
}

return new JobParametersBuilder().addDate( "current.date", today )
                                 .toJobParameters();
}
}
It's pretty obvious that job parameters are an important part of the framework. They allow you to specify values at runtime for your job. They also are used to uniquely identify a run of your job. You use them more throughout the book for things like configuring the dates for which to run the job and reprocessing error files. For now, let's look at another powerful feature at the job level: job listeners.
When you use a web application, feedback is essential to the user experience. A user clicks a link, and the page refreshes within a few seconds. However, as you've seen, batch processes don't provide much in the way of feedback. You launch a process, and it runs. That's it. Yes, you can query the job repository to see the current state of your job, and there is the Spring Batch Admin web application, but many times you may want something to happen at a given point in your job. Say you want to send an email if a job fails. Maybe you want to log the beginning and ending of each job to a special file. Any processing you want to occur at the beginning (once the JobExecution is created and persisted but before the first step is executed) or end of a job is done with a job listener.
There are two ways to create a job listener. The first is by implementing the org.springframework.batch.core.JobExecutionListener interface. This interface has two methods of consequence: beforeJob and afterJob. Each takes JobExecution as a parameter, and they're executed—you guessed it, before the job executes and after the job executes, respectively. One important thing to note about the afterJob method is that it's called regardless of the status the job finishes in. Because of this, you may need to evaluate the status in which the job ended to determine what to do. Listing 4-17 has an example of a simple listener that prints out some information about the job being run before and after as well as the status of the job when it completed.
Example 4.17. JobLoggerListener.java
package com.apress.springbatch.chapter4;

import org.springframework.batch.core.JobExecution;
import org.springframework.batch.core.JobExecutionListener;

public class JobLoggerListener implements JobExecutionListener {
public void beforeJob(JobExecution jobExecution) {
System.out.println(jobExecution.getJobInstance().getJobName()
+ " is beginning execution");
}
public void afterJob(JobExecution jobExecution) {
System.out.println(jobExecution.getJobInstance()
.getJobName()
+ " has completed with the status " +
jobExecution.getStatus());
}
}If you remember, the book previously stated that Spring Batch doesn't support annotations yet for its configuration. That was a lie. A small number of annotations are supported, and @BeforeJob and @AfterJob are two of them. When using the annotations, the only difference, as shown in Listing 4-18, is that you don't need to implement the JobExecutionListener interface.
Example 4.18. JobLoggerListener.java
package com.apress.springbatch.chapter4;

import org.springframework.batch.core.JobExecution;
import org.springframework.batch.core.JobExecutionListener;
import org.springframework.batch.core.annotation.AfterJob;
import org.springframework.batch.core.annotation.BeforeJob;

public class JobLoggerListener {

    @BeforeJob
    public void beforeJob(JobExecution jobExecution) {
        System.out.println(jobExecution.getJobInstance().getJobName()
                + " is beginning execution");
    }

    @AfterJob
    public void afterJob(JobExecution jobExecution) {
        System.out.println(jobExecution.getJobInstance()
                                       .getJobName()
                                       + " has completed with the status " +
                                       jobExecution.getStatus());
    }
}
The configuration of these two options is the same in either case. Back in the world of XML, you can configure multiple listeners in your job, as shown in Listing 4-19.
Example 4.19. Configuring Job Listeners in listenerJob.xml
<beans:bean id="loggingListener"
    class="com.apress.springbatch.chapter4.JobLoggerListener"/>

<job id="listenerJob" incrementer="idIncrementer">
    ...
    <listeners>
        <listener ref="loggingListener"/>
    </listeners>
</job>
Earlier, this chapter discussed job inheritance. This inheritance has an impact on how you configure listeners within your job. When you have a job that has listeners and it has a parent that also has listeners, you have two options. The first option is to let the child's listeners override the parent's. If this is what you want, then you do nothing different. However, if you want both the parent's and the child's listeners to be executed, then when you configure the child's list of listeners, you use the merge attribute as shown in Listing 4-20.
Example 4.20. Merging Listeners Configured in a Parent and Child Job
<beans:bean id="loggingListener"
    class="com.apress.springbatch.chapter4.JobLoggerListener"/>

<beans:bean id="theEndListener"
    class="com.apress.springbatch.chapter4.JobEndingListener"/>

<job id="baseJob">
    ...
    <listeners>
        <listener ref="loggingListener"/>
    </listeners>
</job>

<job id="listenerJob" parent="baseJob">
    ...
    <listeners merge="true">
        <listener ref="theEndListener"/>
    </listeners>
</job>
Listeners are a useful tool to be able to execute logic at certain points of your job. Listeners are also available for many other pieces of the batch puzzle, such as steps, readers, writers, and so on. You see each of those as you cover their respective components later in the book. For now, there is just one more piece to cover that pertains to jobs: ExecutionContext.
Batch processes are stateful by their nature. They need to know what step they're on. They need to know how many records they have processed within that step. These and other stateful elements are vital to not only the ongoing processing for any batch process but also restarting it if the process failed before. For example, suppose a batch process that processes a million transactions a night goes down after processing 900,000 of those records. Even with periodic commits along the way, how do you know where to pick back up when you restart? The idea of reestablishing that execution state can be daunting, which is why Spring Batch handles it for you.
You read earlier about how a JobExecution represents an actual attempt at executing the job. It's this level of the domain that requires state to be maintained. As a JobExecution progresses through a job or step, the state changes. This state is maintained in ExecutionContext.
If you think about how web applications store state, typically it's through the HttpSession.[13] ExecutionContext is essentially the session for your batch job. Holding nothing more than simple key-value pairs, ExecutionContext provides a way to store state within your job in a safe way. One difference between a web application's session and ExecutionContext is that you actually have multiple ExecutionContexts over the course of your job. JobExecution has an ExecutionContext, as does each StepExecution (which you'll see later in this chapter). This allows data to be scoped at the appropriate level (either data-specific for the step or global data for the entire job). Figure 4-4 shows how these elements are related.

ExecutionContext provides a "safe" way to store data. The storage is safe because everything that goes into an ExecutionContext is persisted in the job repository. You briefly looked at the batch_job_execution_context and batch_step_execution_context tables in Chapter 2, but they didn't contain any meaningful data at the time. Let's look at how to add data to and retrieve data from the ExecutionContext and what it looks like in the database when you do.
The ExecutionContext is part of the JobExecution or StepExecution as mentioned earlier. Because of this, to get a handle on the ExecutionContext, you obtain it from the JobExecution or StepExecution based on which you want to use. Listing 4-21 shows how to get a handle on ExecutionContext in the HelloWorld tasklet and add to the context the name of the person you're saying hello to.
Example 4.21. Adding a Name to the Job's ExecutionContext
package com.apress.springbatch.chapter4;

import org.springframework.batch.core.StepContribution;
import org.springframework.batch.core.scope.context.ChunkContext;
import org.springframework.batch.core.step.tasklet.Tasklet;
import org.springframework.batch.repeat.RepeatStatus;
import org.springframework.batch.item.ExecutionContext;

public class HelloWorld implements Tasklet {
    private static final String HELLO_WORLD = "Hello, %s";

    public RepeatStatus execute( StepContribution step,
                                 ChunkContext context ) throws Exception {
        String name =
            (String) context.getStepContext()
                            .getJobParameters()
                            .get("name");

        ExecutionContext jobContext = context.getStepContext()
                                             .getStepExecution()
                                             .getJobExecution()
                                             .getExecutionContext();
        jobContext.put("user.name", name);

        System.out.println( String.format(HELLO_WORLD, name) );
        return RepeatStatus.FINISHED;
     }
}
Notice that you have to do a bit of traversal to get to the job's ExecutionContext. All you're doing in this case is going from the chunk to the step to the job, working your way up the tree of scopes. If you look at the API for StepContext, you see that there is a getJobExecutionContext() method. This method returns a Map<String, Object> that represents the current state of the job's ExecutionContext. Although this is a handy way to get access to the current values, it has one limiting factor in its use: updates made to the Map returned by the StepContext.getJobExecutionContext() method aren't persisted to the actual ExecutionContext. Thus any changes you make to that Map that aren't also made to the real ExecutionContext are lost in the event of an error.
Listing 4-21's example showed using the job's ExecutionContext, but the ability to obtain and manipulate the step's ExecutionContext works the same way. In that case, you get the ExecutionContext directly from the StepExecution instead of the JobExecution. Listing 4-22 shows the code updated to use the step's ExecutionContext instead of the job's.
Example 4.22. Adding a Name to the Job's ExecutionContext
package com.apress.springbatch.chapter4;

import org.springframework.batch.core.StepContribution;
import org.springframework.batch.core.scope.context.ChunkContext;
import org.springframework.batch.core.step.tasklet.Tasklet;
import org.springframework.batch.repeat.RepeatStatus;
import org.springframework.batch.item.ExecutionContext;

public class HelloWorld implements Tasklet {
    private static final String HELLO_WORLD = "Hello, %s";

    public RepeatStatus execute( StepContribution step,
                                 ChunkContext context ) throws Exception {
        String name =
            (String) context.getStepContext()
                            .getJobParameters()
                            .get("name");

        ExecutionContext jobContext = context.getStepContext()
                                             .getStepExecution()
                                             .getExecutionContext();
        jobContext.put("user.name", name);

        System.out.println( String.format(HELLO_WORLD, name) );
        return RepeatStatus.FINISHED;
     }
}As your jobs process, Spring Batch persists your state as part of committing each chunk. Part of that persistence is the saving of the job and current step's ExecutionContexts. Chapter 2 went over the layout of the tables. Let's go ahead and execute the sampleJob job with the updates from Listing 4-21 to see what the values look like persisted in the database. Table 4-2 shows what the batch_job_execution_context table has in it after a single run with the name parameter set as Michael.
Table 4.2. Contents of BATCH_JOB_EXECUTION_CONTEXT
JOB_EXECUTION_ID | SHORT_CONTEXT | SERIALIZED_CONTEXT |
|---|---|---|
|
{"map":{"entry":{"string":["user.name",
"Michael"]}}}
|
|
Table 4-2 consists of three columns. The first is a reference to the JobExecution that this ExecutionContext is related to. The second is a JSON representation of the Job's ExecutionContext. This field is updated as processing occurs. Finally, the SERIALIZED_CONTEXT field contains a serialized Java object. The SERIALIZED_CONTEXT is only populated while a job is running or when it has failed.
This section of the chapter has gone through different pieces of what a job is in Spring Batch. In order for a job to be valid, however, it requires at least one step, which brings you to the next major piece of the Spring Batch framework: steps.
If a job defines the entire process, a step is the building block of a job. It's an independent, sequential batch processor. I call it a batch processor for a reason. A step contains all of the pieces a job requires. It handles its own input. It has its own processor. It handles its own output. Transactions are self-contained within a step. It's by design that steps are as disjointed as they're. This allows you as the developer to structure your job as freely as needed.
In this section you take the same style deep dive into steps that you did with jobs in the previous section. You cover the way Spring Batch breaks processing down in a step by chunks and how that has changed because previous versions of the framework. You also look at a number of examples on how to configure steps within your job including how to control the flow from step to step and conditional step execution. Finally you configure the steps required for your statement job. With all of this in mind, let's start looking at steps by looking at how steps process data.
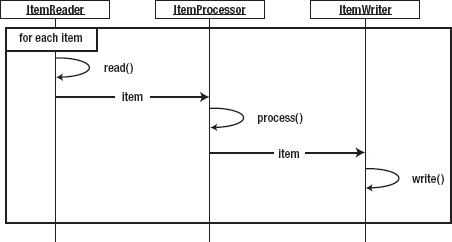
Batch processes in general are about processing data. When you think about what a unit of data to be processed is, there are two options: an individual item or a chunk of items. An individual item consists of a single object that typically represents a single row in a database or file. Item-based processing, therefore, is the reading, processing, and then writing of your data one row, record, or object at a time, as Figure 4-5 shows.
As you can imagine, there can be significant overhead with this approach. The inefficiency of writing individual rows when you know you'll be committing large numbers of rows to a database or writing them to a file can be enormous.
When Spring Batch 1.x came out in 2008, item-based processing was the way records were processed. Since then the guys at SpringSource and Accenture have upgraded the framework, and in Spring Batch 2, they introduced the concept of chunk-based processing. A chunk in the world of batch processing is a subset of the records or rows that need to be processed, typically defined by the commit interval. In Spring Batch, when you're working with a chunk of data, it's defined by how many rows are processed between each commit.
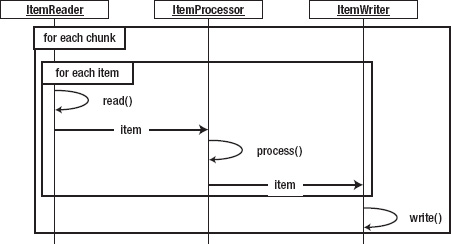
Figure 4-6 shows how data flows through a batch process when designed for chunk processing. Here you see that although each row is still read and processed individually, all the writing for a single chunk occurs at once when it's time to be committed. This small tweak in processing allows for large performance gains and opens up the world to many other processing capabilities.
One of the things that chunk-based processing allows you to do is to process chunks remotely. When you consider things like networking overhead, it's cost prohibitive to process individual items remotely. However, if you can send over an entire chunk of data at once to a remote processor, then instead of making performance worse, it can improve performance dramatically.
As you learn more about steps, readers, writers, and scalability throughout the book, keep in mind the chunk-based processing that Spring Batch is based on. Let's move on by digging into how to configure the building blocks of your jobs: steps.
By now, you've identified that a job is really not much more than an ordered list of steps to be executed. Because of this, steps are configured by listing them within a job. Let's examine how to configure a step and the various options that are available to you.
When you think about steps in Spring Batch, there are two different types: a step for chunk-based processing and a tasklet step. Although you used a tasklet step previously in the "Hello, World!" job, you see more detail about it later. For now, you start by looking at how to configure chunk-based steps.
As you saw earlier, chunks are defined by their commit intervals. If the commit interval is set to 50 items, then your job reads in 50 items, processes 50 items, and then writes out 50 items at once. Because of this, the transaction manager plays a key part in the configuration of a chunk-based step. Listing 4-23 shows how to configure a basic step for chunk-oriented processing.
Example 4.23. stepJob.xml
<?xml version="1.0" encoding="UTF-8"?>
<beans:beans xmlns="http://www.springframework.org/schema/batch"
    xmlns:beans="http://www.springframework.org/schema/beans"
    xmlns:xsi="http://www.w3.org/2001/XMLSchema-instance"
    xsi:schemaLocation="http://www.springframework.org/schema/beans
        http://www.springframework.org/schema/beans/spring-beans-3.0.xsd
        http://www.springframework.org/schema/batch
        http://www.springframework.org/schema/batch/spring-batch-2.1.xsd">

    <beans:import resource="../launch-context.xml"/>

    <beans:bean id="inputFile"
        class="org.springframework.core.io.FileSystemResource" scope="step">
        <beans:constructor-arg value="#{jobParameters[inputFile]}"/>
    </beans:bean>

    <beans:bean id="outputFile"
        class="org.springframework.core.io.FileSystemResource" scope="step">
        <beans:constructor-arg value="#{jobParameters[outputFile]}"/>
    </beans:bean>

    <beans:bean id="inputReader"
        class="org.springframework.batch.item.file.FlatFileItemReader">
        <beans:property name="resource" ref="inputFile"/>
        <beans:property name="lineMapper">
            <beans:bean
  class="org.springframework.batch.item.file.mapping.PassThroughLineMapper"/>
        </beans:property>
    </beans:bean>

    <beans:bean id="outputWriter"
        class="org.springframework.batch.item.file.FlatFileItemWriter">
        <beans:property name="resource" ref="outputFile"/>
        <beans:property name="lineAggregator">
            <beans:bean
class="org.springframework.batch.item.file.transform.PassThroughLineAggregator"/>
        </beans:property>
    </beans:bean>

    <job id="stepJob">
        <step id="step1">
            <tasklet>
                <chunk reader="inputReader" writer="outputWriter"
                       commit-interval="50"/>
            </tasklet>
        </step>
    </job>
</beans:beans>
Listing 4-23 may look intimidating, but let's focus on the job and step configuration at the end. The rest of the file is the configuration of a basic ItemReader and ItemWriter, which are covered in Chapters 7 and 9, respectively. When you look through the job in Listing 4-23, you see that the step begins with the step tag. All that is required is the id or name, like any other Spring Bean. Within the step tag is a tasklet tag. The org.springframework.batch.core.step.tasklet.Tasklet interface is really a strategy interface for the type of step you're going to execute. In this case, you're configuring org.springframework.batch.core.step.item.ChunkOrientedTasklet<I>. You don't have to worry about configuring the class specifically here; just be aware that other types of tasklets can be used. The last piece of the example step is the chunk tag. Here you're defining what a chunk is for your step. You're saying to use the inputReader bean (an implementation of the ItemReader interface) as the reader and the outputWriter bean (an implementation of the ItemWriter interface) as the writer, and that a chunk consists of 50 items.
Note
When you're configuring beans with Spring, it's better to use the id attribute than the name attribute. They both have to be unique for Spring to work, but using the id attribute allows XML validators to enforce it.
It's important to note the commit-interval attribute. It's set at 50 in the example. This means no records will be written until 50 records are read and processed. If an error occurs after processing 49 items, Spring Batch will roll back the current chunk (transaction) and mark the job as failed. If you were to set the commit-interval value to 1, your job would read in a single item, process that item, and then write that item. Essentially, you would be going back to item based processing. The issue with this is that there is more than just that single item being persisted at the commit-interval. The state of the job is being updated in the job repository as well. You experiment with the commit-interval later in this book but you needed to know now that it's important to set commit-interval as high as reasonably possible.
Although the majority of your steps will be chunk-based processing and therefore use ChunkOrientedTasklet, that isn't the only option. Spring Batch provides three other implementations of the Tasklet interface: CallableTaskletAdapter, MethodInvokingTaskletAdapter, and SystemCommandTasklet. Let's look at CallableTaskletAdapter first.
org.springframework.batch.core.step.tasklet.CallableTaskletAdapter is an adapter that allows you to configure an implementation of the java.util.concurrent.Callable<RepeatStatus> interface. If you're unfamiliar with this newer interface, the Callable<V> interface is similar to the java.lang.Runnable interface in that it's intended to be run in a new thread. However, unlike the Runnable interface, which doesn't return a value and can't throw checked exceptions, the Callable interface can return a value (a RepeatStatus, in this case) and can throw checked exceptions.
The adapter is actually extremely simple in its implementation. It calls the call() method on your Callable object and returns the value that the call() method returns. That's it. Obviously you would use this if you wanted to execute the logic of your step in another thread than the thread in which the step is being executed. If you look at Listing 4-24, you can see that to use this adapter, you configure CallableTaskletAdapter as a normal Spring bean and then reference it in the tasklet tag. In the configuration of the CallableTaskletAdapter bean shown in Listing 4-24, CallableTaskletAdapter contains a single dependency: the callable object itself.
Example 4.24. Using CallableTaskletAdapter
<?xml version="1.0" encoding="UTF-8"?>
<beans:beans xmlns="http://www.springframework.org/schema/batch"
xmlns:beans="http://www.springframework.org/schema/beans"
    xmlns:xsi="http://www.w3.org/2001/XMLSchema-instance"
    xsi:schemaLocation="http://www.springframework.org/schema/beans
        http://www.springframework.org/schema/beans/spring-beans-3.0.xsd
        http://www.springframework.org/schema/batch
        http://www.springframework.org/schema/batch/spring-batch-2.1.xsd">

    <beans:import resource="../launch-context.xml"/>

    <beans:bean id="callableObject"
        class="com.apress.springbatch.chapter4.CallableLogger"/>

    <beans:bean id="callableTaskletAdapter"
  class="org.springframework.batch.core.step.tasklet.CallableTaskletAdapter">
        <beans:property name="callable" ref="callableObject"/>
    </beans:bean>

    <job id="callableJob">
        <step id="step1">
            <tasklet ref="callableTaskletAdapter"/>
        </step>
    </job>
</beans:beans>
One thing to note with CallableTaskletAdapter is that although the tasklet is executed in a different thread than the step itself, this doesn't parallelize your step execution. The execution of this step won't be considered complete until the Callable object returns a valid RepeatStatus object. Until this step is considered complete, no other steps in the flow in which this step is configured will execute. You see how to parallelize processing in a number of ways, including executing steps in parallel, later in this book.
The next Tasklet implementation is org.springframework.batch.core.step.tasklet.MethodInvokingTaskletAdapter. This class is similar to a number of utility classes available in the Spring framework. It allows you to execute a preexisting method on another class as the step of your job. Say for example you already have a service that does a piece of logic that you want to run once in your batch job. Instead of writing an implementation of the Tasklet interface that really just wraps that method call, you can use MethodInvokingTaskletAdapter to call the method. Listing 4-25 shows an example of the configuration for MethodInvokingTaskletAdapter.
Example 4.25. Using MethodInvokingTaskletAdapter
<?xml version="1.0" encoding="UTF-8"?>
<beans:beans xmlns="http://www.springframework.org/schema/batch"
    xmlns:beans="http://www.springframework.org/schema/beans"
    xmlns:xsi="http://www.w3.org/2001/XMLSchema-instance"
    xsi:schemaLocation="http://www.springframework.org/schema/beans
        http://www.springframework.org/schema/beans/spring-beans-3.0.xsd
        http://www.springframework.org/schema/batch
        http://www.springframework.org/schema/batch/spring-batch-2.1.xsd">

    <beans:import resource="../launch-context.xml"/>

    <beans:bean id="service"
        class="com.apress.springbatch.chapter4.ChapterFourService"/>

    <beans:bean id="methodInvokingTaskletAdapter"
class="org.springframework.batch.core.step.tasklet.MethodInvokingTaskletAdapter">
        <beans:property name="targetObject" ref="service"/>
        <beans:property name="targetMethod" value="serviceMethod"/>
    </beans:bean>

    <job id="methodInvokingJob">
        <step id="step1">
            <tasklet ref="methodInvokingTaskletAdapter"/>
        </step>
    </job>
</beans:beans>
The example shown in Listing 4-25 specifies an object and a method. With this configuration, the adapter calls the method with no parameters and returns an ExitStatus.COMPLETED result unless the method specified also returns the type org.springframework.batch.core.ExitStatus. If it does return an ExitStatus, the value returned by the method is returned from the tasklet. If you want to configure a static set of parameters, you can use the late-binding method of passing job parameters that you read about earlier in this chapter, as shown in Listing 4-26.
Example 4.26. Using MethodInvokingTaskletAdapter with Parameters
beans:bean id="methodInvokingTaskletAdapter"
class="org.springframework.batch.core.step.tasklet.MethodInvokingTaskletAdapter"
        scope="step">
        <beans:property name="targetObject" ref="service"/>
        <beans:property name="targetMethod" value="serviceMethod"/>
        <beans:property name="arguments" value="#{jobParameters[message]}"/>
    </beans:bean>

    <job id="methodInvokingJob">
        <step id="step1">
            <tasklet ref="methodInvokingTaskletAdapter"/>
        </step>
    </job>
</beans:beans>
The last type of Tasklet implementation that Spring Batch provides is org.springframework.batch.core.step.tasklet.SystemCommandTasklet. This tasklet is used to—you guessed it—execute a system command! The system command specified is executed asynchronously. Because of this, the timeout value (in milliseconds) as shown in Listing 4-27 is important. The interruptOnCancel attribute in the listing is optional but indicates to Spring Batch whether to kill the thread the system process is associated with if the job exits abnormally.
Example 4.27. Using SystemCommandTasklet
<?xml version="1.0" encoding="UTF-8"?>
<beans:beans xmlns="http://www.springframework.org/schema/batch"
             xmlns:beans="http://www.springframework.org/schema/beans"
             xmlns:xsi=http://www.w3.org/2001/XMLSchema-instance
             xsi:schemaLocation="http://www.springframework.org/schema/beans
           http://www.springframework.org/schema/beans/spring-beans-3.0.xsd
           http://www.springframework.org/schema/batch
           http://www.springframework.org/schema/batch/spring-batch-2.1.xsd">

    <beans:import resource="../launch-context.xml" />

    <beans:bean id="tempFileDeletionCommand"
    class="org.springframework.batch.core.step.tasklet.SystemCommandTasklet">
        <beans:property name="command" value="rm – rf /temp.txt " />
        <beans:property name="timeout" value="5000" />
        <beans:property name="interruptOnCancel" value="true" />
    </beans:bean>

    <job id="systemCommandJob">
        <step id="step1">
            <tasklet ref="tempFileDeletionCommand" />
        </step>
    </job>
</beans:beans>
SystemCommandTasklet allows you to configure a number of parameters that can have an effect on how a system command executes. Listing 4-28 shows a more robust example.
Example 4.28. Using SystemCommandTasklet with Full Environment Configuration
<beans:bean id="touchCodeMapper"
class="org.springframework.batch.core.step.tasklet.SimpleSystemProcessExitCodeMapper"/>

    <beans:bean id="taskExecutor"
        class="org.springframework.core.task.SimpleAsyncTaskExecutor"/>

    <beans:bean id="robustFileDeletionCommand"
    class="org.springframework.batch.core.step.tasklet.SystemCommandTasklet">
<beans:property name="command" value="touch temp.txt" />
<beans:property name="timeout" value="5000" />
<beans:property name="interruptOnCancel" value="true" />
<beans:property name="workingDirectory"
value="/Users/mminella/spring-batch" />
<beans:property name="systemProcessExitCodeMapper"
ref="touchCodeMapper"/>
<beans:property name="terminationCheckInterval" value="5000" />
<beans:property name="taskExecutor" ref="taskExecutor" />
<beans:property name="environmentParams"
value="JAVA_HOME=/java,BATCH_HOME=/Users/batch" />
</beans:bean>
<job id="systemCommandJob">
<step id="step1">
<tasklet ref="robustFileDeletionCommand" />
</step>
</job>
</beans:beans>Listing 4-28 includes five more optional parameters in the configuration:
workingDirectory: This is the directory from which to execute the command. In this example, it's the equivalent of executingcd ˜/spring-batchbefore executing the actual command.
systemProcessExitCodeMapper: System codes may mean different things depending on the command you're executing. This property allows you to use an implementation of theorg.springframework.batch.core.step.tasklet.SystemProcessExitCodeMapperinterface to map what system-return codes go with what Spring Batch status values. Spring provides two implementations of this interface by default:org.springframework.batch.core.step.tasklet.ConfigurableSystemProcessExitCodeMapper, which allows you to configure the mapping in your XML configuration, andorg.springframework.batch.core.step.tasklet.SimpleSystemProcessExitCodeMapper, which returnsExitStatus.FINISHEDif the return code was 0 andExitStatus.FAILEDif it was anything else.
terminationCheckInterval: Because the system command is executed in an asynchronous way by default, the tasklet checks periodically to see if it has completed. By default, this value is set to one second, but you can configure it to any value you wish in milliseconds.
taskExecutor: This allows you to configure your ownTaskExecutorto execute the system command. You're highly discouraged from configuring a synchronous task executor due to the potential of locking up your job if the system command causes problems.
environmentParams: This is a list of environment parameters you can set prior to the execution of your command.
You've seen over the previous section that many different tasklet types are available in Spring Batch. Before moving off the topic, however, there is one other tasklet type to discuss: the tasklet step.
The tasklet step is different than the others you've seen. But it should be the most familiar to you, because it's what you used in the "Hello, World!" job. The way it's different is that in this case, you're writing your own code to be executed as the tasklet. Using MethodInvokingTaskletAdapter is one way to define a tasklet step. In that case, you allow Spring to forward the processing to your code. This lets you develop regular POJOs and use them as steps.
The other way to create a tasklet step is to implement the Tasklet interface as you did when you created the HelloWorld tasklet in Chapter 2. There, you implement the execute method required in the interface and return a RepeatStatus object to tell Spring Batch what to do after you completed processing. Listing 4-29 has the HelloWorld tasklet code as you constructed it in Chapter 2.
Example 4.29. HelloWorld Tasklet
package com.apress.springbatch.chapter2;

import org.springframework.batch.core.StepContribution;
import org.springframework.batch.core.scope.context.ChunkContext;
import org.springframework.batch.core.step.tasklet.Tasklet;
import org.springframework.batch.repeat.RepeatStatus;

public class HelloWorld implements Tasklet {

    private static final String HELLO_WORLD = "Hello, world!";

    public RepeatStatus execute( StepContribution arg0,
                                 ChunkContext arg1 ) throws Exception {
        System.out.println( HELLO_WORLD );
        return RepeatStatus.FINISHED;
    }
}
When processing is complete in your Tasklet implementation, you return an org.springframework.batch.repeat.RepeatStatus object. There are two options with this: RepeatStatus.CONTINUABLE and RepeatStatus.FINISHED. These two values can be confusing at first glance. If you return RepeatStatus.CONTINUABLE, you aren't saying that the job can continue. You're telling Spring Batch to run the tasklet again. Say, for example, that you wanted to execute a particular tasklet in a loop until a given condition was met, yet you still wanted to use Spring Batch to keep track of how many times the tasklet was executed, transactions, and so on. Your tasklet could return RepeatStatus.CONTINUABLE until the condition was met. If you return RepeatStatus.FINISHED, that means the processing for this tasklet is complete (regardless of success) and to continue with the next piece of processing.
You configure a tasklet step as you configure any of the other tasklet types. Listing 4-30 shows HelloWorldJob configured using the HelloWorld tasklet.
Example 4.30. HelloWorldJob
<beans:bean id="helloWorld" class="com.apress.springbatch.chapter2.HelloWorld/>

    <job id="helloWorldJob">
        <step id="helloWorldStep">
            <tasklet ref="helloWorld"/>
        </step>
    </job>
...
You may be quick to point out that this listing isn't the same as it was in Chapter 2, and you would be correct. The reason is that you haven't seen one other feature used in Chapter 2: step inheritance.
Like jobs, steps can be inherited from each other. Unlike jobs, steps don't have to be abstract to be inherited. Spring Batch allows you to configure fully defined steps in your configuration and then have other steps inherit them. Let's start discussing step inheritance by looking at the example used in Chapter 2, the HelloWorldJob in Listing 4-31.
Example 4.31. HelloWorldJob
<beans:bean id="helloWorld"
    class="com.apress.springbatch.chapter2.HelloWorld"/>

<step id="helloWorldStep">
    <tasklet ref="helloWorld"/>
</step>

<job id="helloWorldJob">
    <step id="step1" parent="helloWorldStep"/>
</job>
In Listing 4-31, you configure the tasklet implementation (the helloWorld bean), and then you configure the step that references the tasklet (helloWorldStep). Spring Batch doesn't require that the step element be nested in a job tag. Once you're defined your step, helloWorldStep, you can then inherit it when you declare the steps in sequence in your actual job, helloWorldJob. Why would you do this?
In this simple example, there is little benefit to this approach. However, as steps become more complex, experience shows that it's best to configure your steps outside the scope of your job and then inherit them with the steps in the job. This allows the actual job declaration to be much more readable and maintainable.
Obviously, readability isn't the only reason to use inheritance, and that isn't all that is going on even in this example. Let's dive deeper. In this example, what you're really doing in step1 is inheriting the step helloWorldStep and all its attributes. However, step1 chooses not to override any of them.
Step inheritance provides a more complete inheritance model than that of job inheritance. In step inheritance you can fully define a step, inherit the step, and then add or override any of the values you wish. You can also declare a step abstract and place only common attributes there.
Listing 4-32 shows an example of how steps can add and override attributes configured in their parent. You start with the parent step, vehicleStep, which declares a reader, writer, and commit-interval. You then create two steps that inherit from vehicleStep: carStep and truckStep. Each uses the same reader and writer that has been configured in vehicleStep. In each case, they add an item processor that does different things. carStep has chosen to use the inherited commit-interval of 50 items, whereas truckStep has overridden the commit-interval and set it to 5 items.
Example 4.32. Adding Attributes in Step Inheritance
<step id="vehicleStep">
<tasklet>
<chunk reader="vehicleReader" writer="vehicleWriter" commit-interval="50"/>
</tasklet>
</step>

<step id="carStep" parent="vehicleStep">
<tasklet>
<chunk processor="carProcessor"/>
</tasklet>
</step>

<step id="truckStep" parent="vehicleStep">
<tasklet>
<chunk processor="truckProcessor" commit-interval="5"/>
</tasklet>
</step>

<job id="exampleJob">
<step id="step1" parent="carStep" next="step2"/>
<step id="step2" parent="truckStep"/>
</job>
By declaring a step abstract, as in Java, you're allowed to leave things out that would otherwise be required. In an abstract step, as in Listing 4-33, you're allowed to leave off the reader, writer, processor, and tasklet attributes. This would normally cause an initialization error when Spring tried to build the step; but because it's declared abstract, Spring knows that those will be populated by the steps that inherit it.
Example 4.33. An Abstract Step and Its Implementations
<beans:bean id="inputFile"
        class="org.springframework.core.io.FileSystemResource" scope="step">
        <beans:constructor-arg value="#{jobParameters[inputFile]}"/>
    </beans:bean>

    <beans:bean id="outputFile"
        class="org.springframework.core.io.FileSystemResource" scope="step">
        <beans:constructor-arg value="#{jobParameters[outputFile]}"/>
    </beans:bean>

    <beans:bean id="inputReader"
        class="org.springframework.batch.item.file.FlatFileItemReader">
        <beans:property name="resource" ref="inputFile"/>
        <beans:property name="lineMapper">
<beans:bean
class="org.springframework.batch.item.file.mapping.PassThroughLineMapper"/>
</beans:property>
</beans:bean>
<beans:bean id="outputWriter"
class="org.springframework.batch.item.file.FlatFileItemWriter">
<beans:property name="resource" ref="outputFile"/>
<beans:property name="lineAggregator">
<beans:bean
class="org.springframework.batch.item.file.transform.PassThroughLineAggregator"/>
</beans:property>
</beans:bean>
<step id="commitIntervalStep" abstract="true">
<tasklet>
<chunk commit-interval="15"/>
</tasklet>
</step>
<step id="copyStep" parent="commitIntervalStep">
<tasklet>
<chunk reader="inputReader" writer="outputWriter" />
</tasklet>
</step>
<job id="stepInheritanceJob">
<step id="step1" parent="copyStep" />
</job>
</beans:beans>In Listing 4-33, commitIntervalStep is an abstract step that is used to configure the commit interval for any step that extends this step. You configure the required elements of a step in the step that extends the abstract step, copyStep. Here you specify a reader and writer. copyStep has the same commit-interval of 15 that commitIntervalStep has, without the need to repeat the configuration.
Step inheritance allows you to configure common attributes that can be reused from step to step as well as structure your XML configuration in a maintainable way. The last example of this section used a couple of attributes that were chunk specific. To better understand them, let's go over how you can use the different features that Spring Batch provides in its chunk-based processing.
Because chunk-based processing is the foundation of Spring Batch 2, it's important to understand how to configure its various options to take full advantage of this important feature. This section covers the two options for configuring the size of a chunk: a static commit count and a CompletionPolicy implementation. All other chunk configuration options relate to error handling and are discussed in that section.
To start looking at chunk configuration, Listing 4-34 has a basic example of nothing more than a reader, writer, and commit-interval configured. The reader is an implementation of the ItemReader interface, and the writer an implementation of ItemWriter. Each of these interfaces has its own dedicated chapter later in the book, so this section doesn't go into detail about them. All you need to know is that they supply input and output, respectively, for the step. The commit-interval defines how many items make up a chunk (50 items, in this case).
Example 4.34. A Basic Chunk Configuration
<?xml version="1.0" encoding="UTF-8"?>
<beans:beans xmlns="http://www.springframework.org/schema/batch"
             xmlns:beans="http://www.springframework.org/schema/beans"
             xmlns:xsi="http://www.w3.org/2001/XMLSchema-instance"
             xsi:schemaLocation="http://www.springframework.org/schema/beans
             http://www.springframework.org/schema/beans/spring-beans-3.0.xsd
             http://www.springframework.org/schema/batch
           http://www.springframework.org/schema/batch/spring-batch-2.1.xsd">

    <beans:import resource="../launch-context.xml" />

    <beans:bean id="inputFile"
        class="org.springframework.core.io.FileSystemResource" scope="step">
        <beans:constructor-arg value="#{jobParameters[inputFile]}"/>
    </beans:bean>

    <beans:bean id="outputFile"
        class="org.springframework.core.io.FileSystemResource" scope="step">
        <beans:constructor-arg value="#{jobParameters[outputFile]}"/>
    </beans:bean>

    <beans:bean id="inputReader"
        class="org.springframework.batch.item.file.FlatFileItemReader">
        <beans:property name="resource" ref="inputFile"/>
        <beans:property name="lineMapper">
            <beans:bean
class="org.springframework.batch.item.file.mapping.PassThroughLineMapper"/>
        </beans:property>
    </beans:bean>

    <beans:bean id="outputWriter"
        class="org.springframework.batch.item.file.FlatFileItemWriter">
        <beans:property name="resource" ref="outputFile"/>
        <beans:property name="lineAggregator">
            <beans:bean
class="org.springframework.batch.item.file.transform.PassThroughLineAggregator"/>
        </beans:property>
    </beans:bean>

    <step id="copyStep">
        <tasklet>
            <chunk reader="inputReader" writer="outputWriter"
                commit-interval="50"/>
        </tasklet>
    </step>

    <job id="chunkConfigurationJob">
<step id="step1" parent="copyStep" />
</job>
</beans:beans>Although typically you define the size of a chunk based on a hard number configured with the commit-interval attribute as configured in Listing 4-34, that isn't always a robust enough option. Say that you have a job that needs to process chunks that aren't all the same size (processing all transactions for an account in a single transaction, for example). Spring Batch provides the ability to programmatically define when a chunk is complete via an implementation of the org.springframework.batch.repeat.CompletionPolicy interface.
The CompletionPolicy interface allows the implementation of decision logic to decide if a given chunk is complete. Spring Batch comes with a number of implementations of this interface. By default it uses org.springframework.batch.repeat.policy.SimpleCompletionPolicy, which counts the number of items processed and flags a chunk complete when the configured threshold is reached. Another out-of-the-box implementation is org.springframework.batch.repeat.policy.TimeoutTerminationPolicy. This allows you to configure a timeout on a chunk so that it may exit gracefully after a given amount of time. What does "exit gracefully" mean in this context? It means that the chunk is considered complete and all transaction processing continues normally.
As you can undoubtedly deduce, there are few times when a timeout by itself is enough to determine when a chunk of processing will be complete. TimeoutTerminationPolicy is more likely to be used as part of org.springframework.batch.repeat.policy.CompositeCompletionPolicy. This policy lets you configure multiple polices that determine whether a chunk has completed. When you use CompositeCompletionPolicy, if any of the policies consider a chunk complete, then the chunk is flagged as complete. Listing 4-35 shows an example of using a timeout of 3 milliseconds along with the normal commit count of 200 items to determine if a chunk is complete.
Example 4.35. Using a Timeout Along With a Regular Commit Count
<?xml version="1.0" encoding="UTF-8"?>
<beans:beans xmlns="http://www.springframework.org/schema/batch"
xmlns:beans="http://www.springframework.org/schema/beans"
xmlns:util="http://www.springframework.org/schema/util"
xmlns:xsi="http://www.w3.org/2001/XMLSchema-instance"
xsi:schemaLocation="http://www.springframework.org/schema/beans
http://www.springframework.org/schema/beans/spring-beans-3.0.xsd
http://www.springframework.org/schema/util
http://www.springframework.org/schema/util/spring-util.xsd
http://www.springframework.org/schema/batch
http://www.springframework.org/schema/batch/spring-batch-2.1.xsd">
<beans:import resource="../launch-context.xml" />
<beans:bean id="inputFile"
class="org.springframework.core.io.FileSystemResource" scope="step">
<beans:constructor-arg value="#{jobParameters[inputFile]}" />
</beans:bean>
<beans:bean id="outputFile"
class="org.springframework.core.io.FileSystemResource" scope="step">
<beans:constructor-arg value="#{jobParameters[outputFile]}" />
</beans:bean><beans:bean id="inputReader"
class="org.springframework.batch.item.file.FlatFileItemReader">
<beans:property name="resource" ref="inputFile" />
<beans:property name="lineMapper">
<beans:bean
class="org.springframework.batch.item.file.mapping.PassThroughLineMapper" />
</beans:property>
</beans:bean>
<beans:bean id="outputWriter"
class="org.springframework.batch.item.file.FlatFileItemWriter">
<beans:property name="resource" ref="outputFile" />
<beans:property name="lineAggregator">
<beans:bean
class="org.springframework.batch.item.file.transform.PassThroughLineAggregator" />
</beans:property>
</beans:bean>
<beans:bean id="chunkTimeout"
class="org.springframework.batch.repeat.policy.TimeoutTerminationPolicy">
<beans:constructor-arg value="3" />
</beans:bean>
<beans:bean id="commitCount"
class="org.springframework.batch.repeat.policy.SimpleCompletionPolicy">
<beans:property name="chunkSize" value="200" />
</beans:bean>
<beans:bean id="chunkCompletionPolicy"
class="org.springframework.batch.repeat.policy.CompositeCompletionPolicy">
<beans:property name="policies">
<util:list>
<beans:ref bean="chunkTimeout" />
<beans:ref bean="commitCount" />
</util:list>
</beans:property>
</beans:bean>
<step id="copyStep">
<tasklet>
<chunk reader="inputReader" writer="outputWriter"
chunk-completion-policy="chunkCompletionPolicy"/>
</tasklet>
</step>
<job id="chunkConfigurationJob">
<step id="step1" parent="copyStep" />
    </job>
</beans:beans>Using the implementations of the CompletionPolicy interface isn't your only option to determine how large a chunk is. You can also implement it yourself. Before you look at an implementation, let's go over the interface.
The CompletionPolicy interface requires four methods: two versions of isComplete, start, and update. If you look at this through the lifecycle of the class, first the start method is called first. This method initializes the policy so that it knows the chunk is starting. It's important to note that an implementation of the CompletionPolicy interface is intended to be stateful and should be able to determine if a chunk has been completed by its own internal state. The start method resets this internal state to whatever is required by the implementation at the beginning of the chunk. Using SimpleCompletionPolicy as an example, the start method resets an internal counter to 0 at the beginning of a chunk. The update method is called once for each item that has been processed to update the internal state. Going back to the SimpleCompletionPolicy example, update increments the internal counter by one after each item. Finally, there are two isComplete methods. The first isComplete method signature accepts a RepeatContext as its parameter. This implementation is intended to use its internal state to determine if the chunk has completed. The second signature takes the RepeatContext and also the RepeatStatus as parameters. This implementation is expected to determine based on the status whether a chunk has completed. Listing 4-36 shows an example of a CompletionPolicy implementation that considers a chunk complete once a random number of items fewer than 20 have been processed; Listing 4-37 showing the configuration.
Example 4.36. Random Chunk Size CompletionPolicy Implementation
package com.apress.springbatch.chapter4;

import java.util.Random;

import org.springframework.batch.repeat.CompletionPolicy;
import org.springframework.batch.repeat.RepeatContext;
import org.springframework.batch.repeat.RepeatStatus;

public class RandomChunkSizePolicy implements CompletionPolicy {

    private int chunkSize;
    private int totalProcessed;

    public boolean isComplete(RepeatContext context) {
        return totalProcessed >= chunkSize;
    }

    public boolean isComplete(RepeatContext context, RepeatStatus status) {
        if (RepeatStatus.FINISHED == status) {
            return true;
        } else {
            return isComplete(context);
        }
    }

    public RepeatContext start(RepeatContext context) {
        Random random = new Random();

        chunkSize = random.nextInt(20);
totalProcessed = 0;
System.out.println("The chunk size has been set to " + chunkSize);
return context;
}
public void update(RepeatContext context) {
totalProcessed++;
}
}Example 4.37. Configuring RandomChunkSizePolicy
<beans:bean id="randomChunkSizer"
    class="com.apress.springbatch.chapter4.RandomChunkSizePolicy" />

<step id="copyStep">
    <tasklet>
        <chunk reader="inputReader" writer="outputWriter"
            chunk-completion-policy="randomChunkSizer" />
    </tasklet>
</step>

<job id="chunkConfigurationJob">
    <step id="step1" parent="copyStep" />
</job>
You explore the rest of chunk configuration when you get to error handling. That section covers retry and skip logic, which the majority of the remaining options center around. The next step elements that this chapter looks at also carry over from a job: listeners.
When you looked at job listeners, earlier this chapter, you saw the two events they can fire on: the start and end of a job. Step listeners cover the same types of events (start and end), but for individual steps instead of an entire job. This section covers the org.springframework.batch.core.StepExecutionListener and org.springframework.batch.core.ChunkListener interfaces, both of which allow the processing of logic at the beginning and end of a step and chunk respectively. Notice that the Step's listener is named the StepExecutionListener and not just StepListener. There actually is a StepListener interface, however it's just a marker interface that all step related listeners extend.
Both the StepExecutionListener and ChunkListener provide methods that are similar to the ones in the JobExecutionListener interface. StepExecutionListener has a beforeStep and an afterStep, and ChunkListener has a beforeChunk and an afterChunk, as you would expect. All of these methods are void except afterStep. afterStep returns an ExitStatus because the listener is allowed to modify the ExitStatus that was returned by the step itself prior to it being returned to the job. This feature can be useful when a job requires more than just knowing whether an operation was successful to determine if the processing was successful. An example would be doing some basic integrity checks after importing a file (whether the correct number of records were written to the database, and so on). The ability to configure listeners via annotations also continues to be consistent, with Spring Batch providing @BeforeStep, @AfterStep, @BeforeChunk, and @AfterChunk annotations to simplify the implementation. Listing 4-38 shows a StepListener that uses annotations to identify the methods.
Example 4.38. Logging Step Start and Stop Listeners
package com.apress.springbatch.chapter4;

import org.springframework.batch.core.ExitStatus;
import org.springframework.batch.core.StepExecution;
import org.springframework.batch.core.annotation.AfterStep;
import org.springframework.batch.core.annotation.BeforeStep;

public class LoggingStepStartStopListener {

    @BeforeStep
    public void beforeStep(StepExecution execution) {
        System.out.println(execution.getStepName() + " has begun!");
    }

    @AfterStep
    public ExitStatus afterStep(StepExecution execution) {
        System.out.println(execution.getStepName() + " has ended!");

       return execution.getExitStatus();
    }
}
The configuration for all the step listeners is combined into a single list in the step configuration. Similar to the job listeners, inheritance works the same way, allowing you to either override the list or merge them together. Listing 4-39 configures the LoggingStepStartStopListener that you coded earlier.
Example 4.39. Configuring LoggingStepStartStopListener
...
<beans:bean id="loggingStepListener"
    class="com.apress.springbatch.chapter4.LoggingStepStartStopListener"/>

<job id="stepListenerJob">
    <step id="step1">
        <tasklet>
            <chunk reader="inputReader" writer="outputWriter"
                commit-interval="50"/>
            <listeners>
                <listener ref="loggingStepListener"/>
            </listeners>
        </tasklet>
    </step>
</job>
...
As you can see, listeners are available at just about every level of the Spring Batch framework to allow you to hang processing off your batch jobs. They're commonly used not only to perform some form of preprocessing before a component or evaluate the result of a component but also in error handling, as you see in a bit.
The next section covers the flow of steps. Although all your steps up to this point have been processed sequentially, that isn't a requirement in Spring Batch. You learn how to perform simple logic to determine what step to execute next and how to externalize flows for reuse.
A single file line: that is what your jobs have looked like up to this point. You've lined up the steps and allowed them to execute one after another using the next attribute. However, if that were the only way you could execute steps, Spring Batch would be very limited. Instead, the authors of the framework provided a robust collection of options for customizing the flow of your jobs.
To start, let's look at how you can decide what step to execute next or even if you execute a given step at all. This occurs using Spring Batch's conditional logic.
Within a job in Spring Batch, steps are executed in the order you specify using the next attribute of the step tag. The only requirement is that the first step be configured as the first step in the job. If you want to execute steps in a different order, it's quite easy: all you need to do is use the next tag. As Listing 4-40 shows, you can use the next tag to direct a job to go from step1 to step2a if things go ok or to step2b if step1 returns an ExitStatus of FAILED.
Example 4.40. If/Else Logic in Step Execution
<?xml version="1.0" encoding="UTF-8"?>
<beans:beans xmlns="http://www.springframework.org/schema/batch"
    xmlns:beans="http://www.springframework.org/schema/beans"
    xmlns:xsi="http://www.w3.org/2001/XMLSchema-instance"
    xsi:schemaLocation="http://www.springframework.org/schema/beans
        http://www.springframework.org/schema/beans/spring-beans-3.0.xsd
        http://www.springframework.org/schema/batch
        http://www.springframework.org/schema/batch/spring-batch-2.1.xsd">

    <beans:import resource="../launch-context.xml"/>

    <beans:bean id="passTasklet"
        class="com.apress.springbatch.chapter4.LogicTasklet">
        <beans:property name="success" value="true"/>
    </beans:bean>

    <beans:bean id="successTasklet"
        class="com.apress.springbatch.chapter4.MessageTasklet">
        <beans:property name="message" value="The step succeeded!"/>
    </beans:bean>

    <beans:bean id="failTasklet"
        class="com.apress.springbatch.chapter4.MessageTasklet">
        <beans:property name="message" value="The step failed!"/>
    </beans:bean>
<job id="conditionalStepLogicJob">
<step id="step1">
<tasklet ref="passTasklet"/>
<next on="*" to="step2a"/>
<next on="FAILED" to="step2b"/>
</step>
<step id="step2a">
<tasklet ref="successTasklet"/>
</step>
<step id="step2b">
<tasklet ref="failTasklet"/>
</step>
</job>
</beans:beans>The next tag uses the on attribute to evaluate the ExitStatus of the step and determine what to do. It's important to note that you've seen both org.springframework.batch.core.ExitStatus and org.springframework.batch.core.BatchStatus over the course of this chapter. BatchStatus is an attribute of the JobExecution or StepExecution that identifies the current state of the job or step. ExitStatus is the value returned to Spring Batch at the end of a job or step. The on attribute evaluates the ExitStatus for its decisions. So, the example in Listing 4-40 is the XML equivalent of saying, "If the exit code of step1 doesn't equal FAILED, go to step2a, else go to step2b."
Because the values of the ExitStatus are really just Strings, the ability to use wildcards can make things interesting. Spring Batch allows for two wildcards in on criteria:
*matches zero or more characters. For example,C*matches C, COMPLETE, and CORRECT.?matches a single character. In this case,?ATmatches CAT or KAT but not THAT.
Although evaluating the ExitStatus gets you started in determining what to do next, it may not take you all the way. For example, what if you didn't want to execute a step if you skipped any records in the current step? You wouldn't know that from the ExitStatus alone.
Note
Spring Batch helps you when it comes to configuring transitions. It automatically orders the transitions from most to least restrictive and applies them in that order.
Spring Batch has provided a programmatic way to determine what to do next. You do this by creating an implementation of the org.springframework.batch.core.job.flow.JobExecutionDecider interface. This interface has a single method, decide, that takes both the JobExecution and the StepExecution and returns a FlowExecutionStatus (a wrapper for a BatchStatus/ExitStatus pair). With both the JobExecution and StepExecution available for evaluation, all information should be available to you to make the appropriate decision about what your job should do next. Listing 4-41 shows an implementation of the JobExecutionDecider that randomly decides what the next step should be.
Example 4.41. RandomDecider
package com.apress.springbatch.chapter4;

import java.util.Random;

import org.springframework.batch.core.JobExecution;
import org.springframework.batch.core.StepExecution;
import org.springframework.batch.core.job.flow.FlowExecutionStatus;
import org.springframework.batch.core.job.flow.JobExecutionDecider;

public class RandomDecider implements JobExecutionDecider {

    private Random random = new Random();

    public FlowExecutionStatus decide(JobExecution jobExecution,
            StepExecution stepExecution) {

        if (random.nextBoolean()) {
            return new
                FlowExecutionStatus(FlowExecutionStatus.COMPLETED.getName());
        } else {
            return new
                FlowExecutionStatus(FlowExecutionStatus.FAILED.getName());
        }
    }
}
To use RandomDecider, you configure an extra attribute on your step called decider. This attribute refers to the Spring bean that implements JobExecutionDecider. Listing 4-42 shows RandomDecider configured. You can see that the configuration maps the values you return in the decider to steps available to execute.
Example 4.42. If/Else Logic in Step Execution
...
<beans:bean id="decider"
    class="com.apress.springbatch.chapter4.RandomDecider"/>

<beans:bean id="successTasklet"
    class="com.apress.springbatch.chapter4.MessageTasklet">
    <beans:property name="message" value="The step succeeded!"/>
</beans:bean>

<beans:bean id="failTasklet"
    class="com.apress.springbatch.chapter4.MessageTasklet">
    <beans:property name="message" value="The step failed!"/>
</beans:bean>

<job id="conditionalLogicJob">
    <step id="step1" next="decision">
        <tasklet>
            <chunk reader="inputReader" writer="outputWriter"
                commit-interval="20"/>
</tasklet>
</step>
<decision decider="decider" id="decision">
<next on="*" to="step2a"/>
<next on="FAILED" to="step2b"/>
</decision>
<step id="step2a">
<tasklet ref="successTasklet"/>
</step>
<step id="step2b">
<tasklet ref="failTasklet"/>
</step>
</job>
...Because you now know how to direct your processing from step to step either sequentially or via logic, you won't always want to just go to another step. You may want to end or pause the job. The next section covers how to handle those scenarios.
You learned earlier that a JobInstance can't be executed more than once to a successful completion and that a JobInstance is identified by the job name and the parameters passed into it. Because of this, you need to be aware of the state in which you end your job if you do it programmatically. In reality, there are three states in which you can programmatically end a job in Spring Batch:
Completed: This end state tells Spring Batch that processing has ended in a successful way. When a
JobInstanceis completed, it isn't allowed to be rerun with the same parameters.Failed: In this case, the job hasn't run successfully to completion. Spring Batch allows a job in the failed state to be rerun with the same parameters.
Stopped: In the stopped state, the job can be restarted. The interesting part about a job that is stopped is that the job can be restarted from where it left off, although no error has occurred. This state is very useful in scenarios when human intervention or some other check or handling is required between steps.
It's important to note that these states are identified by Spring Batch evaluating the ExitStatus of the step to determine what BatchStatus to persist in the JobRepository. ExitStatus can be returned from a step, chunk, or job. BatchStatus is maintained in StepExecution or JobExecution and persisted in the JobRepository. Let's begin looking at how to end the job in each state with the completed state.
To configure a job to end in the completed state based on the exit status of a step, you use the end tag. In this state, you can't execute the same job again with the same parameters. Listing 4-43 shows that the end tag has a single attribute that declares the ExitStatus value that triggers the job to end.
Example 4.43. Ending a Job in the Completed State
<?xml version="1.0" encoding="UTF-8"?>
<beans:beans xmlns="http://www.springframework.org/schema/batch"
    xmlns:beans="http://www.springframework.org/schema/beans"
    xmlns:xsi="http://www.w3.org/2001/XMLSchema-instance"
xsi:schemaLocation="http://www.springframework.org/schema/beans
http://www.springframework.org/schema/beans/spring-beans-3.0.xsd
http://www.springframework.org/schema/batch
http://www.springframework.org/schema/batch/spring-batch-2.1.xsd">
<beans:import resource="../launch-context.xml"/>
<beans:bean id="passTasklet"
class="com.apress.springbatch.chapter4.LogicTasklet">
<beans:property name="success" value="false"/>
</beans:bean>
<beans:bean id="successTasklet"
class="com.apress.springbatch.chapter4.MessageTasklet">
<beans:property name="message" value="The step succeeded!"/>
</beans:bean>
<beans:bean id="failTasklet"
class="com.apress.springbatch.chapter4.MessageTasklet">
<beans:property name="message" value="The step failed!"/>
</beans:bean>
<job id="conditionalStepLogicJob">
<step id="step1">
<tasklet ref="passTasklet"/>
<end on="*"/>
<next on="FAILED" to="step2b"/>
</step>
<step id="step2b">
<tasklet ref="failTasklet"/>
</step>
</job>
</beans:beans>Once you run conditionalStepLogicJob, as you would expect, the batch_step_execution table contains the ExitStatus returned by the step, and batch_job_execution contains COMPLETED regardless of the path taken.
For the failed state, which allows you to rerun the job with the same parameters, the configuration looks similar. Instead of using the end tag, you use the fail tag. Listing 4-44 shows that the fail tag has an additional attribute: exit-code. It lets you add extra detail when causing a job to fail.
Example 4.44. Ending a Job in the Failed State
<?xml version="1.0" encoding="UTF-8"?>
<beans:beans xmlns="http://www.springframework.org/schema/batch"
    xmlns:beans="http://www.springframework.org/schema/beans"
    xmlns:xsi="http://www.w3.org/2001/XMLSchema-instance"
    xsi:schemaLocation="http://www.springframework.org/schema/beans
        http://www.springframework.org/schema/beans/spring-beans-3.0.xsd
        http://www.springframework.org/schema/batch
        http://www.springframework.org/schema/batch/spring-batch-2.1.xsd">
<beans:import resource="../launch-context.xml"/>
<beans:bean id="passTasklet"
class="com.apress.springbatch.chapter4.LogicTasklet">
<beans:property name="success" value="true"/>
</beans:bean>
<beans:bean id="successTasklet"
class="com.apress.springbatch.chapter4.MessageTasklet">
<beans:property name="message" value="The step succeeded!"/>
</beans:bean>
<beans:bean id="failTasklet"
class="com.apress.springbatch.chapter4.MessageTasklet">
<beans:property name="message" value="The step failed!"/>
</beans:bean>
<job id="conditionalStepLogicJob">
<step id="step1">
<tasklet ref="passTasklet"/>
<next on="*" to="step2a"/>
<fail on="FAILED" exit-code="STEP-1-FAILED"/>
</step>
<step id="step2a">
<tasklet ref="successTasklet"/>
</step>
</job>
</beans:beans>When you rerun conditionalStepLogicJob with the configuration in Listing 4-44, the results are a bit different. This time, if step1 ends with the ExitStatus FAILURE, the job is identified in the jobRepository as failed, which allows it to be reexecuted with the same parameters.
The last state you can leave a job in when you end it programmatically is the stopped state. In this case, you can restart the job; and when you do, it restarts at the step you configure. Listing 4-45 shows an example.
Example 4.45. Ending a Job in the Stopped State
<?xml version="1.0" encoding="UTF-8"?>
<beans:beans xmlns="http://www.springframework.org/schema/batch"
    xmlns:beans="http://www.springframework.org/schema/beans"
    xmlns:xsi="http://www.w3.org/2001/XMLSchema-instance"
    xsi:schemaLocation="http://www.springframework.org/schema/beans
        http://www.springframework.org/schema/beans/spring-beans-3.0.xsd
        http://www.springframework.org/schema/batch
        http://www.springframework.org/schema/batch/spring-batch-2.1.xsd">

    <beans:import resource="../launch-context.xml"/>

    <beans:bean id="passTasklet"
        class="com.apress.springbatch.chapter4.LogicTasklet">
        <beans:property name="success" value="true"/>
</beans:bean>
<beans:bean id="successTasklet"
class="com.apress.springbatch.chapter4.MessageTasklet">
<beans:property name="message" value="The step succeeded!"/>
</beans:bean>
<beans:bean id="failTasklet"
class="com.apress.springbatch.chapter4.MessageTasklet">
<beans:property name="message" value="The step failed!"/>
</beans:bean>
<job id="conditionalStepLogicJob">
<step id="step1">
<tasklet ref="passTasklet"/>
<next on="*" to="step2a"/>
<stop on="FAILED" restart="step2a"/>
</step>
<step id="step2a">
<tasklet ref="successTasklet"/>
</step>
</job>
</beans:beans>Executing conditionalStepLogicJob with this final configuration, as in Listing 4-45, allows you to rerun the job with the same parameters. However, this time, if the FAILURE path is chosen, when the job is restarted execution begins at step2a.
The flow from one step to the next isn't just another layer of configuration you're adding to potentially complex job configurations; it's also configurable in a reusable component. The next section discusses how to encapsulate flows of steps into reusable components.
You've already identified that a step doesn't need to be configured within a job tag in your XML. This lets you extract the definition of your steps from a given job into reusable components. The same goes for the order of steps. In Spring Batch, there are three options for how to externalize the order of steps. The first is to create a flow, which is an independent sequence of steps. The second is to use the flow step; although the configuration is very similar, the state persistence in the JobRepository is slightly different. The last way is to actually call another job from within your job. This section covers how all three of these options work.
A flow looks a lot like a job. It's configured the same way, but with a flow tag instead of a job tag. Listing 4-46 shows how to define a flow using the flow tag, giving it an id and then referencing it in your job using the flow tag.
Example 4.46. Defining a Flow
<?xml version="1.0" encoding="UTF-8"?>
<beans:beans xmlns="http://www.springframework.org/schema/batch"
    xmlns:beans="http://www.springframework.org/schema/beans"
    xmlns:xsi="http://www.w3.org/2001/XMLSchema-instance"
    xsi:schemaLocation="http://www.springframework.org/schema/beans
http://www.springframework.org/schema/beans/spring-beans-3.0.xsd
http://www.springframework.org/schema/batch
http://www.springframework.org/schema/batch/spring-batch-2.1.xsd">
<beans:import resource="../launch-context.xml"/>
<beans:bean id="loadStockFile"
class="com.apress.springbatch.chapter4.MessageTasklet">
<beans:property name="message"
value="The stock file has been loaded"/>
</beans:bean>
<beans:bean id="loadCustomerFile"
class="com.apress.springbatch.chapter4.MessageTasklet">
<beans:property name="message"
value="The customer file has been loaded" />
</beans:bean>
<beans:bean id="updateStart"
class="com.apress.springbatch.chapter4.MessageTasklet">
<beans:property name="message"
value="The stock file has been loaded" />
</beans:bean>
<beans:bean id="runBatchTasklet"
class="com.apress.springbatch.chapter4.MessageTasklet">
<beans:property name="message" value="The batch has been run" />
</beans:bean>
<flow id="preProcessingFlow">
<step id="loadFileStep" next="loadCustomerStep">
<tasklet ref="loadStockFile"/>
</step>
<step id="loadCustomerStep" next="updateStartStep">
<tasklet ref="loadCustomerFile"/>
</step>
<step id="updateStartStep">
<tasklet ref="updateStart"/>
</step>
</flow>
<job id="flowJob">
<flow parent="preProcessingFlow" id="step1" next="runBatch"/>
<step id="runBatch">
<tasklet ref="runBatchTasklet"/>
</step>
</job>
</beans:beans>When you execute a flow as part of a job and look at the jobRepository, you see the steps from the flow recorded as part of the job as if they were configured there in the first place. In the end, there is no difference between using a flow and configuring the steps within the job itself from a JobRepository perspective.
The next option for externalizing steps is to use the flow step. With this technique, the configuration of a flow is the same. But instead of using the flow tag to include the flow in your job, you use a step tag and its flow attribute. Listing 4-47 demonstrates how to use a flow step to configure the same example Listing 4-46 used.
Example 4.47. Using a Flow Step
...
<flow id="preProcessingFlow">
    <step id="loadFileStep" next="loadCustomerStep">
        <tasklet ref="loadStockFile"/>
    </step>
    <step id="loadCustomerStep" next="updateStartStep">
        <tasklet ref="loadCustomerFile"/>
    </step>
    <step id="updateStartStep">
        <tasklet ref="updateStart"/>
    </step>
</flow>

<job id="flowJob">
    <step id="initializeBatch" next="runBatch">
        <flow parent="preProcessingFlow"/>
    </step>
    <step id="runBatch">
        <tasklet ref="runBatchTasklet"/>
    </step>
</job>
...
What is the difference between using the flow tag and the flow step? It comes down to what happens in the JobRepository. Using the flow tag ends up with the same results as if you configured the steps in your job. Using a flow step adds an additional entry. When you use a flow step, Spring Batch records the step that includes the flow as a separate step. Why is this a good thing? The main benefit is for monitoring and reporting purposes. Using a flow step allows you to see the impact of the flow as a whole instead of having to aggregate the individual steps.
The last way to externalize the order in which steps occur is to not externalize them at all. In this case, instead of creating a flow, you call a job from within another job. Similar to the flow step, which creates a StepExecutionContext for the execution of the flow and each step within it, the job step creates a JobExecutionContext for the step that calls the external job. Listing 4-48 shows the configuration of a job step.
Example 4.48. Using a Job Step
<job id="preProcessingJob">
    <step id="step1" parent="loadStockFile" next="step2"/>
    <step id="step2" parent="loadCustomerFile" next="step3"/>
    <step id="step3" parent="updateStartOfBatchCycle"/>
</job>

<beans:bean id="jobParametersExtractor"
class="org.springframework.batch.core.step.job.DefaultJobParametersExtractor">
<beans:property name="keys" value="job.stockFile,job.customerFile"/>
</beans:bean>
<job id="subJobJob">
<step id="step0" next="step4 ">
<job ref="preProcessingJob"
job-parameters-extractor="jobParametersExtractor "/>
</step>
<step id="step4" parent="runBatch"/>
</job>You might be wondering about the jobParametersExtractor bean in Listing 4-48. When you launch a job, it's identified by the job name and the job parameters. In this case, you aren't passing the parameters to your sub job, preProcessingJob, by hand. Instead, you define a class to extract the parameters from either the JobParameters of the parent job or the ExecutionContext (the DefaultJobParameterExtractor checks both places) and pass those parameters to the child job. Your extractor pulls the values from the job.stockFile and job.customerFile job parameters and passes those as parameters to preProcessingJob.
When preProcessingJob executes, it's identified in the JobRepository just like any other job. It has its own job instance, execution context, and related database records.
A word of caution about using the job-step approach: this may seem like a good way to handle job dependencies. Creating individual jobs and being able to then string them together with a master job is a powerful feature. However, this can severely limit the control of the process as it executes. It isn't uncommon in the real world to need to pause a batch cycle or skip jobs based on external factors (another department can't get you a file in time to have the process finished in the required window, and so on). However, the ability to manage jobs exists at a single job level. Managing entire trees of jobs that could be created using this functionality is problematic and should be avoided. Linking jobs together in this manner and executing them as one master job severely limits the capability to handle these types of situations and should also be avoided.
The last piece of the flow puzzle is the ability Spring Batch provides to execute multiple flows in parallel, which is covered next.
Although you learn about parallelization later in this book, this section covers the Spring Batch functionality to execute step flows in parallel. One of the strengths of using Java for batch processing and the tools that Spring Batch provides is the ability to bring multithreaded processing to the batch world in a standardized way. One of the easiest ways to execute steps in parallel is to split them in your job.
The split flow is a step that allows you to list flows that you want to execute in parallel. Each flow is started at the same time, and the step isn't considered complete until all the flows within it have completed. If any one of the flows fails, the split flow is considered to have failed. To see how the split step works, look at Listing 4-49.
Example 4.49. Parallel Flows Using a Split Step
<job id="flowJob">
    <split id="preprocessingStep" next="batchStep">
        <flow>
            <step id="step1" parent="loadStockFile" next="step2"/>
            <step id="step2" parent="loadCustomerFile"/>
</flow>
<flow>
<step id="step3" parent="loadTransactionFile"/>
</flow>
</split>
<step id="batchStep" parent="runBatch"/>
</job>In Listing 4-49, you identify two separate flows: one that loads two files and one that loads one file. Each of these flows is executed in parallel. After all three steps (step1, step2, and step3) have completed, Spring Batch executes batchStep.
That's it. It's amazing how simple it is to do basic parallelization using Spring Batch, as this example shows. And given the potential performance boosts,[14] you can begin to see why Spring Batch can be a very effective tool in high-performance batch processing.
Later chapters cover a variety of error-handling scenarios including error handling at the entire job level down to errors at the transaction level. But because steps are all about processing chunks of items, the next topic is some of the error-handling strategies available when processing a single item.
Spring Batch 2 is based on the concept of chunk-based processing. Because chunks are based on transaction-commit boundaries, the book discusses how to handle errors for chunks when it covers transactions in the ItemReader and ItemWriter chapters. However, individual items are usually the cause of an error, and Spring Batch provides a couple of error-handling strategies at the item level for your use. Specifically, Spring Batch lets you either skip the processing of an item or try to process an item again after a failure.
Let's start by looking at retrying to process an item before you give up on it via skipping.
When you're processing large amounts of data, it isn't uncommon to have errors due to things that don't need human intervention. If a database that is shared across systems has a deadlock, or a web service call fails due to a network hiccup, stopping the processing of millions of items is a pretty drastic way to handle the situation. A better approach is to allow your job to try to process a given item again.
There are three ways to implement retry logic in Spring Batch: configuring retry attempts, using RetryTemplate, and using Spring's AOP features. The first approach lets Spring Batch define a number of allowed retry attempts and exceptions that trigger the new attempt. Listing 4-50 show the basic retry configuration for an item when a RemoteAccessException is thrown in the course of executing the remoteStep.
Example 4.50. Basic Retry Configuration
<job id="flowJob">
    <step id="retryStep">
        <tasklet>
            <chunk reader="itemReader" writer="itemWriter"
                processor="itemProcessor" commit-interval="20"
                retry-limit="3">
                <retryable-exception-classes>
                    <include
                class="org.springframework.remoting.RemoteAccessException"/>
                </retryable-exception-classes>
            </chunk>
        </tasklet>
    </step>
</job>
In the flowJob's retryStep, when a RemoteAccessException is thrown by any of the components in the step (itemReader, itemWriter, or itemProcessor) the item is retried up to three times before the step fails.
Another way to add retry logic to your batch job is to do it yourself via org.springframework.batch.retry.RetryTemplate. Like most other templates provided in Spring, this one simplifies the development of retry logic by providing a simple API to encapsulate the retryable logic in a method that is then managed by Spring. In the case of RetryTemplate, you need to develop two pieces: the org.springframework.batch.retry.RetryPolicy interface and the org.springframework.batch.retry.RetryCallback interface. RetryPolicy allows you to define under what conditions an item's processing is to be retried. Spring provides a number of implementations, including ones for retrying based on an exception being thrown (which you used by default in Listing 4-50), timeout, and others. The other piece of coding retry logic is the use of the RetryCallback interface. This interface provides a single method, doWithRetry(RetryContext context), that encapsulates the logic to be retried. When you use RetryTemplate, if an item is to be retried, the doWithRetry method is called as long as RetryPolicy specifies it to be. Let's look at an example.
Listing 4-51 shows the code to retry a call to a database with a timeout policy of 30 seconds. This means it will continue to try executing the database call until it works or until 30 seconds has passed.
Example 4.51. Using RetryTemplate and RetryCallback
package com.apress.springbatch.chapter4;

import java.util.List;
import org.springframework.batch.item.ItemWriter;
import org.springframework.batch.retry.support.RetryTemplate;
import org.springframework.batch.retry.RetryCallback;
import org.springframework.batch.retry.RetryContext;

public class RetryItemWriter implements ItemWriter<Customer> {

    private CustomerDAO customerDao;
    private RetryTemplate retryTemplate;

    public void write(List<? extends Customer> customers) throws Exception {
for (Customer customer : customers) {
final Customer curCustomer = customer;
retryTemplate.execute(new RetryCallback<Customer>() {
public Customer doWithRetry(RetryContext retryContext) {
return customerDao.save(curCustomer);
}
});
}
}
...
}The code in Listing 4-51 depends significantly on elements that need to be injected (getters and setters were left out of the example). To get a better view of what is happening here, Listing 4-52 shows the configuration for this example.
Example 4.52. Configuration for CustomerDao Retry
<beans:bean id="timeoutPolicy"
    class="org.springframework.batch.retry.policy.TimeoutRetryPolicy">
    <beans:property name="timeout" value="30000"/>
</beans:bean>

<beans:bean id="timeoutRetryTemplate"
    class="org.springframework.batch.retry.support.RetryTemplate">
    <beans:property name="retryPolicy" ref="timeoutPolicy"/>
</beans:bean>

<beans:bean id="retryItemWriter"
    class="com.apress.springbatch.chapter4.RetryItemWriter">
    <beans:property name="customerDao" ref="customerDao"/>
    <beans:property name="retryTemplate" ref="timeoutRetryTemplate"/>
</beans:bean>

<job id="flowJob">
    <step id="retryStep">
        <tasklet>
            <chunk reader="itemReader" writer="retryItemWriter"
                    processor="itemProcessor" commit-interval="20"/>
        </tasklet>
    </step>
</job>
Most of the configuration in Listing 4-52 should be straightforward. You configure the org.springframework.batch.retry.policy.TimeoutRetryPolicy bean with a timeout value set to 30 seconds; you inject that into RetryTemplate as the retryPolicy and inject the template into the ItemWriter you wrote for Listing 4-51. One thing that is interesting about the configuration of this retry, however, is that there is no retry configuration in the job. Because you write your own retry logic, you don't use the retry-limit and so on in the chunk configuration.
The final way to configure item-retry logic is to use Spring's AOP facilities and Spring Batch's org.springframework.batch.retry.interceptor.RetryOperationsInterceptor to declaratively apply retry logic to elements of your batch job. Listing 4-53 shows how to declare the aspect's configuration to apply retry logic to any save methods.
Example 4.53. Applying Retry Logic Using AOP
<aop:config>
    <aop:pointcut id="saveRetry"
    expression="execution(* com.apress.springbatch.chapter4.*.save(..))"/>
    <aop:advisor pointcut-ref="saveRetry" advice-ref="retryAdvice"
        order="-1"/>
</aop:config>

<beans:bean id="retryAdvice"

    class="org.springframework.batch.retry.interceptor.RetryOperationsInterceptor"/>
This configuration leaves out the definition of how many retries to attempt, and so on. To add those, all you need to do is configure the appropriate RetryPolicy into RetryOperationsInterceptor (which has an optional dependency for a RetryPolicy implementation).
RetryPolicy is similar to CompletionPolicy earlier in that it allows you to programmatically decide something—in this case, when to retry. The org.springbatch.retry.RetryPolicy used in either the AOP interceptor or in the regular retry approaches is important, but one thing to note is that you may not want to just retry over and over if it isn't working. For example, when Google's Gmail can't connect back to the server, it first tries to reconnect immediately, then it waits 15 seconds, then 30 seconds, and so on. This approach can prevent multiple retries from stepping on each other's toes. Fortunately, Spring Batch provides a BackoffPolicy interface to implement this type of decay. You can implement an algorithm yourself by implementing the BackoffPolicy interface or use the ExponentialBackOffPolicy provided by the framework. Listing 4-54 shows the configuration required for BackOffPolicy.
Example 4.54. Applying Retry Logic Using AOP
<beans:bean id="timeoutPolicy"
    class="org.springframework.batch.retry.policy.TimeoutRetryPolicy">
    <beans:property name="timeout" value="30000"/>
</beans:bean>

<beans:bean id="backoutPolicy"

                     class="org.springframework.batch.retry.backoff.ExponentialBackOffPolicy"/>

<beans:bean id="timeoutRetryTemplate"
    class="org.springframework.batch.retry.support.RetryTemplate">
    <beans:property name="retryPolicy" ref="timeoutPolicy"/>
    <beans:property name="backOffPolicy" ref="backOffPolicy"/>
</beans:bean>

<beans:bean id="retryItemWriter"
    class="com.apress.springbatch.chapter4.RetryItemWriter">
    <beans:property name="customerDao" ref="customerDao"/>
    <beans:property name="retryTemplate" ref="timeoutRetryTemplate"/>
</beans:bean>

<job id="flowJob">
<step id="retryStep">
<tasklet>
<chunk reader="itemReader" writer="retryItemWriter"
processor="itemProcessor"
commit-interval="20"/>
</tasklet>
</step>
</job>The last aspect of retry logic is that, like most available events in Spring Batch, retry has the ability to register listeners to when an item is being retried. There are two differences, however, between all the other listeners and org.springframework.batch.retry.RetryListener. First, RetryListener has no annotation equivalent of the interface, so if you want to register a listener on retry logic, you have to implement the RetryListener interface. The other difference is that instead of two methods in the interface for the start and end, there are three in this interface. In RetryListener, the open method is called when the retry block is about to be called, onError is called once for each retry, and close is called when the full retry block is complete.
That covers it for retry logic. The other way to handle item-specific error handling is to skip the item altogether.
One of the greatest things in Spring Batch is the ability to skip an item that is causing problems. This feature can easily prevent a phone call in the middle of the night to deal with a production problem if the item can be addressed the next day. Configuring the ability to skip an item is similar to configuring retry logic. All you need to do is use the skip-limit attribute on the chunk tag and specify the exceptions that should cause an item to be skipped. Listing 4-55 demonstrates how to configure a step to allow a maximum of 10 items to be skipped via skip-limit. It then states that any item that causes any subclass of java.lang.Exception except for java.lang.NullPointerException is allowed to be skipped. Any item that throws a NullPointerException causes the step to end in error.
Example 4.55. Skip Logic Configuration
<job id="flowJob">
    <step id="retryStep">
        <tasklet>
            <chunk reader="itemReader" writer="itemWriter"
                processor="itemProcessor" commit-interval="20"
                skip-limit="10">
                <skippable-exception-classes>
                    <include class="java.lang.Exception"/>
                    <exclude class="java.lang.NullPointerException"/>
                </skippable-exception-classes>
            </chunk>
        </tasklet>
    </step>
</job>
When using item-based error handling, whether it's retrying to process an item or skipping it, there can be transactional implications. You learn what those are and how to address them when the book gets into reading and writing items in Chapters 7 & 9.
This chapter covered a large amount of material. You learned what a job is and saw its lifecycle. You looked at how to configure a job and how to interact with it via job parameters. You wrote and configured listeners to execute logic at the beginning and end of a job, and you worked with the ExecutionContext for a job and step.
You began looking at the building blocks of a job: its steps. As you looked at steps, you explored one of the most important concepts in Spring Batch: chunk-based processing. You learned how to configure chunks and some of the more advanced ways to control them (through things like policies). You learned about listeners and how to use them to execute logic at the start and end of a step. You walked through how to order steps either using basic ordering or logic to determine what step to execute next. The chapter briefly touched on parallelization using the split tag and finished discussing steps by covering item-based error handling including skip and retry logic.
The job and step are structural components of the Spring Batch framework. They're used to lay out a process. The majority of the book from here on covers all the different things that go into the structure laid out by these pieces.
[8] For those familiar with the Spring Web Flow framework, a job is very similar in structure to a flow within a web application.
[9] Although most jobs consist of an ordered list of steps, Spring Batch does support the ability to execute steps in parallel. This feature is discussed later.
[10] Later, this chapter looks at abstract jobs.
[12] It may make sense to have a parameter that is incremented for each JobInstance. For example, if the date the job is run is one of its parameters, this can be addressed automatically via a parameter incrementer.
[13] This chapter ignores web frameworks that maintain state in some form of client form (cookies, thick client, and so on).
[14] Not all parallelization results in an increase in performance. Under the incorrect situations, executing steps in parallel can negatively affect the performance of your job.