
Tutorials you find on the Internet in technology can be funny. Most of then rarely extend past a "Hello, World!" level of complexity for any new concept. And although that may be great for a basic understanding of a technology, you know that life is never as simple as a tutorial makes it out to be. Because of this, in this chapter you look at a more real-world example of a Spring Batch job.
This chapter covers the following:
Reviewing the statement job: Before developing any new functionality, you review the goals of the job to be developed, as outlined in Chapter 3.
Project setup: You create a brand-new Spring Batch project from Spring's distribution.
Job development: You walk through the entire development process for the statement job outlined in Chapter 3.
Job testing: You develop a full set of tests for this job, including unit, integration, and functional tests.
Let's get started by reviewing what the statement job you develop is required to do.
The job you develop in this chapter is for a mythical investment firm called Apress Investment Company. Apress Investments has a large number of clients that trade stocks through the company via individual trading accounts. At the end of each month, the clients are assessed a fee based on how many trades they made over the course of a month (the more trades they make, the lower the fee is). The related transaction fees are deducted from their account's current cash balance, and a statement is sent out containing the current values of all their investments as well as the current cash balance of their account.
To accomplish these requirements, you create a job that consists of six steps as outlined in Figure 10-1.
The job starts in step 1 with importing customer and transaction data. You do this all in one step because the data is contained within the same file. After the transaction data has been imported, you can use that in step 2 to get a list of stocks that your clients currently have, and download the latest stock prices from the Internet for them. Then, you can update the customer's accounts with the latest values in step 3 so that you can calculate how much money their account is worth. You finish the job by calculating the customer's fees in steps 4 and 5 of the job and print the statement itself in step 6. The rest of the chapter goes into detail about how each of these steps is implemented and why.
To start any project, you need to begin by creating a new project shell. The next section looks at how to take the shell provided by Spring Batch and clean it up to include just what you need.
To start the statement job, you need to begin with a new project shell. This project shell consists of the Maven project structure, a POM file that addresses your build needs, and the infrastructure configured as required. To create a new project, as you have done in the past, download the zip distribution for Spring Batch and copy the <ZIP_ROOT>/samples/spring-batch-simple-cli directory to your workspace renaming it statement. Figure 10-2 shows the directory structure this provides you with to start.
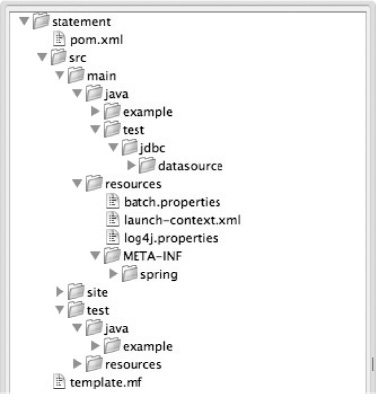
The directory structure that the zip file provides is what you need to use, and the POM file it includes is a good start, but you should clean up a few things that you don't use. The files to delete are as follows:
<project_home>/src/main/java/example: This directory contains sample readers and writers that you don't need in this project.<project_home>/src/main/java/test: You don't use theDataSourceInitializerto initialize the database schema for this project, and it isn't recommended for use in production.<project_home>/src/main/resources/META-INF/spring: As you have throughout the book, you configure the job XML files in the directory<project_home>/src/main/resources/jobs, so this directory and its contents aren't needed.<project_home>/src/test/java/example: Because you deleted the example ItemReader and ItemWriter included in the shell, you don't need their unit tests.<project_home>/src/test/resources/test-context.xml: You do the required configuration for the unit tests slightly differently than using this file, so it isn't needed.
With the project now much leaner, you still need to do a bit more pruning. Specifically, the launch-context.xml file has a reference to the DataSourceInitializer that you need to remove now that your project no longer includes that class.
After you've removed the pieces that won't be used in the project, you should update some of the remaining files. Specifically, you should update the POM file to use Spring 3 and add the MySQL driver dependency. You also need to remove the reference to the DataSourceInitializer from the launch-context.xml file because you deleted it earlier.
Let's start with the POM file updates. Spring does a good job of abstracting the versions of the frameworks you're using, so changing the version of Spring you use requires that you update the spring.framework.version property located near the top of the POM file. Listing 10-1 shows the update you need to make.
Example 10.1. Updating the Spring Version to Spring 3
...
<properties>
  <maven.test.failure.ignore>true</maven.test.failure.ignore>
  <spring.framework.version>3.0.5.RELEASE</spring.framework.version>
  <spring.batch.version>2.1.7.RELEASE</spring.batch.version>
  <dependency.locations.enabled>false</dependency.locations.enabled>
</properties>
...
You also need to add the MySQL driver to the POM file because, as mentioned earlier, you use MySQL for the project. Listing 10-2 shows the Maven dependency you need to add to the POM file.
Example 10.2. MySQL Maven Dependency
...
<dependency>
  <groupId>mysql</groupId>
  <artifactId>mysql-connector-java</artifactId>
  <version>5.1.3</version>
</dependency>
...
Because you added the MySQL driver to the POM file, let's configure the connection to the database next. As covered in Chapter 2, you configure the database connection both for the JobRepository and the application's database in the statement/src/main/resources/batch.properties file. Listing 10-3 shows the contents of this file configured for the statement job.
Example 10.3. batch.properties
# Values to connect to my local
batch.jdbc.driver=com.mysql.jdbc.Driver
batch.jdbc.url=jdbc:mysql://localhost:3306/statement
# use this one for a separate server process so you can inspect the results
# (or add it to system properties with -D to override at run time).
# batch.jdbc.url=jdbc:hsqldb:hsql://localhost:9005/samples
batch.jdbc.user=root
batch.jdbc.password=password
batch.schema=statement
The values in the batch.properties file are those required in launch-context.xml:
batch.jdbc.driver: The fully qualified class name of the JDBC driver for the database you're using. Here, you use MySQL's driver: com.mysql.jdbc.Driver.batch.jdbc.url: The URL to the database you're connecting to for your JobRepository. For the example application, you use one database schema for all tables.batch.jdbc.user: The username for the database you're connecting to.batch.jdbc.password: The password for the database.batch.schema: In MySQL's case, the database you're using.
The last piece of the project setup is to update the launch-context.xml file to prune the beans that you don't need for this job and update the XSDs to use Spring 3 instead of Spring 2.5 (which they come configured to use). Listing 10-4 shows the updated statement/src/main/resources/launch-context.xml file.
Example 10.4. launch-context.xml
<?xml version="1.0" encoding="UTF-8"?>
<beans xmlns="http://www.springframework.org/schema/beans"
  xmlns:p="http://www.springframework.org/schema/p"
  xmlns:xsi="http://www.w3.org/2001/XMLSchema-instance"
  xsi:schemaLocation="http://www.springframework.org/schema/beans
    http://www.springframework.org/schema/beans/spring-beans-3.0.xsd">

  <bean id="jobExplorer"
    class="org.springframework.batch.core.explore.support.JobExplorerFactoryBean"
    p:dataSource-ref="dataSource" />
<bean id="jobLauncher"
class="org.springframework.batch.core.launch.support.SimpleJobLauncher">
<property name="jobRepository" ref="jobRepository" />
</bean>
<bean id="jobRepository"
class="org.springframework.batch.core.repository.support.JobRepositoryFactoryBean"
p:dataSource-/ref="dataSource" p:transactionManager-ref="transactionManager" />
<bean id="dataSource" class="org.apache.commons.dbcp.BasicDataSource">
<property name="driverClassName" value="${batch.jdbc.driver}" />
<property name="url" value="${batch.jdbc.url}" />
<property name="username" value="${batch.jdbc.user}" />
<property name="password" value="${batch.jdbc.password}" />
</bean>
<bean id="transactionManager"
class="org.springframework.jdbc.datasource.DataSourceTransactionManager"
lazy-init="true">
<property name="dataSource" ref="dataSource" />
</bean>
<bean id="placeholderProperties"
class="org.springframework.beans.factory.config.PropertyPlaceholderConfigurer">
<property name="location" value="classpath:batch.properties" />
<property name="systemPropertiesModeName"
value="SYSTEM_PROPERTIES_MODE_OVERRIDE" />
<property name="ignoreUnresolvablePlaceholders" value="true" />
<property name="order" value="1" />
</bean>
</beans>A quick walkthrough of this file shows that it looks like a normal applicationContext.xml file for Spring because ... it's a normal applicationContext.xml file from Spring. You begin with the standard XML namespace declarations for the file. From there, you define six beans:
jobExplorer: This bean is used by Spring Batch to access the JobRepository in a read-only mode. The JobExplorer's only dependency is a datasource.
JobLauncher: In order to run a job with Spring Batch, a JobLauncher is required. Here you keep things simple and use the
SimpleJobLauncherthat is provided by the framework. Although you could administer this job in a number of ways, in most enterprises jobs are administered by an external scheduler, so there is no reason to get fancy here. The JobLauncher has the JobRepository as its only dependency.JobRepository: The JobRepository provides CRUD operations for Spring Batch to persist state and other metadata about each job run. Because you use a persistent JobRepository, it requires a datasource and a transaction manager for its processing.
Datasource: There are many ways to obtain a datasource in Spring. In this case, defining one using Spring's
BasicDataSourcesuffices. The values for the JDBC connection are stored in thebatch.propertiesfile, which you update next.TransactionManager: When you begin reading data from and writing data to the database, this becomes a more important piece of the Spring Batch puzzle. Because you run this locally and with a single datasource, Spring JDBC's
DataSourceTransactionManagerdoes nicely.PlaceholderProperties: This bean handles the loading and population of any properties you choose to extract into your
batch.propertiesfile. For now, the only things you configure are the JDBC connection values.
With that, the setup of the statement job's project is complete. You now have an empty Spring Batch project: the database is configured to point to your database, and all the example code that is included has been removed.
Because Spring Batch jobs are designed to consist of steps that are independent of each other, you can develop them in their entirety independently. Over the course of the remainder of this chapter, you will develop the statement job using the project structure you just configured, the requirements discussed earlier this chapter and in Chapter 3, and the knowledge you've gained over the course of this book. The first step in the job is importing the customer and transaction data which is covered next.
As the job begins, it receives a file from another department that contains information about your customers and their transactions. Both types of data are included in the same CSV file. This section looks at how to configure the step to import the customer and transaction data into your database.
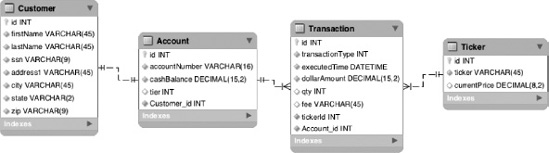
Before you get into the code, however, let's review the data model used for this job. The data model for this job consists of four tables. The Customer table contains all customer-related data including name, address, and Social Security number. Each customer is associated with an account in the Account table. The Account table contains information about how much cash a customer has in their account as well as the pricing tier they have been calculated to be part of for the month. As you would expect, the account has a one-to-many relationship to the Transaction table. Each of the customer's trades has a record in the Transaction table. The Transaction table contains information about the trade itself: the stock that was traded, how many shares were traded, how much the fee was, and so on. The final table is the Ticker table. This table is used to abstract the current values of each stock. Figure 10-3 shows the data model for the statement job.
In order to import the data you receive, you need to understand the format of the file you configure. The file consists of two record formats: one for the customer and one for the transactions. Listing 10-5 shows a sample of the file format.
Example 10.5. Sample of the customerTransaction.csv File
205866465,Joshua,Thompson,3708 Park,Fairview,LA,58517,3276793917668488
3276793917668488,SKT,5534,416811,2011-03-30 00:15:18
3276793917668488,KSS,5767,7074247,2011-04-02 07:00:08
3276793917668488,CSR,3887,6315693,2011-03-14 20:29:20
3276793917668488,EMD,8209,6445091,2011-03-19 18:52:56
3276793917668488,SYY,7980,9524343,2011-03-24 17:26:00
3276793917668488,BYM,4011,6870023,2011-03-05 09:35:18
This sample consists of the records for a single customer. The file you process for the example contains records for many customers. The initial customer record consists of eight fields:
Social Security number: This tax id number is unique for each customer. Although it isn't the primary key for the Customer table, it can be used to look up unique customers.
First name: The customer's first name.
Last name: The customer's last name.
Address: The customer's street address.
City: The city the customer lives in.
State: The state the customer lives in.
Zip code: The postal code for the customer.
Account number: The identifying number for the customer's account.
It's important to note that for processing purposes, the customers you process already exist in your database. This file is only used to update existing customers and accounts. Any record for a customer who doesn't exist (identified by their Social Security number) is invalid.
The records after a customer record and before the next customer record are the transaction records for the customer preceding them. Each transaction record consists of five fields:
Account number: The account number the transaction belongs to. This should match the account number of the previous customer record.
Stock ticker: The stock symbol for this transaction. This is used later to obtain the current price for the stock.
Price: The price of the stock when it was traded.
Quantity: The number of shares traded. Positive numbers mean the shares were purchased; negative numbers indicate they were sold.
Timestamp: The date and time when the transaction was executed.
To process this file, you begin by defining the job and its first step. The job configuration, like all the job configurations you've done in this book, is located in the statement/src/main/resources/jobs directory in a file called statementJob. This file for now contains the configuration for a single job (statementJob) with the first step configured. Listing 10-6 shows the configuration to start with.
Example 10.6. statementJob.xml
<?xml version="1.0" encoding="UTF-8"?>
<beans:beans xmlns="http://www.springframework.org/schema/batch"
  xmlns:beans="http://www.springframework.org/schema/beans"
  xmlns:xsi="http://www.w3.org/2001/XMLSchema-instance"
  xmlns:util="http://www.springframework.org/schema/beans"
  xsi:schemaLocation="http://www.springframework.org/schema/beans
    http://www.springframework.org/schema/beans/spring-beans-3.0.xsd
    http://www.springframework.org/schema/util
    http://www.springframework.org/schema/util/spring-util.xsd
    http://www.springframework.org/schema/batch
    http://www.springframework.org/schema/batch/spring-batch-2.1.xsd">

  <beans:import resource="../launch-context.xml"/>

  <step id="importCustomerAndTransactionData">
    <tasklet>
      <chunk reader="customerTransactionReader" processor="customerLookupItemProcessor"
        writer="customerTransactionItemWriter" commit-interval="100"/>
    </tasklet>
  </step>

  <job id="statementJob">
    <step id="step1" parent="importCustomerAndTransactionData"/>
  </job>
</beans:beans>
There are a couple of things to notice right away. The first is that the file in Listing 10-6 won't work by itself. As you can see, you configure the step importCustomerAndTransactionData to use an ItemReader (customerTransactionReader), ItemProcessor (customerLookupItemProcessor), and ItemWriter (customerTransactionWriter). Without these beans configured, the job won't run. The other thing to notice is that you define a few more XSDs than are currently in use. Rest assured that by the end of the chapter, they will all be used.
The configuration for the job as of right now consists of the inclusion of the launch-context.xml file, which you looked at in Listing 10-4, and the definition of the first step (importCustomerAndTransactionData) with its reader, processor and writer. Finally, it has the definition of the job itself, the statementJob. To get development started, let's begin by creating the ItemReader, customerTransactionReader.
When you consider the input file for this step as shown in Listing 10-5 and the data model you need to translate that data into, it quickly becomes apparent that customerTransactionReader isn't a simple FlatFileItemReader. Instead, this ItemReader is built by assembling a number of different components. This section looks at how to read in the input for the importCustomerAndTransactionData step.
The best way to think about customerTransactionReader is to visualize layers similar to your object model. The customer object has an account object, and the account object has many transactions under it. To be able to map your input file to an object model that represents this data model effectively, you need to use a layered approach to building your reader. Figure 10-4 shows how these layers stack up.
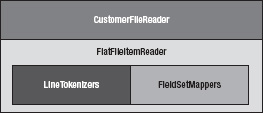
There are two essential layers for this reader. The first major layer, the FlatFileItemReader, works with the strings that make up the file you read in. This layer is responsible for parsing each record into objects that you can use in your batch process. The other layer, represented by the CustomerFileReader, is responsible for associating the objects in the correct way. You've looked at these different types of readers previously when you examined delimited files and files with multiple record formats in Chapter 7. Let's start by parsing the basics (Customer and Transaction). From there, you can add the abstraction of the Account and Address objects and associate them together.
The first layer of this reader, which handles parsing records, is very similar to the example for multiple record formats in Chapter 7. Before you begin parsing the records, Listing 10-7 shows the Customer and Transaction domain objects into which you parse the records.
Example 10.7. Customer and Transaction
package com.apress.springbatch.statement.domain;

public class Customer {

    private long id = −1l;
    private String firstName;
    private String lastName;
    private Address address;
    private Account account;
    private String taxId;

    // Accessors removed
    ...

    @Override
    public String toString() {
        String output = "Customer number " + id + ", " + firstName + " " + lastName;

        if(address != null) {
            output = output + " who lives in "
                + address.getCity() + "," + address.getState();
        }

        if(account != null && account.getTransactions() != null) {
            output = output + " has "
+ account.getTransactions().size() + " transactions.";
}
return output;
}
package com.apress.springbatch.statement.domain;
import java.math.BigDecimal;
import java.util.Date;
public class Transaction {
private long id;
private long accountId;
private String accountNumber;
private String ticker;
private long tickerId;
private long quantity;
private Date tradeTimestamp;
private BigDecimal dollarAmount;
private TransactionType type;
// Accessors removed
...
@Override
public String toString() {
return "Sold " + quantity + " of " + ticker;
}
}You should immediately notice in the Customer and Transaction classes that they both contain a variety of data types including an Address object and an Account object for the Customer object. Listing 10-8 shows the code for those additional domain objects.
Example 10.8. Account and Address
package com.apress.springbatch.statement.domain;

import java.math.BigDecimal;
import java.util.List;

public class Account {

    private long id = −1;
    private String accountNumber;
    private Customer cust;
    private BigDecimal cashBalance;
    private PricingTier tier;
    private List<Transaction> transactions;
// Accessors removed
...
}
package com.apress.springbatch.statement.domain;
public class Address {
private String address1;
private String city;
private String state;
private String zip;
// Accessors removed
...
}The fact that the Customer and Transaction domain objects have a number of different data types brings up an interesting issue. Although this is good in the world of objects, it should immediately signal to you that you need to write custom FieldSetMappers for each object to handle the appropriate data-type conversions required. Because the Transaction FieldSetMapper is simpler, you look at that one first in Listing 10-9.
Example 10.9. TransactionFieldSetMapper
package com.apress.springbatch.statement.reader;

import org.springframework.batch.item.file.mapping.FieldSetMapper;
import org.springframework.batch.item.file.transform.FieldSet;
import org.springframework.validation.BindException;

import com.apress.springbatch.statement.domain.Transaction;

public class TransactionFieldSetMapper implements FieldSetMapper<Transaction> {

    public Transaction mapFieldSet(FieldSet fieldSet) throws BindException {
        Transaction trans = new Transaction();

        trans.setAccountNumber(fieldSet.readString("accountNumber"));
        trans.setQuantity(fieldSet.readLong("quantity"));
        trans.setTicker(fieldSet.readString("stockTicker"));
        trans.setTradeTimestamp(fieldSet.readDate("timestamp", "yyyy-MM-dd HH:mm:ss"));
        trans.setDollarAmount(fieldSet.readBigDecimal("price"));

        return trans;
    }
}
As you can see in Listing 10-9, you use the data-type conversion features of the FieldSet implementation to convert the strings read in from your file to the data types required. In this case, you convert the strings to a long and a date (by specifying the correct pattern for the date). The other FieldSetMapper you need is for the Customer object (see Listing 10-10).
Example 10.10. CustomerFieldSetMapper
package com.apress.springbatch.statement.reader;

import org.springframework.batch.item.file.mapping.FieldSetMapper;
import org.springframework.batch.item.file.transform.FieldSet;
import org.springframework.validation.BindException;

import com.apress.springbatch.statement.domain.Account;
import com.apress.springbatch.statement.domain.Address;
import com.apress.springbatch.statement.domain.Customer;

public class CustomerFieldSetMapper implements FieldSetMapper<Customer> {

    public Customer mapFieldSet(FieldSet fieldSet) throws BindException {
        Customer customer = new Customer();

        customer.setFirstName(fieldSet.readString("firstName"));
        customer.setLastName(fieldSet.readString("lastName"));
        customer.setTaxId(fieldSet.readString("taxId"));
        customer.setAddress(buildAddress(fieldSet));
        customer.setAccount(buildAccount(fieldSet, customer));

        return customer;
    }

    private Account buildAccount(FieldSet fieldSet, Customer cust) {
        Account account = new Account();

        account.setAccountNumber(fieldSet.readString("accountNumber"));
        account.setCust(cust);

        return account;
    }

    private Address buildAddress(FieldSet fieldSet) {
        Address address = new Address();

        address.setAddress1(fieldSet.readString("address"));
        address.setCity(fieldSet.readString("city"));
        address.setState(fieldSet.readString("state"));
        address.setZip(fieldSet.readString("zip"));

        return address;
    }
}
CustomerFieldSetMapper has the responsibility of breaking the customer record into three objects: Customer, Address, and Account. As you can see in Listing 10-10, there isn't much to it besides moving the appropriate fields into the appropriate objects and manually building the relationships. Now that you have the ability to map FieldSets to their respective objects, you need to be able to tokenize the lines in the file into the FieldSets. Unfortunately, in this case, it's not quite that simple.
In the example in Chapter 7, you used a file that contained a prefix on each row. This allowed you to use Spring Batch's PatternMatchingCompositeLineMapper to specify a pattern that identifies each that LineTokenizer uses to parse the record. However, PatternMatchingCompositeLineMapper's pattern-matching ability is limited. It allows for only the verification of string literals and two types of wildcards (? for a single character and * for one or more characters). The records contained in your input file are too complex to be mapped using this form of pattern matching. Because of this, you need to create your own version of PatternMatchingCompositeLineMapper that applies a true regular expression to each line to determine what LineTokenizer (and subsequently, which FieldSetMapper) to use. Listing 10-11 shows RegularExpressionLineMapper.
Example 10.11. RegularExpressionLineMapper
package com.apress.springbatch.statement.reader;

import java.util.HashMap;
import java.util.Map;
import java.util.Map.Entry;
import java.util.regex.Matcher;
import java.util.regex.Pattern;

import org.springframework.batch.item.ParseException;
import org.springframework.batch.item.file.LineMapper;
import org.springframework.batch.item.file.mapping.FieldSetMapper;
import org.springframework.batch.item.file.transform.FieldSet;
import org.springframework.batch.item.file.transform.LineTokenizer;
import org.springframework.beans.factory.InitializingBean;

public class RegularExpressionLineMapper implements LineMapper<Object>, InitializingBean {

    private Map<String, LineTokenizer> tokenizers;
    private Map<String, FieldSetMapper<Object>> mappers;
    private Map<Pattern, LineTokenizer> patternTokenizers;
    private Map<LineTokenizer, FieldSetMapper<Object>> patternMappers;

    public Object mapLine(String input, int rowCount) throws Exception {

        LineTokenizer tokenizer = findTokenizer(input);
        FieldSet fields = tokenizer.tokenize(input);
        FieldSetMapper<Object> mapper = patternMappers.get(tokenizer);

        if(mapper != null) {
            return mapper.mapFieldSet(fields);
        }

        throw new ParseException("Unable to parse the input " + input);
    }

    private LineTokenizer findTokenizer(String input) {
        LineTokenizer tokenizer = null;
for (Entry<Pattern, LineTokenizer> entry : patternTokenizers.entrySet()) {
Matcher matcher = entry.getKey().matcher(input);
if(matcher.find()) {
tokenizer = entry.getValue();
break;
}
}
if(tokenizer != null) {
return tokenizer;
} else {
throw new ParseException("Unable to locate a tokenizer for " + input);
}
}
public void afterPropertiesSet() throws Exception {
patternTokenizers = new HashMap<Pattern, LineTokenizer>();
patternMappers = new HashMap<LineTokenizer, FieldSetMapper<Object>>();
for (Map.Entry<String, LineTokenizer> entry : tokenizers.entrySet()) {
Pattern pattern = Pattern.compile(entry.getKey());
patternTokenizers.put(pattern, entry.getValue());
patternMappers.put(entry.getValue(), mappers.get(entry.getKey()));
}
}
public void setLineTokenizers(Map<String, LineTokenizer> lineTokenizers) {
this.tokenizers = lineTokenizers;
}
public void setFieldSetMappers(Map<String, FieldSetMapper<Object>> fieldSetMappers) {
this.mappers = fieldSetMappers;
}
}RegularExpressionLineMapper is a basic implementation of the LineMapper interface. It implements the one required method, mapLine, to convert a String read in from a flat file to an object. The mapLine method begins by obtaining a LineTokenizer implementation based on the String the method received as input (more on that in a bit). It then uses that LineTokenizer implementation to parse the String into a FieldSet. With the String divided into its individual fields, the appropriate FieldSetMapper is retrieved, and the fields are mapped into a new instance of the object required. The new object is then returned.
To determine which LineTokenizer to use, you do two things. First, the afterPropertiesSet method (from the InitializerBean interface) creates two Maps. The first consists of regular expression keys to LineTokenizer values. The second consists of LineTokenizer keys to FieldSetMapper values. These two Maps are used in delegating to the appropriate implementations. You use these maps by looping through the keys of the patternTokenizers Map, applying each regular expression to the String you're trying to parse. When you find a regular expression that matches, you use the associated LineTokenizer to parse the String. The LineTokenizer from the previous step allows you to get the correct FieldSetMapper from the patternMappers Map and map the FieldSet to the correct object. If for some reason a LineTokenizer or a FieldSetMapper can't be found, a ParseException is thrown indicating that the record couldn't be parsed.
The last part of the parsing puzzle is to configure all the pieces. You need to configure the two FieldSetMappers, two LineTokenizers, a LineMapper and ItemReader all so your step can use them. Listing 10-12 contains the configuration of the pieces you've defined up to now.
Example 10.12. Configuring the Parsing of the customerTransaction File
...
<beans:bean id="customerTransactionFile" class="org.springframework.core.io.FileSystemResource">
  <beans:constructor-arg value="/input/customerTransaction.csv"/>
</beans:bean>

<beans:bean id="customerLineTokenizer"
  class="org.springframework.batch.item.file.transform.DelimitedLineTokenizer">
  <beans:property name="names"
    value="taxId,firstName,lastName,address,city,state,zip,accountNumber"/>
  <beans:property name="delimiter" value=","/>
</beans:bean>

<beans:bean id="transactionLineTokenizer"
  class="org.springframework.batch.item.file.transform.DelimitedLineTokenizer">
  <beans:property name="names" value="accountNumber,stockTicker,price,quantity,timestamp"/>
  <beans:property name="delimiter" value=","/>
</beans:bean>

<beans:bean id="customerFieldSetMapper"
  class="com.apress.springbatch.statement.reader.CustomerFieldSetMapper"/>

<beans:bean id="transactionFieldSetMapper"
  class="com.apress.springbatch.statement.reader.TransactionFieldSetMapper"/>

<beans:bean id="customerTransactionLineMapper"
  class="com.apress.springbatch.statement.reader.RegularExpressionLineMapper">
  <beans:property name="lineTokenizers">
    <beans:map>
      <beans:entry key="^d+,[A-Z][a-zA-Z]+,[A-Z][a-zA-Z]+,.*"
        value-ref="customerLineTokenizer"/>
      <beans:entry key="^d+,[A-Z. ]+,d+.*"
        value-ref="transactionLineTokenizer"/>
    </beans:map>
  </beans:property>
  <beans:property name="fieldSetMappers">
    <beans:map>
      <beans:entry key="^d+,[A-Z][a-zA-Z]+,[A-Z][a-zA-Z]+,.*"
        value-ref="customerFieldSetMapper"/>
      <beans:entry key="^d+,[A-Z. ]+,d+.*"
        value-ref="transactionFieldSetMapper"/>
    </beans:map>
  </beans:property>
</beans:bean> <beans:bean id="customerTransactionReader" class="org.springframework.batch.item.file.FlatFileItemReader"> <beans:property name="resource" ref="customerTransactionFile"/> <beans:property name="lineMapper" ref="customerTransactionLineMapper"/> </beans:bean> ...
In Listing 10-12, you begin the configuration with the input file configuration. It's a FileSystemResource like all your flat files have been; you specify the path to the file you process. From there, you configure the customer and transaction LineTokenizers. These are simple DelimitedLineTokenizers provided by the framework and configured to parse the comma-separated record format you defined earlier. Next are the customer and transaction FieldSetMappers. These are the two you wrote. Because they have no dependencies, they consist only of the bean definitions. The next (and largest) piece of the configuration is RegularExpressionLineMapper. It has two dependencies: a map of regular expressions to LineTokenizers and a map of the same regular expressions to FieldSetMappers. Each map contains a single entry for each record type. The ItemReader follows in the XML. In this case, you use a regular FlatFileItemReader for the implementation, passing it a reference to your input file and a reference to your LineMapper (RegularExpressionLineMapper).
That's all you need to read the input required for the customerTransaction.csv file. But reading is only half the process. The goal of this step is to get the data into your database. To do that, you need to update each item with some ids for referential integrity to work. You look at the ItemProcessor responsible for these updates in the next section.
Although the goal of this first step is to read the data from the customerTransaction.csv file and write it to the database, the customer and transaction data needs some processing before you can do the write. Per the requirements in Chapter 3, you need to insert customers if they don't exist currently in the database and update them if they do. In this section, you write an ItemProcessor to update the customer item if it exists in the database.
The items you get from customerTransactionReader can be either Customer objects or Transaction objects. Because of this, the ItemProcessor needs to determine which type it is, update the ticker id and the account id if it's a transaction, or look up the customer by social security number to get the database id to update the Customer object before passing it along. Listing 10-13 has the code for CustomerLookupItemProcessor.
Example 10.13. CustomerLookupItemProcessor
package com.apress.springbatch.statement.processor;

import org.springframework.batch.item.ItemProcessor;

import com.apress.springbatch.statement.dao.AccountDao;
import com.apress.springbatch.statement.dao.CustomerDao;
import com.apress.springbatch.statement.dao.TickerDao;
import com.apress.springbatch.statement.domain.Account;
import com.apress.springbatch.statement.domain.Customer;
import com.apress.springbatch.statement.domain.Ticker;
import com.apress.springbatch.statement.domain.Transaction;
import com.apress.springbatch.statement.domain.TransactionType;
import com.apress.springbatch.statement.exception.InvalidItemException;

public class CustomerLookupItemProcessor implements ItemProcessor<Object, Object> {

    private CustomerDao customerDao;
    private TickerDao tickerDao;
    private AccountDao accountDao;

    public Object process(Object curItem) throws Exception {
        if(curItem instanceof Customer) {
            doCustomerUpdate((Customer) curItem);
        } else if(curItem instanceof Transaction){
            doTransactionUpdate((Transaction) curItem);
        } else {
            throw new InvalidItemException("An invalid item was received: " + curItem);
        }

        return curItem;
    }

    private void doTransactionUpdate(Transaction curItem) {
        updateTicker(curItem);
        updateAccount(curItem);

        curItem.setType(TransactionType.STOCK);
    }

    private void updateAccount(Transaction curItem) {
        Account account = accountDao.findAccountByNumber(curItem.getAccountNumber());

        curItem.setAccountId(account.getId());
    }

    private void updateTicker(Transaction curItem) {
        Ticker ticker = tickerDao.findTickerBySymbol(curItem.getTicker());

        if(ticker == null) {
            Ticker newTicker = new Ticker();
            newTicker.setTicker(curItem.getTicker());

            tickerDao.saveTicker(newTicker);
            ticker = tickerDao.findTickerBySymbol(curItem.getTicker());
        }

        curItem.setTickerId(ticker.getId());
    }

    private void doCustomerUpdate(Customer curCustomer) {
        Customer storedCustomer = customerDao.findCustomerByTaxId(curCustomer.getTaxId());
        Account account = accountDao.findAccountByNumber(curCustomer.getAccount().getAccountNumber());
curCustomer.setId(storedCustomer.getId());
curCustomer.setAccount(account);
}
public void setCustomerDao(CustomerDao customerDao) {
this.customerDao = customerDao;
}
public void setTickerDao(TickerDao tickerDao) {
this.tickerDao = tickerDao;
}
public void setAccountDao(AccountDao accountDao) {
this.accountDao = accountDao;
}
}Listing 10-13 looks like it has quite a bit going on, but it's really not that bad. Like any ItemProcessor, the logic begins in the process method. Here you determine what type of item you're processing and pass it to the appropriate method to update that type.
For a Customer object, you look up the customer's database id and update the Customer object with it. You do the same for the customer's Account object before you return it to be written. For a Transaction object, you update the ticker object's id if the ticker is already in the database. If it isn't, you save it to the database for future objects to reference. You also update the account id on the Transaction object as well as identify the type of transaction before you return it to be written.
CustomerLookupItemProcessor requires a few data access objects (DAOs) to look up the ids you populate. First is CustomerDaoJdbc, which looks up the customer's id (see Listing 10-14).
Example 10.14. CustomerDaoJdbc
package com.apress.springbatch.statement.dao.impl;

import java.sql.ResultSet;
import java.sql.SQLException;
import java.util.List;

import org.springframework.jdbc.core.JdbcTemplate;
import org.springframework.jdbc.core.RowMapper;

import com.apress.springbatch.statement.dao.CustomerDao;
import com.apress.springbatch.statement.domain.Address;
import com.apress.springbatch.statement.domain.Customer;

public class CustomerDaoJdbc extends JdbcTemplate implements CustomerDao {

    private static final String FIND_BY_TAX_ID = "select * from customer c where ssn = ?";

    @SuppressWarnings("unchecked")
    public Customer findCustomerByTaxId(String taxId) {
        List<Customer> customers = query(FIND_BY_TAX_ID,
                new Object[] { taxId }, new RowMapper() {
public Object mapRow(ResultSet rs, int arg1)
throws SQLException {
Customer customer = new Customer();
customer.setId(rs.getLong("id"));
customer.setFirstName(rs.getString("firstName"));
customer.setLastName(rs.getString("lastName"));
customer.setTaxId(rs.getString("ssn"));
customer.setAddress(buildAddress(rs));
return customer;
}
private Address buildAddress(ResultSet rs)
throws SQLException {
Address address = new Address();
address.setAddress1(rs.getString("address1"));
address.setCity(rs.getString("city"));
address.setState(rs.getString("state"));
address.setZip(rs.getString("zip"));
return address;
}
});
if (customers != null && customers.size() > 0) {
return customers.get(0);
} else {
return null;
}
}
}CustomerDaoJdbc in Listing 10-14 is definitely more robust than it needs to be. As you can see, the findCustomerByTaxId method maps a full Customer object when you really only need its id. However, this approach makes the DAO much more reusable in the long run.
Next on the list of DAOs is AccountDaoJdbc. This is the same situation as the Customer DAO you just looked at. This DAO provides the ability to look up an Account by account number and returns a full Account object including transactions. Listing 10-15 shows the code.
Example 10.15. AccountDaoJdbc
package com.apress.springbatch.statement.dao.impl;

import java.sql.ResultSet;
import java.sql.SQLException;
import java.util.ArrayList;
import java.util.List;

import org.springframework.jdbc.core.JdbcTemplate;
import org.springframework.jdbc.core.RowMapper;

import com.apress.springbatch.statement.dao.AccountDao;
import com.apress.springbatch.statement.domain.Account;
import com.apress.springbatch.statement.domain.Address;
import com.apress.springbatch.statement.domain.Customer;
import com.apress.springbatch.statement.domain.PricingTier;
import com.apress.springbatch.statement.domain.Transaction;
import com.apress.springbatch.statement.domain.TransactionType;

public class AccountDaoJdbc extends JdbcTemplate implements AccountDao {

    private static final String FIND_BY_ACCOUNT_NUMBER = "select a.id, " +
        "a.accountNumber, a.cashBalance, a.tier, a.customer_id, c.firstName, " +
        "c.lastName, c.ssn, c.address1, c.city, c.state, c.zip, t.id as transaction_id, " +
        "t.transactionType, t.executedTime, t.dollarAmount, t.qty, t.tickerId, t.fee  " +
        "from account a inner join customer c on a.customer_id = c.id left outer join " +
        "transaction t on a.id = t.account_id where accountNumber = ?";

    private final class AccountRowMapper implements RowMapper {
        public Object mapRow(ResultSet rs, int arg1)
                throws SQLException {
            Account account = new Account();

            account.setAccountNumber(rs.getString("accountNumber"));
            account.setCashBalance(rs.getBigDecimal("cashBalance"));
            account.setTier(PricingTier.convert(rs.getInt("tier")));
            account.setId(rs.getLong("id"));
            account.setCust(buildCustomer(rs));
            account.setTransactions(buildTransactions(rs));

            return account;
        }

        private List<Transaction> buildTransactions(ResultSet rs) throws SQLException {
            List<Transaction> transactions = new ArrayList<Transaction>();

            do {
                if(rs.getLong("transaction_id") >= 0) {
                    Transaction curTransaction = new Transaction();
                    curTransaction.setAccountId(rs.getLong("id"));
                    curTransaction.setAccountNumber(rs.getString("accountNumber"));
                    curTransaction.setDollarAmount(rs.getBigDecimal("dollarAmount"));
                    curTransaction.setId(rs.getLong("transaction_id"));
                    curTransaction.setQuantity(rs.getLong("qty"));
                    curTransaction.setTickerId(rs.getLong("tickerId"));
                    curTransaction.setTradeTimestamp(rs.getDate("executedTime"));

curTransaction.setType(TransactionType.fromIntValue(rs.getInt("transactionType")));

                    transactions.add(curTransaction);
                }
} while(rs.next());
if(transactions.size() > 0) {
rs.previous();
}
return transactions;
}
private Customer buildCustomer(ResultSet rs) throws SQLException {
Customer customer = new Customer();
customer.setId(rs.getLong("customer_id"));
customer.setFirstName(rs.getString("firstName"));
customer.setLastName(rs.getString("lastName"));
customer.setTaxId(rs.getString("ssn"));
customer.setAddress(buildAddress(rs));
return customer;
}
private Address buildAddress(ResultSet rs)
throws SQLException {
Address address = new Address();
address.setAddress1(rs.getString("address1"));
address.setCity(rs.getString("city"));
address.setState(rs.getString("state"));
address.setZip(rs.getString("zip"));
return address;
}
}
@SuppressWarnings("unchecked")
public Account findAccountByNumber(String accountNumber) {
List<Account> accounts = query(FIND_BY_ACCOUNT_NUMBER,
new Object[] { accountNumber }, new AccountRowMapper());
if (accounts != null && accounts.size() > 0) {
return accounts.get(0);
} else {
return null;
}
}
}The last DAO you need to implement is the ticker DAO. This one needs to provide a bit more functionality. As you process each of the transactions in the ItemProcessor, you try to update the Transaction object with the id of the ticker involved in the sale. However, if the ticker isn't found, you save a new copy of it and associate the Transaction object with that new Ticker object. Because of this, you need to implement not only the lookup functionality but the save as well. Listing 10-16 shows the code for TickerDaoJdbc.
Example 10.16. TickerDaoJdbc
package com.apress.springbatch.statement.dao.impl;

import java.math.BigDecimal;
import java.sql.ResultSet;
import java.sql.SQLException;
import java.util.List;

import org.springframework.jdbc.core.JdbcTemplate;
import org.springframework.jdbc.core.RowMapper;

import com.apress.springbatch.statement.dao.TickerDao;
import com.apress.springbatch.statement.domain.Ticker;
import com.apress.springbatch.statement.domain.Transaction;

public class TickerDaoJdbc extends JdbcTemplate implements TickerDao {

    private static final String FIND_BY_SYMBOL = "select * from ticker t where ticker = ?";
    private static final String SAVE_TICKER = "insert into ticker (ticker, currentPrice) values (?,?)";

    @SuppressWarnings("unchecked")
    public Ticker findTickerBySymbol(String symbol) {
        List<Ticker> tickers = query(FIND_BY_SYMBOL, new Object [] {symbol}, new RowMapper() {

            public Object mapRow(ResultSet rs, int arg1) throws SQLException {
                Ticker ticker = new Ticker();

                ticker.setId(rs.getLong("id"));
                ticker.setPrice(rs.getBigDecimal("currentPrice"));
                ticker.setTicker(rs.getString("ticker"));

                return ticker;
            }
        });

        if(tickers != null && tickers.size() > 0) {
            return tickers.get(0);
        } else {
            return null;
        }
    }

    public void saveTicker(Ticker ticker) {
        update(SAVE_TICKER, new Object [] {ticker.getTicker(), ticker.getPrice()});
    }
}
By looking up the customer in the ItemProcessor and updating the item with the database id before passing it onto the writer, you allow the writer to be dumb and do nothing more than a typical save-or-update style operation. Without this, your ItemWriter would need to do both a lookup and an insert, which isn't the behavior you're looking for in an ItemWriter.
The configuration for the job needs to be updated to include the new ItemProcessor. To configure the ItemProcessor, you add it to the statementJob.xml file as well as the DAOs the ItemProcessor is dependent on. Listing 10-17 shows the configuration to add to the statementJob.xml file.
Example 10.17. Configuration for customerLookupItemProcessor
...
<beans:bean id="customerLookupItemProcessor"
  class="com.apress.springbatch.statement.processor.CustomerLookupItemProcessor">
  <beans:property name="customerDao" ref="customerDao"/>
  <beans:property name="tickerDao" ref="tickerDao"/>
  <beans:property name="accountDao" ref="accountDao"/>
</beans:bean>

<beans:bean id="customerDao"
  class="com.apress.springbatch.statement.dao.impl.CustomerDaoJdbc">
  <beans:property name="dataSource" ref="dataSource"/>
</beans:bean>

<beans:bean id="tickerDao"
  class="com.apress.springbatch.statement.dao.impl.TickerDaoJdbc">
  <beans:property name="dataSource" ref="dataSource"/>
</beans:bean>

<beans:bean id="accountDao"
  class="com.apress.springbatch.statement.dao.impl.AccountDaoJdbc">
  <beans:property name="dataSource" ref="dataSource"/>
</beans:bean>
...
The added configuration shown in Listing 10-17 begins with the configuration of CustomerLookupItemProcessor itself. The ItemProcessor is dependent only on the DAOs you coded in this section, which are also configured as the next three beans; each requires only a reference to a datasource.
The last piece of the process to import the customer and transaction data is to write the data to the database. The required ItemWriters are covered in the next section.
The last piece of importing the customer and transaction data is updating the database with your newly read items. This section looks at how to write both the Customer items and Transaction items processed in this step.
Spring Batch provides a great tool to handle the writing for this step: ClassifierCompositeItemWriter. With its ability to determine which writer to use based on a classifier paired with Spring Batch's SubclassClassifier, which allows you to define class-to-ItemWriter associations, it's a perfect fit for this type of problem. Figure 10-5 shows the structure of the importCustomerAndTransaction step as a whole.

Figure 10-5 shows that you have the FlatFileItemReader and your implementation of the ItemProcessor (CustomerLookupItemProcessor). It also shows that you define three ItemWriters for this step: customerImportWriter as a JdbcBatchItemWriter; followed by the transactionImportWriter, which is also a JdbcBatchItemWriter; and the ClassifierCompositeItemWriter defined by the bean customerTransactionItemWriter, which wraps those two ItemWriters. This maps Customer items to one writer and Transaction items to the other.
The nice part about this step's writers is that they require zero code. The JdbcBatchItemWriters both look the same except for the SQL being used. For customerImportWriter, you use an update statement because this step only updates existing customers' information and doesn't add new customers. However, for transactionImportWriter, you insert each one new, so it uses an insert statement as expected. Listing 10-18 shows the configuration for all three of this step's ItemWriters.
Example 10.18. ItemWriters for the Customer and Transaction Import as Configured in statementJob.xml
...
<beans:bean id="customerImportWriter"
  class="org.springframework.batch.item.database.JdbcBatchItemWriter">
  <beans:property name="dataSource" ref="dataSource"/>
  <beans:property name="sql"
    value="update customer set firstName = :firstName, lastName = :lastName, address1 = :address.address1, city = :address.city, state = :address.state, zip = :address.zip where ssn = :taxId"/>
  <beans:property name="itemSqlParameterSourceProvider">
    <beans:bean

class="org.springframework.batch.item.database.BeanPropertyItemSqlParameterSourceProvider"/>
  </beans:property>
</beans:bean>

<beans:bean id="transactionImportWriter"
  class="org.springframework.batch.item.database.JdbcBatchItemWriter">
  <beans:property name="dataSource" ref="dataSource"/>
  <beans:property name="sql"
    value="insert into transaction (transactionType, executedTime, dollarAmount, qty,
tickerId, account_id) values (:type.intValue, :tradeTimestamp, :dollarAmount, :quantity, :tickerId, :accountId)"/>
  <beans:property name="itemSqlParameterSourceProvider">
    <beans:bean
class="org.springframework.batch.item.database.BeanPropertyItemSqlParameterSourceProvider"/>
  </beans:property>
</beans:bean>
<beans:bean id="customerTransactionItemWriter"
class="org.springframework.batch.item.support.ClassifierCompositeItemWriter">
<beans:property name="classifier">
<beans:bean class="org.springframework.batch.classify.SubclassClassifier">
<beans:property name="typeMap">
<beans:map>
<beans:entry key="com.apress.springbatch.statement.domain.Customer"
value-ref="customerImportWriter"/>
<beans:entry key="com.apress.springbatch.statement.domain.Transaction"
value-ref="transactionImportWriter"/>
</beans:map>
</beans:property>
</beans:bean>
</beans:property>
</beans:bean>
...Each of the JdbcBatchItemWriters as shown in Listing 10-18 provides the same three dependencies. First, they provide a datasource to be able to connect to the database. Second, they provide the SQL to be executed for each item. In both cases, you provide a statement using named parameters. This allows you to use BeanPropertyItemSqlParameterSourceProvider as your third dependency to set the values for PreparedStatement.
Note
The BeanPropertyItemSqlParameterSourceProvider supports dot notation when referring to the properties to be set in your SQL, such as address.city and address.state.
The last element of this step's configuration is the driver for the ItemWriters, customerTransactionItemWriter. This ItemWriter sends all items of type Customer to customerImportWriter and all items of type Transaction to the writer transactionImportWriter. Although it isn't used in this example, SubclassClassifier does what it says in that it identifies not only by type but by subtype as well. If you had items that extended Customer (VIPCustomer, for example), those would be routed to customerImportWriter as well.
Believe it or not, that is all you need to be able to import the customer transaction file. If you build the project right now using the mvn clean install command from the root of the project, and then execute it, you see that your customer records are updated, the transactions are imported, and all the stocks that have been traded have a single record in the Ticker table.
The next section looks at the next step, which consists of downloading the current prices for each of the stocks you just imported.
After you've imported the transactions, you can get the current prices of all the stocks your customers currently hold. This allows you to generate a statement that accurately displays what your customers' current investments are worth. This section looks at how to download the current prices for the stocks your customers hold.
There are a couple different ways you can approach downloading the current stock prices you need:
You can use an ItemReader that returns an item representing the stock symbol for which you need to get the price. From there, you can get the price for each of the stock tickers and write it to a file to be imported later.
You can use an ItemReader to read a single stream from the web service, getting all the stock prices at once.
Although the first option fits better with the components of Spring Batch, let's consider what you're attempting to do. The New York Stock Exchange (NYSE) has over 2,000 listed stocks, not to mention bonds, mutual funds, and other securities. To loop through each of these financial products one by one and make a web service call to get a single number (the closing price of the stock) isn't a practical way to process this data. Because of this, this example uses option 2.
This opens up a different can of worms. Although Spring Batch provides a nice array of ItemReader implementations, it doesn't offer one that reads from a URL. To implement this functionality, you have to create your own custom URL reader. This reader loads all the stocks that your customers currently hold, calls a web service to obtain the closing price for each ticker, and returns the response as a single string to be written out as a file by the writer.
To start, let's create a DAO to obtain a list of all the stock tickers your customers currently have. To do this, you add a method to the ticker DAO to return a list of tickers for which you need to get prices. Listing 10-19 shows the updated TickerDaoJdbc with the new method.
Example 10.19. TickerDao Jdbc
package com.apress.springbatch.statement.dao.impl;

import java.math.BigDecimal;
import java.sql.ResultSet;
import java.sql.SQLException;
import java.util.List;

import org.springframework.jdbc.core.JdbcTemplate;
import org.springframework.jdbc.core.RowMapper;

import com.apress.springbatch.statement.dao.TickerDao;
import com.apress.springbatch.statement.domain.Ticker;
import com.apress.springbatch.statement.domain.Transaction;

public class TickerDaoJdbc extends JdbcTemplate implements TickerDao {

    private static final String FIND_BY_SYMBOL = "select * from ticker t where ticker = ?";
    private static final String SAVE_TICKER =
      "insert into ticker (ticker, currentPrice) values (?,?)";
    private static final String FIND_ALL =
      select distinct ticker from ticker order by ticker limit ?, ?";

    @SuppressWarnings("unchecked")
    public Ticker findTickerBySymbol(String symbol) {
        List<Ticker> tickers = query(FIND_BY_SYMBOL, new Object [] {symbol}, new RowMapper() {
public Object mapRow(ResultSet rs, int arg1) throws SQLException {
Ticker ticker = new Ticker();
ticker.setId(rs.getLong("id"));
ticker.setPrice(rs.getBigDecimal("currentPrice"));
ticker.setTicker(rs.getString("ticker"));
return ticker;
}
});
if(tickers != null && tickers.size() > 0) {
return tickers.get(0);
} else {
return null;
}
}
public void saveTicker(Ticker ticker) {
update(SAVE_TICKER, new Object [] {ticker.getTicker(), ticker.getPrice()});
}
@SuppressWarnings("unchecked")
public List<String> getTickersPaged(int page, int pageSize) {
return queryForList(FIND_ALL,
new Object [] {(page * pageSize), pageSize},
String.class);
}
}The new method getTickersPaged returns a list of stock tickers. Notice that you're paginating the results. The reason is that the web service you use can't take large numbers of stock tickers at once, so you break up the list.
After you can get the stock tickers from the Transactions table, you can create your web service call. In this case, you don't need to use a web service client. All you need to do is make a simple HTTP GET request and get the String response. For this, you use Apache Commons' HttpClient. To use it, you have to add the library to your POM file. Listing 10-20 lists the dependency required.
Example 10.20. HttpClient Dependency
...
<dependency>
  <groupId>org.apache.httpcomponents</groupId>
  <artifactId>httpclient</artifactId>
  <version>4.1</version>
</dependency>
...
With the dependency addressed, you can write your reader. This reader consists of formatting the URL, making the request to obtain the stock prices, and returning the String response. The only logic you need to be concerned with is storing the results before you return them the first time, because you only want to make the request once in the case of an import failure. If you've already retrieved the results, then the next time you come through, you can return null to indicate that the input has been exhausted. Listing 10-21 shows UrlReader.
Example 10.21. UrlReader
package com.apress.springbatch.statement.reader;

import java.net.URI;
import java.util.List;

import org.apache.commons.io.IOUtils;
import org.apache.commons.lang.StringUtils;
import org.apache.http.HttpEntity;
import org.apache.http.HttpResponse;
import org.apache.http.client.HttpClient;
import org.apache.http.client.methods.HttpGet;
import org.apache.http.impl.client.DefaultHttpClient;
import org.springframework.batch.item.ExecutionContext;
import org.springframework.batch.item.ItemStreamException;
import org.springframework.batch.item.ItemStreamReader;
import org.springframework.batch.item.ParseException;
import org.springframework.batch.item.UnexpectedInputException;

import com.apress.springbatch.statement.dao.TickerDao;

public class UrlReader implements ItemStreamReader<String> {

    private String host;
    private String path;
    private int curPage = −1;
    private int pageSize = 200;
    private TickerDao tickersDao;

    public String read() throws Exception, UnexpectedInputException,
            ParseException {

        HttpClient client = new DefaultHttpClient();

        String buildQueryString = buildQueryString();

        if(buildQueryString == null) {
            return null;
        }

        URI uri = new URI("http", host, path, buildQueryString, null);

        HttpGet get = new HttpGet(uri);

        HttpResponse response = client.execute(get);
HttpEntity entity = response.getEntity();
String stockPrices = IOUtils.toString(entity.getContent());
stockPrices = StringUtils.strip(stockPrices);
if(stockPrices != null && stockPrices.length() > 0) {
return stockPrices;
} else {
return null;
}
}
private String buildQueryString() throws Exception {
List<String> tickers = tickersDao.getTickersPaged(curPage, pageSize);
if(tickers == null || tickers.size() == 0) {
return null;
}
StringBuilder tickerList = new StringBuilder("s=");
for (String ticker : tickers) {
tickerList.append(ticker + "+");
}
tickerList = new StringBuilder(tickerList.substring(0, tickerList.length() - 1));
return tickerList.append("&f=sl1").toString();
}
public void close() throws ItemStreamException {
}
public void open(ExecutionContext executionContext) throws ItemStreamException {
if(executionContext.containsKey("step2.tickers.page")) {
curPage = (Integer) executionContext.get("step2.tickers.page");
} else {
executionContext.put("step2.tickers.page", curPage);
}
}
public void update(ExecutionContext executionContext) throws ItemStreamException {
executionContext.put("step2.tickers.page", curPage);
curPage++;
}
public void setTickersDao(TickerDao tickersDao) {
this.tickersDao = tickersDao;
}
public void setHost(String host) {
this.host = host;
}public void setPath(String path) {
this.path = path;
}
public void setPageSize(int pageSize) {
this.pageSize = pageSize;
}
}The UrlReader class, like any ItemReader, begins with the read method. In it, you build a query string and then use HttpClient to send an HTTP GET request to the web service. The results you get back are in a CSV format: ticker, price.
To create the query string, you call the ticker DAO to obtain the current page of stock tickers to price. This reader is stateful, so it keeps track of where it is in the list of stocks by page number. You use the ItemStream's open and update methods to reset the page count on a restart and update the current page you're processing, respectively.
The last step of putting this reader to use is to configure it and your DAO. The DAO has a single dependency of a datasource. UrlReader takes three dependencies: a host name, a path, and a reference to the DAO. Finally, you can add the second step, retrieveStockPrices, with references to your reader. The configuration for these pieces is shown in Listing 10-22.
Example 10.22. Configuring the retrieveStockPrices Step
...
<beans:bean id="stockPriceWebServiceReader"
  class="com.apress.springbatch.statement.reader.UrlReader">
  <beans:property name="host" value="download.finance.yahoo.com"/>
  <beans:property name="path" value="/d/quotes.csv"/>
  <beans:property name="tickersDao" ref="tickerDao"/>
</beans:bean>

<step id="retrieveStockPrices">
  <tasklet>
    <chunk reader="stockPriceWebServiceReader" writer="stockFileWriter" commit-interval="1"/>
  </tasklet>
</step>
...
<job id="statementJob">
  <step id="step1" parent="importCustomerAndTransactionData" next="step2"/>
  <step id="step2" parent="retrieveStockPrices"/>
</job>
...
With the input side of step 2 complete, let's look at writing the values you get back from the web service to a file. This couldn't be easier using Spring Batch's declarative ItemWriters.
Because the output from the web service is in CSV format when you receive it, all you needed to do is some simple cleanup (removing whitespace at the start and end of each chunk, which was done in your UrlReader) and you can pass it on. The output you receive from Yahoo! is in CSV format already, so your ItemWriter becomes significantly simplified. In this case, because your item is a String, using the FlatFileItemWriter with a PassThroughLineAggregator works perfectly. Listing 10-23 shows the configuration for this ItemWriter.
Example 10.23. The stockFileWriter Configuration
...
<beans:bean id="stockFile" class="org.springframework.core.io.FileSystemResource">
  <beans:constructor-arg value="/output/stockFile.csv"/>
</beans:bean>

<beans:bean id="stockFileWriter"
  class="org.springframework.batch.item.file.FlatFileItemWriter">
  <beans:property name="resource" ref="stockFile" />
  <beans:property name="lineAggregator">
    <beans:bean
      class="org.springframework.batch.item.file.transform.PassThroughLineAggregator"/>
  </beans:property>
</beans:bean>
...
You can't get much simpler for an ItemWriter. By providing a file to write to and using a String as the item, there is nothing for Spring Batch to do other than write the String to the file. Short, sweet, and to the point.
When you build and run the job with only the first and second steps fully functional, the end result of step 2 is a CSV file that looks like what is shown in Listing 10-24.
Example 10.24. Output of Step 2
"A",42.94
"AA",16.11
"AAI",7.30
"AAP",64.80
"AAR",24.04
"AAV",8.31
"AB",21.57
"ABA",25.6231
"ABB",23.14
As you can see, the file consists of the stock ticker followed by the closing price of the previous day. The next section looks at the process of importing this file into your Ticker table.
In the previous step, you read the results of a web service call and wrote it to disk to import. You might be wondering, why not just read it straight into the database? The main reason is that if something goes wrong with the import step (after you've successfully downloaded the stock prices), you don't have to rerequest the prices. Once you've successfully received the stock prices, you can skip step 2 if the import fails.
Because of this, the third step is dedicated to reading the file generated in the previous step and updating the database with its contents. This section looks at how to write the reader and writer appropriate for the import of the stock price file.
Unlike the reader from step 2, which wasn't exactly an ItemReader you need to write every day, this ItemReader is much more off the shelf. For this, you use the FlatFileItemReader and the DelimitedLineTokenizer to read in each stock ticker and parse it into a Ticker item. The domain object you use for this step, Ticker, consists of nothing more than two fields, ticker and price. Listing 10-25 shows the Ticker class.
Example 10.25. Ticker
package com.apress.springbatch.statement.domain;

import java.math.BigDecimal;

public class Ticker {

    private long id;
    private String ticker;
    private BigDecimal price;

    // Accessors go here
   ...

    @Override
    public String toString() {
        return ticker + " closed at " + price;
    }
}
For the ItemReader, you define a FlatFileItemReader with a resource (the output file from step 2) and a LineMapper. Because the output you receive from step 2 is comma delimited as shown in Listing 10-24, you use the DefaultLineMapper with a DelimitedLineTokenizer to chop up the line and Spring Batch's BeanWrapperFieldSetMapper to map the FieldSet to your domain object by naming convention. The configuration for your ItemReader and the importStockPrices step is in Listing 10-26.
Example 10.26. Configuration of stockFileReader and the importStockPrices Step
...
<beans:bean id="stockFileReader" class="org.springframework.batch.item.file.FlatFileItemReader">
  <beans:property name="resource" ref="stockFile" />
  <beans:property name="lineMapper">
    <beans:bean class="org.springframework.batch.item.file.mapping.DefaultLineMapper">
      <beans:property name="lineTokenizer">
        <beans:bean class="org.springframework.batch.item.file.transform.DelimitedLineTokenizer">
          <beans:property name="names"value="ticker,price"/>
<beans:property name="delimiter" value=","/>
</beans:bean>
</beans:property>
<beans:property name="fieldSetMapper">
<beans:bean
class="org.springframework.batch.item.file.mapping.BeanWrapperFieldSetMapper">
<beans:property name="prototypeBeanName" value="stock"/>
</beans:bean>
</beans:property>
</beans:bean>
</beans:property>
</beans:bean>
<beans:bean id="stock" class="com.apress.springbatch.statement.domain.Ticker"
scope="prototype"/>
<step id="importStockPrices">
<tasklet>
<chunk reader="stockFileReader" writer="tickerUpdateWriter" commit-interval="100"/>
</tasklet>
</step>
<job id="statementJob" incrementer="idIncrementer">
<step id="step1" parent="importCustomerAndTransactionData" next="step2"/>
<step id="step2" parent="retrieveStockPrices" next="step3"/>
<step id="step3" parent="importStockPrices"/>
</job>
...With this reader configured, you can now obtain the closing prices for all the stocks your customers currently hold as well as read in the output you receive from the web service so that you can import it into your database. In the next section, you look at how to update the database with the stock prices you received in step 2.
With the ability to read stock prices in from your file configured, you can move to updating the database with the values you read. This section looks at the configuration for the ItemWriter required to import the stock prices you download in step 2.
In the previous section, you used a FlatFileItemReader to read in the CSV generated in step 2. To update the tickers stored as part of the process of updating the Transaction in step 1, you again use a simple JdbcBatchItemWriter to update the currentPrice column of the Ticker table. Listing 10-27 shows the configuration of the ItemWriter required for this step.
Example 10.27. tickerUpdateItemWriter Configuration
...
<beans:bean id="tickerUpdateWriter"
  class="org.springframework.batch.item.database.JdbcBatchItemWriter">
  <beans:property name="dataSource" ref="dataSource"/>
  <beans:property name="sql"
value="update ticker set currentPrice = :price where ticker = :ticker"/>
  <beans:property name="itemSqlParameterSourceProvider">
    <beans:bean

class="org.springframework.batch.item.database.BeanPropertyItemSqlParameterSourceProvider"/>
  </beans:property>
</beans:bean>
...
With the tickers updated, the data import is complete. From here, you can apply the business rules as required and finally output your customers' statements. The first step of applying business logic for this job is determining the pricing tier to which each of your customers belongs. The next section looks at how to apply that logic to your customers' accounts.
The Apress Investment Company charges for each transaction a customer chooses to make through it. However, Apress Investments gives discounts based on how many transactions a customer makes in a month. The more transactions the customer makes, the less the company charges. The pricing is divided into four tiers. The number of transactions a customer performed in a month indicates each tier. Pricing for a customer is based on the tier they fall into. In this section you create an ItemProcessor that calculates the tier each customer falls into for the month.
Before you get into the technical aspects of the calculation, Table 10-1 shows how each tier is defined and the related price that each transaction is charged based on the tier.
Table 10.1. Pricing Tiers
Tier | Trades | Fee per Transaction |
|---|---|---|
I | <=1,000 | $9 + .1% of the purchase price |
II | 1,001: 100,000 | $3 |
III | 100,001: 1,000,000 | $2 |
IV | > 1,000,000 | $1 |
You may wonder why you need to calculate the tiers prior to calculating the fees and why you can't just do it all in one step. The reasons are twofold. First, processing the tiers requires only the number of transactions a customer performed in a month and not the transactions themselves. Because of this, you don't need to load all the transactions to make this calculation. Second, because knowing the tier is a prerequisite for calculating the fees, it would require a lot of state management to pull off this type of calculation in a single step, and with large numbers of transactions doing so would be impractical. Finally, this approach also provides you with a safer implementation because this step can fail without impacting the pricing of the transactions.
To implement this piece of functionality, you use a JDBC-based ItemReader to read in the data required to determine the pricing tier. Once the data for each account has been read in, it's passed to the ItemProcessor to calculate what tier the customer's account falls into. Finally, a JDBC-based ItemWriter is used to update the account record of the user. This section looks at how to code and configure the required components to implement the pricing tiers' calculation.
There are two ways you can get the number of transactions for each account:
You can load each account and its list of transactions (similar to how Hibernate would do it) and get the size of the transactions list.
You can create a custom object and query just for the account number and the count of transactions the account has had.
The problem with the first option is that it doesn't scale well. As customers accumulate more and more transactions, this approach may work well for counts in the thousands; but when you have customers who literally make millions of trades per month,[30] this approach falls apart in a painful way. Instead, in this example you opt for the second choice.
For this choice, you need to create a special domain object for this step. It contains the account number and the number of transactions the account has had over the given period. Listing 10-28 shows the code for the AccountTransactionQuantity domain object.
Example 10.28. AccountTransactionQuantity
package com.apress.springbatch.statement.domain;

public class AccountTransactionQuantity {

    private String accountNumber;
    private long transactionCount;
    private PricingTier tier;

    // Accessors go here
    ..

    @Override
    public String toString() {
        return accountNumber + " has " + transactionCount +
            " transactions this month wich falls into tier " + tier;
    }
}
If you remember from the discussion in Chapter 7 about JDBC ItemReaders, there are two possible approaches: cursor based and paged based. For this reader, you a cursor-based implementation. The reasons are that it's the default behavior for Spring Batch and there is no improvement in a case like this from a performance perspective between the two approaches.
To create the ItemReader, you need to create a RowMapper implementation and configure both the RowMapper and the JdbcCursorItemReader. Listing 10-29 has the code for the RowMapper.
Example 10.29. AccountTransactionQuantityRowMapper
package com.apress.springbatch.statement.reader;

import java.sql.ResultSet;
import java.sql.SQLException;

import org.springframework.jdbc.core.RowMapper;

import com.apress.springbatch.statement.domain.AccountTransactionQuantity;

public class AccountTransactionQuantityRowMapper implements RowMapper {

    public AccountTransactionQuantity mapRow(ResultSet resultSet, int arg1)
      throws SQLException {
        AccountTransactionQuantity qty = new AccountTransactionQuantity();

        qty.setAccountNumber(resultSet.getString("accountNumber"));
        qty.setTransactionCount(resultSet.getLong("qty"));

        return qty;
    }
}
To configure AccountTransactionQuantityRowMapper (wow, that's a mouthful) and the JdbcCursorItemReader is very easy. The JdbcCursorItemReader is the only thing with dependencies, and you configure only the basics here: a datasource, a row mapper, and the SQL statement to be executed. Listing 10-30 contains the configuration for this ItemReader and the calculateTiers step.
Example 10.30. calculateTiers Step Configuration with ItemReader
...
<beans:bean id="accountTransactionQtyItemReader"
  class="org.springframework.batch.item.database.JdbcCursorItemReader">
  <beans:property name="dataSource" ref="dataSource"/>
  <beans:property name="sql"
    value="select a.accountNumber, count(*) as qty from account a inner join transaction t on t.account_id = a.id group by a.accountNumber"/>
  <beans:property name="rowMapper" ref="accountTransactionQtyRowMapper"/>
</beans:bean>

<beans:bean id="accountTransactionQtyRowMapper"
  class="com.apress.springbatch.statement.reader.AccountTransactionQuantityRowMapper"/>

<step id="calculateTiers">
  <tasklet>
    <chunk reader="accountTransactionQtyItemReader" processor="pricingTiersItemProcessor"
      writer="tiersUpdateWriter" commit-interval="10"/>
  </tasklet>
</step>
<job id="statementJob" incrementer="idIncrementer"> <step id="step1" parent="importCustomerAndTransactionData" next="step2"/> <step id="step2" parent="retrieveStockPrices" next="step3"/> <step id="step3" parent="importStockPrices" next="step4"/> <step id="step4" parent="calculateTiers"/> </job> ...
The configuration in Listing 10-30 begins with the definition of the accountTransactionQtyItemReader—the JdbcCursorItemReader with its three dependencies: a datasource, the select statement that gets you each account number and the number of transactions the account has, and a reference to the RowMapper implementation you developed. The configuration for this RowMapper is next, followed by the step that is configured to use the ItemReader.
Now that you can read in a customer's transaction history, you can calculate the pricing tier they fall into. In the next section, you look at the ItemProcessor you use to do that calculation.
In the previous section, you defined an AccountTransactionQuantity object that you use as the item into which your reader reads the data. It contains two fields: an account number and a transaction count (the number of transactions the customer performed during the month). To calculate the tiers, you add a PricingTier reference to the AccountTransactionQuantity object. Listing 10-31 shows the updated AccountTransactionQuantity object and the related PricingTier enum.
Example 10.31. AccountTransactionQuantity and PricingTier
package com.apress.springbatch.statement.domain;

public class AccountTransactionQuantity {

    private String accountNumber;
    private long transactionCount;
    private PricingTier tier;

    // Accessors go here
    ...

    @Override
    public String toString() {
        return accountNumber + " has " + transactionCount +
          " transactions this month wich falls into tier " + tier;
    }
}

package com.apress.springbatch.statement.domain;

public enum PricingTier {
   UNDEFINED(0), I(1), II(2), III(3), IV(4);

   private int value;
PricingTier(int value) {
this.value = value;
}
public int getValue() {
return value;
}
public static PricingTier convert(Integer i) {
if(i != null && i >= 0) {
return values()[i];
} else {
return UNDEFINED;
}
}
public String toString() {
return name();
}
}Now you can create your ItemProcessor. In this case, you assign the PricingTier based on the value of the transactionCount field. With this simple logic, Listing 10-32 has the code for the new PricingTierItemProcessor.
Example 10.32. PricingTierItemProcessor
package com.apress.springbatch.statement.processor;

import java.util.ArrayList;
import java.util.List;

import org.springframework.batch.item.ItemProcessor;

import com.apress.springbatch.statement.domain.AccountTransactionQuantity;
import com.apress.springbatch.statement.domain.PricingTier;

public class PricingTierItemProcessor implements ItemProcessor<AccountTransactionQuantity,
AccountTransactionQuantity> {

    private List<Integer> accountsProcessed = new ArrayList<Integer>();

    public AccountTransactionQuantity process(AccountTransactionQuantity atq)
            throws Exception {

        if(atq.getTransactionCount() <= 1000) {
            atq.setTier(PricingTier.I);
        } else if(atq.getTransactionCount() > 1000 &&
                  atq.getTransactionCount() <= 100000) {
            atq.setTier(PricingTier.II);
} else if(atq.getTransactionCount() > 100000 && atq.getTransactionCount() <= 1000000) {
atq.setTier(PricingTier.III);
} else {
atq.setTier(PricingTier.IV);
}
return atq;
}
}As with each component of the batch process, you need to configure it. This ItemProcessor obviously doesn't have any dependencies, so the configuration involves nothing more than a bean definition and updating your step to reference the bean. Listing 10-33 shows the updated configuration for the calculateTiers step.
Example 10.33. calculateTiers Step Configuration
...
<beans:bean id="pricingTiersItemProcessor"
  class="com.apress.springbatch.statement.processor.PricingTierItemProcessor"/>
...
With the pricing tiers calculated, you need to update the database with the values you've calculated. That database update occurs in the next section.
Unlike the steps up to this point, which were mostly about moving data around, step 4 is the first step intended to apply business rules to the data you already have. Because of that, the ItemReader and the ItemWriter are simplistic. The logic for this step resides in the ItemProcessor. This section looks at the ItemWriter required for the tier-processing step.
Because most of the work in this step is done in the ItemProcessor, it should come as no surprise that the ItemWriter for this step is, again, quite simple. Its responsibility is only to update the account being processed with the tier you've calculated it to fall into. Using a JdbcBatchItemWriter, you can perform the required updates. Listing 10-34 shows the configuration for the new ItemWriter.
Example 10.34. Configuration for tiersUpdateWriter
...
<beans:bean id="tiersUpdateWriter"
  class="org.springframework.batch.item.database.JdbcBatchItemWriter">
  <beans:property name="dataSource" ref="dataSource"/>
  <beans:property name="sql"
    value="update account set tier = :tier.value where accountNumber = :accountNumber"/>
  <beans:property name="itemSqlParameterSourceProvider">
    <beans:bean
class="org.springframework.batch.item.database.BeanPropertyItemSqlParameterSourceProvider"/>
  </beans:property>
</beans:bean>
...
You may wonder about the :tier.value parameter defined in the SQL in this example. Because you define a getValue method on the PricingTier enum, you can use the dot notation and save the value of the tier as its integer value. This is purely a personal preference in this case.
Apress Investments doesn't make its money by moving data around. It makes its money by charging fees per transaction. In the next section, you look at how those fees are calculated.
With the pricing tier determined, you can calculate the cost of each transaction. To do this, you need two pieces of information: the price of the purchase and the pricing tier you calculated in the previous step. This section looks at how to calculate a fee and update the transaction accordingly.
Just as in the previous step, you use a new domain object for this step. In this case, you have a class that extends Transaction but adds a couple of Account fields that you need (pricing tier, specifically) to make the calculations. Listing 10-35 shows the new domain object.
Example 10.35. AccountTransaction
package com.apress.springbatch.statement.domain;

import java.math.BigDecimal;

public class AccountTransaction extends Transaction {

    private String accountNumber;
    private PricingTier tier;
    private BigDecimal fee;
    private long quantity;
    private BigDecimal price;

    // Accessors go here
    ...

    @Override
    public String toString() {
        return getId() + ":" + accountNumber + ":" + getTicker() +
            ":" + getTradeTimestamp().getTime() + ":" + fee;
    }
}
Each AccountTransaction represents a transaction that needs a fee to be calculated. When the fee has been calculated, the ItemWriter updates the transaction. The process for creating this ItemReader is no different than creating the one covered in the previous section. You have a JdbcCursorItemReader that executes the SQL query you configure and uses the RowMapper you configure to map the results to the AccountTransaction object. Listing 10-36 shows the code required for the RowMapper.
Example 10.36. AccountTransactionRowMapper
package com.apress.springbatch.statement.reader;

import java.sql.ResultSet;
import java.sql.SQLException;

import org.springframework.jdbc.core.RowMapper;

import com.apress.springbatch.statement.domain.AccountTransaction;
import com.apress.springbatch.statement.domain.PricingTier;

public class AccountTransactionRowMapper implements RowMapper {

    public Object mapRow(ResultSet resultSet, int arg1) throws SQLException {
        AccountTransaction accountTransaction = new AccountTransaction();

        accountTransaction.setAccountId(resultSet.getLong("accountId"));
        accountTransaction.setAccountNumber(resultSet.getString("accountNumber"));
        accountTransaction.setId(resultSet.getLong("transactionId"));
        accountTransaction.setQuantity(resultSet.getLong("qty"));
        accountTransaction.setTicker(resultSet.getString("ticker"));
        accountTransaction.setTier(PricingTier.convert(resultSet.getInt("tier")));
        accountTransaction.setTradeTimestamp(resultSet.getDate("executedTime"));
        accountTransaction.setPrice(resultSet.getBigDecimal("dollarAmount"));

        return accountTransaction;
    }
}
With the domain object defined and the RowMapper written, all that is left is to configure the ItemReader and the step of the job used to calculate transaction fees. For the configuration, you use almost the exact same configuration as in the previous step. The only difference is the SQL statement and the ItemReader's reference to the RowMapper implementation. Listing 10-37 shows the configured step with the ItemReader.
Example 10.37. Configuring the calculateTransactionFees Step and Dependencies
...
<beans:bean id="transactionPricingItemReader"
  class="org.springframework.batch.item.database.JdbcCursorItemReader" scope="step">
  <beans:property name="dataSource" ref="dataSource"/>
  <beans:property name="sql"
    value="select a.id as accountId, a.accountNumber, t.id as transactionId, t.qty, tk.ticker, a.tier, t.executedTime, t.dollarAmount from account a inner join transaction t on a.id = t.account_id inner join ticker tk on t.tickerId = tk.id and t.processed = false and t.jobId = #{jobParameters[run.id]} order by t.executedTime"/>
  <beans:property name="rowMapper" ref="transactionPricingRowMapper"/>
</beans:bean>
<beans:bean id="transactionPricingRowMapper"
class="com.apress.springbatch.statement.reader.AccountTransactionRowMapper"/>
<step id="calculateTransactionFees">
<tasklet task-executor="taskExecutor">
<chunk reader="transactionPricingItemReader" processor="feesItemProcessor"
writer="applyFeeWriter" commit-interval="100"/>
</tasklet>
</step>
<job id="statementJob" incrementer="idIncrementer">
<step id="step1" parent="importCustomerAndTransactionData" next="step2"/>
<step id="step2" parent="retrieveStockPrices" next="step3"/>
<step id="step3" parent="importStockPrices" next="step4"/>
<step id="step4" parent="calculateTiers" next="step5"/>
<step id="step5" parent="calculateTransactionFees"/>
</job>
...The configuration for the calculateTransactionFees step shown in Listing 10-37 begins with the definition of the ItemReader—a JdbcCursorItemReader in this case. transactionPricingItemReader requires three dependencies: a datasource, the SQL, and a reference to the RowMapper implementation you coded back in Listing 10-36. After the ItemReader configuration, you configure an instance of the RowMapper the ItemReader needs for the dataset it is processing. Finally the configuration for your step is provided. However, just as in the previous steps you've configured, you still have more to do before this is operational. First you need to code and configure the ItemProcessor, which is covered in the next section.
Table 10-1 showed that tiers II through IV all have a flat fee, but tier I's fee consists of a flat fee of $9.00 plus 0.1% of the total cost of the transaction. For example, if the transaction consists of 20 shares of HD stock at $40.00 each, the fee is calculated as
($40.00 × 20 shares)0.001 = $0.80
To calculate what the fee is for each transaction a customer has made, you implement an ItemProcessor to apply that logic. This section looks at how to develop and configure the ItemProcessor required to calculate the customer's transaction fees.
The code for this ItemProcessor is straightforward; Listing 10-37 has the code for FeesItemProcessor.
Example 10.38. FeesItemProcessor
package com.apress.springbatch.statement.processor;

import java.math.BigDecimal;

import org.springframework.batch.item.ItemProcessor;

import com.apress.springbatch.statement.domain.AccountTransaction;
import com.apress.springbatch.statement.domain.PricingTier;

public class FeesItemProcessor implements
        ItemProcessor<AccountTransaction, AccountTransaction> {

    public AccountTransaction process(AccountTransaction transaction)
            throws Exception {
        if (transaction.getTier() == PricingTier.I) {
            priceTierOneTransaction(transaction);
        } else if (transaction.getTier() == PricingTier.II) {
            priceTierTwoTransaction(transaction);
        } else if (transaction.getTier() == PricingTier.II) {
            priceTierThreeTransaction(transaction);
        } else {
            priceTierFourTransaction(transaction);
        }

        return transaction;
    }

    private void priceTierFourTransaction(AccountTransaction transaction) {
        transaction.setFee(new BigDecimal(1.00));
    }

    private void priceTierThreeTransaction(AccountTransaction transaction) {
        transaction.setFee(new BigDecimal(2.00));
    }

    private void priceTierTwoTransaction(AccountTransaction transaction) {
        transaction.setFee(new BigDecimal(3.00));
    }

    private void priceTierOneTransaction(AccountTransaction transaction) {
        BigDecimal fee = transaction.getPrice()
                .multiply(new BigDecimal(.001));

        fee = fee.add(new BigDecimal(9.00));

        transaction.setFee(fee);
    }
}
FeesItemProcessor determines what tier the account for each transaction has been calculated to be. From there, it calls the appropriate method to calculate the price. To configure this ItemProcessor, you use virtually the same configuration you did for pricingTiersItemProcessor. Listing 10-39 has the configuration for feesItemProcessor.
Example 10.39. Configuration for the calculateTransactionFees Step
...
<beans:bean id="feesItemProcessor"
class="com.apress.springbatch.statement.processor.FeesItemProcessor"/>
...
When you've calculated the fees for each transaction, you need to save them to the database, as you look at next.
After a transaction's fee has been calculated, you need to do two things: update the transaction record and update the account's cash balance, deducting the fee. This section looks at the ItemWriters required to apply transaction fees to a customer's account.
Coming out of the feesItemProcessor in this step, you have an item that has information that needs to be applied to two different locations. The first location where it needs to be applied is the Transaction table. Each transaction stores the fee applied to it. The second place the item's information needs to be applied is in the account's cash balance, where you need to deduct the amount of the fee.
To do this, Spring Batch provides the ability to process a single item with multiple ItemWriters using CompositeItemWriter, as you saw earlier in Chapter 9. CompositeItemWriter is the perfect tool for a scenario like this. Figure 10-6 shows the structure of this step as a whole.

Figure 10-6 shows that you read in each transaction with transactionPricingItemReader (the FlatFileItemReader) and process it with feesItemProcessor (the ItemProcessor). However, using CompositeItemWriter, you apply the transaction to the Transaction table with feesUpdateWriter and the Account table with cashBalanceUpdateWriter. Listing 10-40 shows the configuration for the three required ItemWriters for this step.
Example 10.40. ItemWriter Configuration for Step 5
...
<beans:bean id="feesUpdateWriter"
  class="org.springframework.batch.item.database.JdbcBatchItemWriter">
  <beans:property name="dataSource" ref="dataSource"/>
  <beans:property name="sql" value="update transaction set fee = :fee where id = :id"/>
  <beans:property name="itemSqlParameterSourceProvider">
    <beans:bean
class="org.springframework.batch.item.database.BeanPropertyItemSqlParameterSourceProvider"/>
  </beans:property>
</beans:bean>

<beans:bean id="cashBalanceUpdateWriter"
  class="org.springframework.batch.item.database.JdbcBatchItemWriter">
  <beans:property name="dataSource" ref="dataSource"/>
<beans:property name="sql"
value="update account set cashBalance = (cashBalance - :fee) where accountNumber =
:accountNumber"/>
<beans:property name="itemSqlParameterSourceProvider">
<beans:bean
class="org.springframework.batch.item.database.BeanPropertyItemSqlParameterSourceProvider"/>
</beans:property>
</beans:bean>
<beans:bean id="applyFeeWriter"
class="org.springframework.batch.item.support.CompositeItemWriter">
<beans:property name="delegates">
<util:list>
<util:ref bean="feesUpdateWriter"/>
<util:ref bean="cashBalanceUpdateWriter"/>
</util:list>
</beans:property>
</beans:bean>
...Like the classifying ItemWriter used for step 1, the CompositeItemWriter used in step 5 has two virtually identical ItemWriters it delegates to. Both are JdbcBatchItemWriters, with only the SQL as the difference between the two.
applyFeeWriter handles the delegation of items to each of the registered ItemWriters for this step. In this case, it executes feesUpdateWriter with all the items in the current chunk before moving on to cashBalanceUpdateWriter. As noted in Chapter 9, each ItemWriter in order processes all the items in the chunk at once.
When step 5 has completed, all the business processing is finished. The last step is to generate the customer statements, as covered next.
The end goal of this batch job is to generate a statement for each customer with a summary of their account. All the processing up to this point has been about updating and preparing to write the statement. Step 6 is where you do that work. This section looks at the processing involved writing the statements.
When you look at the expected output of this last step, you quickly realize that a large amount of data needs to be pulled in order to generate the statement. Before you get into how to pull that data, let's look at the domain object you use to represent the data: the Statement object (see Listing 10-41).
Example 10.41. Statement.java
package com.apress.springbatch.statement.domain;

import java.math.BigDecimal;
import java.util.List;
public class Statement {
    private Customer customer;
    private BigDecimal securityTotal;
    private List<Transaction> stocks;

    // Accessors go here
    ...
}
The Statement object consists of the customer's information to display on the statement. It also includes the total value of all the stocks the customer currently holds (the total is easier to get in the database than it is to calculate as you process the statements). Finally, it contains a list the stock holdings the customer currently has. It's important to note that the list of Transaction objects isn't a list of all the customer's actual transactions—you're just reusing an existing domain object because the format is similar.
Because you now know what you need to populate, you can begin to look at how to populate it. When you're designing a complex ItemReader structure like this, begin by thinking about what the item is. In this case, the item or single unit to be processed is the statement. Because of that, your ItemReader returns a Statement object.
By looking at the Statement class in Listing 10-41, you can tell that given the complexity of the data, using a single ItemReader is not going to be practical. Instead, to read the statement data, you layer ItemReaders as you've done in the past. You use a regular JDBC ItemReader to read the customer data. Although you could use a DAO, because each statement is based on a Customer anyway, using an ItemReader makes more sense. From there, you can use DAOs to populate the related data.
However, notice that the Statement has no data. Everything is associated with the Statement, but nothing is Statement specific. Because of that, you use a custom ItemReader to aggregate all the datasources. To start, let's look at the code for the custom ItemReader, CustomerStatementReader (see Listing 10-42).
Example 10.42. CustomerStatementReader
package com.apress.springbatch.statement.reader;

import org.springframework.batch.item.ItemReader;
import org.springframework.batch.item.ParseException;
import org.springframework.batch.item.UnexpectedInputException;

import com.apress.springbatch.statement.dao.TickerDao;
import com.apress.springbatch.statement.domain.Customer;
import com.apress.springbatch.statement.domain.Statement;

public class CustomerStatementReader implements ItemReader<Statement> {

    private ItemReader<Customer> customerReader;
    private TickerDao tickerDao;

    public Statement read() throws Exception, UnexpectedInputException,
            ParseException {

        Customer customer = customerReader.read();
if(customer == null) {
return null;
} else {
Statement statement = new Statement();
statement.setCustomer(customer);
statement.setSecurityTotal(tickerDao.getTotalValueForCustomer(customer.getId()));
statement.setStocks(tickerDao.getStocksForCustomer(customer.getId()));
return statement;
}
}
public void setCustomerReader(ItemReader<Customer> customerReader) {
this.customerReader = customerReader;
}
public void setTickerDao(TickerDao tickerDao) {
this.tickerDao = tickerDao;
}
}CustomerStatementReader begins its processing in the read method. You read in a customer from the ItemReader you configure. If one isn't found, you consider all the input exhausted and tell Spring Batch that by returning null. If a customer is returned, you create a new Statement object for them, including the customer you just received as well as the associated other data, via TickerDaoJdbc.
TickerDao for this step needs two new methods: getTotalValueForCustomer, which returns a BigDecimal value of the total value of the securities the customer currently holds, and getStocksForCustomer, which returns a List of Transaction items representing the customer's current stock holdings. Listing 10-43 shows the updated TickerDao with the new methods.
Example 10.43. TickerDaoJdbc
package com.apress.springbatch.statement.dao.impl;

import java.math.BigDecimal;
import java.sql.ResultSet;
import java.sql.SQLException;
import java.util.List;

import org.springframework.jdbc.core.JdbcTemplate;
import org.springframework.jdbc.core.RowMapper;

import com.apress.springbatch.statement.dao.TickerDao;
import com.apress.springbatch.statement.domain.Ticker;
import com.apress.springbatch.statement.domain.Transaction;

public class TickerDaoJdbc extends JdbcTemplate implements TickerDao {

    private static final String FIND_BY_SYMBOL = "select * from ticker t where ticker = ?";
private static final String SAVE_TICKER =
"insert into ticker (ticker, currentPrice) values (?,?)";
private static final String FIND_ALL =
"select distinct ticker from ticker order by ticker limit ?, ?";
private static final String TOTAL_VALUE =
"select SUM(value) as totalValue " +
"from (select ticker, qty * currentPrice as value " +
"from (select tk.ticker, SUM(ts.qty) as qty, tk.currentPrice " +
"from transaction ts inner join " +
"ticker tk on ts.tickerId = tk.id inner join " +
"account a on ts.account_id = a.id inner join " +
"customer c on c.id = a.customer_id " +
"where c.id = ? " +
"group by tk.ticker, tk.currentPrice) as stocks) as total";
private static final String STOCKS_BY_CUSTOMER =
"select ticker, qty, qty * currentPrice as value " +
"from (select tk.ticker, SUM(ts.qty) as qty, tk.currentPrice " +
"from transaction ts inner join " +
"ticker tk on ts.tickerId = tk.id inner join " +
"account a on ts.account_id = a.id inner join " +
"customer c on c.id = a.customer_id " +
"where c.id = ? " +
"group by tk.ticker, tk.currentPrice) as stocks";
@SuppressWarnings("unchecked")
public Ticker findTickerBySymbol(String symbol) {
List<Ticker> tickers = query(FIND_BY_SYMBOL, new Object [] {symbol}, new RowMapper() {
public Object mapRow(ResultSet rs, int arg1) throws SQLException {
Ticker ticker = new Ticker();
ticker.setId(rs.getLong("id"));
ticker.setPrice(rs.getBigDecimal("currentPrice"));
ticker.setTicker(rs.getString("ticker"));
return ticker;
}
});
if(tickers != null && tickers.size() > 0) {
return tickers.get(0);
} else {
return null;
}
}public void saveTicker(Ticker ticker) {
update(SAVE_TICKER, new Object [] {ticker.getTicker(), ticker.getPrice()});
}
@SuppressWarnings("unchecked")
public List<String> getTickersPaged(int page, int pageSize) {
return queryForList(FIND_ALL,
new Object [] {(page * pageSize), pageSize},
String.class);
}
public BigDecimal getTotalValueForCustomer(long id) {
BigDecimal result = (BigDecimal) queryForObject(TOTAL_VALUE,
new Object [] {id},
BigDecimal.class);
if(result == null) {
result = new BigDecimal("0");
}
return result;
}
@SuppressWarnings("unchecked")
public List<Transaction> getStocksForCustomer(long id) {
return query(STOCKS_BY_CUSTOMER, new Object [] {id}, new RowMapper() {
public Object mapRow(ResultSet rs, int arg1) throws SQLException {
Transaction transaction = new Transaction();
transaction.setDollarAmount(rs.getBigDecimal("value"));
transaction.setQuantity(rs.getLong("qty"));
transaction.setTicker(rs.getString("ticker"));
return transaction;
}
});
}
}The hard part in TickerDaoJdbc isn't the processing but is in the SQL. The execution of the SQL and the mapping of the results to the objects is nothing more than standard uses of Spring's JdbcTemplate.
To make these three pieces work (the customer reader, CustomerStatementReader, and TickerDaoJdbc, you need to update your configuration. Listing 10-44 shows the configuration for these three components.
Example 10.44. Configuring the generateMonthlyStatement Step
...
<beans:bean id="customerReader"
  class="org.springframework.batch.item.database.JdbcCursorItemReader">
<beans:property name="dataSource" ref="dataSource"/>
  <beans:property name="sql"
    value="select a.id as account_id, a.accountNumber, a.cashBalance, a.tier, c.address1 as address, c.city, c.state, c.zip, c.id as customer_id, c.firstName, c.lastName from customer c left outer join account a on a.customer_id = c.id order by c.id"/>
  <beans:property name="rowMapper" ref="customerStatementRowMapper"/>
</beans:bean>

<beans:bean id="customerStatementRowMapper"
  class="com.apress.springbatch.statement.reader.CustomerStatementRowMapper"/>

<beans:bean id="customerStatementReader"
  class="com.apress.springbatch.statement.reader.CustomerStatementReader">
  <beans:property name="customerReader" ref="customerReader"/>
  <beans:property name="tickerDao" ref="tickerDao"/>
</beans:bean>

<step id="generateMonthlyStatements">
  <tasklet>
    <chunk reader="customerStatementReader" writer="statementsWriter"
      commit-interval="1">
      <streams>
        <stream ref="customerReader"/>
      </streams>
    </chunk>
  </tasklet>
</step>

<job id="statementJob" incrementer="idIncrementer">
  <step id="step1" parent="importCustomerAndTransactionData" next="step2"/>
  <step id="step2" parent="retrieveStockPrices" next="step3"/>
  <step id="step3" parent="importStockPrices" next="step4"/>
  <step id="step4" parent="calculateTiers" next="step5"/>
  <step id="step5" parent="calculateTransactionFees" next="step6"/>
  <step id="step6" parent="generateMonthlyStatements"/>
</job>
...
The configuration in Listing 10-44 begins with the definition of the JdbcCursorItemReader used to read the customer data. As in any of your JdbcCursorItemReader configurations, you provide a datasource, SQL, and a RowMapper implementation (the customerStatementReader RowMapper). The configuration for the RowMapper on which customerReader depends is next in the list. The CustomerStatementReader configuration is configured next. Its only two dependencies, customerReader and a reference to the TickerDaoJdbc, are both provided.
The last part of Listing 10-44 is the configuration of the final step in the job. Although it looks like a normal step, two aspects of it are unique. First is the registration of customerReader as a stream. As you saw in Chapter 7, if an ItemReader needs to be opened and isn't configured directly as the ItemReader for the step, you need to register it as a stream so Spring Batch calls the open method for you. The second interesting piece for this step is the commit count: it's set to 1. The reason is the ItemWriter you use, as you see next.
When you look at the expected output from this step, you may think a very complex system of ItemWriters must be employed. But nothing could be further from the truth. Instead, you use nothing more than a MultiResourceItemWriter (to generate a single file per customer) that delegates to a regular FlatFileItemWriter with a header callback. You obtain the complex formatting by implementing your own LineAggregator to generate the output required. To see the pieces involved, let's start with the code you need to write first: the LineAggregator implementation and the FlatFileHeaderCallback implementation.
Chapter 9 discussed how the LineAggregator interface is similar to the LineMapper interface of the ItemReader side. The LineAggregator's responsibility is to extract the fields required from each item and format them into a record to be written by a FlatFileItemWriter. Listing 10-45 shows the code for StatementFormatter.
Example 10.45. StatementFormatter
package com.apress.springbatch.statement.writer;

import java.text.NumberFormat;

import org.springframework.batch.item.file.transform.LineAggregator;

import com.apress.springbatch.statement.domain.Customer;
import com.apress.springbatch.statement.domain.Statement;
import com.apress.springbatch.statement.domain.Transaction;

public class StatementFormatter implements LineAggregator<Statement> {

    private static final String ADDRESS_FORMAT = "%s %s
%s
%s, %s %s

";
    private static final String SUMMARY_HEADER_FORMAT = "Account Number   %s
"
            + "
Your Account Summary

";
    private static final String SUMMARY_FORMAT =
            "Market Value of Current Securities" +
            "                             %s
Current Cash Balance                   " +
            "                             %s
Total Account Value                     " +
            "                       %s

";
    private static final String CASH_DETAIL_FORMAT =
            "Account Detail

Cash        " +
            "                                              %s

Securities

";
    private static final String SECURITY_HOLDING_FORMAT =
            "     %s                  " +
            "     %s                           %s
";
    private static NumberFormat moneyFormatter = NumberFormat
            .getCurrencyInstance();

    public String aggregate(Statement statement) {
        StringBuilder output = new StringBuilder();

        formatAddress(statement, output);
        formatSummary(statement, output);
        formatDetails(statement, output);
return output.toString();
}
private void formatDetails(Statement statement, StringBuilder output) {
output.append(String.format(CASH_DETAIL_FORMAT,
new Object[] { statement.getCustomer().getAccount()
.getCashBalance() }));
for (Transaction transaction : statement.getStocks()) {
output.append(String.format(SECURITY_HOLDING_FORMAT, new Object[] {
transaction.getTicker(), transaction.getQuantity(),
moneyFormatter.format(transaction.getDollarAmount()) }));
}
}
private void formatSummary(Statement statement, StringBuilder output) {
output.append(String.format(SUMMARY_HEADER_FORMAT,
new Object[] { statement.getCustomer().getAccount()
.getAccountNumber() }));
output.append(String.format(
SUMMARY_FORMAT,
new Object[] {
moneyFormatter.format(statement.getSecurityTotal()),
moneyFormatter.format(statement.getCustomer()
.getAccount().getCashBalance()),
moneyFormatter.format(statement.getCustomer()
.getAccount().getCashBalance().doubleValue()
+ statement.getSecurityTotal().doubleValue()) }));
}
private void formatAddress(Statement statement, StringBuilder output) {
Customer customer = statement.getCustomer();
output.append(String.format(ADDRESS_FORMAT,
new Object[] { customer.getFirstName(), customer.getLastName(),
customer.getAddress().getAddress1(),
customer.getAddress().getCity(),
customer.getAddress().getState(),
customer.getAddress().getZip() }));
}
}Although there is quite a bit of code here, you can quickly see that all it consists of is multiple calls to String.format for the various types of objects you're working with. When the FlatFileItemWriter calls the aggregate method on the LineAggregator, it gets back the entire statement, formatted and ready to be written to your file.
The main part of the statement is formatted, but you still need to write one other small piece of code. Each statement has a simple header consisting of the name of the statement, the brokerage address, and the customer assistance phone number. To add that information to the top of each statement, you use Spring Batch's FlatFileHeaderCallback (see Listing 10-46).
Example 10.46. StatementHeaderCallback
package com.apress.springbatch.statement.writer;

import java.io.IOException;
import java.io.Writer;

import org.springframework.batch.item.file.FlatFileHeaderCallback;

public class StatementHeaderCallback implements FlatFileHeaderCallback {

    public void writeHeader(Writer writer) throws IOException {
        writer.write("                                             " +
                "                         Brokerage Account Statement
");
        writer.write("

");
        writer.write("Apress Investment Company                     " +
                "                        Customer Service Number
");
        writer.write("1060 W. Addison St.                            " +
                "                       (800) 876-5309
");
        writer.write("Chicago, IL 60613                              " +
                "                       Available 24/7
");
        writer.write("

");
    }
}
StatementHeaderCallback writes some static text to each of your files. Because Spring Batch handles calling it, the job is pretty easy.
The last piece of code that needs to be written for the statement job is a suffix generator. This class will be used by Spring Batch to append a number and the .txt extension on the statement files that are generated. Listing 4-47 shows the code for the StatementSuffixGenerator.
Example 10.47. StatementSuffixGenerator.
package com.apress.springbatch.statement.writer;

import org.springframework.batch.item.file.ResourceSuffixCreator;

public class StatementSuffixGenerator implements ResourceSuffixCreator {

    public String getSuffix(int arg0) {
        return arg0 + ".txt";
    }
}
That is all the code you need to write to output the robust statement you require. The configuration is also deceptively simple. It consists of the output resource, a suffix generator so that your files have a nice file name, StatementFormatter, the statement writer, and the MultiResourceItemWriter used to create new files for each customer. The complete configuration is shown in Listing 10-48.
Example 10.48. Configuration of Writer Components for the Statement
...
<beans:bean id="statementFiles"
  class="org.springframework.core.io.FileSystemResource">
  <beans:constructor-arg value="/output/statement"/>
</beans:bean>

<beans:bean id="statementSuffixGenerator"
  class="com.apress.springbatch.statement.writer.StatementSuffixGenerator"/>

<beans:bean id="statementFormatter"
  class="com.apress.springbatch.statement.writer.StatementFormatter"/>

<beans:bean id="statementWriter"
  class="org.springframework.batch.item.file.FlatFileItemWriter">
  <beans:property name="headerCallback">
    <beans:bean class="com.apress.springbatch.statement.writer.StatementHeaderCallback"/>
  </beans:property>
  <beans:property name="lineAggregator" ref="statementFormatter"/>
</beans:bean>

<beans:bean id="statementsWriter"
  class="org.springframework.batch.item.file.MultiResourceItemWriter">
  <beans:property name="resource" ref="statementFiles"/>
  <beans:property name="resourceSuffixCreator" ref="statementSuffixGenerator"/>
  <beans:property name="itemCountLimitPerResource" value="1"/>
  <beans:property name="delegate" ref="statementWriter"/>
</beans:bean>
...
As Listing 10-48 shows, there is nothing extravagant for this step's writing. You begin by defining the template resource on which the MultiResourceItemWriter bases each file. From there, you define the configuration for statementSuffixGenerator, which appends a number.txt at the end of each file name. StatementFormatter is configured next with no dependencies as required. Finally, you configure the two ItemWriters involved.
FlatFileItemWriter uses two dependencies: a reference to the header callback and a reference to the LineAggregator. This writer does the majority of the heavy lifting for your output. The final ItemWriter involved in this step is MultiResourceItemWriter. It uses a reference to your resource to create similar files, it uses the suffix generator to make the file names acceptable, and it delegates the writing of the statement to the statementWriter you defined earlier. It's important to note that itemCountLimitPerResource (the number of items per file you write) is set to 1 for this configuration. Because StatementFormatter is designed to write an entire statement, you should write only one per file.
The code is written and configured. When you build and run the job, you're left with one file per customer, with the customer's statement completed. Listing 10-49 shows an example of the statement as it's generated.
Example 10.49. A Sample Statement
Brokerage Account Statement
Apress Investment Company                         Customer Service Number
1060 W. Addison St.                                                (800) 876-5309
Chicago, IL 60613                                                    Available 24/7

Joshua Thompson
3708 Park
Fairview, LA 58517

Account Number   3276793917668488

Your Account Summary

Market Value of Current Securities                           $26,193,904,052.27
Current Cash Balance                                                ($138,274.56)
Total Account Value                                                $26,193,765,777.71

Account Detail

Cash                                                    $(138274.56)

Securities

     ABT                       9004084                           $432,466,154.52
ABX                       9392107                           $472,610,824.24
ADI 6493573 $247,535,002.76Learning how to do something without context makes it hard to take what you've learned and apply it to the real world. This chapter has taken commonly used elements of the Spring Batch framework and put them together into a realistic example of a batch job.
With the basics covered we will dive deeper into the more advanced topics of Spring Batch in the upcoming chapters. In Chapter 11, you will look at how to scale batch jobs beyond a single threaded execution like you have used up to this point.
[30] Customers like this are typically what are known as algorithmic traders. These customers use computer models to trigger trades automatically without human intervention.