
C H A P T E R 7
Creating and Using RIA Services
What is RIA Services? The full name is actually Windows Communication Foundation (WCF) RIA Services, which is a bit of a mouthful, so it's usually referred to as just RIA Services (pronounced reeya, not R-I-A, as some people tend to do). In essence, RIA Services provides a set of server components and ASP.NET extensions that simplify the n-tier application development process, making applications almost as easy to develop as if they were running on a single tier. This is a large part of how LightSwitch does its magic.
This chapter explains why you might need to create a RIA Service. You'll learn how to create a RIA service, and how to use it to carry out data aggregation. You'll then see how to update data, and finish the chapter by learning how to consume the RIA service in your LightSwitch application.
Why Would I Need a RIA Service?
If you need to do something that isn't currently built into LightSwitch, such as aggregating data, joining tables, or attaching to an external data source that doesn't have an Entity Framework data provider, you can probably do it with a custom RIA service.
In fact, LightSwitch already uses RIA Services when accessing data via the intrinsic, external SQL Server, or SharePoint data sources. Although this is largely transparent to you (the developer), RIA Services is the mechanism that allows the Silverlight client to communicate with the LightSwitch server.
To Aggregate Data
LightSwitch doesn't have any built-in ability to deal with anything other than an entity in its simplest form, other than including navigation properties in a grid or list. If you want to do any kind of aggregating of your data, such as grouping, counting, summing values, or totaling amounts, you'll usually need to create a RIA service to do that.
Sure, you can create calculated properties in your tables that will allow you to create and display totals and some calculations, but they can often result in quite poor performance, because LightSwitch has to make a trip to the database for each row in a grid or list. Using a RIA service that has already done these calculations on the server tier will result in much better performance.
To Simulate a SQL View
LightSwitch can work with only one (whole) entity at a time. As far as LightSwitch is concerned, an entity is a collection of its own properties, as well as related properties (from related entities). Other than for display purposes, in a list or grid, for example, you can't combine two or more entities to produce a third made-up entity (this is often called entity projection).
Sometimes you might want only certain properties from an entity, because some properties may not be needed all the time, and dragging the whole entity down to the client to do work on only a few properties isn't really efficient. Or you might not have been given sufficient permissions on an attached database to create a view, to either join tables, or reduce the amount of data coming from the server. Or you might have the necessary permissions, but a SQL view is always read-only in LightSwitch, so you'd be able to display the results of your SQL view, but you won't be able to update them.
And if you happen to be using the intrinsic database, and not an attached SQL database, you can't create any views anyway.
So you can't do any of these things out-of-the-box, but by creating a custom RIA service, you can simulate a SQL view, without any of the disadvantages we've just pointed out.
To Attach to an External Data Source
Out-of-the-box LightSwitch can connect to SQL database servers, SharePoint lists, and WCF RIA Services (see Figure 7-1). If you need to connect to a data source that doesn't have an Entity Framework 4 data provider, then creating a custom RIA service will allow you to get around this restriction.
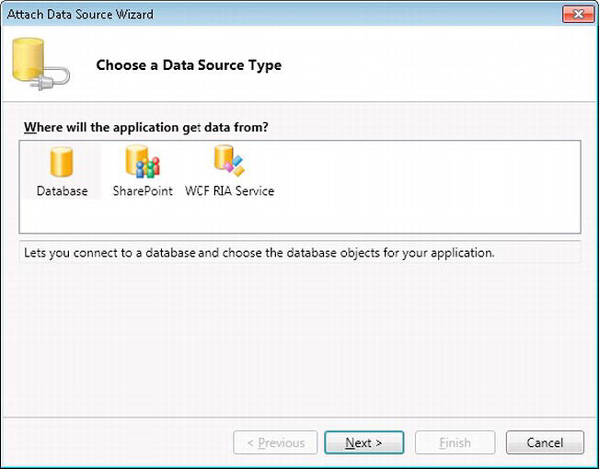
Figure 7-1. Attaching the data source wizard
WCF RIA Services are typically called as a remote service, so it's useful to clarify exactly how LightSwitch communicates with the RIA service. To retrieve or update data from a RIA Services data source, the Silverlight client doesn't access the RIA service directly. Instead, it communicates with the LightSwitch server (also known as the DomainService) in the same way as any other data source. The DomainService is the component that actually communicates with the RIA service, and this acts as an in-process data adapter for the Silverlight client.
Creating a RIA Service
The process of creating a custom RIA service to use in your LightSwitch project really isn't as hard as you might think. There are only a few, fairly simple, steps.
Step 1: Add a Class Library to the Solution
- In Solution Explorer, right-click the solution name.
- Choose Add
 New Project.
 - Click either the VB or the C# tab.
- In the details pane, select Class Library.
- Call the new class library
Central.Data.Services(browse to the same folder whereCentral.Utilitieswas created). - Click OK.
![]() Note Make sure that the project that you add targets the full .NET 4 Framework, not the .NET 4 Client Profile.
Note Make sure that the project that you add targets the full .NET 4 Framework, not the .NET 4 Client Profile.
Step 2: Add Some References
In the code samples that we'll show you later, you'll need to add some assembly references that won't have been added to the class library:
System.ComponentModel.DataAnnotationsSystem.ConfigurationSystem.Data.EntitySystem.Runtime.SerializationSystem.ServiceModel.DomainServices.Server
(browse to%ProgramFiles%Microsoft SDKsRIA Servicesv1.0LibrariesServer)System.Web
Of course, any references that you need to add will depend on what you want your RIA service to do.
Step 3: Add a Domain Service Class
A domain service is a WCF service that encapsulates the business logic part of a RIA service, which exposes a set of related operations as a service layer. When you define a domain service, you're actually specifying the data operations that are permitted in the RIA service. So, this class enables your application to do things such as CRUD database operations (create, read, update, and delete). In addition, and very important, it gives you a place to include your business logic. A domain service operates on the server or middle tier.
As you design a domain service, you should think of it as a set of related tasks that you expect users to be able to perform in your application. These tasks usually involve a small group of closely related entities. For example, in an expense-reporting application, you might expose entities for expense reports, line items, and details. You might also put entities for accounts and payments in a separate domain service.
There are two ways that you can add a domain service class:
- Right-click the data project.
- Choose Add New Item Domain Service Class (see Figure 7-2).
- Call the class
ReportDataService. - Deselect the Enable Client Access check box.
- Click OK.
- Choose Add
- Rename the default
Class1toReportDataService.
- Make the class inherit from
DomainService.
- Make the class inherit from
Using either of these methods, you now have a custom RIA service that LightSwitch can consume. Of course, it doesn't do anything yet, though.
In step 1, you might wonder why it's necessary to deselect the Enable Client Access check box. As we mentioned earlier, the RIA Service data source runs on the server and acts as an in-process data adapter for the Silverlight client. Because this works in process, you can disable the client access check box.
If you leave the Enable Client Access check box selected, the WCF service can be called by other external clients, which can cause a security risk. With the check box deselected, the WCF service gets exposed via the LightSwitch endpoint and is further guarded by the LightSwitch pipelines.
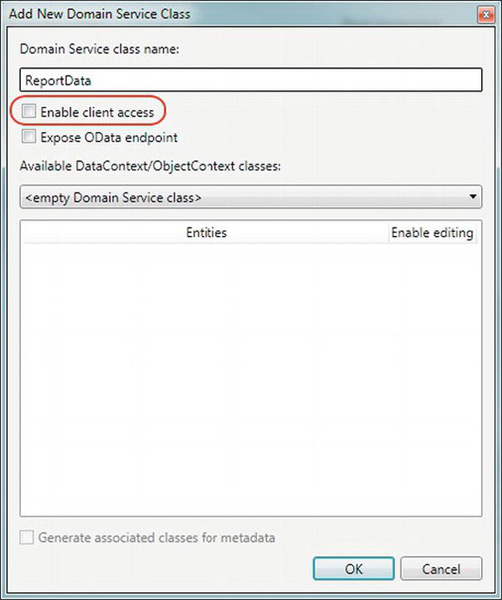
Figure 7-2. Adding a new domain service class
Step 4: Connect to the Data
In this step, you do the actual work, by connecting the RIA Service to an external database and querying the data. How do you do that? Well, there are several data access mechanisms that you can choose from. Some of these include the following:
- ADO.NET Entity Framework
- LINQ to SQL
- ADO.NET
- Reusing LightSwitch's Entity Framework model
If you're using a RIA service to work with data that you've already added as a data source to your LightSwitch application, reusing LightSwitch's Entity Framework model can save you a lot of work.
You can use the other data access mechanisms to wrap operations that you wouldn't natively be able to access through LightSwitch. Calling SQL Server stored procedures, user-defined functions, or returning views that don't contain a primary-key column are examples.
Of course, these are many more data access mechanisms that you can choose from. For example, if your company uses the NHibernate object-relational mapping (ORM) system, you can choose a data access technology that works around this. Alternatively, if you want to use a RIA service that exposes the contents of files that are stored on the file system, you can use the classes in the System.IO namespace.
We'll now describe the options that we've mentioned in more detail.
Option 1: Using an ADO.Net Entity Framework Model
The advantage of using the ADO.NET Entity Framework is that you can create more-complex models, beyond what LightSwitch could natively create. You'd use Entity Framework's EDMX designer to generate more-sophisticated object-relational (OR) mappings. This allows you to abstract the relational schema of the data that's stored in your database, and to present a cleaner conceptual model that LightSwitch can consume.
Option 2: Using LINQ to SQL
If we were attaching to a Microsoft SQL Server database, we could use LINQ to SQL to create a model that connects to the database. This could be useful if you have existing experience of using LINQ to SQL. But because LightSwitch uses the Entity Framework by default, a disadvantage is that you'll be using two data access technologies in your solution, instead of just one. This arrangement is not ideal because it would make your application more difficult to maintain.
Option 3: Using ADO.NET
To attach to a database that doesn't have a compatible Entity Framework data provider, you may need to go down a level further, and use plain old ADO.NET DataSets and DataReaders to access your data via OLEDB or ODBC. You might need to use this technique if you were connecting to something like an Access or FoxPro database.
Option 4: Reusing LightSwitch's Entity Framework Data Model
If you want to manipulate data that LightSwitch has already connected to, but in a way that LightSwitch is unable to do, it makes much more sense to just reuse the model that already exists in your LightSwitch project. Fortunately, there's a technique that allows us to do just that, by simply adding a link to the file that LightSwitch generates for the data source that you want to access, and then creating a Context property to access the data.
Writing the RIA Service Code
Now that you understand the steps involved in adding a class library, creating a domain service class, and choosing a data access mechanism, we'll show you a couple of RIA service examples.
First, we'll show you how to view aggregated data by using LightSwitch's Entity Framework model. Next, we'll show you an example of how to update and add data by using ADO.NET.
Creating a RIA Service to Aggregate Data
In this first example, we'll use a RIA service to create an aggregated view of data. To make life really simple, we'll reuse LightSwitch's Entity Framework data model.
We'll base our example on a person table. This table includes a relationship to a table called Gender. The Gender table contains a string property called GenderName. The Gender table contains two rows, with the GenderName set to male and female. In the person table, the name of the navigation property to the Gender table is called Person_Gender.
Our RIA service then returns a count of people grouped by gender.
Step 1: Add a Link to the Generated Model File
To make use of the data model that LightSwitch has already created, we simply add a link to the model file that LightSwitch generated for us. Here are the steps:
- In Solution Explorer, right-click the
Central.Data.Servicesproject. - Choose Add Existing Item.
- Browse to the LightSwitch project folder (the one with the
lsprojfile). - Browse to the
ServerGeneratedGeneratedArtifactsfolder (see the item marked a in Figure 7-3). - Select the
ApplicationData.vb/csfile, but don't click the Add button yet (see the item marked b in Figure 7-3). - Click the drop-down button on the right-hand side of the button (see the item marked c in Figure 7-3).
- Select Add As Link (see the item marked d in Figure 7-3).
Now the LightSwitch-created data model is being shared between the two projects, through the linked ApplicationData file. As changes are made in the LightSwitch project, those changes will be automatically made available to the Central.Data project as well, without needing to take any manual action.
How cool is that!
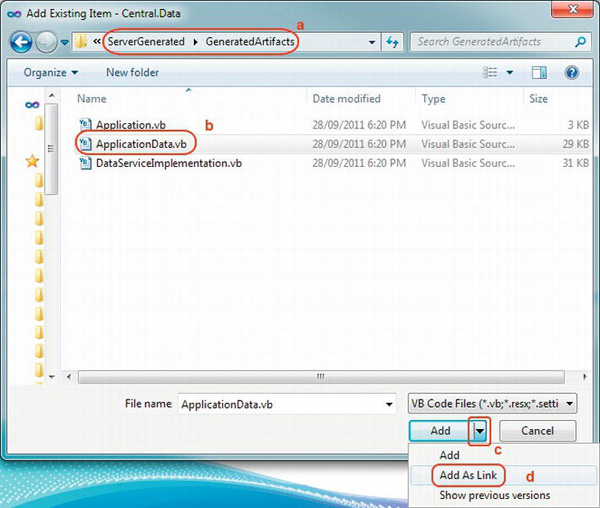
Figure 7-3. Adding a link to the model file
Step 2: Add Some Code to the DomainService Class
To be able to access the data, we'll need to create a Context property (see Listing 7-1) that's based on the ApplicationDataObjectContext that was created in the LightSwitch project's data model.
Listing 7-1. Creating an Object Context
VB:


File: Central.Data.ServicesReportDataService.vb


Imports System.ServiceModel.DomainServices.Server
Imports System.Data.EntityClient

Imports System.Web.Configuration

Imports System.ComponentModel.DataAnnotations

Imports System.Linq


'this might be named differently if you've set the namespace for your project

Imports Central.Data.Services.ApplicationData.Implementation


Public Class ReportDataService

    Inherits DomainService


    Const METADATA_NAME As String = "ApplicationData"


    'used to build the metatdata

    Const METADATA_FORMAT As String =

       "res://*/{0}.csdl|res://*/{0}.ssdl|res://*/{0}.msl"


    'LightSwitch uses a special name for its intrinsic database connection

    'instead of ApplicationData as you would normally expect

    Const CONNECTION_NAME As String = "_IntrinsicData"


    'the data provider name

    Const PROVIDER_NAME As String = "System.Data.SqlClient"


    Private _context As ApplicationDataObjectContext

    Public ReadOnly Property Context As ApplicationDataObjectContext

        Get

            If (_context Is Nothing) _

            Then

                Dim builder = New EntityConnectionStringBuilder


                builder.Metadata =

                   String.Format(METADATA_FORMAT, METADATA_NAME)

                builder.Provider = PROVIDER_NAME

                builder.ProviderConnectionString = WebConfigurationManager

                    .ConnectionStrings(CONNECTION_NAME)

                    .ConnectionString


                _context = NewApplicationDataObjectContext(

                    builder.ConnectionString)

            End If


            Return _context

        End Get

    End Property


End Class


C#:


File: Central.Data.ServicesReportDataService.vs
using System.ServiceModel.DomainServices.Server;

using System.Data.EntityClient;

using System.Web.Configuration;

using System.ComponentModel.DataAnnotations;

using System.Linq;


// this might be named differently if you've set the namespace for your project

using ApplicationData.Implementation;


public class ReportDataService : DomainService

{

    private const string METADATA_NAME = "ApplicationData";


    //used to build the metatdata

    const string METADATA_FORMAT =

        "res://*/{0}.csdl|res://*/{0}.ssdl|res://*/{0}.msl";


    //LightSwitch uses a special name for its intrinsic database connection

    //instead of ApplicationData as you would normally expect

    const string CONNECTION_NAME = "_IntrinsicData";


    //the data provider name

    const string PROVIDER_NAME = "System.Data.SqlClient";


    private ApplicationDataObjectContext _context;

    public ApplicationDataObjectContext Context

    {

        get

        {

            if (_context == null)

            {

                var builder = new EntityConnectionStringBuilder();


                builder.Metadata = string.Format(

                    METADATA_FORMAT, METADATA_NAME);

                builder.Provider = PROVIDER_NAME;

                builder.ProviderConnectionString = WebConfigurationManager

                    .ConnectionStrings[CONNECTION_NAME]

                    .ConnectionString;


                _context = new ApplicationDataObjectContext(

                   builder.ConnectionString);

            }


            return _context;

        }

    }

}
We'll also need to add a class to represent the entity we want to return to LightSwitch. We've called ours ReportDataClass (see Listing 7-2). This class can either be added to a separate class file, as we have, or it could be added to the service class itself, if you prefer.
VB:


File: Central.Data.ServicesReportDataClass.vb


Imports System.ComponentModel.DataAnnotations


Public Class ReportDataClass

    <Key()>

    Public Property Id As Integer


    Public Property Name As String

    Public Property Total As Decimal


    ' if you need to cast any values from one type to another,

    ' you'll need to do it here

    ' because casts aren't allowed in LINQ to Entity queries

    Friend WriteOnly Property TotalSingle As Single

        Set(value As Single)

            Me.Total = New Decimal(value)

        End Set

    End Property


End Class


C#:


File: Central.Data.ServicesReportDataClass.cs


using System.ComponentModel.DataAnnotations;


public class ReportDataClass

{

    [Key]

    public int Id {get; set;}


    public string Name {get; set;}

    public decimal Total {get; set;}


    // if you need to cast any values from one type to another,

    // you'll need to do it here

    // because casts aren't allowed in LINQ to Entity queries

    internal float TotalSingle

    {

        set

        {

            this.Total = new decimal(value);

        }

    }

}
In the code shown, we've decorated the Id property with the Key attribute. This is important because it tells LightSwitch to treat this property as the primary key. You can decorate more than one property with the Key attribute, if you want to specify a combination key.
Finally, we'll need to add a couple of methods to allow us to query the data (see Listing 7-3).
Listing 7-3. Query Methods
VB:


File: Central.Data.ServicesReportDataService.vb


<Query(IsDefault:=True)>

Public Function GenderCount() As IQueryable(Of ReportDataClass)

    Dim result As IQueryable(Of ReportDataClass)


    result = From p In Me.Context.People

             Group By Gender = p.Gender

             Into g = Group

             Select New ReportDataClass With

               {

                  .Id = Gender.Id

                  , .Name = Gender.GenderName

                  , .Total = g.Count

               }


        Return result

End Function


Protected Overrides Function Count(Of T)(

       query As IQueryable(Of T)) As Integer

   Return query.Count()

End Function


C#:


File: Central.Data.ServicesReportDataService.cs


[Query(IsDefault=true)]

public IQueryable<ReportDataClass> GenderCount()

{

    IQueryable<ReportDataClass> result = null;


     result =  from Person p in this.Context.People

              group p by p.Gender into g

              select new ReportDataClass

                 {

                     Id = g.Key.Id

                     , Name = g.Key.GenderName

                    , Total = g.Count

                 };
    return result;

}


protected override int Count<T>(IQueryable<T> query)

{

    return query.Count();

}
The GenderCount method is decorated with the Query attribute, and the IsDefault property of this is set to true. This tells LightSwitch to use the GenderCount method as the default method for returning a collection.
If you fail to decorate a method with the Query(IsDefault=true) attribute, and don't decorate any properties with the Key attribute, LightSwitch won't allow you to import the entity or entity set.
In addition to the Key and Query attributes, you can also define relationships and navigation properties by using similar attributes. If you do this, LightSwitch recognizes the relationships and navigation properties that you've specified when you attach to the RIA service.
Step 3: Attach the RIA Service as a Data Source
The process for attaching our custom RIA service as a data source is no different from attaching to any other RIA service. The steps required are explained in the section “Using a RIA Service” later in this chapter. Just make sure that you've built (or rebuilt) your solution, or else your custom service may not be available to select.
Creating a RIA Service to Update Data
We'll now move onto another example that shows you how to update, insert, and delete data by using a RIA Service. In this example, the data access is carried out using ADO.NET. We'll show you how to perform CRUD operations against a supplier table in an external SQL Server database. Although we're using SQL Server in this example, you're not limited to just SQL Server. Because we're using ADO.NET, you could just as easily connect to any other Database Management System (DBMS) provided that an ADO.NET data provider exists for that DBMS.
It's really easy to update data. To begin, you'll need to carry out the same two steps that we showed you earlier:
- Create a class library project.
- Add a domain service.
After that, you'll need to carry out the following steps:
- Write a class that represents your entity.
- Write the data access code.
Step 1: Write an Entity Class
Just as before, you'll need to create a class that represents your entity. Figure 7-4 shows the schema of our supplier table. Listing 7-4 shows the class that you'd use to represent the records in this table.
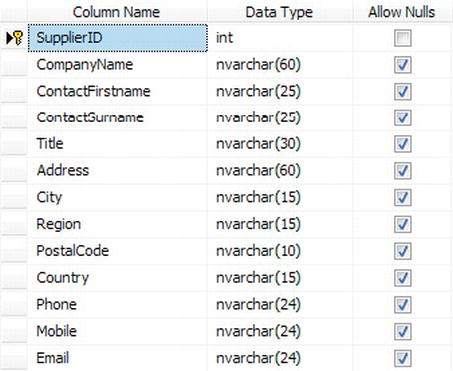
Figure 7-4. Schema of Supplier table
Your RIA service doesn't need to expose every single column in this table. You'd therefore design your class to suit the properties that you want to return. In fact, creating a RIA service that returns a subset of columns is an ideal way to optimize the performance of your LightSwitch application.
Listing 7-4. Supplier Entity Class
VB:


File: Central.Data.ServicesSupplierRecord.vb


Imports System.ComponentModel.DataAnnotations


Public Class SupplierRecord

    <Key(), Editable(False)>

    Public Property SupplierID As Integer


    <Required(ErrorMessage:="Supplier Name must be entered"),

        StringLength(60)>

    Public Property SupplierName As String


    <StringLength(25)>

    Public Property FirstName As String


    <StringLength(25)>

    Public Property LastName As String

End Class
C#:


File: Central.Data.ServicesSupplierRecord.cs


using System.ComponentModel.DataAnnotations;


public class SupplierRecord

{

    [Key, Editable (false)]

    public int SupplierID { get; set; }


    [Required(ErrorMessage ="Supplier Name must be entered"),

       StringLength(60)]

    public string SupplierName { get; set; }


    [StringLength(25)]

    public string FirstName { get; set; }


    [StringLength(25)]

    public string LastName { get; set; }

}
We've decorated the primary-key property (SupplierID) with the key attribute. But unlike last time, we've also included the Editable attribute and have set this value to false. So LightSwitch won't allow users to edit this property on any screen that displays it.
We've also decorated several other properties with attributes, and we'll now explain what these do.
The SupplierName property is decorated with the Required attribute. This tells LightSwitch that the property can't be null or empty. If you create a screen that uses the Supplier entity and the user fails to enter a SupplierName, LightSwitch triggers its built-in validation and prevents the save operation from happening.
The StringLength attribute allows you to specify the maximum length of a property. This also hooks into LightSwitch's built-in validation and prevents users from entering text that exceeds the maximum length that you specify.
It's important to apply the StringLength and Required attributes to ensure that users enter valid data, and to prevent any exceptions that might occur if invalid data is entered.
Step 2: Write ADO.NET Code
Now that we've created our entity class, we'll need to write the code that performs the actual data access. This is shown in Listing 7-5.
The methods that we've used to add, update, and delete entities are called InsertSupplierData, UpdateSupplierData, and DeleteSupplierData, respectively. These methods must include a parameter that accepts an instance of your entity.
Prefixing the methods with the names Insert, Update, and Delete tells LightSwitch to use these methods for inserting, updating, and deleting entities. There isn't anything more that you need to do to specify that these methods should be used by LightSwitch to insert, update, or delete data.
We've used ADO.NET in our example to carry out the data access. The pattern that we've used is to create a SqlConnection object, and to specify the SQL command that we want to execute by using a SqlCommand object. If you want to use a non-SQL-Server data source, you can import the System.Data.OleDb namespace and use the OleDbConnection and OleDbCommand objects instead.
Any parameters that you need to supply are prefixed with the @ symbol in the SQL command text. We've used the AddParameterWithValue method to set the values of our parameters. It's important to supply parameters in this way, rather than build up the entire SQL command in code. This prevents rogue users from carrying out a SQL injection attack on your application.
The SQL command that's used in the InsertSupplierData method includes a command that selects @@Identity. This is a T-SQL command that retrieves the autogenerated identity value that's been assigned to the newly added entity, and sets the SupplierID property to this value. This allows the user to see the ID of the record onscreen immediately after a save.
We've also included some code that sets the connection string to the database, as well as some code that shows you how to call a SQL Server stored procedure. We'll now describe these in more detail.
Listing 7-5. Domain Service Code for Updating Records
VB:


File: Central.Data.ServicesSupplierDataService.vb


Option Compare Binary

Option Infer On

Option Strict On

Option Explicit On


Imports System

Imports System.Collections.Generic

Imports System.ComponentModel

Imports System.ComponentModel.DataAnnotations

Imports System.Linq

Imports System.ServiceModel.DomainServices.Hosting

Imports System.ServiceModel.DomainServices.Server


Imports System.Configuration

Imports System.Data.SqlClient


<Description ("Enter the connection string to the Shipper Central DB")>

Public Class SupplierDataService

    Inherits DomainService


    Private ReadOnly _supplierRecordList As List(Of SupplierRecord)

    Public Sub New()

        _supplierRecordList = New List(Of SupplierRecord)()

    End Sub


    Private _connectionString As String


    Public Overrides Sub Initialize(context

        As  System.ServiceModel.DomainServices.Server.DomainServiceContext)


        _connectionString = ConfigurationManager.ConnectionStrings

             (Me.[GetType]().FullName).ConnectionString

        MyBase.Initialize(context)
    End Sub


    <Query(IsDefault:=True)>

    Public Function GetSupplierData() As IQueryable(

       Of SupplierRecord)

        _supplierRecordList.Clear()

        Dim cnn As New SqlConnection(_connectionString)


        Dim cmd As New SqlCommand(

           "SELECT SupplierID, CompanyName,ContactFirstname, ContactSurname

            FROM Supplier", cnn)


        Try

            cnn.Open()

            Using dr As SqlDataReader = cmd.ExecuteReader()

                While dr.Read()

                    Dim supplier As New SupplierRecord()

                    supplier.SupplierID = CInt(dr("SupplierID"))

                    supplier.SupplierName = dr("CompanyName").ToString()

                    supplier.FirstName = dr("ContactFirstname").ToString()

                    supplier.LastName = dr("ContactSurname").ToString()

                    _supplierRecordList.Add(supplier)

                End While

            End Using

        Finally

            cnn.Close()

        End Try


        Return _supplierRecordList.AsQueryable()

    End Function


    Public Sub UpdateSupplierData(Supplier As SupplierRecord)

        Dim cnn As New SqlConnection(_connectionString)

        Dim cmd As New SqlCommand(

           "UPDATE Supplier SET CompanyName = @CompanyName,

            ContactFirstname=@ContactFirstname,

            ContactSurname=@ContactSurname

            WHERE SupplierID = @SupplierID", cnn)


        cmd.Parameters.AddWithValue("CompanyName", Supplier.SupplierName)

        cmd.Parameters.AddWithValue("ContactFirstName", Supplier.FirstName)

        cmd.Parameters.AddWithValue("ContactSurname", Supplier.LastName)

        cmd.Parameters.AddWithValue("SupplierID", Supplier.SupplierID)


        Try

            cnn.Open()

            cmd.ExecuteNonQuery()

        Finally

            cnn.Close()

        End Try
    End Sub


    Public Sub InsertSupplierData(Supplier As SupplierRecord)


        Dim cnn As New SqlConnection(_connectionString)

        Dim cmd As New SqlCommand("INSERT INTO Supplier

          (CompanyName,ContactFirstname, ContactSurname)

           VALUES

          (@CompanyName ,@ContactFirstname, @ContactSurname);

          SELECT @@Identity ", cnn)


        cmd.Parameters.AddWithValue("CompanyName", Supplier.SupplierName)

        cmd.Parameters.AddWithValue("ContactFirstName", Supplier.FirstName)

        cmd.Parameters.AddWithValue("ContactSurname", Supplier.LastName)


        Try

            cnn.Open()

            Supplier.SupplierID = CInt(cmd.ExecuteScalar())

        Finally

            cnn.Close()

        End Try


    End Sub


    Public Sub DeleteSupplierData(Supplier As SupplierRecord)


        Dim cnn As New SqlConnection(_connectionString)

        Dim cmd As New SqlCommand("DeleteSupplier", cnn)

        cmd.Parameters.AddWithValue("@SupplierID", Supplier.SupplierID)

        cmd.CommandType = System.Data.CommandType.StoredProcedure

        Try

            cnn.Open()

            cmd.ExecuteNonQuery()

        Finally

            cnn.Close()

        End Try


    End Sub


End Class


C#:


File: Central.Data.ServicesSupplierDataService.cs


namespace Central.Data.Services

{

    using System;

    using System.Collections.Generic;

    using System.ComponentModel;

    using System.ComponentModel.DataAnnotations;

    using System.Linq;
    using System.ServiceModel.DomainServices.Hosting;

    using System.ServiceModel.DomainServices.Server;

    using System.Data.SqlClient;

    using System.Configuration;


    [Description ("Enter the connection string to the Shipper Central DB")]

    public class SupplierDataService : DomainService

    {

        private readonly List<SupplierRecord> _supplierRecordList;

        public SupplierDataService ()

        {

            _supplierRecordList = new List<SupplierRecord>();

        }


        string _connectionString;

        public override void Initialize

           (System.ServiceModel.DomainServices.Server.DomainServiceContext

              context)

        {

            _connectionString = ConfigurationManager.ConnectionStrings

              [this.GetType().FullName].ConnectionString;

            base.Initialize(context);

        }


        [Query(IsDefault = true)]

        public IQueryable<SupplierRecord> GetSupplierData()

        {

            _supplierRecordList.Clear();

            SqlConnection cnn = new SqlConnection(_connectionString);


            SqlCommand cmd = new SqlCommand(

                "SELECT SupplierID, CompanyName,ContactFirstname,

                   ContactSurname FROM Supplier", cnn);


            try

            {

                cnn.Open();


                using (SqlDataReader dr = cmd.ExecuteReader())

                {

                    while (dr.Read())

                    {

                        SupplierRecord supplier = new SupplierRecord();

                        supplier.SupplierID = (int)dr["SupplierID"];

                        supplier.SupplierName = dr["CompanyName"].ToString();

                        supplier.FirstName =

                                  dr["ContactFirstname"].ToString();

                        supplier.LastName = dr["ContactSurname"].ToString();

                        _supplierRecordList.Add(supplier);

                    }

                }
            }

            finally

            {

                cnn.Close();

            }


            return _supplierRecordList.AsQueryable();

        }


        public void UpdateSupplierData(SupplierRecord Supplier)

        {

            SqlConnection cnn = new SqlConnection(_connectionString);

            SqlCommand cmd = new SqlCommand(

                "UPDATE Supplier SET

                    CompanyName = @CompanyName ,

                    ContactFirstname=@ContactFirstname ,

                ContactSurname=@ContactSurname

                WHERE SupplierID = @SupplierID", cnn);

            cmd.Parameters.AddWithValue(

               "CompanyName", Supplier.SupplierName );

            cmd.Parameters.AddWithValue(

                "ContactFirstName", Supplier.FirstName );

            cmd.Parameters.AddWithValue(

                "ContactSurname", Supplier.LastName );

            cmd.Parameters.AddWithValue(

                "SupplierID", Supplier.SupplierID );


            try

            {

                cnn.Open();

                cmd.ExecuteNonQuery();

            }

            finally

            {

                cnn.Close();

            }


        }


        public void InsertSupplierData(SupplierRecord Supplier)

        {

            SqlConnection cnn = new SqlConnection(_connectionString);

            SqlCommand cmd = new SqlCommand(

                "INSERT INTO Supplier

                (CompanyName,ContactFirstname, ContactSurname)

                     VALUES ( @CompanyName ,@ContactFirstname, @ContactSurname);

                SELECT @@Identity ", cnn);


            cmd.Parameters.AddWithValue(

               "CompanyName", Supplier.SupplierName);

            cmd.Parameters.AddWithValue(
               "ContactFirstName", Supplier.FirstName);

            cmd.Parameters.AddWithValue(

               "ContactSurname", Supplier.LastName);


            try

            {

                cnn.Open();

                Supplier.SupplierID = (int)cmd.ExecuteScalar();

            }

            finally

            {

                cnn.Close();

            }


        }


        public void DeleteSupplierData(SupplierRecord Supplier)

        {


            SqlConnection cnn = new SqlConnection(_connectionString);

            SqlConnection cnn = new SqlConnection(_connectionString);

            SqlCommand cmd = new SqlCommand(

                "DeleteSupplier", cnn);

            cmd.Parameters.AddWithValue("@SupplierID", Supplier.SupplierID );

            cmd.CommandType = System.Data.CommandType.StoredProcedure;

            try

            {

                cnn.Open();

                cmd.ExecuteNonQuery();

            }

            finally

            {

                cnn.Close();

            }


        }


    }


}
Retrieving a Connection String from web.config
The RIA service uses an ADO.NET connection string to connect to the database. You'll want to save this connection string within the web.config file of your LightSwitch application, because this allows for easy modification after the deployment of your application.
When you connect to a RIA service at design time, LightSwitch prompts you to enter a connection string. We'll cover this later, in the “Using a RIA Service” section. LightSwitch saves this connection string into the ConnectionStrings section of your web.config file, and keys this entry using the fully qualified name of your class.
You can obtain the connection string value in your RIA service code by using the methods in the ConfigurationManager namespace, as shown here:
VB: ConfigurationManager.ConnectionStrings(Me.[GetType]().FullName).ConnectionString

C#: ConfigurationManager.ConnectionStrings[this.GetType().FullName].ConnectionString;
You'll need to add a reference to the System.Configuration assembly to access the ConfigurationManager object. In practice, you might also want to write some additional error-checking code to make sure that the connection string setting exists, and that it isn't null or empty.
You'll also notice that the name of our domain service class has been decorated with the description attribute. The value that you specify here is shown when you attach the RIA service from inside LightSwitch.
Calling Stored Procedures
Calling database stored procedures can be useful, particularly if you're connecting to an existing database that already contains stored procedures.
The DeleteSupplier method shown in Listing 7-5 shows the ADO.NET code that you'd use to call a stored procedure. The name of this stored procedure is DeleteSupplier, which is shown in Listing 7-6.
When you're calling a stored procedure using ADO.NET, you'll need to set the CommandType property of the SqlCommand object to StoredProcedure. If you don't do this, your SQL command will fail to execute.
Listing 7-6. T-SQL Definition of the DeleteSupplier Stored Procedure
CREATE PROCEDURE DeleteSupplier

   @SupplierID int

AS

BEGIN

   SET NOCOUNT ON;

   DELETE FROM Supplier

   WHERE SupplierID=@SupplierID

END

GO
Using a RIA Service
Now that you've created your RIA service, you'll need to attach it to your LightSwitch application. Using a RIA service in a LightSwitch application is as simple as adding it as a data source:
- In Solution Explorer, right-click Data Sources.
- Select Add Data Source.
- Select WCF RIA Service (see Figure 7-5).
- Click Next.
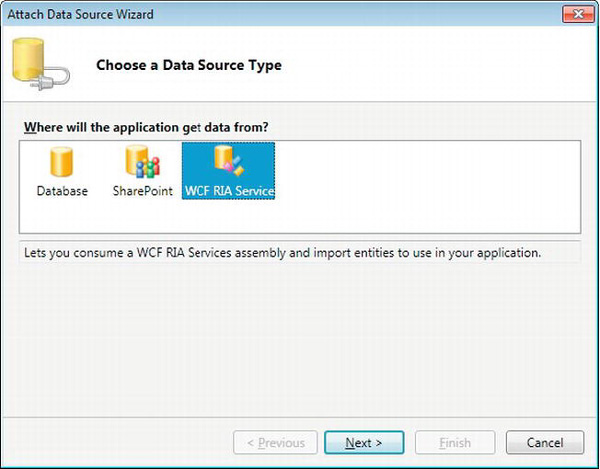
Figure 7-5. Attaching a WCF RIA Service
If this is the first time you're adding the RIA service, the list of available classes may be blank. If that's the case, follow these steps:
- Click the Add Reference button.
- Click the Browse tab (or the Projects tab if you're adding a custom RIA service in the current solution).
- Locate the RIA service that you want to add as a data source.
- Click OK.
If the service that you want to add is already listed (or you used Add Reference to get it in the list), follow these steps:
- Select the service from the list, as shown in Figure 7-6.
- Click the Next button.
- Expand the Entities entry (see Figure 7-7).
- Select the check boxes for any entities that you want to import.
- Enter a suitable name for the data source. (This will appear in the list of Data Sources, so it's best to try to keep it consistent with
ApplicationData, and so forth.) - Click Finish.
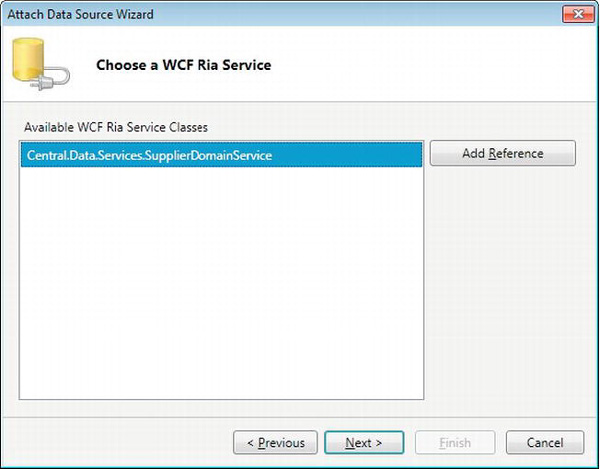
Figure 7-6. Choosing an available RIA service class
If your RIA service requires a connection string, you can enter it into the Connection String text box. In Figure 7-7, notice how the default Connection String text box indicates, Enter the connection string to the Shipper Central DB. This help text comes from the description attribute of the domain service class, which was shown in Listing 7-5.
You should now have a new table for each of the entities for which you selected a check box. You can leave the default name (which will be the name of the class that you created earlier), or you can change it to something else if you prefer.
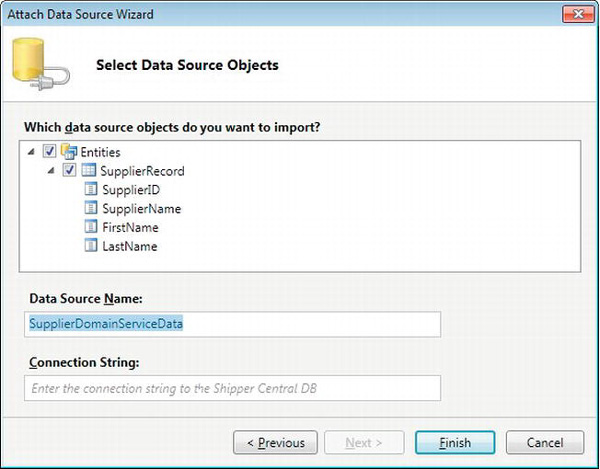
Figure 7-7. Choosing the entities that you want to use
Summary
In this chapter, you learned what a RIA service is, and why you might possibly need to create or use one.
We showed you the following:
- How to create a RIA service by adding a class library project and creating a domain service class
- The data access methods that you can use in your RIA service, including a technique to reuse LightSwitch's data model
- How to perform data aggregation in your RIA service
- How to update data by using ADO.NET in your RIA service
- How to call a SQL stored procedure
RIA Services helps you perform data-related operations that you can't natively carry out in LightSwitch.
You can use RIA Services to aggregate your data. This allows you to group data and to apply arithmetic operations such as count, sum, average, and so on.
You can also use RIA Services to create views of your data. You can create views to join data from multiple tables. Alternatively, you can reduce the number of columns that are returned from a table, and you can use this technique to optimize the performance of your application.
RIA Services also allows you to access data sources that are not supported by LightSwitch. For example, you can write a RIA service that accesses data from a FoxPro or Microsoft Access database.
To create a RIA service, you'll need to create a class library project and then add a domain service class. Next, you'll need to create a class that represents your entity. If you want to return a supplier entity, for example, you'll need to create a supplier class and include properties that represent the supplier ID, supplier name, and so forth. The property that acts as the primary key must be decorated with the key attribute. If you don't specify a key property, LightSwitch won't import your entity.
Every RIA service needs a method that returns a collection of data. This method must return an IQueryable object and has to be decorated with the query attribute. The IsDefault property on the query attribute must be set to true.
To update data, you'll need to create methods that are prefixed with the name Insert, Update, or Delete. These methods have to include a parameter that accepts an instance of your entity.
The database connection string that your RIA service uses can be stored in your web.config file. This allows you to change the setting after you deploy your application. You've seen how to retrieve this setting in code, and how to set it when you attach your RIA service.
Finally, you've learned how easy it is to consume a RIA service by using the Attach Data Source Wizard.