
C H A P T E R 13
Authenticating Your Users
In the next set of chapters, you'll look at some of the security-related aspects of LightSwitch. You'll start with authentication, the process that determines the identity of your user. This is perhaps the most important part of LightSwitch security. Unless you can correctly identify your user, you won't be able to restrict what users can do in your application. You also won't be able to apply any useful security auditing, because you'll be missing a key piece of information.
LightSwitch has three authentication options that you can choose from (one of which has two “flavors”):
- No authentication, which also means that no authorization is possible
- Windows Authentication, using the Windows identities of one of the following:
- All Windows-authenticated users
- Specific Windows-authenticated users
- Forms Authentication, using a set of application-defined identities
In the rest of this chapter, we'll show you when and why you should use each option. We'll also explain how to configure each authentication type. LightSwitch uses the ASP.NET membership provider behind the scenes, so we'll also describe how this works.
![]() Note Many people confuse the terms authentication and authorization, and they're often used interchangeably. But they're not the same at all. Authorization is the process of determining what your users can do in your application, and is based on the roles that have been assigned to them. Roles and authorization are covered in Chapter 14.
Note Many people confuse the terms authentication and authorization, and they're often used interchangeably. But they're not the same at all. Authorization is the process of determining what your users can do in your application, and is based on the roles that have been assigned to them. Roles and authorization are covered in Chapter 14.
Choosing an Authentication Method
We'll start off by showing you how to choose from among different types of authentication, and we'll also explain the pros and cons of each authentication type. Your application type will guide you toward the most appropriate choice of authentication. Table 13-1 summarizes the recommended options.
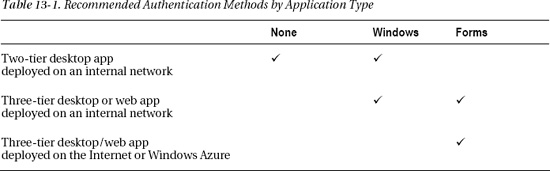
If you want to use authentication in a two-tier desktop application, the recommended choice is Windows Authentication. This is because Forms Authentication isn't secure in a two-tier application. In a two-tier application, the connection string to the membership database is saved in clear text inside the web.config file, which is stored on the client's machine. If a malicious user discovers the connection string to your membership database, that user could tamper with your membership data outside of LightSwitch.
If you want to make your application available via the Internet (or to deploy to Azure), Windows Authentication isn't really a viable solution. Forms Authentication is therefore the recommended choice in this scenario.
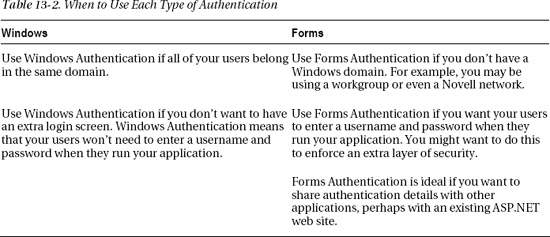
In a three-tier local network deployment (with the LightSwitch server components hosted in IIS), you have a choice of either Windows or Forms Authentication. Table 13-2 summarizes some of the features of these two authentication types and explains when you should use each type.
We'll now explain each authentication type in more detail, beginning with the No Authentication option.
Using No Authentication
To manage the authentication settings for your application, open the properties pane by selecting the right-click option in Solution Explorer. You'll find the authentication settings inside the Access Control tab. On any new project that you create, authentication is disabled by default. If you view the Access Control tab, the Do Not Enable Authentication option is selected by default (see Figure 13-1).
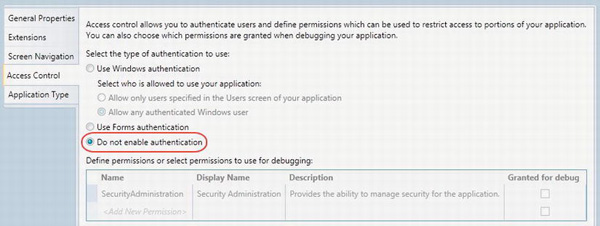
Figure 13-1. Default authentication option
This is the most basic of the available authentication options, because no authentication mechanism is used at all. Anybody who has physical access to your application can run it and will have full access to all of its features and data.
You would use this option if you have no need to know who is using your application. This isn't really a very wise practice. In some smaller companies, the need for security may not be a high priority, but at the very least, you want to be able to know who added an entry, or worse, who deleted one.
It's a much more likely scenario that you'll want to be able to restrict what your users can do, based on something such as membership of certain roles. But to be able to do this, you'll first need to enable authorization.
![]() Note If you select Do Not Enable Authentication, the Define Permissions section (shown in the lower section of Figure 13-1) is automatically disabled, because it makes no sense to define permissions if you're not authenticating your users. Defining permissions is covered in the next chapter.
Note If you select Do Not Enable Authentication, the Define Permissions section (shown in the lower section of Figure 13-1) is automatically disabled, because it makes no sense to define permissions if you're not authenticating your users. Defining permissions is covered in the next chapter.
Using Windows Authentication—Allow Any Authenticated Windows User
Choosing this option in the Access Control tab of the LightSwitch project (see Figure 13-2) will allow any user who has been authenticated by Windows to run your application.
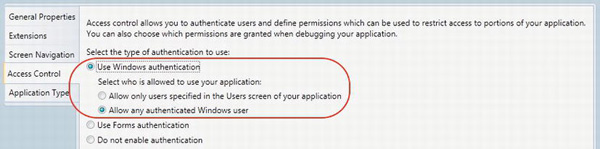
Figure 13-2. Allowing any authenticated Windows user
The Allow Any Authenticated User option is the less restrictive of the two Windows authentication types. When you select it, anybody who has been authenticated by Windows can run your application. You would use this option if you want all Windows users to be able to run the application, and not have to add each user individually.
However, the application administrator can still add specific users so that roles can be assigned to them. Roles can help you to secure your application by allowing only specific users to perform certain functions in your application. Chapter 14 covers this in greater depth.
The application administrator is a special user whom you specify at deployment. The application administrator can be designated by using the publish wizard or by using a command-line utility. Chapter 16 shows you the specific steps that you would follow to set up an application administrator.
The application administrator can add the specific users, and specify roles at runtime by using the screen shown in Figure 13-3.
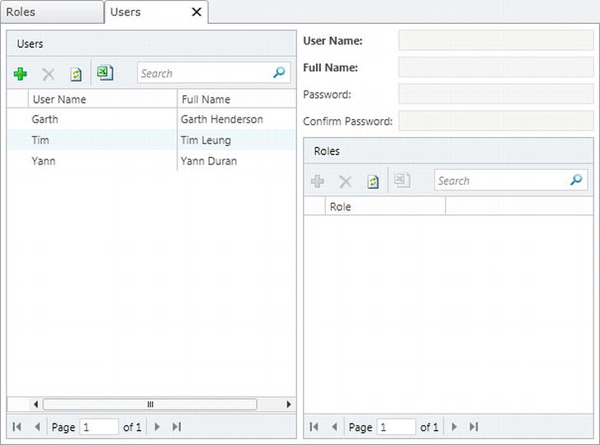
Figure 13-3. Specifying users in the Users screen
![]() Caution Allow Any Authenticated Windows User essentially means that anyone who can log onto your Windows domain can run your application.
Caution Allow Any Authenticated Windows User essentially means that anyone who can log onto your Windows domain can run your application.
Using Windows Authentication—Allow Specified Users
Choosing this option in the Access Control tab of the LightSwitch project (see Figure 13-4) allows only users who have been authenticated by Windows to run your application, provided they have also been added as a user in your application. This option is the more restrictive of the two Windows Authentication types.
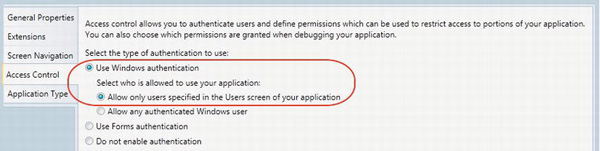
Figure 13-4. Allowing only users specified in the Users screen
You would use this option if you want only specified Windows users, as opposed to all Windows users, to be able to run the application. Just as before, the users whom you want to allow are added by your application administrator at runtime by using the Users screen.
![]() Tip Instead of requiring the administrative user to enter Active Directory users into your application by hand, make their life easier and create a utility to import them automatically.
Tip Instead of requiring the administrative user to enter Active Directory users into your application by hand, make their life easier and create a utility to import them automatically.
The Active Directory sample written by the LightSwitch team provides sample code that you can use to integrate with Active Directory: http://code.msdn.microsoft.com/windowsdesktop/LightSwitch-Active-5092eaa8.
Using Forms Authentication
When you choose Forms Authentication (see Figure 13-5), the user will be asked for a username and password when the application starts. Forms Authentication uses a set of application-defined identities. These identities are created by the application administrator.
There are a couple of security considerations that you should to be aware of. Forms Authentication can be regarded as a less-secure option, because your users' usernames and passwords are stored in a database table, rather than being securely maintained by Windows. Although LightSwitch stores the cryptographic hash of the passwords rather than the clear-text values, this might still be considered a security risk.
Second, the username and password details entered by the user are transmitted in clear text across the network. An attacker who snoops the network might discover the usernames and passwords that are being used. Enabling HTTPS on your server helps to mitigate this risk.
A properly secured server environment means that the overall security risk is low, but it's still good for you to be aware of these issues.
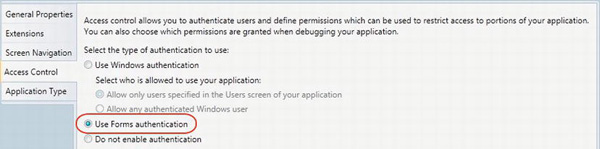
Figure 13-5. Forms Authentication
The identities and passwords that you want to add to your application are created at runtime. This is carried out by the application administrator using the Users administrator screen. This screen also allows the application administrator to delete users or to reset passwords.
When using Forms Authentication, your users can change their passwords after logging into your application. They would do this by clicking the Change Password link at the bottom-right side of the status bar. This opens a screen that prompts them to enter the new password (Figure 13-6).

Figure 13-6. Changing a password
Membership Provider Settings
When you choose to enable authentication, LightSwitch uses the ASP.NET membership provider to manage your users. By default, the users that you create are added to a table called aspnet_Users in the intrinsic database. Figure 13-7 shows a screenshot of this table. The primary-key field is called UserId and is of data type GUID. The usernames that you specify are stored in a field called UserName.

Figure 13-7. aspnet_Users table
Any roles that you create are saved in a table called aspnet_Roles. This table is shown in Figure 13-8.

Figure 13-8. aspnet_Roles table
The user-to-role settings are saved in a table called aspnet_UsersInRoles. The user password details are stored in a table called aspnet_Membership, and details that relate to your application are stored in a table called aspnet_Applications.
These tables and the relationships between them are shown in Figure 13-9.
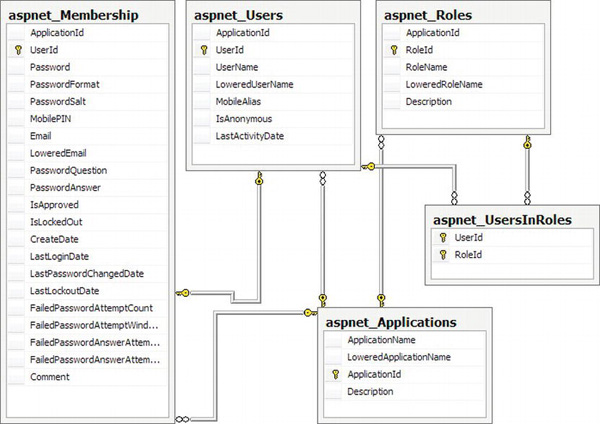
Figure 13-9. Tables used by the membership provider and their relationships
Changing Password-Complexity Rules
When using Forms Authentication, LightSwitch enforces a password-complexity rule to help keep your application secure. By default, any user password that's created must be eight characters in length and contain a non-alphanumeric character. An example of a valid password is pass@word1.
This default rule provides a good level of security, but some users might find this too restrictive, and you might want to weaken this rule. Alternatively, you might even want to strengthen the password-complexity setting to force users to use passwords that are even more complex.
The password-complexity rules are managed by the ASP.NET membership provider. After deploying your application, you can change the password-complexity rule by modifying your web.config file. When you deploy your application in IIS, you'll find the web.config file in the root folder of your LightSwitch application. As mentioned earlier, we don't recommend Forms Authentication for two-tier applications. This section therefore focuses on the three-tier IIS setup.
After you find your web.config file, open it in Notepad. Now search for the ASPNetSQLMembershipProvider element (shown in Listing 13-1). The password complexity is controlled by the attributes minRequiredPasswordLength and minRequiredNonalphanumericCharacters, which are highlighted in bold.
Listing 13-1. Changing the Password-Complexity Rules
<?xml version="1.0"?>

<configuration

    xmlns="http://schemas.microsoft.com/.NetConfiguration/v2.0">

  <connectionStrings>

    <remove name="LocalSqlServer"/>

    <add name="LocalSqlServer"

       connectionString="Data Source=.SQLExpress;

       Integrated Security=True;UserInstance=True;

       AttachDBFilename=|DataDirectory|aspnetdb.mdf" />

  </connectionStrings>

  <system.web>

    <membership>

      <providers>

        <remove name="AspNetSqlMembershipProvider" />

        <add name="AspNetSqlMembershipProvider"

            type="System.Web.Security.SqlMembershipProvider,

                 System.Web, Version=2.0.0.0, Culture=neutral,

                 PublicKeyToken=b03f5f7f11d50a3a"

            connectionStringName="LocalSqlServer"

            enablePasswordRetrieval="false"

            enablePasswordReset="true"

            requiresQuestionAndAnswer="true"

            applicationName="/"

            requiresUniqueEmail="false"

            minRequiredPasswordLength="1"

            minRequiredNonalphanumericCharacters="0"

            passwordFormat="Hashed"

            maxInvalidPasswordAttempts="5"

            passwordAttemptWindow="10"

            passwordStrengthRegularExpression="" />

      </providers>

    </membership>

  </system.web>

</configuration>
Changing Password-Encryption Settings
By default, LightSwitch saves the hashes of the user passwords rather than the clear-text password. This is controlled by the passwordFormat attribute in the AspNetSqlMembershipProvider element of your web.config file (which you'll also see in Listing 13-1). There are three choices that you can enter here:
HashedEncryptedClear
Hashed is the default value and is the most secure. When you choose this option, LightSwitch uses a one-way hash algorithm and a randomly generated salt value when storing passwords in the database. When a user enters a username and password at logon, LightSwitch hashes the password that's entered and compares it to the value that's stored in the database.
It's impossible for you to retrieve the plain-text password values when passwordFormat is set to Hashed. If you want your passwords to be stored in plain text inside your aspnet_users table, change the passwordFormat setting to Clear. This is obviously less secure, because anyone who can access the aspnet_users table will be able to see all of the passwords.
Although it is less secure, there are a couple of reasons why you might choose this option:
- You might want to build a mechanism outside of LightSwitch to remind users of their actual passwords.
- During the initial setup of your application, you might want to preload users and known passwords by manually populating the
aspnet_userstable. Maintaining clear-text passwords simplifies this process and means that you won't need to create an additional process to work out the hash or encrypted value.
Sharing Forms Authentication Data with ASP.NET
Let's imagine that you have an existing ASP.NET web site that uses Forms Authentication. Because your web site already contains a set of users, you might want to share these existing credentials with your LightSwitch application. You can set up your LightSwitch application to share Forms Authentication details with existing ASP.NET web sites by modifying your web.config file.
To do this, deploy your LightSwitch application to IIS and open the web.config file in Notepad (see Chapter 16 for more help on deployment). You'll need to make the following changes to this file:
- Create a new connection string that points to the authentication database that your existing ASP.NET application uses.
- Update the membership, role and profile provider strings to reference the connection string that you've created.
- Ensure that the same
ApplicationNameis specified in the provider strings in both your LightSwitch and ASP.NET application.- Specify the same machine key setting for both of your applications.
To create a new connection string that references the authentication database that your existing ASP.NET application uses, search for the connectionStrings element. Beneath the _IntrinsicData connection string that's created by LightSwitch, create a new connection string that points to your existing authentication database (shown in bold in Listing 13-2). We've called this new connection string _AuthData.
Listing 13-2. Creating a New Connection String
<connectionStrings>


   <add name="_IntrinsicData"

      connectionString="Data Source=myDBServer1;

      Initial Catalog=ShipperCentralDB; Integrated Security=False;

      User ID=Sqllogin1;Password=somepassword1;

      Pooling=True;Connect Timeout=30;User Instance=False" />


   <add name="_AuthData"

     connectionString="Data Source=MyDBServer2;

     Initial Catalog=MyAuthDB;Integrated Security=False;

     User ID=Sqllogin2;Password=somepassword2;

     Pooling=True;Connect Timeout=30;User Instance=False" />


</connectionStrings>
Now search for the AspNetMembershipProvider, AspNetRoleProvider, and AspNetProfileProvider entries in the web.config file for your LightSwitch application. By default, the connectionStringName setting for each entry is set to _IntrinsicData by default. Change this to _AuthData (as shown in Listing 13-3).
Open the web.config file for your existing ASP.NET application and search for the AspNetMembershipProvider entry. Find the applicationName that this uses. In this example, let's assume that the applicationName value is set to ExistingASPApp.
Make sure that the three provider strings in the web.config file for your LightSwitch application specify the applicationName of ExistingASPApp.
Listing 13-3. Changing the Settings in your LightSwitch web.config File
<membership defaultProvider="AspNetMembershipProvider">

   <providers>

      <clear />


      <add name="AspNetMembershipProvider"

         type="System.Web.Security.SqlMembershipProvider"

         connectionStringName="_AuthData"

         applicationName="ExistingASPApp"

         requiresUniqueEmail="false"

         requiresQuestionAndAnswer="false" />


   </providers>

</membership>


<roleManager enabled="True"

    defaultProvider="AspNetRoleProvider">

   <providers>


      <clear />

      <add name="AspNetRoleProvider"

          type="System.Web.Security.SqlRoleProvider"

          connectionStringName="_AuthData"

          applicationName="ExistingASPApp" />


    </providers>

</roleManager>


<profile enabled="True"

    defaultProvider="AspNetProfileProvider">

   <providers>

      <clear />


      <add name="AspNetProfileProvider"

         type="System.Web.Profile.SqlProfileProvider"

         connectionStringName="_AuthData"

         applicationName="ExistingASPApp" />


   </providers>

</profile>
You'll need to have the same machine key defined in both of your applications. Because passwords are hashed (or encrypted), identical machine keys are needed to ensure that the encryption and decryption operate identically across both of your applications.
If a machine key isn't specified in the web.config file of your existing application, you'll need to generate a new key. IIS Manager includes a feature that generates machine keys for you (see Figure 13-10). Alternatively, a search on the Web will reveal some online web pages that can generate keys for you. After you've decided on a key, you'll need to add the machine key entry to the <system.web> section in both of your web.config files. Listing 13-4 shows how this looks.
Listing 13-4. Adding a Machine Config Key Section
 <?xml version="1.0" encoding="utf-8"?>

 <configuration>

   <system.web>

      <machineKey validationKey="C50B3C89CB21F4F1422FF158A5B42D0E8DB8CB5CDA

          1742572A487D9401E3400267682B202B746511891C1BAF47F8D25C07F6C39A104

          696DB51F17C529AD3CABE"

        decryptionKey="8A9BE8FD67AF6979E7D20198CFEA50DD3D3799C77AF2B72F"

        validation="ABC" />

   </system.web>

 </configuration>
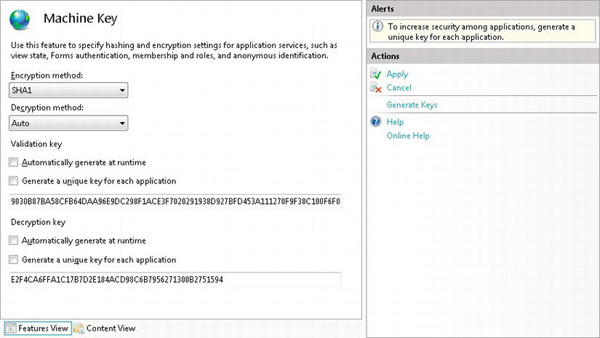
Figure 13-10. Generating a machine key in IIS 7 Manager
Summary
In this chapter, you've learned the difference between authentication and authorization, as well as the difference between Windows identities (Windows Authentication) and application-defined ones (Forms Authentication).
This chapter explained the following:
- The three authentication options that you can use in your application (No Authentication, Windows Authentication, and Forms Authentication) and why you would choose each of them.
- The default authentication option is in fact not to authenticate the user at all, therefore allowing everyone unrestricted access to your application and its data.
- LightSwitch uses the ASP.NET membership provider, and you can change authentication settings such as password-complexity rules and encryption settings by using the
web.configfile.
If you’re creating a two-tier desktop application to run on your local network, Windows Authentication is the most secure choice. Three-tier desktop or web applications can use either Windows or Forms Authentication. Applications deployed over the Internet (or on Azure) should use Forms Authentication.
Forms Authentication is also a good choice if you don't have a Windows domain or if you want to share authentication details with other applications (such as ASP.NET applications). If you do have a Windows domain, you can choose to use Forms Authentication if you want to force your users to enter an additional username and password when logging in.
When using Windows or Forms Authentication, you can explicitly define the users who can access your application. These users are specified by the application administrator at runtime.
By default, LightSwitch uses the ASP.NET membership provider to store and manage your users. The user details are stored in a table called aspnet_Users, and the password details are held in a table called aspnet_Membership (when using Forms Authentication).
Forms Authentication enforces a default password complexity rule of eight characters and a non-alphanumeric character. You can change this password rule by modifying the web.config file for your application. The web.config file also allows you to change the way that passwords are encrypted in your database. By default, passwords are hashed, but you can choose to store the encrypted or plain-text values instead. If you want to share your Forms Authentication credentials with other ASP.NET applications, you can do so by modifying your web.config file.