
C H A P T E R 3
Working with Data
Data is the core feature that makes LightSwitch what it is. Data is the heart and soul of the product, and without it, LightSwitch would not be capable of doing very much. To illustrate the prominence of data, the very first screen that you see when creating a LightSwitch application prompts you to either create a new table or attach to existing data.
In this chapter, you will learn how to use data in LightSwitch. This includes creating tables and fields, attaching to existing data, setting up relationships, and programming computed properties.
Understanding Entities and Properties
We begin this chapter by explaining a couple of fundamental items. An entity is the basic unit of data that is used within LightSwitch. Database developers are familiar with tables and rows. An entity can be thought of as a single row from a database table. A database row contains one or more fields, and LightSwitch properties are analogous to the fields or columns from a table.
To give a second example, LightSwitch can be used to connect to a Microsoft SharePoint 2010 list. A SharePoint list item will map to a LightSwitch entity, and a list column will be exposed as a LightSwitch property.
Screens in LightSwitch are based on entities (or entity collections in the case of list or grid-type screens). Entities can also be programmatically accessed through code, and Chapter 4 provides many coding examples.
Note To clarify the correct technical terminology, entity collections are not the same as entity sets. A list or grid binds to an entity collection, which is the result of querying an entity set. An entity set represents the table or list on the server where the entities come from and return to.
Attaching to Existing Data
LightSwitch allows you to connect to a wide range of data sources. If you select the option to attach to existing data, LightSwitch provides you with three default choices. You can attach to any of the following:
- A database
- A SharePoint list
- A Windows Communication Foundation Rich Internet Application (WCF RIA) service
The list doesn't end there, however. As long as a compatible entity framework provider is available for your data source, LightSwitch can consume the data. This enables you to connect to data sources such as Oracle and MySQL (as shown in Figure 3-1). To clarify what we mean by a compatible entity framework provider, not all providers are created equal. LightSwitch requires specific features to be supported by the entity framework provider, so the compatibility is worth checking before you attempt to use a provider in LightSwitch.
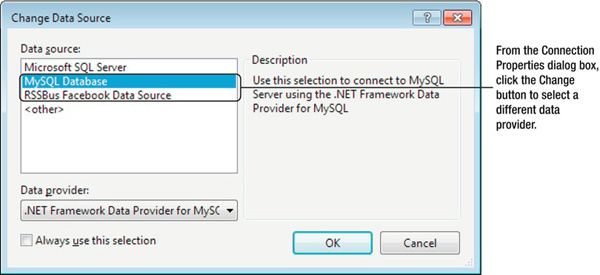
Figure 3-1. Connecting to a MySQL data source
If an entity framework provider is unavailable, you can write your own RIA service or even your own custom data source extension. Both options provide you with much flexibility in terms of connecting to the data of your choice.
When using an external data source, you can't add new tables or modify the schema of an existing table. For example, you can't add new database fields or modify the names of existing fields.
However, it is possible to change the data type of a LightSwitch property to another compatible business type. For example, a property that LightSwitch has imported as a string can be changed to the LightSwitch Phone Number type.
Attaching to an Existing Database
To attach to an existing SQL Server database, right-click the Data node in Solution Explorer and select the Add a Datasource option. Choose the SQL Server option and follow the steps until you reach the Connection Properties dialog box.
This standard dialog box enables you to enter the details of your SQL Server. If you want to connect to a SQL Server instance running on your local machine, you can specify localhost or type the full-stop character (a period) as the server name.
The next dialog box, shown in Figure 3-2, enables you to choose the tables and views to use in your LightSwitch application.
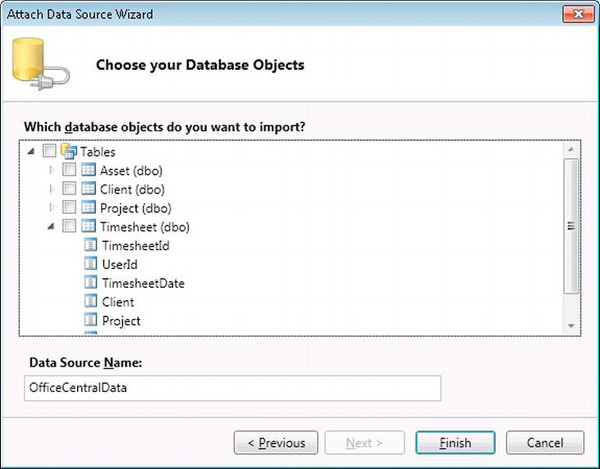
Figure 3-2. Choose your Database Objects dialog box
Stored procedures, user-defined functions, and other SQL objects are not supported and do not appear in this dialog box. If you want to use stored procedures, you can do so by writing a custom RIA service.
![]() Note After attaching to an external table, you can use the table designer to reorder the columns. Although this won't affect the underlying SQL table, any new screens that you create will have their data entry controls ordered in the sequence that you have specified.
Note After attaching to an external table, you can use the table designer to reorder the columns. Although this won't affect the underlying SQL table, any new screens that you create will have their data entry controls ordered in the sequence that you have specified.
Finding Missing Tables
Some users often report that tables appear to be missing from the Choose Your Database Objects dialog box. This problem is caused by primary keys not being defined on the missing tables. After primary keys have been set up, the tables will appear correctly in the Data Source Wizard.
If an identity column has been specified without a primary key defined, the table appears in read-only mode. Figure 3-3 illustrates the alert that LightSwitch shows you when it encounters such a table. For those unfamiliar with SQL Server, identity columns are auto-incrementing fields similar to sequences in Oracle or autonumbers in Microsoft Access.
Likewise, any views that you want to add must contain a derivable primary-key column and can be attached only in read-only mode.
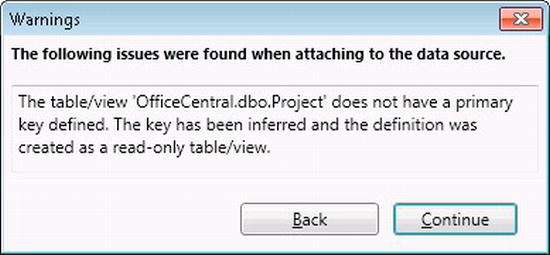
Figure 3-3. Table attached in read-only mode
Refreshing an External Data Source
After adding an external data source, two things could change about that data source. First, the location of the data source could change. For example, a SQL Server database might be moved to a different server. Second, tables and fields can be added, edited, or deleted.
In order for your LightSwitch application to continue working, the data source must be refreshed. To do this, right-click the data source and select the Refresh Data Source option. The first dialog box that appears is the Choose Your Database Objects dialog box, illustrated earlier in Figure 3-2.
If the location of the data source has changed, click the Previous button to return to the Connection Properties dialog box. This will enable you to update the connection details. If tables or fields have been added, edited, or deleted, click the Next button to progress through the Data Source Wizard. If any changes are found, these will be indicated by icons with a red x or exclamation point, as shown in Figure 3-4.
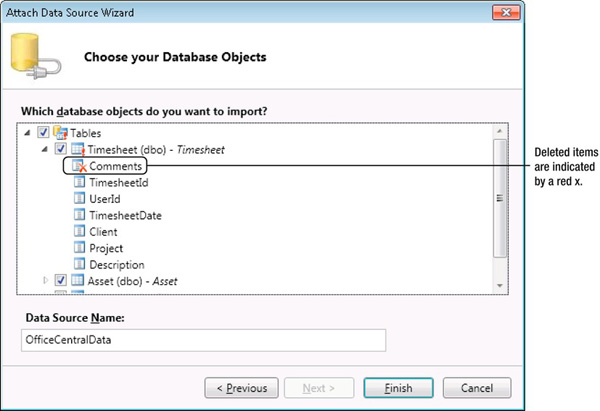
Figure 3-4. Database Objects Dialog box showing changed items
Clicking the Finish button will update all screens and remove controls that are bound to the deleted fields. Any references made to those fields in code will not be updated. If references exist in code, they will become invalid and show up in the Error List window as errors. At this point, you can work your way through the error list and resolve any remaining errors.
![]() Note Although the Refresh Data Source option allows you to change the connection string from one SQL Server to another, you can't change the underlying data provider. For example, you can't change from SQL Server to MySQL without deleting the tables in the LightSwitch model and reimporting.
Note Although the Refresh Data Source option allows you to change the connection string from one SQL Server to another, you can't change the underlying data provider. For example, you can't change from SQL Server to MySQL without deleting the tables in the LightSwitch model and reimporting.
Working with Datetimeoffset and Other Unsupported Data Types
When connecting to an existing database, there are five SQL column types that are currently unsupported. These are the spacial types geography and geometry, hierarchyid, sql_variant, and datetimeoffset. If you have an existing database that uses any of these data types, LightSwitch will be unable to read or write to any of these fields.
The data type datetimeoffset is the one that causes the most concern with developers. It is commonly used in applications that span multiple time zones.
If you want to create an application that supports multiple time zones, the simplest solution is to save all datetime values in UTC (Coordinated Universal Time). Server-side code related to entities can be used to ensure that all dates are saved in this format. The .NET datetime class contains a DateTime.ToUniversalTime method that can be used to convert times. A custom control can then be written to display the UTC value in the local time zone.
Using SQL Server Binary Data Types
A useful feature included in SQL Server 2008 is the FileStream feature. This allows you to save varbinary(max) data such as images and documents into the file system instead of inside the database. T-SQL can still be used to insert, update, and read the binary data.
One advantage of using FileStream is that it makes it easier to access your data, particularly if you integrate your LightSwitch solution with other systems (such as an ASP.NET web site) that need to access the data. If you're using SQL Server 2008 Express, the database size is limited to 4GB. FileStream data does not count toward this 4GB limit, so a second advantage is that it allows you to store more data. A third benefit is that FileStream provides better performance over database storage if the average size of the files that are stored is larger than 1MB.
Note that the FileStream data type is supported only in external SQL Server 2008 and is not directly supported in the intrinsic LightSwitch database. If you're wondering how FileStream-enabled databases are backed up, the standard SQL backup will include the FileStream data.
![]() Note If you attach a table that contains an image column, LightSwitch will set the data type for that column to
Note If you attach a table that contains an image column, LightSwitch will set the data type for that column to Binary by default. If you want the column to behave as an image column and to use the built-in LightSwitch image controls, be sure to open the table in the LightSwitch designer and change the data type from Binary to Image.
Attaching to SharePoint Data
LightSwitch can connect to a SharePoint 2010 server and attach to list data. LightSwitch uses a custom OData provider, and therefore versions prior to SharePoint 2010 are not supported. At the time of this writing, SharePoint Online is also unsupported. You can attach to SharePoint lists by using the Data Source Wizard in a similar fashion to connecting to SQL Server data.
Various limitations exist when using SharePoint data, however. First, LightSwitch cannot be used to manage SharePoint attachments or documents. Second, there is limited support for the SharePoint column types of Picture and Hyperlink. This is because no native controls exist for formatting these data items. Formatted text is also not fully supported, because there is no native HTML control built in to edit the content.
Attaching to WCF RIA Services Data
If a data provider doesn't exist for your chosen data source, you can write your own RIA service to make a data connection. Because this involves writing your own entity classes, it is best done for in-house solutions or for connecting to services with data schemas that rarely change. Chapter 7 describes how to do this in more detail.
Deleting a Data Source
If you delete a data source, LightSwitch will remove all entities that relate to the data source from all screens in your application. The screens themselves will not be deleted, but only the instances of the entities and related controls.
Creating a Table in the Intrinsic Database
When tables are created in LightSwitch, they are created in the intrinsic database. As mentioned earlier, the LightSwitch designer cannot be used to add or modify tables in an external SQL database or other attached data source. To create a table, right-click the ApplicationData node in Solution Explorer and select the option to create a new table.
Modifying Table Properties
Figure 3-5 illustrates the properties that can be modified after you've created a table.
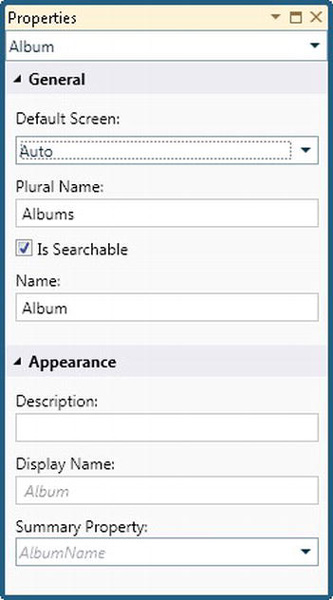
Figure 3-5. The properties of a table
The properties are as follows:
- Name: The name is used to identify the table. The name must begin with an alphabetic character and can contain only alphanumeric characters and the underscore character. Other special characters such as spaces or periods (the full-stop character) are not permitted.
- Display Name: The display name is shown by default in the navigation pane.
- Description: This field is used to provide a longer description of the table.
- Plural Name: This field indicates the default name used when the table collection is added onto a screen. It's also used to refer to the collection when writing code.
- Summary Property: If a summary control is added onto a screen, the text displayed on the summary control uses the field specified here. Also, LightSwitch creates an entity object that allows you to refer to a record in code. This object includes a
ToStringmethod that returns the value of the summary property. - Default Screen: The summary control renders itself as a link. Clicking the link opens the screen specified here. The drop-down list includes an Auto option. If Auto is selected, LightSwitch will automatically generate a screen based on the table.
- Is Searchable: If this option is selected, the contents of the table are searchable. However, autosearching is supported only for string data types. If you create a screen by using the search screen template, the search results do not include data that is saved in numeric and datetime columns, even if the Is Searchable check box is selected.
Moving Intrinsic Tables to an External Data Source
After creating a table in the intrinsic database, you might want to move it to an external database without deleting or creating any screens that are based on that entity. There is no native way to do this. Instead, you must create a connection to your database by using the technique outlined in Chapter 2: script your table and re-create it in your new database. Unless you want to re-create all screens that use the table, you will need to manually modify your ApplicationData.lsml file and change all references to the table to point to the new data source. If there is any possibility that you may want to move your tables to an external database, the best advice we can give you is to create the tables externally in the first place.
There are some advantages to be gained from using external data sources. SQL gurus can easily control other database objects such as stored procedures, triggers, and custom views. You could then use Visual Studio Professional (or above) or SQL Server Management Studio to create and edit the database and attach to it using LightSwitch. LightSwitch will subsequently not manage publishing or updating the schema.
Working with LightSwitch Data Types
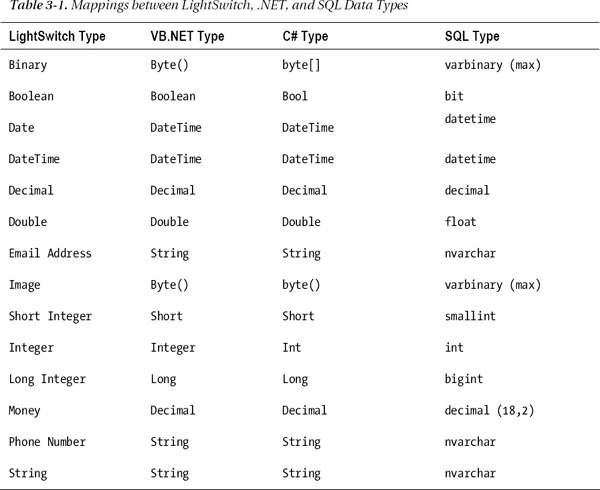
When tables are created in the LightSwitch entity designer, corresponding tables are created in the intrinsic SQL Server database. These fields will also be exposed through code and are mapped to .NET data types. Table 3-1 illustrates the relationship between the LightSwitch, .NET, and SQL Server types. For example, a Boolean field created in LightSwitch will be created as a bit field in the SQL Server database. Working in the other direction, a float field in an external data source will be exposed as a Double when attached to LightSwitch.
Table 3-1 also highlights the Email Address, Money, and Phone Number business types and how these map to the SQL nvarchar data type. Business types are custom data types provided by LightSwitch. These extend the native data types that are provided by .NET. For example, the Phone Number business type is an extension of the String type.
![]() Note If the table designer fails to list any of the business types, make sure that the Microsoft LightSwitch Extensions option has not been inadvertently deselected in the Extensions section of the properties pane for your project.
Note If the table designer fails to list any of the business types, make sure that the Microsoft LightSwitch Extensions option has not been inadvertently deselected in the Extensions section of the properties pane for your project.
String Data Type
The underlying SQL data type used for storing string data is nvarchar. This data type provides storage for variable-length Unicode data and supports international character types.
When a new string field is created, the maximum field size is set to 255 characters. As a matter of good practice, this should be modified as appropriate for the data to be stored. It is unlikely that a Surname field would require 255 characters, for example. Setting the maximum field to something more appropriate will help improve performance.
Behind the scenes, LightSwitch creates an nvarchar column that corresponds to the required field length. For example, setting the maximum field length to 25 creates an nvarchar(25) field within the SQL Server table.
If you need to create an unlimited-length string, or a field of data type nvarchar(max) in SQL Server terms, it may not be clear how to do this through the entity designer. The way to do this is to clear the contents of the Maximum Length text box and leave it blank, as shown in Figure 3-6.
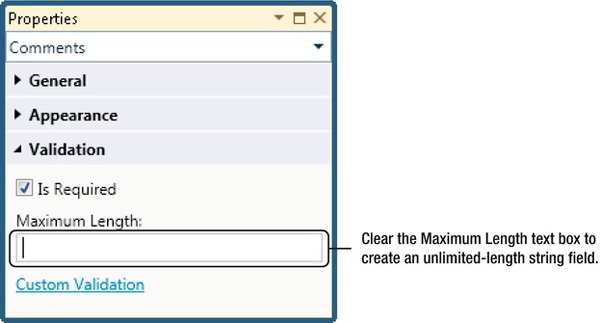
Figure 3-6. Properties of a string field
Double and Decimal Numeric Types
If you want to store numbers with decimal places, LightSwitch provides a choice of either the double or decimal data types.
The practical difference between the two types is that doubles can store a wide range of numbers in a smaller amount of memory. However, doubles are less precise and are subject to rounding errors when calculations are performed with them.
Decimals do not suffer from such rounding errors but take up more space and are slower to compute. Sums of money should always be based on the decimal data type. Therefore, notice how the LightSwitch Money business type is mapped to the SQL decimal type.
Other important attributes that relate to decimals are precision and scale. Precision is the total number of digits in a number. Scale is the number of digits after the decimal place. Figure 3-7 illustrates this using the example number 123456.789.

Figure 3-7. Identifying precision and scale
Decimal fields in LightSwitch are created with a default precision of 18 and scale of 2. In keeping with good practice, the precision and scale should be set to values appropriate for the data being stored. As shown in Figure 3-8, these settings are entered in the Validation section of the Properties window.
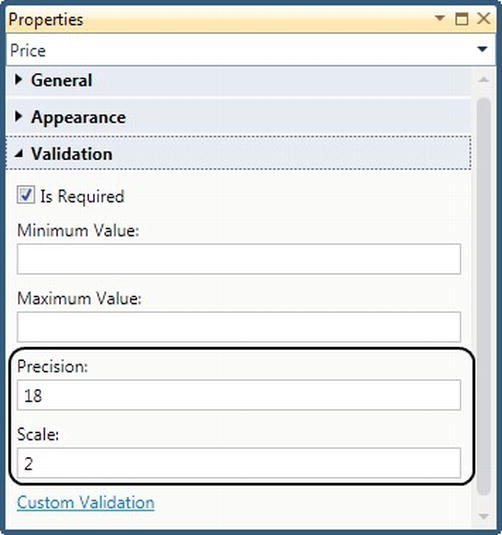
Figure 3-8. Setting the precision and scale
Phone Number Business Type
Phone Number is one of three business types included in LightSwitch. As its name indicates, this type is designed for entering phone numbers. Any data entered into this field is saved as nvarchar string data in the database.
After selecting the Phone Number type for a property, the Phone Number Formats dialog box, shown in Figure 3-9, enables you to input a list of valid formats.
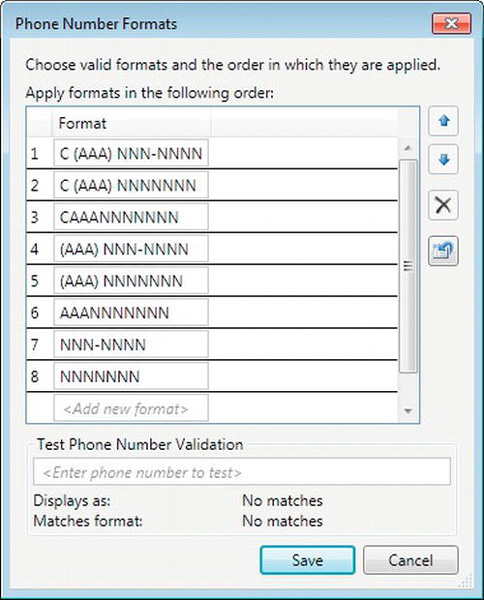
Figure 3-9. Phone Number Formats dialog box
The symbols that you can use to specify formats are as follows:
- C: Country code
- A: Area or city code
- N: Local number
- +, -, (,), . : Additional symbols that are also supported
When a Phone Number property is added onto a screen, the phone number control is the default control used to display the data. When a phone number is entered, this control attempts to validate the phone number against the first format in the list. If the digits match the format, the phone number appears in that format. Otherwise, an attempt is made to validate the phone number against all remaining formats in the list until a match is made.
When a phone number is saved in the database, the string data is saved without any formatting. If you want to create your own reports or to use the phone number data outside of LightSwitch, you'll need to write your own procedures to format the data.
The US phone number formats are added by default. For those living in the United Kingdom, here is list of formats valid for that country:
Unfortunately, it's not possible to specify formats on a global or application basis. They must be specified each time a phone number field is used in a table.
Email Business Type
Email is another business type included in LightSwitch. Just like the Phone Number business type, the underlying database storage type is nvarchar.
After adding an Email property to a table, you'll find two extra settings in addition to the settings that are available for the string type (shown in Figure 3-10). These are as follows:
- Default Email Domain: If an email domain is omitted, the email domain will be appended to the end of the email address. This setting is ideal when creating an internal system that is used by a single company. This setting applies only when entering data by using the built-in email control, and does not apply when the property is programmatically set.
- Require Email Domain: If this option is selected, the user must enter an email domain when entering an email address. This setting applies to LightSwitch's data validation functionality, which operates independently of data entry.
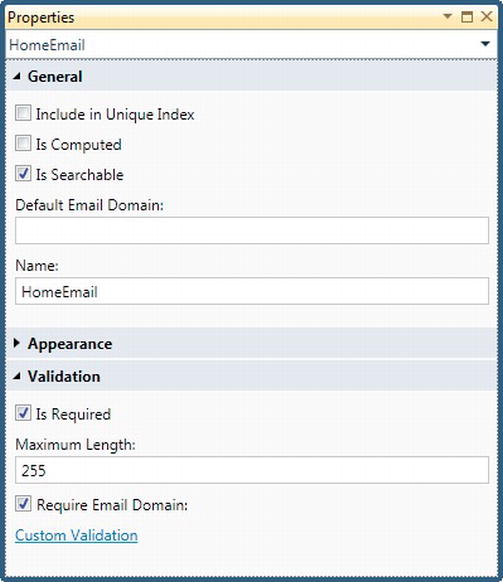
Figure 3-10. Email business type properties
Money Business Type
Money is the third business type that is provided by LightSwitch.
After adding a Money field to a table, the additional properties that you can set are shown in Figure 3-11. These are as follows:
- Currency Code: Use this field to specify the locale for the currency. For example, if you wish to use US dollars, specify en-US. The most common language codes are listed in Appendix 1.
- Is Formatted: If this option is selected, the currency symbol, grouping separator, and custom decimal digits are displayed.

Figure 3-11. Money field properties
The following options become relevant only if the Is Formatted check box is selected:
- Is Grouped: If this option is selected, digit grouping separators will be shown. For example,
1,234,567.89will be displayed rather than1234567.89. - Symbol Mode: You can choose from Currency Symbol, ISO Currency Symbol, or No Currency Symbol. Here are some examples of how the currencies would be formatted:
- Currency Symbol: $123.45
- ISO Currency Symbol: 123.45 USD
- No Currency Symbol: 123.45
- Decimal Places: Currency values will be formatted to the number of decimal places indicated here.
![]() Note If the currency code is not explicitly set, it defaults to US format rather than the culture that is set on your machine.
Note If the currency code is not explicitly set, it defaults to US format rather than the culture that is set on your machine.
Image Data Type
The image type is designed to store images. LightSwitch includes Image Editor and Image Viewer controls that enable you to select and view images, respectively.
Note that these controls support images in only JPG and PNG format (other common image types such as BMP and GIF are not supported). If you wish to upload and view image files in other formats, you will need to purchase a third-party custom control or write your own.
Also, LightSwitch doesn't perform any image compression on upload, and big images can bloat your database. When editing or saving a record that contains an image, LightSwitch carries out a concurrency check by sending the original image back to the server. This can slow the process of updating records, and if this becomes a problem, you can improve performance by saving images to a separate table.
Binary Data Type
The binary data type can be used to store binary large objects such as documents, videos, or other file types. Chapter 8 explains how you can design a screen to upload and download files.
DateTime Data Type
The LightSwitch DateTime type corresponds to the SQL Server datetime data type.
When working in code, it's important to realize that there is a difference in size between the .NET and SQL Server datetime fields. Table 3-2 illustrates the differences.
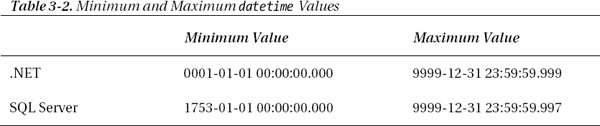
This difference might present a problem if, for example, code is written to set a date variable to the maximum value by using the .NET DateTime.Max method. Some developers choose to do this in order to prevent null values from being saved into the database. On saving the record, LightSwitch will report that the date is too big for the SQL type. Additional code must therefore be written in order to perform this translation if you wish to use the DateTime.Min and DateTime.Max functions in LightSwitch.
If you are using an attached SQL 2008 database, an alternative suggestion is to utilize the datetime2 data type. This data type offers more precision and a greater range of date values, and corresponds more closely with the .NET DateTime type. LightSwitch chose to use datetime rather than datetime2 for compatibility with SQL 2005.
Changing Data Types
When developing an application, any data entered in LightSwitch is persisted between debug sessions in a temporary local database. Changing data types in a table can result in the entire contents of the table being deleted.
The LightSwitch designer will generally warn you before any data is deleted (shown in Figure 3-12), but you should take care if you have spent a lot of time entering data. If design time data is important to you, you should consider using an external SQL Server database rather than the intrinsic database.
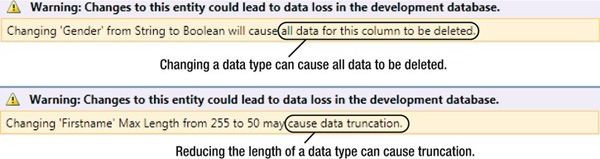
Figure 3-12. Warnings that appear when changing types
Choosing Field Names
It is always a good idea to avoid using reserved names when naming fields. Although such naming can be valid, it could cause you problems later.
A naming rule that you may have encountered is that field names cannot be the same as table names. If you create a field that matches the table name, the LightSwitch designer reports that FieldName has already been used by the entity type and cannot be used.
If you attach to a SQL table that contains a field name matching the table name, LightSwitch renames the field name in the model. For example, if you attach a table named Customer that also contains a Customer field, this field will be named Customer1 by LightSwitch. If the field name matches a data type (if you have a field named date for example), LightSwitch prefixes c to the start of the name so that it becomes c_Date.
Naming a field with the prefix Entity (for example, EntityKey) has been known to cause problems and is therefore not recommended. This is likely due to a conflict caused by objects in the entity framework. In addition, there are also other entity and entity set names that can conflict with the built-in tables added by LightSwitch or ASP.NET.
Ensuring Unique Values
Each field contains an Include in Unique Index check box. Selecting this check box includes the field in a combination index.
It is not possible to create individual unique fields (that is, multiple unique indexes) by using the designer. If this is required, validation can be written to enforce uniqueness. Chapter 5 contains some example code that shows how to do this.
If an attached SQL database is used, this could also be enforced by creating unique indexes at the SQL Server level.
Creating Choice Lists
Creating a choice list enables you to use the AutoCompleteBox or modal window picker controls when creating screens. You can create these on fields from external data sources as well as the tables that you create yourself in the intrinsic database.
A choice list is a set of name-value pairs and can be created for most data types including fields that are based on Boolean and numeric types. To give you an example, a choice list could be created for a Boolean field with the choice values of Yes and No. The data types that do not support choice lists include Image and Binary types.
To create a choice list, click the Choice List link from the properties pane for your field and enter a list of Value and Display Name pairs. When the autocomplete box is rendered on a screen, the items will be displayed in the order in which they are entered in the Choice List window. Items can be reordered by right-clicking an item and selecting the Move Up or Move Down options, as shown in Figure 3-13.
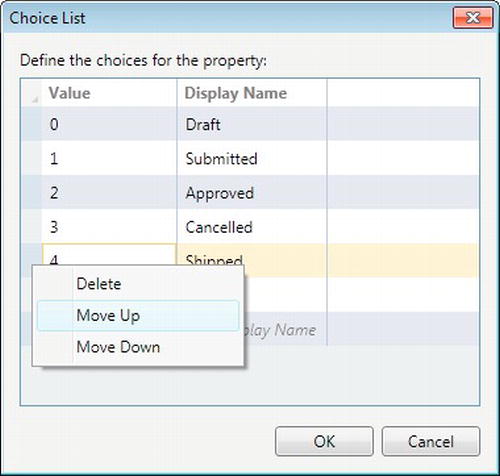
Figure 3-13. Reordering items by using the right-click option
The designer prevents you from entering multiple-choice list items by using copy and paste. If you need to rapidly enter multiple-choice list items, you can manually edit the ApplicationDefinition.lsml file, as described in Chapter 2. Open the LSML file in Notepad and find the XML that relates to the choice list. The choice items can be added manually in XML format, as illustrated in Listing 3-1.
Hand-editing the LSML file carries risk, and the usual warnings that apply to editing this file should be heeded.
Listing 3-1. Choice List Excerpt from the LSML File
<EntityProperty Name="OrderStatus" PropertyType=":Int32">

    <EntityProperty.Attributes>

        <Required />

        <NotSearchable />

        <SupportedValue DisplayName="Draft" Value="0" />

        <SupportedValue DisplayName="Submitted" Value="1" />

        <SupportedValue DisplayName="Approved" Value="2" />

        <SupportedValue DisplayName="Cancelled" Value="3" />

        <SupportedValue DisplayName="Shipped" Value="4" />

        <SupportedValue DisplayName="Fulfilled" Value="5" />

    </EntityProperty.Attributes>

</EntityProperty>
Choice List vs. Related Tables
When creating AutoCompleteBoxes, a common question is whether the items should be based on a choice list or a related table.
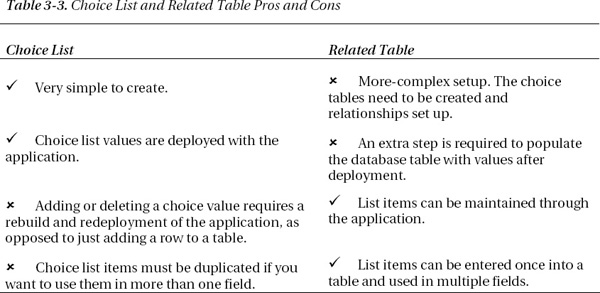
In summary, a choice list is ideal for data items that are relatively static. Creating choice lists with integer/name mappings also helps ensure the proper normalization of a database. The disadvantage of using a choice list is that adding or deleting items requires that the application be recompiled and redeployed, which can be cumbersome. Table 3-3 summarizes the pros and cons of using a choice list as compared to a related table.
Setting Relationships
It's important that correct data relationships are set up in LightSwitch Doing this makes setting up parent-child grids, or drop-down boxes, very easy. This section describes the various types of relationships that are available in LightSwitch.
One-to-Many Relationships
One-to-many relationships are the most basic type of relationship that can be created in LightSwitch. The following example illustrates the Client and Project tables in the OfficeCentral application. Each client can have one or more projects associated with it.
To demonstrate the creation of the relationship, create the Client and Project tables as illustrated in Figure 3-14. At this point, no relationship has been set up.

Figure 3-14. Client and Project tables without a relationship
To create the relationship, click the Relationships button in the designer and create the relationship as shown in Figure 3-15.
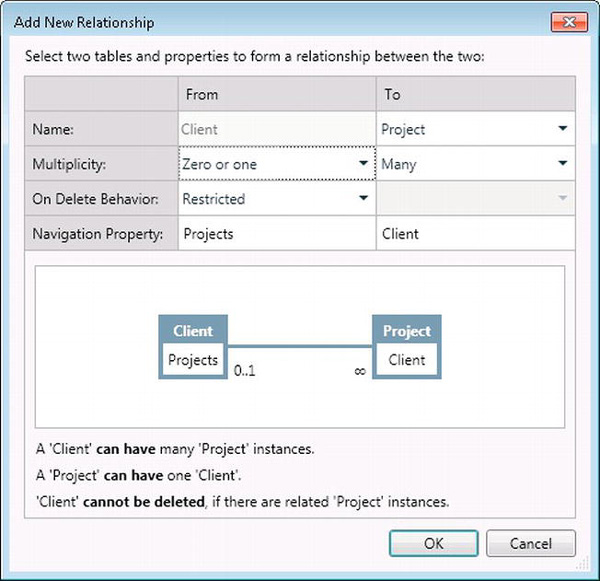
Figure 3-15. Add New Relationship dialog box
The Multiplicity row enables you to define the type of relationship between the two tables. In this case, we have selected a zero- or one-to-many relationship. When multiplicities are selected by using these drop-down boxes, a description of the relationship is given in plain, simple English at the bottom of the dialog box.
The final section of the dialog box enables you to set the name of the Navigation Property for each table. Navigation properties provide the mechanism that enables you to navigate related entities. When writing code, they appear as objects in IntelliSense and can also be used to construct LINQ expressions in code.
What Happens in SQL Server?
Figure 3-15 illustrates how LightSwitch guides you through creating relationships by using simple language and how relationships are exposed through navigation properties. Although this simplifies the process for beginners, this simplicity may feel a little alien to more-experienced database developers. What actually happens at the SQL Server level when these relationships are created through LightSwitch? Figure 3-16 shows the answer to this question.
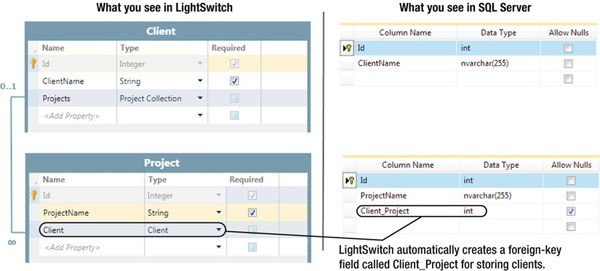
Figure 3-16. Illustration of SQL schema
Notice how LightSwitch creates a column in the project table named Client_Project and also creates the corresponding foreign-key relationship. LightSwitch therefore creates the foreign key in the same way as if you were creating it manually.
Self-Referencing Relationships
Self-referencing, or recursive, relationships are relationships in which entities reference themselves. They are often found when modeling hierarchies. An example of a self-referencing relationship is an Employee table that contains a Manager field. The Manager field will refer to a related row in the same table.
In order to create a self-join, open the Add New Relationship dialog box and select the same table in the To side of the relationship, as illustrated in Figure 3-17. Then rename the navigation properties to Manager and StaffMembers. This will result in two navigation properties in the same entity, each representing one end of the relationship (Figure 3-18).
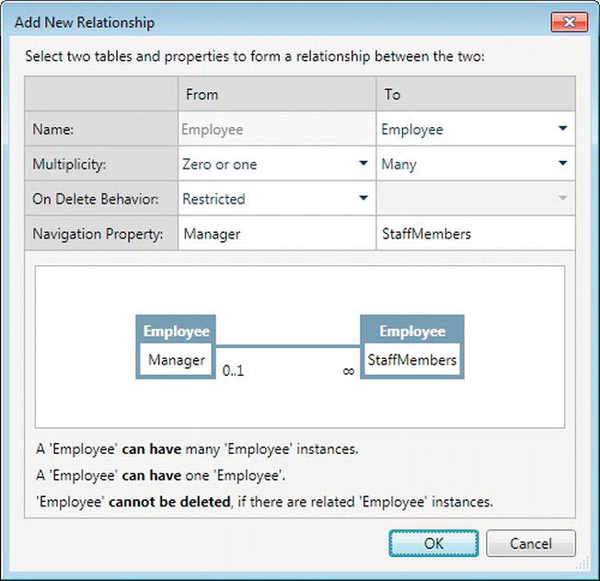
Figure 3-17. Setting up a self-join in the Add New Relationship dialog box

Figure 3-18. An example of a self-join
Many-to-Many Relationships
In the relationship designer, many-to-many relationships are not natively supported. Many-to-many relationships are therefore implemented in LightSwitch through the use of a junction table. In other words, an intermediary table must be created that contains two one-to-many relationships.
In the OfficeCentral application, the details of products and product attributes are stored. In our example business, the Product table contains food items. The Attribute table is used to store characteristics about the product, such as contains nuts, suitable for vegetarians, or high in protein. A product can contain many attributes, and an attribute can be referenced by many products.
After creating the Product and Attribute tables, create a ProductAttribute table to store the many-to-many relationship. In the table designer for the ProductAttribute table, create a one-to-many relationship between the Product and ProductAttribute table. Next, create a one-to-many relationship between the Attribute and ProductAttribute table.
Figure 3-19 illustrates the table structure that we've created.
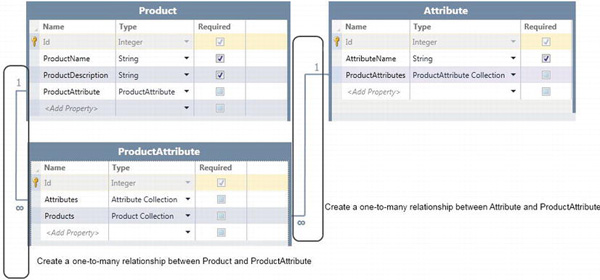
Figure 3-19. How to create a many tomany relationship
This completes the table design. Chapter 8 demonstrates how to create a screen for entering data into these tables.
One-to-One Relationships
One-to-one relationships are not supported in LightSwitch. However, there are often good reasons for having one-to-one relationships, which are often created following normalization or performance tuning.
An example of a one-to-one relationship is a database with the tables Person and EmployeeDetail. When recording information about a person, employee details are split off into a separate table. This means that the Person table isn't littered with lots of empty fields when entering a person that isn't an employee.
There is no easy workaround to implement one-to-one relationships in the entity designer. The following chapter on Screen Design provides some strategies on how to construct screens based on tables with one-to-one relationships.
Cannot Create Relationships in Attached SQL Databases
If you connect to an existing SQL Server database and attempt to set up a relationship in LightSwitch that does not exist in SQL Server, you will receive the error Cannot add a relationship between tables because they are in the same container. The inability to create a relationship makes it very difficult to use controls such as modal window pickers and AutoCompleteBoxes to select related data when creating screens. Figure 3-20 illustrates this exact error when attempting to set up a relationship between the Client and Project tables.
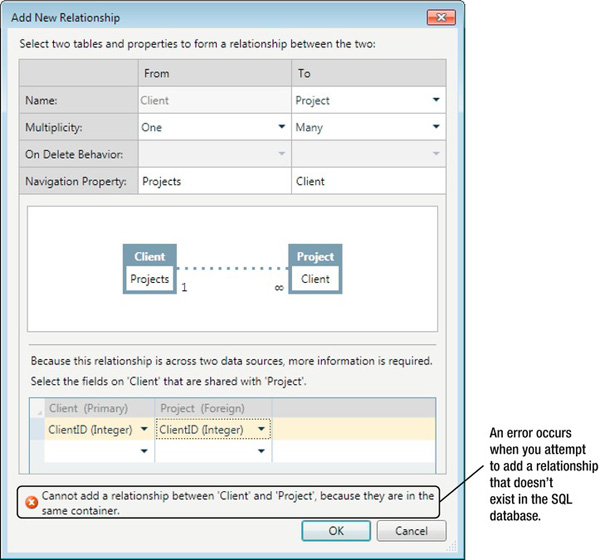
Figure 3-20. Cannot add a relationship error
The obvious fix is to create the correct relationships in the underlying SQL Server database. In many cases, however, this is not possible—for instance, if the database is owned by someone else or if you have insufficient privileges. The workaround for this problem is to place both tables in separate data sources. Assuming that the Client table is in the same database, right-click the Data Sources option in Solution Explorer and select the option to Add Data Source. Set the connection details of the new data source to be the same as your initial data source and add the Project table into the new data source.
The relationship can now be successfully set up between the two tables. The technical name for such a relationship is a virtual relationship. This indicates a relationship that exists in the LightSwitch model, but not in the actual underlying data store.
![]() Note When using this workaround, LightSwitch sees the two data sources as totally different and does not permit updates (in the default case) to both simultaneously. This means you cannot easily update the relationship in some cases, and this technique is therefore more suited for read-only screens.
Note When using this workaround, LightSwitch sees the two data sources as totally different and does not permit updates (in the default case) to both simultaneously. This means you cannot easily update the relationship in some cases, and this technique is therefore more suited for read-only screens.
Deletion Behavior
When creating a relationship, the On Delete Behavior setting can be used to determine what happens when a record is deleted. There are three possible settings:
- Cascade Delete
- Restricted
- Disassociate
Returning to our client and project example, setting the deletion behavior to Cascade Delete will delete all related projects when a client is deleted. This ensures that you don't end up with orphan records that are not associated with a parent. If the behavior is set to Restricted, clients cannot be deleted until all related projects have first been deleted. The final Disassociate option will set all project references to null on related projects prior to the deletion of a client. The Disassociate option is valid on only zero- or one-to-many relationships.
The deletion behavior option is not available and is grayed out if you have created a relationship between two separate data sources. When working between data sources, LightSwitch makes no guarantees about referential integrity or multiplicity on virtual relationships. The deletion options are available only for tables designed in the intrinsic database and not for external data sources.
Using Computed Properties
Computed properties are fields that derive their values through calculations and typically from other properties. They are read-only by definition and appear in the entity designer with a calculator icon next to the field.
These properties are very versatile. The code that you write for computed properties is contained in the Common folder and calculated on both the client and server tiers. From a practical point of view, this means that computed properties shown on a screen can be recalculated immediately without requiring interaction that triggers a server event, such as clicking the Save button on the screen.
In the compute method where you write the code for your computed properties, LightSwitch exposes properties that relate to the fields in your table. These are accessible through the this variable in C# or the me variable in VB.NET. All of the autogenerated properties (and any child properties that are generated) are automatically tracked by LightSwitch. If a tracked property changes, it forces a recalculation of the computed property. The important point is that computed properties are recalculated only when changes are made to properties that are autogenerated by LightSwitch.
The following section illustrates several examples of computed properties. This should give you a flavor of the type of code that is involved in constructing a computed property.
![]() Note Computed properties are fully supported in attached tables and are not just limited to tables that you create in the intrinsic database.
Note Computed properties are fully supported in attached tables and are not just limited to tables that you create in the intrinsic database.
Summary Properties with Computed Fields
Each table allows you to specify a designated summary property. LightSwitch shows the summary property though the summary control. By default, this control is automatically added to data grids and AutoCompleteBoxes. By setting the summary to a computed property, display items can be formatted much more tidily.
In this first example, a computed property is created in the Project table. Each project is associated with a client. The client details are saved in a separate table, and a one-to-many relationship exists between the Client and Project tables.
The following example concatenates the client name from the client table along with the project name. Because Client is a related table, this example also highlights how you can reference related tables in a computed property.
Open the Project table and create a new property called ProjectDescription. In the General section of the properties pane for the new field, select the Is Computed check box. Click the Edit Method hyperlink that appears, and the code window opens. Now enter the code as shown in Listing 3-2.
Listing 3-2. Formatting Strings in a Computed Field
VB:

File : OfficeCentralCommonUserCodeProject.vb


Private Sub ProjectDescription_Compute(ByRef result As String)

   result = String.Format("{0} - {1}", Me.Client.ClientName, Me.ProjectName)

End Sub


C#:

File : OfficeCentralCommonUserCodeProject.cs


partial void ProjectDescription_Compute(ref string result)

{

   result = string.Format("{0} - {1}", this.Client.ClientName, this.ProjectName);

}
The Summary Property setting on the table can be set to ProjectDescription (as shown in Figure 3-21), and the ProjectDescription field will now be shown in the summary control.
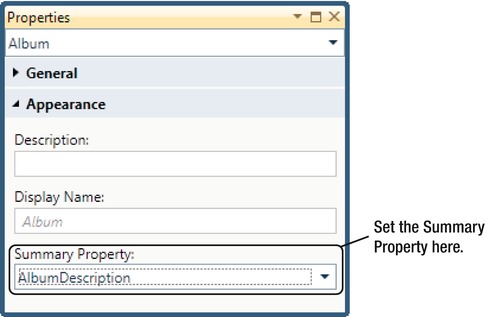
Figure 3-21. Summary Property set to a computed field
.NET String Formatting Tips
Listing 3-2 illustrates a common pattern for building strings using the .NET String.Format method. This method accepts two parameters. The first parameter contains the string to be displayed. This display string contains placeholders for data in the format {0},{1} and so on. The second parameter accepts a comma-separated list of data items that will be substituted into the display string.
The data placeholders can be further formatted by passing in length and format string arguments in the format {index[,length][:formatString]}. The length parameter controls the minimum length that is displayed. The parameter is left-aligned if length is positive, and right-aligned if length is negative. If the data to be displayed is smaller than the length argument, the data item is padded out with spaces until the minimum length is reached.
An additional format string can be passed in with a colon. To demonstrate this concept, the computed property code is modified as shown in Listing 3-3.
Listing 3-3. Left- and Right-Aligning Strings by Using the Length Parameter
'This is the syntax that we use {index[,length][:formatString]}


result = String.Format("{0, 15} - {1}", "FrescoFoods", "Walnuts")

'This is the result:  "FrescoFoods    -  Walnuts"


result = String.Format("{0, -15} - {1}", "FrescoFoods", "Walnuts")

'This is the result:  "    FrescoFoods -  Walnuts"
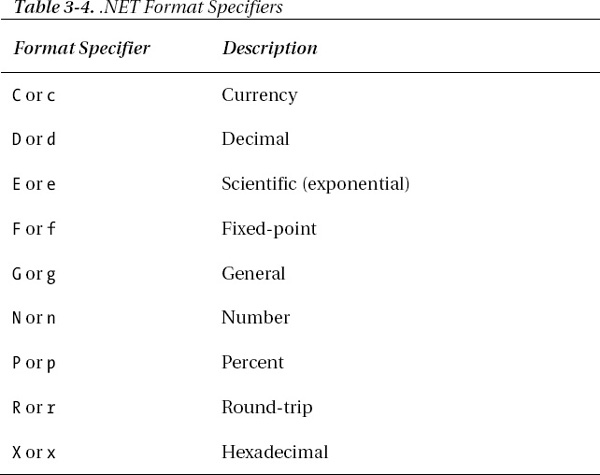
Numeric values in .NET can be formatted by constructing a format string that begins with a format specifier followed by a number that indicates the desired number of decimal places. These format specifiers are summarized in Table 3-4.
Listing 3-4 shows some examples of numeric format strings and the results that are returned.
Listing 3-4. Numeric Formatting Examples
'This is the syntax that we use {index[,length][:formatString]}

Dim dbl As Double = 87654.321

result = dbl.ToString("N2") ' - 87,654.3

result = dbl.ToString("P2") ' - 8765432.10%

result = dbl.ToString("C0") ' - $87,654


result = String.Format("{0, 15} - {1} (Sales {3: N0}) ", " FrescoFoods ", "Walnuts", dbl)

'This is the result:  "FrescoFoods    -  Walnuts (Sales 87,654)"
Formatting Data with Computed Properties
Creating a computed property is a simple way to format the numeric data that appears on screens, and the following example illustrates how to do this using the formatting code from Listing 3-4.
Let's imagine a Product table with a weight field of data type decimal that is used to store the weight of a product in grams. In order to display this field to two decimal places, a computed field called WeightFormatted is created by using the code in Listing 3-5.
Listing 3-5. Formatting Data to Two Decimal Places by Using a Computed Property
VB:

File : ShipperCentralCommonUserCodeProduct.vb


Private Sub WeightFormatted_Compute(ByRef result As String)

   result = Weight.ToString("N2")

End Sub


C#:

File : ShipperCentralCommonUserCodeProduct.cs


partial void WeightFormatted_Compute(ref string result)

{

   result = Weight.ToString("N2");

}
The WeightFormatted computed field can now be used on screens to display the weight to two decimal places.
![]() Note In Listing 3-5,
Note In Listing 3-5, Weight is assumed to be a required field. When referring to nonrequired fields, properties are exposed as nullable objects. In this case, if the entity is not null, the value can be obtained by using the value or GetValueOrDefault property. More details on nullable fields can be found in Chapter 4.
Arithmetic Calculations Using Computed Properties
Computed properties are often used to perform arithmetic calculations. In this example, two computed properties are created in the Order entity. The first one calculates the total weight of the order. The second one calculates the average weight of each line item. This example also highlights how you can reference related items through a navigation property.
Create two computed string fields called TotalWeight and AverageWeight. Then enter the code as shown in Listing 3-6.
Listing 3-6. Arithmetic Calculations Using Computed Properties
VB:

File : ShipperCentralShipperCentralCommonUserCodeOrder.vb


Private Sub TotalWeight_Compute(ByRef result As Integer)

   result = Me.OrderItems.Sum(Function(item) item.Product.Weight))

End Sub


Private Sub AverageWeight_Compute(ByRef result As Integer)

   result = Me.OrderItems.Average(Function(item) item.Product.Weight))

End Sub
C#:

File : ShipperCentralShipperCentralCommonUserCodeOrder.cs


partial void TotalWeight_Compute(ref int result)

{

    result = this.OrderItems.Sum (item => item.Product.Weight);

}


partial void AverageWeight_Compute(ref int result)

{

    result = this.OrderItems.Average(item => item.Product.Weight);

}
The code in Listing 3-6 demonstrates how aggregate functions such as sum and average are carried out on related child items. These aggregate functions are performed using .NET lambda expressions. Don't worry if you don't fully understand the syntax that is shown. All will become clear in Chapter 6.
Date Calculations Using Computed Properties
The next example illustrates how to calculate time differences. The Order table contains OrderDate and ShippingDate columns. The order processing time can be calculated by working out the difference between the two dates and times.
Create a string computed property called ProcessingTime and enter the code as shown in Listing 3-7.
Listing 3-7. Calculating Date and Time Differences
VB.NET:

File : ShipperCentralCommonUserCodeOrder.vb


Private Sub ProcessingTime_Compute(ByRef result As String)

    If ShippedDate.HasValue AndAlso OrderDate.HasValue Then

        Dim span = ShippedDate - OrderDate

        result = String.Format("{0} days{1} hrs {2} mins", span.Days, span.Hours,

span.Minutes)

    Else

        result = "0"

    End If

End Sub


C#:

File : ShipperCentralCommonUserCodeOrder.cs


partial void ProcessingTime_Compute (ref string result)

{

    if (ShippedDate.HasValue && OrderDate.HasValue)

        {

            TimeSpan span = ShippedDate.Value.Subtract(OrderDate.Value);

            result = String.Format("{0} days{1} hrs {2} mins", span.Days, span.Hours,

span.Minutes);

        }
        else

        {

            result = "0";

        }

}
Listing 3-7 illustrates the use of the .NET TimeSpan object, which can be useful for converting time durations into the corresponding string representations of days, hours, minutes, and seconds.
![]() Caution Computed properties that include the
Caution Computed properties that include the DateTime.Now function (a function that returns the current time) can be dangerous. This is because LightSwitch doesn't know when to recompute the value, and this could lead to subtle errors in your program. This problem isn't limited to just DateTime.Now, but any external value not managed by LightSwitch.
Rounding and Truncating Numbers
When working with numbers, it's important to understand the impact that rounding and truncation might have. Let's return to the earlier example of displaying product weights that are rounded to two decimal places. Each order contains one or more order items. Each order item has an associated product.
Next, a computed property is created on the Order entity to calculate the total weight of the products that are contained in the order. If the computed property is written to sum up the nonrounded product weight (Listing 3-8), a discrepancy can occur (as shown in Figure 3-22).
Listing 3-8. Summing Nonrounded Values
VB:

File : ShipperCentralCommonUserCodeOrders.vb


Private Sub OrderWeight_Compute(ByRef result As Decimal)

    result = Decimal.Round(Me.OrderItems.Sum(Function(item) item.ProductWeight), 2)

End Sub


C#:

File : ShipperCentralCommonUserCodeOrders.cs


partial void OrderWeight_Compute(ref decimal result)

{

    result = decimal.Round (this.OrderItems.Sum(item => item.ProductWeight), 2);

}

To resolve these kinds of problems, the computed property code should be amended to apply a sum on the rounded values (Listing 3-9).
Listing 3-9. Summing Up Rounded Values
VB:

File : ShipperCentralCommonUserCodeOrders.vb


Private Sub OrderWeight_Compute(ByRef result As Decimal)

    result = Decimal.Round(Me.OrderItems.Sum(Function(item) Decimal.Round(item.ProductWeight,2)), 2)

End Sub


C#:

File : ShipperCentralCommonUserCodeOrders.cs


partial void OrderWeight_Compute(ref decimal result)

{

    result = decimal.Round (this.OrderItems.Sum(item => Decimal.Round(item.ProductWeight,2)),

2);

}
By default, the Round method in .NET applies bankers' rounding. If numbers are always rounded up when the fractional unit is 0.5, the results are unevenly skewed upward. Bankers' rounding prevents this problem from happening by rounding toward the even number. There's no need to worry too much about the LINQ syntax that is used here. The important point is to be cautious when applying calculations based on rounded or truncated values. Although users may not be too concerned with product weights adding up correctly, it would definitely be more of a problem if this were a financial report that contained money values.
Returning Images with Computed Properties
It's not just string and numeric data that can be returned in a computed property. The following example demonstrates how to create a computed property that returns an image. To give an example of where this might be useful, imagine visualizing order details on a data grid. A computed image property could be used to display a small icon against each row to illustrate the order status.
Create an image field called Icon and enter the code as shown in Listing 3-10.
Listing 3-10. Returning an Image in a Computed Property
VB.NET:

File : ShipperCentralCommonUserCodeProduct.vb


Private Sub Icon_Compute(ByRef result As Byte())

   'The string beneath represents a base64Encoded image. It has been truncated to save space

in this book.

   Dim base64EncodedImage As String = "/9j/4AAQSkZJRgABAQEAYABgAAD"

   result = Convert.FromBase64String(base64EncodedImage)

End Sub


C#:

File : ShipperCentralCommonUserCodeProduct.cs

partial void Icon_Compute(ref byte[] result)

{

   //The string beneath represents a base64Encoded image. It has been truncated to save space

in this book.

   string base64EncodedImage = "/9j/4AAQSkZJRgABAQEAYABgAAD";

   result = Convert.FromBase64String(base64EncodedImage);

}
The computed property returns a hard-coded, base-64 encoded image. You can find various web sites that will convert image files into their base-64 encodings. An example can be found at http://www.dailycoding.com/Utils/Converter/ImageToBase64.aspx.
Alternatively, the images can be retrieved from a table. Chapter 4 describes in further detail the code that would be used to do this.
Sorting and Filtering on Computed Properties
A slight limitation of computed properties is that you cannot sort or filter by these properties. If you create a query based on a table with computed properties, these properties will not appear in the drop-down list of available items when creating a filter or sort.
To work around this problem, the first option is not to use a computed property but to use a normal property instead. Code can be written in the inserting and updating events (explained in Chapter 4) on your entity to permanently store the data in a normal, persisted property. You can then sort and filter your data using this property.
If you are using an external SQL data source, a second workaround is to use a SQL Server computed column rather than a LightSwitch computed property. A limitation on SQL Server computed columns, however, is that they can refer to only the data in the same table and are less powerful than their LightSwitch equivalent. The earlier example of creating a TotalWeight computed property in the Product table cannot be re-created in a SQL Server computed column.
The following example demonstrates how to create a computed column that calculates the total price in a Product table. Computed columns can be created by using the table designer in SQL Server Management Studio. After opening the product table in Management Studio, create a TotalPrice column and view the properties of the column. In the Computed Column Specification text box that appears, enter T-SQL CAST(Quantity AS decimal(18,2)) * UnitPrice, as illustrated in Figure 3-23.
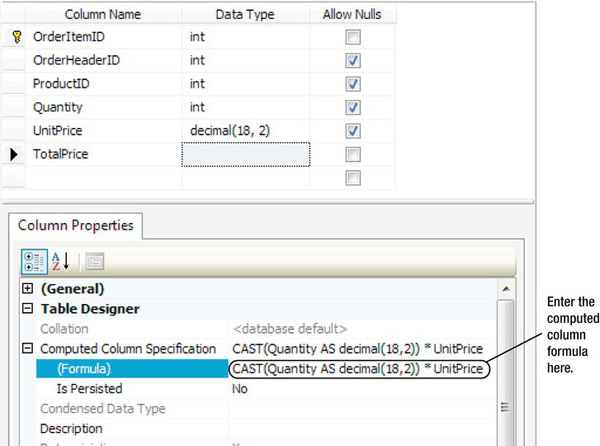
Figure 3-23. Creating computed columns in SQL Server
In the example T-SQL, UnitPrice is an integer field and Quantity a decimal field. The CAST command is used to convert the quantity field into a decimal value to enable the multiplication to take place.
SQL computed columns are calculated each time the field is queried. Setting the Is Persisted value to true will improve performance by saving the calculated values into the table. These persisted values will be updated each time the underlying data changes.
If a column is set to Is Persisted, Deterministic or Imprecise, an index can be created on the column. Creating an index on a computed column will further improve performance when performing searches in LightSwitch.
Deterministic columns will always return the same value for any given set of inputs. A computed column that calculates someone's age is an example of something that is nondeterministic.
A disadvantage of using SQL computed columns is that computed values will be updated only when the data is refreshed from the server. For example, if a LightSwitch screen is created based on the Product table, updating a quantity text box will not automatically update the computed TotalPrice value until the record is saved. LightSwitch computed columns will update immediately because the computed field logic exists in the common project and executes on both the client and the server.
![]() Note Chapter 6 introduces writing queries and explains how custom sorting can be implemented through the
Note Chapter 6 introduces writing queries and explains how custom sorting can be implemented through the PreProcessQuery method. This provides another technique for solving this particular problem and unlike SQL computed columns, this method can be easily applied to tables belonging in the intrinsic database.
Summary
This chapter has covered many data-related topics. You have learned that entities and properties are the core units of data used in LightSwitch. Entities are synonymous with rows from a database table, and properties can be thought of as fields or columns from a table.
By default, you can use LightSwitch to attach to SQL Server, SharePoint, or RIA service data sources. You can attach to any data source as long as a compatible entity framework provider for that data source is available.
If using SQL Server, try to ensure that all tables have primary keys and correct relationships set up. Tables without primary keys cannot be attached to LightSwitch. Relationships cannot be defined in LightSwitch if they haven't been set up at the SQL Server level. This makes it very difficult to use the AutoCompleteBox on screens to select related records. A workaround to resolve this problem is to use two separate data sources.
All of the standard data types are available. In addition, there are three business types: Phone Number, Email Address, and Money. These business types map to standard SQL data types, and you have seen how all of the other LightSwitch data types map to underlying SQL types.
If you want to create a screen that contains an autocomplete box, you can choose to use a related table or create a choice list. Choice lists are ideal for short lists of data that are unlikely to change.
Various types of relationships can be set up, and cascade delete options can be set up to delete all related child records when a parent record is deleted. Many-to-many relationships can be established through the use of a junction table, and self-referencing relationships can also be created.
Finally, you have seen various examples of writing computed properties to perform string formatting, date arithmetic, and calculations that involve related child records.