
C H A P T E R 12
Creating and Sending Emails
Email has become an indispensable part of our lives, and the modern world would struggle to function without it. This book, for example, could not have been written without the help of email. Most businesses rely on email and expect their applications to integrate with email systems too.
Typically, .NET developers have relied on the methods in the System.Net.Mail namespace to send email. However, LightSwitch applications are based on a Silverlight client, and this namespace is not available inside the Silverlight runtime. So how do you go about sending email when such an integral part of the .NET framework is missing from Silverlight?
Fortunately, you can use various techniques to send email, and in this chapter you will learn about the options that are available. Because the server portion of a LightSwitch application uses ASP.NET, the System.Net.Mail namespace can be used on the server tier to send email. In desktop applications, a second option is to automate Microsoft Outlook by using COM. However, this solution depends on Outlook being installed on the client. The final option is to construct HTML hyperlinks to open the default email client.
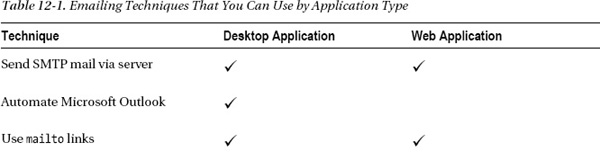
Table 12-1 summarizes the options that are available according to the application type that you have chosen to use.
Sending Email by Using Server-Side Code
Having established that the System.Net.Mail namespace can be used only on the server, the next step is to work out how to call these server methods from the LightSwitch client. However, there is no direct way of calling a server method from the LightSwitch client, which presents a challenge for us.
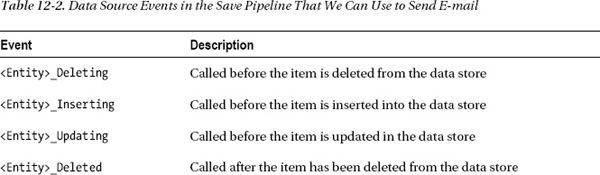
The way to work around this is to hook into the data source events that relate to an entity set. Table 12-2 summarizes the events within the save pipeline that you can use.
If you want to send an email when data changes in your application, this process is somewhat simplified. For example, if the status of a sales order changes from processed to shipped, the Updated method can be used to trigger an email.
If you want to send an email through a process that is disconnected from data, the procedure is more involved. For example, you might want to create a button on a screen that sends an email to the current customer shown onscreen, without saving any of that customer's details. To code around this problem, an operation table is created. This is used to temporarily store the details of the email that you want to send. Other names that you could choose for this table are command table or conduit table. This table gives you access to the data source events and allows you to call the server-side methods.
Figure 12-1 illustrates the techniques that are covered in this section.
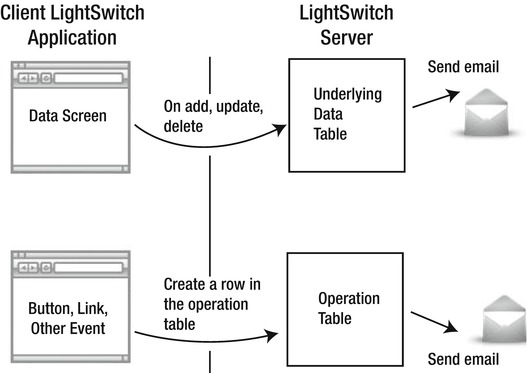
Figure 12-1. Sending an email by using server-side code

Sending Email When Data Changes
In this section, you'll learn how to send an email when an element of an order changes. Code is written in the updated method of an Order entity to send the email.
To run this example, open the Order table in the table designer, click the Write Code button, and select the Updated method. Now write the code as shown in Listing 12-1.
Listing 12-1. Sending Email When Data Is Updated
VB:


File: ShipperCentralServerUserCodeApplicationDataService.vb


Imports System.Net.Mail


Private Partial Sub Orders_Updated(entity As Order)

    Dim message As New MailMessage()


    message.From = New MailAddress("[email protected]")

    message.To.Add(entity.Customer.Email)

    message.Subject = "Order Updated"

    message.Body = "The status of your order has changed. Order ID " & entity.Id

    Dim client As New SmtpClient("smtp.yourmailserver.net", 25)


    'Set the details below if you need to send credentials

    'client.Credentials = new System.Net.NetworkCredential("yourUsername", "yourPassword")

    'client.UseDefaultCredentials = false

    client.Send(message)


End Sub


C#:


File: ShipperCentralServerUserCodeApplicationDataService.cs


using System.Net.Mail;

partial void Orders_Updated(Order entity)

{

    MailMessage message = new MailMessage();

    message.From = new MailAddress("[email protected]");

    message.To.Add(entity.Customer.Email);

    message.Subject = "Order Updated";

    message.Body = "The status of your order has changed";

    SmtpClient client = new SmtpClient("smtp.yourmailserver.net", 25);
    //Set the details below if you need to send credentials

    //client.Credentials = new System.Net.NetworkCredential("yourusername", "yourpassword");

    //client.UseDefaultCredentials = false;

    client.Send(message);

}
Listing 12-1 illustrates the use of the following objects in the System.Net.Mail namespace:
SmtpClient: This class is used for sending email. It must be initialized with credentials such as the SMTP Server URL, port numbers, and authentication credentials. For the SMTP Server setting, you can supply either a server name or an IP address. The methods that you use to send the email message are calledSendandSendAsync.MailMessage: This object represents an email message. It contains properties such as the recipient email address, email subject, and email body.
In order for the code to work, you'll first need to set the address of your SMTP server in the SmtpClient object. The SmtpClient constructor accepts the name of the mail server as the first parameter, and the port number as the second parameter (typically port 25). If a username and password are needed to log onto your mail server, these can be set using the Credentials property.
The Updated method gives you access to the underlying entity. In the code shown, we've incorporated the order ID and customer email address into the message that is sent.
Because you can access the entity in this method, you could modify the code to conditionally send the email. For example, you could write an if statement to send an email only if the order status changes. You can determine whether the order status has changed by calling the method entity.Details.OrderStatus.IsChanged.
![]() Tip If your email fails to send, there are a few simple things that you can check. First, are there any firewalls or antivirus applications blocking the SMTP traffic? Some antivirus programs protect against mass-mailing worms and will block any outgoing SMTP traffic. Second, email servers such as Microsoft Exchange may need to have relay settings configured in order for it to be used in this way.
Tip If your email fails to send, there are a few simple things that you can check. First, are there any firewalls or antivirus applications blocking the SMTP traffic? Some antivirus programs protect against mass-mailing worms and will block any outgoing SMTP traffic. Second, email servers such as Microsoft Exchange may need to have relay settings configured in order for it to be used in this way.
Writing an Email Helper Class
Because the code in Listing 12-1 can be used in several places, Listing 12-2 illustrates a helper method called SendMail to prevent you from having to write lots of lines of repetitive code.
This SendMail method allows you to send email by passing in details indicating the sender, recipient, subject, and email body. You will learn more about this method later in this chapter, when the server-side email example is extended further.
The SmtpMailHelper class can be added into the server project. Alternatively, you could compile the class into a separate DLL and add a reference to it in the server project.
If you choose to add the class directly into the server project, a good place to put it is in the User Code folder. This folder is automatically created when any server code is added into your project. If the folder doesn't exist, you can easily create it by using the designer to create a method for a data source event such as <entity>_inserted.
Listing 12-2. SMTP Mail Helper Class and Method
VB:


File: ShipperCentralServerUserCodeSMTPMailHelper.vb


Imports System.Net

Imports System.Net.Mail


Namespace Central.Utilities


Public Module SmtpMailHelper

    Const SMTPServer As String = "smtp.yourmailserver.net"

    Const SMTPUserId As String = "myUsername "

    Const SMTPPassword As String = "myPassword"

    Const SMTPPort As Integer = 25


    Public Sub SendMail(ByVal sendFrom As String,

                               ByVal sendTo As String,

                               ByVal subject As String,

                               ByVal body As String)

        Dim fromAddress = New MailAddress(sendFrom)

        Dim toAddress = New MailAddress(sendTo)

        Dim mail As New MailMessage


        With mail

            .From = fromAddress

            .To.Add(toAddress)

            .Subject = subject

            If body.ToLower().Contains("<html>") Then

                    .IsBodyHtml = true;

            End If

            .Body = body

        End With


        Dim smtp As New SmtpClient(SMTPServer, SMTPPort)

        'add credentials here if required

        'smtp.Credentials = New NetworkCredential(SMTPUserId, SMTPPassword)

        smtp.Send(mail)

    End Sub

End Module


End Namespace


C#:


File: ShipperCentralServerUserCodeSMTPMailHelper.cs


using System.Net;

using System.Net.Mail;
namespace Central.Utilities

{


    public static class SmtpMailHelper

    {

        const string SMTPServer = "smtp.yourmailserver.net";

        const string SMTPUserId = "myUsername";

        const string SMTPPassword = "myPassword";

        const int SMTPPort = 25;


        public static void SendMail(string sendFrom, string sendTo,

            string subject, string body)

        {

            MailAddress fromAddress = new MailAddress(sendFrom);

            MailAddress toAddress = new MailAddress(sendTo);

            MailMessage mail = new MailMessage();


            mail.From = fromAddress;

            mail.To.Add(toAddress);

            mail.Subject = subject;


            if (body.ToLower().Contains("<html>"))

            {

                mail.IsBodyHtml = true;

            }

            mail.Body = body;

            SmtpClient smtp = new SmtpClient(SMTPServer, SMTPPort);

            //add credentials here if required

            //smtp.Credentials = new NetworkCredential(SMTPUserId, SMTPPassword);

            smtp.Send(mail);

        }

    }

}![]() Tip If you choose to use the SMTP service provided by Google's Gmail, here are some tips to make the code work. First, the
Tip If you choose to use the SMTP service provided by Google's Gmail, here are some tips to make the code work. First, the DeliveryMethod attribute of SmtpClient should be set to SmtpDeliveryMethod.Network. Second, make sure to set the SmtpClient Credentials property with the credentials of your Gmail account. At the time of this writing, the port number used by Google is 587, rather than the standard SMTP port of 25.
Using Configuration Settings to Save Credentials
The code in Listing 12-2 hard-codes configuration details such as the SMTP server, authentication credentials, and port number. Such details are subject to change, so it makes good sense to save these settings in a place where they can be easily modified. When writing code in the server project, Application Settings can be created to store such settings.
To create these settings, return to the server project and open the properties pane, as shown in Figure 12-2. Switch to the Settings tab and create a set of application-scoped settings to store your email credentials.
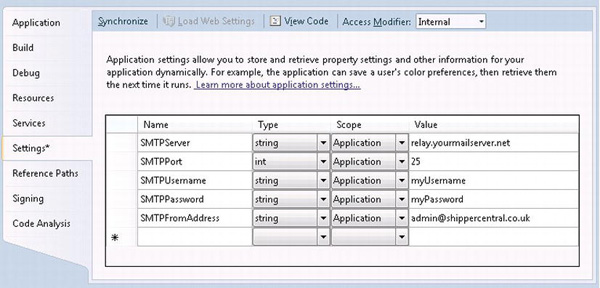
Figure 12-2. Creating configuration settings in the server project
You can then modify your code to use the configuration settings instead. Listing 12-3 highlights the change that you would make to the SmtpMailHelper method. In VB.NET, you can use the My.Settings object to easily refer to your configuration settings.
Listing 12-3. Configuration Settings Code
VB:


File: ShipperCentralServerUserCodeSMTPMailHelper.vb


Imports System.Configuration

Private Shared ReadOnly SMTPServer As String = My.Settings.SMTPServer

Private Shared ReadOnly SMTPUserId As String = My.Settings.SMTPUserId

Private Shared ReadOnly SMTPPassword As String = My.Settings.SMTPPassword

Private Shared ReadOnly SMTPPort As Integer = My.Settings.SMTPPort
C#:


File: ShipperCentralServerUserCodeSMTPMailHelper.cs


using System.Configuration;

private static readonly string SMTPServer =

     LightSwitchApplication.Properties.Settings.Default.SMTPServer;

private static readonly string SMTPUserId =

     LightSwitchApplication.Properties.Settings.Default.SMTPUsername;

private static readonly string SMTPPassword =

     LightSwitchApplication.Properties.Settings.Default.SMTPPassword;

private static readonly int SMTPPort =

    LightSwitchApplication.Properties.Settings.Default.SMTPPort;
Setting SMTP MailMessage Object Properties
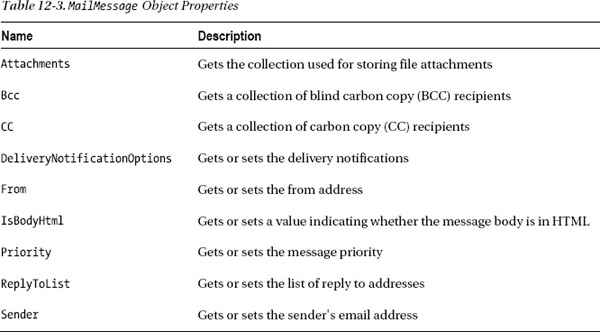
In Listing 12-2, you saw how mail messages can be constructed by creating a MailMessage object and setting the from, to, subject, and body properties. In more-advanced scenarios, there are many more useful properties that you can use. These are summarized in Table 12-3.
Triggering Server Email from an Onscreen Button on the Client
If you want to send an email through a client method that is unrelated to data, an operation table can be created to mimic the steps that were carried out in the earlier examples. This would allow you to create a button or a link on your screen to trigger an email.
The first step is to create this table, which in this example we have named EmailOperation. Figure 12-3 shows the schema of this table.
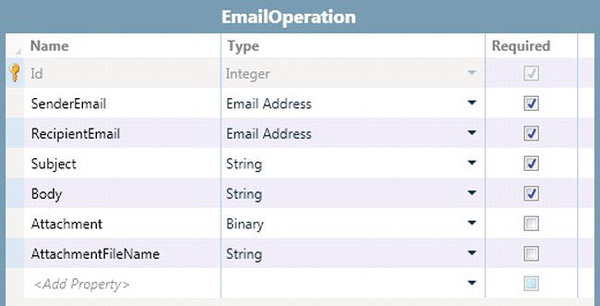
Figure 12-3. EmailOperation table
This table contains all of the fields that are required to send an email, such as the recipient email address, email body, and subject.
When a row is inserted into the table, code in the Inserted method is used to send out the email. We can therefore trigger the sending of emails just by inserting rows into this table.
Listing 12-4 shows the code that needs to be added into the Inserted method for the table. The code takes advantage of the SmtpMailHelper class that was created earlier to simplify the task of sending email.
Listing 12-4. Sending Email by Inserting Records into the EmailOperation Table
VB:


File: ShipperCentralServerUserCodeApplicationDataService.vb


Imports Central.Utilities


Private Sub EmailOperations_Inserting(entity As EmailOperation)


    SmtpMailHelper.SendMail(

        entity.SenderEmail,

        entity.RecipientEmail,

        entity.Subject,

        entity.Body)


    'We've sent the email but don't actually want to save it in the database

    entity.Details.DiscardChanges()

)


End Sub
C#:


File: ShipperCentralServerUserCodeApplicationDataService.cs


using Central.Utilities;

partial void EmailOperations_Inserting(EmailOperation entity)

{


    SmtpMailHelper.SendMail(

        entity.SenderEmail,

        entity.RecipientEmail,

        entity.Subject,

        entity.Body);


    // We've sent the email but don't actually want to save it in the database

    entity.Details.DiscardChanges();

}
The only thing that remains is to create a button on your screen to send the email. Listing 12-5 presents the Execute code for your button. The email body, subject and address details are hard-coded in this example. To allow users to submit their own details, local properties could be added onto the screen, and the code in Listing 12-5 could refer to those properties instead.
Listing 12-5. Button Code for Sending Email
VB:


File: OfficeCentralClientUserCodeSendEmailScreen.vb


Private Sub SendEmail_Execute()


    Using tempWorkspace As  New DataWorkspace()

        Dim newEmail = tempWorkspace.ApplicationData.EmailOperation.AddNew()

        With newEmail

            .RecipientEmail = "[email protected]"

            .SenderEmail = "[email protected]"

            .Subject = "The email subject goes here"

            .Body  =  "The email body goes here"

        End With


        Try

            tempWorkspace.ApplicationData.SaveChanges()


            ' If you want, you can write some code here to create a record in an audit table

            newEmail.Delete()

            tempWorkspace.ApplicationData.SaveChanges()


        Catch ex As Exception

            ShowMessageBox(ex.Message)

        End Try


    End Using
End Sub


C#:


File: OfficeCentralClientUserCodeSendEmailScreen.cs


partial void SendEmail_Execute()

{


    Using (var tempWorkspace = new DataWorkspace() ){

        EmailOperation newEmail = tempWorkspace.ApplicationData.EmailOperation.AddNew();


        newEmail.RecipientEmail = "[email protected]";

        newEmail.SenderEmail = "[email protected]";

        newEmail.Subject = "The email subject goes here";

        newEmail.Body  =  "The email body goes here";


        try{

            tempWorkspace.ApplicationData.SaveChanges();


            //If you want, you can write some code here to create a record in an audit table

            newEmail.Delete();

            tempWorkspace.ApplicationData.SaveChanges();

        }

        catch (Exception ex) {

             this.ShowMessageBox(ex.Message);

        }

}
In this code, we've added the EmailOperation record by using a temporary data workspace. We could have chosen to use the screen DataWorkspace instead (which would have been a simpler option). However, calling the SaveChanges method on the screen's data workspace would save all modified data. Performing the work in a temporary data workspace therefore provides greater isolation and is a safer option.
At the end of the procedure, the record is deleted from the EmailOperation table. If you want to maintain an audit of the emails sent, you could add some code to create a record in an audit table.
Including Email Attachments
You might want to include file attachments in the emails that you send. For example, you might want to attach a picture of a product in a marketing email.
In Table 12-3, you may have noticed that the MailMessage object includes a property called Attachments. This can be used to attach one or more files to your email.
The EmailOperation table shown in Figure 12-3 includes an Attachment field of data type Binary. Listing 12-6 illustrates a change to the SMTP SendMail helper method to enable a file attachment and file name to be passed in.
Listing 12-7 illustrates the code that opens a file browser dialog box and prompts the user to select a file from their file system. After this is done, the file is emailed by creating a row in the EmailOperation table.
Listing 12-6. Modified SendMail Method to Include Attachments
VB:

File: ShipperCentralServerUserCodeSMTPMailHelper.vb


Public Shared Sub SendMail(sendFrom As String,

    sendTo As String,

    subject As String,

    body As String,

    attachment As Byte(),

    filename As String)


    Dim fromAddress As New MailAddress(sendFrom)

    Dim toAddress As New MailAddress(sendTo)

    Dim mail As New MailMessage()


    mail.From = fromAddress

    mail.To.Add(toAddress)

    mail.Subject = subject

    mail.Body = body


    If attachment IsNot Nothing AndAlso Not String.IsNullOrEmpty(filename) Then

        Using ms As New MemoryStream(attachment)

            mail.Attachments.Add(New Attachment(ms, filename))

            Dim smtp As New SmtpClient(SMTPServer, SMTPPort)

            smtp.Send(mail)

        End Using

    End If


End Sub


C#:

File: ShipperCentralServerUserCodeSMTPMailHelper.cs


public static void SendMail(string sendFrom,

    string sendTo,

    string subject,

    string body,

    byte[] attachment,

    string filename)

{

    MailAddress fromAddress = new MailAddress(sendFrom);

    MailAddress toAddress = new MailAddress(sendTo);

    MailMessage mail = new MailMessage();


    mail.From = fromAddress;

    mail.To.Add(toAddress);

    mail.Subject = subject;

    mail.Body = body;


    if (attachment != null && !string.IsNullOrEmpty(filename))
    {

        using (MemoryStream ms = new MemoryStream(attachment))

        {

            mail.Attachments.Add(new Attachment(ms, filename));

            SmtpClient smtp = new SmtpClient(SMTPServer, SMTPPort);

            smtp.Send(mail);

         }


    }

}
Listing 12-7. Screen Code to Send Email Attachments
VB:


File: : ShipperCentralClientUserCodeEmailAttachment.vb


Imports Microsoft.LightSwitch.Threading

Imports System.Windows.Controls


Private Sub SendAttachment_Execute()

    Dispatchers.Main.Invoke(

        Sub()

            Dim dlg As New OpenFileDialog()

            If dlg.ShowDialog().GetValueOrDefault(False) = True Then

                Dim data As Byte()

                Using stream As FileStream = dlg.File.OpenRead()

                    data = New Byte(stream.Length - 1) {}

                    stream.Read(data, 0, data.Length)

                End Using


              Dim filename = dlg.File.Name


                'send the email here

                Me.Details.Dispatcher.BeginInvoke(

                    Sub()


                            Using dw As New DataWorkspace()


                                Dim newEmail = dw.ApplicationData.EmailOperations.AddNew()

                                newEmail.RecipientEmail = "[email protected]"

                                newEmail.SenderEmail = "[email protected]"

                                newEmail.Body = "The email body goes here"

                                newEmail.Subject = "The email subject goes here"

                                newEmail.Attachment = data

                                newEmail.AttachmentFileName = filename


                                Try
                                    dw.ApplicationData.SaveChanges()

                                    ' If you want, you can write some code here to

                                        ' create a record in an audit table

                                    newEmail.Delete()

                                    dw.ApplicationData.SaveChanges()

                                Catch ex As Exception

                                    ShowMessageBox(ex.Message)

                                End Try

                            End Using


                    End Sub)


       End If


   End Sub)

End Sub


C#:


File: ShipperCentralClientUserCodeEmailAttachment.cs


using Microsoft.LightSwitch.Threading;

using System.Windows.Controls;


partial void SendAttachment_Execute()

{

    Dispatchers.Main.Invoke(() =>

        {

        OpenFileDialog dlg = new OpenFileDialog();

        if (dlg.ShowDialog().GetValueOrDefault(false)  == true)

        {

            byte[] data;

            using (FileStream stream = dlg.File.OpenRead())

            {

                data = new byte[stream.Length];

                stream.Read(data, 0, data.Length);

            }


            string filename = dlg.File.Name;

            //send the email here

            this.Details.Dispatcher.BeginInvoke(() =>

            {

                using (var dw = new DataWorkspace())

                {

                    EmailOperation newEmail = dw.ApplicationData.EmailOperations.AddNew();

                    newEmail.RecipientEmail = "[email protected]";

                    newEmail.SenderEmail = "[email protected]";

                    newEmail.Body  =  "The email body goes here";

                    newEmail.Subject  =  "The email subject goes here";

                    newEmail.Attachment  =  data;

                    newEmail.AttachmentFileName  =  filename;


                    try

                    {

                        dw.ApplicationData.SaveChanges();

                        //If you want, you can write some code here to

                           //create a record in an audit table
                        newEmail.Delete();

                        dw.ApplicationData.SaveChanges();

                    }

                   catch (Exception ex)

                    {

                         this.ShowMessageBox(ex.Message);

                    }

                }

            });

        }

    });

}
By default, the screen code that you write runs on the screen thread. Because the open file dialog box interacts with the user, the code must be run on the UI thread. The Dispatchers.Main.Invoke() method is used to execute this code on the UI thread.
After reading the file, the Details.Dispatcher.BeginInvoke() method is used to execute the remaining code on the screen thread. It isn't good practice to carry out data operations on the UI thread because a long-running operation could lock up your UI and leave your application unresponsive.
The record in the operation table is added by using a new data workspace. If we didn't do this, all other data changes made to the screen would be saved when the SaveChange() method is called.
This example won't work in a browser application because ShowDialog won't be on the same call stack as the UI button press. To work around this limitation, you could use a custom control (button) and handle its Click event directly.
Creating Mail in a Pickup Folder
If you cannot send email by using the preceding technique, a second option is to configure a pickup folder. Most SMTP servers including Microsoft Exchange can be configured with such a folder. Rather than sending the email, a plain-text message is saved into this folder. Any file placed into it will be processed as an outbound email. If the messages are in the correct format, they are sent to the recipient specified in the to line of the text file. The snippet in Listing 12-8 illustrates the format that should be used when creating files in this folder.
Listing 12-8. Mail Pickup Text File Format
to:[email protected]

from: [email protected]

subject:This is where you put the email subject.

this is a the body of the email.
Sending Mail via Outlook by Using COM Automation
If your company uses Microsoft Outlook and you're creating a desktop application, automating Outlook is another option that you can consider. This technique is entirely client based, and unlike the previous example, it requires no server-side coding.
The helper class defined in Listing 12-9 is created in the client project. Because this technique can be used only while in desktop mode, you'll need to first perform a check on AutomationFactory.IsAvailable to make sure that COM automation is available. If this check succeeds, you can continue with your Outlook automation code.
Listing 12-9. Client-Side COM Code to Create an Outlook Message
VB:


File: ShipperCentralClientUserCodeOutlookMailHelper.vb


Option Strict Off


Imports System.Runtime.InteropServices.Automation


Namespace Central.Utilities


Public Module OutlookMailHelper

    Const olMailItem As Integer = 0

    Const olFormatPlain As Integer = 1

    Const olFormatHTML As Integer = 2


    Public Sub CreateEmail(toAddress As String, subject As String, body As String)

       Try

           Dim outlook As Object = Nothing


           If AutomationFactory.IsAvailable Then

              Try

                  'Get the reference to the open Outlook App

                  outlook = AutomationFactory.GetObject("Outlook.Application")

              Catch ex As Exception

                 'Outlook isn't open, therefore try and open it

                 outlook = AutomationFactory.CreateObject("Outlook.Application")

              End Try


            If outlook IsNot Nothing Then


               Dim mail = outlook.CreateItem(olMailItem)

               If body.ToLower().Contains("<html>") Then

                  mail.BodyFormat = olFormatHTML

                  mail.HTMLBody = body

               Else

                  mail.BodyFormat = olFormatPlain

                  mail.Body = body

               End If


               mail.Recipients.Add(toAddress)

               mail.Subject = subject


               mail.Save()

               'uncomment the code below if you prefer to send the email immediately

               'mail.Send()

               mail.Display()

            End If
      End If

      Catch ex As Exception

         Throw New InvalidOperationException("Failed to create email.", ex)

      End Try


    End Sub

End Module


End Namespace


C#:


File: ShipperCentralClientUserCodeOutlookMailHelper.cs


using System;

using System.Runtime.InteropServices.Automation;


namespace Central.Utilities

{


    public static class OutlookMailHelper

    {

        const int olMailItem = 0;

        const int olFormatPlain = 1;

        const int olFormatHTML = 2;


        public static void CreateEmail(string toAddress, string subject, string body)

        {

            try

            {

                dynamic outlook = null;


                if (AutomationFactory.IsAvailable)

                {

                    try

                    {

                        //Get the reference to the open Outlook App

                        outlook = AutomationFactory.GetObject("Outlook.Application");

                    }

                    catch (Exception ex)

                    {

                        //Outlook isn't open, therefore try and open it

                        outlook = AutomationFactory.CreateObject("Outlook.Application");

                    }


                    if (outlook != null)

                    {

                        //Create the email

                        dynamic mail = outlook.CreateItem(olMailItem);

                        if (body.ToLower().Contains("<html>"))

                        {
                            mail.BodyFormat = olFormatHTML;

                            mail.HTMLBody = body;

                        }

                        else

                        {

                            mail.BodyFormat = olFormatPlain;

                            mail.Body = body;

                        }

                        mail.Recipients.Add(toAddress);

                        mail.Subject = subject;


                        mail.Save();

                        mail.Display();

                        //uncomment the code below if you prefer to send the email immediately

                        //mail.Send()

                    }

                }


            }

            catch (Exception ex)

            {

                throw new InvalidOperationException("Failed to create email.", ex);

            }

        }

    }


}
After creating this class, you can add a button to your screen to call the CreateEmail function. Listing 12-10 illustrates the code that does this. The name of the method that we've added to the screen is SendToOutlook.
Listing 12-10. Screen Code to Create an Outlook Message
VB:


File: ShipperCentralClientUserCodeEmailOutlook.vb


Imports Central.Utilities


Private Sub SendToOutlook_Execute()

    Dim bodyText As String = "Dear " & CustomerProperty.Firstname &

         ", Thank you for your order etc…"


    OutlookMailHelper.CreateEmail (CustomerProperty.EmailAddress,

                                    "Your Order Details -Email Subject", bodyText)

End Sub


C#:


File: ShipperCentralClientUserCodeEmailOutlook.cs
using Central.Utilities;


partial void SendToOutlook_Execute()

{

    string bodyText = "Dear " + CustomerProperty.Firstname +

        ", Thank you for your order etc…";


    OutlookMailHelper.CreateEmail(CustomerProperty.EmailAddress,

                                    "Your Order Details (Email Subject)", bodyText);

}
When you run the application and click the button, Outlook opens and a new message is created containing the email message. The message can be manually sent by the end user when ready. If you prefer for the email to be sent without any user intervention, you can uncomment the code in Listing 12-9 to call the mail.Send method.
To disable the SendToOutlook button in a browser application, you can test for AutomationFactory.IsAvailable in the CanExecute method of the SendToOutlook command. The only way to test whether Outlook is available is to attempt to create an instance. Because this task is resource intensive, we don't recommend that you do this in the CanExecute method. Listing 12-11 shows the code that you would use to minimally check for Outlook. This type of authorization code is described in further detail in Chapter 14.
Listing 12-11. Code to Disable the SendToOutlook Button in a Browser Application
VB:


File: ShipperCentralServerUserCodeEmailOutlook.vb


Imports System.Runtime.InteropServices.Automation


Private Sub SendToOutlook_CanExecute(ByRef result As Boolean)

    result = AutomationFactory.IsAvailable

End Sub


C#:


File: ShipperCentralServerUserCodeEmailOutlook.cs


using System.Runtime.InteropServices.Automation;


partial void SendToOutlook_CanExecute(ref bool result)

{

    result = AutomationFactory.IsAvailable;

}![]() Tip Although this chapter is primarily focused on sending email, Outlook can be automated in many other ways. Using similar code, you could create some powerful applications. For example, LightSwitch can be used to create Outlook appointments, contacts, or tasks.
Tip Although this chapter is primarily focused on sending email, Outlook can be automated in many other ways. Using similar code, you could create some powerful applications. For example, LightSwitch can be used to create Outlook appointments, contacts, or tasks.
Creating mailto Hyperlinks
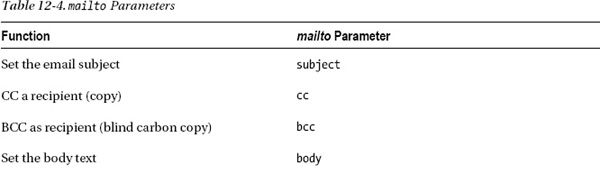
The final method of generating an email is to use a mailto hyperlink. This technique can be used in desktop and browser applications. It works by opening the default email program on the client (if one exists). This could be Outlook, Outlook Express, Windows Live Mail, or any other email client. Arguments can be passed into the hyperlink to set the recipient email address, subject, and body. It's very likely that you've encountered such a link when browsing the Web, and web developers will be familiar with this technique.
The syntax of a simple mailto link is as follows:
mailto:[email protected]If you want to send an email to multiple recipients, the email addresses can be comma separated in the following manner:
After specifying the recipient(s), use a ? character if you want to pass in additional arguments. For example, the following syntax can be used to specify an email subject:
mailto:[email protected],[email protected]?subject=Email SubjectIf you want to pass in multiple arguments, separate the arguments by using the & symbol. Here's an example link that specifies both an email subject and body:
mailto:[email protected],[email protected]?

    subject=Email Subject&Body=Here is the body of the email.
Table 12-4 shows the list of available parameters.
Using mailto in a Screen Button
Now that you know how to construct a mailto link, you can create a button on your screen to execute the mailto command. Listing 12-12 presents a method that constructs and executes the hyperlink.
If you're writing a desktop application, we'll use the shell command is used to open the default email client. Otherwise, we'll use the HtmlPage object from the System.Windows.Browser namespace instead. You will need to add a reference to the System.Windows.Browser.dll assembly in your client project. This code needs to be invoked on the main dispatcher. Otherwise, you will receive an error telling you that the operation can occur only on the UI thread.
In this example, we've created a button which is bound to a screen command called SendEmail. The code in the SendEmail command calls the SendEmailByHyperlink method, and passes in the recipient email address, subject, and body text.
Listing 12-12. Sending Email by Using a mailto Hyperlink
VB:


File: ShipperCentralClientUserCodeEmailByHyperlink.vb


Imports System.Runtime.InteropServices.Automation


Private Sub SendEmail_Execute()

   SendEmailByHyperlink("[email protected]",

      "Email subject", "Here's the body text")

End Sub


Public Sub SendEmailByHyperlink (

      ByVal toAddress As String,

      ByVal subject As String,

      ByVal body As String

    )


    subject = System.Uri.EscapeDataString(subject)

    body = System.Uri.EscapeDataString(body)


    Dim url As String = String.Format(

        "mailto:{0}?subject={1}&body={2}", toAddress, subject, body)

    Dim uri As Uri = New Uri(url)


    If AutomationFactory.IsAvailable Then

            Dim shell = AutomationFactory.CreateObject("Shell.Application")

            'shell.ShellExecute(url) if Option Strict is Off

            CompilerServices.Versioned.CallByName(shell, "ShellExecute", CallType.Method, url)

    Else

            Microsoft.LightSwitch.Threading.Dispatchers.Main.BeginInvoke(Sub()

                System.Windows.Browser.HtmlPage.Window.Navigate(uri, "_blank")

            End Sub)

    End If

End Sub


C#:


File: ShipperCentralClientUserCodeEmailByHyperlink.cs


using System.Runtime.InteropServices.Automation;


partial void SendEmail_Execute()

{

   SendEmailByHyperlink("[email protected]",

      "Email subject", "Here's the body text");

}
public static void SendEmailByHyperlink(string toAddress, string subject, string body)

{

    subject = Uri.EscapeDataString(subject);

    body = Uri.EscapeDataString(body);


    string url = string.Format("mailto:{0}?subject={1}&body={2}", toAddress, subject, body);

    Uri uri = new Uri(url);


    if (AutomationFactory.IsAvailable)

    {

        var shell = AutomationFactory.CreateObject("Shell.Application");

        shell.ShellExecute(url);

    }else{

         Microsoft.LightSwitch.Threading.Dispatchers.Main.BeginInvoke(() =>{

             System.Windows.Browser.HtmlPage.Window.Navigate(uri, "_blank");

         });

    }

}
When sending email by using this technique, special characters must be URI encoded. For example, the & symbol must be replaced with %25 because & is the character used for separating parameters in the mailto string. Therefore, you must call Uri.EscapeDataString on the subject and body values in order to encode special characters and punctuation that might appear in the query portion of the URL.
Summary
In this chapter, you've learned how to send email by using the following three techniques:
- Sending SMTP email via server-side code
- Automating Microsoft Outlook by using COM
- Generating
mailtohyperlinks
Sending email on the server is possible for both web and desktop applications. This approach uses the methods that are available in the System.Net.Mail namespace. The server-side code that sends the email can be called from the client through data source events in the save pipeline. This makes it very easy to automatically send email when entities are created, updated, or deleted.
The SmtpClient and MailMessage objects are used to send SMTP mail. The MailMessage object represents an email and includes many properties that you can set. For example, you can add file attachments to a message by using the Attachments collection. The IsBodyHtml property allows you to create a richly formatted message by composing the body of your message in HTML format. To encourage code reusability, you've learned how to create an SMTP helper class and method to simplify the task of sending email.
The server can send an email in response to added, updated, or deleted entities. Or you can create an EmailOperation table to send email independent of other application data. This table would contain fields such as recipient address, subject, and body. Any row added to this table would trigger an email using the data that has been entered.
If your company uses Microsoft Outlook and you're creating a desktop application, automating Outlook is another option that you can choose. The sample code has shown you how to programmatically create an email based on data that is visible on a LightSwitch screen.
If Microsoft Outlook is not available, an alternative is to create a mailto hyperlink. This technique can be used on both desktop and browser applications. You can build your hyperlink so that it includes the email subject and body details. A button can then be added to your screen to call the hyperlink. On a desktop application, the hyperlink is called by using the shell command. On a browser application, the HtmlPage object from System.Windows.Browser is used instead.