
 |
RECORDING MEDIUMS: FILM AND DIGITAL |
Photography is primarily about creating high quality images, whatever the recording medium chosen. That choice will be determined by a number of factors: client demands, hardware costs, education, and the desired speed and efficiency of communication.
Both film and Charge-Coupled Device (CCD) digital image capture share some common characteristics. Both record light reflections received at the image plane onto a light-sensitive medium with the objective of reproduction at some later stage. While the eventual output can appear very similar, be it a print or published page, the routes to achieve it are technologically quite different. The silver halide technology of traditional photography produces an analogue, continuous tone image where quality is limited by the grain size of the individual halide crystals. Digital images, by comparison, are electronically created stepped-tone images based on the binary digital system where ‘0’ is black and ‘1’ is white, in its simplest form. An image is recorded as a framework of millions of ‘pixels’: the smallest distinct units of a digital image that are encoded with the varying intensities of the colours red, green and blue that make up the image.
Clients on the whole are not yet demanding digital originals because the scanning of conventional transparencies is so simple and the quality consistently high. Further technological advances and standardization, combined with lower prices as a result of increased demand, will trigger the acceleration of the switch from film to digital so it is important that any hardware purchased now will be compatible with both technologies in the future.
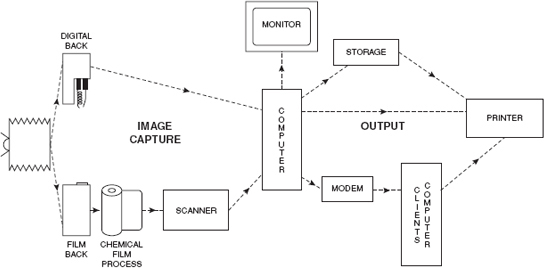
Figure 2.1 The different photographic routes that can be taken from image capture to final print output. While the outputs from both routes can appear very similar, the processes involved in each are technologically quite different
Film
In many other branches of photography, the photographer has to compromise film speed with quality in order to capture any movement with sufficient sharpness. The majority of architectural photographs are devoid of any subject movement and demand the use of a tripod, thereby affording architectural photographers the luxury of using high quality slow films as their regular stock (Figure 2.2). The slower the film, the finer the grain and therefore the sharper the images for reproduction. Where people do need to appear in an architectural shot, they can either be posed for clear definition or allowed to continue their movement, resulting in a blurred action on film that is often considered a creative asset against the crisp structure of the building. The degree of blur can be varied according to requirements by varying the length of exposure, typically between ![]() second and 2 seconds.
second and 2 seconds.
It is important to make comparative tests of your own to determine your personal brand preferences, and then to develop an intimate knowledge of just a couple of film types that will become your regular stock. The popular films in both colour and black-and-white are available in most formats, so the specific information outlined below applies equally to users of large-format, roll film and 35 mm cameras.

Figure 2.2 The qualities of films of different speeds
Colour transparency film
Colour transparency film is the popular choice of most commercial photographers working in colour, and is widely used for the purpose of mechanical reproduction. It produces an original image, as opposed to a print from a negative that is necessarily once removed from the original. Since the final published image is twice further removed from the original supplied by the photographer, it is essential to give the publisher an original of the highest possible quality from which to work.
Colour transparency films are available in two basic varieties: daylight balanced and tungsten balanced. A good choice for both exterior and interior work is a professional slow/medium-speed daylight balanced film rated at ISO 100, for example a Fuji Fujichrome or Kodak Ektachrome transparency material. Slower films are available for even finer grain, and these are certainly an excellent choice for critical work under perfect conditions. Film with the ISO 100 speed rating, however, is the most versatile as regular stock and can be used successfully for both high quality exterior and interior work, as well as for dusk shots. For interiors, it requires no filtration when daylight through windows combined with flash is the primary light source, and suffers no significant reciprocity failure for exposures up to 10 seconds.
While daylight balanced film is fine for most interiors, tungsten balanced film rated at ISO 64 is useful for interiors that are lit entirely, or largely, by tungsten lighting as it requires little or no filtration for perfect colour rendition. It has a further useful quality for interior photography in that it has been designed specifically for long exposures. There is no reciprocity failure between ![]() second and 30 seconds, with minimal failure up to one or two minutes. This is particularly advantageous when photographing large interiors as it enables great depth of field to be achieved through the use of small apertures and very long exposures. For interior work where daylight is the dominant light source, an 85B colour correction filter is necessary over the camera lens, reducing the effective film speed by 1 stop to ISO 32. With such a slow film speed, long exposures become essential. The long exposure time also enables the flash to be fired several times, if necessary, to build up sufficient flash intensity. Again, the major manufacturers all produce their own versions and I would recommend a direct comparison experiment as the best way to make your preferred individual choice.
second and 30 seconds, with minimal failure up to one or two minutes. This is particularly advantageous when photographing large interiors as it enables great depth of field to be achieved through the use of small apertures and very long exposures. For interior work where daylight is the dominant light source, an 85B colour correction filter is necessary over the camera lens, reducing the effective film speed by 1 stop to ISO 32. With such a slow film speed, long exposures become essential. The long exposure time also enables the flash to be fired several times, if necessary, to build up sufficient flash intensity. Again, the major manufacturers all produce their own versions and I would recommend a direct comparison experiment as the best way to make your preferred individual choice.

Figure 2.3 An example of the use of tungsten balanced film, rated at ISO 64, in which the only light sources in the bathroom were tungsten. This shot was taken using only the available light and without filtration
Both colour transparency and negative films, in roll and sheet formats, are frequently entitled ‘professional’ films. This means that the colour balance of the film is neutral at the time of production and therefore should be refrigerated until used to halt the ageing process. As film ages, its overall colour balance shifts, it becomes less sensitive to light and its contrast diminishes. So, when using a refrigerated ‘professional’ film, the photographer can be confident that the overall colour balance of the film will be as neutral as possible. General-purpose amateur films, on the other hand, are created to render a neutral colour balance after ageing for 3 months at room temperature.
To avoid any minor factory variations of colour balance it is best to shoot each assignment with film from the same batch (the batch number is shown on the side of the box along with the expiry date), in order to achieve consistent results. This is most easily done by buying film in relative bulk. All colour transparency films use the Kodak E-6 process or equivalent for development (other than Kodachrome films, which have to be processed almost exclusively by Kodak themselves). The E-6 process involves 11 stages, taking 1 hour to complete (inclusive of drying time), with a usual turnaround time of 2–3 hours in a professional laboratory.
Colour negative film
Although excellent colour prints can be usefully produced either directly, positive to positive, from a colour transparency or indirectly, via an internegative stage, colour negative film is still the most popular option when colour prints are the only desired end product of a shoot. The quality is obviously better than going via an extra internegative stage, and cheaper for long print runs than direct positive-to-positive prints from a transparency. The image quality is also quite different, and therefore choice of printing from negative or transparency is dependent both on requirements and personal preference.
A slow/medium-speed film would be appropriate for architectural work, both exterior and interior, though for very long exposures it is still susceptible to reciprocity failure. Colour balance on negative film is not as critical as that on transparency film, as minor colour variations at the time of exposure can be filtered out at the printing stage to produce the desired colour balance.
Since negative film alone cannot, by definition, produce a positive image for viewing, the quality of the final image is as dependent on the paper on which it is printed as the film on which it was taken. For these reasons, experimentation under the same conditions is the best route for discovering your personal choice of film/paper combination, concentrating on the comparison of tone, detail sharpness, grain size, and the richness and accuracy of the colour rendition.
Colour negative films are developed using the Kodak C-41 process or equivalent. This is a seven-stage process that takes approximately 45 minutes (inclusive of drying time), with a turnaround time of anything from 1 hour in a professional laboratory.
Black-and-white film
There are two main uses of black-and-white film for purposes of architectural photography: for the archival recording of buildings, and for dramatic, artistic effect in advertising brochures. The archival recording of buildings is best exemplified by the photographers of The National Monuments Record in the UK. A medium/slow film rated around ISO 100 is the recommended regular film stock for such work owing to its flexibility and consistent high quality results. While fill-in flash is recommended for most interior photography to reduce the contrast in an interior to recordable levels, it is possible with black-and-white film to control contrast to an extent by overexposing the film in the camera and then reducing the development time accordingly. Contrast can be further reduced or boosted at the printing stage depending on the contrast balance of the printing paper you choose. If complicated exposure/development variations are likely to be a regular part of your work then it would probably be sensible to process and print your own films, as your experience will be the best guide to achieving perfect results.
The advantage of using black-and-white film for the archival recording of buildings is that they have proved their durability over a long period of time if stored correctly, and are not prone to the potential fading of synthetic dyes in colour films (Figure 2.4). Furthermore, photographic archives on black-and-white film and paper are more consistent for the direct comparison of shots taken at different times than a variety of colour films with slightly different colour balances and varying degrees of fading. The most dramatic black-and-white film for artistic effect is infrared film with its grainy, high-contrast, ghostly results. Available in 35 mm or sheet film form, it is sensitized to respond both to infrared wavelengths and much of the visible spectrum. To maximize its dramatic effect, it is necessary to use a visually opaque filter that transmits only infrared. This causes green vegetation to glow a fuzzy shade of white and, on a bright sunny day, makes white clouds stand out boldly against a blackened sky. For a fuller description on the use of this type of film, see the section ‘Black-and-white infrared photography’ in Chapter 9.

Figure 2.4 Black-and-white film is the ideal medium for the archival recording of buildings, having proved its durability over a long period of time, and is more consistent than colour for the direct comparison of shots. This photograph was taken at the turn of the century by William Dunn (great-grandfather of the author) of the Forth Railway Bridge in Scotland under construction
For less dramatic, yet crisp artistic or abstract images with relatively high contrast, a slow ISO 25 film is an appropriate choice, in conjunction with a fine-grain developer. When processed the grain of the film is so fine as to be invisible to the naked eye for most standard enlargements. The effect of this film can be enhanced by darkening blue skies with either a red contrast filter or a polarizer to make white clouds stand out starkly.
By comparison with colour film, black-and-white film with its simpler emulsion is both forgiving and easy to use. It is tolerant of minor exposure variations, and obviously avoids any problems caused by unwanted colour casts from artificial light sources in interiors. It is also flexible in the way it can be processed and printed, enabling a wide range of possibilities for the final print in terms of grain, contrast and sharpness.
Instant-print film
The importance of instant-print film, available in both colour and black-and-white, cannot be overstated. When used in an instant-print magazine back or film holder that has been interchanged with the regular film back or holder on the camera, it can produce a positive image of the precise image you are intending to take in only 90 seconds after exposure. It enables you to check composition and lighting, and the approximate effect of any filters being used, especially graduated ones. It also provides a check as to whether any vignetting of the image is taking place as a result of excessive shift movements (see Figure 7.2), which can be difficult to assess from the viewing screen alone. Basically, it gives you unprecedented confidence that what you believe you are recording on film you will successfully be recording on film when you change film backs or holders.
There are several types of instant-print films available, matched to the film speeds of the popular film types. Polaroid Polacolor Type 679 film is a daylight balanced colour film rated at ISO 100 – ideal when used in conjunction with ISO 100 daylight balanced transparency film. This produces a positive image 90 seconds after exposure at temperatures between 21°C and 35°C. Processing time is increased to 120 seconds at 16°C.
When working with ISO 64 tungsten balanced film for interior work, the perfectly matched instant-print film is Polaroid Polacolor 64T film. With this material, film speed is nominally kept constant along with processing times, but exposure adjustments of a third of a stop must be made according to the ambient temperature.
For black-and-white work, Polaroid Polapan Type PRO 100 rated at ISO 100 is the most popular, though other types are available. These include Type 665 on medium format, rated at ISO 50 that produces a print in 30 seconds and a reusable negative, and Type 55 (5 in. × 4 in. sheet film), which is similar.
Matching the instant-print film to the colour transparency or negative film to be used overcomes the need to make complicated exposure calculations between films of different speed, and is therefore preferable, though not obligatory. Precise processing times or exposure adjustments are clearly detailed on each pack.
The instant-print magazine back on a camera sometimes produces a larger image area than the subsequent transparency or negative film size will allow. If this is the case, it is important to carry a transparency-sized mask to show you the precise image area that will be recorded on film. The advantage of having a larger image area on the instant print is that it enables you to shift the mask around to check that composition for the film area is perfect. If it is not, you can make a lens shift on a view camera corresponding to the mask shift on the instant-print without affecting the focus. Always re-check any changes you make by taking a further instant-print.
Digital
Digital imaging embraces the entire process of generation, storage and retrieval of images by electronic means. For medium and large formats this involves replacing the film back on the camera with a digital back connected to a computer. It has advantages over film on several levels, notably speed of transmission; reduced running costs (after initial hardware investment); the opportunity for image enhancement and perfect replication any number of times. It also gives the photographer immediate confirmation of results, more reliable than instant-print film. It enables photographers to package their images for direct reprographic output and use over the Internet. The disadvantages for location photographers include lack of portability (other than for small digital cameras used for reference shots) and, more importantly, restricted lens coverage owing to the small chip size in relation to standard film sizes – see next chapter.
The overall light sensor in a digital camera is a form of silicon chip known as a Charge-Coupled Device (CCD). This CCD comprises millions of individual ‘pixels’ that each produce an electric charge when exposed to light, proportional to the amount of light received. The pixel charges are then processed by an Analogue-to-Digital Converter (ADC), i.e., the voltage variations of the individual pixels as a result of light variations in the image are converted into a sequence of binary numbers where ‘0’ represents pure black and ‘1’ perfect white. A sequence of numbers between ‘0’ and ‘1’ represent different shades of grey, and so the longer the sequence, the greater the number of distinct shades recorded. The length of this sequence is determined by the ‘bit depth’ of the CCD, so a CCD with a 2-bit depth will record a sequence of pairs of binary numbers: 00, 01, 10, 11 enabling 22 = 4 shades to be distinguished. With a sequence of three binary numbers (3-bit depth) 23 = 8 shades can be recorded etc. Accordingly, a CCD with an 8-bit depth creates 28 = 256 different shades, well beyond the discernment of the naked eye, which can distinguish only about 200 different shades. As a result, an 8-bit depth stepped-tone digital image will deceptively appear to the eye as a continuous-tone image.
For a full colour image, an 8-bit depth is needed for each of the three primary colours used in photography: red, green and blue (RGB), or 24 bits in total. This enables R256 × G256 × B256 = 16.7 million colours to be generated.
There are two main types of CCD used in digital photography: ‘area array’ and ‘linear array’ CCDs. An area array CCD has millions of pixels arranged in rows and columns in a square or rectangular format that are exposed simultaneously. This is known as a single-shot system, behaving very like conventional film, and is able to record both flash and continuous light. By contrast, a linear array CCD has a single row of pixels that measure light by the sequential scanning of the film plane. While the result is a higher definition image, it requires very long exposures (often several minutes) so is only suitable for stationary subjects with continuous lighting. It is therefore not suitable for architectural work where movement can be an element, be it of people, varying light intensity or even the movement of clouds in the sky.
The area array CCD is fundamentally a monochrome device so, in order to record colours, the number of pixels have to be divided up into blocks of four and covered with a tri-colour mosaic filter to represent the three primary colours. This filter allows 50 per cent to record green and 25 per cent each to record red and blue. The predominance of the green filter is to produce the best match for the human eye, which itself is more sensitive to green light than to red or blue. The disadvantage of this compared with the linear array CCD (though unavoidable for the architectural photographer) is that it produces a smaller file size. This is enlarged through interpolation (expanding the file size by educated computer guesswork) to produce an image not quite as sharp as the three-shot system. Pixel quantity is everything: the more you have, the greater the detail recorded, and therefore the better the resolution, that all-important definition of clarity and sharpness in an image. A typical chip size for a digital camera back is 24 mm × 36 mm, comprising 2k × 3k = 6-megapixels, i.e. 6 million pixels.
Resolution
Traditional photographic resolution can be defined in terms of the sharpness of the lens and the fineness of the film's emulsion grain. Digital file resolution, on the other hand, is defined as the finite number of pixels in an image at a specific size, i.e. the number of pixels per inch (ppi) or centimetre used to construct the final print. The more pixels in an image, the finer the resolution, and hence the formula:
![]()
Alternatively,
pixel size = resolution (ppi) × physical dimension
So, to produce a 10 in. × 8 in. image for reproduction in a quality magazine at 300 ppi (the minimum resolution designers and repro houses demand for colour magazine or brochure production) would require pixel dimensions of 3000 × 2400, using the above formula. Likewise, a full-bleed A4 magazine page (measuring approx 11.65 in. × 8.3 in.) would require a 3500 × 2500 pixel image, with a file size of 23Mb RGB, or 30Mb CMYK file (CMYK being the colours of the standard inks used in four-colour litho printing for brochures, books and magazines: Cyan, Magenta, Yellow and Black).
Practical digital imaging for location photographers
Cameras for digital photography can very broadly be divided into two main categories. First there are those that have the portability and feel of conventional 35 mm film cameras (be that SLR or compact), and record their images onto a removable memory card. A built-in LCD preview screen lets you view the images just captured, while a computer back at base fitted with a card reader retrieves the images from the card enabling it to be re-used.
The second category is the high resolution medium- and large-format equivalents, requiring a digital back to be attached to the image plane of the camera instead of a film back. While the quality is significantly higher, and enables the use of camera movements for architectural work, portability is correspondingly reduced as, ideally, these backs need to be connected to a computer, albeit a laptop, for viewing and storing the larger image files on location.
A compromise can be made by shooting the high quality shots for publication on film, and instant snapshots for speedy e-mailing to the client on a small SLR or compact digital camera. Property agents especially find this a useful arrangement as it provides them with very fast images for their websites, along with the high quality film original for brochure publication, and all at affordable prices. For more detail on the different digital options available, refer to the next chapter on hardware.
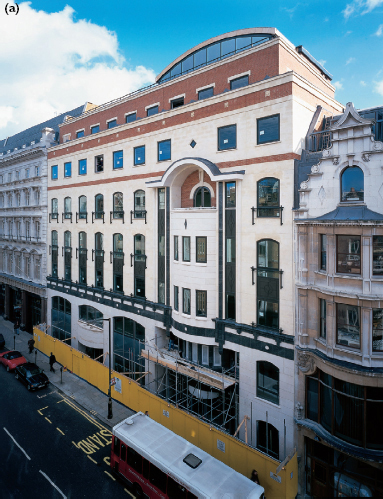
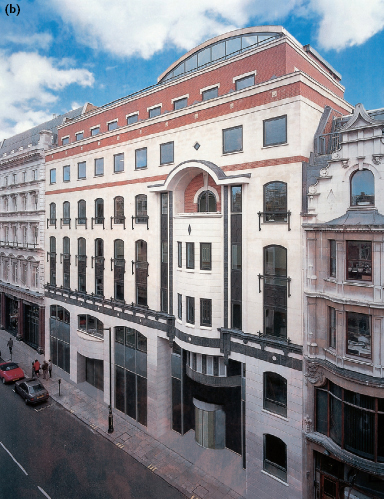
Figure 2.5 Digital image manipulation, using Adobe Photoshop software, enables a digitized image to be ‘cleaned up’ in spectacular fashion. In this case, for the purpose of advanced publicity, the Regent Gate building had to be photographed while still under partial scaffolding and boarding. The original transparency, off the same film strip as (a), was then scanned into digital form and retouched in Photoshop to produce print (b) for publication. An image of the finished building can be seen in the Regent Gate brochure reproduced in Figure 10.1
The digital imaging process from capture to output
The digital imaging process can be broken down into a series of five stages: capture, manipulation, storage, transmission and output. The first stage, to capture the image in digital form, can either be achieved by photographing the subject with a digital camera, or by the conversion of a conventional transparency or print to digital form by scanning.
Once captured and loaded into the computer, the image can then be manipulated using a specially designed software package. Adobe Photoshop is the most popular, enabling the image to be adjusted for colour correction, saturation, brightness and contrast, as well as for more dramatic distortions, special effects filtrations and invisible retouching. The multiple layer system allows easy compositing: the subtle merging of various images together. The distortion facility has potential specifically for the architectural photographer, as outlined in Chapter 8.
The manipulated digital image can then be put onto a CD for storage and future retrieval with a capacity for up to 650Mb of digital information. Digital images take up large amounts of storage space with file sizes too large to fit onto conventional floppy disks. The file size of an image depends upon the scanning resolution of the image. The scanning resolution chosen, i.e. the number of pixels or dots per inch (dpi), depends on the size of the image required for final publication – see Table 10.1 in Chapter 10. Too low resolution will result in ‘pixelation’ appearing in the published image, and too high resolution is a waste of time, storage space and money. The resolution of printing systems is quoted in lines per inch (lpi), and the print industry standard rule of thumb is to have twice as many pixels as lines. Whole portfolios can be stored on CD, and can be easily duplicated for sending to potential clients.
A fast way of transmitting digital data to a client is via an ISDN telephone line, a line dedicated to carrying data and images in digital form. The use of a conventional telephone line in conjunction with a modem in the computer is a slower and less reliable alternative, and not suitable for large image files.
Finally, at some point you will probably want to produce conventional prints from your digital images, and you will require a printer to do this. However, fast high quality printers can be expensive, so it may be more appropriate to have a slower, but affordable, dye sublimation printer (or even one of the latest inkjet printers) for proof printing, and use the services of a bureau for producing top quality final prints.