 |
COMPOSING THE IMAGE |
Introduction
The task of the architectural photographer is to convey the aesthetic appearance of a massive three-dimensional building, as effectively as possible, onto a small two-dimensional sheet of film or CCD chip. In practice, it usually requires several exposures and includes both detail and interior shots of the building as well as general exterior views. However, the same fundamental principles of composition underlie all the different types of shot so it is important for the photographer to understand them thoroughly in order to be able to apply them in practice on assignment.
The three main elements of composition are structure, line dynamics and perspective. Structure is concerned with organizing the different parts of the image into a harmonious whole within the borders of the film frame. Dynamic lines are those within the subject image that are juxtaposed at exaggerated angles for visual impact, and are created by visualizing the image in a purely linear, two-dimensional abstract way. Finally, perspective produces the illusion of depth on a two-dimensional surface, enabling the viewer to differentiate size and distance in the image.
Structure: symmetry
The simplest form of compositional structure is symmetry whereby both sides of the image are identical, but opposite, around a vertical central axis. The simple, clean perfection of this type of composition is both its strength and its corresponding weakness. Unless a building demands such treatment through the perfect symmetry of its own structure, symmetrical images can appear dull and unimaginative. Straight symmetrical shots of the exterior of buildings usually need something extra to justify such simple treatment. They also need to be executed with absolute technical precision.

Figure 6.1 Symmetrical shots need to be executed with absolute technical precision to be effective. This image was shot at dusk to balance the daylight with that of the interior. The only flash of asymmetry is the commissionaire standing just to the right of the reception desk
The photograph in Figure 6.1 of the front entrance of an office building was shot in this way, with a wide-angle lens to improve the dynamic impact of the canopy. Shot at dusk to balance the daylight with that of the interior, the only flash of asymmetry in the image is the commissionaire standing just to the right of the reception desk.
With interiors, certain massive symmetrical atria, or classic Georgian entrance halls can demand symmetrical treatment. The sterility of the symmetry is frequently offset by an asymmetrical staircase, or asymmetrical furnishings that just add that extra spark of interest often needed in such a shot.
Structure: Law of Thirds
We have seen that to choose a symmetrical composition, the building being photographed has to be outstanding in its own symmetrical perfection. The picture area, divided into two equal parts is a fundamentally uninteresting arrangement – see Figure 6.2(a). A more interesting framework for composition is a division away from the centre, typically dividing the rectangle or square into one-third and two-thirds, as shown in Figure 6.2(b). Taking this theory one step further, a frame divided symmetrically around both a vertical and horizontal axis produces a picture divided into four rectangles of equal size, as in Figure 6.3(a). Conversely, Figure 6.3(b) shows a frame divided into thirds around both a vertical and horizontal axis. This produces four rectangles all of different sizes, juxtaposed to create a much more interesting composition.
Thus, a composition with the main lines of the image constructed along the thirds, and any specific focal points placed at the intersection of a vertical third with a horizontal third, is likely to create an appealing shot. This is the principle behind what is commonly called the Law of Thirds, an approach to composition that universally appeals to our sense of beauty, and one which applies to all forms of picture making and therefore all branches of photography. Having intersected the frame along the thirds, in both directions (see Figure 6.4), the Law of Thirds states:

Figure 6.2 Drawing (a) shows a simple symmetrical division of the picture area around a vertical axis into two equal parts; while drawing (b) shows a more interesting division away from the centre into a one-third and two-thirds

Figure 6.3 Drawing (a) shows the picture area divided symmetrically around both a vertical and horizontal axis, producing a picture divided into four rectangles of equal size. Conversely, drawing (b) shows the same area divided into thirds around both a vertical and horizontal axis, producing four rectangles all of different sizes, juxtaposed to create a much more interesting composition
a The main subject(s) should be positioned on or near an intersection of the thirds.
b Some other element of the picture should lead the eye towards the main subject.
c The main subject should contrast with the background, either in tone or colour.
This law applies to general view exteriors, interiors and detail shots, and Figure 6.5 shows some typical applications.
With general exterior views, the skyline and sometimes the road line can lie approximately on the horizontal thirds, with the corner of the building lying close to a vertical third. In a general view interior, the perspective can lead the eye to the far wall, the centre of which can be at the junction of a vertical and horizontal third.
Figure 6.4 The division of the three basic photographic formats according to the Law of Thirds

Figure 6.5 Some typical applications of the Law of Thirds in the practice of architectural photography. The dotted lines mark out the thirds to demonstrate how the Law has been applied to a typical exterior, interior and detail shot
The Law does not have to be adhered to strictly. In fact, the most interesting shots often deviate from it quite dramatically, and it is this deviation that puts the photographer's individual stamp on an image. Whatever the deviation, however, the photographer should be aware of the Law in order to understand how it can be successfully adjusted to his or her preferred individual approach.
Line dynamics
When a composition is viewed in a purely two-dimensional abstract linear way, those lines in the picture that are out of parallel with the edges of the frame are considered dynamic. The closer their angles are to 45° (i.e. half-way between vertical and horizontal), and the more dramatic their juxtaposition at opposing and unequal angles, the greater the sense of excitement generated within the image, and therefore the more powerful its impact. If the camera is tilted 45° for deliberate dynamic abstract effect on a detail shot, the sight of brickwork or a street lamp, for example, at a 45° angle disturbs our sense of gravitational normality and at the same time stimulates our creative thirst for an alternative approach.

Dynamic lines that exist naturally within a composition (without any deliberate camera tilting) exercise the same effect on our mind. This is because they upset our sense of perfect balance, of a person standing upright on level ground, that is most simply depicted by a vertical line resting on a horizontal line. Horizontal lines in a composition express a sense of level tranquillity, while vertical lines represent gravitational stability. By contrast, dynamic lines appear directional, agitated and unresolved, but they add that daring vitality to a potentially perfect, yet sterile, image.

A fine example of the use of dynamic lines for impact in an architectural photograph is when a low vantage point is selected for shooting a perfectly symmetrical front elevation of a building. Instead of correcting the verticals with shift movements, the verticals are deliberately left to con-verge, as in Figure 8.1.
When photographing a building from an angle, the use of a wide-angle lens can exaggerate the perspective, thereby enhancing the line dynamics. The closer one is to a building, the wider the lens needed for a full general view, and therefore the greater the perspective distortion with its correspondingly exaggerated line dynamics – see Figure 3.11.
Perspective and three-dimensional structure
In the photography of architecture, line dynamics are the most significant mechanism by which perspective produces the illusion of depth on a two-dimensional surface. Lines converging to one or more vanishing points cause the subject to get smaller as it recedes into the distance. Thus linear perspective is the primary factor that demonstrates the three-dimensional structure of a building when reproduced as a two-dimensional image, along with contrast and tone that naturally also play their part.
When approaching a building for purposes of photography, it is important, where possible, to be thinking of representing it as a solid structure and not just a façade. For a general view, concentrate on the front elevation, but also allow a more oblique view of the side elevation to appear in the shot where possible, typically a 60°/30° perspective as illustrated in Figure 6.6. The frame can be divided roughly into thirds: two-thirds for the front elevation, and one-third for the side elevation, as shown in Figure 6.5(a). This is obviously not possible with a terraced property, though a side angle shot along the terrace with the whole of the relevant elevation in the foreground allows diminishing perspective to suggest depth in the image.

Figure 6.6 A 60°/30° perspective on a building represents it as a solid structure and not just a facade, while emphasizing the front elevation
A straight-on front elevation shot will inevitably be two-dimensional in appearance except for any threedimen sional texture details on the surface of the structure. This can be a useful additional shot, as a photographic extension o the architect's original front elevation drawing, but is no often used as the main general view of a building.
Focal length variations for alternative visual interpretations
The visual effects of lenses with different focal lengths vary enormously from the dramatic perspective enhancement of a wide-angle lens, to the compressed image produced by a long-focus lens (Figure 6.7). Both effects actually come about as a result of changing the distance of the viewpoint from the building. The wider the angle of view, the more you can see of the lines that are converging to one or more vanishing points. The narrower the angle of view, the less you can see of these lines.

Figure 6.7 A comparison of the effect on perspective when a building is photographed from different distances, using different lenses to fill the frame. It is the varying of the distance rather than the type of lens used that causes the changes in perspective
The standard lens lies mid-way between these two extremes, with a focal length equal to the diagonal measurement of the film frame. In other words, the diagonal measurement of a film frame on medium format is approximately 95 mm for 6 cm × 7 cm, and 110 mm for 6 cm × 9 cm. Consequently, the typical standard lens for medium format has a focal length of 100 mm. Similarly, the typical standard lens on 5 in. × 4 in. large format is 180 mm. Wideangle lenses have focal lengths shorter than the standard for a particular format, and long-focus lenses have focal lengths longer than the standard.
The focal length of the standard lens, and hence field angle of view, relates to that of the human eye and so the images it produces appear to have the most natural perspective. Perspective is altered by changing the distance of the camera from the subject, usually accompanied with a change of the focal length of the lens used. More simply, to include the same amount of the building with a wide-angle lens as with the standard, you would have to move closer to it. The effect of this is exaggerated perspective that both enhances the dominance of the building and the dynamic structure of the image. It creates a more punchy and exciting shot that is well suited to the linear nature of much modern architecture. A wide-angle lens is also a popular choice when space is restricted, as in city streets, for example.
The use of a wide-angle lens is, however, limited when the roof structure of a building is an important element to include in the photograph. The close vantage point demanded by such a lens can be too close to the building to be able to see the roof structure at all. In such circumstances, a lens of longer focal length and a more distant viewpoint is necessary.
Conversely, to maintain the same amount of the building with a long-focus lens, the camera has to be moved further from the subject. This has the effect of flattening the perspective, compressing the space between the subject and its background. This lens is useful for showing a tall building within its context of a city skyline, for example, although its use is most often restricted because of lack of space or suitable vantage point. It is also useful for selectively isolating a building within its landscape.
Remember also that depth of field in the image varies with focal length. The shorter the focal length (the wider the angle of the lens) the greater the depth of field in the image for a given aperture. The longer the focal length of the lens, the smaller the depth of field for that same aperture. Consequently, longer lenses require the use of smaller apertures to achieve sharp focus throughout the depth of the image. This can be achieved by using longer exposure times.
Creating a set of photographs of one building
Clients vary considerably in terms of how detailed a brief they give you when commissioning the photography of a building. Some rely on your experience and past working relationship together to come up with suitable shots for the purpose for which they are required. They expect to see a selection of photographs that best convey the location, size, amenities, quality, detail and atmosphere of a building, emphasizing different aspects depending on the nature of the client. However strong your client relationship, it is always worth pressing the client for as much detail of his requirements as possible to avoid disappointment and the aggravation of a re-shoot.
Other clients are extremely specific, and will come on site to show you the precise shots they have carefully worked out in advance. This both takes the responsibility of selection away from the photographer, and saves time not having to shoot alternative angles. For example, one leading property agent had worked out the perfect way of eliminating the appearance of unsightly and intrusive ceiling ducting that ran the full length of a reconditioned office building. By standing directly below the boxed ducting, its side could be visually aligned with the line of the ceiling tiles, on the viewing screen. Selecting a low vantage point prevented the top of the windows at the end of the line of ducting from being obscured by it, which would otherwise have given the game away. A masterful plan of creative deception, the forte of property agents, which required precision alignment and careful lighting to maintain the two-dimensional appearance of the ducting, but was otherwise easily executed.
This section aims to outline the type of shots that combine together neatly to create a representative set of photographs of a building from a broad brief, typically either for an architect or for use in a smart property brochure. Generally speaking, it is easiest to work from the general views to the particular details, as that is the way we naturally size-up and come to terms with buildings we see for the first time. It can be difficult to appreciate the significance of some of the detail without having worked on its context, i.e. the building as a whole.
Finally, when creating a set of photographs remember to vary both the format and your shooting angle between shots. Let the building or detail, by virtue of its vertical or horizontal nature, determine whether you shoot it ‘portrait’ (as a vertical shot) or ‘landscape’ (as a horizontal shot). Try also to vary these, unless specifically directed otherwise. With regard to your shooting angle, you do not want to end up with a set of photographs all receding to the left of the image, for example. Just as people are either left-handed or right-handed, most photographers have a tendency to shoot from the same angle when a building allows the photographer the choice.
Exterior photographs
The first impression we have of a building is often its semi-distant appearance in the landscape. This can either be favourable or unfavourable, depending on how comfortably the building sits within its environment. At this range, the distances between potential accessible vantage points in a wide radius around the site can be considerable, and there-fore time-consuming to explore. As a result, it is usually best to leave such photographs till later, when you have the major shots under your belt, and your time feels at less of a premium. It is not worth spending a couple of valuable hours at the start of the day locating the perfect vantage point for a situational shot. You could end up finding the sun disappearing fast from the more important on-site general-view shots, with your time under undue pressure.
The angle at which the building lies relative to the movement of the sun will determine whether you start with the exterior or interior of the building. Assuming the sun is correctly positioned on your arrival (see Chapter 4), it is best to start with the on-site general exterior views. While interiors are often much improved with direct sunlight, it is usually quite acceptable to shoot them without, so sunshine priority should always be given to the external shots. Diffuse natural light internally from an overcast sky is always preferable to a grey, lifeless exterior on a cloudy day.
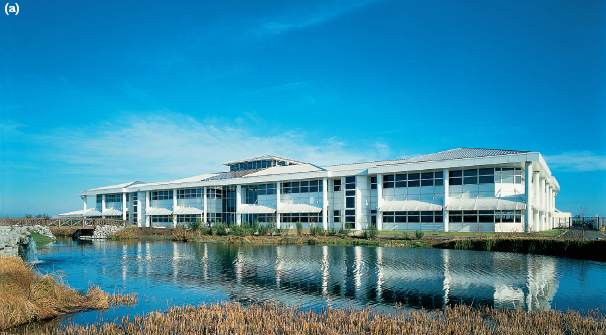

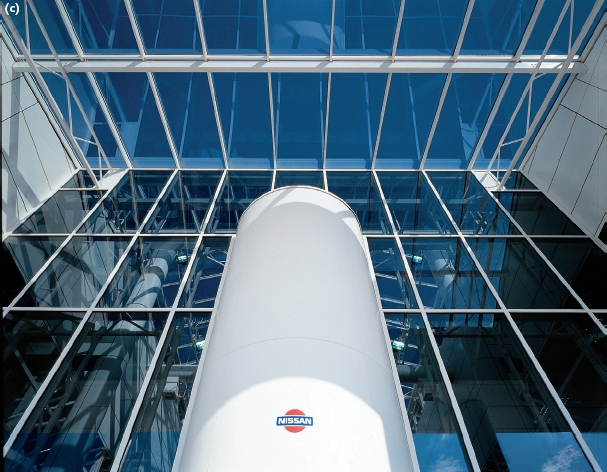
Figure 6.8 Some typical exterior views expected by an architectural client. Image (a) shows an angled front elevation shot of the whole building; image (b) shows a detail shot of the structure; and image (c) shows a purely abstract photograph of the entrance canopy
The general exterior views (see Figure 6.8) are likely to include a straight-on front elevation photograph (as in Figure 8.6) and an angled front elevation shot to show the three-dimensional structure of the building. These, of course, should be taken with a view camera and verticals fully corrected. The shape of the building itself usually determines whether the building is photographed on a horizontal (‘landscape’) format, or vertical (‘portrait’) format, though in some instances this may be dictated for purposes of layout. It is always worth checking this with the client in advance.
Beyond these main front elevation photographs would be any relevant detail shots and perhaps some exciting abstract images of part of the elevation for visual impact in a brochure (see section on ‘Abstract detail shots’ later in this chapter). These are often taken looking up at the building from an extreme angle, or by tilting the camera itself, or a combination of both.
Depending on the nature of these detail or abstract photographs, they can either be taken with a view camera if the vertical structure of the building is a dominant element of the image, or more conveniently with an SLR camera. The latter greatly simplifies finding such shots, especially the abstract ones, as it enables you to wander around while constantly viewing the actual image through the viewfinder. It also speeds up the operation and encourages that spark of spontaneity that often leads to rewarding results.
Interior photographs
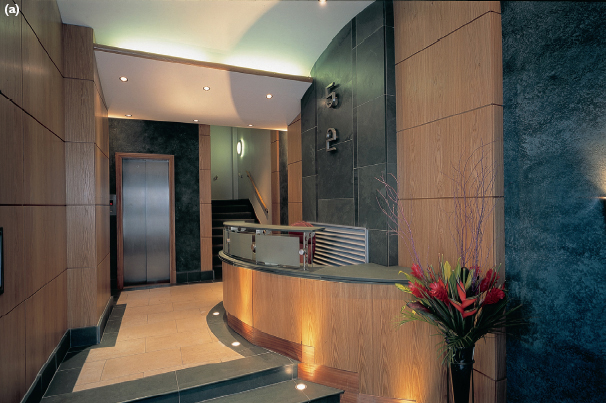
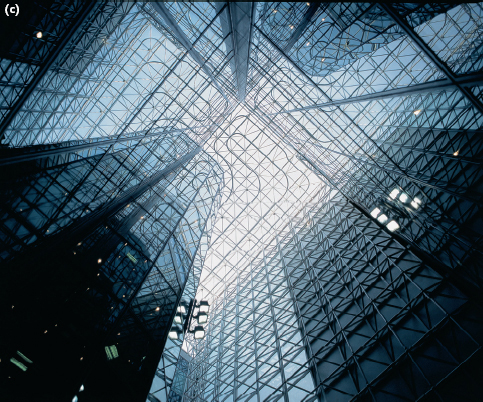
With a selection of sunny exterior shots under your belt, you can now confidently turn your attention to the interior of the building (see Figure 6.9(a), (b) and (c)). Note how the main interiors lie relative to the angle of the sun, and schedule your interior work accordingly to make the best use of it. With commercial buildings there is usually a reception area that will need to be photographed; often a boardroom as the smartest room in the building; sometimes an attractive stairwell; and then the open-plan floors that, if unfurnished, can benefit enormously from direct sunshine creating abstract patterns across the empty floor space. There may also be other interesting rooms, features or details that need to be covered.
Figure 6.9 Some typical interior views. Image (a) shows a reception shot; image (b) shows an open-plan floorspace with just a few items of furniture in the foreground to add some visual interest to an otherwise empty interior; and image (c) is a dramatic atrium shot full of exciting dynamic lines

Before starting, always spend time to work out the photographs that are required, and their logical shooting sequence. This should be designed for the minimum movement of equipment between shots as well as taking into account the angle of the sun. A sequence that I find works well in large buildings is to start at the top and work my way down the building. This is because it is easiest to transport fully packed equipment in a lift to the top floor, and carry it down the stairs piece by piece as required. I find that having started a shoot, it is quicker to move the equipment to the next location piece by piece than to pack it up between shots.
Where you can, shoot as much as possible on one floor of the building to be economical with your time. This is quite acceptable practice as often one floor is better fitted out, or has larger windows and higher ceilings than the other floors, and therefore creates the most favourable image of the building.
As you take the main interior shots, do not forget to photograph any interesting features that could make useful interior detail images. Again these can either be photographed with the view camera that you have used to shoot the interiors, or with an SLR camera for speed and ease of use. Dramatic shots of stairwells – either looking up or down – are certainly more easily taken with an SLR camera than a view camera, for example.
When you feel you have fulfilled your brief and adequately covered both the exterior and the interior of the building, you can confidently pack away your equipment. If time and weather conditions permit, you can now spend some time if you choose to find a suitable vantage point for a more distant situational shot. This should show the building within the context of its environment, and is likely to be taken with a long-focus lens.
Abstract detail shots
Abstract detail shots enable a client to present the style and quality of a building by isolating representative features of it. They can also add a dynamic impact to a brochure of otherwise perfect, but straightforward, general elevation and interior photographs.

Figure 6.10 An abstract exterior detail shot
The photographer must identify the interesting details or features that warrant such treatment. These can sometimes be thematic, with a particular shape or pattern being echoed around the building, both inside and out. Such themes make the task of isolating suitable features fairly simple. For buildings without such thematic features, look for quality finishes. Internally, these can include door handles, light fittings, stairrails, etc., and any interesting juxtapositions of two or more of these items. Typical exterior details can include unusual structural features, the junctions of walls with roofs, windows, doors, etc.
Most abstract detail photographs are taken in one of three ways. First, they can be taken with the camera parallel with the elevation of the building, with the full abstraction lying within the structure of the building itself. This could be a small or large section of the building, isolated out of context to create an abstract arrangement in its own right. Second, they can be photographed from an oblique angle to the building (either vertically or horizontally), preferably with a wide-angle lens to enhance the perspective impact. Or third, the camera can be tilted at an angle, often facing the building with a standard lens. This has the effect of converting the vertical and horizontal lines of the building into angular ones, thereby creating a dynamism in the image that is not inherent within the structure of the building as it stands.

Figure 6.11 Uniformity of detail is essential to achieve the perfectionist quality of an architectural image
Uniformity of detail
To enhance the clean, perfectionist quality of an architectural image – either interior or exterior – the building must present a uniform face. It is, therefore, essential to check for uniformity of the detail within the picture area (Figure 6.11). With office interiors, for example, this would mean setting all the blinds (typically the vertical Venetian variety) to appear at precisely the same angle of openness, and with none drawn aside. Office chairs should be either perfectly facing the desks, or perhaps angled invitingly towards the viewer. Chairs and blotter-pads around a boardroom table should be precisely arranged.
For exterior photographs, all windows should be closed and any blinds or curtains consistently arranged. The lights inside should be switched on at every level both for the purpose of uniformity and also to give the building a lively appearance. The latter is obviously especially important for dusk shots where a single light left switched off could seriously spoil the final photograph. Similarly, a single window left open for a daylight shot can ruin the harmonious perfection of an elevation.