 |
CREATIVE TECHNIQUES |
This book has so far been concerned with the basic techniques and underlying principles of architectural photography, and their practical application on assignment. The purpose of this chapter is to expand this range of techniques in order to enhance the creative impact of your architectural images. This can be achieved in a diversity of ways, ranging from the use of simple camera movements for creative composition to the use of specialist films, cameras or lenses for special effects. All the techniques are valid occasionally, and often as supplementary shots to the more conventional ones.
Deliberate convergence of verticals
Contrary to the golden guiding principle in architectural photography for perfectly parallel verticals, there are occasions when the deliberate convergence of verticals successfully boosts the dynamic impact of a shot. To do it deliberately, it must be extreme, with the camera at a sharp angle in order to maximize the angles of the diagonals. With anything less than extreme you could run the risk of the image appearing as if parallel verticals had been poorly attempted with a rigid, fixed plane camera.
These deliberate convergence photographs can be divided into two types. First, there is the symmetrical shot of a basically symmetrical front elevation (see Figure 8.1). The horizontal base of the film plane must be parallel with the wall, a low viewpoint selected (often as low as the tripod will allow), and the camera tilted to include the full height of the front elevation. The use of a wide-angle lens maximizes the dramatic effect, producing the dynamic diagonals that result from selecting a close viewpoint. As with any symmetrical shot, precision alignment is the essential criterion for an outstanding result.
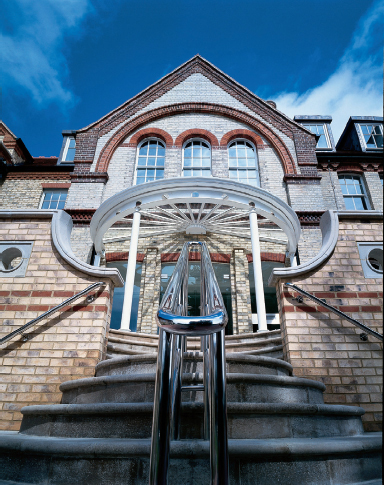
Figure 8.1 A symmetrical shot showing the deliberate convergence of verticals. The low vantage point adds extra impact to this image, with the steel rail and converging steps leading the eye into the photograph
The second type of deliberate convergence photograph is reserved for tower blocks to dramatize their sheer height and scale (Figure 8.2). Standing quite close to its base, you tilt the camera almost on its back to look up at the top corner of the building, using either a standard or wide-angle lens. The dramatic linear perspective emphasizes the height and presence of the building, creating an exciting image.
One final word of caution: do not attempt a deliberate corner convergence shot on a building with a front elevation that is wider than it is tall as this is likely to produce an image in which the building appears uncomfortably as though it is both falling over backwards and in on itself at the same time (see Figure 3.3). Reserve the technique for tall buildings only.
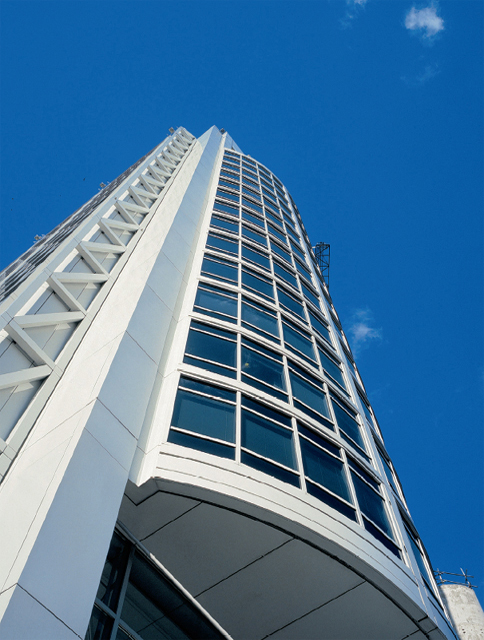
Figure 8.2 (Facing page) A useful convergence technique for tall tower blocks. The dramatic linear perspective emphasizes the height and presence of the building with dynamic impact
Tilting the camera
A second way of creating impact in an image is by converting both the vertical and horizontal lines of a building into diagonal ones by tilting the camera at an angle on its side (Figure 8.3). The effect is exciting, though somewhat disorientating as we do not expect to see buildings on anything other than level ground. Such a technique can be useful for abstract detail shots, and only rarely for full building shots, but their use should be restricted to a subject that has little intrinsic dynamism of its own. The whole exercise should be treated as a creative process of abstract picture composition.

Figure 8.3 Tilting the camera at an angle on its side converts the vertical and horizontal lines of a building into diagonal ones, for dynamic effect
Expanding the sky area with shift
A simple technique that appears to isolate a building within a significant setting is to take a portrait shot of a basically horizontal building. Then employ an excessive rising-front shift movement on the camera to place the building close to the bottom of the frame (while retaining perfect verticals). This has the effect of filling the rest of the frame with a large area of blue sky, as in Figure 8.4. With an excessive shift movement such as this, the blue of the sky will tend to darken towards the top of the frame as the limit of the lens's circle of illumination is approached. This subtle darkening only serves to enhance the image and, if further darkening is desired, a neutral density graduated filter can also be successfully employed. This technique works best when the colour or tone of the building contrasts strongly with the colour or tone of the sky.

Figure 8.4 This photograph of Kenwood House on Hampstead Heath, London, was taken using an excessive rising-front shift movement to dramatically expand the sky area while retaining perfect verticals in the image
Correction of horizontal convergence in interiors and exteriors
As we have seen throughout this book, architects like to see perfect vertical lines in the images of their buildings, easily achieved through the use of a simple rising-front shift movement in most cases. In this section we will consider the possibilities and implications of perfecting the horizontal lines in an image as well.
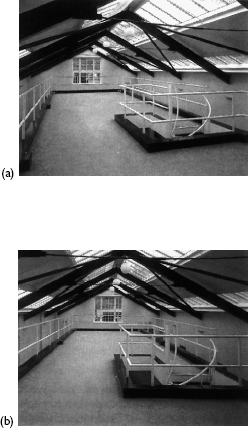
Figure 8.5 Image (a) shows a typical commercial interior photographed for a property brochure, with natural convergence of the horizontal lines in the image. Image (b) shows the same interior but with the horizontal convergence corrected by employing a cross-front shift movement on a view camera. Such clean parallel lines would be more appropriate for the exacting demands of an architectural client
With the camera at an angle to the opposite wall in an interior, convergence of the horizontal lines of the floor and ceiling is the inevitable result. While this is much more visually acceptable than vertical convergence in an exterior shot of a building, it can still be corrected when necessary to satisfy the exacting demands of the architect. In order to achieve this, the film plane must be parallel with the plane of the opposite wall and a cross-front shift move-ment employed to recapture the view of the interior, but with fully corrected horizontal lines – see Figure 8.5. The same technique can be usefully exploited with exteriors to achieve different objectives. The first is when the viewpoint is restricted for a direct, front-on elevation shot (by an obstruction such as a street sign or busy road) and no perfectly central viewpoint is possible. A viewpoint slightly to one sidecan be adopted with the film plane parallel to the elevation of the building, and a cross-front shift movement utilized to re-centre the image on the viewing screen while retaining parallel horizontals and verticals.

Figure 8.6 This image was taken by placing the camera to one side of the symmetrical axis of the building, and using a cross-front shift movement to deliberately add an element of asymmetry to the otherwise perfectly symmetrical site. By adopting this method the parallel horizontal lines of the building are retained as if it was taken along the symmetrical axis
The second use of such cross-front shift movements for exterior work is to deliberately add an element of asymmetry to an otherwise perfectly symmetrical building on a perfectly symmetrical site. Such perfect symmetry can appear sterile, with symmetrically aligned elements actually so perfectly aligned as to block each other out. The way around this is to deliberately stand to one side of the central axis and employ a cross-front shift movement to re-centre the image while retaining the parallel horizontal lines. The result is a more interesting juxtaposition of the otherwise symmetrical elements of the site, without having any of the all-important features that lie along the line of symmetry blocked by any other. This was the technique used in Figure 8.6, in which the central flagpole was symmetrically aligned with the centre of the drive and front entrance of the building.
The third objective of cross-front shift movements when photographing the exterior of a building is to flatten its perspective when forced to shoot from an acute angle because of a restricted viewpoint. The camera can be turned on the tripod to make the angle to the building less acute, and a simple cross-front shift movement used to bring the whole building back into view with an expanded area of the front elevation now visible owing to the flattened perspective, as demonstrated in Figure 3.5.
Cross-front shift movements should only be slight if the appearance of normality is to be maintained. Extreme movements cause the image to appear unnatural, for example by being able to apparently produce an ‘impossible’ image showing the flat-on front elevation and an acute view of the side elevation at the same time. Combined cross shifts and rising shifts should be used cautiously to prevent a greater tendency toward vignetting of the image than with a single directional movement. Any such vignetting would also appear uncomfortably asymmetric.
Night shots
Night shots of buildings, at least what appear to be night shots, can be some of the most interesting and stimulating of all architectural photographs when executed carefully and with forethought (see Figure 8.7). They probably give us the clearest sense of the complete functional building – both exterior and interior – with the glowing room lights enlivening a structure that may, by day, appear somewhat empty and lifeless. The combination of the cool, deep blue of the sky and the rich orange warmth of the tungsten lighting so frequently used to illuminate interiors has the effect of drawing the viewer in from the cold night outside.
Night shots actually have to be taken during a critical 20- or 30-minute period at dusk, or dawn, to overcome the film's inherent problem of recording a higher contrast than that observed by the naked eye. At these times, it is possible to retain just enough of the surface detail of the building on film to define its structure, while the blue tone of the sky is still sufficiently bright to enable the outline of the building to be satisfactorily silhouetted. An added advantage from the photographer's point of view is that while the colour of a clear sky is likely to be the purest, the dusk sky is always a shade of blue even on a cloudy day.
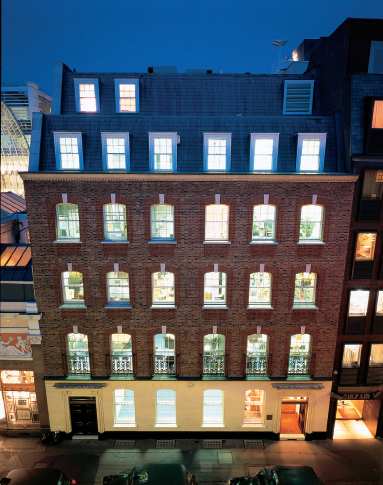
Figure 8.7 A typical night shot, actually taken at dusk. The sky retains sufficient brightness for the outline of the building to be satisfactorily silhouetted and detail of the structure to be just visible. Uniformity of the interior lighting is essential for such shots
The quality and colour temperature of the natural light at dusk and dawn is the same, though the brighter glow in the sky as a result of the sun setting or rising will be in the west or east, respectively. This may have a bearing on your choice of time depending on the direction the building faces, and the angle from which you choose to shoot it. When the sun sets directly behind a building (from your chosen angle) the extra brightness in the sky can detract from the night-shot effect. Generally, it is easier to work at dusk than at dawn as one can readily see when the room lights start to glow through the windows, relative to the daylight. It is sensible to shoot a series of shots from the start of dusk through to complete darkness, as the sky colour, the tone of the building, the brightness of the room lights and any flood lighting are all variables throughout this period, with slightly differing effects on film. At dawn (apart from being much colder!), by the time your eyes have registered that dawn has begun, you may just have missed the perfect moment for such photography. In other words, for the purpose of creating a series of photographs throughout this period, dusk seems to be the more predictable.
Correct exposure for dusk shots is very difficult to deduce accurately, especially since the light levels, relative to each other, are constantly changing. I therefore recommend using roll film to enable a wide bracketing of exposures. Light meters produce readings that will render all subjects a mid-grey tone on film, so they tend to suggest an overexposure for the facade of the building (unless evenly floodlit) and an underexposure for the interior illumination. We want the building to appear dark, just retaining visible detail, with the light through the windows glowing brightly. An educated interpretation of the readings provides the best starting point for exposure, having monitored light levels since daylight. The Kodak Professional Data Guide suggests various trial exposures for different outdoor scenes at night. Using a film rated between ISO 64 and ISO 100, it suggests an exposure of 1 second at f/4 for floodlit buildings; ![]() second at f/4 for a skyline 10 minutes after sunset; and 4 seconds at f/2.8 for a skyline showing a distant view of buildings with lit windows at night. These guidelines span an eight-stop range, but can be useful references to be used in conjunction with your own educated interpretation of the meter readings. To ensure a perfect result, check exposure with instant-print film, and shoot several rolls of film, widely bracketed, throughout the half-hour period between the start of dusk and night. This way it is possible to see the full range of variable effects and gives you the option to select the perfect image for any particular usage.
second at f/4 for a skyline 10 minutes after sunset; and 4 seconds at f/2.8 for a skyline showing a distant view of buildings with lit windows at night. These guidelines span an eight-stop range, but can be useful references to be used in conjunction with your own educated interpretation of the meter readings. To ensure a perfect result, check exposure with instant-print film, and shoot several rolls of film, widely bracketed, throughout the half-hour period between the start of dusk and night. This way it is possible to see the full range of variable effects and gives you the option to select the perfect image for any particular usage.
Despite the low light-level conditions, I still recommend the use of a slow/medium-speed film (ISO 100) for high quality results, even though this will necessitate using long exposures (typically between 1 and 10 seconds). With colour transparency film, I favour the use of daylight balanced film, which both enhances the apparent warmth of any tungsten interior lighting and renders fluorescent lighting relatively neutral (this can even be corrected using a suitable magenta compensating filter, with the effect of giving the sky colour a slightly purple hue). Tungsten balanced film can be used, and is favoured by some photographers towards the end of dusk for a partial colour correction of any tungsten room or floodlighting. It also has the effect of making the sky colour even bluer. However, tungsten balanced film should never be used when the interior lighting is fluorescent as this produces an unpleasant effect of blue/green room lighting.
The reason why both daylight and tungsten balanced film can be suitable for night shots is that there is no such thing as a universally recognized neutral colour balance to which such shots should approximate (as there is, for example, with white photographic light, by day). It is a question of personal taste as to whether one prefers deeper blue dusk light with whiter tungsten lighting; or weaker blue dusk light with warmer tungsten lighting. For the same reason, there is little need to worry about compensating for any slight colour shift as a result of reciprocity failure.
Finally, always allow yourself plenty of time to prepare for taking photographs at dusk or dawn. Times of sunset and sunrise can be deduced from the ‘sun finder’ charts in Appendix 1 at the end of this book, and are generally available in daily newspapers. A visual check for several days in advance of the shoot will give you a clearer idea of likely timings under different weather conditions. Arrange for all the lights to be switched on in the building and make sure that any people inside are aware of your assignment so they do not switch off any lights just at the critical moment. It is usually possible to override the timer on any floodlighting to have it switched on while still daylight to give it plenty of time to warm to its regular operating colour temperature and brightness.
The use of people to emphasize scale
In order to demonstrate the scale of a building we need to be able to compare its size with some recognizable reference to everyday life. The simplest scale indicator is, naturally, the image of a person in the photograph from which one can easily determine the approximate scale of the surroundings.
When required to emphasize the scale of a building in this way, people can either be posed, or caught on film as they go about their daily lives. The latter involves setting up the camera, watching and waiting for a suitable juxtaposition of people in the setting already established. When using a view camera for such shots, it is essential to memorize the parameters of the image frame so you will know just by watching the scene develop, when a person or people entering the view will be suitably positioned.

Figure 8.8 The use of people in architectural shots can both emphasize scale and add extra points of visual interest
Balancing colours in the image
The classic combination in an image of the three primary colours (red, yellow and blue) produces a visually satisfying balance of colours, whereby the tension created by each individual colour is perfectly counterbalanced by the other two. Such a combination can occasionally be achieved in an architectural image if elements of the building being photo-graphed are either predominantly red or yellow in colour, with a rich blue sky as the background.
For example, in the photograph of the roof terrace in Figure 8.9, the rich blue of the sky in combination with the green of the trees cries out for a bit of contrasting colour that was to be found in the red of a passing London bus. You can really appreciate the significance of the bus by hiding it with your finger and viewing the image as if it was not there.

Figure 8.9 Just the contrasting red of the passing bus was enough to balance the colours in this otherwise blue and green image. Also, the fact that this was a transitory moment now frozen in time, greatly enhances the image
The very fact that the bus is an animate object, captured in that transitory moment, also enhances the image. Cars, people's clothing, flowers, letterboxes and so on can all be used to either balance or complete the primary combination for a more resolved, punchy image.
Reflected views
Some of the most unusual and artistic effects can be generated by photographing the reflection of a building in the glass of a mirror-finished building, for example, in water, or even in a car windscreen. An interesting juxtaposition of both the reflection (in the case of water or a car windscreen) and the building itself can sometimes yield a stunning result, as in Figure 8.10.
While such opportunities can be rare, it is always worth bearing this technique in mind for supplementary shots on an assignment. Where the building being photographed as a reflection is asymmetric in structure or has visible signage on it, remember that both negatives and transparencies can be ‘flopped’ for printing, i.e. printed by projecting through the film from the wrong side. This simply has the effect of correcting any back-to-front signage or the way round that the image appears in the reflection.

Figure 8.10 Reflections can produce some of the most exciting, artistic effects. Here, the unusual use of a panoramic camera in a portrait format in combination with the reflection of the building in the car's paintwork creates a very imaginative image (photograph courtesy of Christian Smith, reproduced by kind permission)
Framing the image of a building
An element of the situation and layout of the site of a building can on occasions be used to frame the image of that building. For example, a traditional university building can be strategically viewed and photographed through an arch, adding an extra element to the final image. Likewise, a building can be framed with a window, or more commonly with trees, as in Figure 7.1(a). While much modern architecture is photographed for dramatic graphic impact using powerful line dynamics, the inclusion of trees can add a welcoming, natural feel to a building for the purposes of marketing. This technique is probably best suited to traditional architecture that has tended over the passing years to harmonize more sympathetically with the natural environment.
Use of the fisheye lens
Fisheye lenses are basically exaggerated wide-angle lenses with extreme angles of view, typically 180° or 220°. Distinctive circular images are produced that are spherical in appearance as a result of uncorrected barrel distortion: the vertical and horizontal lines in the image become increasingly bowed the greater their distance from the central optical axis.
There are two basic varieties: the circular and the full-frame. The circular produces an image on film that is in the form of a full circle; while the full-frame version makes a rectangular image from within a larger projected image circle, as with regular lenses. A fisheye lens is therefore very much an ‘effects’ lens that is both instantly recognizable and lacking in subtlety. As a result, its use is limited in regular architectural work, though there are occasions when its wide angle of view can usefully encompass the whole site of a large building complex (especially when used from a high vantage point). It can also be used deliberately for spectacular effect on either the exterior or interior of a building, especially when that building is symmetrical in design so that the bowed verticals on the one side of the image are perfectly mirrored on the other side. Figure 8.11(a) was taken using a full-frame fisheye lens, for a property marketing brochure. The bowed verticals merely serve to add interest to an otherwise bland shot.
By comparison, the image in Figure 8.11(b) was taken with a circular fisheye lens, from a position halfway up a crane. This lens enabled the photography of an otherwise impossible view, to show the full extent of the construction site. A fisheye lens should be used sparingly owing to its highly distinctive characteristics, and primarily for an exciting supplementary image to the distortion-free ones taken with regular lenses. Because of the high cost and rare usage of a fisheye lens, it makes sense to hire one when required, rather than purchase one.


Figure 8.11 Image (a) was taken using a full-frame fisheye lens. By comparison, image (b) was taken using a circular fisheye lens to photograph the full extent of the construction site, from a position half way up a crane
Panoramic photography
Images shot with a panoramic camera also encompass an ultra-wide angle of view, and provide an alternative to those shot with a fisheye lens (Figure 8.12). The image proportions, however, are quite different, usually in the proportion of approximately 3:1, producing very long, or wide, images of little height. These unusual proportions have limited use for standard publication formats, though they have a novelty value and can be effective for exhibition use.
Panoramic cameras are available in two types: the fixed body and the rotating lens varieties. The rotating lens panoramic camera is closest in effect to the full-frame fisheye, owing to barrel distortion of the horizontal lines in the image caused as a result of the curved film plane. The lens is rotated and the film exposed through a slit sweeping across it just in front of the emulsion. However, unlike the image produced by a fisheye lens, the vertical lines remain vertical so long as the camera is kept level. Such distortion can effectively be corrected for viewing by curving the final print and viewing it from the centre of its radius. As such, it can be used for exhibition purposes.
The fixed body panoramic camera (the Linhof Technorama being an excellent example) is more useful for architectural work as it suffers no barrel distortion. It does, however, use virtually the full coverage of a 90 mm superangulon large-format lens to produce a 6 cm × 17 cm image on roll film. This utilizes the lens to its outer limits causing slight darkening away from the centre of the image. This can be corrected using a centrally graduated filter. Similarly, a final alternative is to use a panoramic roll film back on a large-format camera.
Black-and-white infrared photography
For purposes of mainstream architectural photography, black-and-white infrared film is used for its unusual special effect, often as a novel theme for a creative corporate brochure (see Figure 10.8). A print made from Kodak's High Speed Infrared film appears as a cross between a grainy, high contrast black-and-white photograph and an ethereal work of art (Figure 8.13) This is because infrared film is both sensitive to infrared radiation that is invisible to the naked eye, as well as being sensitive to much of the visible spectrum. The sun emits infrared radiation as well as light, and the ghostly images are due to the fact that many surfaces do not reflect infrared and light equally. For example, the chlorophyll in green foliage and vegetation reflects much more infrared than light and therefore appears much brighter (often white) in infrared images. By contrast, a clear blue sky reflects much less infrared, appearing darker and sometimes black in print. Accordingly, any cumulus clouds glow brightly against this dark sky, the luminescent effect resulting from grainy detail diffusion from strong reflections.

Figure 8.12 This image brilliantly displays the potential for architectural work using the increasingly popular panoramic format. The landscape shot was taken using a fixed body panoramic camera by photographer Christian Smith, as was the image in Figure 8.10 which demonstrates the possibilities that can be achieved using the panoramic camera in a portrait format (photograph courtesy of Christian Smith, reproduced by kind permission)
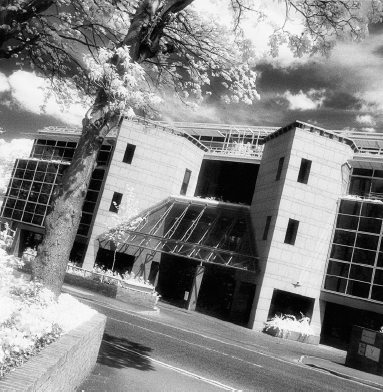
Figure 8.13 Black-and-white infrared film is used for its unusual ethereal effects. Clouds glow brightly against a dark sky, and green vegetation is reproduced as ghostly white
Available only in 5 in. × 4 in. and 35 mm formats, it has an extremely sensitive emulsion, making it very vulnerable to fogging. Even the 35 mm version can only be removed from its canister and loaded/unloaded inside a light-tight changing bag. The 5 in. × 4 in. film is even harder to use, prone to both fogging and scratching. Despite this extreme sensitivity, and therefore ‘high speed’ rating, it actually behaves as a slow film for the practical purposes of photography, with an effective film speed of around ISO 25 owing to the strong filtration required to achieve maximum infrared effect. While a deep red filter can be used (typically a Kodak Wratten 25 Red) at a recommended film speed rating of ISO 50 under daylight conditions, its effect on film is part daylight and part infrared. The most extreme effects are obtained by using a visually opaque filter, typically the Wratten 87 or 87C with a recommended film speed rating of ISO 25 under daylight conditions. The Wratten 25 Red filter tends to be used for convenience of composition and focus with the filter in place. However, since architectural photographers are trained to carefully pre-plan shots and use tripods at all times, such a convenience is of little practical use. In many respects, it is simpler to compose and focus the image without the filter in place, and then place the visually opaque filter over the lens before exposing the film.
Because levels of infrared radiation do not faithfully correspond to light levels (tending to be higher in the early morning and late afternoon), light metering can only be used as an approximate guide to exposure. Exposures should be based on the ratings outlined above, and then bracketed by a series of exposures up to two stops each side of the recommended setting to take account of these variations.
Because of the longer wavelength of the infrared compared with visible radiation, the focal length of a lens is greater for infrared than it is for visible radiation. It is therefore necessary to extend the distance between the lens and the film plane by a small amount when focusing for infrared radiation. Working on 35 mm with a visually opaque filter, the lens must be focused in the normal way and then adjusted by turning the focus ring so that the focusing distance already established (for daylight) is turned to align with the tiny red spot on the f-number depth of field ring, on the lens barrel. This has the effect of correcting the focus for the wavelength of infrared radiation. When using a red filter, it is best to make only half the adjustment as a compromise between the wavelength of red light and that of invisible infrared radiation, as both will be recorded on film. The increased depth of field from using a small aperture should overcome any potential problem from a slightly confused plane of focus. When using a view camera, the focusing adjustment is of the order of 0.3–0.4 per cent of the focal length, for example 0.3 mm for a 100 mm lens. Again, any minor inaccuracies are best taken care of by stopping the lens well down to increase the depth of field.
Aerial photography
The term ‘aerial photography’ conjures up an image of taking photographs from a light aircraft or helicopter, and this is certainly true of higher altitude photography. As such, it enables unique ‘whole-site’ shots to be taken, and then viewed in the form of a realistic axonometric projection. It is, however, a specialist branch of photography in its own right, and beyond the scope of this book.
In reality, the term also includes lower altitude photography, which is that taken from ground-based structures at any height above eye level (Figure 8.14). Examples include shots taken from a simple stepladder or scaffolding tower (Figure 8.15), those taken from the roof of a conveniently situated building (to which access can be gained), and those taken from a hydraulic platform. Such lower altitude photography can provide an alternative perspective for architectural work, especially when photographing tall buildings that are ideally shot from a vantage point approximately one-third of their height. Even working from the top of a tall step-ladder, or off the roof of a motor vehicle, raises the vantage point above the height of parked cars to enable you to capture a significantly cleaner image of the building.
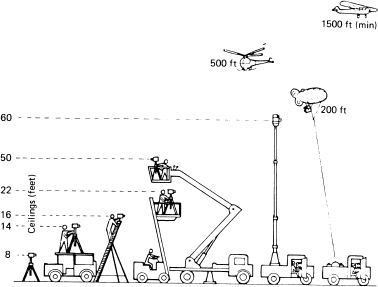
Figure 8.14 The range of options available for aerial photography

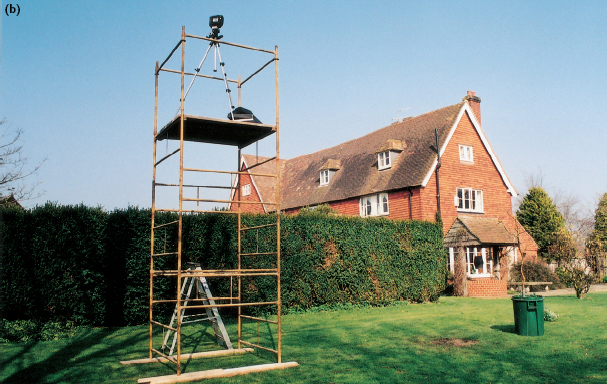
Figure 8.15 Image (a) shows the best view of this farmhouse taken from the scaffolding tower shown in image (b). This overcame the problem of the tall hedge and included some of the farm buildings in the background
Formatting the focusing screen
When assigned by a client to photograph a particular building it is usually for a specific purpose, often publication. The layout for the publication will either be photo-led or design-led and this should always be discussed in advance. When a publication is to be photo-led, it means that the photographer is free to photograph the building exactly as he or she chooses, in either a portrait or landscape format. However, when a publication is to be design-led, its format (typically A4 portrait, for example) will have been chosen by the designer who may even work out both the size and layout of the photographs in advance of the photography being undertaken. In these circumstances, the photographer has to produce suitable images that fit the precise proportions dictated by the design.
The best way to do this is to format the focusing screen, i.e. draw extra lines on the glass focusing screen with a fine chinagraph crayon (easily removable afterwards) of the precise proportions of the image to be used in the publication. This will enable you to both view and compose the image of the building on the focusing screen within the proportions of the layout of the publication. You will then be confident that the image you are taking will suit the proportions of the publication without having to leave the decision to your powers of approximate judgement.
A practical way to format the focusing screen (assuming the published image shape is to be rectangular) is outlined below. First, trace the image area of the focusing screen onto tracing paper, and cut it out so you end up with a tracing-paper replica of the focusing screen. Second, draw up the precise dimensions that the image will appear in the publication, on a separate piece of paper. Third, draw a straight diagonal line from the bottom-left corner to the top-right corner, as shown in Figure 8.16. Fourth, place the tracing-paper replica of the focusing screen in the bottom left-hand corner of the sheet of paper, and trace the diagonal onto it. The point at which the diagonal comes off the edge of the tracing paper is the point at which you must draw a line at right angles to that edge. This will give you the scaled down proportions of the publication format. Fifth, cut this new format out of the tracing paper, and centre it over the focusing screen. With a chinagraph crayon draw lines on the screen to correspond with the edges of the tracing paper. The focusing screen is now formatted for the specific proportions of the image in the publication for which the photograph is to be taken.

Figure 8.16 Formatting a 5 in. × 4 in. focusing screen for A4 proportions. Step 1: draw a diagonal line from the bottom-left to the top-right corner of an A4 sheet of paper. Overlay a tracing-paper replica of the focusing screen in the bottom-left corner and trace the diagonal onto it. Draw a line down to the base of the tracing paper from the point where the diagonal crosses its edge, and cut along this line. Step 2: centre the tracing paper over the focusing screen and mark the outline of the new format with a chinagraph crayon
Digital perspective controls
Within the popular Adobe Photoshop software are various tools for image transformation. The distort option has a potentially useful application for correcting the perspective in architectural shots.
Once the original photograph has been scanned into the computer, the distort tool in the ‘layer’ > ‘transform’ menu can literally change an image with converging verticals into one with corrected parallel verticals. It does this by redrawing the image to fit an altered frame shape (wider at the top and narrower at the bottom). The distort tool also allows you to stretch the image at the same time to elongate what would otherwise appear to be a foreshortened building. It is then cropped back to a rectangular shape ready for output.