13.1. WCM in Office SharePoint Server 2007
13.1.1. WCM in Office SharePoint Server 2007
The MOSS web content management components are implemented as part of the Microsoft SharePoint publishing framework, which is implemented as a set of Windows SharePoint Services 3.0 features. In other words, the publishing framework is implemented in the same way as any other "feature," which is really a testament to the breadth and effectiveness of the Windows SharePoint Services 3.0 architecture. The following table describes the major components of the Office SharePoint Server 2007 publishing framework:
| Features Folder | Description |
|---|---|
| 12TEMPLATESFEATURESPublishing | Provides the core publishing framework that enables publishing in a web. Adds custom actions to the user interface for managing item scheduling from a document library, and for setting up content type conversions. |
| 12TEMPLATESFEATURESPublishingLayouts | Defines the default layouts that are available for publishing pages. |
| 12TEMPLATESFEATURESPublishingPrerequisites | Installs a custom event receiver to handle publishing feature activation and deactivation for a site collection. |
| 12TEMPLATESFEATURESPublishingResources | Installs Web Parts, images, stylesheets and other resources that are used by various components of the publishing framework. |
| 12TEMPLATESFEATURESPublishingSite | Sets up feature activation dependencies for a publishing site to ensure that the necessary components are in place for a given publishing site. |
| 12TEMPLATESFEATURESPublishingStapling | Establishes dependencies between publishing features and site templates. |
| 12TEMPLATESFEATURESPublishingWeb | Defines activation dependencies between publishing features. |
13.1.2. The SharePoint Publishing Object Model
The Office SharePoint Server 2007 publishing features work in conjunction with a robust object model that consists of eight public namespaces which are implemented in the Microsoft.SharePoint.Publishing dll. The following sections describe each of these namespaces and the components they provide.
13.1.2.1. Microsoft.SharePoint.Publishing
This namespace contains core components and utility classes that are used by the other publishing components. This includes the page layout framework and foundation classes for pages that use the enhanced caching mechanisms designed especially for web page publishing. This namespace also declares interfaces used to expose document converter settings to end users and to manage Web Part properties between variations.
Variations are a way to publish multiple versions (variations) of a web site from a single set of pages. See the "Using Variations" section for additional details.
13.1.2.2. Microsoft.SharePoint.Publishing.Administration
These classes are used for content deployment and for migrating content from Microsoft Content Management Server (CMS) 2002 to SharePoint Server 2007.
13.1.2.3. Microsoft.SharePoint.Publishing.Administration.WebServices
Implements the ContentDeploymentRemoteImport web service that supports remotely executing content deployment jobs.
13.1.2.4. Microsoft.SharePoint.Publishing.Fields
This namespace defines the base hierarchy for fields, field values, and core field behavior, including HTML and image fields, summary links, schedules, and content type identifiers.
13.1.2.5. Microsoft.SharePoint.Publishing.Navigation
This namespace provides support for navigating publishing sites. This includes the hierarchical views and specialized site map nodes that take advantage of the enhanced caching support provided by the publishing layer.
13.1.2.6. Microsoft.SharePoint.Publishing.WebControls
This namespace implements classes that define the appearance and behavior of publishing web controls. It includes a rich set of base controls for handling typical publishing operations such as editing HTML content, browsing for URL assets in a site collection, displaying error messages to end users, and specifying content queries. It also includes extensive support for content validation, scheduling, and setting up variations.
13.1.2.7. Microsoft.SharePoint.Publishing.WebControls.EditingMenuActions
This namespace implements the custom actions that define the behaviors available through the SharePoint Editing menu. This includes the common actions such as add, remove, check in, and check out, as well as workflow- and publishing-specific functions such as spell checking, workflow approval, and checking for broken links.
13.1.2.8. Microsoft.SharePoint.Publishing.WebServices
This namespace implements the SharePoint PublishingService and the SharepointPublishingToolboxService components. The PublishingService component provides a SOAP interface for the Publishing web service, which exposes members that can be used to remotely create and manipulate page layouts. The SharepointPublishingToolboxService is used by SharePoint Designer 2007 to retrieve toolbox information for a given page layout.
13.1.3. The SharePoint Publishing Architecture
Web content management boils down to three key activities; content authoring, which may involve a revision cycle that requires approval of content prior to publication; page design and layout, which may also involve a separate revision/approval cycle; and page rendering, which presents the merged content and layout either immediately or on a predefined schedule. Figure 13-1 illustrates the major components of the SharePoint publishing architecture.
Each of these activities carries with it a different set of requirements.
Content authors need a way to contribute material and to collaborate while developing it, preferably using familiar authoring tools and without consuming precious IT resources. Consider an intranet portal that includes information from many different departments, each contributing a different type of information. Some of the content may come from Microsoft Word documents; some from Microsoft Excel spreadsheets; and still other content may come from text files, Microsoft Project plans, presentations, PDF files, and other file formats. The WCM system needs to provide a way for authors to pull content from a variety of sources, while still preserving the distinction between raw content and its presentation.
Web designers create master pages to define the overall look and feel of the site, and then use page layouts to specify where the approved content will be injected into the final rendered page.
The master pages used by the SharePoint publishing framework are the same as ASP.NET 2.0 master pages, and the page layout files are the same as ASP.NET 2.0 content pages. The page layout files hold additional markup that is merged with the designated master page to produce the HTML that is rendered in the browser.
Figure 13.1. Figure 13-1

With these master pages and page layout files in place, administrators can then change the underlying master page at any time, and content authors can select the page layout they want that is most appropriate for the kind of content being developed. The actual content comes from the metadata associated with a given document library item.
The MOSS 2007 system ships with a set of predefined page layouts for publishing news articles. Each layout is tied to the same underlying content type (Article), but provides different ways to present the article content.
13.1.3.1. How Page Rendering Works
End users consume content through pages, which are rendered according to rules attached to controls embedded within each page. Each control pulls content from a data source such as a SharePoint list item, and then displays or hides that content based on the current state of the data, the configuration of the site, the permissions of the current user, or other rules that have been specified by the content authors. Figure 13-2 illustrates the Office SharePoint 2007 page rendering architecture.
Figure 13.2. Figure 13-2

Everything is tied together using Windows SharePoint Services 3.0 content types and field controls which are aware of the content type to which they are bound. All of the pages involved in the rendering process, including the master page, the page layout, and the content pages, are instances of a content type defined by the publishing framework. Each content type declares the necessary fields (columns) that the publishing framework then uses to store configuration information (in the case of master pages and page layouts), and content metadata (in the case of content pages). The following diagram (see Figure 13-3) illustrates the relationships between the content types declared by the publishing framework.
Figure 13.3. Figure 13-3
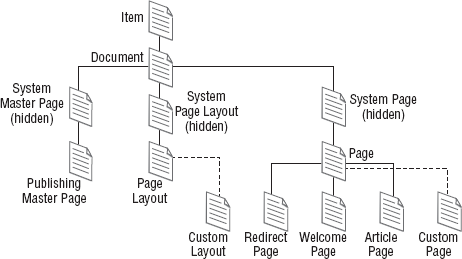
The hidden System Master Page content type inherits the name and title from its parent types, Document and Item. It also declares some additional information for the description, primary contact, and the preview image to display in the master page gallery. The derived Publishing Master Page does not add any columns, but is provided so that administrators or developers can add additional columns.
The System Page Layout content type is similar to the System Master Page, but adds a field to hold the identifier of the content type that will provide the rendering column data, as well as a field to keep track of variations. Again, the derived Page Layout is provided to enable additional columns to be added.
Finally, the System Page content type adds support for scheduled publishing by defining fields to hold the scheduling start and end dates. It includes fields for specifying the primary contact person in charge of the page, the rollup image, and target audiences for the published content. The derived Page content type rounds out the set of foundation content types.
To build a custom WCM solution, you can start with the default Page Layout, or you can derive a custom Page Layout if you need to manage a common set of data across multiple pages. You typically then create one or more custom page content types that hold the publishing content supplied by content authors.
13.1.3.2. Working with Master Pages
Master pages typically contain navigation elements, logos, a search box, a login control, editing controls, CSS references, and other server controls. The easiest way to create a new master page is to open an existing master page using SharePoint Designer 2007 and then save it to the file system. Once you've made the desired customizations, you can then upload it to the master page gallery of a top-level site, or you can package it into a Windows SharePoint Services 3.0 feature for deployment to multiple sites.
If you want to create a master page from scratch, it is still a good idea to start with a copy of an existing master page. This is because there are specific ContentPlaceholder controls that must be present in the master page markup, or SharePoint will throw an exception when the page is displayed. These controls can be placed in a hidden panel to prevent them from rendering HTML content, as shown in the highlighted part of the following code:
<%@ Master language="C#" %>
<!DOCTYPE html PUBLIC "-//W3C//DTD HTML 4.01 Transitional//EN" "http://www.w3.org/TR/html4/loose.dtd">
<%@ Import Namespace="Microsoft.SharePoint" %>
<%@ Register Tagprefix="SPSWC" Namespace="Microsoft.SharePoint.Portal.WebControls"
Assembly="Microsoft.SharePoint.Portal, Version=12.0.0.0, Culture=neutral, PublicKeyToken=71e9bce111e9429c" %>
<%@ Register Tagprefix="SharePoint" Namespace="Microsoft.SharePoint.WebControls"
Assembly="Microsoft.SharePoint, Version=12.0.0.0, Culture=neutral, PublicKeyToken=71e9bce111e9429c" %>
<%@ Register Tagprefix="WebPartPages" Namespace="Microsoft.SharePoint.WebPartPages"
Assembly="Microsoft.SharePoint, Version=12.0.0.0, Culture=neutral, PublicKeyToken=71e9bce111e9429c" %>
<%@ Register Tagprefix="PublishingWebControls"
Namespace="Microsoft.SharePoint.Publishing.WebControls"
Assembly="Microsoft.SharePoint.Publishing, Version=12.0.0.0, Culture=neutral, PublicKeyToken=71e9bce111e9429c" %>
<%@ Register Tagprefix="PublishingNavigation"
Namespace="Microsoft.SharePoint.Publishing.Navigation"
Assembly="Microsoft.SharePoint.Publishing, Version=12.0.0.0, Culture=neutral, PublicKeyToken=71e9bce111e9429c" %>
<%@ Register TagPrefix="wssuc" TagName="Welcome"
src="~/_controltemplates/Welcome.ascx" %>
<%@ Register TagPrefix="wssuc" TagName="DesignModeConsole"
src="~/_controltemplates/DesignModeConsole.ascx" %>
<%@ Register TagPrefix="PublishingVariations" TagName="VariationsLabelMenu"
src="~/_controltemplates/VariationsLabelMenu.ascx" %>
<%@ Register Tagprefix="PublishingConsole" TagName="Console"
src="~/_controltemplates/PublishingConsole.ascx" %>
<%@ Register TagPrefix="PublishingSiteAction" TagName="SiteActionMenu"
src="~/_controltemplates/PublishingActionMenu.ascx" %>
<html>
  <WebPartPages:SPWebPartManager runat="server"/>
  <SharePoint:RobotsMetaTag runat="server"/>
  <head runat="server">
    <asp:ContentPlaceHolder runat="server" id="head">
      <title>
        <asp:ContentPlaceHolder id="PlaceHolderPageTitle" runat="server" />
      </title>
    </asp:ContentPlaceHolder>
    <Sharepoint:CssLink runat="server"/>
    <asp:ContentPlaceHolder
id="PlaceHolderAdditionalPageHead" runat="server" />
  </head>
  <body onload="BLOCKED SCRIPT_spBodyOnLoadWrapper();">
<form runat="server" onsubmit="return _spFormOnSubmitWrapper();">
<wssuc:Welcome id="explitLogout" runat="server"/>
<PublishingSiteAction:SiteActionMenu runat="server"/>
<PublishingWebControls:AuthoringContainer
id="authoringcontrols" runat="server">
<PublishingConsole:Console runat="server" />
</PublishingWebControls:AuthoringContainer>
<asp:ContentPlaceHolder id="PlaceHolderMain" runat="server" />
<asp:Panel visible="false" runat="server">
<asp:ContentPlaceHolder id="PlaceHolderSearchArea" runat="server"/>
<asp:ContentPlaceHolder id="PlaceHolderTitleBreadcrumb" runat="server"/>
<asp:ContentPlaceHolder id="PlaceHolderPageTitleInTitleArea" runat="server"/>
<asp:ContentPlaceHolder id="PlaceHolderLeftNavBar" runat="server"/>
<asp:ContentPlaceHolder ID="PlaceHolderPageImage" runat="server"/>
<asp:ContentPlaceHolder ID="PlaceHolderBodyLeftBorder" runat="server"/>
<asp:ContentPlaceHolder ID="PlaceHolderNavSpacer" runat="server"/>
<asp:ContentPlaceHolder ID="PlaceHolderTitleLeftBorder" runat="server"/>
<asp:ContentPlaceHolder ID="PlaceHolderTitleAreaSeparator" runat="server"/>
<asp:ContentPlaceHolder ID="PlaceHolderMiniConsole" runat="server"/>
<asp:ContentPlaceHolder id="PlaceHolderCalendarNavigator" runat ="server" />
<asp:ContentPlaceHolder id="PlaceHolderLeftActions" runat ="server"/>
<asp:ContentPlaceHolder id="PlaceHolderPageDescription" runat ="server"/>
<asp:ContentPlaceHolder id="PlaceHolderBodyAreaClass" runat ="server"/>
<asp:ContentPlaceHolder id="PlaceHolderTitleAreaClass" runat ="server"/>
</asp:Panel>
</form>
</body>
</html>13.1.3.2.1. Using the Edit Mode Panel Control
The EditModePanel control provides a useful mechanism for displaying custom controls that are visible only during page editing. Simply placing a control within the EditModePanel control accomplishes the desired result, and it works with any control you want to use. This is nice, because there are many situations in which you want to provide additional information for the author without having to write a lot of code to set up a special authoring environment. In essence, this control allows you to create that environment automatically. The following example pulls in a special stylesheet for use only when the page is in edit mode:
<PublishingWebControls:editmodepanel runat="server" id="editmodestyles">
<!- Styles for edit mode only-->
        <SharePointWebControls:CssRegistration
name="<% $SPUrl:~sitecollection/Style Library/~language/Core Styles/zz2_editMode.css %>" runat="server"/>
</PublishingWebControls:editmodepanel>
There can be multiple instances of the EditModePanel control on the layout page; so it is easy to configure the page for different editing scenarios. You can also place Web Part zones within the edit mode panel, to allow authors (and only authors) to select additional Web Parts they may need while researching their content. Because they are placed within the EditModePanel control, the Web Part zones do not appear on the final rendered page.
13.1.3.2.2. Using the AuthoringContainer Control
You can also use the AuthoringContainer control on a master page to hold controls that should only be displayed to content authors. However, this control works slightly differently from the EditModePanel control. The AuthoringContainer control is shown in both edit and view modes, but only for content authors, and not on the final published page. The following code fragment shows the AuthoringContainer control with an embedded welcome control that is shown only to authors:
<PublishingWebControls:AuthoringContainer id="logincontrols" runat="server">
<div class="login">
<asp:ContentPlaceHolder id="PlaceHolderLogin" runat="server">
<SharePointWebControls:Welcome id="welcome" runat="server"
EnableViewState="false"></SharePointWebControls:Welcome>
    </asp:ContentPlaceHolder>
</div>
</PublishingWebControls:AuthoringContainer>
Recall that the page-rendering scheme involves three distinct display modes—Edit Mode, when the page is checked out for editing by an author; Author Review Mode, when the page is not checked out for editing, but is being reviewed by an author; and View Mode, when the page is rendered for final publication. When the page is in Author Review Mode, it might be useful to provide additional information that is intended only for authors. For example, a stock ticker Web Part might be useful for authors who are working on a financial document. Another use might be to display status information related to the document itself.
13.1.3.3. Working with Page Layouts
By far, the easiest way to create a page layout is to use SharePoint Designer 2007. Whether you ultimately plan to deploy the layout directly to a site or via a solution deployment package, the first step is just to define the layout. SharePoint Designer makes this very easy when you are working directly with a SharePoint site. It becomes a bit more strenuous when you want to work with page layouts in Visual Studio.
Start with an existing page layout by opening a site in SharePoint Designer, and then navigate to the master page gallery, which is located under _catalogs/masterpage. In the gallery, click the Type column to sort the list, and then select the desired layout from the .aspx types. To start with a minimal layout, select the PageLayoutTemplate.aspx file. This file uses only two content placeholders, one for the title and another for the main content. For a more typical layout, choose DefaultLayout.aspx or one of the Article layouts. Figure 13-4 shows the ArticleRight layout opened in SharePoint Designer 2007.
Depending on the layout you choose, SharePoint Designer will populate the SharePoint Controls section of the toolbox with controls that can be used on the chosen page. This collection of controls is determined in part by the content type associated with the layout. Referring back to Figure 13-4, notice the toolbox for the ArticleRight layout. Since the ArticleRight page layout is associated with the Article Page content type, which is derived from the System Page content type, SharePoint Designer references these content types to retrieve the list of controls that can be used on the page. The Page Fields subsection contains field controls that can be used with the columns specified by the inherited System Page content type. The Content Fields subsection contains controls for fields defined in the Article Page content type itself.
Figure 13.4. Figure 13-4

Here is where the problem arises for developing page layouts in Visual Studio. The toolbox only works for existing page layouts that reside in a running SharePoint site. This is because SharePoint Designer populates the toolbox by communicating with the SharePoint site in real time. This makes sense because the association between the page layout and the content type is stored as metadata in the pages document library on the site. As soon as you save the layout to a separate file, the link between it and the site is broken, and SharePoint Designer can no longer populate the toolbox.
To work around this problem, take the following steps:
Create a SharePoint site to use as a temporary workspace, using one of the publishing templates.
Open the site in SharePoint Designer 2007, and then create a new page layout from the File
 New menu. Select the SharePoint Content tab, and then click the SharePoint Publishing item in the list on the left side, as shown in Figure 13-5. Select Page Layout from the middle list, and then choose Page Layout Content Types from the Content Type Group drop-down.
Select the content type you want to associate with the new page layout, and then specify a name and title, and click OK. SharePoint Designer creates the new page layout and populates the toolbox accordingly.
Figure 13.5. Figure 13-5

Now you can work from within SharePoint Designer to drag and drop controls onto the new page layout. When you are finished designing the page, you can then save it to disk and add it to your Visual Studio solution or to a SharePoint solution package for deployment.