
In the previous chapter, you learned how to create and edit pages using wikitext, but that just skimmed the surface of the kind of content you can add to a wiki page. In this chapter, you will learn how to configure MediaWiki so that files can be uploaded, as well as how to control what kinds of files can be uploaded. You will also learn how to link to images, embed images in pages, and create thumbnails, as well as how to make image galleries. The chapter concludes with a discussion of uploading different file types and how you can use this feature as a simple document management tool.
MediaWiki can be configured to allow users to upload files of any type. By default, this feature is used primarily to upload images, but it can also be used to upload documents in formats such as Microsoft Word, Adobe PDF, and so on. By default, file uploading is disabled, so the first step is to enable it.
There are three steps to enabling file uploads. The first step is to make sure that PHP is configured to allow file uploads. This is set in the php.ini file:
file_uploads = On
The second step is to make sure that $wgFileUploads is set to true in LocalSettings.php:
$wgFileUploads=true
By default, MediaWiki installs all files inside the images folder of your MediaWiki installation.
The third step is to make sure that the images directory in your MediaWiki installation is writeable by the Web server because that is where the uploaded files will reside.
Files are uploaded using the Special:Upload page. If you have the privileges to upload files, then a link to this page will appear in the toolbox of your wiki (in the left-hand column in the default design). You can also go directly to the page at the following URL (changing the address to match yours, of course):
http://127.0.0.1/wiki/index.php/Special:Upload
If you click on the Special:Upload page and you have not enabled file uploads, then you will be notified that uploads are disabled.
Another way to get to the Special:Upload page is to put an image link in another page, just as you put wiki links into pages in order to create new pages (see "Image Linking and Embedding" later in this chapter to learn about the syntax of creating image links). After you add a link to an image, the link to that image will appear as a hyperlink on the page, which, when clicked, will take the user to the Special:Upload page.
The Special:Upload page (shown in Figure 5-1) enables you to select the file to upload by clicking the Choose File button. Once a file is selected, its name appears next to the button. You can also choose to give the file a different name when it is uploaded. You might want to do this if there is already a file with the same name that you do not want to overwrite. (MediaWiki saves copies of all uploaded files, so you can always revert to a previous version of the file if you inadvertently overwrite another file.)
You should also write a summary of the file in the Summary field—the summary appears in several places and helps to identify the image without having to actually view it. Finally, you are given the option to watch the page, which you invoke by checking the Watch This Page checkbox. You can also select the option to Ignore Any Warnings, which you should only do if you truly know what you are doing. The warnings include messages that you are about to overwrite a file, that the file is larger than is preferred, or that it's not of a type that MediaWiki wants you to upload. The parameters that trigger the warnings about file size and file type are all configurable in LocalSettings.php and are discussed in more detail later in this chapter.

If you upload an image with the same name as an image that has already been uploaded, then it will overwrite the original image. The old version of the file (or image) is saved, however, and you will be able to revert to the file if needed. Chapter 7 provides more details about MediaWiki's version control facilities and how to revert to earlier versions of pages and files.
Once a file is uploaded, MediaWiki creates a page for that file known as an image description page (it would be more accurate to call it a file description page). The page that it creates is a page like any other page (see Figure 5-2). If the file is an image, then the image is embedded in the page. If the file is not an image, then an icon for that file is displayed if MediaWiki knows the file's MIME type.

The image shown in Figure 5-2 is rather large, large enough that the entire length of the page could not be viewed on my computer without scrolling. Because users of wikis have different monitor sizes, and different connection speeds, MediaWiki enables users to set some preferences for how these images are displayed. In the preferences section of MediaWiki, users can specify how large an images should be displayed.
The following code excerpt from DefaultSettings.php shows the available settings from which users can choose. The first array determines the size of the image as displayed on the image description page. The second array sets the width of image thumbnails, which are explained in the section "Image Linking and Embedding" later in this chapter.
/**
 * Limit images on image description pages to a user-selectable limit. In order
 * to reduce disk usage, limits can only be selected from a list. This is the
 * list of settings the user can choose from:
 */
$wgImageLimits = array (
      array(320,240),
      array(640,480),
      array(800,600),
      array(1024,768),
      array(1280,1024),
      array(10000,10000) );

/**
 * Adjust thumbnails on image pages according to a user setting. In order to
 * reduce disk usage, the values can only be selected from a list. This is the
 * list of settings the user can choose from:
 */
$wgThumbLimits = array(
      120,
      150,
      180,
      200,
      250,
      300
Figure 5-3 shows an example of an image description page displaying the same image shown in Figure 5-2, except that here the image width has been modified.

Now that we have a more manageable image size, we can turn to the other information that is on the page. The first section is a section about the file's history. Every time you upload a new file with the same name as this file, a new entry in the history list will be added. This enables you to revert to older versions of the image (or document). This is followed by a list of pages that link to this image.
This page can be edited, just like any other page, by clicking the Edit tab at the top of the page. Your copy will appear above the file history section, right below the image thumbnail. Anything you do on a regular MediaWiki page can be done here, too.
The following code listing shows the default configuration of MediaWiki with respect to file uploads. The $wgFileExtensions variable is a list of file extensions that MediaWiki allows. This is followed by $wgFileBlacklist, which is an array of extensions that MediaWiki explicitly does not allow because of security concerns. For example, MediaWiki won't let you upload HTML files, JavaScript files, or any files associated with scripting languages or executables. The variable $wgCheckFileExtensions must be set to true for this to have any effect.
In addition to testing by file extension, MediaWiki also maintains a blacklist based on MIME type, as the file extension is no guarantee of what is in the file. In order for this to work, $wgVerifyMimeType must be enabled.
/**
 * This is the list of preferred extensions for uploading files. Uploading files
 * with extensions not in this list will trigger a warning.
 */
$wgFileExtensions = array( 'png', 'gif', 'jpg', 'jpeg' );

/** Files with these extensions will never be allowed as uploads. */
$wgFileBlacklist = array(
      # HTML may contain cookie-stealing JavaScript and web bugs
      'html', 'htm', 'js', 'jsb',
      # PHP scripts may execute arbitrary code on the server
      'php', 'phtml', 'php3', 'php4', 'php5', 'phps',
      # Other types that may be interpreted by some servers
      'shtml', 'jhtml', 'pl', 'py', 'cgi',
      # May contain harmful executables for Windows victims
      'exe', 'scr', 'dll', 'msi', 'vbs', 'bat', 'com', 'pif', 'cmd', 'vxd', 'cpl' );

/** Files with these MIME types will never be allowed as uploads
 * if $wgVerifyMIMEType is enabled.
 */
$wgMIMETypeBlacklist= array(
      # HTML may contain cookie-stealing JavaScript and web bugs
      'text/html', 'text/javascript', 'text/x-javascript',
   'application/x-shellscript',
      # PHP scripts may execute arbitrary code on the server
      'application/x-php', 'text/x-php',
# Other types that may be interpreted by some servers
'text/x-python', 'text/x-perl', 'text/x-bash', 'text/x-sh', 'text/x-csh',
# Windows metafile, client-side vulnerability on some systems
'application/x-msmetafile'
);
/** This is a flag to determine whether or not to check file extensions on upload. */
$wgCheckFileExtensions = true;The previous settings defined file types that are allowed, as well as file types that are disallowed, but there are a lot more file types than what is defined in these settings. In order to address all of the other file types that are not explicitly addressed in the previous configuration variables, MediaWiki also introduces $wgStrictFileExtensions, which by default is set to true. When this is set to true, MediaWiki won't let you upload any file, unless it is explicitly configured to do so. For example, you will not be able to upload a PDF file with the default configuration, nor will you be able to upload a TIFF file.
If this parameter is set to false, the user will see a warning when trying to upload a file that is not on the list, but will be allowed to continue and post it anyway.
/**
 * If this is turned off, users may override the warning for files not covered
 * by $wgFileExtensions.
 */
$wgStrictFileExtensions = true;
A better alternative to setting $wgStrictFileExtensions to true is to explicitly add whatever file types you want to the list. Again, placing these settings in LocalSettings.php and modifying them will address the issue. If you want your users to be able to upload PDF files, then you need to have the following line in LocalSettings.php:
$wgFileExtensions = array( 'png', 'gif', 'jpg', 'jpeg', 'pdf' );
Finally, you can warn users if the files they upload are too large, which, by default, is 150 kilobytes:
/** Warn if uploaded files are larger than this (in bytes)*/
$wgUploadSizeWarning = 150 * 1024;
Once you upload an image, you can link to two different things. You can link directly to the image file itself or you can link to an image description page that is automatically created by MediaWiki.
When a file is uploaded, it is accessible using either the Image or Media namespace.
After file uploading, MediaWiki automatically generates a page for the file, which works much like any other page in MediaWiki except that it is accessible through the Image namespace. If you want to link directly to the file itself, you must use the Media namespace.
By default, when you add an image link to a page, the image is embedded, or displayed, in the page itself, but you can also put links to images that appear like normal hyperlinks, which the user can click on in order to be taken directly to either the image itself or the image description page.
Basic image links work just like wiki links, except that the filenames are accessed through the Image namespace. When you use the Image namespace, the image is embedded in the page. The following table shows the wikitext markup to use alongside the HTML into which MediaWiki converts that text.
Wikitext | HTML Output |
|---|---|
|
|
|
|
As you can see in the table, you can use the pipe (|) character with image links in a similar way that you do in wiki links. The difference is that the text that follows the | is used as the Alt text of the image. This should be a descriptive phrase or sentence about the image that screen readers can use to describe the image for people with disabilities, or it can also be displayed as a tooltip when a user holds the mouse over the image. Figure 5-4 shows an example of how these two kinds of image links are displayed. In the second image, you can see the tooltip for the image.

Sometimes you may not want to embed an image in a page, but you still want to link to the image. In other cases, you may want to link to a file for which there is no image to embed (other than an icon). When you want to link directly to any uploaded file, you need to use the Media namespace, rather than the Image namespace. The following table shows the wikitext and corresponding HTML output of two links using the Media namespace.
Wikitext | HTML Output |
|---|---|
|
|
|
|
Much like the previous example that used the Image namespace, you can use the pipe (|) character in Media namespace links as well. In this case, instead of generating Alt text, it creates the text that is displayed by the link, just like it does when you use the same text in a wiki link.
Figure 5-5 shows how the two links are displayed on a Web page. You can see that the text for the first link is just the name and namespace of the link, whereas the second link uses the "Some descriptive text" phrase to serve as the link text.

In addition to embedding an image in a page, or linking directly to the image, there is a third option: linking directly to the image description page (without embedding the image). In order to link to the image description page, you need to prepend a colon to the image link, as illustrated here:
[[:Image:SampleImageUpload.png]]
The colon forces the link to be in the default namespace, which is why it links to the description page itself, rather than the file. You can use the | character here as well, with the expected results.
Another thing you might want to do is use an image in place of text in a link. In other words, you might want to have an image embedded in a page that, when clicked on, goes to some other wiki page, rather than the image description page. In order to use an image as a link to a different page, you need to use a template or install an extension. Templates are discussed in detail in Chapter 8, where you will find an example of how to do this.
It is at this point that image links begin to part ways from common wiki links. Technically speaking, the extended image syntax is an example of a parser function, and it allows additional properties about an image to be decided by the author.
Note
Parser functions, like templates, are discussed in Chapter 8.
Pay special attention to the HTML that is output when using the extended image syntax, because MediaWiki implements the actual look and feel of these images through stylesheets, so setting a parameter primarily affects the name of the class that is assigned to surrounding elements. It does not necessarily apply the values to legal HTML attributes of the <img> element. This is important to know, because it means that you can entirely change the way the image looks on the page simply by changing the underlying stylesheet. This is covered in more detail in Chapter 8, "Magic Words, Templates, and Skins."
With extended image syntax, you can set the image display width, image alignment and float properties, and instruct MediaWiki to display an image thumbnail.
The following table is an example of how to set the display width of an image in MediaWiki. In this case, the image width is set to 150 pixels across. MediaWiki automatically calculates the height of the image, which can be seen in the HTML output in the adjacent column.
Wikitext | HTML Output |
|---|---|
|
|
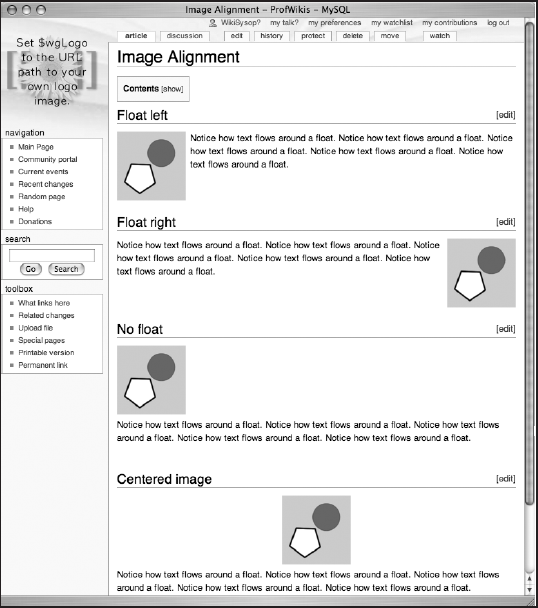
Image alignment is determined by setting the CSS float value of the containing element. The element can either float left, right, or not float at all. There is also another alignment option: You can center the element, but that is not accomplished through a CSS float value (there is no float:center property); instead, it uses the CSS text-align property.
The important thing to remember about floats is that in addition to determining where an image is placed on a page, they also determine how text flows (or does not flow) around the image. If an image floats to the left, then text will flow to the right of the image. Likewise, if an image floats to the right, then text will flow to the left of the image. If an image is centered, and is not floating, or if its float value is simply set to none, then the text does not flow on either side of the image. Instead, the text before the image in the HTML file stops above where the image is located on the page, and the text following the image in the HTML document starts below the image, with no text appearing on either side. Figure 5-6 shows examples of these image alignment options.
In the following examples, you can see that MediaWiki controls the float property by assigning different classes to each wrapping <div> element: floatleft, floatright, floatnone and so on. There are corresponding CSS class selectors that define the float properties.
Wikitext | HTML Output |
|---|---|
|
<div class="floatleft"> <span> <a href="/mysql/index.php/Image:SampleImageUpload.png" class="image" title="Float left"><img src="/mysql/images/thumb/b/b5/SampleImageUpload.png/100px-SampleImageUpload.png" alt="Float left" width="100" height="100" longdesc="/mysql/index.php/Image:SampleImageUpload.png"> </a> </span> </div> |
|
<div class="float right"> <span><a href="/mysql/index.php/Image:SampleImageUpload.png" class="image" title="Float right"><img src="/mysql/images/thumb/b/b5/SampleImageUpload.png/100px-SampleImageUpload.png" alt="Float right" width="100" height="100" longdesc="/mysql/index.php/Image:SampleImageUpload.png"></a></span> </div> |
|
<div class="floatnone"> <span><a href="/mysql/index.php/Image:SampleImageUpload.png" class="image" title="Float none"><img src="/mysql/images/thumb/b/b5/SampleImageUpload.png/100px-SampleImageUpload.png" alt="Float none" width="100" height="100" longdesc="/mysql/index.php/Image:SampleImageUpload.png"></a></span> </div> |
|
<div class="center">
   <div class="floatnone">
      <span><a
href="/mysql/index.php/Image:SampleImageUpload.png" class="image" title="Some centered text"><img src="/mysql/images/thumb/b/b5/SampleImageUpload.png/100px-SampleImageUpload.png" alt="Some centered text" width="100" height="100" longdesc="/mysql/index.php/Image:SampleImageUpload.png"></a></span>
   </div>
</div>
|
In some situations, you may not want text to continue to float around an image. For example, there may be text that applies to the image that is followed by an unrelated section. If you do not want that unrelated content to appear directly beside the image, but instead want it to start below it, then you can use the <br> HTML element, which is a line break. If you place the following code directly above the content you do not want to appear next to the image, then it will be pushed down and will only appear beneath the image, as if the float property were not set.
A visual example is probably the best way to illustrate this. The following snippet of wikitext takes an example from the previous table and inserts <br clear="all"/> between the image and the text that was flowing next to the image:
[[Image:SampleImageUpload.png|100px|left|Float left]]

<br clear="all"/>

Notice how text flows around a float. Notice how text
   flows around a float. Notice how text flows around a float.
   Notice how text flows around a float.
Notice how text flows around a float.
As shown in Figure 5-7, the text no longer flows around the image. Instead, it starts beneath it.

Thumbnails and frames are two similar ways of displaying an image in a wiki page. The following wikitext code shows how the two formats can be used. The difference between them is that an image with the thumb parameter set automatically scales the image to the size selected by the user in their user preferences, whereas the framed parameter displays the image in either its natural size or in the size specified (in this case, it's 175 pixels wide):
== Image thumbnail ==

[[Image:SampleImageUpload.png|thumb|An image with the "thumb" parameter set.]]

<br clear="all"/>
==Framed==

[[Image:SampleImageUpload.png|175px|framed|Some framed centered text]]

Notice how text flows around a float. Notice how text flows
   around a float. Notice how text flows around a float.
   Notice how text flows around a float.
Notice how text flows around a float.
The thumbnailed image link produces the following HTML:
<div class="thumb tright">
<div class="thumbinner" style="width:122px;">
<a href="/mysql/index.php/Image:SampleImageUpload.png"
class="internal" title="An image with the "thumb" parameter set.">
<img src="/mysql/images/thumb/b/b5/SampleImageUpload.png/
120px-SampleImageUpload.png" alt="An image with the "thumb"
parameter set." width="120" height="120"
longdesc="/mysql/index.php/Image:SampleImageUpload.png" class="thumbimage"></a>
<div class="thumbcaption">
<div class="magnify" style="float:right">
<a href="/mysql/index.php/Image:SampleImageUpload.png"
class="internal" title="Enlarge"><img src="/mysql/skins/common/images/
magnify-clip.png" width="15" height="11" alt=""></a>
</div>An image with the "thumb" parameter set.
</div>
</div>
</div>The framed HTML output is displayed next. It looks exactly like the thumbnail version, except that the image isn't thumbnailed:
<div class="thumb tright">
        <div class="thumbinner" style="width:255px;">
            <a href="/mysql/index.php/Image:SampleImageUpload.png"
   class="internal" title="Some framed centered text">
   <img src="/mysql/images/b/b5/SampleImageUpload.png"
   alt="Some framed centered text" width="253" height="254"
   longdesc="/mysql/index.php/Image:SampleImageUpload.png" class="thumbimage"></a>

            <div class="thumbcaption">
                Some framed centered text
            </div>
        </div>
</div>
Figure 5-8 shows the page produced by the preceding HTML. You can see the similarities in presentation between the two formats (a gray box around the image and a light-gray background) as well as the differences. The thumbnail contains a graphic indicating that it's a thumbnail and can be clicked on to see a larger image.

MediaWiki also enables you to substitute an image of your choice to be used as the thumbnailed image. Consider the following wikitext:
==Thumbnail==

[[Image:SampleImageUpload.png|thumb|An image with the "thumb" parameter set.]]

<br clear="all"/>

==Selected Thumbnail==

[[Image:SampleImageUpload.png|thumb=Closedfolder.gif|An
   image with the "thumb" parameter set.]]
Note that the second image link includes thumb=Closedfolder.gif, which means that the Closedfolder.gif file will be used as the thumbnail image, rather than an automatically generated thumbnail. In both cases, if you click on the thumbnail image, you will go to the same place. The only difference is the thumbnailed image. Keep in mind that you must use an image that has already been uploaded as a thumbnail replacement.(Figure 5-9)

As you can see from the preceding examples, thumbnails are automatically generated so that they float right, but that can be overridden by explicitly specifying the thumbnail to float left, as shown in the following code:
[[Image:SampleImageUpload.png|100px|left|thumb|An image with the "thumb"
    parameter set and a width of 100px.]]
The HTML output follows. Note the use of the class tleft in the outer <div> element:
<div class="thumb tleft">
<div class="thumbinner" style="width:102px;">
<a href="/mysql/index.php/Image:SampleImageUpload.png"
class="internal" title="An image with the "thumb"
parameter set and a width of 100px."><img src="/mysql/images/thumb/b/b5/
SampleImageUpload.png/100px-SampleImageUpload.png"alt="An image with the "thumb" parameter set
and a width of 100px." width="100" height="100" longdesc="/mysql/index.php/
Image:SampleImageUpload.png" class="thumbimage"></a>
<div class="thumbcaption">
<div class="magnify" style="float:right">
<a href="/mysql/index.php/Image:SampleImageUpload.png"
class="internal" title="Enlarge"><img
src="/mysql/skins/common/images/magnify-clip.png"
width="15" height="11" alt=""></a>
</div>An image with the "thumb" parameter set and a width of 100px.
</div>
</div>
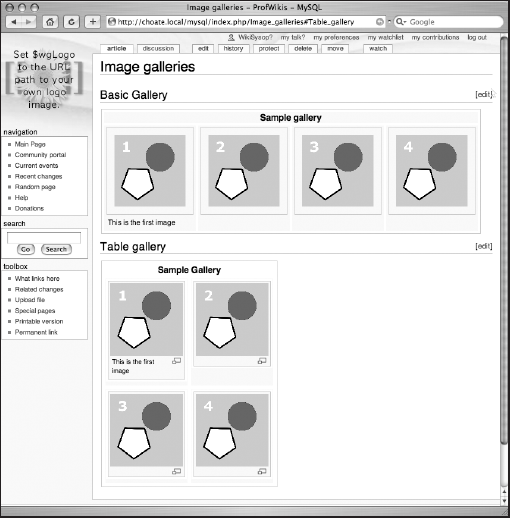
</div>You can add an entire gallery of images to a page using the following syntax. In MediaWiki version 1.9.3, the only attribute you can set is the gallery—a thumbnail size of 120 pixels is hard-coded into the ImageGallery.php file that handles generation of the gallery. You may still find some references to more detailed syntax on the MediaWiki.org website, but it won't work. The following is a sample of a basic image gallery:
<gallery caption="Sample gallery">
Image:SampleImageUpload1.png
Image:SampleImageUpload2.png
Image:SampleImageUpload3.png
Image:SampleImageUpload4.png
</gallery>
The HTML produced by this tag is as follows:
<table class="gallery" cellspacing="0" cellpadding="0">
  <tr>
         <td class="galleryheader" colspan="4"><big>Sample gallery</big></td>
  </tr>

  <tr>
         <td>
                <div class="gallerybox">
                        <div class="thumb" style="padding: 13px 0;">
                               <a href="/mysql/index.php/Image:SampleImageUpload1.png"
   title="Image:SampleImageUpload1.png"><img src="/mysql/images/thumb/9/99/
   SampleImageUpload1.png/120px-SampleImageUpload1.png"
   width="120" height="120" alt=""></a>
                        </div>

                        <div class="gallerytext">
                               This is the first image
                        </div>
                </div>
         </td>
<td>
<div class="gallerybox">
<div class="thumb" style="padding: 13px 0;">
<a href="/mysql/index.php/Image:SampleImageUpload2.png"
title="Image:SampleImageUpload2.png"><img src="/mysql/images/thumb/d/d3/
SampleImageUpload2.png/120px-SampleImageUpload2.png" width="120"
height="120" alt=""></a>
</div>
<div class="gallerytext"></div>
</div>
</td>
<td>
<div class="gallerybox">
<div class="thumb" style="padding: 13px 0;">
<a href="/mysql/index.php/Image:SampleImageUpload3.png"
title="Image:SampleImageUpload3.png"><img src="/mysql/images/thumb/6/64/
SampleImageUpload3.png/120px-SampleImageUpload3.png" width="120"
height="120" alt=""></a>
</div>
<div class="gallerytext"></div>
</div>
</td>
<td>
<div class="gallerybox">
<div class="thumb" style="padding: 13px 0;">
<a href="/mysql/index.php/Image:SampleImageUpload4.png"
title="Image:SampleImageUpload4.png"><img src="/mysql/images/thumb/3/30/
SampleImageUpload4.png/120px-SampleImageUpload4.png" width="120"
height="120" alt=""></a>
</div>
<div class="gallerytext"></div>
</div>
</td>
</tr>
</table>Because the basic gallery tag is so limited, you may find it better to create your own galleries using wikitext table syntax. The following code produces a similar gallery, with a few notable exceptions. First, by using a table, you can control how many images appear on each row. In this case, there are two images per row. In order to ensure that the thumbnail images appear correctly in the table, you have to make sure they don't float left or right, so you need to use the none parameter.
You also need to hard-code a width of 120 pixels. Note that in the example, the class of the table element is set to gallery, and the class of the caption row is set to galleryheader. This ensures that the table will share common design elements with the table produced automatically by the gallery tag.
==Table gallery==

{| class="gallery"
|+
!class="galleryheader" style="border:none" colspan="2"| <big>Sample Gallery</big>
|-
| [[Image:SampleImageUpload1.png|120px|none|thumb| This is the first image]]
| [[Image:SampleImageUpload2.png|120px|none|thumb]]
|-
| [[Image:SampleImageUpload3.png|120px|none|thumb]]
| [[Image:SampleImageUpload4.png|120px|none|thumb]]
|}
The HTML output of this table is as follows:
<table class="gallery">
  <tr>
          <th class="galleryheader" style="border:none" colspan="2"><big>Sample
   Gallery</big></th>
  </tr>

  <tr>
          <td>
                <div class="thumb tnone">
                        <div class="thumbinner" style="width:122px;">
                               <a href="/mysql/index.php/Image:SampleImageUpload1.png"
   class="internal" title="This is the first image"><img
   src="/mysql/images/thumb/9/99/SampleImageUpload1.png/
   120px-SampleImageUpload1.png"
   alt="This is the first image" width="120" height="120"
   longdesc="/mysql/index.php/Image:SampleImageUpload1.png"
   class="thumbimage"></a>

                               <div class="thumbcaption">
                                       <div class="magnify" style="float:right">
                                              <a
   href="/mysql/index.php/Image:SampleImageUpload1.png" class="internal"
   title="Enlarge"><img src="/mysql/skins/common/images/magnify-clip.png"
   width="15" height="11" alt=""></a>
                                       </div>This is the first image
                               </div>
                        </div>
                </div
         </td>

         <td>
                <div class="thumb tnone">
                        <div class="thumbinner" style="width:122px;">
                               <a
   href="/mysql/index.php/Image:SampleImageUpload2.png" class="internal"
title=""><img src="/mysql/images/thumb/d/d3/SampleImageUpload2.png/
120px-SampleImageUpload2.png" alt="" width="120" height="120"
longdesc="/mysql/index.php/Image:SampleImageUpload2.png" class="thumbimage"></a>
<div class="thumbcaption">
<div class="magnify" style="float:right">
<a
href="/mysql/index.php/Image:SampleImageUpload2.png"
class="internal" title="Enlarge"><img
src="/mysql/skins/common/images/magnify-clip.png" width="15" height="11"
alt=""></a>
</div>
</div>
</div>
</div>
</td>
</tr>
<tr>
<td>
<div class="thumb tnone">
<div class="thumbinner" style="width:122px;">
<a
href="/mysql/index.php/Image:SampleImageUpload3.png" class="internal"
title=""><img src="/mysql/images/thumb/6/64/SampleImageUpload3.png/120
px-SampleImageUpload3.png" alt="" width="120" height="120"
longdesc="/mysql/index.php/Image:SampleImageUpload3.png" class="thumbimage"></a>
<div class="thumbcaption">
<div class="magnify" style="float:right">
<a
href="/mysql/index.php/Image:SampleImageUpload3.png" class="internal"
title="Enlarge"><img src="/mysql/skins/common/images/magnify-clip.png"
width="15" height="11" alt=""></a>
</div>
</div>
</div>
</div>
</td>
<td>
<div class="thumb tnone">
<div class="thumbinner" style="width:122px;">
<a
href="/mysql/index.php/Image:SampleImageUpload4.png" class="internal"
title=""><img src="/mysql/images/thumb/3/30/SampleImageUpload4.png/120
px-SampleImageUpload4.png" alt="" width="120" height="120"
longdesc="/mysql/index.php/Image:SampleImageUpload4.png"
class="thumbimage"></a><div class="thumbcaption">
<div class="magnify" style="float:right">
<a
href="/mysql/index.php/Image:SampleImageUpload4.png" class="internal"
title="Enlarge"><img src="/mysql/skins/common/images/magnify-clip.png"
width="15" height="11" alt=""></a>
</div>
</div>
</div>
</div>
</td>
</tr>
</table>Figure 5-10 shows an example of both galleries. Note the design similarities between the two, because they both use the same classes in the wikitext table version as that automatically generated using the gallery tag. They both share a gray border around the table, and the "Sample gallery" text is the same font, size, and alignment. In Chapter 8, you will learn how to change the CSS directly in order to change the look and feel of any of the HTML produced by MediaWiki.
On Wikipedia, images seem to be what is uploaded most often, but don't forget that this MediaWiki feature enables you to upload any kind of document, as long as you have configured it properly. Many organizations use wikis on their intranet, both for basic knowledge management and as a way to share files. While you may wish that everyone would enter their content directly to the wiki, you will find that many Word documents and PDF files need to be shared as well.
MediaWiki's facilities for tracking changes to any file that has been uploaded can be used to track changes in a Microsoft Word document, for example.
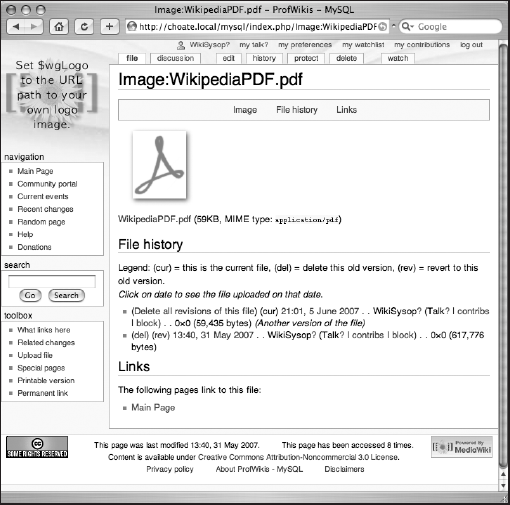
The image in Figure 5-11 shows the so-called image description page for an uploaded PDF file. In order to enable this, you have to add the PDF extension to the list of files that MediaWiki would accept for uploading. In DefaultSettings.php, the legal extensions are as follows:
$wgFileExtensions = array( 'png', 'gif', 'jpg', 'jpeg' );
In order to enable PDF files, you need to put the following line in LocalSettings.php:
$wgFileExtensions = array( 'png', 'gif', 'jpg', 'jpeg', 'pdf' );
Once you make this change, you can upload a PDF file just like you uploaded images before.
The ins and outs of tracking changes to the uploaded files are discussed in the next chapter, but you can already see the potential for using MediaWiki as a basic document management system.
This author once consulted with a small nonprofit scientific research firm that was in the process of standardizing all of their internal processes (a necessary evil that results from growth). They were creating standard operating procedure (SOP) documents in Microsoft Word and posting them to a shared drive on which everyone in the office could access them.
The problem was that they had no way of knowing whether they were viewing the latest copy, and no way to make comments on the documents as they went through the editing process. MediaWiki was recommended as a viable solution to such a problem because it has some distinct advantages. The documents could be made available through a Web browser, as opposed to through the file system, and anyone could look at the different versions of the document that existed, including who uploaded the latest version. If there was a question about one of the SOPs, then it could be posted on the talk page for that image. Not only is it a very simple solution, it's also very inexpensive (effectively free), and a significant improvement on the previous method they were using.
In this chapter, you learned how to enable images and how to use wikitext to embed images in your pages and link to images. You also learned how to create and work with image galleries. In the next chapter, you will build on that knowledge and learn about more advanced editing features. For example, you will learn how to move, delete, and protect pages, followed by learning how to perform advanced editing functions using what the developers of MediaWiki call magic words. You will also learn how MediaWiki handles version control for both regular pages and images, and how you can control access to certain page functions.