
In this chapter, you will learn about writing and editing content on MediaWiki using wikitext. Wikitext is a shorthand form of HTML, intended to be easier (and quicker) to type than HTML. As a consequence, the more you know about HTML, the easier it will be to begin using wikitext. This chapter assumes you have a basic knowledge of HTML, so it does not provide a detailed explanation about how to write HTML. If you are a complete newcomer, a good starting place is Jon Duckett's Beginning Web Programming with HTML, XHTML, and CSS (Wrox, 2004).
MediaWiki provides a wide array of tools to edit and customize pages. This chapter focuses on wikitext, but this is only the beginning. In Chapter 6, you will learn advanced methods of managing pages, such as how to move and delete pages, how to protect them from unwanted editing, and how to add additional functionality to them through extensions or external applications. In Chapter 8, you will learn how to use MediaWiki's magic words and templates, as well how to define your own skins for MediaWiki, which also means more advanced skills for determining the style and presentation of your content.
Prior to jumping into the nuts and bolts of writing wikitext, I'll share some thoughts about writing for the Web in general in order to provide some context for the discussion of wikitext itself.
Writing for the Web is different from writing something that will spend its life on paper. People read differently on a computer screen than they do on the printed page, primarily because of the nature of modern computer screens—they are backlit and lack the resolution of a printed page. This is gradually changing as e-paper technologies are beginning to emerge, but do not expect major changes anytime soon. People read more slowly onscreen, and they have a greater tendency to scan the text, rather than read it in great detail.
The pace of reading is an ergonomic issue; a more interesting difference relates to the nature of hypertext. Writing for print is primarily a linear activity. When you write for the Web, you are writing in three dimensions. Designers and authors inexperienced with Web production often mistakenly believe that they can control their readers' actions and ensure that readers navigate their site in a certain order, or see it in a certain way.
Site visitors do not always start on the home page of a site. In fact, the home page may be one of the least frequently visited pages on your site. Eye-tracking studies also show that readers often avoid graphics; some analysts theorize that this is because readers quickly train themselves to avoid advertisements and tend to interpret all graphics as banner ads.
The three-dimensionality of hypertext is due to links. The author can link from one page to another at any time and any place in the document. Individual pages are not distinct. They exist within a context (a website is one such grouping of related, interlinked pages). This interlinking is not limited to a given domain, because pages can link to any other page (in any other format) as long as that page is available on the Internet.
Some of this may be rudimentary information if you are experienced with writing online. Nevertheless, it is necessary to frame what is truly creative and empowering about wikis: they make it easy to create links between pages. They have specialized approaches for internal links, external links, and links between other wikis.
In Apple Computer's user-interface guidelines, WYSIWYG (what you see is what you get) is defined as the image on the screen being representative of the output that is printed. WYSIWYG, by definition, assumes a printed page. Everything is different now. First, most content will never be printed. Second, it will be available on monitors of all different sizes, and on different devices, from handheld computers to mobile phones and screen readers. Finally, users can opt to use their own stylesheet, to change the colors on a page, to hide the images, to view it in their RSS aggregator, and so on. What you see is not what you get. WYSIWYG is convenient, but it gives a false sense of security and detracts from the true business of writing on the Web, which is worrying about the connections between content.
Because of reader behavior, and the unique characteristics of hypertext, there are two basic rules of thumb for writing effectively for the Web:
Use headings liberally and make plenty of use of bulleted (or numbered) lists. This helps readers skim your work faster.
Link richly, adding links to other sections of your site, or to your references or related material. Organize content in a way that does not assume a sequential reading.
There is a certain amount of disagreement among the user community about wikitext versus the more traditional WYSIWYG interfaces. One thing is certain: most users prefer WYSIWYG, especially if they are nontechnical and not used to thinking about writing in terms of codes. If you are implementing a wiki for such a group, then you should consider a WYSIWYG interface.
Despite user preferences, there is an argument to be made in favor of wikitext, and my position is that there is substantial value in encouraging authors to use wikitext because it provides an opportunity to create content that is more structured and thereby more easily searchable and leveraged in other contexts.
Wikitext was born of a need to enable writers to easily create links to other pages, and to apply basic formatting to pages edited through a Web browser. Wikitext is a markup language. The "through the Web" requirement meant that the user did not have the benefit of a WYSIWYG interface.
Following are the benefits of a wikitext editing interface:
Low barriers to entry; everybody with a browser can edit with it.
WYSIWYG editors give authors too much flexibility (something that seems to be most often exploited by those authors who are design-impaired, leading to a tossed salad of fonts and colors without any consistent semantic meaning).
In my experience, WYSIWYG editors do a lousy job of making it easy to link to different pages within the wiki. There really isn't an easier way of doing it than that used by wikis, which usually involves the simple wrapping of a page title with double brackets, like so: [[A Title of a Wiki Page]].
The negatives of wikitext editing are as follows:
Users almost universally prefer WYSIWYG editors, because they are more familiar with them.
The lack of syntax highlighting makes wikitext hard to read. You cannot easily scan for section headings, for example.
An excellent discussion of this topic can be found on CMSWatch at www.cmswatch.com/Feature/79-Writers,-XML,-and-CMS
There are three different approaches to resolving the editing problem:
Wikitext (or some other text-oriented markup language such as Textile, Markdown, etc.)
WYSIWYG interfaces, like those used in word processors
Syntax highlighting, similar to what is used by software programmers in Integrated Development Environments (IDEs). You get the benefit of visual feedback as you type, but you also have absolute control over the HTML that is generated.
The biggest problem with WYSIWYG interfaces is that they link the visual design of a site with the content in an environment where the separation of content from design is seen as an asset. Because content published online can be viewed in multiple browsers on a variety of different platforms (from cell phones to televisions to 50-inch plasma television screens), the WYSIWYG interface does not really provide the author with meaningful information. In fact, it might even shield the author from important structural issues that are not apparent when the page on the computer screen is supposed to be an accurate representation of the expression of that page on paper.
Philosophically speaking, markup used in HTML should be semantically meaningful; references to visual representations are resisted. For example, the HTML element <strong> is preferred to the HTML element <b>. Both elements are displayed in bold, but the use of <strong> explicitly states that the author wants to provide a strong emphasis to this word, whereas the use of <b> only makes that information implicit, and all you know for certain is that the author wanted to make the word bold—perhaps for purely aesthetic reasons.
The reason for this distinction is that content will appear on different platforms, now and in the future, and there may be different visual representations of the same idea of strong emphasis used on those platforms. For example, how does one render a bold word when read by a screen-reader application intended for the visually impaired? It is much easier to imagine a screen reader strongly emphasizing a word or phrase by changing the tone of the voice.
Another reason why wikitext is important can best be illustrated with an example. MediaWiki, the application that runs Wikipedia, allows the user to assign a category to a page, the details of which are discussed in the next section. MediaWiki categories are the functional equivalent of the tags used by Flickr. We won't get into the details now, but what is important to understand at this point is that MediaWiki categories are used to group and organize pages, so the text used to designate a category needs to be identifiable by the software application because it will ultimately be used to provide an alternative means of navigation for the user. Even if you have a WYSIWYG editor for your wiki, the user will still need to use some form of markup to identify a category. In this instance, wikitext makes it possible to apply structure to a document as you write, and this can be a very powerful feature.
There appear to be two broad applications for wikis used by organizations. The first application is as a collaborative tool, most often used to manage projects, as a replacement for e-mail. In this sense, it represents a middle ground between e-mail and more formal project management tools. The second application is as a knowledge management platform. The ease of use inspires organizations to capture tacit employee knowledge and other details that tend to never be documented.
First and foremost, a wiki engine is a content management system, and many organizations use wiki engines for anything you would use a content management system for—more than likely in an intranet. Wikis are an excellent entry-level content management system because they are easy to edit and require very little training and no specialized software (other than the browser and the Web server).
Wiki engines can also be used as a project management tool. In many cases, users report that they are employing wikis as a replacement for e-mail. Consider two e-mail-related issues. The first is mailbox clutter. So much information (and clutter) crowds the typical professional's mailbox these days that messages are easily lost (overlooked or inadvertently routed to junk mail folders by overly eager spam filters). The second issue with e-mail relates to document management and versioning.
Many organizations use Microsoft Word for a number of different purposes. Word's internal version tracking is often used, which can be very powerful and quite handy at times. Unfortunately, e-mail works by spawning innumerable copies of Word documents (constrained only by the number of intended recipients). Unless carefully managed, each document can represent a fork of the original document, with changes made to different copies of the same document, leading to a nightmare merge scenario, not to mention the mere difficulty of knowing with relative assurance that you are viewing the most recent version of the document. (You can view the most recent version of your copy of the document, but you don't know if your copy is the latest copy.)
Wikis nicely present the very latest version of every page (plus a history of edits and who made the edits). The wiki becomes the authoritative source of the document to be managed by the project. Mailboxes are decluttered (and reduced in size) and documents are easier to find.
The base content is saved in the database as wikitext. When you edit a page in MediaWiki, you can't edit every aspect of the page. Much of it is generated by the skin. You can only edit the primary content of the page—the text of the article, for example, but not content that appears in the left-hand column, or in the heading. In order to change that information, you must change the skin first, a topic that is covered in Chapter 8.
Much of the writing on Wikipedia is defined by convention, rather than programmatically enforced. Wikipedia has extensive article-naming guidelines, and rules for how to structure pages. This can be a good starting point for your own wiki. It is important to remember that wikis are relatively unstructured sites, so a user can do a lot with what's available—and it may not always look pretty.
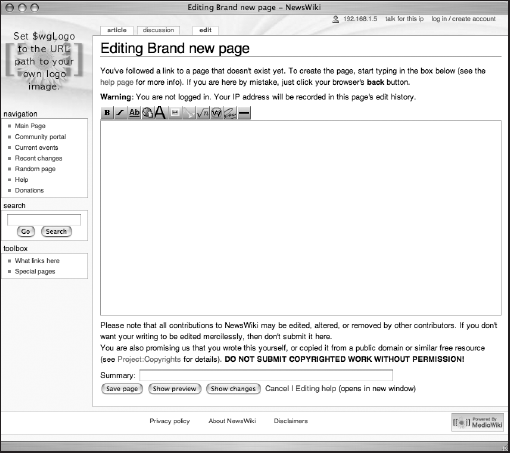
As you learned in the previous chapter, new pages are created by embedding a wiki link into a page. For example, if you wanted to create a page called "Brand New Page," then you could create a link to it from the main page of my wiki by clicking the Edit tab at the top of the page (assuming you have privileges, of course). Figure 4-1 shows a screen shot of the edit field for the wiki's main page. There are a few things to note here: First, no one is logged in (which you can tell because an IP address is displayed in the upper right-hand corner of the page, rather than a username). As a consequence, there are only four tabs across the top of the page: article, discussion, edit, and history. The primary heading on the page is "Editing Main Page," and below that is a row of icons. This is the toolbar, which provides some editing shortcuts, which you will learn more about later in this chapter.

Beneath the toolbar is the edit field where wikitext is entered into the page. In addition to the text that is displayed on that page by default when you first install MediaWiki, the following code shows an additional sentence:
<big>'''MediaWiki has been successfully installed.'''</big>

Consult the [http://meta.wikimedia.org/wiki/Help:Contents User's Guide] for
   information on using the wiki software.

== Getting started ==
* [http://www.mediawiki.org/wiki/Help:Configuration_settings Configuration
  settings list]
* [http://www.mediawiki.org/wiki/Help:FAQ MediaWiki FAQ]
* [http://mail.wikimedia.org/mailman/listinfo/mediawiki-announce
  MediaWiki release mailing list]

I'm going to edit a [[brand new page]]
An empty line separates the new text that has been entered (the line about creating a brand-new page) and the text that was already on the page. This is the first rule of wikitext: a blank line separates paragraphs. At this point, you have the option of saving the page, showing a preview of the page, showing changes, and canceling my edits. When you click the Save Page button, you are returned to the main page, where you will see that the new text you entered has now been converted to HTML. The text [[brand new page]] has been converted to a link, and if you are using the default skin that comes with MediaWiki, the link will be colored red, which indicates that the page does not exist. If you click on the red link, then you will automatically be taken to the editing page for the Brand New Page page, as shown in Figure 4-2.
Pressing the Show Preview button enables you to see the raw wikitext alongside the rendered HTML, in order to ensure that it is converted as intended (see Figure 4-3).

MediaWiki also provides a summary field in which you can enter information about the changes you've made before saving them. This can be particularly helpful when several people are collaborating on a document. The text of the summary is displayed in the page's history.
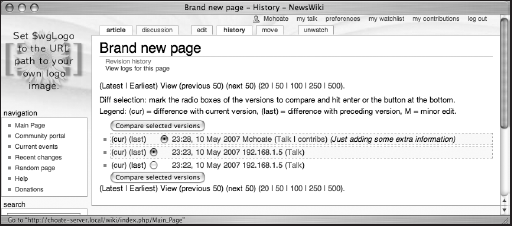
The history of changes made to a document can be viewed by clicking the History tab (see Figure 4-4).
If you are a registered user, the editing interface gives you two more options: a This Is a Minor Edit checkbox, and a Watch This Page checkbox.
The first option allows you, as a registered user, to mark an edit as a minor edit. A minor edit is an edit that fixes a typo or makes a small cosmetic adjustment that doesn't otherwise substantively change the meaning of the underlying article.
This privilege is reserved for registered users because it is used by sysops and others who review the site—they don't want to be bothered with checking a recently changed page if the change only reflects a spelling correction. As a registered user, you are presumably a little more trustworthy, so others can focus their monitoring efforts on changes made by unregistered users, which are always checked.
In my opinion, creating links is the most important part of wikitext. This is because linking to other pages can be the most tedious part of writing content for the Web. In most other writing environments, the interface to creating a link is cludgy, and typically involves a pop-up window in which you enter the link data. Once a link is established (as in Microsoft Word), it becomes difficult to edit because if you mistakenly click on the word in the wrong way, the application assumes you want to follow the link; and the next thing you know a Web browser is loading a page, when all you wanted was to edit the text, or see exactly where the link was directed.
In MediaWiki terms, there are three basic varieties of link: internal links (also called wiki links), external links, and interwiki links. The following sections describe about each one.
A wiki link is used to link one page from a wiki to another page in the same wiki. Because every page title in a wiki is unique, you can readily create links to other pages, as long as you know the title of the page. A wiki link is created when a word or phrase that corresponds to a page title is surrounded by a pair of brackets, like so: [[Main Page]]. If you were to type this into the edit field of your wiki, it would create a link that takes you to the main page of your wiki.
This is also the way a new page is created. You can place a word or phrase in a pair of brackets, whether a page actually exists or not. Once you save this page, MediaWiki will check to see whether the page designated in the brackets already exists. If it does not exist, then the link is displayed in red (when using the default monospace skin), and links to the edit page for the currently unwritten page.
For example, the following is an example of wikitext that includes basic wiki links:
==Wiki links==

This links to the [[Main Page]].

This links to the [[Main page]].

This links to the [[main Page]].

This links to the [[Help:Link]] page.
The first three links all go to the Main Page of the wiki, but you will notice that the capitalization is different for each one. When you examine the HTML that is produced, you will notice that the first link and third link to the Main Page works, but the second link is treated as a link to a completely different page. This is because MediaWiki automatically treats the first character of a page title as uppercase.
In the third link, main is changed to Main and everything works fine. The reason the second link does not work is because the second word is in lowercase, and MediaWiki will not modify the second word, so it does a case-sensitive search for a title whose second word is : rather than Page and doesn't find it. You can also see in this example that MediaWiki treats namespaces just like any other link:
<h2>Wiki links</h2>
<p>This links to the <a href="/wiki/index.php/Main_Page"
title="Main Page">Main Page</a></p>
<p>This links to the <a
href="/wiki/index.php?title=Main_page&action=edit"
class="new" title="Main page">Main page</a>.</p>
<p>This links to the <a href="/wiki/index.php/Main_Page"
title="Main Page">main Page</a>.</p>
<p>This links to the <a
href="/wiki/index.php?title=Help:Link&action=edit"
class="new" title="Help:Link">Help:Link</a> page.</p>Piped links are links that use the | character, which, when inserted inside a wiki link, enables you to define text displayed in the browser that is different from the title of the document. In the following example, the first link is a standard example of how pipe links typically appear. Note the remaining four links in the example: The wiki link ends with a pipe character and no information follows. In these examples, the pipe is a shorthand notation that converts the links according to a particular set of rules. The rules are as follows:
If a pipe character follows a page with a namespace, then the namespace is dropped from the text that is displayed in the browser.
If the title contains a parenthetical word or phrase that is followed by a single pipe, then the parenthetical phrase will be dropped from the text displayed in the browser.
If the title contains a comma that is followed by a single pipe, then the text following the comma will be dropped from the text that is displayed in the browser.
==Piped Links==

This links to the [[Main Page | home page]].

This is how to  [[Help:Link|]] to the help section.

A link to Dylan's [[Ain't No Man Righteous (No Not One)|]]

A link to Dylan's [[It's Alright, Ma (I'm only bleeding)|]]

The pipe character is [[pipes||]].
You can see an example of how these links are displayed in Figure 4-5. In the following output, you can see the HTML that is produced from the wikitext, and how the special pipe rules are manifested:
<h2>Piped Links</h2>
<p>This links to the <a href="/wiki/index.php/Main_Page"
title="Main Page">home page</a>.</p>
<p>This is how to <a
href="/wiki/index.php?title=Help:Link&action=edit"
class="new" title="Help:Link">Link</a> to the help
section.</p>
<p>A link to Dylan's <a
href="/wiki/index.php?title=Ain%27t_No_Man_Righteous_%28
No_Not_One%29&action=edit" class="new" title="Ain't
No Man Righteous (No Not One)">Ain't No Man
Righteous</a></p>
<p>A link to Dylan's <a
href="/wiki/index.php?title=It%27s_Alright%2C_Ma_%28I%27
m_only_bleeding%29&action=edit" class="new"
title="It's Alright, Ma (I'm only bleeding)">It's
Alright, Ma</a></p>
<p>The pipe character is <a
href="/wiki/index.php?title=Pipes&action=edit"
class="new" title="Pipes">|</a>.</p>
<div class="editsection" style="float:right;margin-
left:5px;">
[<a
href="/wiki/index.php?title=Wikilink_examples&action
=edit&section=3" title="Edit section: Special
case">edit</a>]
</div>Finally, there is one special case worth mentioning. Good link style suggests that you embed links in the normal flow of text, so that it reads like a sentence, and that you should avoid constructions such as the phrase "click here" to insert a link into text. Sometimes, however, grammatical constructs makes this a little awkward. For example, sometimes a word needs to be written as a plural, even though the title of the page that you will be linking to is singular. The following wikitext example shows two different ways to approach this:
==Special case==

How many [[Main Page]]s are there?

How many  [[Main Page]]<nowiki>s</nowiki> are there?
When this wikitext is rendered as HTML, the trailing s in the first link is included in the link that is displayed in the browser (see Figure 4-5 for an example), whereas in the second example the s is left outside the link. The image in Figure 4-5 is in black and white, but if it were in color, you would see that the s in the first link is blue, whereas the s in the second link is black.
<p><a name="Special_case" id="Special_case"></a></p>

<h2>Special case</h2>

<p>How many <a href="/wiki/index.php/Main_Page" title="Main
    Page">Main Pages</a> are there?</p>

<p>How many <a href="/wiki/index.php/Main_Page" title="Main
    Page">Main Page</a>s are there?</p>
External links are those that link to websites on the Internet that are not part of your wiki. There are three basic forms for external links:
[http://choate.info/]
[http://choate.info This is a link to my site]
http://choate.info
Each form results in a different look on the final HTML page, which is displayed as shown in Figure 4-6.

The first link is treated almost like a footnote. The second (predictably) shows the text that follows the URL, as well as the arrow icon indicating that it's an external link. The final format simply repeats the URL as the text of the link, also followed by the arrow icon.
If you wrap the external links in a <span> element, and assign it the class plainlink, then the arrow icon will not be displayed:
<span class="plainlinks">[http://choate.info]</span>

<span class="plainlinks">[http://choate.info This is a link to my site.]</span>

<span class="plainlinks">http://choate.info</span>
This is not really a MediaWiki feature. It leverages cascading stylesheets that can control whether an element is displayed or not. You could just as easily decide that external links should be bold, and create a class that does that within your stylesheet:
<span class="bold">[http://choate.info]</span>
Alternately, you can embed the style information in the HTML in the style attribute. In the following example, the text is bold and underlined:
<span style="font-weight:bold; text-
   decoration:underline">http://choate.info</span>
Characters at the end of external links are not automatically added, as they are with internal wiki links.
Interwiki links demonstrate the benefits of having a flat namespace, as wikis do. An interwiki link is an external link that links to another wiki (any kind of wiki will do, as long as its URL structure is predictable). When MediaWiki is installed, an interwiki table is established in the database. The table defines a prefix and a URL (the columns iw_prefix and iw_url, respectively). The prefix serves as a substitute for the full URL so that the URL can be typed onto a page conveniently.
One example is an interwiki link that links to the wiki run by Ward Cunningham. The prefix wiki is replaced by http://c2.com/cgi/wiki?$1, and the $1 variable is replaced by the word or words that follow the prefix in the link. For example, [wiki: WikiWikiWebFaq] is translated into the following:
http://c2.com/cgi/wiki?WikiWikiWebFaq
One thing you should be aware of is that MediaWiki translates what it considers to be titles according to its own rules, but not every wiki uses the same guidelines. Originally, wikis used CamelCase links (two or more words joined together, with an uppercase letter used on the first letter of each distinct word). The preceding link takes you to a wiki from the Portland Pattern Repository, and it uses CamelCase links. In order for the link to work, you have to use CamelCase as well. MediaWiki replaces spaces with underscore (_) characters, but Portland Pattern Repository does not.
A principle concept for Web development is the separation of content from design. The underlying realities of this idea have already been discussed earlier in the chapter. In practice, this separation is typically implemented in HTML by the use of cascading stylesheets (CSS). While it is possible to format a document in HTML, it is considered bad form. Instead, HTML should focus on the structure of your document, and a separate stylesheet should define how that structure appears on different kinds of devices. For example, you might have one stylesheet for print and another one for viewing on a screen.
That said, you do have some control over styles using wikitext, but bear in mind that most of the style information is documented in stylesheets. MediaWiki uses skins (I really wish they'd use a different name), which is a combination of templates and stylesheets that together comprise a site's look and feel.
Note
Customizing your wiki's skin is discussed in great detail in Chapter 8.
The fastest way to understand this is to see some examples. You can break down these elements into two basic categories. The first group is called inline elements, because they can be applied to individual words or phrases within a paragraph or block of text. The second group is called block-level elements, and these are used to apply style information to an entire block of text, such as a paragraph. The following code samples illustrate all the wikitext and HTML tags that can be used to format inline text.
The wikitext is identified by a cluster of apostrophes. In order to make a word appear in italic type, you have to surround it with a pair of apostrophes, like so:
This word is "italic".
Likewise, to make the word appear in bold text, you surround it with three apostrophes:
This word is '''bold'''.
Finally, to display the word both in italic and bold, you use five apostrophes:
This word is '''''bold and italic'''''.
In addition to this wikitext markup, also available are several HTML elements that you can embed in your wikitext document, and which work just like regular HTML. The following wikitext example demonstrates all of the inline wikitext and HTML elements available to you:
Wikitext lets you set text to ''italic'', '''bold''' and
   '''''bold and italic''''' using wikitext, and I can set
   text to <i>italic</i>, <b>bold</b> and <b><i>bold and
   italic</i></b> using html, too. I can even
   <u>underline</u> it. Don't forget
   <strong>strong</strong> and <em>emphasis</em>, either.

This text is <tt>teletype</tt> and this text is for a <var>variable</var>

I can make text <big>big</big> and I can make text <small>small</small>.

I can <s>strike</s> text I no longer need.

I can <strike>strike</strike> text I no longer need this way, too.

I can write H<sub>2</sub>O, if I want, as well as E=mc<sup>2</sup>.

I do not recommend setting the <font face="Palatino">font
   to "Palatino"</font>, because not all computers use that font.

Here is a code example:<code>2+2=5</code>

Feel free to <cite>cite me in your code</cite>.
The preceding passage will be translated into the following HTML:
<p>Wikitext lets you set text to <i>italic</i>, <b>bold</b>
    and <i><b>bold and italic</b></i> using wikitext, and I
    can set text to <i>italic</i>, <b>bold</b> and
    <b><i>bold and italic</i></b> using html, too. I can
    even <u>underline</u> it. Don't forget
    <strong>strong</strong> and <em>emphasis</em>, either.</p>

<p>This text is <tt>teletype</tt> and this text is for a <var>variable</var></p>

<p>I can make text <big>big</big> and I can make text <small>small</small>.</p>

<p>I can <s>strike</s> text I no longer need.</p>

<p>I can <strike>strike</strike> text I no longer need this way, too.</p>
<p>I can write H<sub>2</sub>O, if I want, as well as E=mc<sup>2</sup>.</p> <p>I do not recommend setting the <font face="Palatino">font to "Palatino"</font>, because not all computers use that font.</p>
As you can see, the original HTML elements that were used in the wikitext remained as is when the entire passage was converted to HTML. Figure 4-7 shows how the converted wikitext will be displayed in the viewer's browser.

In order to write italicized text, you must wrap the text in two apostrophes. (If you create the text in Microsoft Word and paste it into the editing field of MediaWiki, expect unexpected results. Microsoft Word usually converts apostrophes to "smart quotes," which is not read by MediaWiki.)
HTML comments are also allowed in wikitext:
<!-- Comment goes here -->
A comment in wikitext is created in the same way as a comment in HTML, but with one important difference. Just as in regular HTML, MediaWiki does not display comments in the browser. In fact, MediaWiki doesn't convert a comment into HTML at all. The only time you can see a comment is when you are editing the wikitext. This means that you can leave notes to other editors without having to worry about the general public seeing them (assuming, of course, that the general public doesn't have access to editing your wikitext).
In the following sections you will learn about more complex wikitext constructs, so the examples have wikitext comments to highlight important areas for you to review.
Headings are used for generating tables of contents. When used, individual [edit] links appear to the right of the heading so that users can edit a particular section of the page, rather than the entire page.
The following code sample shows the six different heading levels, coded both in wikitext and in HTML:
=Heading 1=

<h1>Heading 1 (HTML)</h1>

==Heading 2==

<h2>Heading 2 (HTML)</h2>

===Heading 3===

<h3>Heading 3 (HTML)</h3>

====Heading 4====

<h4>Heading 4 (HTML)</h4>

=====Heading 5=====

<h5>Heading 5 (HTML)</h5>

======Heading 6======

<h6>Heading 6 (HTML)</h6>
For the sake of brevity, the following shows only the output of the first four headings:
<div class="editsection" style="float:right;margin-left:5px;"> [<a href="/wiki/index.php?title=Headings&action=edit&section=1" title="Edit section: Heading 1">edit</a>] </div> <p><a name="Heading_1" id="Heading_1"></a></p> <h1>Heading 1</h1> <div class="editsection" style="float:right;margin-left:5px;"> [<a href="/wiki/index.php?title=Headings&action=edit&section=2" title="Edit section: Heading 1 (HTML)">edit</a>] </div> <p><a name="Heading_1_.28HTML.29" id="Heading_1_.28HTML.29"></a></p> <h1>Heading 1 (HTML)</h1> <div class="editsection" style="float:right;margin-left:5px;"> [<a href="/wiki/index.php?title=Headings&action=edit&section=3" title="Edit section: Heading 2">edit</a>] </div> <p><a name="Heading_2" id="Heading_2"></a></p> <h2>Heading 2</h2>
<div class="editsection" style="float:right;margin-left:5px;"> [<a href="/wiki/index.php?title=Headings&action=edit§ion=4" title="Edit section: Heading 2 (HTML)">edit</a>] </div> <p><a name="Heading_2_.28HTML.29" id="Heading_2_.28HTML.29"></a></p> <h2>Heading 2 (HTML)</h2>
MediaWiki treats headings as sections, and it allows users to edit only the section of the page they want to modify. This can be helpful with long pages. As you can see in the HTML output, preceding each heading is a <div> element that links to an editing page for each section. The preceding HTML output contains four sections, numbered one through four, which you can see referred to inside the <div> element.
In addition, as you can see, both the wikitext heading and the HTML heading are formatted the same way. The only difference is the name used for the named anchor. This is a consequence of the fact that you cannot have duplicate named anchors in a document, so MediaWiki creates a unique name. This is why the first heading has a name and id of Heading_1, while the second heading has a name and id of Heading_1_.28HTML.29. These named anchors are used to generate a table of contents for the page, which is displayed at the top of the page. Again, this is helpful when reading long pages. The following code shows the HTML that is produced for the table of contents page. Note that it ends with a bit of JavaScript code that enables users to toggle between displaying or not displaying the table:
<table id="toc" class="toc" summary="Contents">
  <tr>
    <td>
  <div id="toctitle">
    <h2>Contents</h2>
  </div>

  <ul>
    <li class="toclevel-1"><a href="#Heading_1"><span class="tocnumber">
   1</span> <span class="toctext">Heading 1</span></a></li>

    <li class="toclevel-1">
      <a href="#Heading_1_.28HTML.29"><span class="tocnumber">2</span> <span
   class="toctext">Heading 1 (HTML)</span></a>

      <ul>
        <li class="toclevel-2"><a href="#Heading_2"><span class="tocnumber">
   2.1</span> <span class="toctext">Heading 2</span></a></li>

        <li class="toclevel-2"><a href="#Heading_2_.28HTML.29"><span
   class="tocnumber">2.2</span> <span class="toctext">Heading
   2 (HTML)</span></a></li>
      </ul>
    </li>
  </ul>
    </td>
  </tr>
</table>
<p><script type="text/javascript">
 if (window.showTocToggle) { var tocShowText = "show"; var
  tocHideText = "hide"; showTocToggle();}
</script></p>
By default, the table of contents is only generated for pages with three or more headings. A user can opt not to have any table of contents at all by going to the user preferences page and clicking the Misc tab. One of the options that is selected by default is Show Table of Contents (for pages with more than three headings). Clicking the checkbox toggles that default preference off. You can also set limits on how deep the table of contents can go by adding the following to the LocalSettings.php file:
/** Maximum indent level of toc. */
$wgMaxTocLevel = 999;
By default, the maximum indent level is 999, which is more than enough. In fact, the only really meaningful limit would be something less than six, as the headings only extend six levels deep.
As a stylistic point, bear in mind that the title of the page is displayed using <h1> the element, so you should reserve your use of headings in the body of the article to the equivalent of <h2> and above. It is also regarded as good style to nest your headings in descending order, without skipping any levels. For example, you do not want to do the following:
==This is my first article section==

Some introductory text...

====This is a sub-heading====
This example jumps from a level 2 heading to a level 4 heading, rather than use a level 3 heading as the next natural subhead. Figure 4-8 shows the heading levels in MediaWiki.

A horizontal rule is simply four hyphens (----). You can also use the <hr> HTML element.
The horizontal rule element is one of only a couple of elements that never have any child elements. In HTML, you are allowed to have an element with an opening tag, but not a closing tag. XML forbids this, so XHTML (the XML implementation of HTML) requires a closing tag, or the use of a shorthand notation. Note that MediaWiki accepts both forms of horizontal rule.
The first item in the following example is the old-fashioned HTML version of the horizontal rule, and the second item is the new-fangled XHTML version of the horizontal rule. The only difference is the presence of a / in the second item:
<hr width="50%">
<hr width="50%"/>
One of the advantages of using the HTML version, rather than the wikitext version, is that you get access to all the attributes of horizontal rules. In the previous example, I have set the width of the rule to be 50% of the size of the page on which it is displayed. Without the intervention of cascading stylesheets (CSS), this is not possible with the wikitext version.
When you want to insert a line break into a document without establishing another paragraph, you can use the <br> element. Like the horizontal rule, it doesn't have any children, so MediaWiki takes two forms of it as well:
<br>
<br/>
Technically speaking, heading elements are block-level elements too, as they apply to the entire paragraph of text. Nevertheless, they have special attributes that warrant a separate treatment. By definition, a block-level element stands alone with space before it and after it (see Figure 4-9). Unlike inline elements, you'll never see two block-level elements displayed side by side. The wikitext addition to the HTML is simple: A blank line designates a new paragraph, as shown in the following example:
A blank line separates paragraphs.

You can also use HTML tags to establish paragraphs.

<p>This is a paragraph</p>

<div>This is a block of text</div>

<blockquote>Yes, you can quote me on this</blockquote>

And a caption: <caption>This is my caption.</caption>
The wikitext is converted to the following HTML:
<p>A blank line separates paragraphs.</p>

<p>You can also use HTML tags to establish paragraphs.</p>
<p>This is a paragraph</p>

<center>
  This is a centered paragraph
</center>

<div>
  This is a block of text
</div>

<blockquote>
  Yes, you can quote me on this
</blockquote>
<p>And a caption:</p>

<table>
  <caption>
         This is my caption.
  </caption>
</table>
Note that when MediaWiki encounters a <caption> element, it automatically assumes that it is part of a table, and inserts it between <table> tags.

There are times when you do not want your wikitext converted to HTML. There are three ways to do this in MediaWiki. The following code shows all three methods:
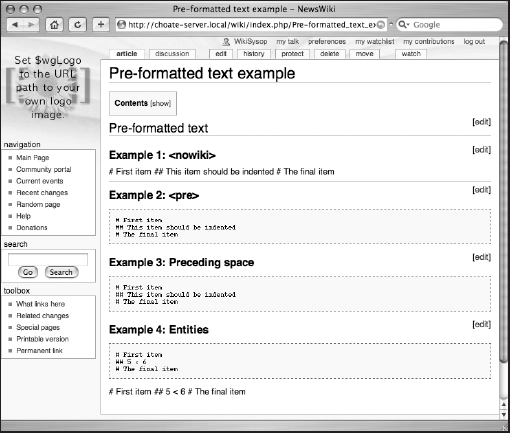
== Pre-formatted text==

===Example 1: <nowiki> ===

<nowiki>
# First item
## This item should be indented
# The final item
</nowiki> ---- ===Example 2: <pre> === <pre> # First item ## This item should be indented # The final item </pre> ===Example 3: Preceding space=== # First item ## This item should be indented # The final item
The first example uses the <nowiki> tag. The second example uses <pre>, which should be familiar if you know HTML. Figure 4-10 shows an example of how these are displayed. In the final example, a space has been inserted at the front of each line. The following code shows the HTML that is rendered:
<div class="editsection" style="float:right;margin-left:5px;"> [<a href="/wiki/index.php?title=Pre-formatted_text_example&action=edit& section=1" title="Edit section: Pre-formatted text">edit</a>] </div> <p><a name="Pre-formatted_text" id="Pre-formatted_text"></a></p> <h2>Pre-formatted text</h2> <div class="editsection" style="float:right;margin-left:5px;"> [<a href="/wiki/index.php?title=Pre-formatted_text_example&action=edit& section=2" title="Edit section: Example 1: &lt;nowiki&gt;">edit</a>] </div> <p><a name="Example_1:_.3Cnowiki.3E" id="Example_1:_.3Cnowiki.3E"></a></p> <h3>Example 1: <nowiki></h3> <p># First item ## This item should be indented # The final item</p> <hr> <div class="editsection" style="float:right;margin-left:5px;"> [<a href="/wiki/index.php?title=Pre-formatted_text_example&action=edit& section=3" title="Edit section: Example 2: &lt;pre&gt;">edit</a>] </div> <p><a name="Example_2:_.3Cpre.3E" id="Example_2:_.3Cpre.3E"></a></p> <h3>Example 2: <pre></h3> <pre> # First item ## This item should be indented
# The final item </pre> <div class="editsection" style="float:right;margin-left:5px;"> [<a href="/wiki/index.php?title=Pre-formatted_text_example&action=edit& section=4" title="Edit section: Example 3: Preceding space">edit</a>] </div> <p><a name="Example_3:_Preceding_space" id="Example_3:_Preceding_space"></a></p> <h3>Example 3: Preceding space</h3> <pre> # First item ## This item should be indented # The final item </pre>
There are three kinds of lists: ordered lists, unordered lists (bulleted lists), and definition lists. An ordered list uses numbers of different formats to identify each list item, whereas an unordered list uses bullets. The actual numeric format and bullet are ultimately decided by stylesheets. Definition lists are lists of terms, along with their definitions, such as a glossary.
As you might guess, there is both a wikitext method of creating lists and an HTML method. The following code shows examples of both methods:
==Wikitext ordered list== # first list item # second list item ==HTML ordered list== <ol> <li> first list item</li> <li> second list item</li> </ol> ==Wikitext unordered list== * first list item * second list item ==HTML unordered list== <ul> <li> first list item</li> <li> second list item</li> </ul> definition lists: ;Glossary ;Wikitext : Markup used for MediaWiki ;HTML: Hypertext Markup Language <dl><dt>Glossary <dt>Wikitext <dd> Markup used for MediaWiki <dt>HTML<dd> Hypertext Markup Language </dl>
One important difference between the wikitext method and the HTML method is that the wikitext method limits list items to a single paragraph. This is due to a limitation in the parser. If your list items need to be more than one paragraph, then you should use the HTML method.
You may have noticed that the HTML used in the last example for the definition list does not use closing tags—that is, there is no < /dt> or </dl> . That's because, for some reason, the parser does not interpret them properly and they end up being displayed on the page. When they are removed, the parser converts the text to proper HTML and it is formatted appropriately when displayed. This kind of shorthand is based on SGML-based HTML which allows tags to not be closed. In most cases, this chapter doesn't focus on that syntax because it is nonstandard XHTML and there is simply not enough space to address every possible variation (the MediaWiki parser is actually quite accommodating). In this case, the example used here was chosen because the XHTML method does not work.
Figure 4-11 illustrates three lists displayed as HTML.

So far, the examples have been simple, but you can do more complicated, interesting things with your lists. For example, you can create nested lists. The following example shows you how to make a nested, ordered list:
==Nested lists==
# first list item
## first sub item
## second sub item
# second list item

<ol>
  <li> first list item
    <ol>
      <li> first sub item</li>
      <li> second sub item</li>
    </ol>
  </li>
  <li> second list item</li>
</ol>In the previous example, one ordered list was nested inside another ordered list. You might be tempted to use the following wikitext to nest an unordered list inside an ordered list:
==Bad mixed nested list==
# first list item
** first sub item
** second sub item
# second list item

==Good mixed nested list==

# first list item
#* first sub item
#**first sub sub item
#* second sub item
# second list item
## first numbered sub item

==Another good mixed nested list==

# first list item
#* first sub item
#*#first sub sub item
#* second sub item
# second list item
## first numbered sub item
In the preceding examples, the first list attempts to nest an unordered list inside an ordered list. If you do this, however, you will get the following output, which is likely not what you expect:
<ol>
  <li> first list item</li>
</ol>
<ul>
  <li>
    <ul>
      <li> first sub item</li>
      <li> second sub item</li>
    </ul>
  </li>
</ul>
<ol>
  <li> second list item</li>
</ol>
Instead of finding an unordered list nested inside an ordered list, you find an ordered list followed by an unordered list, followed by yet another ordered list. Figure 4-12 illustrates how this list will be displayed by MediaWiki.
The two examples that follow the first example show the proper way to do nesting. You were shown the wrong way to do it first because the wrong way seems to be the intuitive way (to me, at least), and the correct way isn't that intuitive.
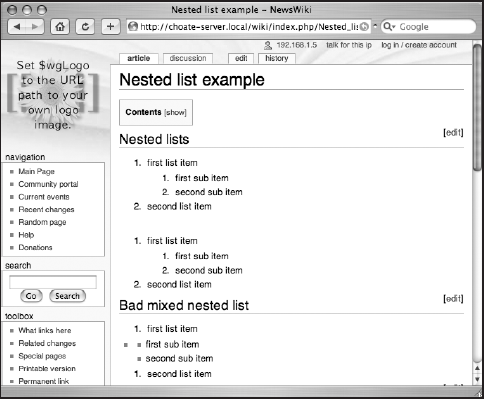
Figure 4-13 shows both examples of acceptable nested lists.

Tables are difficult to implement under any circumstances. Wikitext provides a non-WYSIWYG way to create tables, but it is less than ideal. As a matter of fact, it allows you to use three different approaches to creating tables. Because the first approach is simply to code it in XHTML, I focus my examples on the other two approaches: simplified HTML and a piped table. Either way, each system requires a thorough understanding of how to create tables in HTML. The piped table merely substitutes | characters for certain HTML constructs, so if you don't understand what's being replaced, you may find it confusing.
The following wikitext examples show three different ways of making a basic table in MediaWiki. Tables are divided into rows and columns, and the intersection of a row and a column is a cell. The first table is created using familiar HTML syntax:
<table>
  <tr>
    <th>Row 1, Heading 1</th>
    <th>Row 1, Heading 2</th>
  </tr>
  <tr>
    <td>Row 2, Cell 1</td>
    <td> Row 2, Cell 2</td>
  </tr>
</table>
This is the wikitext version of the same table:
{|
! Row 1, Heading 1
! Row 1, Heading 2
|-
| Row 2, Cell 1
| Row 2, Cell 2
|}
The following example shows an alternative equivalent. Instead of each cell being written on its own line, the following example shows the cells of each row displayed on the same line. In order to separate cells using table headers, the line must start with an exclamation mark (!), and each cell must be separated by two exclamation marks (!!). Likewise, table data rows start with a pipe (|), and each cell in the row is separated by two pipes (‖):
{|
! Row 1, Heading 1!! Row 1, Heading 2
|-
| Row 2, Cell 1 || Row 2, Cell 2
|}
All three of the preceding table examples are rendered the same way in MediaWiki, as shown in Figure 4-14.
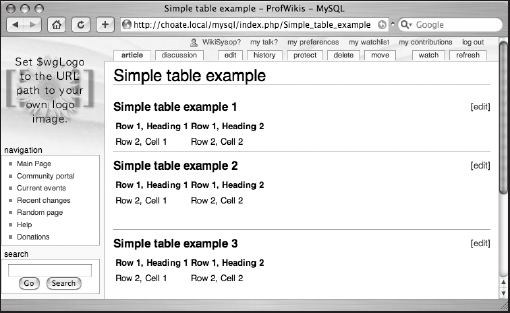
If you enter the table example into the edit field of MediaWiki, it will be published as is, with no changes to the code you entered. If you do this, you'll see that the table is formed, but difficult to read. In order to fix that, you need to modify some attributes of the table. When testing or writing a new table, one of the best things to do is display the borders of the cells. The space between the cells is defined by the cellpadding and cellspacing attributes.
Padding refers to the space between the text within the cell and the edge of the cell, while spacing refers to the space between the cells. The following two examples display the same table from the previous example, but with a border that is 1-pixel wide, and with cell padding of 2 pixels and cell spacing of 6 pixels. Figure 4-15 shows a simple table with various attributes added. In addition to the border, a caption is added as well:
===Simple table (with attributes) example 1===

<!-- You can create tables in plain HTML -->

<table border="1" cellpadding="2" cellspacing="6">
  <caption>This is my caption</caption>
  <tr>
    <th>Row 1, Heading 1</th>
    <th>Row 1, Heading 2</th>
  </tr>
  <tr>
    <td>Row 2, Cell 1</td>
    <td> Row 2, Cell 2</td>
  </tr>
</table>

===Simple table (with attributes) example 2===
<!-- The following table is equivalent to the previous
HTML table-->
{| border="1" cellpadding="2" cellspacing="6"
|+ This is my caption
! Row 1, Heading 1
! Row 1, Heading 2
|-
| Row 2, Cell 1
| Row 2, Cell 2
|}
Attributes can be used on rows and cells, too. The following example builds on the previous one by adding color to two of the rows of the table, and by adding a wikilink in the first cell of row 4:
===Simple table (with attributes) example 3===

<!-- This is a slightly more complex table, that
sets attributes on rows and individual cells -->

<!-- Set the space between the cells (cellspacing) to 0-->
{| border="1" cellpadding="2" cellspacing="0"
<!-- I want the caption to be bold and italic-->
|+ '''''This is my caption'''''
<!-- Set the header background color to gray-->
|- bgcolor="gray"
! Row 1, Heading 1 ! Row 1, Heading 2 |- | Row 2, Cell 1 | Row 2, Cell 2 <!-- This row uses a different way to define the color--> |- bgcolor="#cccccc" <!-- Regular wikitext can be used in cells, too--> | Row 3, '''Cell 1''' | Row 3, Cell 2 |- <!--Wiki links work as well--> | Row 4, [[Cell 1]] | Row 4, Cell 2 |}
You can also combine cells, across rows or columns. The following examples show both the HTML and the wikitext method of joining cells:
===Colspan and rowspan example 1===

====HTML colspan====
<table border="1">
  <tr>
 <!-- The header will span two columns -->
    <th colspan="2">Row 1, Heading 1</th>
  </tr>
  <tr>
    <td>Row 2, Cell 1</td>
    <td> Row 2, Cell 2</td>
  </tr>
</table>

----

====Wikitext colspan====

{| border="1"
|+ This is my caption
! colspan="2" |Row 1, Heading 1
|-
| Row 2, Cell 1
| Row 2, Cell 2
|}


===Colspan and rowspan example 2===


====HTML rowspan====
<table border="1">
<tr>
<!--The following cell spans two rows-->
<th rowspan="2">Row 1, Heading 1</th>
<th>Row 1, Heading 2</th>
</tr>
<tr>
<td> Row 2, Cell 2</td>
</tr>
</table>
----
====Wikitext rowspan====
{| border="1"
|+ This is my caption
! rowspan="2"| Row 1, Heading 1
! Row 1, Heading 1
|-
| Row 2, Cell 2
|}Figure 4-16 shows how the different colspan and rowspan options are displayed.

A more complicated construct occurs when combining tables and lists. The following wikitext is an example of embedding a list inside a cell of a table:
===Tables and lists example===

{|border=1 cellpadding=0 cellspacing=0
|+ Resume
|- valign="top"
! Experience
|
<!-- The "NASA" item has a space in front of it, causing it to
be displayed incorrectly-->
 # NASA
# CIA
|- valign="top"
<!-- The list items need to be on their own line -->
! Goals
|
# Get a job
# Lose weight
|}
The following code shows the HTML that is output. Two lists are used in the table: The first list is used to display a list of organizations for which the applicant has worked in the past, and the second list is a record of personal goals for the applicant. The first list is not displayed as expected because an extra space has been inserted before the # NASA phrase, which MediaWiki assumes should be converted into a <pre> tag. It is then followed by an ordered list with one item, CIA. The list of goals is displayed properly.
<div class="editsection" style="float:right;margin-left:5px;">
[<a href="/wiki/index.php?title=Table_with_embedded_lists&action=edit&
section=1" title="Edit section: Tables and lists example">edit</a>]
</div>
<p><a name="Tables_and_lists_example" id="Tables_and_lists_example"></a></p>
<h3>Tables and lists example</h3>
<table border="1" cellpadding="0" cellspacing="0">
<caption>
Resume
</caption>
<tr valign="top">
<th>Experience</th>
<td>
<pre>
# NASA
</pre><ol>
<li>CIA</li>
</ol>
</td>
</tr>
<tr valign="top">
<th>Goals</th>
<td>
<ol>
<li>Get a job</li>
<li>Lose weight</li>
</ol>
</td>
</tr>
</table>The output of this HTML is shown in Figure 4-17.

Despite the convenience of wikitext, many users prefer to use HTML, and MediaWiki obliges that wish by providing several options for placing HTML on the page. However, it does so with its own idiosyncrasies.
MediaWiki deviates from the XML standard in handling numeric character references and character entity references. The goal is to avoid collisions with special characters used in XML markup.
For example, if you were to refer to a < character in the text of a document, an XML parser would mistake that for the beginning of an XML tag. In order to avoid that, you use a reference instead. When you enter < in your text, it is rendered by the browser as a < character. XML defines the character entity references shown in the following table, along with the character that is displayed in the browser.
Entity References | Displayed Character |
|---|---|
|
|
|
|
|
|
|
|
|
|
MediaWiki supports all of these entities except '. All of the others work just like they do in XML, but any use of ' in text will be converted to &apos;, which is displayed as "'". In other words, it is displayed in the browser just as it's written in wikitext.
In addition to the XML character entity references, HTML defines a total of 252 character entity references. These are defined in the global variable $wgHtmlEntities by Sanitizer.php.
Whenever you want the characters defined in this list to display in the browser, you need to use the entity references. One possible source of confusion is that you can enter the characters directly into the edit field:
When you select Preview, the characters will be displayed as is, without being converted. However, when you are ready to save the changes to the page, a blank page is returned—the raw UTF-8 characters are neither converted to entities nor displayed in the browser. The reason for this has to do with how different languages are handled by MediaWiki, a topic reviewed later in the book.
MediaWiki allows you to use a wide range of HTML instead of wikitext. All such HTML is run through the Sanitizer.php script, which ensures that the HTML is well formed, and converts HTML 4.x tags to XHTML tags (performing tasks such as changing <br> to < br/> and making the element names lowercase). It also encodes values in attributes that would confuse the MediaWiki parser. Any characters with special meaning to the parser are converted into entities, as shown in the following snippet of code pulled from Sanitizer.php:
'<' => '<', // This should never happen,
'>' => '>', // we've received invalid input
'"' => '"', // which should have been escaped.
'{' => '{',
'[' => '[',
"''" => '''','ISBN' => 'ISBN',
'RFC' => 'RFC',
'PMID' => 'PMID',
'|' => '|',
'__' => '__',It also cleans up any CSS included in style attributes, removing JavaScript expressions (from Internet Explorer 5.0+) and all URLs.
If you choose not to have this level of security (and concomitant restrictions), you can opt to allow unrestricted HTML to be entered by users (a risky proposition), by setting the global variable $wgRawHtml to true. Likewise, you can disable HTML altogether, by setting the global variable $wgUserHtml to false.
The following example shows wikitext handling of entities. The result of this wikitext will be a table that displays the entity markup in the first column, and the entity output in the second column. In order to do this, the entities in the first column are escaped:
<h2>Tables and Entities</h2>
{|border="1" width="80%" cellpadding="4px" cellspacing="0px"
|+ This table illustrates the use of entities in wikitext
|- bgcolor="gray"
! Entity !! Character
|-align="center"
|&amp;|| &
|-
|&amp;|| &
|-
|&gt;|| >
|-
|&gt;|| >
|-
|&lt;|| <
|-
|&lt;|| <
|-
|&copy;|| ©
|-
|&#34;|| "
|-
|&quot;|| "
|-
|&#34;|| "
|}The wikitext is converted to the following HTML. Pay special attention to how the entities are converted:
<div class="editsection" style="float:right;margin-left:5px;"> [<a href="/wiki/index.php?title=Table_example&action=edit& section=1" title="Edit section: Tables and Entities">edit</a>] </div>
<p><a name="Tables_and_Entities" id="Tables_and_Entities"></a></p>
<h2>Tables and Entities</h2>
<table border="1" width="80%" cellpadding="4px" cellspacing="0px">
<caption>
This table illustrates the use of entities in wikitext
</caption>
<tr bgcolor="gray">
<th>Entity</th>
<th>Character</th>
</tr>
<tr align="center">
<td>&amp;</td>
<td>&</td>
</tr>
<tr>
<td>&amp;</td>
<td>&</td>
</tr>
<tr>
<td>&gt;</td>
<td>></td>
</tr>
<tr>
<td>&gt;</td>
<td>></td>
</tr>
<tr>
<td>&lt;</td>
<td><</td>
</tr>
<tr>
<td>&lt;</td>
<td><</td>
</tr>
<tr>
<td>&copy;</td>
<td>©</td>
</tr>
<tr>
<td>&#34;</td>
<td>"</td>
</tr>
<tr>
<td>&quot;</td>
<td>"</td>
</tr>
<tr>
<td>&#34;</td>
<td>"</td>
</tr>
</table>Figure 4-18 shows how MediaWiki displays a complex table of entities.

The final group of HTML elements usable in MediaWiki are those used for rubies, a typographical technique used in Japanese writing:
<rb>
<rp>
<rt>
<ruby>
Footnotes are not part of the base MediaWiki installation, but there is an extension that you can easily install that adds this feature. All extensions are installed inside the extensions folder. The first step is to create a Cite folder inside the extensions folder. Then, download Cite.php and Cite.i18n.php from MediaWiki's Subversion repository:
http://svn.wikimedia.org/viewvc/mediawiki/trunk/extensions/Cite/Cite.php?view=co
http://svn.wikimedia.org/viewvc/mediawiki/trunk/extensions/Cite/
   Cite.i18n.php?view=co
Once the files are downloaded, you need to update LocalSettings.php by adding the following line:
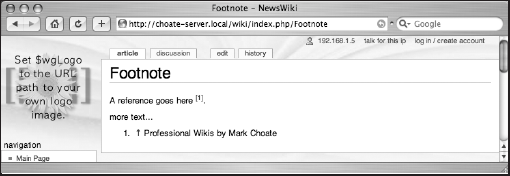
require_once( "{$IP}/extensions/Cite/Cite.php" );That's all there is to adding this extension. It enables two new XML tags to be used in the text: <ref> </ref> and <references/>. The text for the footnote is inserted between the <ref> tags. <references/> is a placeholder that you type at the bottom of the page, where the actual reference will be displayed. The following snippet shows how a reference is entered into the document:
A reference goes here <ref>Professional Wikis by Mark Choate</ref>.

more text....


<references/>
The preceding reference is translated into the following HTML:
A reference goes here <sup id="_ref-0" class="reference"><a
   href="#_note-0" title="">[1]</a></sup>.

more text...

<ol class="references">
  <li id="_note-0"><a href="#_ref-0" title="">↑</a> This is
   a reference</li>
</ol>
The footnotes themselves are automatically numbered. This example contains one footnote, and it's numbered 1. The code is also smart enough to know when references are repeated, so it will combine footnotes if more than one footnote refers to the same text.
Figure 4-19 shows how the references are displayed.
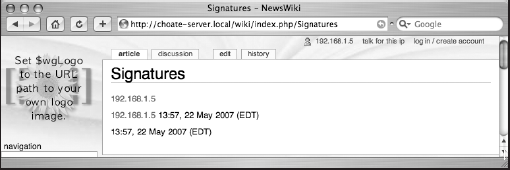
If you want to sign your name to a post, MediaWiki offers three shortcuts. Signatures are used primarily on pages in the Talk namespace, to identify the person making the post. Typically, articles in the main namespace do not use signatures because they are collaboratively authored.
<!--Three tildes display your username-->
~~~
<!--Four tildes display your username and the current date-->
~~~~
<!--Five tildes display the current date-->
~~~~~
Figure 4-20 shows how the three different variations are displayed on the page.
Wikitext and HTML are not your only editing options. MediaWiki also provides a toolbar that can be used to assist with the composition of wikitext, and some WYSIWYG alternatives are available too.
The toolbar displayed above the edit field offers some shortcuts that can help you avoid typing wikitext. It offers at least some of the ease of using a WYSIWYG editor. The following table shows you the wikitext that is generated if you click one of the buttons while no text is selected in the edit field is selected.
The buttons insert some placeholder text, which can be useful if you've forgotten the syntax of a particular item. If you have text selected in the field, then pressing the button wraps the selected text in the appropriate wiki tags in order to apply the proper formatting.
| |
| |
[[Link title]] | |
[ | |
= = Headline text = = | |
[[Image:Example.jpg]] | |
[[Media:Example.ogg]] | |
<math>Insert formula here</math> | |
<nowiki>Insert non-formatted text here</nowiki> | |
--~~~~ | |
---- |
You can find information online about different approaches to editing MediaWiki, including instructions for embedding a WYSIWYG interface, as well as how to use external editors. This chapter does not cover these in any detail, for a few reasons.
First, many of the approaches were developed specifically for Wikipedia, so the process of customizing them for your own needs is somewhat complex, and certainly beyond the scope of this book. Second, in almost all cases, specialized approaches mean limiting users to certain browsers. Finally, all of the approaches tested for this book simply didn't work very well, or they didn't work at all. None of them are core parts of the MediaWiki distribution, and they are not implemented by the MediaWiki developers.