
This chapter takes a look at how to performance-tune MediaWiki sites. Because of Wikipedia's success, you could consider it to be a worst-case scenario in terms of performance management. It is fairly safe to say that most other installations will have much less traffic and be much less complex than the one in place for Wikipedia, but it's nice to know that there's no doubt that MediaWiki can scale.
When MediaWiki receives a request for a page, it performs a number of tasks—from ensuring that the user requesting the page is allowed to see it to converting wikitext to HTML, and then generating the page itself, delivering the appropriate layout based upon the preferences of the user. As programmers are wont to say: this is not a trivial task. Consider the fact that Wikipedia is reportedly the eighth most visited website in the world and one can see that for the developers of MediaWiki, performance is an important issue.
A website lives in a complex environment and numerous factors influence a site's performance characteristics. From a user's perspective, performance is simply a measure of how long it takes for a page to load after the user has clicked a link to that page. When a user clicks on a link, a request is sent to the host server in the form of an HTTP header, a simple string of text that looks like this:
GET /mysql/index.php/Main_Page HTTP/1.1
Host: 127.0.0.1
User-Agent: Mozilla/5.0 (Macintosh; U; Intel Mac OS X; en-US; rv:1.8.1.6)
   Gecko/200707250 Firefox/2.0.0.6
Accept: text/xml,application/xml,application/xhtml+xml,text/html;q=0.9,text/
   plain;q=0.8,image/png,*/*;q=0.5
Accept-Language: en-us,en;q=0.5
Accept-Encoding: gzip,deflate
Accept-Charset: ISO-8859-1,utf-8;q=0.7,*;q=0.7
Keep-Alive: 300
Connection: keep-alive
This request has to find the host server and then travel through a series of networks to get there, where the server gets the request and returns a new header, followed by the content of the page. This round-trip is made in a matter of seconds and appears almost instantaneous to the user when everything goes well. Of course, things never go well all the time, and many factors can influence the time it takes for the request/response cycle to complete.
Factors that affect a site's performance include the amount of bandwidth available to the user whose computer is making the request; how far away the server is from the computer making the request; general network congestion, which can slow down the trip to and from the host server; and the bandwidth available to the server.
On the server itself, performance factors include the size of the webpages, the speed of the microprocessor and the amount of RAM available to it, how long it takes to read data from hard drives or to query the database, as well as internal network traffic. Finally, the software used to run the site, obviously, is a factor in a site's performance. Because of all the factors that contribute to a site's perceived performance, optimizing performance can be a complex activity.
Fortunately, the developers of MediaWiki have been very open about the kind of hardware they have in place, as well as how they have configured it. Information about Wikipedia's installation can be found at http://meta.wikimedia.org/wiki/Wikimedia_servers.
MediaWiki uses a variety of strategies to manage the load on their servers and to optimize their performance. The following list outlines their basic architecture:
Load balancing: Round-robin DNS routes requests to multiple Squid servers.
Squid: Squid is a caching proxy server based on the Harvest Cache Daemon developed in the early 1990s. Originally funded by an NFS grant, Squid is now developed by volunteers. It sits between the user making the request and the Apache Web server, and performs two tasks.
First, it caches frequently requested content so that when it is requested, the Squid server handles the request instead of passing the request on to Apache. This reduces the load on the Apache servers.
Second, Squid can be used to intelligently map incoming requests to Apache servers in a way that distributes the request loads to different machines. Running a proxy server is a complex task that if not done correctly can leave a site open to security vulnerabilities. MediaWiki supports Squid, but you won't learn about it in any detail here, as that is a subject beyond the scope of this book. In fact, only the most active wikis would need something like Squid. The vast majority will find Memcached and other caching strategies more than adequate. To learn more about Squid, visit
www.squid-cache.org.Memcached: Memcached was developed by Danga Interactive for
LiveJournal.com, and it is known as a distributed memory object caching system. In other words, it keeps webpages cached in memory so that when they are requested, they can be sent back directly to the client and not read off a hard drive or regenerated by a PHP script.Apache/PHP: The PHP scripts are compiled into bytecode and then executed. In the default PHP installation, the scripts are compiled every time they are requested. One way to improve performance is to cache the bytecode that is produced by the scripts so that it isn't regenerated every time. MediaWiki supports three different products that do this: Alternative PHP Cache (APC), eAccelerate, and Turck MMCache.
Relational Databases: These are database clusters in a master/slave configuration. In a typical configuration, the "master" database is the only database that can be written to, and one or more "slaves" are used for all "read" requests. The master then synchronizes the new data with the data in the slaves. (Database load balancer: LoadBalancer.php)
Full-text search (Lucene): In a default installation, MediaWiki uses the full-text indexing capabilities of either MySQL or Postgres relational databases, but because these are relational databases and are not designed from the ground up for full-text searches, their performance degrades as the size of the full-text database grows, as well as when the number of searches increases. As a consequence, Wikipedia uses Lucene, which is a full-text search engine that's part of the Apache Foundation family of open-source projects.
The Wikipedia installation uses all of these features to one degree or another to deliver Wikipedia content to the world. Unfortunately, a detailed discussion of proxy servers, database architecture, and the Lucene search engine are beyond the scope of this book (and are worthy of entire books themselves, of which there are many).
This chapter focuses on the most commonly used performance-enhancing techniques and describes how to configure MediaWiki's cache. The chapter concludes with information about how to backup and restore your wiki.
MediaWiki provides a flexible caching mechanism and can implement caching in a number of ways.
The PHP Memcached client script is included in the MediaWiki distribution, and this forms the basic approach used by MediaWiki. Wikipedia and related sites use Memcached, and this is what they recommend. However, for single-server installations, Memcached can be overkill because it runs in a separate process and needs to be monitored. In those instances, MediaWiki can use one of several other caching mechanisms, including APC, eAccelerator, or Turck MMCache.
These other methods are subclasses of the BagOStuff class, which is defined in BagOStuff.php. These subclasses adopt the same interface as the Memcached PHP client, so the MediaWiki code is the same regardless of which caching mechanism you decide to use—the only difference is whether the memcached object is used, or one of the BagOStuff variants.
MediaWiki can cache HTML files on the file system, or it can cache serialized PHP objects in a database (or dbm file).
One of the most common sources of problems for new MediaWiki developers is the cache. Typically, a developer makes a change to some code and then goes to view it in the browser and doesn't see the changes just made. Whenever something is not doing what it is supposed to do, it's a good idea to suspect a cache problem. Developers have two caches to worry about: the browser cache and the MediaWiki cache.
To purge the browser cache, do the following:
IE: Press Ctrl+F5, or press Control and then click the Reload button.
Mozilla: Press Ctrl+F5 (Command+F5 on a Macintosh), or press the Ctrl key and click the Reload button.
Safari: Press Command+Shift+R, or press the Command key and click the Reload button.
To purge the MediaWiki cache, add the purge action to the end of the URL of a file:
/wiki/index.php/Main_Page?action=purge
You can also purge all caches, both browser caches and server-side caches, by setting the value of $wgCacheEpoch in LocalSettings.php to the current date, as illustrated in the following example:
/**
 * Set this to current time to invalidate all prior cached pages. Affects both
 * client- and server-side caching.
 * You can get the current date on your server by using the command:
 *   date +%Y%m%d%H%M%S
 */
$wgCacheEpoch = '20070822000000';
You just learned there are two caches, a browser cache and the MediaWiki cache. That is only partly true. MediaWiki has an aggressive and far-reaching caching strategy embedded in the application and actually has several different kinds of caches caching different things.
In addition to the browser cache, there is a file cache and a collection of object caches.
The HTTP specification defines HTTP headers that are to be used by clients (browsers) to manage their cache. In order to enable client-side caching, the $wgCachePages variable must be set to true (the default):
# Client-side caching:

/** Allow client-side caching of pages */
$wgCachePages       = true;
In order to understand how this changes MediaWiki's behavior, it's helpful to understand how HTTP 1.1 handles caching. What follows is a brief, and not complete, description of the caching process used by browsers so that you will understand how MediaWiki changes response headers when this value is set.
When a browser requests a page, the server's response includes HTTP headers, as well as the page that was requested. The HTTP headers that are sent back to the browser, called the response headers, can contain information that the browser uses to cache the page.
The Expires header is optional; it tells the browser explicitly when to stop caching a page. When a browser makes a request, it first checks to see whether the page is in the cache and if it has an expiration date. If it has expired, then it will check to see whether the page has been modified since the last download. If it has been modified, then it will download a new copy; otherwise, it displays the page in the cache. The following example shows the Expires header:
Expires: Thu, 23 Aug 2007 14:19:41 GMT
The next two response headers are called validators because they are used to determine whether a page has changed and needs to be retrieved from the server, rather than the cache. These response headers are Last-Modified and Etag (shown here):
Last-Modified: Wed, 30 May 2007 01:01:53 GMT
Etag: "655194-9f2f-465ccd01"
When a browser caches a page, it stores this information along with it. The next time it requests the same page, it includes the following request headers, which are used to validate the cache based on the Last-Modified time or the Etag:
If-Modified-Since: Wed, 30 May 2007 01:01:53 GMT
If-None-Match: "655194-9f2f-465ccd01"
In the preceding example, these headers tell the server that if the page has been modified since May 30, 2007 at 1:01:53 GMT, or if the Etag as generated by the server does not match the Etag sent in the If-None-Match header, then a new instance of the page should be sent. Otherwise, it returns a header with the following message:
HTTP/1.x 304 Not Modified
ETags (or entity tags) were introduced in the HTTP 1.1, and they are used in cache management. They are a unique value (or hash) normally created using a file's inode, size, and last modified time. They can be customized using the FileEtag directive (see the Apache HTTPD documentation for more information); and in MediaWiki, the MediaWiki application creates the Etag, using its own formula.
When $wgCachePages is set to True, ETags are used in non-dynamically generated pages, which allows the client to cache those files. If the $wgUseETag variable is set to True in LocalSettings.php, then an ETag is used on dynamically generated pages, too.
In the following request/response example, MediaWiki has been configured to cache files, but has not been configured to use ETags. This is a request for a static file, called SampleImageUpload.png:
GET /mysql/images/b/b5/SampleImageUpload.png HTTP/1.1
Host: 127.0.0.1
User-Agent: Mozilla/5.0 (Macintosh; U; Intel Mac OS X; en-US; rv:1.8.1.6)
   Gecko/20070725 Firefox/2.0.0.6
Accept: image/png,*/*;q=0.5
Accept-Language: en-us,en;q=0.5
Accept-Encoding: gzip,deflate
Accept-Charset: ISO-8859-1,utf-8;q=0.7,*;q=0.7
Keep-Alive: 300
Connection: keep-alive
Referer: http://127.0.0.1/mysql/index.php/Image_links
Despite the fact that MediaWiki has not been configured to use ETags, the response returns an ETag. That's because ETags are generated and sent automatically for static pages. At the most basic level, a file is cached by a browser as long as the Last-Modified value does not change. When this page is requested again, the browser will send an If-Modified-Since request header to the server. If the file has been modified since the modification in the cache, then a new file will be sent:
HTTP/1.x 200 OK
Date: Wed, 22 Aug 2007 23:10:01 GMT
Server: Apache/1.3.33 (Darwin) PHP/5.2.0
Last-Modified: Wed, 30 May 2007 01:01:53 GMT
Etag: "655194-9f2f-465ccd01"
Accept-Ranges: bytes
Content-Length: 40751
Keep-Alive: timeout=15, max=98
Connection: Keep-Alive
Content-Type: image/png
In this example, MediaWiki has been configured to cache pages, as well as to use ETags. Because ETags are automatic on static files, our expectation is that ETags will not be used on dynamic pages, such as articles, as well. This is a new page that the browser has not visited before, so the request headers are standard:
http://127.0.0.1/mysql/index.php/A_new_page

GET /mysql/index.php/A_new_page HTTP/1.1
Host: 127.0.0.1
User-Agent: Mozilla/5.0 (Macintosh; U; Intel Mac OS X; en-US; rv:1.8.1.6)
   Gecko/20070725 Firefox/2.0.0.6
Accept: text/xml,application/xml,application/xhtml+xml,text/html;q=0.9,text/
   plain;q=0.8,image/png,*/*;q=0.5
Accept-Language: en-us,en;q=0.5
Accept-Encoding: gzip,deflate
Accept-Charset: ISO-8859-1,utf-8;q=0.7,*;q=0.7
Keep-Alive: 300
Connection: keep-alive
Referer: http://127.0.0.1/mysql/index.php/Main_Page
When the response headers are returned, however, you see several new header tags, including Etag, Expires, Cache-Control, in addition to the familiar Last-Modified:
HTTP/1.x 200 OK
Date: Wed, 22 Aug 2007 23:11:44 GMT
Server: Apache/1.3.33 (Darwin) PHP/5.2.0
X-Powered-By: PHP/5.2.0
Content-Language: en
Etag: W/"wikidb-profwiki_:pcache:idhash:28-0!1!0!!en!2--20070604224328"
Vary: Accept-Encoding,Cookie
Expires: Thu, 01 Jan 1970 00:00:00 GMT
Cache-Control: private, must-revalidate, max-age=0
Last-Modified: Wed, 22 Aug 2007 23:11:18 GMT
Keep-Alive: timeout=15, max=98
Connection: Keep-Alive
Transfer-Encoding: chunked
Content-Type: text/html; charset=UTF-8
The two items we are most concerned with now are the Etag and Cache-Control response headers. Earlier, this section mentioned the Last-Modified and If-Modified-Since headers. These are examples of validators. When HTTP 1.1 was released, it contained a specification for a new kind of validator called an ETag, which is what we see in this example:
Etag: W/"wikidb-profwiki_:pcache:idhash:28-0!1!0!!en!2--20070604224328"
Cache-Control: private, must-revalidate, max-age=0
It works like this: When the browser requests a file, it is sent back with an ETag, which is stored in the cache along with the file. The Cache-Control header says must-revalidate, which means that it must check the ETag stored in the cache with the new ETag that is sent. If they are the same, then the file hasn't changed and the complete file is transferred. If it has not changed, then HTTP returns with a "304 Not Modified" response.
In the following example, the same page is requested again. The page has already been requested once, so it is in the browser cache. Because caching has been enabled, the If-Modified-Since header, plus a new one, If-None-Match, which you can see in the following example, references the ETag of the file that was just received:
GET /mysql/index.php/A_new_page HTTP/1.1
Host: 127.0.0.1
User-Agent: Mozilla/5.0 (Macintosh; U; Intel Mac OS X; en-US; rv:1.8.1.6)
   Gecko/20070725 Firefox/2.0.0.6
Accept: text/xml,application/xml,application/xhtml+xml,text/html;q=0.9,text/
   plain;q=0.8,image/png,*/*;q=0.5
Accept-Language: en-us,en;q=0.5
Accept-Encoding: gzip,deflate
Accept-Charset: ISO-8859-1,utf-8;q=0.7,*;q=0.7
Keep-Alive: 300
Connection: keep-alive
Referer: http://127.0.0.1/mysql/index.php/Main_Page
If-Modified-Since: Wed, 22 Aug 2007 23:11:18 GMT
If-None-Match: W/"wikidb-profwiki_:pcache:idhash:28-0!1!0!!en!2--20070604224328"
Cache-Control: max-age=0
Compare the If-None-Match value in the request header with the Etag value in the previous response header—they are both the same. This means the file hasn't changed, so the HTTP server dutifully sends back the appropriate HTTP response:
HTTP/1.x 304 Not Modified
Date: Wed, 22 Aug 2007 23:12:52 GMT
Server: Apache/1.3.33 (Darwin) PHP/5.2.0
Connection: Keep-Alive
Keep-Alive: timeout=15, max=93
Etag: W/"wikidb-profwiki_:pcache:idhash:28-0!1!0!!en!2--20070604224328"
Expires: Thu, 01 Jan 1970 00:00:00 GMT
Cache-Control: private, must-revalidate, max-age=0
Vary: Accept-Encoding, Cookie
The file cache is used only for non-logged in users. It works by caching the contents of the HTML file that MediaWiki produces in response to a request. In order for it to work, you must set the $wgUseFileCache variable to true in LocalSettings.php, and set the $wgShowIPinHeader variable to false. Setting the $wgFileCacheDirectory setting is optional; if it is not set, then MediaWiki will use the default value of {$wgUploadDirectory}/cache. When you do configure the cache directory yourself, you must include a full path to the directory, and you must ensure that the directory is writeable by the Web server:
$wgUseFileCache = true;
$wgFileCacheDirectory = "/tmp/yourcache";
// Setting $wgShowIPinHeader to false removes the
// personal tool links at the top of the page for
// anonymous users, who are identified by their
// IP address. This improves caching by showing
// all anonymous users the same page.
$wgShowIPinHeader = false;
You can also configure MediaWiki to compress the cached files in order to save bandwidth when they are requested. If you do this, you need to disable the ob_gzhandler in LocalSettings.php, like so:
if ( $wgCommandLineMode ) {
 if ( isset( $_SERVER ) && array_key_exists( 'REQUEST_METHOD', $_SERVER ) ) {
         die( "This script must be run from the command line
" );
}
} elseif ( empty( $wgNoOutputBuffer ) ) {
 ## I have commented out the following line to disable it
 #if( !ini_get( 'zlib.output_compression' ) ) @ob_start( 'ob_gzhandler' );
}
$wgUseGzip = false;
More information about the file cache can be found at http://meta.wikimedia.org/wiki/Help:File_cache.
Memcached is a distributed object store that you can run on any number of servers. The primary benefit of being distributed is that it is highly scalable. If you need more caching, just add another memcached server. You do incur some additional overhead because the cached data is retrieved through a TCP/IP connection, but the benefit of having multiple servers, and the ability to share things such as session data across servers, more than makes up for this deficit.
MediaWiki comes with a Memcached client. It is the Memcached client that saves objects into the store and retrieves them using a unique key. Internally, the client knows which of the available memcached servers a given object is stored in, so it can request it directly.
Memcached allows you to run multiple servers. Because the Memcached client manages the delegation of keys, it knows on which of the available Memcached servers a given object is stored. This makes it possible to cache session data across multiple Web servers, something that is not possible with APC and similar tools.
You can install Memcached by going to www.danga.com/memcached/download.bml, or through fink (Macintosh) or yum (Linux). A Windows port of Memcached is available at http://jehiah.cz/projects/memcached-win32/, which is linked to from the danga.com website. I have not used this port, however, and cannot speak to how well it works with MediaWiki.
If you are going to compile Memcached, you need to make sure that PHP is compiled with --enable-sockets, and that you have a current copy of the libevent library (www.monkey.org/provos/libevent/). Linux users may also want the epoll-rt patch for the Linux kernel, available from www.xmailserver.org/linux-patches/nio-improve.html.
You must tell MediaWiki what to cache, as well as how to cache it. All of this is configured in LocalSettings.php:
/**
 * Object cache settings
 * See Defines.php for types
 */
$wgMainCacheType = CACHE_NONE;
$wgMessageCacheType = CACHE_ANYTHING;
$wgParserCacheType = CACHE_ANYTHING;
The cache types, defined in Defines.php, are as follows:
/**#@+
 * Cache type
 */
define( 'CACHE_ANYTHING', −1 );  // Use anything, as long as it works
define( 'CACHE_NONE', 0 );       // Do not cache
define( 'CACHE_DB', 1 );         // Store cache objects in the DB
define( 'CACHE_MEMCACHED', 2 );  // MemCached, must specify servers in
                                 // $wgMemCacheServers
define( 'CACHE_ACCEL', 3 );      // APC, eAccelerator or Turck, whichever is
                                 //available
define( 'CACHE_DBA', 4 );        // Use PHP's DBA extension to store in a DBM-style
                                 //database
/**#@-*/
You will see a reference to $wgUseMemCached in DefaultSettings.php, but this has been deprecated, and you should use $wgMainCacheType instead:
$wgMainCacheType = CACHE_MEMCACHED;
The following are additional configuration items for Memcached:
$wgParserCacheExpireTime = 86400;
$wgSessionsInMemcached = false;
$wgLinkCacheMemcached = false; # Not fully tested

/**
 * Memcached-specific settings
 * See docs/memcached.txt
 */
$wgMemCachedDebug   = false; # Will be set to false in Setup.php,
  if the server isn't working
$wgMemCachedServers = array( '127.0.0.1:11000' );
$wgMemCachedPersistent = false;
Because memcached runs as a different process from your Web server, it's possible for the Memcached server to go down while your Apache/PHP server is still running. You wiki will not crash if this happens, but it will slow down considerably, even slower than it was before caching any data.
There are two ways to identify servers. The first simply lists the IP address and the port on which Memcached will be listening:
$wgMemCachedServers = array( "127.0.0.1:11000" );
The second way passes an array with two items, the IP/port plus a number identifying how much memory to allocate for the server. These two different formats can be combined when configuring memcached in LocalSettings.php, as in the following example (from memcached.txt in the MediaWiki distribution):
$wgMemCachedServers = array(
    "127.0.0.1:11000", # one gig on this box
    array("192.168.0.1:11000", 2 ) # two gigs on the other box
  );
Memcached is launched from the command line. In the following example, Memcached is launched in daemon mode, using the IP 127.0.0.1, with the port 11000 and 64 MB of memory allocated to the cache:
memcached -d -l 127.0.0.1 -p 11000 -m 64
The most commonly used options are listed in the following table.
In addition to these, there are other, more obscure optimizations that can be made. For details, check the man page for Memcached.
Memcached stores objects in hash tables, so each object is assigned a unique key. The Memcached client generates the keys and uses the keys to determine the server on which the object is stored. It is helpful to know how the client generates the key in case you want to look it up in Memcached. MediaWiki creates the following caches when using Memcached:
User Cache: The user cache stores an instance of the class
User, which includes session data.key:
$wgDBname:user:id:$sId
Newtalk: This caches data that identifies a talk page as "new."
key:
$wgDBname:newtalk:ip:$ip
LinkCache: Recall that articles are created in MediaWiki by creating a link to the article. If the article does not yet exist, when you follow the link you are taken to the edit page so that you can create it. A link to a page that does not exist looks different than a link to a page that does exist. Depending on the configuration, purple links link to existing pages and red links link to pages that have not been created. The
LinkCacheclass keeps track of article titles, and whether the articles exist yet, which is used to create the right kind of link when wikitext is being parsed.key:
$wgDBname:lc:title:$title
MediaWiki namespace: The MediaWiki namespace is used for storing system messages so that they can be appropriately localized. If Memcached is configured to cache messages, then this key is used.
key:
$wgDBname:messages
Watchlist: Caches the user's watchlist
key:
$wgDBname:watchlist:id:$userID
IP blocks: IP blocks are lists of IP addresses that have been blocked from accessing the wiki. Looking up IP addresses individually would use too many resources, so they can be cached.
key:
$wgDBname:ipblocks
Like Memcached, Alternative PHP Cache (APC) caches PHP objects in memory. The primary distinction is that Memcached is a distributed object store, whereas APC is local to the machine. This means that if you are running a single-server wiki, then APC is probably your best choice. In that context, APC outperforms Memcached because you make Memcached requests through TCP/IP, which is naturally slower than accessing the APC cache.
MediaWiki also supports eAccelerator and Turck MMCache, but this chapter does not cover them in detail. While Turck MMCache is still in use, the open-source project itself is no longer actively maintained. eAccelerator is based on Turck MMCache and is still an actively maintained project, but recent versions have had problems working with PHP. eAccelerator version 0.9.4 doesn't work with PHP 5.1. Version 0.9.5 does work with 5.1, but requires a patch to work with PHP 5.2 in order to avoid a segmentation fault. By all reports, version 0.9.5.1 appears to work fine. Because eAccelerator is finicky about which versions of PHP it runs on, this discussion focuses on Alternative PHP Cache. Not only is it actively maintained, but it works with a variety of versions of PHP so there does not seem to be a compelling reason not to use APC.
More information on the other alternatives can be found here:
http://eaccelerator.net/http://turck-mmcache.sourceforge.net/index_old.html
APC is most easily installed using PECL:
$ pecl install AP
Windows users can download PECL binaries at www.php.net/downloads.php.
APC is a PHP extension, so the PHP.ini file needs to be configured properly before MediaWiki can use it. First, you should ensure that the extension path in PHP.ini is correct, and that APC has been installed in the extension directory, which is determined by PHP.ini:
;;;;;;;;;;;;;;;;;;;;;;;;;
; Paths and Directories ;
;;;;;;;;;;;;;;;;;;;;;;;;;


; Directory in which the loadable extensions (modules) reside.
extension_dir = "/usr/local/php5/lib/php/extensions/no-debug-non-zts-20060613/"
Once the extensions directory is verified, you need to add the apc.so extension (or apc.dl if you are a Windows user) to PHP.ini, as shown in the following example:
;;;;;;;;;;;;;;;;;;;;;;
; Dynamic Extensions ;
;;;;;;;;;;;;;;;;;;;;;;
;
; If you wish to have an extension loaded automatically, use the following
; syntax:
;
;   extension=modulename.extension
;
; For example, on Windows:
;
;   extension=msql.dll
;
; ... or under UNIX:
;
;   extension=msql.so
;
; Note that it should be the name of the module only; no directory information
; needs to go here.  Specify the location of the extension with the
; extension_dir directive above.

extension=apc.so
The following items need to be configured in LocalSettings.php. The CACHE_ACCEL global tells MediaWiki to use either APC, eAccelerator, or MMTurck Cache, depending on which cache is installed in PHP:
$wgMainCacheType = CACHE_ACCEL;
$wgMessageCacheType = CACHE_ ACCEL;
$wgParserCacheType = CACHE_ACCEL G;
The following value is set in terms of seconds, and determines how long the parsed output should be cached:
$wgParserCacheExpireTime = 86400;
When you downloaded APC, the distribution should have included a file called apc.php. Copy this file into the main directory of your MediaWiki installation and configure it. At the very least, you need to assign a new admin password—as long as it is "password," the apc.php script will not return any information. The other configuration options are, as they should be, optional:
////////// BEGIN OF DEFAULT CONFIG AREA //////////////////////////////////////
   /////////////////////

defaults('USE_AUTHENTICATION',1);// Use (internal) authentication - best choice if
                                // no other authentication is available
                                // If set to 0:
                                //  There will be no further authentication. You
                                //  will have to handle this by yourself!
                                // If set to 1:
                                //  You need to change ADMIN_PASSWORD to make
                                //  this work!
defaults('ADMIN_USERNAME','apc'); // Admin Username
defaults('ADMIN_PASSWORD','password'); // Admin Password - CHANGE THIS TO ENABLE!!!
//defaults('DATE_FORMAT', "d.m.Y H:i:s");      // German
defaults('DATE_FORMAT', 'Y/m/d H:i:s');        // US

defaults('GRAPH_SIZE',200);    // Image size
Save the changes you made, and then you can use apc.php to monitor caching (see Figure 11-1). This particular configuration is fine for testing, but you should probably not have this file exposed on a production server.

In addition to caching, there are several things wiki administrators can do to improve the overall performance of their wikis.
Message files are located in the Languages folder of your MediaWiki distribution. According to the MediaWiki developers, they decided that it is faster to load serialized message files from the file system than it is to load it from APC or Memcached. Therefore, they've provided a way to serialize all the message files in the serialized folder.
In order to do this, you need to have GNU make installed. Simply change directories into the serialized folder and type the following at the command line:
make
After running this on OS X, the serialized directory took up 19.8 MB of space.
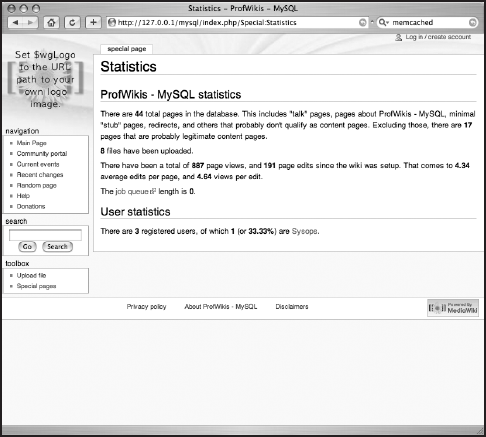
If true, $wgMiserMode disables database-intensive features. This includes reading special pages marked as expensive from the cache instead of regenerating them every time they are requested:
/** Disable database-intensive features */
$wgMiserMode = false;
$wgAllowSlowParserFunctions = false;
Figures 11-2 and 11-3 show the Special:Statistics page when marked as false and true, respectively.

One source of strain on any Web server is spiders. Spiders are software applications that crawl a site in order to make copies of the content on the site, or to index it for a search engine. In many cases you will be more than happy to have your site crawled, but there are also many spiders that you want to block as well.
The Robots Exclusion Standard (usually just referred to as robots.txt, in reference to the file that contains the exclusion rules) is supposed to provide Web servers a way to communicate with spiders and indicate to them what you want indexed. For a site run by MediaWiki, it is likely that you do want article pages indexed, but you may not want special pages indexed, or talk pages, and so on.
A good place to look for ideas and suggestions about what you want to do is http://meta.wikimedia.org/robots.txt.
The following excerpt of Wikimedia's robots.txt file shows you how to configure your server appropriately. Spiders are identified by their user-agent, which is information that is passed to the server from the HTTP request. The value for the user-agent is easily spoofed, so you cannot rely on it entirely. However, although there are some well-known spiders that you may not want indexing your site, you can generally rely on the user-agent identity reported.
The robots.txt file used by MediaWiki excludes some spiders because they are related to advertising, or because they otherwise misbehave and put too much a strain on the servers. In the next example, you will see how the robots.txt file excludes all spiders from user-agents that start with "Mediapartners-Google*":
# robots.txt for http://www.wikipedia.org/ and friends
#
# Please note: There are a lot of pages on this site, and there are
# some misbehaved spiders out there that go _way_ too fast. If you're
# irresponsible, your access to the site may be blocked.
#
# advertising-related bots:
User-agent: Mediapartners-Google*
Disallow: /


#
# Sorry, wget in its recursive mode is a frequent problem.
# Please read the man page and use it properly; there is a
# --wait option you can use to set the delay between hits,
# for instance.
#
User-agent: wget
Disallow: /


# Don't allow the wayback-maschine to index user-pages
#User-agent: ia_archiver
#Disallow: /wiki/User
#Disallow: /wiki/Benutzer
Wikipedia administrators have also decided to keep all spiders from indexing dynamically generated pages. While this isn't necessarily always the best thing to do, the logic is that because they are dynamically generated, the spiders' results will not always be accurate. Add to that the fact that dynamically generated pages are more expensive to produce in terms of server performance. Therefore, they concluded they would keep them from being indexed.
# Friendly, low-speed bots are welcome viewing article pages, but not
# dynamically-generated pages please.
#
# Inktomi's "Slurp" can read a minimum delay between hits; if your
# bot supports such a thing using the 'Crawl-delay' or another
# instruction, please let us know.
#
User-agent: *
Disallow: /w/
Disallow: /trap/
Disallow: /wiki/Special:Random
Disallow: /wiki/Special%3ARandom
Disallow: /wiki/Special:Search
Disallow: /wiki/Special%3ASearch
Disallow: /wiki/Spesial:Search
#ar
Disallow: /wiki/%D8%AE%D8%A7%D8%B5:Search
Disallow: /wiki/%D8%AE%D8%A7%D8%B5%3ASearch
## <snip>
## *at least* 1 second please. preferably more :D
## we're disabling this experimentally 11-09-2006
#Crawl-delay: 1
In addition to the robots.txt file, instructions for spiders can also be embedded in the metadata of a file. The following meta tag tells the spider not to index the file:
<meta name="robots" content="noindex">
If you want the file to be indexed, then use the following:
<meta name="robots" content="index">
In addition to indexing, you can tell the spider whether to follow links on the page, and attempt to spider those pages as well. (This is what crawling a site is: starting with one page, gathering all the links on that page, and then retrieving all the links on each of the pages linked to, and so on.) The content attribute in that case would be set to either follow or not follow. The index and follow values can also be combined, as shown here:
<meta name="robots" content="index,follow">
<meta name="robots" content="noindex,follow">
<meta name="robots" content="index,nofollow">
<meta name="robots" content="noindex,nofollow">
Finally, you can use two shortcuts that enable you to either both index and follow all links, or not index and follow links:
<meta name="robots" content="all">
<meta name="robots" content="none">
In order to generate these meta tags on MediaWiki pages, you need to configure MediaWiki to do so. You can tell MediaWiki which articles to index or not index by setting the $wgArticleRobotPolicies with an array of article titles, as shown in the following example:
$wgArticleRobotPolicies = array( 'Main Page' => 'noindex' );
You can also configure the indexing policy based on namespace. The following example causes a 'noindex' meta tag to be placed on all pages in the NS_TALK namespace:
$wgNamespaceRobotPolicies = array( NS_TALK => 'noindex' );
Setting the following variable in LocalSettings.php causes all external links in wikitext to be given the rel = "nofollow" attribute, which serves the same purpose as the metatags just described:
/**
 * If true, external URL links in wiki text will be given the
 * rel="nofollow" attribute as a hint to search engines that
 * they should not be followed for ranking purposes as they
 * are user-supplied and thus subject to spamming.
 */
$wgNoFollowLinks = true;
Setting this variable defines the namespaces that do not apply to the $wgNoFollowLinks variable:
/**
 * Namespaces in which $wgNoFollowLinks doesn't apply.
 * See Language.php for a list of namespaces.
 */
$wgNoFollowNsExceptions = array();
Google sitemaps also provide information to the spider, telling it which pages to index. However, rather than being an exclusionary approach like robots.txt, it is an inclusionary approach. This means that the default answer is no; and unless a page is on the sitemap, it won't be spidered. Since Google first started using sitemaps, Yahoo! and Microsoft have signed on, and it is becoming something of a standard. You can read details about it at http://sitemaps.org/.
The maintenance script is called generateSitemap.php and when executed, produces the following output:
0 ()
        sitemap-wikidb-profwiki_-NS_0-0.xml.gz
1 (Talk)
        sitemap-wikidb-profwiki_-NS_1-0.xml.gz
6 (Image)
        sitemap-wikidb-profwiki_-NS_6-0.xml.gz
10 (Template)
        sitemap-wikidb-profwiki_-NS_10-0.xml.gz
14 (Category)
        sitemap-wikidb-profwiki_-NS_14-0.xml.gz
The output of generateSitemap.php is six files. One of the files is a sitemap index file that lists all the other files. It's named sitemap-index-{database-name}.xml, where database-name is the name of your wiki's database:
<?xml version="1.0" encoding="UTF-8"?>
<sitemapindex xmlns="http://www.google.com/schemas/sitemap/0.84">
 <sitemap>
         <loc>sitemap-wikidb-profwiki_-NS_0-0.xml.gz</loc>
         <lastmod>2007-08-22T20:10:21Z</lastmod>
 </sitemap>
 <sitemap>
         <loc>sitemap-wikidb-profwiki_-NS_1-0.xml.gz</loc>
         <lastmod>2007-08-22T20:10:21Z</lastmod>
 </sitemap>
 <sitemap>
         <loc>sitemap-wikidb-profwiki_-NS_6-0.xml.gz</loc>
         <lastmod>2007-08-22T20:10:21Z</lastmod>
 </sitemap>
 <sitemap>
         <loc>sitemap-wikidb-profwiki_-NS_10-0.xml.gz</loc>
         <lastmod>2007-08-22T20:10:21Z</lastmod>
 </sitemap>
 <sitemap>
         <loc>sitemap-wikidb-profwiki_-NS_14-0.xml.gz</loc>
         <lastmod>2007-08-22T20:10:21Z</lastmod>
 </sitemap>
</sitemapindex>
The remaining files are gzipped by default. The following is an excerpt from one of the files that shows the basic format of the output. One thing you should notice is that it uses localhost for the host, which is not what we want:
<?xml version="1.0" encoding="UTF-8"?>
<urlset xmlns="http://www.google.com/schemas/sitemap/0.84">
 <url>
         <loc>http://localhost/mysql/index.php/ASamplePage</loc>
         <lastmod>2007-07-12T19:30:33Z</lastmod>
         <priority>1.0</priority>
 </url>
 <url>
         <loc>http://localhost/mysql/index.php/A_new_page</loc>
         <lastmod>2007-06-04T22:43:28Z</lastmod>
         <priority>1.0</priority>
 </url>
</urlset>
Because this script is run on the command line, it has no way of knowing what the proper host name will be for spiders trying to access the wiki from elsewhere. To correct this, specify the host on the command line like so:
php generateSitemap.php choate.info
This will generate the following output:
?xml version="1.0" encoding="UTF-8"?>
<urlset xmlns="http://www.google.com/schemas/sitemap/0.84">
 <url>
         <loc>http://choate.info/mysql/index.php/ASamplePage</loc>
         <lastmod>2007-07-12T19:30:33Z</lastmod>
         <priority>1.0</priority>
 </url>
 <url>
         <loc>http://choate.info/mysql/index.php/A_new_page</loc>
         <lastmod>2007-06-04T22:43:28Z</lastmod>
         <priority>1.0</priority>
 </url>
</urlset>
For information about what options are available, enter the following command:
php generateSitemap.php --help
The output is as follows:
Usage: php generateSitemap.php [host] [options]
        host = hostname
        options:
                --help  show this message
                --fspath        The file system path to save to, e.g /tmp/sitemap/
                --path  The http path to use, e.g. /wiki
                --compress=[yes|no]     compress the sitemap files, default yes
The --fspath option specifies the directory in which the output should be saved. If it is not specified, then it defaults to the current directory.
The --path option specifies that path portion of the URL (the part after the domain, such as /wiki). In most cases, it can figure this out itself.
If --compress=yes, then the output will be compressed in gzip format (which also happens to be the default).
The sitemap files should be placed in the root directory of MediaWiki in order to be indexed. You can tell spiders where to find the sitemap by including it in robots.txt:
Sitemap: sitemap.xml
You can also submit the sitemap file directly to the individual search engines.
MediaWiki comes with a long list of maintenance scripts in the maintenance directory of the MediaWiki installation. Most of them are PHP scripts that are run from the command line. There are far too many to review all of them here, but there is one set of scripts that is important to cover: dumpBackup.php and importDump.php, both of which can be used to make backups of your wiki.
You should first configure AdminSettings.php before running any maintenance scripts. It can be found in the base directory of your MediaWiki installation.
<?php
/**
 * This file should be copied to AdminSettings.php, and modified
 * to reflect local settings. It is required for the maintenance
 * scripts which run on the command line, as an extra security
 * measure to allow using a separate user account with higher
 * privileges to do maintenance work.
 *
 * Developers: Do not check AdminSettings.php into Subversion
 *
 * @package MediaWiki
 */

/*
 * This data is used by all database maintenance scripts
 * (see directory maintenance/). The SQL user MUST BE
 * MANUALLY CREATED or set to an existing user with
 * necessary permissions.
 *
 * This is not to be confused with sysop accounts for the
 * wiki.
 */
$wgDBadminuser      = 'wikiadmin';
$wgDBadminpassword  = 'adminpass';
/*
 * Whether to enable the profileinfo.php script.
 */
$wgEnableProfileInfo = false;

?>
While you can perform backups of data in MySQL or Postgres, just as you would any other database, MediaWiki also provides an XML dump of the data in the database, which has the advantage of not containing any kind of user passwords or other sensitive data that a database dump would have. It also can be used to import into future versions of MediaWiki. While the database tables may change, the MediaWiki developers intend to support the XML format into the future.
The schema for the XML format can be found at www.mediawiki.org/xml/export-0.3.xsd, and this is the same format used by the Special:Export and Special:Import pages.
The dumpBackup.php script takes the following options:
This script dumps the wiki page database into an XML interchange wrapper
format for export or backup.

XML output is sent to stdout; progress reports are sent to stderr.
Usage: php dumpBackup.php <action> [<options>]
Actions:
  --full      Dump complete history of every page.
  --current   Includes only the latest revision of each page.
Options:
  --quiet     Don't dump status reports to stderr.
  --report=n  Report position and speed after every n pages processed.
              (Default: 100)
  --server=h  Force reading from MySQL server h
  --start=n   Start from page_id n
  --end=n     Stop before page_id n (exclusive)
  --skip-header Don't output the <mediawiki> header
  --skip-footer Don't output the </mediawiki> footer
  --stub      Don't perform old_text lookups; for 2-pass dump

Fancy stuff:
  --plugin=<class>[:<file>]   Load a dump plugin class
  --output=<type>:<file>      Begin a filtered output stream;
                              <type>s: file, gzip, bzip2, 7zip
  --filter=<type>[:<options>] Add a filter on an output branch
To get a full dump of the data, enter the following command (on Unix-like systems). The data is sent to standard output, so you can redirect standard output into a file test-xml-dump.xml:
php ./dumpBackup.php --full > test-xml-dump.xml
The root element in the XML document is <mediawiki>:
<mediawiki xmlns="http://www.mediawiki.org/xml/export-0.3/"
   xmlns:xsi="http://www.w3.org/2001/XMLSchema-instance"
   xsi:schemaLocation="http://www.mediawiki.org/xml/export-0.3/
   http://www.mediawiki.org/xml/export-0.3.xsd" version="0.3" xml:lang="en">
<!-- Body goes here-->
</mediawiki>
The rest of the XML output is divided into two sections. The first section, which is wrapped in the <siteinfo> tag, contains basic information about the site, including the list of namespaces:
<siteinfo>
    <sitename>ProfWikis - MySQL</sitename>
    <base>http://localhost/mysql/index.php/Main_Page</base>
    <generator>MediaWiki 1.9.3</generator>
    <case>first-letter</case>
      <namespaces>
      <namespace key="-2">Media</namespace>
      <namespace key="-1">Special</namespace>
      <namespace key="0" />
      <namespace key="1">Talk</namespace>
      <namespace key="2">User</namespace>
      <namespace key="3">User talk</namespace>
      <namespace key="4">ProfWikis - MySQL</namespace>
<namespace key="5">ProfWikis - MySQL talk</namespace>
<namespace key="6">Image</namespace>
<namespace key="7">Image talk</namespace>
<namespace key="8">MediaWiki</namespace>
<namespace key="9">MediaWiki talk</namespace>
<namespace key="10">Template</namespace>
<namespace key="11">Template talk</namespace>
<namespace key="12">Help</namespace>
<namespace key="13">Help talk</namespace>
<namespace key="14">Category</namespace>
<namespace key="15">Category talk</namespace>
</namespaces>
</siteinfo>The rest of the document is a series of <page> tags. Each <page> tag contains all the revisions of that page if the --full option was used, or only the most recent revision if --current was used. The following sample shows output for a page with two revisions:
<page>
<title>Main Page</title>
<id>1</id>
<restrictions>edit=autoconfirmed:move=autoconfirmed</restrictions>
<revision>
<id>1</id>
<timestamp>2007-04-10T14:37:02Z</timestamp>
<contributor>
<ip>MediaWiki default</ip>
</contributor>
<text xml:space="preserve"><big>'''MediaWiki has been
successfully installed.'''</big>
Consult the [http://meta.wikimedia.org/wiki/Help:Contents User's Guide] for
information on using the wiki software.
</text>
</revision>
<revision>
<id>2</id>
<timestamp>2007-04-10T14:39:17Z</timestamp>
<contributor>
<ip>192.168.1.10</ip>
</contributor>
<comment>/* Getting started */</comment>
<text xml:space="preserve"><big>'''MediaWiki has been
successfully installed.'''</big>
Consult the [http://meta.wikimedia.org/wiki/Help:Contents User's Guide] for
information on using the wiki software.
Welcome to my new wiki, for my book [[Professional Wikis]].</text>
</revision>
</page>Files in this XML format can be imported using the importDump.php script in the maintenance directory. The best way to run it is to test it with the --dry-run option, as shown in the following example:
./importDump.php --dry-run test-xml-dump.xml
This will tell you whether there are any problems importing the data, but it won't actually import the data. Once you are sure you want to import it, you execute the script without the --dry-run option:
./importDump.php test-xml-dump.xml
In this chapter, you learned how to manage MediaWiki's caching features, as well as a few other techniques for optimizing your wiki's performance. In addition, you learned how to back up and restore your wiki. You have now learned how to install MediaWiki, edit pages in wikitext, and create your own MediaWiki extensions.
MediaWiki is a thriving, open-source project and, as a consequence, it is always evolving. What is most exciting about open-source software development is that the developers who use the project also have a say in the future of the project. If this book has whetted your appetite enough, then you can use your new skills to participate in the ongoing evolution of MediaWiki. If so, you can read about how to participate as a developer at www.mediawiki.org/wiki/How_to_become_a_MediaWiki_hacker.