
In order to run MediaWiki, you need a Web server, support for PHP, and a database, either MySQL or Postgres. The simplest way to install MediaWiki is to install it on a computer running Linux or a Unix-like operating system, with the Apache Web server and mod_php installed. The PHP installation should be version 5.0 or later (don't use 5.1 with 64-bit computers, as there are reportedly some bugs), and the database should be either MySQL 4.0 or later, or Postgres 8.0 or later. This is the basic configuration that Wikipedia's servers run and the configuration on which the developers of MediaWiki focus their efforts. It is also possible, although a little more difficult, to install and run MediaWiki on Windows servers.
Apache is not the only Web server you can use, but it is the best of the options, for a few reasons. First, because of the success of Wikipedia, we know that MediaWiki has been installed on a high-traffic website that uses Apache servers, and we know that this configuration works reliably and can scale to accommodate whatever optimistic growth expectations we have about our own wiki endeavors. Second, the Apache/PHP combination is pervasive and readily available. PHP can be loaded as a dynamic shared object (DSO) in Apache, which makes installation and configuration a much simpler task in most cases. While the core PHP libraries are supposed to be threadsafe, not all of the many extensions available for it are, so experts often recommend that you do not run PHP on Web servers that are threaded—this includes Internet Information Server (IIS). If you are running Apache 2, then you need to use the pre-forked version.
In all other cases, the most stable approach is to use FastCGI to run PHP. FastCGI is a speedier alternative to regular old CGI, as it allows CGI applications to stay in memory between requests, something that CGI does not do and that leads to a lot of overhead as the program is reloaded into memory every time it is executed. Note that not all of the features or options available to MediaWiki when running under Apache with mod_php work when running in CGI mode, with or without FastCGI.
All testing for this book was done using MediaWiki 1.9.3. This version is a moving target—the application is actively maintained and is on a schedule of continuous integration with quarterly snapshot releases.
All of the testing was done on a Macintosh MacBook Pro, running Tiger (10.4) version of OS X, Windows Vista, and SuSE Linux 9.2, with MediaWiki installed and running on all three operating systems. Two different configurations are running on OS X: one that uses MySQL 4.1.22 and another that uses PostgreSQL 8.2.3.
The examples used in this book were developed using Eclipse PHP Development Tools, available at www.zend.com/pdt. While other PHP IDEs are available, this one works well for the purposes of this book and provides very powerful debugging tools, which would normally only be available in a commercial IDE.
There are many administrative tasks for which no Web interface is provided by MediaWiki. This means that you will often have to update the underlying SQL tables in order to accomplish what you want. While this can be done from the command line, it is much simpler using a Web-based front end such as phpMyAdmin for MySQL, or phpPgAdmin for Postgres, which is what was used for this book.
This book focuses on getting MediaWiki up and running using the Apache Web server, but if that does not meet your needs, you can find a lot of information online that is worth checking. The MediaWiki wiki (http://MediaWiki.org) is a good starting point, and the mailing list is a good source of information; you can ask specific questions about different installation issues.
If you are running Linux, then you'll have the easiest time of all, and there is a good chance you can install MediaWiki as is. If you are running Macintosh OS X, then you will have to make a few tweaks in order to get it configured properly. If you are running Windows, your best bet is to download a preconfigured package of Apache, PHP, and MySQL.
Once we step through the typical Linux Apache MySQL PHP (LAMP) installation of MediaWiki, we'll review a few installation variants too, such as using Postgres instead of MySQL.
Before getting started, we need to address a few issues. If you are unfamiliar with these concepts, then you should get help from somebody more familiar with Apache, PHP, or MySQL, depending on the source of your confusion. Entire books have been written about each of these software packages individually, and there is not space (or time) available to delve too deeply into them here, so you should have at least a moderate level of experience in all three. If you run into trouble, don't forget to check the MediaWiki mailing lists, as well as look into documentation or books specifically related to Web servers, PHP, and databases.
Do you have root privileges on your server (or administrator privileges on Windows)? If you do not, then you will not be able to install the necessary software. If you do not have the required software already installed, then you will need to get a systems administrator to set things up for you.
Do you have Apache installed? If you do, which version is it? If you have Apache 2 or later, then you need to know which multi-processing module (MPM) is being run. While it may be possible to run MediaWiki with other MPMs, it is advisable to run it only with the pre-fork multi-processing module because of potential threading conflicts between some third-party PHP libraries and threaded Apache modules. If you do not have Apache installed, or it's the wrong module, then read the section "Installing Apache."
If Apache is already installed, do you have access to the Apache configuration file,
httpd.conf? You will if you have root privileges on your server. If not, you may have to rely on.htaccessfiles for some configuration options. You also need to determine whether you have themod_rewriteandmod_aliasmodules enabled, as well asmod_php. If they are not enabled, then you need to enable them. If you do have access tohttpd.conf, then you can check and update the configuration file yourself. You can read about how to do that in the section "Configuring Apache and mod_php." If you do not have access tohttpd.conf, then you need to have a systems administrator update the configuration for you.Is the installed version of PHP 5.0 or later, and is the PHP command-line interface (CLI) installed, as well as the dynamic shared object (DSO) module for Apache? MediaWikiincludes several PHP maintenance scripts that must be run from the command line, which is why the CLI version should be installed. See the section "Installing PHP" in this chapter for instructions on how to install PHP. Again, if you don't have root privileges and cannot install software, you need to find someone to help you.
Is MySQL installed? If so, do you have superuser privileges on MySQL? This means you can create new databases and new users. If you do not have superuser privileges, are you at least able to create your own databases? If you are not able to create your own databases, has a database already been created that you can use? You will need to have privileges to
CREATEtables, and to doSELECT, INSERT, UPDATE, DELETEandLOCKoperations on tables in the database. If you do not have these privileges, then you will not be able to run MySQL; otherwise, read the section "Installing MySQL."
On most Linux distributions, Apache and PHP are already installed. If for some reason you do not have them installed, or you have the wrong versions installed, the simplest way to install them is using the package manager for your distribution, such as yum, which is just about as easy as it gets. Throughout the book, when demonstrating commands that you enter on the shell in Linux or Macintosh OS X, $ represents the shell prompt—you do not need to type in the shell prompt, only the characters that follow it:
$ sudo yum install httpd
You can also download the source code for Apache at http://apache.org. Once downloaded, you must unpack the distribution:
$ tar xvfz httpd-2.2.4.tar.gz
Change directories and open the Apache directory that was created when you unpacked the distribution, and do the usual installation procedure. You will need to log in as root, or use sudo when installing it:
$ ./configure --prefix=/apache2 --enable-module=so --enable-rewrite
$ sudo make
$ sudo make install
Apache can now be started and stopped by typing the following command:
$ /apache2/bin/apachectl start
$ /apache2/bin/apachectl stop
This is only a cursory description of how to install Apache. If you will be running Apache in a production environment, then you need to be aware of numerous security concerns and configuration options, so be sure to take the appropriate precautions and consult with experts or more detailed documentation about Apache.
If you are interested in running a test server and want to get up and running as quickly as possible, you can also download a pre-packaged bundle of Apache, PHP, and MySQL called XAMPP from the Apache Friends website: www.apachefriends.org/en/xampp-linux.html. Other such packages are available, but XAMPP works well because it maintains distributions for Linux, Windows, and Macintosh OS X. They are designed to be used for test environments, so they are not configured for security out of the box. They also tend to have a "kitchen sink" mentality, meaning that every possible Apache module and PHP extension is installed. This is good for getting started and not an issue on a test server, but is probably not ideal on a high-traffic website.
The download instructions are simply and clearly articulated on the website, so there is no need to repeat them here. Once you have downloaded the bundle, you can skip to the "Installing MediaWiki" section.
Macintosh OS X comes with Apache 1.3 installed, which is sufficient for our purposes, but it also has PHP 4.4.4 installed, which will not work with MediaWiki. There are two ways to get the right version of PHP installed. The simplest is to download the PHP distribution maintained by Marc Liyanage at www.entropy.ch/software/macosx/php. He only maintains a distribution for the current version of OS X, which is 10.4. The advantage of using Marc's distribution is that it comes with an installer that configures the default Apache installation to use PHP 5. Follow the download instructions and you will have a working Apache/PHP 5 installation on your Macintosh.
Another alternative for Macintosh OS X is to use Fink, available from http://fink.sourceforge.net. Fink is a package manager for OS X, like yum for Linux. You need to have the Apple developer tools installed in order to use Fink, but they are freely available at the Apple developer website at http://developer.apple.com.
The XAMPP option is available for OS X as well, and it can be downloaded from www.apachefriends.org/en/xampp-macosx.html. The same caveat about Linux applies to OS X—that this is good for a test server, and not a production environment.
You may run into a slight permissions problem when installing it on OS X. The Apache server runs as user nobody, and when first installed, there were permissions errors when accessing the sample PHP files. Once you make the offending files readable by Apache, everything should work fine. Because OS X already has Apache installed, you need to turn off the other Apache, which you can do by turning off Personal Web Sharing in the System Preferences pane.
The simplest route to getting MediaWiki up and running on Windows is to use a pre-packaged installation of Apache, PHP, and MySQL. Several such packages are available, including XAMPP, which was used for this book and is available at www.apachefriends.org/en/xampp.html. Others have had equal success with WAMP, which is available at www.wampserver.com/en/. Note that WAMP only works on Windows, and not on Linux and OS X.
If you are going to use Internet Information Server (IIS), then it is best to use MediaWiki with FastCGI, rather than regular CGI, or ISAPI. PHP is not as stable under ISAPI on IIS because some PHP extensions are not threadsafe, whereas IIS is a threaded server. At the time of this writing, there is a preview release of a FastCGI component for IIS 7.0; it can be downloaded from http://blogs.msdn.com/hsshin/archive/2007/01/17/fastcgi-for-iis.aspx.
The first step is to check whether you have PHP and if so, which version it is. If the path where PHP resides is in your path, you can just enter php –v on the command line to determine which version is running; otherwise, you need to use the full path. The following example will query the default PHP implementation on Macintosh OS X. The results return the version number, followed by the API of this particular implementation of PHP. In this example, the version is 4.4.4 of the command-line interface version:
$ /usr/bin/php -v
PHP 4.4.4 (cli) (built: Nov  1 2006 18:10:56)
Copyright (c) 1997-2006 The PHP Group
Zend Engine v1.3.0, Copyright (c) 1998-2004 Zend Technologies
You need the CLI, but the version number is too low; and after checking the other version you have downloaded, you can see that you are running version 5.2.1 and that it is the cgi-fcgi version, which is the same thing as CLI, except that FastCGI support was enabled when it was compiled:
$ /usr/local/bin/php -v
PHP 5.2.1 (cgi-fcgi) (built: Mar 17 2007 20:28:34)
Copyright (c) 1997-2007 The PHP Group
Zend Engine v2.2.0, Copyright (c) 1998-2007 Zend Technologies
If you are running Linux or Macintosh OS X and you do not want to download a pre-packaged version of PHP, you may want to download and compile it yourself. The pre-packaged installations are frequently packed with a lot of libraries, many of which you do not necessarily need, so in the interests of economy you might compile a slimmer version.
You can download pre-compiled binaries for Windows, and source code for Linux and OS X, at http://php.net.
In order to compile PHP, you need to have GNU make. Go into the source directory and first execute the configure script. At a minimum, you need to enable Apache—in the following example, I am building PHP to be used for Apache 2 with the option -with-apxs2=/apache2/bin/apxs (you will change the path to match your Apache installation).
You also need the GD graphics library installed, which varies according to libJPEG and libPNG. The -with-zlib option enables PHP to compress pages in order to save bandwidth.
Finally, you need to enable multi-byte strings (mbstring) and iconv, which allows you to convert easily between encodings. The following code shows a minimal PHP configuration for use with MediaWiki:
$ sudo ./configure '--prefix=/apache2/php' '--with-mysql=/usr/local/mysql' '--with-
   apxs2=/apache2/bin/apxs' '--with-zlib' '--with-gd' '--with-jpeg-dir=/sw' '--with-
   png-dir=/sw' '--with-iconv-dir' '--enable-mbstring'
Once configured, run make and make install, as described in the Apache installation instructions.
In addition to the required libraries, a handful of optional libraries are of value. One group of options includes libraries or tools to increase PHP performance through different kinds of caching. Several different libraries support opcode caching, which means that your PHP code doesn't have to be recompiled with every request. These libraries are Turk MMcache, eAccelerator, and Alternative PHP Cache (APC). You also have the option of page caching using memcached, which is a distributed object store suitable for high-volume sites. In order to enable this option, you need to have memcached installed; then you can compile PHP with the –enable-sockets option. This chapter does not go into detail about caching, but it is covered in depth in Chapter 11.
Another option is to enable Tidy with the --with-tidy[=/path/to/tidy] option enabled. MediaWiki uses Tidy to fix the sometimes malformed HTML submitted by users when they are editing pages. The code directly generated by MediaWiki is well formed, but there is no way to ensure that users on the site will use wikitext correctly, so tidy is used as the last line of defense.
Once PHP is installed, you need to configure Apache to work with PHP. The following is an example configuration from Apache 1.3 on OS X. These changes need to be made in the httpd.conf configuration file, or in .htaccess:
LoadModule php5_module        /usr/local/php5/libphp5.so

<IfDefine APACHE1>
AddModule mod_php5.c
</IfDefine>

<IfModule mod_php5.c>

    AddType application/x-httpd-php .php
    AddType application/x-httpd-php-source .phps

    <IfModule mod_dir.c>
        DirectoryIndex index.html index.php
    </IfModule>
</IfModule>
When configuring Apache for PHP, make sure that PHP 5 is mapped to the .php extension. On some installations, if you have both PHP 4 and PHP 5 installed, the administrator may have PHP 5 mapped to the extension .php5. Of course, MediaWiki requires PHP 5.x, but all of its files end in .php.
You can download MySQL binaries for Windows, Macintosh OS X, and a variety of Linux implementations directly from the MySQL website at http://dev.mysql.com/downloads/mysql/5.0.html. You can download PHPMyAdmin, the Web front-end for MySQL, at www.phpmyadmin.net.
Of the two database options, MySQL is definitely the more mature implementation. Postgres was only added relatively recently. Some people make their selection based on the different open-source licenses used. MySQL is licensed under the GNU General Public License, and Postgres is licensed under the BSD open-source license. This means that Postgres can be used and distributed in commercial applications. Of course, MediaWiki is GPL'd too, so this may not be a compelling reason to use Postgres in this particular instance.
The general rule of thumb in terms of performance is as follows: On the one hand, MySQL is fast, especially on sites containing a lot of SELECTs and not as many INSERTs and UPDATEs. Postgres, on the other hand, scales better, especially with large transactions and a lot of INSERTs and UPDATEs. If you are not familiar with databases, or you do not have a compelling reason to use Postgres, it's definitely simpler to stick with MySQL in this instance.
The out-of-the-box MediaWiki uses MySQL's full-text indexing for the site search, or it can use Postgres' tsearch2. The actual Wikipedia website uses Apache Lucene for its full-text indexing, so you will notice a difference in the output of search results if you compare Wikipedia's search results with your own.
If you have a superuser account on MySQL, the installation script will handle creating the database and users for you, but in the interest of providing complete information, the steps needed to create the necessary database and user are outlined here.
The first step is to create a database, which by default is named wikidb (but does not need to be), using the following command:
$ mysqladmin -u root -p create wikidb
Next, you need to grant appropriate privileges to wikiuser, the username that MediaWiki uses to access MySQL. In order to do this, log into mysql as root, and then enter the following GRANT statement:
$ mysql -u root
mysql> grant create, select, insert, update, delete, lock tables on wikidb.* to
   'wikiuser'@'localhost' identified by 'password';
flush privileges;
Once the user is created, you can then start the MySQL server. The following command launches MySQL on OS X or Linux (the actual path will vary depending on your installation):
$ /usr/local/mysql/bin/safe_mysqld &.
PostgreSQL does not offer as many options at their site for downloads, but you can download Linux and Windows binaries at www.postgresql.org/download. Fortunately, Marc Liyanage has prepared binaries for Mac 10.4, which can be downloaded at www.entropy.ch/software/macosx/postgresql.
You can download the Web front end to Postgres at http://phppgadmin.sourceforge.net.
In order to use PostgreSQL, you need to have plpsql and tsearch2 installed. Depending on your distribution, it may or may not have it installed. As a consequence, it is probably a good idea to manually create the users and database in Postgres, rather than rely on the automated process. When Postgres is first installed, the superuser is postgres, and it has no password. You are also provided with a number of administrative programs that make it easy to create users and databases.
The first step is to create wikiuser, using the following command:
$ createuser -D -P -E wikiuser
After you enter this line, you will be prompted for the new user's password, two consecutive times. Then you'll be asked whether this user should be allowed to create new users. The answer should be no.
Shall the new user be allowed to create more new users? (y/n) n CREATE USER
Once this is done, you can create the new database and assign ownership of it to wikiuser:
$ createdb -O wikiuser wikidb
In order for Postgres to work with MediaWiki, plpgsql (PL/pgSQL), a procedural language used to write functions, needs to be installed as well. This can be done with the following command, which tells Postgres to enable plpgsql with the wikidb database:
$ createlang plpgsql wikidb
The other addition to Postgres is tsearch2, which enables full-text searching. If you have downloaded the Postgres source code, then you will find the tsearch2 directory inside the pgsql/share/contrib directory.
tsearch2 is actually a SQL program, and you run it against a database that you want to have full-text indexing capability. Postgres has a default table called Template1, which is used as a template to create new databases, so you can install tsearch2 there if you want every database produced by Postgres to use it. For the purposes of this example, install tsearch2 directly into your wikidb database.
In order to do this, access the tsearch2 directory and run the following commands:
$ make
$ make install
After you've run make, you can then apply tsearch2 to the wikidb database that you just created:
$ psql wikidb < tsearch2.sql -U postgres
After you've installed tsearch2.sql, you need to provide the right privileges to wikiuser. To do this, log in to the interactive prompt as the postgres user and issue the following series of grant statements. After the permissions have been granted, you need to update the locale in the pg_ts_cfg table, which defaults to the "C" locale. In order for full-text indexing to work, you need to have the right locale set up:
$ psql wikidb -U postgres
wikidb=# grant select on pg_ts_cfg to wikiuser;
wikidb=# grant select on pg_ts_cfgmap to wikiuser;
wikidb=# grant select on pg_ts_dict to wikiuser;
wikidb=# grant select on pg_ts_parser to wikiuser;
wikidb=# update pg_ts_cfg set locale =
   current_setting('lc_collate') where ts_name = 'default';
Now you have the wikidb database created, you have both plpgsql and tsearch2 installed on wikidb, and you have created the wikiuser user and granted this user the appropriate privileges to interact with the database on behalf of MediaWiki.
You can now turn to the task of actually installing MediaWiki. In most respects, the installation process will be exactly the same whether you are using MySQL or Postgres, with a couple of exceptions, which you will see as you follow along with this example.
You can download the most current official releases from SourceForge, at http://sourceforge.net/projects/wikipedia, or from the wikimedia.org site at http://download.wikimedia.org/mediawiki. Once you have downloaded the source, unpack it using the following command:
$ tar xvzf mediawiki-1.9.3.tar.gz
If you are using Windows, then you need to have software to unpack the code, such as 7-Zip, an opensource application available from SourceForge at http://sourceforge.net/projects/sevenzip that knows how to manage tarred and gzipped files.
Once unpacked, you will find a folder called mediawiki-1.9.3.
If you prefer, you can check out the latest release from the MediaWiki Subversion repository by entering the following command:
$ svn checkout http://svn.wikimedia.org/svnroot/mediawiki/branches/REL1_9/phase3
If you like to live dangerously, then you can check out the developer version here:
$ svn checkout http://svn.wikimedia.org/svnroot/mediawiki/trunk/phase3
Once MediaWiki is unpacked, it needs to be copied into the document root of the Apache Web server. On Macintosh OS X, that would be /Library/WebServer/Documents/; on Windows with XAMPP, it is C:Program FilesXAMPPhtdocs; and on Linux, it can be any number of places, depending on where the Web server has been installed, such as /srv/www/htdocs/.
It is important that you put the MediaWiki folder in the document root folder and change the name from mediawiki-1.9.3 to something simple like w (this is because it will make it easier to configure Apache to support shorter URLs, which are demonstrated later in the chapter). With this done, the path to the MediaWiki installation on OS X would be /Library/WebServer/Documents/w/, and so on.
At this point, it is instructive to look inside the MediaWiki folder to see how the code is organized. Following are the list directories and PHP files inside the mediawiki-1.9.3 directory:
-rw-r--r--     1 mchoate  admin     825 Feb 20 21:20 AdminSettings.sample
-rw-r--r--     1 mchoate  admin     605 Feb 20 21:20 StartProfiler.php
-rw-r--r--     1 mchoate  admin    1316 Feb 20 21:20 api.php
drwxr-xr-x     4 mchoate  admin     136 Feb 20 21:20 bin
drwxrwxrwx     3 mchoate  admin     102 Feb 20 21:20 config
drwxr-xr-x    22 mchoate  admin     748 Feb 20 21:20 docs
drwxr-xr-x     3 mchoate  admin     102 Feb 20 21:20 extensions
drwxr-xr-x     3 mchoate  admin     102 Feb 20 21:20 images
-rw-r--r--     1 mchoate  admin    1978 Feb 20 21:20 img_auth.php
drwxr-xr-x   187 mchoate  admin    6358 Feb 20 21:20 includes
-rw-r--r--     1 mchoate  admin    1756 Feb 20 21:20 index.php
-rw-r--r--     1 mchoate  admin    3899 Feb 20 21:20 install-utils.inc
drwxr-xr-x     8 mchoate  admin     272 Feb 20 21:20 languages
drwxr-xr-x     3 mchoate  admin     102 Feb 20 21:20 locale
drwxr-xr-x   138 mchoate  admin    4692 Feb 20 21:20 maintenance
drwxr-xr-x    23 mchoate  admin     782 Feb 20 21:20 math
-rw-r--r--     1 mchoate  admin    1532 Feb 20 21:20 opensearch_desc.php
-rw-r--r--     1 mchoate  admin    6173 Feb 20 21:20 profileinfo.php
-rw-r--r--     1 mchoate  admin     319 Feb 20 21:20 redirect.php
-rw-r--r--     1 mchoate  admin      91 Feb 20 21:20 redirect.phtml
drwxr-xr-x     7 mchoate  admin     238 Feb 20 21:20 serialized
drwxr-xr-x    22 mchoate  admin     748 Feb 20 21:20 skins
drwxr-xr-x    18 mchoate  admin     612 Feb 20 21:20 tests
-rw-r--r--     1 mchoate  admin    2408 Feb 20 21:20 thumb.php
-rw-r--r--     1 mchoate  admin    1384 Feb 20 21:20 trackback.php
-rw-r--r--     1 mchoate  admin      88 Feb 20 21:20 wiki.phtml
In order to complete the installation, you need to access MediaWiki through your Web browser, but before you can do that you need to make MediaWiki's config directory writeable by the Apache server prior to running the Web-based installation. In this case, you can make the directory world writeable by typing the following:
$ chmod 777 config
In order to load the installation script, you need to make sure your Apache server is running, as well as MySQL (or Postgres). If both are working, then you will see the page shown in Figure 2-1 when you type in the address of http://localhost/w/ (remember that we renamed the MediaWiki directory from mediawiki-1.9.3 to w).

If all goes well when you do this, you will be redirected to http://localhost/w/config/index.php. If something goes wrong, it's probably because you forgot to make the config directory writeable by the Web server. MediaWiki will cordially inform you of your error and ask that you fix it and try again. The reason why config needs to be writeable is that during the installation, a file called LocalSettings.php will be created inside the config directory. Once the installation is complete, you need to copy LocalSettings.php from the config directory into the main MediaWiki directory. At that point, you can delete the config directory, or change permissions so that it is no longer world writeable.
Ideally, after the installation is complete you will change ownership of LocalSettings.php to the user who runs the Web server (oftentimes, it's nobody). Then enter chmod 600 LocalSettings.php in the command line, so that prying eyes can't see it.
If you get partway through the installation process and decide to start over again, you need to ensure that LocalSettings.php has been deleted from the config directory. As long as MediaWiki sees it, MediaWiki assumes that the installation has been completed.
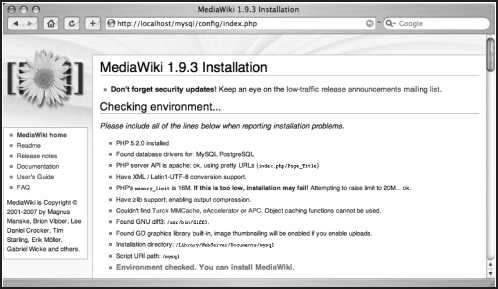
If all goes well (and it usually does), then you will see the installation page, shown in Figure 2-2.
The top of the page outlines what it has found out about your system and whether you are able to finish the install:
apache 2 installation results:
PHP 5.2.1 installed
Found database drivers for: MySQL PostgreSQL
PHP server API is apache2handler; ok, using pretty URLs (index.php/Page_Title)
Have XML / Latin1-UTF-8 conversion support.
PHP's memory_limit is 128M. If this is too low, installation may fail!
Have zlib support; enabling output compression.
Couldn't find Turck MMCache, eAccelerator or APC. Object caching functions
   cannot be used.
Found GNU diff3: /usr/bin/diff3.
Found GD graphics library built-in, image thumbnailing will be enabled if you
   enable uploads.
Installation directory: /apache2/htdocs
Script URI path:
Environment checked. You can install MediaWiki.
Farther down on the page, it is divided into a few different sections where you are prompted for some basic configuration information.
The site configuration section of the installation script is shown in Figure 2-3.
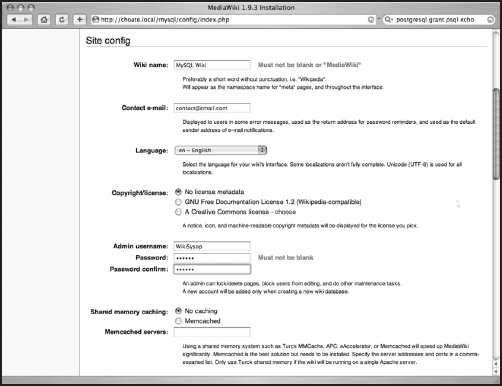
In this section, you need to enter the name of your wiki (this example is called "MySQL Wiki" because it is a test installation that will run using the MySQL database). Then, you enter a contact e-mail address. This is the e-mail address that is used in error messages, and as the sender of password reminders and other e-mail notifications. You should create an e-mail address to be used exclusively for this purpose. Next, you select the language to use in the wiki. In this case, it is English (en – English).
The next option deserves some consideration. MediaWiki gives you the opportunity to select a license for your content. (You can read more about licensing options for your content in the "Page Metadata" section of Chapter 6.) You are also given the option of including no license metadata, which means that the license defaults to traditional copyright regulations. Due to the nature of wikis and the fact that many people post to them and more than one person can be responsible for an article, selecting one of the other two alternatives is a good idea (if you are a public-facing website, at least). The GNU Free Documentation License 1.2 is used by Wikipedia.
This excerpt from the GNU Free Documentation License, posted at www.gnu.org/licenses/fdl.txt, provides a good summary:
"The purpose of this License is to make a manual, textbook, or other functional and useful document 'free' in the sense of freedom: to assure everyone the effective freedom to copy and redistribute it, with or without modifying it, either commercially or noncommercially. Secondarily, this License preserves for the author and publisher a way to get credit for their work, while not being considered responsible for modifications made by others.
This License is a kind of 'copyleft', which means that derivative works of the document must themselves be free in the same sense. It complements the GNU General Public License, which is a copyleft license designed for free software."
Choosing a Creative Commons license gives you more flexibility over the rights you keep and give away. You can fill out a questionnaire at http://creativecommons.org/license to help you decide which license you would like to offer.
Next, you need to select the name and password of the site's administrator. You can choose whatever password you want for the wikisysop, but be sure to keep a copy of the password!
The next section is for configuring shared memory caching. For now, leave this option off. While caching is very useful on production sites, it can be a hassle when you are developing a new site, but changes that you make aren't automatically reflected in the site. Caching is discussed in more detail in Chapter 11, and you will learn how to set it up at that time.
The notification and authentication setup section, shown in Figure 2-4, gathers information about how e-mail should be used. The selections are self-explanatory, but pay attention to e-mail address authentication, which means that when new users sign up, they have to provide their e-mail address. The system then e-mails the users at the e-mail addresses they gave when they signed up, and they are asked to confirm their registration. Only after confirming their registration are users allowed to edit pages. (More information about setting access permissions for users can be found in Chapter 6.) If you use a public-facing wiki on which people "off the street" can sign up, it's a very good idea to keep this enabled.

If you have access to the MySQL superuser (root, by default), then the MediaWiki installation script can create the necessary database and users for you. In the Database Config section on the same page, you are given the option to select MySQL or Postgres for your wiki's database. Select the MySQL radio button, as shown in Figure 2-5.
Next, you are asked to enter the database host. If the database is being hosted on the same server as MediaWiki itself, then you can enter localhost. If MySQL is being hosted on a different database, which will likely be the case if you run a very active wiki, then you would enter the appropriate host in that field.
The form will have wikidb pre-filled for the database name, and wikiuser for the database user's name that will be used to access the wikidb database. These names can be changed if you'd like. After the name are two blank fields for you to enter the password twice (just in case). Further down is a checkbox that you should select if you have access to the superuser account on MySQL. The example that follows indicates that you do have access to it, so you can select it and enter the superuser name (there's no password on the default installation—this should be changed in a production setting). You can, of course, have a different superuser name and password if MySQL has been configured that way.
There are a few other items to configure and then you'll be able to complete the installation. First, you are asked to provide a prefix for the database tables. This is a good idea because it will enable you to run more than one wiki out of the same database. In this example, the tables are prefixed with mw_. Then, when asked what charset to use, choose the default, utf-8.
If you do not have access to the MySQL superuser (if you are using a hosting service, for example), then you need to have a username and password already created. If that's the case, then enter your username and password in place of "wikiuser." If you do not have privileges to create a database, then you will need to use the database you already have, so enter that information into the database field.

The important things to remember at this stage are as follows:
You can choose any name you would like for the database, even though the default is wikidb. If you have a pre-existing database that you want to use, then you can enter the name of that database into the name field.
The database user, wikiuser, can be named anything you'd like. If you have already created a user in the database that you intend to use, then you should enter that user's name and password instead of wikiuser.
The only time you need to select the superuser checkbox is when you do not already have a database and user already created and you know the username and password of a superuser. On the default MySQL installation, a superuser called "root" is installed; and, by default, there is no password for this user, so the Password field is left blank. This is a pretty big security hole, so you should assign a password to the user as soon as you can. If there is a password, then you obviously need to enter the password into the Password field.
If you have decided to use Postgres, then you need to check the Postgres radio button, and then fill out the fields according to the database and username you created earlier. Do not select the superuser checkbox, even if you know the superuser name and password—you do not need to use it because you have already created everything you need.
Once the configuration process is completed, a file called LocalSettings.php is created in the config directory. This file needs to be moved into the base directory for the installation, and the permissions need to be set so that only the Web server can read it (chmod 400 for Unix-like systems). The config directory can then be deleted and the site accessed from the primary URL. Figure 2-6 shows the front page of a freshly installed wiki.

You need to make quite a few customizations once MediaWiki is installed. Most of those are discussed in subsequent chapters, but there is one such customization that most people want to change immediately, which is configuring Apache to use shorter URLs.
When using Apache, the URL for the main page (aptly called Main_Page) is http://mysite.tld/mediawiki/index.php/Main_Page. If you happen to run under CGI or FastCGI, then the URL is even longer, http://mysite.tld/mediawiki/index.php?title=Main_Page. There is also a chance that the URL will look like this when you are running Apache. If it does, that's because the AcceptPathInfo directive is set to "off." It is normally set to "on" by default, so it is unlikely that you will encounter this, but if you do, then enter the following in httpd.conf or in an .htaccess file:
AcceptPathInfo On
Many people want to get rid of the index.php in the middle of the URL because it's not really useful and makes the URL longer than it needs to be. There is a lot of confusion about how this should work, but it's fairly straightforward once you understand the relationship between the variables in the LocalSettings.php file and the directives used by Apache.
Using the Alias directive in Apache is the easiest way to dispense with the "index.php." In the following example, the /wiki path is mapped to /Library/WebServer/Documents/pg/index.php, which is where one of my WikiMedia installations is located. Pay special attention to the absence of "/" at the end of /wiki. That's a requirement. A second path, /index.php, is also mapped to the same index.php file:
Alias /wiki /Library/WebServer/Documents/pg/index.php
Alias /index.php /Library/WebServer/Documents/pg/index.php
In order for this to work, you need to have the $wgArticlePath variable defined in LocalSettings.php:
## This variable determines who MediaWiki builds links to
## articles from other articles. This pattern must correspond
## with the RewriteRule.
$wgArticlePath          = ''/wiki/$1'';
This tells MediaWiki to use the path /wiki/Article_Name when generating links to articles within MediaWiki. Then, if one of these links is clicked, Apache handles the request and substitutes /Library/WebServer/Documents/pg/index.php for /wiki (using the full path from the system, rather than just the request path).
The problem with using Alias is that you cannot use it in a .htaccess file, and many users do not have access to httpd.conf. Another approach is to use Apache's Mod_Rewrite, which uses regular expressions to map URLs to items in the underlying file system. It's similar to Alias but much more flexible, and, as a consequence, much more complicated. In the end, though, it's the better route to take.
One reason for using Mod_Rewrite is that it can be used in .htaccess files. However, unless you truly need to use .htaccess files, you shouldn't, because they slow things down considerably. If you have access to httpd.conf, then you can use Mod_Rewrite there.
If you are using virtual hosting in Apache, then you can put the RewriteRule directive in <Virtual>; otherwise, you can put it anywhere in the configuration file.
You need to change the LocalSettings.php file, in either the httpd.conf file for Apache, or create a .htaccess file in the doc root of your Apache installation:
RewriteEngine on
RewriteRule ^/wiki/?(.*)$ /w/index.php?title=$1 [L,QSA]
LocalSettings.php should be configured in this way:
$wgSitename             = ''MySQL Wiki'';

## The URL base path to the directory containing the wiki;
## defaults for all runtime URL paths are based off of this.
$wgScriptPath           = ''/w'';
$wgScript               = ''$wgScriptPath/index.php'';
$wgRedirectScript       = ''$wgScriptPath/redirect.php'';

## This variable determines who MediaWiki builds links to
## articles from other articles. This pattern must correspond
## with the RewriteRule.
$wgArticlePath          = ''/wiki/$1'';
The RewriteRule directive takes the path as defined in $wgArticlePath and maps it internally to the actual URL, making the URL http://mysite.tld/wiki/Main_Page effectively the same as if you had called http://mysite.tld/pg/index.php?title=Main_Page.
You can put the RewriteRule into a .htaccess file, but when you do, it needs to be in the top-level directory or the doc root of your Apache implementation.
This chapter covered how to install MediaWiki. By this time, you should be able to get MediaWiki up and running with an Apache Web server. Now, with MediaWiki installed, it's time to take a look at the ins and outs of using MediaWiki software. In the next chapter, you'll learn MediaWiki terminology and find a user's guide to MediaWiki, detailing information about user accounts, how to create and edit pages, and more.