© Ahmed Bakir 2018
Ahmed BakirProgram the Internet of Things with Swift for iOShttps://doi.org/10.1007/978-1-4842-3513-3_8

8. Building a Web Server on a Raspberry Pi

Ahmed Bakir1 
(1)
devAtelier, Tokyo, Japan
 

Back in the early days of the World Wide Web (the browser-based Internet you know today), the idea of a web server was transparent to most developers. You would install a program to host your HTML files (or open a free account on a service such as GeoCities) and spend most of your time thinking about what size to make your text or where you could find the best GIFs to put. To most people, a web server was just a place where you would upload your files.

As web development technologies continued to progress, more people found themselves needing the ability to control their web hosting themselves, leading to greater awareness of web server technologies. Instead of relying on your hosting provider’s guarantees of security or uptime, you could begin to take matters into your own hands by configuring the server yourself.

Additionally, more advanced applications such as e-commerce and electronic medical records (EMR) systems began taking off, with their own requirements for user personalization, database integration, and security. To meet these needs, scripting languages, such as PHP and Ruby began to rise in popularity, allowing programmers to create pages that could perform all of the logic of processing data and generating a static page immediately after a user requested the page from his/her browser. Instead of static web pages, people were beginning to develop web applications.

In the world of the Internet of Things (IoT), you can take advantage of web application technology to help you expose data from your IoT devices over HTTP, the Hypertext Transfer Protocol. Whenever you use a web browser or an app that connects to a server, it is using HTTP to transfer that data. As you may remember from earlier chapters, protocols such as Bluetooth or HomeKit are optimized for specific use cases and sometimes require a massive amount of domain-specific knowledge to be deployed successfully. Web technologies, on the other hand, are a well-known platform with a strong development community and low hardware requirements (you just need something that can power a web server).

In this chapter, you will revisit the Raspberry Pi and Node.js development environment from earlier chapters and expand both to advertise the same data over HTTP and HTTPS, using the Express module for Node.js. Due to its small binary size, potential for scaling, and huge developer base, Node has been taking over as a first-class web application scripting language.

Learning Objectives

In this chapter, you will learn how to set up a web server on the Raspberry Pi you have been using throughout this book, expose its sensor data over HTTPS end points, and connect to the server from the IOTHome app for iOS. You will use Node.js to create the web application and Swift for the iOS app. While some projects to get Swift running on Raspberry Pi are starting to gather steam, in today’s environment, Python and Node.js are the most well-documented and -supported options for building web-based applications on a Raspberry Pi.

For this chapter, rather than depending on a full web server application, such as Apache, to listen for HTTPS connections and route them to Node.js, you will learn how to use the Express module for Node.js, to accomplish the same task. For projects for which you will be running multiple web applications on the same server, you may want to look at Apache or NGINX, to better manage your connections. However, the project in this chapter aims to replicate the use case for a single-purpose IoT device or a single-purpose web microservice, such as one you would host on Heroku or an Amazon Web Services Lambda.

In building the Raspberry Pi web server, you will learn the following key concepts for iOS IoT application development:
  • Web application development core concepts

  • Setting up Express to expose web services through Node.js

  • Reading data from a temperature sensor in a Node.js application

  • Reading data from Bluetooth sensors within a Node.js application

  • Providing security with HTTPS

The project in this chapter is heavily based on the Express module for Node.js. If you would like to learn more about the module or find more support on it, please visit its official home page at www.expressjs.com .

Creating a Web Server to Share Data over HTTPS

In this section, I will focus on the process of setting up a web server using Node.js and Express, as well as how to use Node modules to expose the data generated by the IOTHome sensors (temperature, humidity, status of a switch) over HTTPS. The projects in this section assume that Node.js and the temperature sensor from Chapter 7 have been set up correctly. If you still feel uncomfortable with either topic, or are coming into this chapter directly, I highly recommend going back to the setup sections of Chapter 7 before progressing with this chapter.

In this section, you will start by implementing a web server that transfers data over HTTP, then you will learn how to apply an SSL certificate to the server, to make it an HTTPS server—the new, secure standard for web applications. After the web server is set up successfully, you will use it to provide the data for the Home screen on the IOTHome app.

Using Express to Expose Web Services

Unlike the HomeBridge project, where the primary task was installing and configuring a Node application that was developed by another party, in this chapter, you will develop your own Node application from scratch. To start developing the project, begin by deciding on a location for the project. After turning on your Raspberry Pi, open the terminal and create two new directories under your home directory: sites and iothome. These directories are the sites or /var/www/ directory that most web hosting Linux distributions use as the document root (starting point) for web applications, and the location of the application itself. As shown in Listing 8-1, create the new directories, then use the cd command to change your working directory to the iothome directory.
mkdir ~/sites
mkdir ~/sites/iothome
cd ~/sites/iothome
Listing 8-1

Creating a Folder for the Express Project

Next, you must use npm to install Express in the directory for the iothome project. In Chapter 7, you installed the modules for HomeBridge globally, meaning all Node-based applications on the Raspberry Pi could use them. However, for application development, I recommend installing modules only in the project you are currently working on. In multi-application environments, this will prevent side effects on other projects. To install Express for the IOTHome project, run npm install, without the global flag.
npm install express
To verify the installation, you can write a simple Node application, which echoes Hello World across HTTP. To begin the development process, create a new JavaScript file, called app.js , using nano or your favorite text editor.
nano app.js
Unlike iOS or Arduino programming, in which application execution begins from a very specific method (for example, viewDidLoad for iOS, setup for Arduino), Node applications begin executing immediately. As Node implements object-oriented programming (OOP) concepts, you should use them to control the flow of your program in a predictable manner. To use Express, you must include the module, then instantiate an object of it. You can continue other operations while Express is running, but all HTTP requests will have to be handled through the Express object. To create your blank Express application, implement the code sample in Listing 8-2.
var express = require('express');
var app = express();
Listing 8-2

Creating a New Express-Based Node Application

A Quick Introduction to how Express Works

Express works by listening for HTTP requests on a port, then responding to them, based on the end point that is specified. End points are defined as functions that are available to consumers of your API, made up of a route, the path component appended to the server’s address and the HTTP method that is used to make the request (for example, GET, POST). Throughout web application development, you will see these two terms used interchangeably. To reduce confusion, I think the clearest explanation is that end point is primarily used as a term to describe external (client-facing) interactions with your server, and route is used primarily to describe the internal logic of your Express application.

For example, if you wanted to get a list of movie titles from a server with the IP address 10.0.1.5, the request would be GET 10.0.1.5/movie/titles. The GET method is frequently used for reading data. In this example, the route is /movie/titles and GET is the end point. In Express, the code for this end point would be look like this:
app.get('/movie/titles', function (req, res) { ... }
Creating a record for a new movie, on the other hand, may look something like this: POST 10.0.1.5/movie/new. The POST method is often used to add a new record. In database programming, the term CRUD is used to describe the four major operations for any type of data: create, read, update, and delete. Many back-end developers like to use this same model for naming their routes, and they will append /new, /delete, or /update to a route, to indicate it is a create, update, or delete operation. In Express, the code for this end point would be
app.post('/movie/now', function (req, res) { ... }

As you can tell, the method called on the app object changed, as well as the string for the route.

Finally, two of the other most frequently used HTTP methods are PUT and DELETE, which are used to update and delete records. You will not use them in this chapter, but they may be helpful to you in your own projects in the future.

By default, when you load a web page in a browser, it will try to make a GET request to the document root of the server on TCP port 80 (the port reserved for HTTP traffic). To represent this in Express, use the get() method on your object, to specify the code that should execute for the root directory. To make Express listen for requests, use the listen() method on the app object. The implementation for both the route and listener is shown in Listing 8-3.
var express = require('express');
var app = express();
app.get('/', function (req, res) {
    res.send('Hello World');
});
app.listen(3000);
Listing 8-3

Creating a New Express-Based Node Application

In this example, I instructed Node to send the text, Hello World, upon receiving a GET request for the document root. The res object is built into Node and specifies that you want to pipe output as an HTTP response. In this example, I asked Express to listen on port 3000 instead of the standard HTTP port 80, because Node considers port 80 a privileged port. Unless you are logged in to a root or system user account, you are not able to run applications from this port. Later in this section, you will switch to port 80, but for initial testing, it is best to use a non-privileged port.

To verify that the Express application is working, you must tell Node to start executing the new script, then try to make the request from a web browser.

Before starting the server, you must get the IP address for the Raspberry Pi. Inside the terminal, use the ifconfig command to view the information for your device. As shown in Figure 8-1, the IP address will appear next to the inet field, under the record for the wlan0 interface (representing the built-in Wi-Fi interface).
../images/346879_2_En_8_Chapter/346879_2_En_8_Fig1_HTML.jpg
Figure 8-1

Getting the IP address for a Raspberry Pi

Next, begin execution of the Node application, by calling the node command with your script’s file name.
node app.js
Finally, open your favorite browser on another computer in your network and type in the URL for the Raspberry Pi, with the port number (3000) appended to it. Your "Hello World" string should appear as plain text in the browser, as shown in Figure 8-2.
../images/346879_2_En_8_Chapter/346879_2_En_8_Fig2_HTML.jpg
Figure 8-2

Verifying the Hello World example in a browser

Congratulations on creating your first Node application! It will keep executing until you kill the Node process on your Raspberry Pi.

Reading Values from the DHT Temperature Sensor

Now that you have the hang of adding a Node module and Express route, you can begin to refine your simple example to mirror the status of the temperature sensor via HTTP. To begin, enter Ctrl+C into the terminal, to kill Node.js, then install the node-dht-sensor module using npm.
npm install node-dht-sensor
For my example, I thought it would make sense to use the temperature path extension to represent the temperature and humidity sensor. As shown in Listing 8-4, include the node-dht-sensor module in your application and add a route and end point for GET requests to the temperature path extension.
var express = require('express');
var dht = require('node-dht-sensor');
var app = express();
app.get('/temperature', function (req, res) {
        //Your cool code will go here
});
app.listen(80);
Listing 8-4

Defining a New Route for the Temperature Sensor

At this point, I recommend making two changes: removing the end point for the earlier example and changing the port to 80. Many web servers are easily hacked when debugging end points are left active. Vigilant code maintenance is an easy way to reduce this risk in your applications. By using port 80, you will also be able to make your server behave closer to the HTTP specification, which states that HTTP traffic is transmitted on TCP/IP port 80.

Next, you must use the node-dht-sensor module to retrieve the data from the sensor. Referring to the documentation for the module available at its GitHub repository ( https://github.com/momenso/node-dht-sensor ), you will learn that you can perform this operation by calling the read() method on your dht object, specifying the sensor type (22 for DHT22 or 11 for DHT11), the general-purpose input/output (GPIO) pin its data line is connected to, and a callback method that will execute when the reading is complete. In my example in Chapter 7, I used GPIO 21 for the DHT22 sensor. In Listing 8-5, I have expanded the example to include reading the data from the temperature sensor.
var express = require('express');
var dht = require('node-dht-sensor');
var app = express();
app.get('/temperature', function (req, res) {
    dht.read(22, 21, function(err, temperature, humidity) {
        res.type('json');
        if (!err) {
            res.json({
                'temperature': temperature.toFixed(1),
                'humidity':  humidity.toFixed(1)
            });
        } else {
            res.status(500).json({error: 'Could not access
                sensor'});
        }
    });
});
app.listen(80);
Listing 8-5

Reading DHT22 Data from a Node Application

In this example, you will notice that I used the json() method on the res object, to send back the temperature data. While plain text was sufficient for the Hello World example, using JSON (JavaScript Object Notation) is a widely adopted practice to represent dictionaries and hierarchical data in web application development. Additionally, most web and mobile frameworks these days provide built-in JSON validation and encoding/decoding, making it much easier to work with than custom data types. Following this line of reasoning, you will notice that I also used the status() method to return the error as a standard HTTP 500 server error. This allows you to use built-in HTTP error handling.

Next, you must restart the Node application. Kill the existing process, then run the script again with superuser permission.
sudo node app.js

Tip

If you would like your Node application to automatically restart whenever you change its source code, I recommend looking into the nodemon tool, available via npm and GitHub at https://github.com/remy/nodemon . While this tool can be convenient during the development phase, I recommend disabling it in production.

To verify that the new route is working, attempt to load it in a web browser, by appending /temperature to the old URL. You should receive a plain text response containing the JSON-encoded temperature and humidity, as shown in Figure 8-3.
../images/346879_2_En_8_Chapter/346879_2_En_8_Fig3_HTML.jpg
Figure 8-3

Verifying the temperature route in a browser

Caution

It takes approximately two seconds for the DHT22 temperature and humidity sensor to get an accurate reading. Keep this in mind if you are getting stale data or time-outs when pinging the temperature route.

Reading Information from Bluetooth Devices

In the last section, you exposed the data from the temperature sensor over HTTP by reading its value directly from a Node application and then echoing it via Express. In this section, you will expose the Bluetooth door sensor’s data over HTTP, by making the Node application act like a Bluetooth central manager, using the Noble module for Node ( https://github.com/noble/noble ). You may remember from previous chapters that one of the riskiest and time-consuming parts of Bluetooth communication is discovering the device and establishing a connection to receive data. To help with this operation, in this section, you will add end points for managing the connection state and transmit data based on the last update (rather than making a new connection each time data is requested).

To begin, you must add Noble to the project, using the npm package manager.
npm install noble
Next, you must modify the Node application to include Noble and the UUIDs for Bluetooth services and characteristics for the door sensor, as shown in Listing 8-6. Just as with the apps in previous chapters, you will need these values to help identify the device and its data notifications.
var express = require('express');
var dht = require('node-dht-sensor');
var noble = require('noble');
var app = express();
const LOCK_SERVICE_UUID = "4fafc2011fb5459e8fccc5c9c331914b";
const BATT_SERVICE_UUID = "0af2d54c4d334fc79e34823b02c294d5";
const LOCK_CHARACTERISTIC_UUID = "beb5483e36e14688b7f5ea07361b26a8";
const BATT_CHARACTERISTIC_UUID = "134c298f7d6b4f6484968965e0851d03";
...
Listing 8-6

Adding Noble and Bluetooth UUIDs to the Node Application

Remember: These UUIDs were defined in Chapter 6 as unique, random hexadecimal values that identify the device. Just as with Chapter 6’s Bluetooth app and Chapter 7’s HomeBridge configuration, you need these values to find and identify the device. Because the values will not change while the application is executing, you can define them as constants, using the const keyword.

Just as with connecting to a hardware protocol like Bluetooth or I2C, it is common for flow-based web server operations, such as creating a new user account, to require the client developer (for example, mobile app developer, front-end web developer) to follow a specified flow of API calls to complete the operation. For the IOTHome Node application, the client developer must POST the /door/connect/ end point before attempting to request data from the device. Similarly, after they have finished their session, they must POST to the /door/disconnect/ end point, to close the connection and allow other applications to use the hardware.

In my implementation, I decided to start the connection process from the Express end point. In Listing 8-7, I have expanded the Node application to include a /door/connect/ end point that uses Noble to scan for the door sensor. In this example, I also saved a reference to the response object from Express, so that I could complete the HTTP request at the same time the Bluetooth connection was established.
var response;
...
app.post('/door/connect', function (req, res) {
       console.log("start connect");
       response = res;
       noble.startScanning();
});
...
noble.on('discover', function(peripheral) {
  console.log("discovered");
  console.log("peripheral name "+peripheral.id+" "+peripheral.address + " | " + peripheral.advertisement.localName);
  var advertisement = peripheral.advertisement;
  if (PERIPHERAL_NAME == advertisement.localName) {
    noble.stopScanning();
    console.log('peripheral with name ' +
    advertisement.localName + ' found');
    console.log('ready to connect');
  }
});
Listing 8-7

Discovering a Bluetooth Peripheral Using Noble

The arrangement of the connection may seem a bit odd at first. In the Arduino code for the door sensor, you had to implement completion handlers to progress through the connection flow for the Bluetooth server. In the iOS app, you had to implement delegate methods. To receive messages with Noble, you must respond to discover events, which are triggered by initiating a scan for devices. To implement an efficient Bluetooth LE connection process, you should scan only for the devices advertising the services you need. However, at the time of writing, I noticed that the results of the scan API that specifies service UUIDs were hard to predict, so, instead, I decided to filter discovered devices by the name specified in their advertisement data.

After you have confirmed that the device is within range, you must try to connect to it. In Listing 8-8, I have expanded the application to include the connection process. Just as when you implemented a Bluetooth central manager on iOS, after finding a device, you must connect to it and save a reference to it, so you can disconnect from it later.
...
var savedPeripheral;
...
noble.on('discover', function(peripheral) {
  console.log("discovered");
  var advertisement = peripheral.advertisement;
  if (PERIPHERAL_NAME == advertisement.localName) {
    noble.stopScanning();
    console.log('attempting to connect');
    connect(peripheral);
  }
});
function connect(peripheral) {
       peripheral.connect(function(error) {
             if (error) {
                    console.log('error = ' + error);
                    response.status(500).json({error: 'Could not
                    find sensor'});
             } else {
                    console.log('connected');
                    response.json({'status': 'connected'});
                    savedPeripheral = peripheral;
             }
       });
}
Listing 8-8

Connecting to a Bluetooth Peripheral Using Noble

For the final step in the connection process, you must find the characteristics for the data you want to observe and set up their completion handlers. In Listing 8-9, I call the discoverAllServicesAndCharacteristics() method , then subscribe to events only for the characteristics matching the desired UUIDs.
function connect(peripheral) {
       peripheral.connect(function(error) {
             if (error) {
             ...
             } else {
                    ...
                  discoverServices();
             }
       });
}
function discoverServices() {
  if (savedPeripheral) {
    savedPeripheral.discoverAllServicesAndCharacteristics(
    function(error, services,  characteristics) {
          if (error) {
            console.log('error  = ' + error);
          }
          console.log('services = ' + services);
          console.log('characteristics = ' + characteristics);
          for (characteristic in characteristics) {
             if (characteristic.uuid ==
              LOCK_CHARACTERISTIC_UUID ||
              characteristic.uuid == BATT_CHARACTERISTIC_UUID) {
                observeCharacteristic(characteristic);
             }
          }
    });
  }
}
function observeCharacteristic(characteristic) {
  //Fires when data comes in
  characteristic.on('data', (data, isNotification) => {
    console.log('data: "' + data + '"');
    lastUpdateTime = date.getTime();
    if (characteristic.uuid == BATT_CHARACTERISTIC_UUID) {
        batteryStatus = data;
    }
    if (characteristic.uuid == LOCK_CHARACTERISTIC_UUID) {
        lockStatus = data;
    }
  });
  //Used to setup subscription
  characteristic.subscribe(error => {
    if (error) {
      console.log('error setting up subscription = ' + error +
        'for uuid:' + characteristic.uuid);
    } else {
      console.log('subscription successful for uuid:' +
        characteristic.uuid);
    }
  });
Listing 8-9

Observing and Responding to Characteristic Updates with Noble

The subscription process is initiated through the subscribe method, but the data must be observed through the on method. Because it is impractical to make the user wait until the first update has been delivered, I save the values to global variables that can be queried later.

Caution

While researching this chapter, I noticed that the Bluetooth utility on the Raspberry Pi became unable to maintain a connection after several connection debugging sessions. If you are having issues with the door sensor not reporting a successful connection via its blue status LED, try restarting the Pi and then trying again.

To expose the data over HTTP, create a /door/status end point. When the end point is called, echo the saved values from the global variables and wrap them in a JSON dictionary, as shown in Listing 8-10. To help enforce the connection flow for the API, return an error if the device connection has not been established yet.
app.get('/door/status', function (req, res) {
  console.log("start connect");
  if (savedPeripheral) {
    res.json({
      'lockStatus': lockStatus,
      'batteryStatus': batteryStatus,
      'lastUpdateTime': lastUpdateTime
    });
  } else {
    res.status(500).json({error: 'Not connected to a
       sensor. Please re-connect and try again.'});
  }
});
Listing 8-10

Reading Data from a Bluetooth Peripheral, Using Noble

To wrap up the Node application, you must create the /door/disconnect/ end point. As shown in Listing 8-11, in my implementation, I disconnect from the device when the end point is called. To be safe, I also stop scanning for the BLE device, just in case this method is called before the connection has been fully established.
app.post('/door/disconnect', function (req, res) {
       noble.stopScanning();
       console.log("stop scan");
       if (savedPeripheral) {
              console.log('disconnected');
              savedPeripheral.disconnect();
       }
       res.json({
              'status': 'disconnected'
       });
});
Listing 8-11

Disconnecting from a Bluetooth Peripheral, Using Noble

Before moving on, you may be wondering how to test the POST-based end points. For this task, I recommend downloading the Postman OS X app from www.getpostman.com/ . As shown in Figure 8-4, to begin your debugging session, simply click the Send button after configuring your request. The results of your request will appear in the large text field at the bottom of the window. You can access a list of your past requests (and their configurations) from the left sidebar of the window.
../images/346879_2_En_8_Chapter/346879_2_En_8_Fig4_HTML.jpg
Figure 8-4

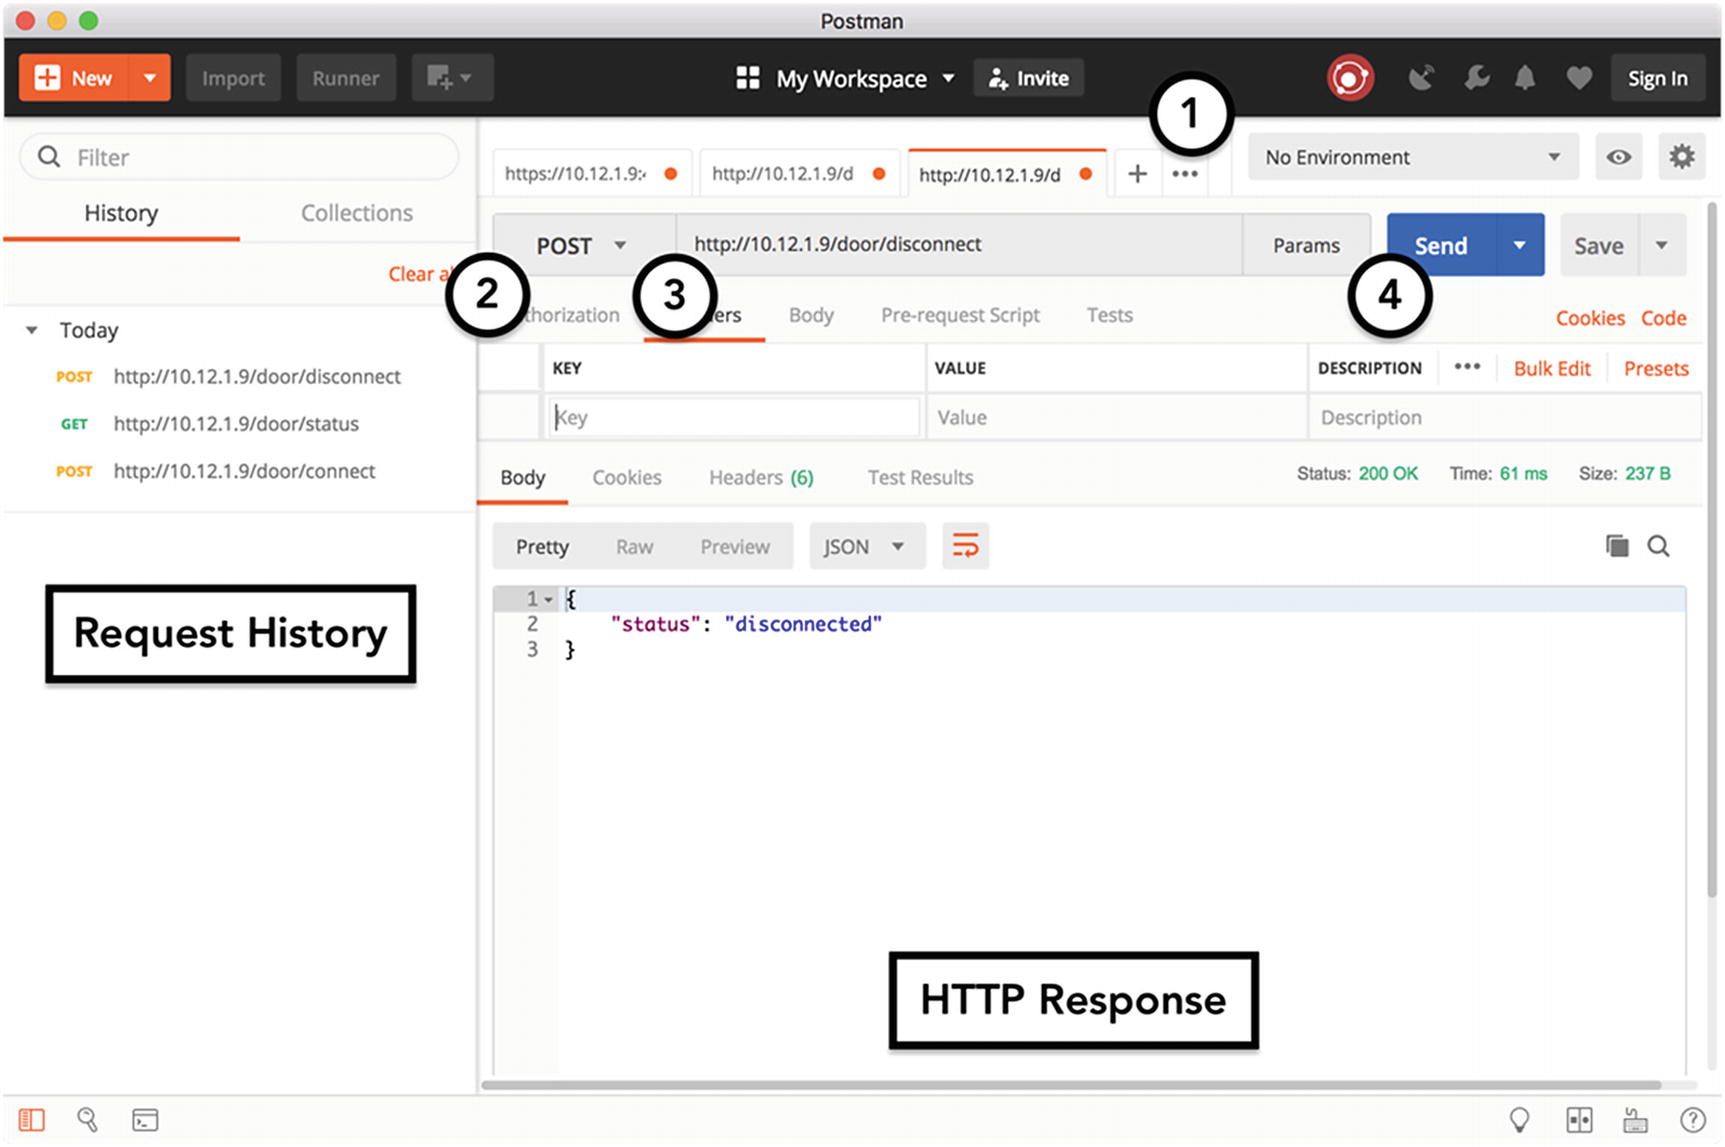
Using Postman to verify POST requests

Using HTTPS to Provide Secure HTTP Connections

In a move to increase the privacy of users’ data and reduce phishing (false identity) attacks on the Internet, starting in 2016, Apple, Google, and other major technology companies announced that their platforms would be moving toward primarily supporting servers that implement HTTPS, an extension of HTTP that requires all data to be encrypted with Transport Layer Security (TLS). TLS is implemented by adding a Secure Sockets Layer (SSL) certificate to your server, which has been issued by a provider that is trusted by the major browsers and your platform (for example, iOS).

In Google Chrome, some of the most obvious implications of not using HTTPS are that your site will show up lower in Google’s search ranking. Additionally, sites with untrusted TLS certificates will be marked as Not Secure and present users a warning page when they are loaded in the browser. In iOS, Apple enforces HTTPS by making all HTTP requests fail inside of an app, unless the developer manually re-enables them. Additionally, all untrusted HTTPS requests will fail.

To work around these limitations and improve the security of the IOTHome device, you should extend the Node application to support HTTPS. As with the other functionality in this project, you can take advantage of Node modules and tools that have been developed for web apps, to easily add HTTPS to the IOTHome project.

There are three major options for implementing HTTPS in your project.
  1. 1.

    If you are developing for a production environment, you must request an SSL certification from a service that is trusted by the Internet Engineering Task Force (IETF), the organization that maintains the HTTPS standard. I recommend using Comodo, Verisign, or a certificate from Amazon Web Services (AWS). Certificates from these providers have the greatest compatibility, clear instructions, and support.

     
  2. 2.

    If you would like to develop a production-level prototype and already have a domain, you can use the Let’s Encrypt trust authority ( www.letsencrypt.org ) and its accompanying tool, certbot-auto ( https://certbot.eff.org/docs/install.html ), to generate a free, trusted SSL certificate for testing.

     
  3. 3.

    For pure prototype purposes, you can generate your own SSL certificate, using OpenSSL on your Raspberry Pi.


For the purposes of this book, I have chosen option #3. If you would like to use options #1 or #2, I suggest creating those certificates on the server attached to your domain name, then copying it over to your Raspberry Pi (granted your SSL provider allows this capability).

Generating an OpenSSL Self-Signed SSL Certificate

With OpenSSL, you act as your own trust provider and generate an SSL certificate that meets the basic encryption requirements of HTTPS. This is referred to as a self-signed certificate . Because it is not generated by one of the trusted vendors I mentioned above, most browsers and iOS will initially reject it, until you perform some steps to trust it on the device, which I will explain after you are done generating the certificate.

If you have ever created an Apple Developer Program iOS development certificate or Push Notification certificate, you are already familiar with the process of generating SSL certificates (although the delivery method is different). In Apple’s model, you create a private key (a unique hex value that is used as the base for the encryption/decryption of communications), create a Certificate Signing Request (CSR) file using the Keychain Access tool to serve as a receipt for your application for a new certificate, and then submit the CSR file to Apple’s web site, which will refresh with a new SSL certificate you can download once your request has been processed.

With OpenSSL, you can have complete control of this flow, to the point where you can even import existing private keys or hand CSRs to another service. For this project, though, you will act as your own Certificate Authority (CA), so you do not require a CA; you simply have to create a private key and a certificate. To do this in one command in OpenSSL, input the following command:
openssl req -x509 -nodes -days 365 -newkey rsa:2048 -keyout express.key -out express.crt

The preceding command specifies that you want to create a private key based on RSA 2048-bit encryption and a certificate based on that key, which is good for 365 days. As with your iPhone developer certificate, make sure that you save the private key and do not share it with others. Losing the key will result in being unable to use the certificate. Sharing the key will allow others to break your encryption.

Now that you have a valid SSL certificate, you can begin using it in your Node application. To begin, add the https and fs (filesystem) modules to your project, as shown in Listing 8-12. These modules are provided with the standard Node.js distribution and do not require any additional installation steps.
var express = require('express');
var dht = require('node-dht-sensor');
var fs = require('fs');
var https = require('https');
var app = express();
app.get('/temperature', function (req, res) {
    ...
});
Listing 8-12

Adding the https and fs Modules to the Node Project

Earlier in the chapter, app.listen(80) was used to instruct Express to listen for HTTP traffic on port 80. To use HTTPS in place of HTTP, you must disable this line and, instead, instruct an https object to listen for traffic. To initialize the https object, you must provide it with the paths to the SSL certificate and its private key on the Raspberry Pi. If you used Let’s Encrypt to generate these, they will be under the folder that was output by the certbot-auto tool. If you generated the SSL certificates with your own provider, you will have to save the files to your Raspberry Pi, either by downloading them via the Chromium browser on the Pi itself or configuring another tool, such as avahi-daemon, to help make the Raspberry Pi discoverable by your Mac over Bonjour.

Once you have verified the location of the SSL certificate and private key, create a dictionary to store the file paths, and initialize a new https object, as shown in Listing 8-13.
var express = require('express');
var dht = require('node-dht-sensor');
var fs = require('fs');
var https = require('https');
var app = express();
var sslOptions = {
    key: fs.readFileSync('express.key'),
    cert: fs.readFileSync('express.crt)
}
https.createServer(sslOptions, app);
https.listen(4443);
//app.listen(80);
app.get('/temperature', function (req, res) {
    ...
});
Listing 8-13

Configuring the Node Project to Use HTTPS Instead of HTTP

As with the earlier HTTP example, for the first HTTPS test, I suggest listening for traffic on port 4443 instead of the protected port for HTTPS, 443. To test that your SSL configuration was successful, kill your old Node process and reload the file for the application. If there is a problem loading the SSL certificate, you will see an error message in the terminal at this point, similar to the example in Figure 8-5. As they are well-adopted technologies, you can find a great deal of data to help you resolve OpenSSL and Node HTTPS issues, based on these error messages.
../images/346879_2_En_8_Chapter/346879_2_En_8_Fig5_HTML.jpg
Figure 8-5

Sample error message for failed Node HTTPS configuration

Next, change the URL for the /temperature end point to include port number 4443 and https as the protocol. Attempt to load the URL in your browser. If you are using Google Chrome, you will receive a security warning about the page being insecure, similar to the one I received in Figure 8-6.
../images/346879_2_En_8_Chapter/346879_2_En_8_Fig6_HTML.jpg
Figure 8-6

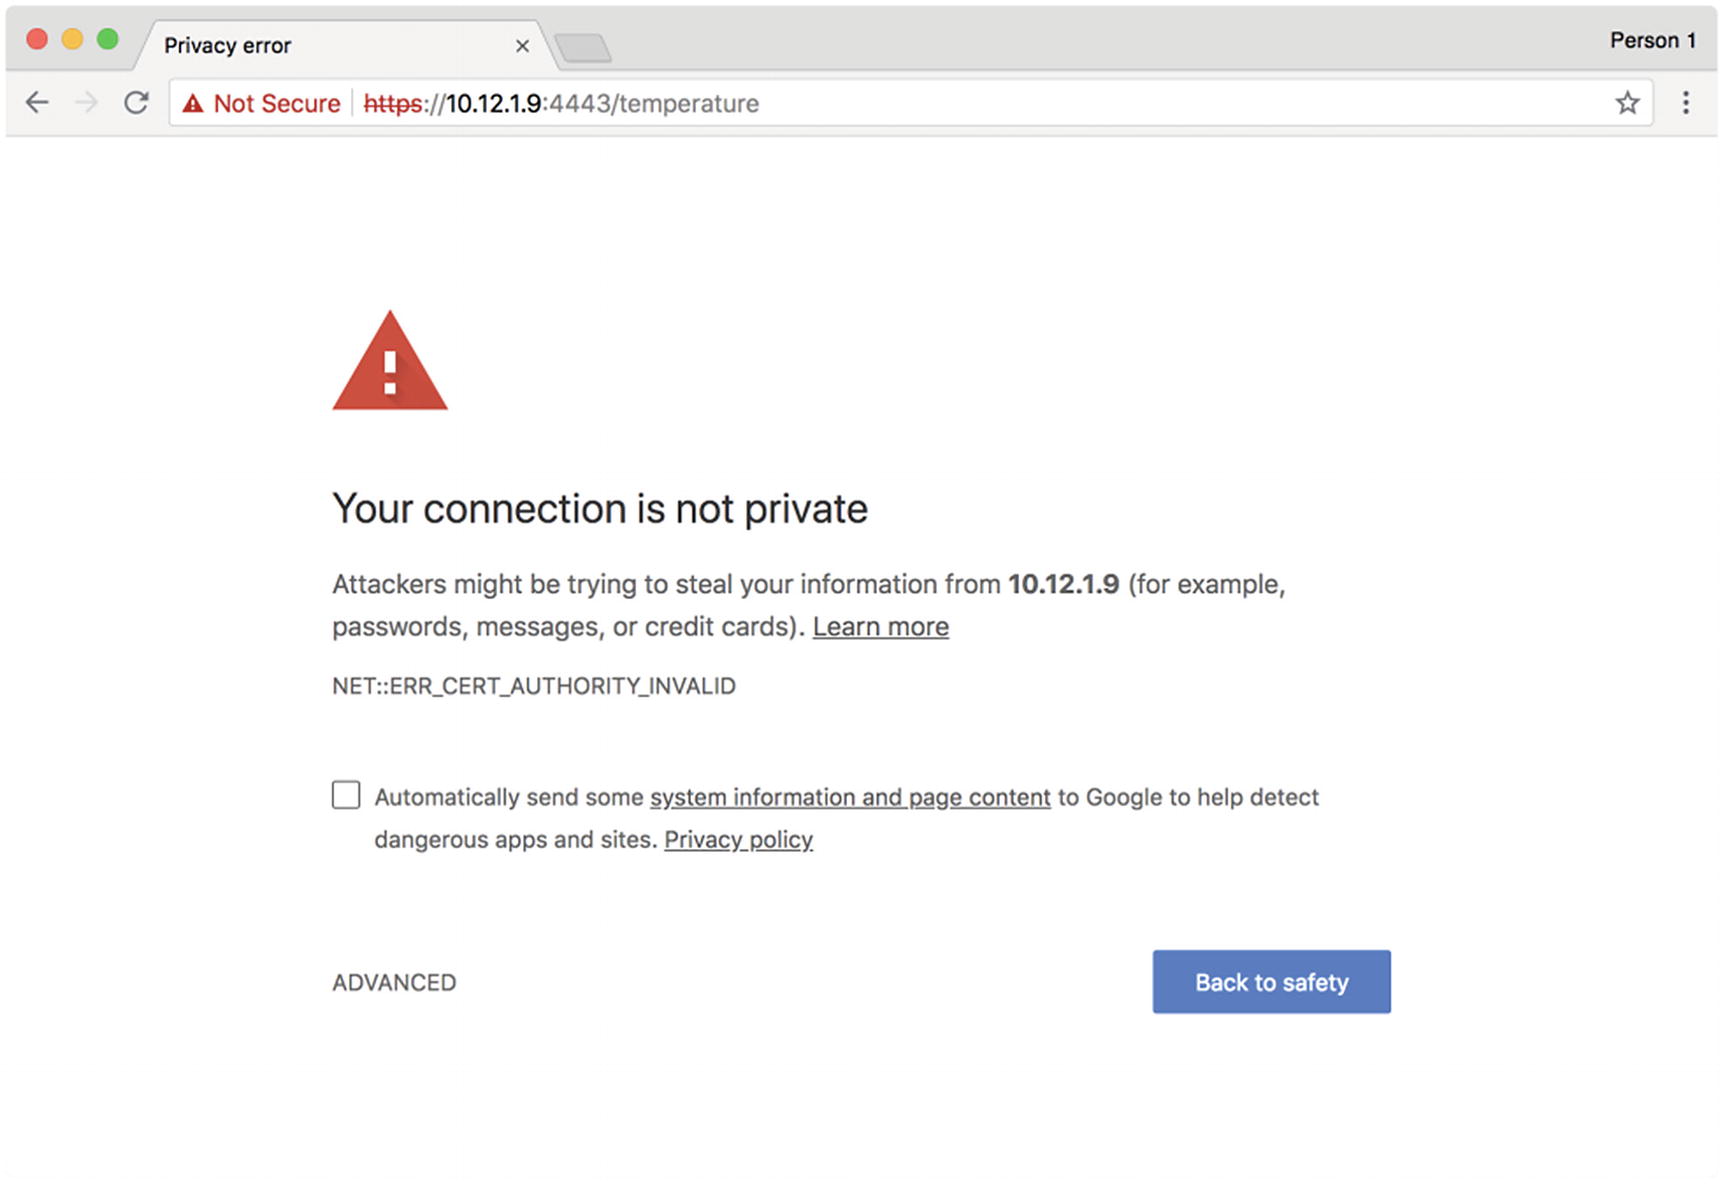
Google Chrome warning for pages with untrusted SSL certificates

To resolve this error, click the ADVANCED link at the bottom of the page, and then click the Proceed to… link, as shown in Figure 8-7.
../images/346879_2_En_8_Chapter/346879_2_En_8_Fig7_HTML.jpg
Figure 8-7

Enabling trust for a page in Google Chrome

After verifying that you want to load the page, you should now be able to see the temperature JSON data in the browser, just like you did when it was exposed through normal HTTP.

At this point, it is safe to change your application to listen on port 443. Just remember that you will have to run Node as a superuser, and that you will have to trust the :443 end point in Chrome. For HTTPS requests to port 443, you do not have to append the port number in iOS or your web browser.

To enable Postman to connect to self-signed certificates, click the Wrench icon at the top-right of the screen, as shown in Figure 8-8, then set SSL certificate verification to OFF.
../images/346879_2_En_8_Chapter/346879_2_En_8_Fig8_HTML.jpg
Figure 8-8

Trusting self-signed certificates in Postman

Configuring the Server to Start Up with the Raspberry Pi

As the final step in setting up the web server, you should make the Node application start with the Raspberry Pi on boot. This will prevent you from having to manually start and run the Node application every time you want to access its data through HTTPS. If you implemented this step for the HomeBridge project from the last chapter, this setup process should be extremely familiar to you, as you will create a service using the systemd tool , to manage this operation. Unlike HomeBridge, however, the IOTHome web server is much easier to set up as a service.

To begin, you must create a service definition. First, create a file named iothome.service in your home directory using your favorite text editor. Within this file, you will have to specify
  • The name of the service

  • The working directory for the script that will be run as a service

  • The location of the script

  • The user permissions for the script

  • The failure behavior for the script

In Listing 8-14, I have provided the service definition file for my implementation of the project. To mimic the development environment, note that the user is set to root, and the working direction is set as the sites/iothome folder for the pi user.
[Service]
WorkingDirectory=/home/pi/sites/iothome
ExecStart=node app.js
Restart=always
StandardOutput=syslog
StandardError=syslog
SyslogIdentifier=iothome
User=root
Group=root
[Install]
WantedBy=multi-user.target
Listing 8-14

Service Definition for the IOTHome Node Application

Next, you will have to copy the definition file to the default directory for systemd and enable read and execute permissions on the file.
sudo cp ~/iothome.service /etc/systemd/system/iothome.service
sudo chmod u+rwx /etc/systemd/system/iothome.service
As with the HomeBridge service, you must register the service with system.
sudo systemctl enable iothome
To start the service, call the systemctl tool again, this time with the start command.
sudo systemctl enable iothome
Your script is now set up to restart with the Raspberry Pi! To confirm that the operation was successful, restart your Raspberry Pi and try to call the /temperature end point from your browser. To view error messages, call the systemctl utility with the status command.
sudo systemctl status iothome

From here on out, if you have to modify your service definition or would like to modify the script itself, stop the service before performing your changes, then restart it once you are done.

Connecting to Your Server from an iOS App

At this point, you are able to access all of the data from the IOTHome system, using the web server on the Raspberry Pi. You also learned many different tools to debug the connection, including Google Chrome, the command line, and Postman. However, this is an iOS book, so it is only natural to learn how to apply these skills to iOS apps.

In this section, you will expand the IOTHome app from previous chapters to add a screen that allows users to access the sensors in the system via HTTP instead of Bluetooth. While the UI code for Apple platforms are mostly single-use, the networking code can be reused among all platforms. In Chapter 9, you will reuse the networking code from this chapter to power an Apple TV–based dashboard for the IOTHome system.

Setting Up the User Interface

For this project, the user interface plays a supporting role to the networking code. As such, I do not want to focus too much on creating a new user interface for the Home Manager screen (the one intended to show data for the entire system). As opposed to the Door Manager, it should show information from the temperature system and connect to the web server instead of Bluetooth to retrieve data. To accomplish this, you will subclass the DoorViewController class (the backbone for the Door Manager screen), add the new properties for displaying temperature, and override the connect() method to initiate a call to the HTTPS web server, instead of a Bluetooth device.

For the user interface, I have provided the updated wireframes in Figure 8-9. I used the same basic layout as the Door Manager screen, except I added the new labels for the temperature and humidity data above the door sensor information. I also changed the description text for the Update button.
../images/346879_2_En_8_Chapter/346879_2_En_8_Fig9_HTML.jpg
Figure 8-9

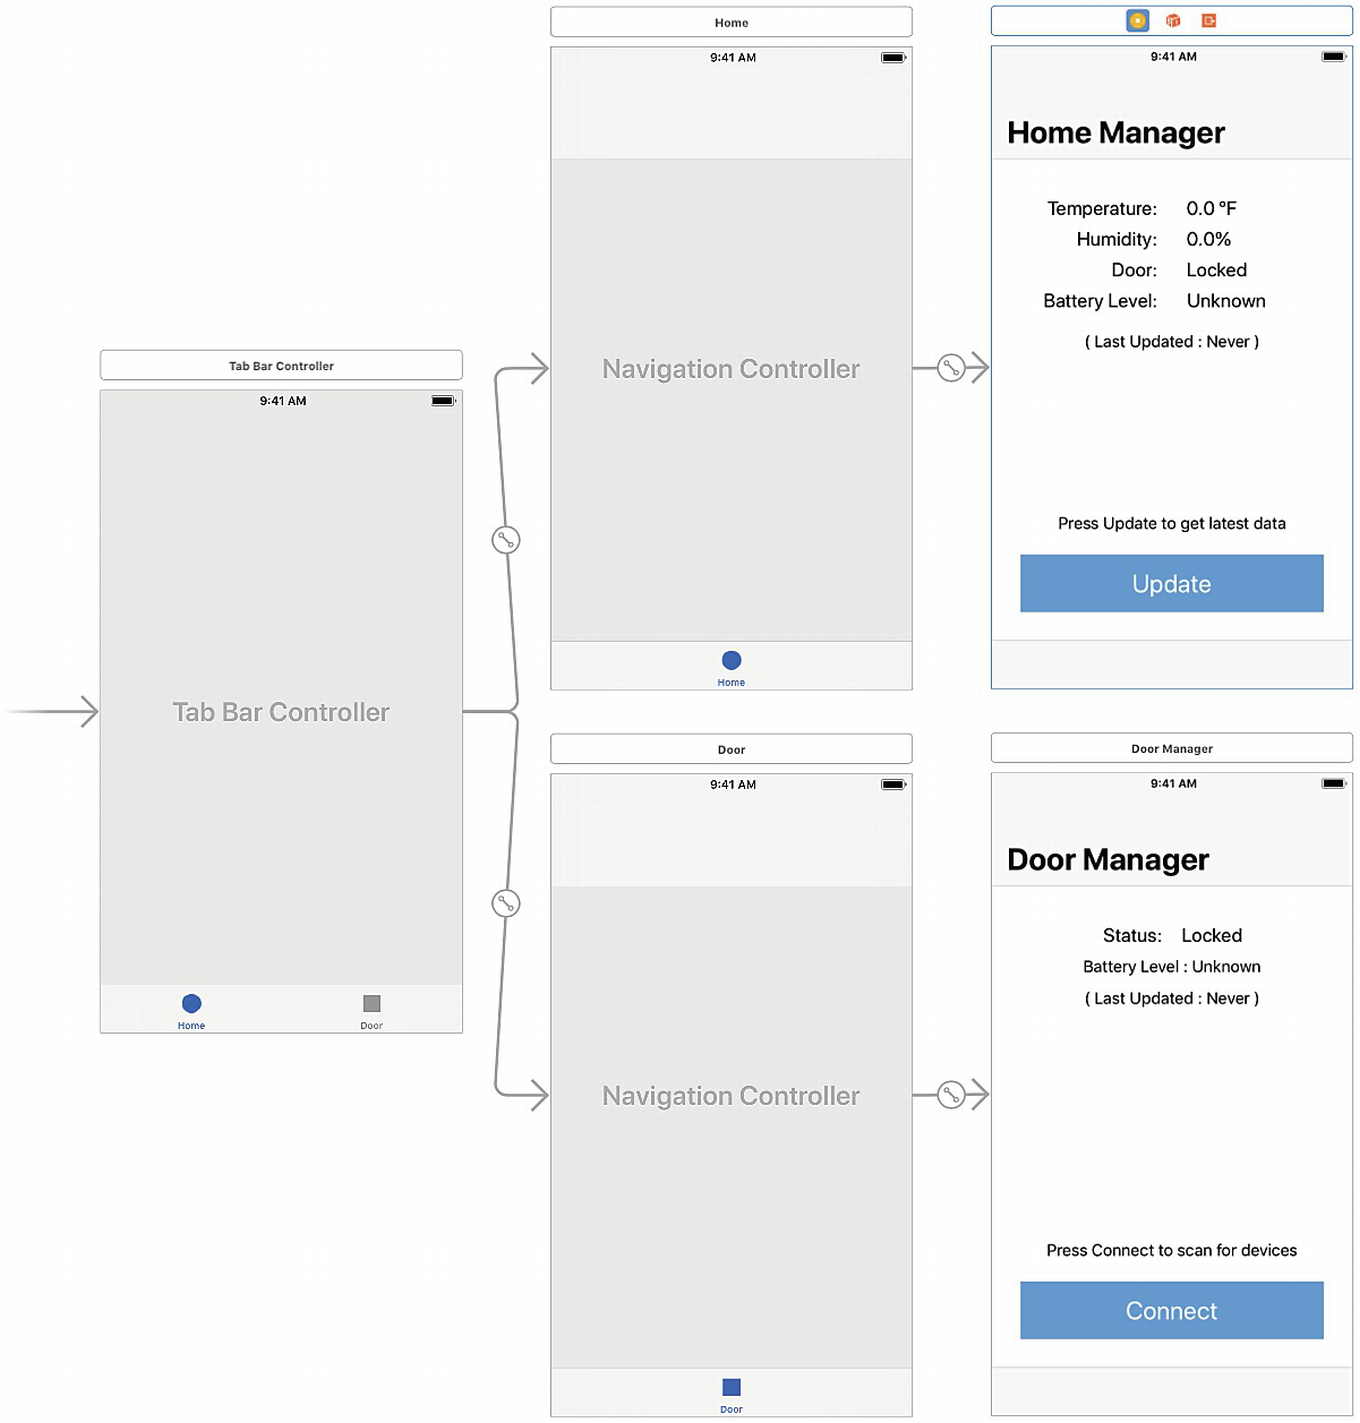
Updated wireframes for the IOTHome app

To start implementing the project, make a clone of the IOTHome app from Chapter 6. You can copy your project files or a fresh copy from the GitHub project for this book ( https://github.com/Apress/program-internet-of-things-w-swift-for-ios ).

In Table 8-1, I have provided the property names and constraints for the user interface elements. If you need a refresher on applying constraints, I recommend reviewing Chapters 1 and 6.
Table 8-1

Styling for Home View Controller User Interface Elements

Element Name

Text Style

Height

Top Margin

Bottom Margin

Left Margin

Right Margin

Navigation bar

Prefers large text

“Temperature” title label

Title 2

24

40

30

20

“Temperature” value label

Title 2

24

40

20

≥30

“Humidity” title label

Title 2

24

8

30

20

“Humidity” value label

Title 2

24

8

20

≥30

“Door” title label

Title 2

24

8

30

20

“Door” value label

Title 2

24

8

20

≥30

“Battery Level” title label

Title 2

24

8

30

20

“Battery Level” value label

Title 2

24

8

20

≥30

“Last Updated” label

Body

25

8

20

20

“Press to Connect” label

Body

25

20

20

20

“Connect” button

Title 1

60

20

30

20

20

Your final Interface Builder storyboard file (Main.storyboard) should be similar to my example in Figure 8-10.
../images/346879_2_En_8_Chapter/346879_2_En_8_Fig10_HTML.png
Figure 8-10

Updated storyboard for the IOTHome app

From the previous implementation in Chapter 6, the owner for the Home Manager screen was set to the HomeViewController class. As shown in Listing 8-15, update the HomeViewController.swift file to use the DoorViewController class as its parent. Additionally, add the properties for the new labels and create an empty connect() method, with the override keyword, to indicate you will be overriding a method from the parent class.
import UIKit
class HomeViewController: DoorViewController {
    @IBOutlet var temperatureLabel: UILabel?
    @IBOutlet var humidityLabel: UILabel?
    override func viewDidLoad() {
        super.viewDidLoad()
        // Do any additional setup after loading the
        // view, typically from a nib.
    }
    @IBAction override func connect() {
        //Put network init code here
    }
}
Listing 8-15

Updated HomeViewController Class , Including User Interface Scaffolding

For the final step, in the user interface setup process, connect all of the outlets for the labels and Update button handler to the view controller via Interface Builder. Your Connection Inspection output for the class should resemble my implementation in Figure 8-11. If you need a refresher on making the connections, please review Chapters 1 and 6.
../images/346879_2_En_8_Chapter/346879_2_En_8_Fig11_HTML.jpg
Figure 8-11

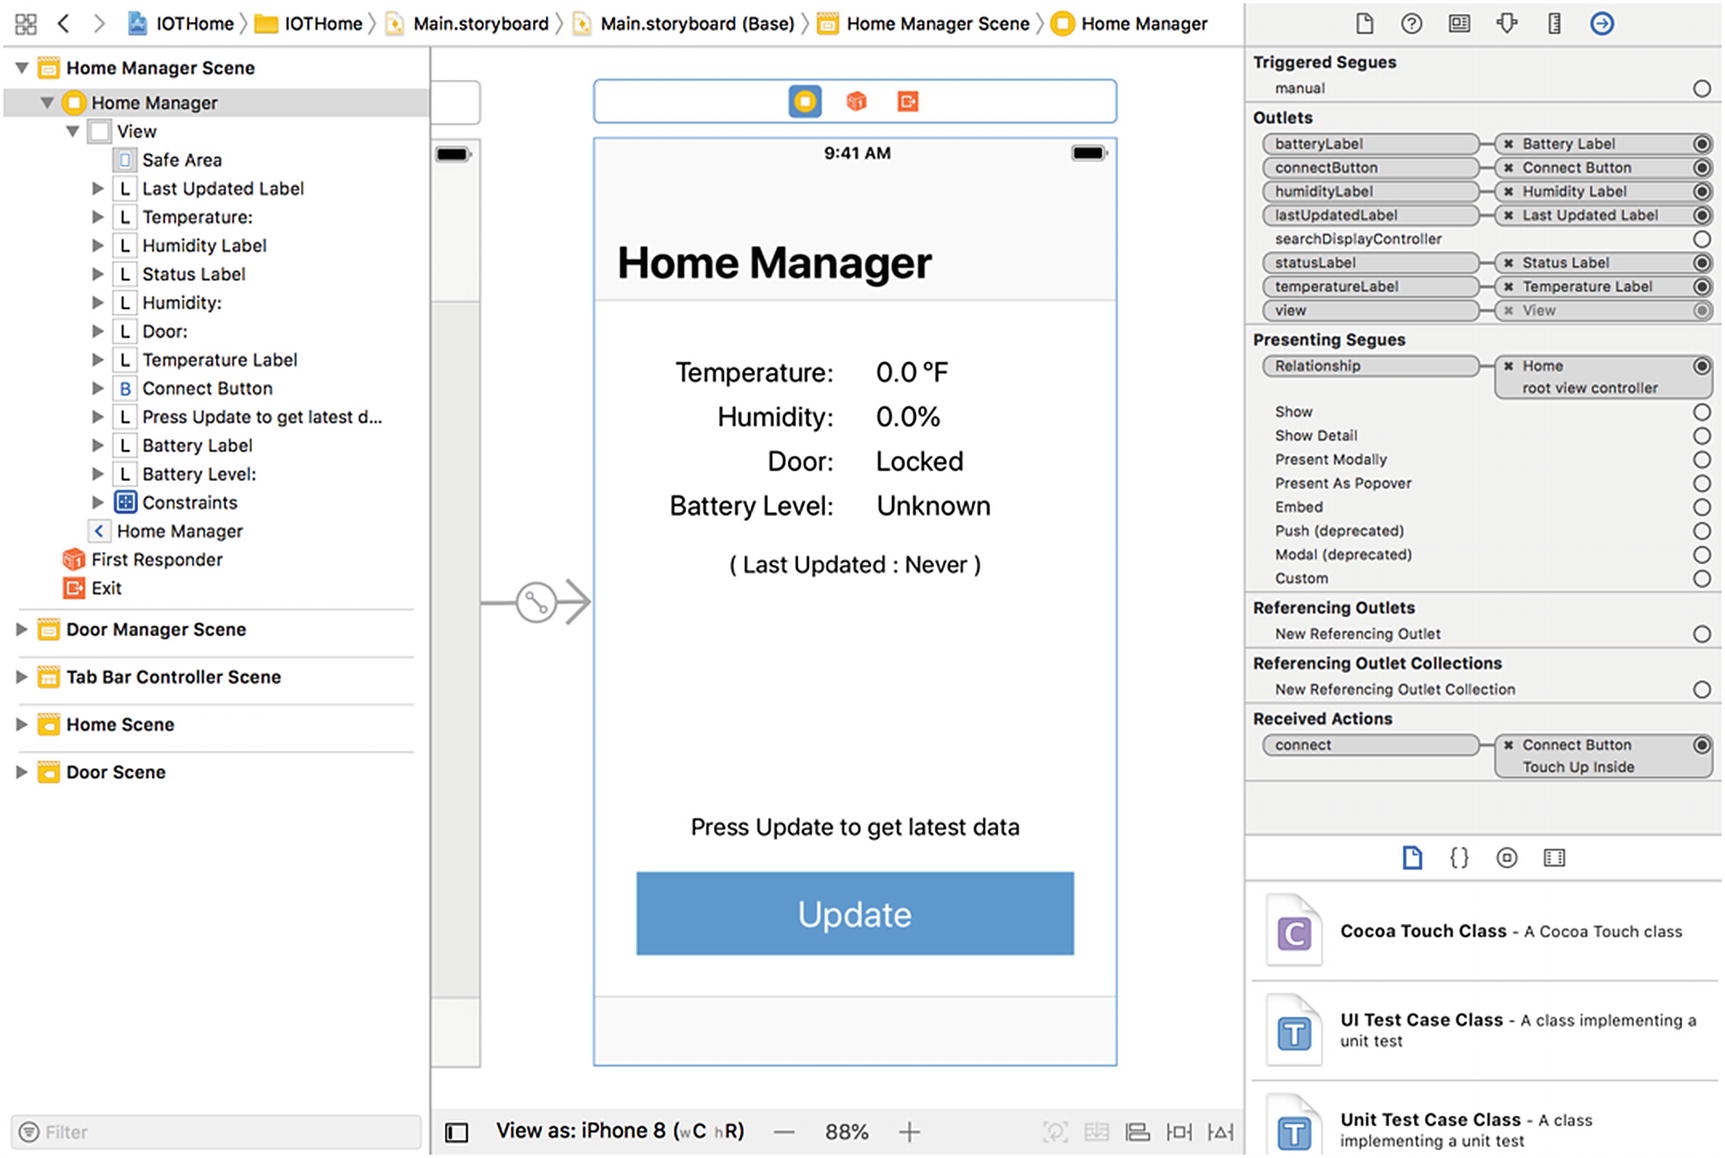
Updated storyboard connections for the Home View Controller

Making and Responding to HTTPS Requests

Now that the user interface is ready for the Home View Controller, you can begin working on the networking code for the project. In Chapter 6, you created a BluetoothService class to streamline Bluetooth connections in the Door View Controller. For this project, you will use a similar pattern, by creating a NetworkManager class to manage network connections in the app. Unlike the Bluetooth Service, the Network Manager will have to be accessed by the Home Manager and AppDelegate class for the app, and the state will have to be the same, regardless of who is calling it. For the sake of simplicity, in this project, I will implement this behavior via a singleton (a lazy-loaded, global object). I have provided my initial implementation of the class in Listing 8-16.
import Foundation
class NetworkManager: NSObject {
    static let shared = NetworkManager(urlString:
        "https://raspberrypi.local")
    let baseUrl: URL
    init(urlString: String) {
        guard let baseUrl = URL(string: urlString) else {
            fatalError("Invalid URL string")
        }
        self.baseUrl = baseUrl
    }
}
Listing 8-16

Initial implementation of Network Manager as a Singleton

Singletons are a contentious subject in the Apple developer community, owing to their nature of being shared globally, but for this chapter, a singleton is a convenient choice, because there are no side effects, and I want to re-create Apple’s approach to accessing hardware APIs (using a single object throughout iOS to manage one resource, for example, GPS, camera). If you are interested in alternatives to singletons, I recommend researching dependency injection. Dependency injection is not a first-class design pattern from Apple, so you should exercise some caution in picking a library or implementation that suits your application.

Singletons are implemented in Swift by adding a static property to an object, which returns an initialized instance of that class. If the object was initialized before, the existing object will be returned; otherwise, a new object will be initialized. This is referred to as lazy-loading. For my initializer, all I needed to do was initialize the class with the base URL for the network requests. For the base URL, use the Bonjour name of the device, as I did in my example. As of this writing, Raspbian ships with Bonjour enabled by default. Bonjour allows Apple devices to find devices on a network by their domain name, instead of an IP address.

For the network implementation, start with the simplest end point first (temperature). To query the temperature, all you have to do is make a GET request to the /temperature end point. In iOS, this operation is accomplished using the URLSession class. Just like the Network Manager, this object is a singleton. The URLSession class exposes network operations in three main categories: data tasks, upload tasks, and download tasks. As the names suggest, upload and download tasks are intended for long-running file uploads or downloads. For short-running operations, such as web server API calls, data task is the most appropriate operation to use. Because all of the API responses from the Raspberry Pi return JSON data, you can wrap the network calls in a single method. In Listing 8-17, I have created the base method for these calls: request(endpoint:httpMethod:completion:). As does its parameters, it takes the end point extension and string representing the method types, and it returns a JSON dictionary containing the response from the server (or an error).
class NetworkManager: NSObject {
    func request(endpoint: String, httpMethod: String,
        completion: @escaping (_ jsonDict: [String: Any]) ->
             Void) {
        guard let url = URL(string: endpoint, relativeTo:
             baseUrl) else {
                return completion(["error": "Invalid URL"])
        }
        var urlRequest = URLRequest(url: url)
        urlRequest.httpMethod = httpMethod
        let session = URLSession.default
        let task = session.dataTask(with: urlRequest) { (data:
          Data?, url: URLResponse?, error: Error?) in
            if error == nil {
                do  {
                    guard let jsonData = data else {
                        return completion(["error": "Invalid
                        input data"])
                    }
                    guard let result = try
                    JSONSerialization.jsonObject(with: jsonData,
                    options: []) as? [String : Any] else {
                           return completion(["error": "Invalid
                           JSON data"]) }
                    completion(result)
                } catch let error {
                    return completion(["error":
                           error.localizedDescription])
                }
            } else {
                guard let errorObject = error else { return
                     completion(["error": "Invalid error
                           object"]) }
                return completion(["error":
                    errorObject.localizedDescription])
            }
        }
        task.resume()
    }
}
Listing 8-17

Network Manager Method for Making HTTP Requests

The basic flow of the method is to create a URL request object using the end point and HTTP method string, then create a completion handler for the data task, and execute the task using the resume() method. You may notice a significant amount of error handling in this method. Although the JSONSerializer and URLSession classes abstract a lot of logic for you, they are prone to failure from incorrect configuration. Adding detailed error handling will make it easier for you to find which step failed later. Because the method returns its result through a completion handler, you can pass along the error object, instead of the result from the server.

In Listing 8-18, I use this method to get the temperature, by calling from the Home View Controller’s connect() method , via a new Network Manager method called getTemperature(completion:). By using completion handler–based logic, you can quickly pass the result object through the entire flow, without having to reprocess it at every step.
class NetworkManager: NSObject {
    ...
    func getTemperature(completion: @escaping (_ jsonDict:
       [String: Any]) -> Void) {
        request(endpoint: "temperature", httpMethod: "GET") {
          (resultDict: [String: Any]) in
             completion(resultDict)
        }
    }
}
class HomeViewController: DoorViewController {
    ...
    @IBAction override func connect() {
        NetworkManager.shared.getTemperature { [weak self]
          (resultDict: [String: Any]) in
            if let error = resultDict["error"] as? String {
                self?.displayError(errorString: error)
            } else {
                DispatchQueue.main.async {
                    if let temperature =
                      resultDict["temperature"] as? String {
                        self?.temperatureLabel?.text = "(temperature) C"
                    }
                    if let humidity = resultDict["humidity"]
                      as? String {
                         self?.humidityLabel?.text = "(humidity)%"
                    }
                }
            }
        }
    }
    func displayError(errorString: String) {
        let alertView = UIAlertController(title: "Error",
             message: errorString, preferredStyle: .alert)
        let alertAction = UIAlertAction(title: "OK", style:
             .default, handler: nil)
        alertView.addAction(alertAction)
        
        DispatchQueue.main.async { [weak self] in
            self?.present(alertView, animated: true,
             completion: nil)
        }
    }
}
Listing 8-18

Using the Network Manager to Get the Temperature from the Server

Caution

When you must access a class’s properties from within a completion handler, always perform the operation through a weak reference. Accessing self directly creates what is referred to as a retain cycle: a memory leak resulting from strong references to a class never being completely released.

Next, run the app and press the Update button, to attempt the network request. The request should fail with an SSL similar to my result in Figure 8-12. This is owing to the Raspberry Pi using a self-signed certificate, just like the issues you faced with Postman and Google Chrome.
../images/346879_2_En_8_Chapter/346879_2_En_8_Fig12_HTML.jpg
Figure 8-12

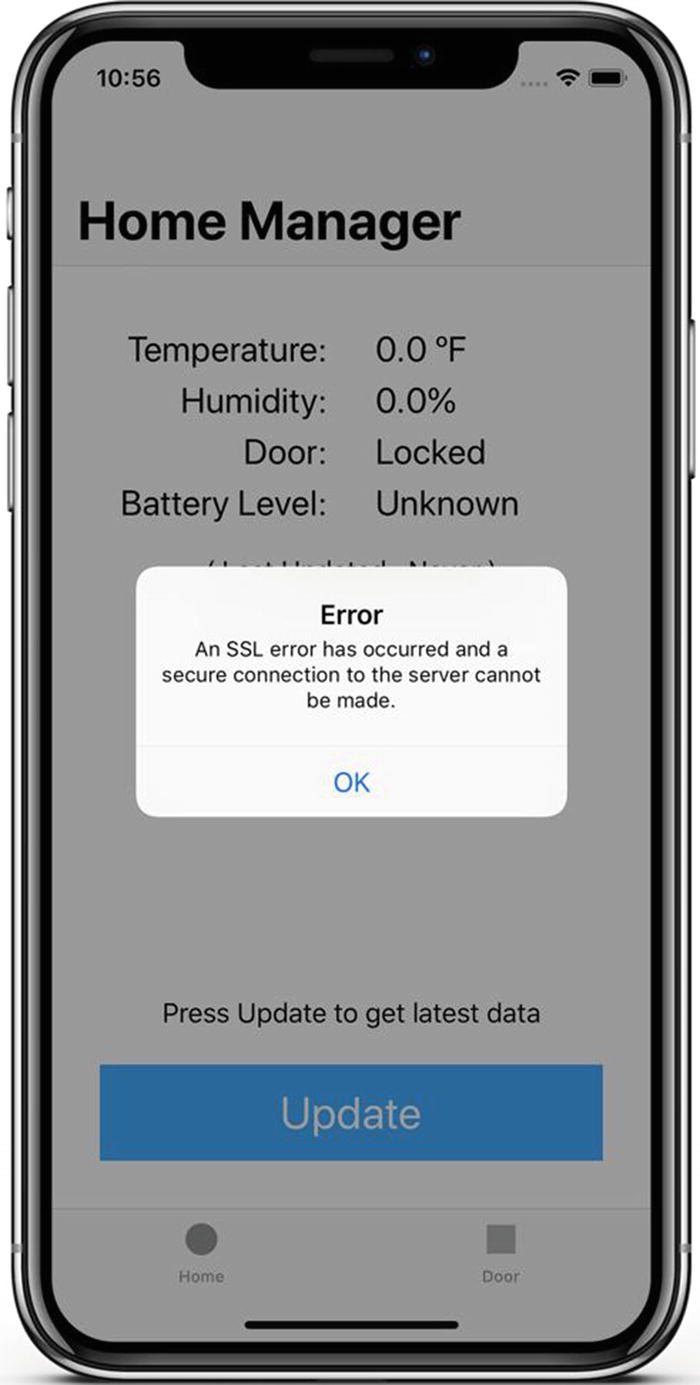
Error message for self-signed certificates

As mentioned earlier in the chapter, Apple wants to enforce verified SSL certificates as the default setting for network operations in iOS apps, to help ensure the safety of users’ data. To enable self-signed certificates for the Raspberry Pi, you can add a whitelist entry, or exception, for the server in the IOTHome app’s Info.plist file . Find the file in your project explorer, then secondary-click (long-press or right-click) it, to select Open As ➤ Source File. When the text editing window for the file appears, append the snippet in Listing 8-19, to enable self-signed certificates for the Raspberry Pi’s domain only.
<?xml version="1.0" encoding="UTF-8"?>
<!DOCTYPE plist PUBLIC "-//Apple//DTD PLIST 1.0//EN" "http://www.apple.com/DTDs/PropertyList-1.0.dtd">
<plist version="1.0">
<dict>
       <key>CFBundleDevelopmentRegion</key>
       <string>$(DEVELOPMENT_LANGUAGE)</string>
       ...
    <key>NSAppTransportSecurity</key>
     <dict>
        <key>NSExceptionDomains</key>
        <dict>
            <key>raspberrypi.local</key>
            <dict>
                <key>NSExceptionAllowsInsecureHTTPLoads</key>
                <true/>
                <key>NSIncludesSubdomains</key>
                <true/>
            </dict>
        </dict>
    </dict>
</dict>
</plist>
Listing 8-19

Info.plist Entry for Enabling Self-Signed SSL

For the final change to enable self-signed certificates, you must override the URLSessionDelegate protocol method for HTTPS authentication challenges. In Listing 8-20, I have implemented this by creating a new URLSession object, which takes a delegate, in the request() method. Within the authentication method, I whitelist the Raspberry Pi’s domain only. After this change, when you try to run the app again, your network requests should now complete successfully.
class NetworkManager: NSObject, URLSessionDelegate {
    func request(endpoint: String, httpMethod:
        String, completion: @escaping (_ jsonDict:
        [String: Any]) -> Void) {
        ...
        var urlRequest = URLRequest(url: url)
        urlRequest.httpMethod = httpMethod
        let session: URLSession = URLSession(configuration:
             URLSessionConfiguration.default, delegate: self,
             delegateQueue: OperationQueue.main)
        let task = session.dataTask(with: urlRequest)
             { (data: Data?, url: URLResponse?, error:
             Error?) in
            ...
        }
        task.resume()
    }
    ...
    func urlSession(_ session: URLSession, didReceive
       challenge: URLAuthenticationChallenge, completionHandler: @escaping (URLSession.AuthChallengeDisposition, URLCredential?) -> Void) {
        let method = challenge.protectionSpace.
             authenticationMethod
        let host = challenge.protectionSpace.host
        NSLog("Received challenge for (host)")
        switch (method, host) {
        case (NSURLAuthenticationMethodServerTrust,
          "raspberrypi.local"):
            let trust = challenge.protectionSpace.serverTrust!
            let credential = URLCredential(trust: trust)
            completionHandler(.useCredential, credential)
        default:
           completionHandler(.performDefaultHandling, nil)
        }
    }
}
Listing 8-20

Enabling Self-Signed SSL Certificates Through URLSessionDelegate

To read the door status for the IOTHome system, you must call the /door/connect end point and then the /door/status end point. In Listing 8-21, I implemented this behavior by nesting the call for the /door/status end point within the completion handler for the /door/connect end point. Just as with the temperature reading, this network call should be initiated when you press the Update button in the app.
class NetworkManager: NSObject, URLSessionDelegate {
    ...
    func getDoorStatus(completion: @escaping (_ jsonDict:
      [String: Any]) -> Void) {
        connectDoor { [weak self] (result: [String: Any]) in
            if (result["error"] as? String) != nil {
                return completion(result)
            } else {
                self?.request(endpoint: "door/status",
                    httpMethod: "GET") { (resultDict: [String:
                    Any]) in
                          completion(resultDict)
                }
            }
        }
    }
    
    func connectDoor(completion: @escaping (_ jsonDict:
      [String: Any]) -> Void) {
        request(endpoint: "door/connect", httpMethod: "POST") {
           (resultDict: [String: Any]) in
             completion(resultDict)
        }
    }
}
class HomeViewController: DoorViewController {
...
@IBAction override func connect() {
        ...
        NetworkManager.shared.getDoorStatus{ [weak self]
           (resultDict: [String: Any]) in
            if let error = resultDict["error"] as? String {
                self?.displayError(errorString: error)
            } else {
                DispatchQueue.main.async {
                    if let doorStatus =
                        resultDict["doorStatus"] as? String {
                        self?.statusLabel?.text =
                           "(doorStatus)"
                    }
                    if let batteryStatus =
                        resultDict["batteryStatus"] as? String {
                        self?.batteryLabel?.text =
                           "(batteryStatus)"
                    }
                    if let lastUpdate =
                       resultDict["lastUpdate"] as? String {
                        self?.lastUpdatedLabel?.text =
                           "(lastUpdate)"
                    }
                }
            }
        }
    }
}
Listing 8-21

Getting the Status of the Door Sensor Through the Network Manager

Finally, to implement the final API calls for the app, you should call the /door/disconnect end point when the app is backgrounded or when the Home screen is navigated away from. This will allow other devices to connect to the door sensor when the app is inactive. As shown in Listing 8-22, you can implement this by creating a disconnectDoor() method in the NetworkManager and calling it from the Home View Controller’s viewWillDisappear() method , as well as the App Delegate’s applicationWillResignActive() method.
class NetworkManager: NSObject, URLSessionDelegate {
    ...
    func disconnectDoor(completion: @escaping (_ jsonDict:
    [String: Any]) -> Void) {
        request(endpoint: "door/disconnect", httpMethod:
          "POST") { (resultDict: [String: Any]) in
            completion(resultDict)
        }
    }
}
class AppDelegate: UIResponder, UIApplicationDelegate {
       ...
       func applicationWillResignActive(_ application:
        UIApplication) {
        NetworkManager.shared.disconnectDoor { (resultDict:
              [String: Any]) in
            NSLog("Disconnect result:
               (resultDict.description)")
        }
    }
 }
 class HomeViewController: DoorViewController {
        ...
       override func viewWillDisappear(_ animated: Bool) {
        super.viewWillAppear(animated)
        NetworkManager.shared.disconnectDoor { (resultDict:
             [String: Any]) in
            NSLog("Disconnect result:
             (resultDict.description)")
        }
    }
 }
Listing 8-22

Automatically Disconnecting from the Door Sensor

Summary

In this chapter, you were able to build a classic IoT device by expanding the Raspberry Pi from earlier chapters to act as a web server and expose its data via HTTPS end points. During this process, you also learned how HTTP requests work, how Express and Noble can offload the hard work of implementing the HTTP and Bluetooth stacks for you, and how to connect to the end points using an iOS app. In a similar manner to setting up HomeKit, many of these tasks were not as much iOS- or Raspberry Pi–specific as they were implementations of established Linux and web application development practices.

Before single-board computers such as the Raspberry Pi achieved commercial success, many proprietary system-on-a-chip solutions were providing this same core functionality, GPIO and a web server, with a much higher price tag and learning curve. Thanks to the streamlining of technologies such as these, the IoT continues to expand, but as you will learn later in the book, you should also remember to add HTTPS or other security measures, to help make it a safe IoT.

..................Content has been hidden....................

You can't read the all page of ebook, please click here login for view all page.
Reset
18.118.1.232