So far, you have learned how to use the motion and GPS sensors on iOS devices to build a workout app called IOTFit, with the capabilities to track activity data (steps, altitude, step count) and display the user's workout path on a map. Additionally, you’ve learned how to store this data to a property-list (.plist) file inside the app’s Documents folder.
While it is useful to store data within one app, you can help the user even more by saving the data in a way that is accessible to other workout apps. For this purpose, you can use the HealthKit framework. HealthKit allows you to abstract workouts into HKWorkout objects and store them in the iPhone’s HealthKit store. The HealthKit store is an encrypted area in memory in which the iOS Health app and HealthKit-authorized third-party apps can share information about a user. For example, by enabling HealthKit, users can see workouts they created in IOTFit as discrete items on the iOS Health app. They can also use HealthKit to read display workouts from other apps within IOTFit.
Aside from security, one of HealthKit’s most powerful features is the breadth of data it can store via its HKSample class. For the sake of clarity, this chapter will focus on how to apply it to workout-related data, but you can make apps to manage everything from heart rate to UV exposure to vitamin C consumption.
Learning Objectives
In this chapter, by integrating HealthKit into IOTFit, you will learn the following key concepts of Internet of Things (IoT) app development:
Requesting permission to the iOS HealthKit Store
How to save data to HealthKit
How to load data from HealthKit
How to display data on a Table View Controller
These changes will be expressed by expanding the previously developed WorkoutDataManager class and adding a History tab to the app, which will contain a table view documenting the user’s workout history, as shown in Figure 4-1.
Figure 4-1
Modified wireframe for the IOTFit app, including the new History tab
As in the previous chapters, this project builds on the progress you have made through Chapter 3. If you get stuck or have to reference the completed code for this project, it is available on the GitHub repository for this book, under the Chapter4 folder (https://github.com/Apress/program-internet-of-things-w-swift-for-ios).
Requesting HealthKit Permission
Given the sensitive nature of health data, it should come as no surprise that using HealthKit requires you to modify your app to declare that it wants to use health-related features and presents a permission alert when users want to access these features. Similar to Core Motion, HealthKit is only available on newer iPhones, iPod touches, and the Apple Watch, requiring you also to query for the availability of these features. Luckily, you can use the same workflow you learned for requesting permissions in Core Motion and Core Location to add HealthKit to your app.
Note
Similar to the Core Motion features discussed in Chapter 3, this chapter is designed to run on an iPhone or iPod touch. As of this writing, Apple does not expose the Health app or HealthKit on iPad.
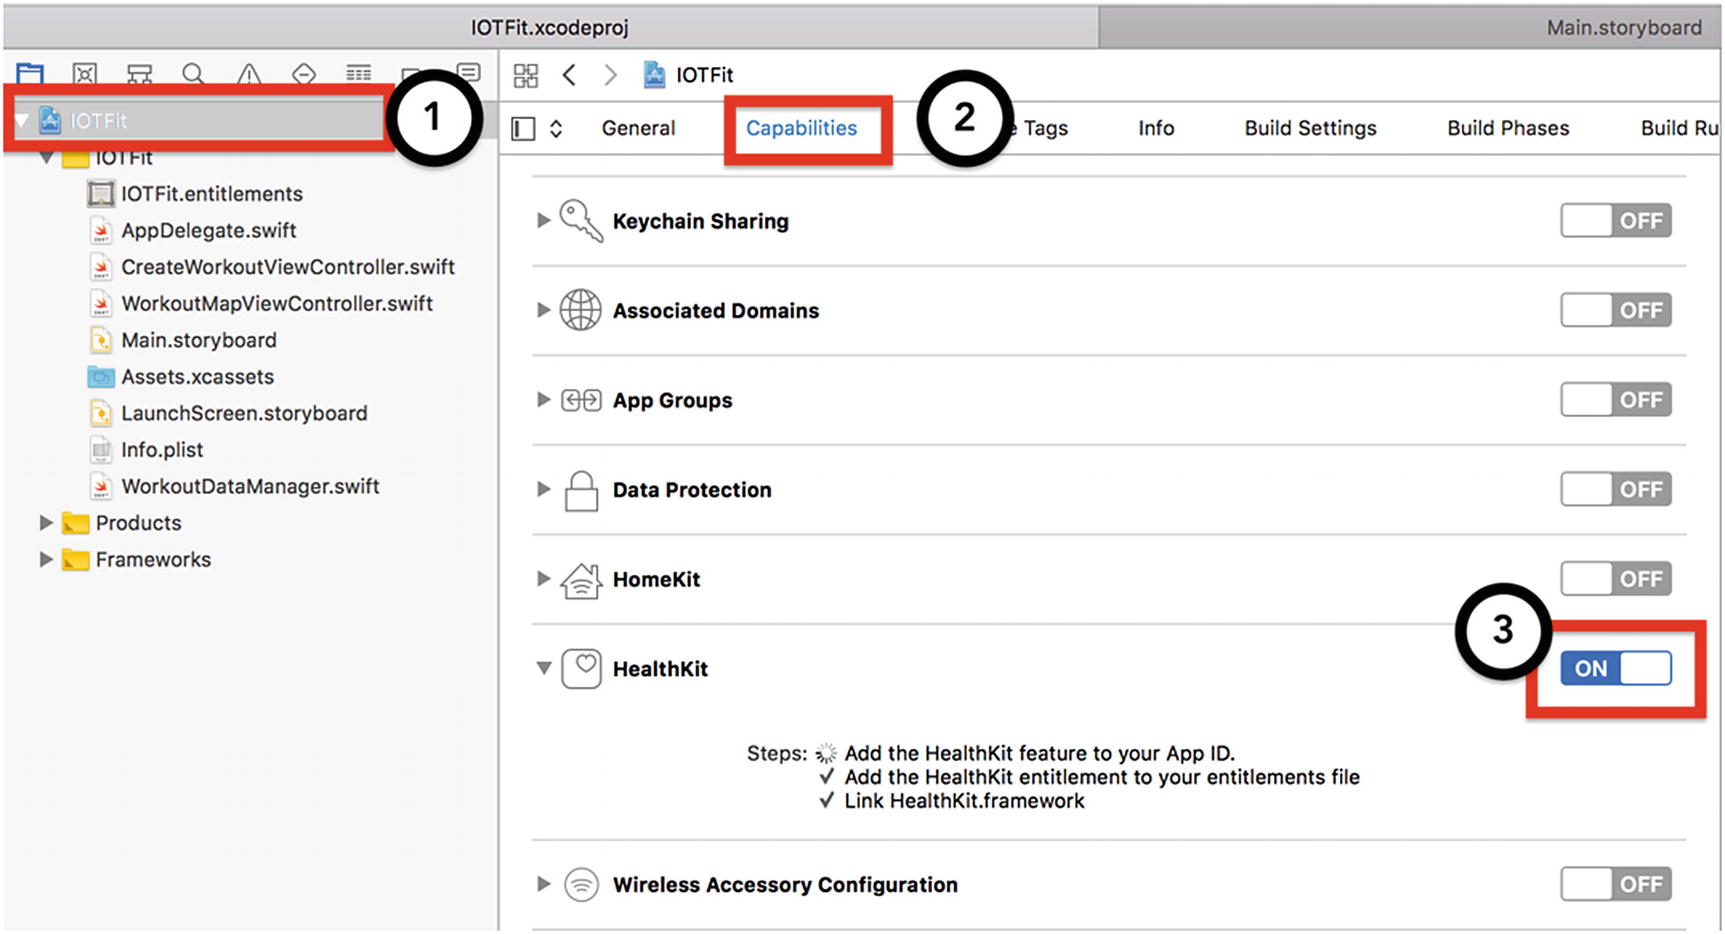
To begin, make a copy of the IOTFit app you developed in Chapter 3 or download a copy from the GitHub repository for this book. Next, select the project settings for the app, by clicking IOTFit in the project hierarchy navigator. As shown in Figure 4-2, to declare that the app wants to advantage HealthKit, add the HealthKit capability to the app by clicking the Capabilities tab. Scrolling down to HealthKit, and clicking the switch once to flip it to ON.
Figure 4-2
Enabling the HealthKit capability in the IOTFit project
If the app is not linked to a valid Apple Developer account (paid or free are both acceptable), enabling the HealthKit capability will fail. This will be expressed by the switch reverting to the OFF position. If you are having trouble remembering how to connect your project to an Apple Developer account, refer back to Chapter 1.
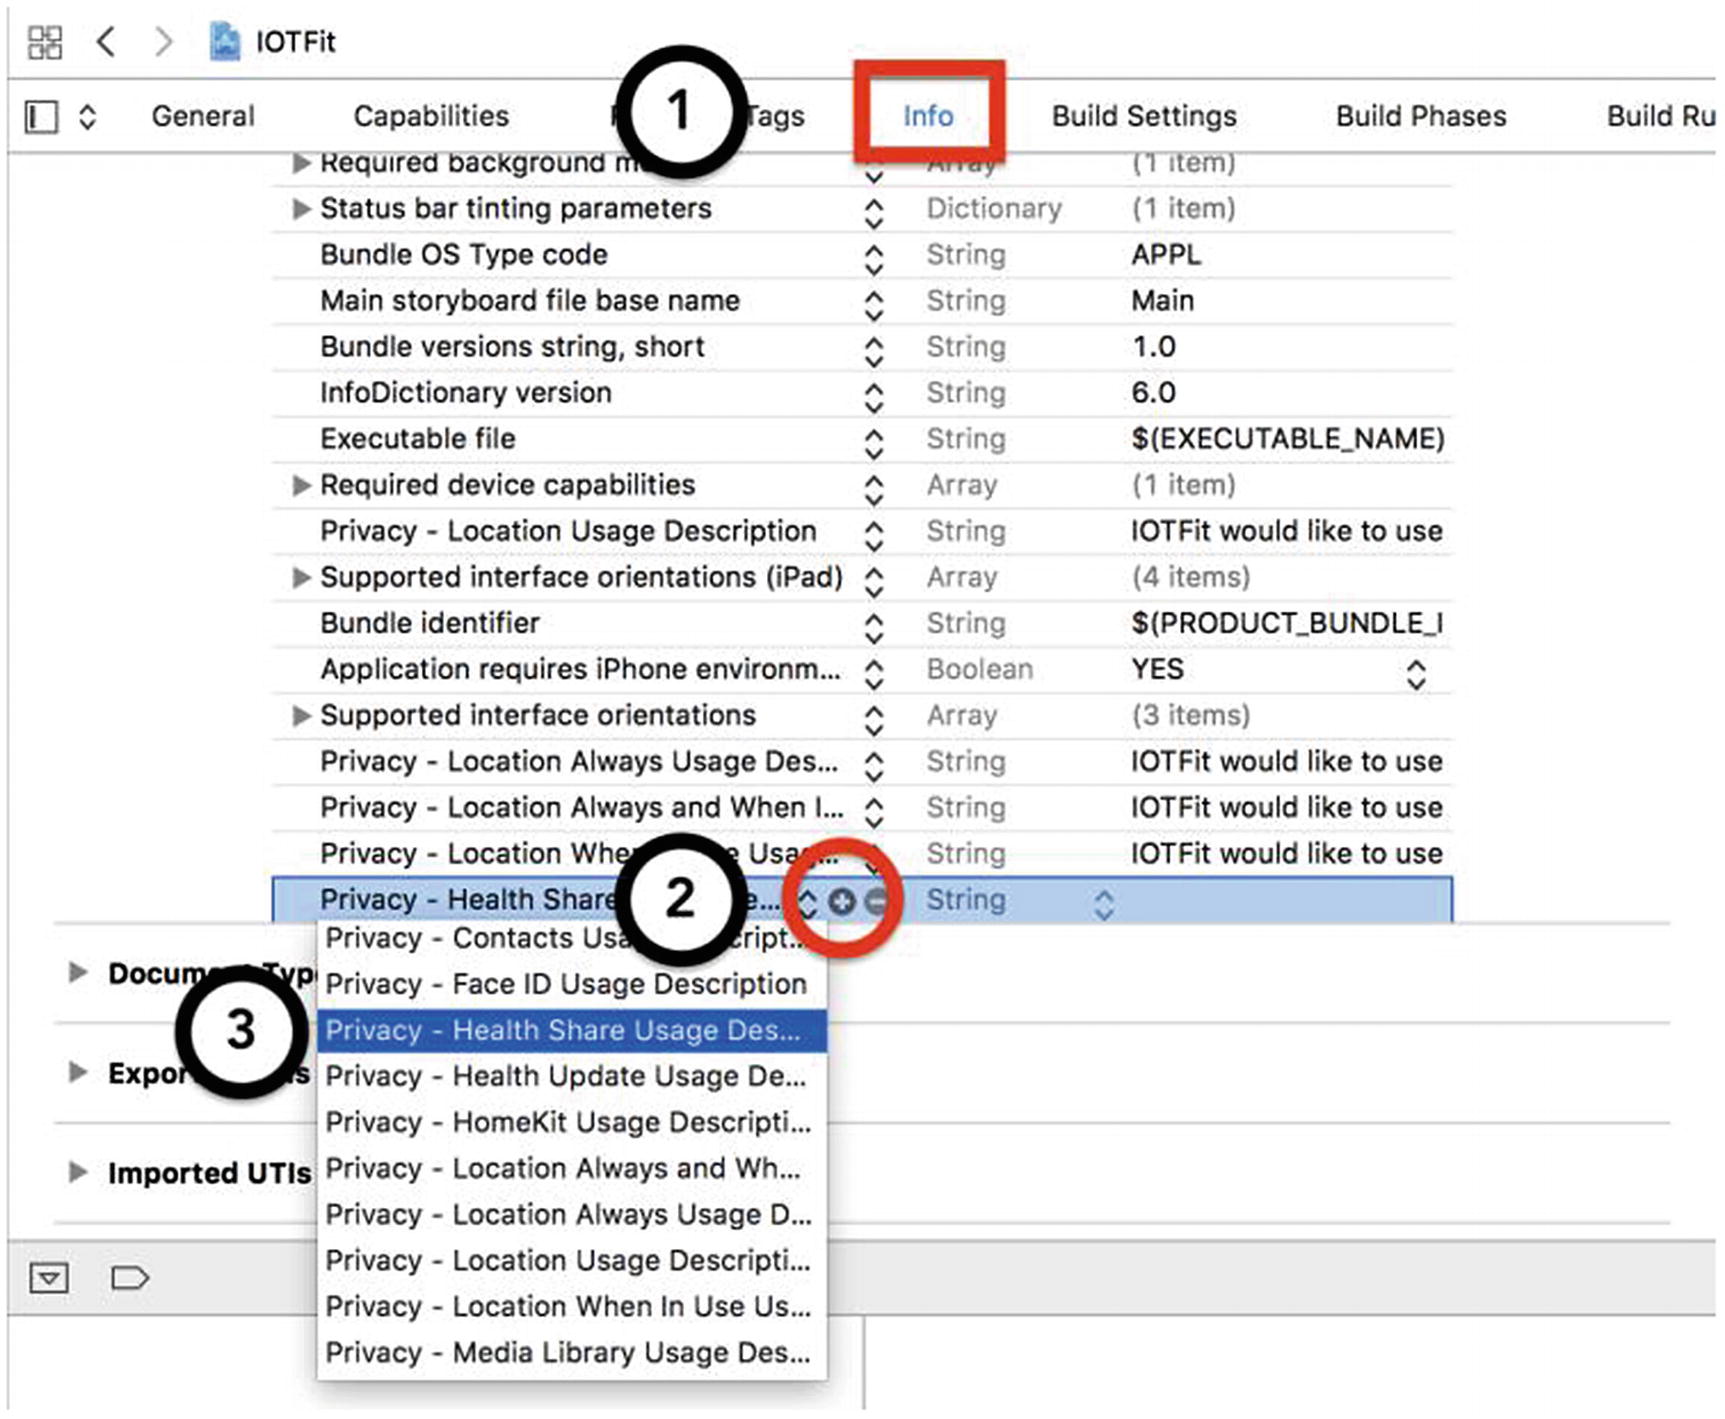
Next, as with all permission-based features, you must add keys to the project’s information property list (Info.plist), to define the messages that will appear in the system-generated permission alerts. As shown in Figure 4-3, click the Info tab, then click the (+) button that appears when you hover over the Privacy – Location When in Use Description row, to add a new key.
Figure 4-3
Adding new keys to IOTFit’s information property list
To enable reading data from HealthKit, add the Privacy – Health Share Usage Description key-value pair. For the description string, the text I used was “IOTFit would like to use HealthKit permission to import workout data from the Health app into the History feature of the app. This information will not be shared online or with third parties.” To enable saving data to HealthKit, add the Privacy – Health Share Usage Description key-value pair. The text I used for the description string was “IOTFit would like to use HealthKit permission to export workout data to the Health app. This information will not be shared online or with third parties.”
In the same manner as Core Location, you should query for HealthKit availability and display its permission prompt before your first operation that attempts to use the framework. The primary class for accessing HealthKit from your applications is HKHealthStore. Similar to the manager objects from Core Motion, you instantiate an instance of the class and make calls to HealthKit through that. Unlike Core Motion, there is a hard requirement from Apple that you only create one instance of the class in your application. For this purpose, the most appropriate place to put the HKHealthStore object would be in the WorkoutDataManager singleton. In Listing 4-1, I have modified the WorkoutDataManager class to add a HKHealthStore object as a property and instantiate it if the feature is available on the device.
import Foundation
import CoreLocation
import HealthKit
...
class WorkoutDataManager {
static let sharedManager = WorkoutDataManager()
...
private var healthStore: HKHealthStore?
private init() {
print("Singleton initialized")
loadFromPlist()
if HKHealthStore.isHealthDataAvailable() {
healthStore = HKHealthStore.init()
}
}
...
}
Listing 4-1
Adding an HKHealthStore Property to the WorkoutDataManager Class
For the IOTFit app, the two points at which you will be interacting with HealthKit are when you must save a workout and when you have to read the list of workouts to display them on the Workout History Table View Controller. To make the code easier to read, I will perform these operations through loadWorkoutsFromHealthKit() and saveWorkoutToHealthKit() methods in the WorkoutDataManager class. As you do not know which operation the user is going to perform first, you should make the permission request in both methods. If the user has already accepted or declined the permission request, no alert will be shown, and the next instruction will execute immediately.
The method HealthKit uses for requesting health permission is requestAuthorization(toShare:read:completion:), which is part of the HKHealthStore class. As its parameters, this method takes in a set of the types of health data you want to read and write and a completion handler that will execute when the user has made his/her decision (or immediately upon a second call). To work with HealthKit, you must specify every type of data you wish to read or write. My secondary reason for suggesting making the permission call before every HealthKit operation is because if your type list changes between app versions, iOS will show the alert pop-up again, asking to authorize your app for the new permissions. In Listing 4-2, I have added the new loadWorkoutsFromHealthKit and saveWorkoutToHealthKit() methods to the WorkoutDataManager class and added a call to saveWorkoutToHealthKit() in the saveWorkout(duration:) method, to trigger the health permission pop-up. Thanks to the healthStore property being declared as an optional value, if the availability request in the init() method fails, the permission request and its subsequent HealthKit operations will not execute.
//Request completed, it is now safe to use HealthKit
})
}
}
Listing 4-2
Requesting Health Permissions Before Reading or Writing Health Data
To reduce duplicated code, I made the hkDataTypes computed property to represent the list of data types the app required. The types you must use to request permissions are implementations of the HKSampleType abstract class. As the name suggests, they represent data that is saved and measured in samples. You will learn more about how HealthKit represents data in the next section. Samples are just one of many types you can use. The most important point to remember now is that, as with like health permissions, not all sample types are available on all iOS devices, and you must query for the types you want to use before attempting to use them.
Now, if you run the IOTFit app and try to save a workout, you will be presented with the health permission alert, as shown in Figure 4-4. Users can selectively choose permissions they want to allow from this screen or turn everything on. When they press the Allow button, the settings will be saved, and the completion handler in your app will execute.
Figure 4-4
Health permission alert for the IOTFit app
Writing Data to HealthKit
The easiest way to start working with HealthKit is to use it to save workouts to the HealthKit store. In the preceding chapters, you generated enough data to get a good snapshot of the user’s activity, but it needs to be serialized (massaged) into a format that can be consumed by HealthKit. Rather than storing data as simple data types, such as String or Float, HealthKit employs a hierarchical system that allows you to group related statistics together. It also has its own system of units that you must learn to work with, in order to make your data conform to a format the HealthKit store can recognize. In this section, you will learn the conceptual foundations for this system and how to use it to convert raw numbers into health data.
Understanding How HealthKit Represents Data
The HealthKit store in iOS classifies data into two primary categories: characteristic data and sample data. Characteristic data refers to qualitative information about a user, which is described in characteristics, rather than units, and does not change frequently. For instance, a user’s blood type or skin color. In HealthKit, these are represented by instantiations of the HKCharacteristicType class. Sample data refers to information arising from a user action, which can be measured and described in quantitative units (for example, meters) or quantitative descriptors of the data (for example, steps) or the aggregate action (for example, workouts). In HealthKit, these are represented by subclasses of the HKSample class. In the IOTFit app, you will be working primarily with sample data.
In HealthKit terminology, quantitative sample data (such as step count or distance) are called quantity samples and represented by objects of the HKQuantitySample class. Sample data that describes the characteristics of an activity (such as if a workout should be described as bicycling or running) are called category samples and represented by HKCategorySample objects. For describing aggregate activities, HealthKit defines two final sample types: workouts and correlations. Workouts are represented by HKWorkout objects and fit the purpose their name suggests: they are meant to represent a set of data about a workout the user has performed. Correlations are represented by HKCollection objects and although their name is a bit hard to derive meaning from, their purpose is similar to that of workouts: they are specifically intended for grouping data about food that was consumed or a blood pressure reading.
Units in HealthKit are represented by the HKUnit objects. When storing quantitative samples, you must specify which HKUnit class to use to represent the data. You can do this by either using a convenience method provided by Apple for commonly used units (for example, HKUnit.meter()) or defining your own by passing a String to the init(from:) convenience initializer method for the HKUnit class.
Creating and Saving HealthKit Samples
For the IOTFit app and your own projects, you must follow these steps to save data to HealthKit:
Verify that the device is capable of storing the samples you want to work with (workouts, correlations, and quantity samples)
Create an aggregate sample object (workout or correlation)
Create quantity samples
Save the samples to a workout
In Listing 4-2, you performed the verify step by checking the quantity types you wanted to work with (step count, flights climbed, workout type, walking distance, and cycling distance). Now that you have a better idea of how HealthKit represents data, you can begin to convert the simple numerical data from the Create Workout View Controller into something HealthKit can consume.
The first step you must perform to save data to HealthKit is to create a HKWorkout object to represent the workout. There are several convenience constructor methods for the HKWorkout class, but the most appropriate one for storing workouts from IOTFit is init(activityType:start:end:duration:totalEnergyBurned:totalDistance:distanceQuantity:device:metadata), which will allow you to specify a workout type (HKWorkoutType), start and end dates (Date objects), and workout distance. To enable this operation, as well as eventually saving such other statistics as flights climbed, you have to modify the Workout struct to add the new parameters and refactor the calling functions to use a Workout as a parameter, instead of a long list of parameters. In Listing 4-3, I have modified the CreateWorkoutViewController and WorkoutDataManager classes to include these changes.
class CreateWorkoutViewController: UIViewController {
...
@IBAction func toggleWorkout() {
switch currentWorkoutState {
...
case .active:
currentWorkoutState = .inactive
...
if let workoutStartTime = workoutStartTime {
let workout = Workout(startTime: workoutStartTime,
Modifying the CreateWorkoutViewController and WorkoutDataManager Classes to Include All Workout Data
Now that you have access to all the data you require, you can try to create the HKWorkout object. In Listing 4-4, I have modified the saveWorkoutToHealthKit(...) method to include the new call to create the HKWorkout object. I created the createHKWorkout(workoutType:startDate:endDate) method to help manage converting the custom WorkoutType struct to HealthKit’s HKWorkoutActivityType category sample type. Use a guard-let or if-let block to verify that the object was created successfully, before attempting to use it.
One of the downsides of working with HealthKit is that the setup steps required to use it are very rigid. After creating a workout, the only way to attach samples to it is by first saving it to the HealthKit store. If the operation is successful, you can begin to add samples to the workout. In Listing 4-5, I have modified the saveWorkoutToHealthKit(...) method to save the workout and then make a call to a function that will be used to add the samples.
As shown in the addSamples(...) method, to add samples to a workout, you build a series of HKSample objects and call the add(to:completion:) method on the iOS health store, using the workout object you created earlier. The setup code for an HKSample object can get lengthy, so I created methods to generate each sample and append it to the array.
Harkening back to the discussion on sample types in HealthKit, to store quantitative data about the workout, you will want to use the HKQuantitySample class. In comparing the convenience initializers, the best one to use would be init(type: quantity: start: end:). At this point, the scaffolding code starts to get lengthy. To use the quantity parameter, you must generate a HKQuantity object and specify an HKQuantityType object to represent the quantity type. Similarly, you will also have to specify the unit type. In Listing 4-6, I have implemented the addStepCountSample(...) and addFlightsClimbedSample(...) methods, which implement all of these steps.
Creating “Step Count” and “Flights Climbed” Sample Objects
In these methods, the two lines that stand out are the method signature and lookup of the quantity type. The inout keyword specifies that a parameter should be passed by reference. For C/C++ programmers, this term should be very familiar. Passing by reference is a way to modify the contents of a parameter from within a method, rather than operating on a copy of that data. When you make the method call, you add the & symbol in front of the name of the variable that will be modified to pass it by reference. Apple uses this pattern frequently in their methods that pass back an Error object.
In the line where you look up the quantity type, once again you will have to check that the result is valid before using it. As mentioned earlier, some sample types are not available on all iOS devices or iOS versions. Better to be safe than sorry!
The final quantity type you must add is workout distance. One of the particularities of this quantity type is that Apple treats walking/running distance and cycling distance as separate quantity types. To remove this limitation, in Listing 4-7, I have implemented the addWorkoutDistance(...) method, using the workout type to specify the quantity type.
Believe it or not, this completes all the steps required to save data to HealthKit! Now, if you complete a workout on the Create Workout View Controller, it will create a new workout that you can view in the iOS Health app, as shown in Figure 4-5. To view the workout, in the Health app, click the Sources tab, then IOTFit, then Data, and finally Workouts.
Figure 4-5
Viewing a saved workout in the iOS Health app
Reading Workout Data from HealthKit
Now that you understand how HealthKit represents data, as well as the steps required to convert simple data types into HealthKit sample data, you can use that knowledge to read data from the iOS HealthKit store. In the IOTFit app, you will use this to fetch the user’s workout history. Much like writing data, the primary data type you will use for reading data from the HealthKit store is HKSample.
To fetch data, you must perform a query on the HealthKit store, using the HKSampleQuery class. As with creating an HKSample object, there are several convenience initializers you can use, but for the IOTFit app, HKSampleQuery(sampleType:predicate:limit:, sortDescriptors:resultsHandler) is an appropriate choice. There is a lot to unpack in this, but the important concepts are that you must specify a sample type to fetch, a predicate to filter the search results, and a completion handler to process the results. In Listing 4-8, I have updated the loadWorkoutsFromHealthKit() method to include a query for workouts, in decreasing date order (newest first), limited to the newest ten from the preceding week.
let predicate = HKQuery.predicateForSamples(withStart:
weekAgo, end: Date(), options: [])
let sortDescriptor = NSSortDescriptor(key: "startDate",
ascending: false)
let query = HKSampleQuery(sampleType: workoutType,
predicate: predicate, limit: 10, sortDescriptors:
[sortDescriptor], resultsHandler: { (query:
HKSampleQuery, samples: [HKSample]?, error:
Error?) in
if let error = error {
NSLog("Error fetching items from HealthKit ")
completion(nil)
} else {
let workouts = [Workout]()
completion(workouts)
}
})
self?.healthStore?.execute(query)
}
})
}
Listing 4-8
Setting Up a HealthKit Sample Query
Unless a user disables location and step counting, iOS is always collecting health data on a user. To avoid the risk of your query taking too long, I recommend using a date-based predicate or (page) limit to restrict the query results. You can always use your user interface to allow the user to see more search results. Another important point to remember is that after you declare the query, it will not start until you call the execute() method on your HKHealthStore object.
Next, to use the results of the sample query in the app, you must convert the HKSample array to custom Workout structs you have been using throughout the project. In Listing 4-9, I have further expanded the loadWorkoutsFromHealthKit(completion:) method to perform the conversion logic.
Converting HealthKit Sample Objects to Simple Data Types
In this function, the first challenge I had to tackle was making sure the sample was a HKWorkout object. In order to make a generic completion handler, Apple must use a type general enough to handle all sample data. However, for the purposes of IOTFit, the type I had to work with was HKWorkout. Next, I had to extract simple data types from HKSample objects. To cast the data down, I used the doubleValue(for:) method and specified the unit to convert from. If the operation fails, I return 0 as a default value. The final challenge was to convert the HKWorkoutType property to a String with which to build a Workout object. This, however, was easily taken care of with a switch() statement.
Using a Table View Controller to Display Data
The final step in this chapter is to display the workout history. For many data-based apps, a Table View Controller is a great choice for letting users interact with the data. Out of the box, it provides you with a scrolling user interface, an easy way to display results in a uniform manner (cells), and components that you can easily customize through Interface Builder. The difficulty, however, is that the setup code for the UITableViewController class is very protocol-heavy and can be intimidating for newer iOS developers. In learning how to display the workout results for IOTFit on a table, you will learn three fundamental skills for working with the UITableViewController class that you can apply to other apps: adding a Table View Controller from Interface Builder, setting up the UITableViewDataSource delegate methods for populating the table, and setting up the UITableViewDelegate delegate methods for displaying the workout content in each cell.
To begin, use Xcode’s template feature to create a new UITableViewControllersubclass. As in the case of the examples in Chapters 1 and 2, go to the File menu, then select New ➤ File and, from the template picker, choose Cocoa Touch Class, as shown in Figure 4-6.
Figure 4-6
Creating a new Cocoa Touch class
Next you will be asked to name the new class and select a base class. As shown in Figure 4-7, name the new file WorkoutTableViewController and choose UITableViewController as the base class.
Figure 4-7
Creating a new UITableViewController class based on a template
Your new WorkoutTableViewController class should resemble Listing 4-10, in which Apple’s template provides you with stubs for the required methods you require to implement the UITableViewDelegate and UITableViewDataSource protocols.
import UIKit
class WorkoutTableViewController: UITableViewController {
override func viewDidLoad() {
super.viewDidLoad()
}
// MARK: - Table view data source
override func numberOfSections(in tableView:
UITableView) -> Int {
return 0
}
override func tableView(_ tableView: UITableView,
numberOfRowsInSection section: Int) -> Int {
return 0
}
override func tableView(_ tableView: UITableView,
cellForRowAt indexPath: IndexPath) ->
UITableViewCell {
let cell = tableView.dequeueReusableCell(
withIdentifier: "Identifier", for:
indexPath)
return cell
}
}
Listing 4-10
Empty WorkoutTableViewController Class
Setting Up the User Interface
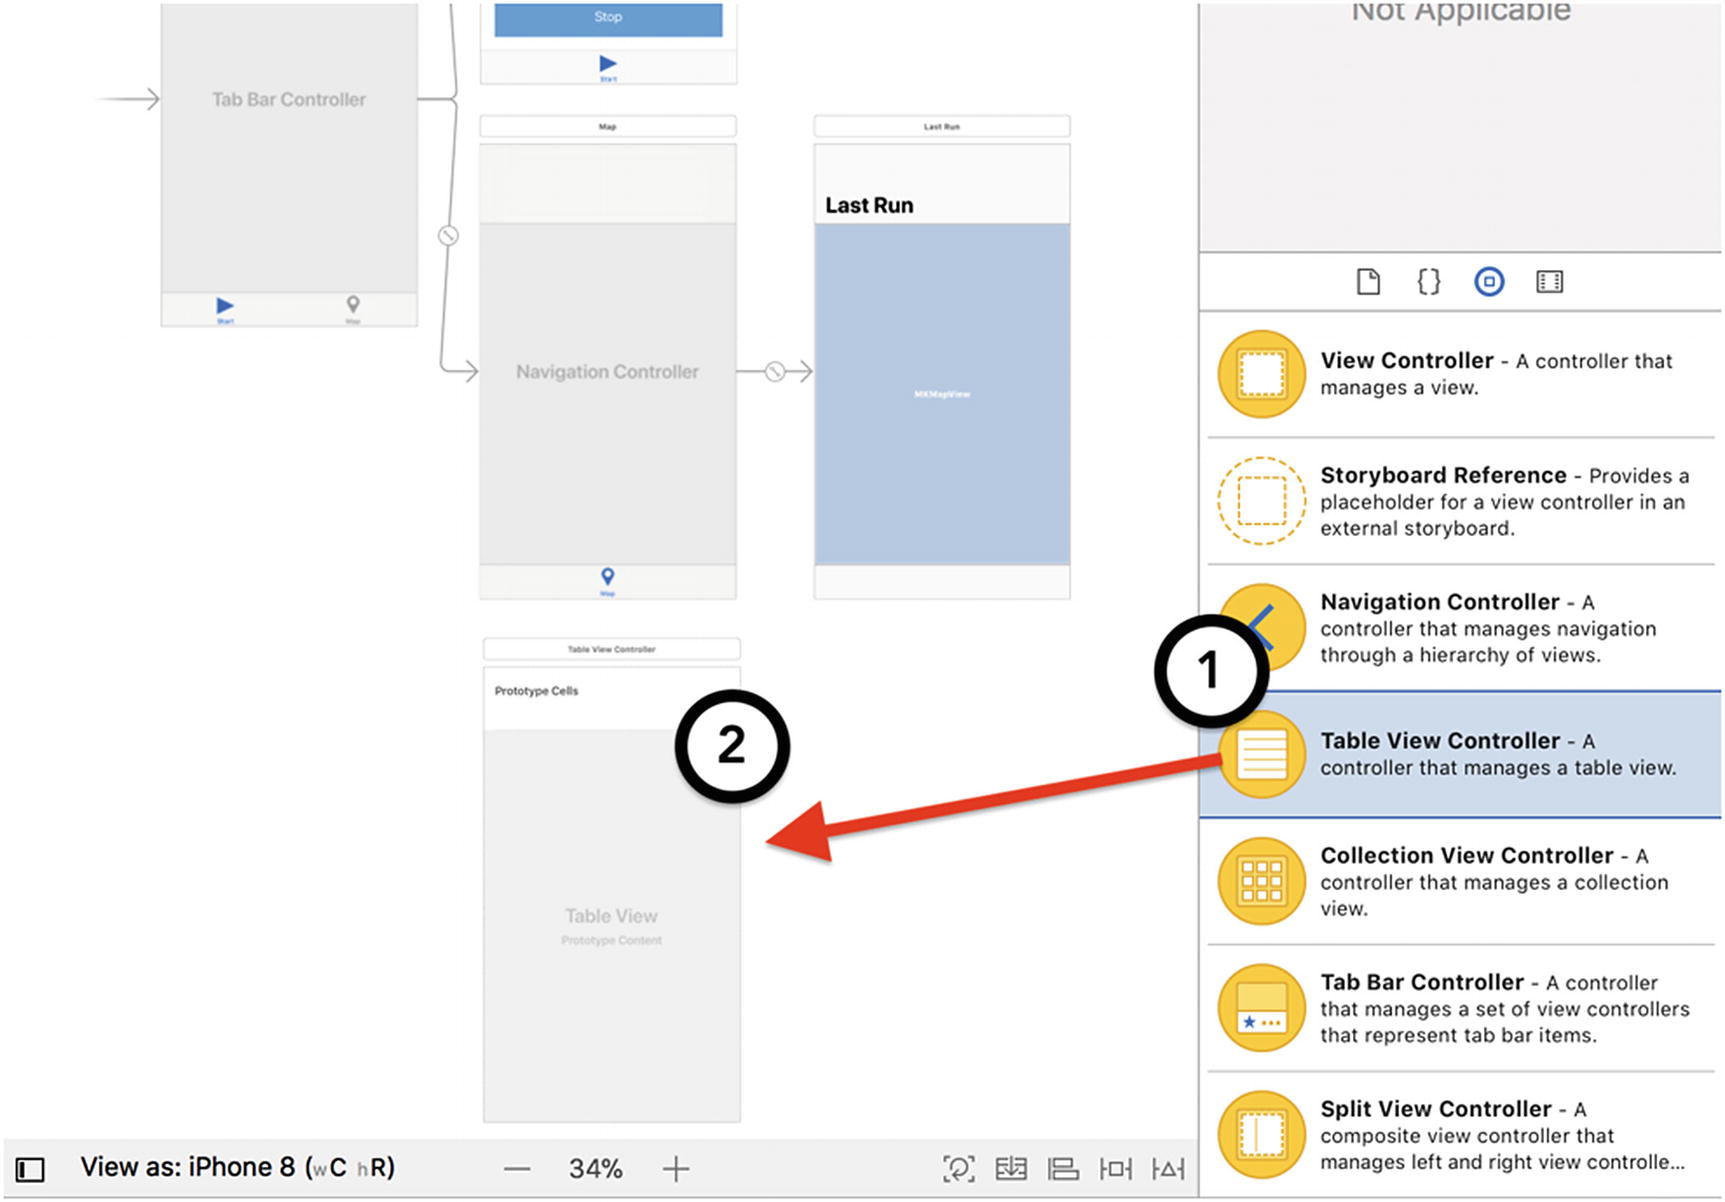
First, select the Main.storyboard file from the Project Navigator to open Interface Builder in the Xcode’s editor (center) pane. As shown in Figure 4-8, drag and drop a Table View Controller object from the Object Library to the storyboard.
Figure 4-8
Adding a Table View Controller to the storyboard
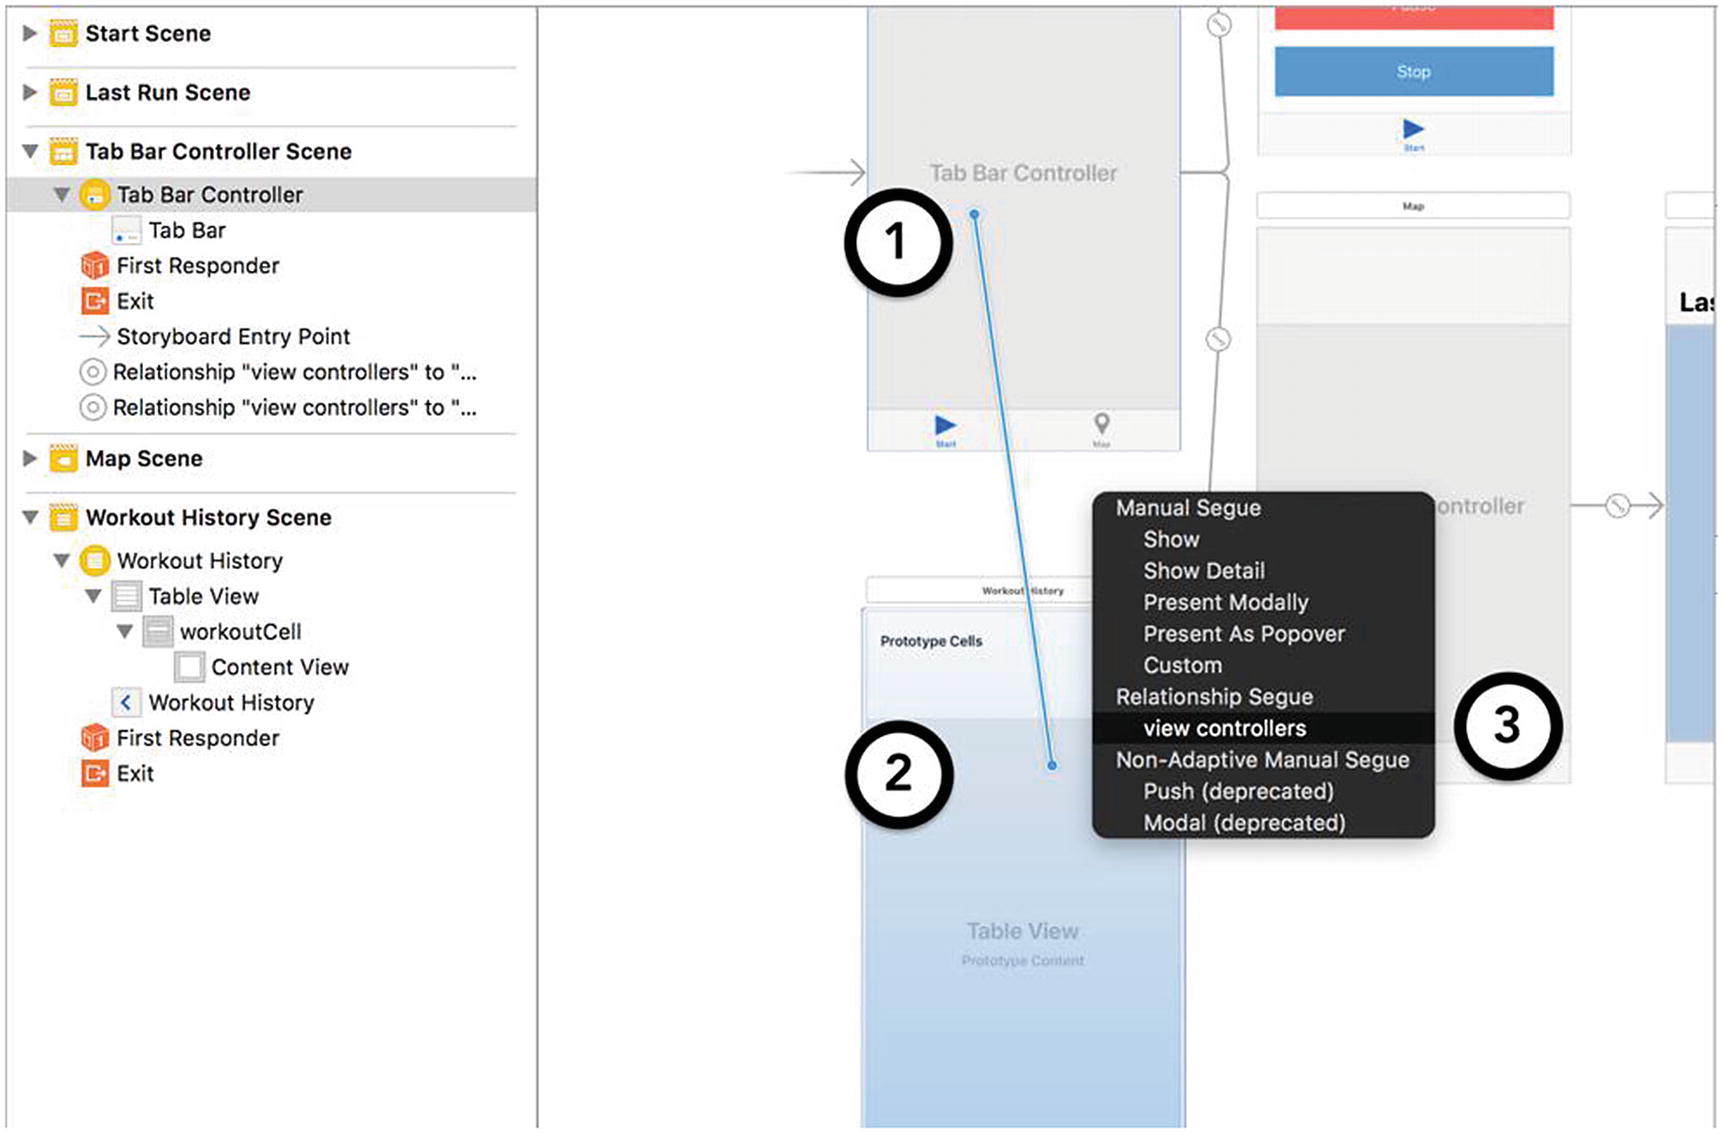
To attach the Table View Controller to the Tab View Controller, hold down the Control button on your keyboard and drag a line to the Tab View Controller. From the context menu, select View Controllers as the relationship type, as shown in Figure 4-9.
Figure 4-9
Adding new items to a Tab View Controller
To change the icon on the Tab bar, click the Tab Bar under the Table View Controller, and in the Attributes Inspector, select History from the System Item row, as shown in Figure 4-10.
Figure 4-10
Changing the icon for a Tab bar item
To make the cell match the wireframe in Figure 4-1, where there are two lines of text, click the cell, and in the Attributes Inspector, set the style to Subtitle, as shown in Figure 4-11.
Figure 4-11
Changing the style of a Table View Cell
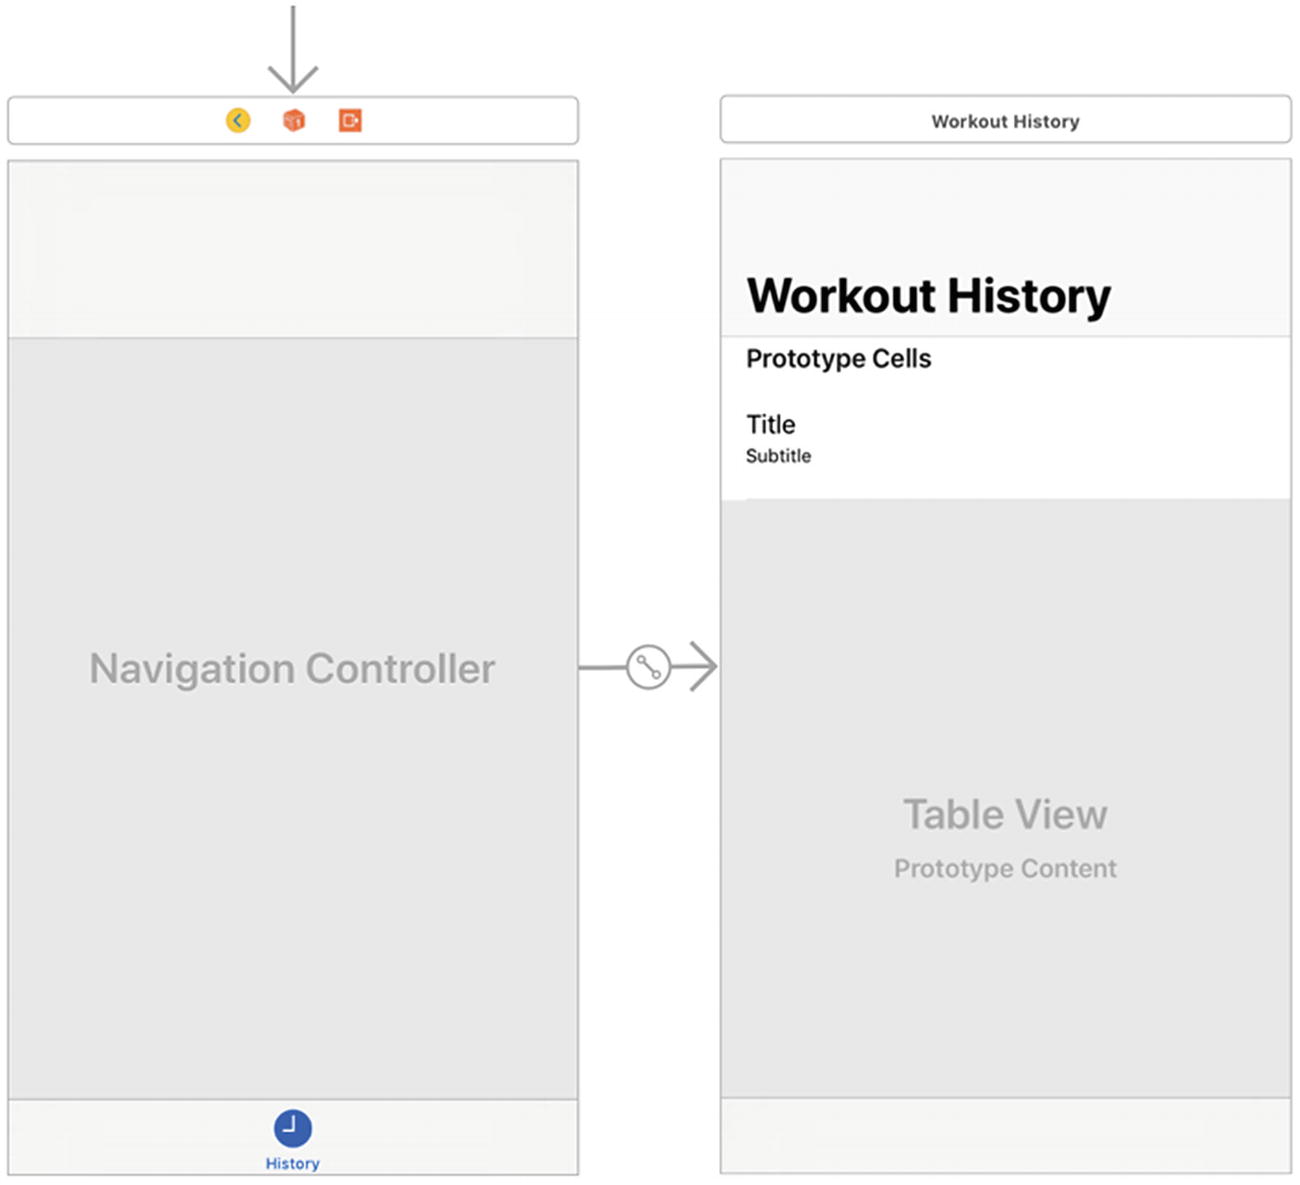
For the final layout task, you must embed the Table View Controller in a navigation controller. This will help the app maintain consistency between the workout history and map screens. To perform this operation, click to select the view controller and then, from the Editor menu, select Embed In ➤ Navigation Controller. To edit the title of the navigation item for the Workout Table View Controller, double-click the navigation bar above the screen and begin typing in the text field that appears. To make the text large, enable the Prefers Large Titles option for the navigation controller. When all of these operations are completed, your Workout Table View Controller should be similar to the screenshot in Figure 4-12.
Figure 4-12
Completed storyboard for Workout Table View Controller
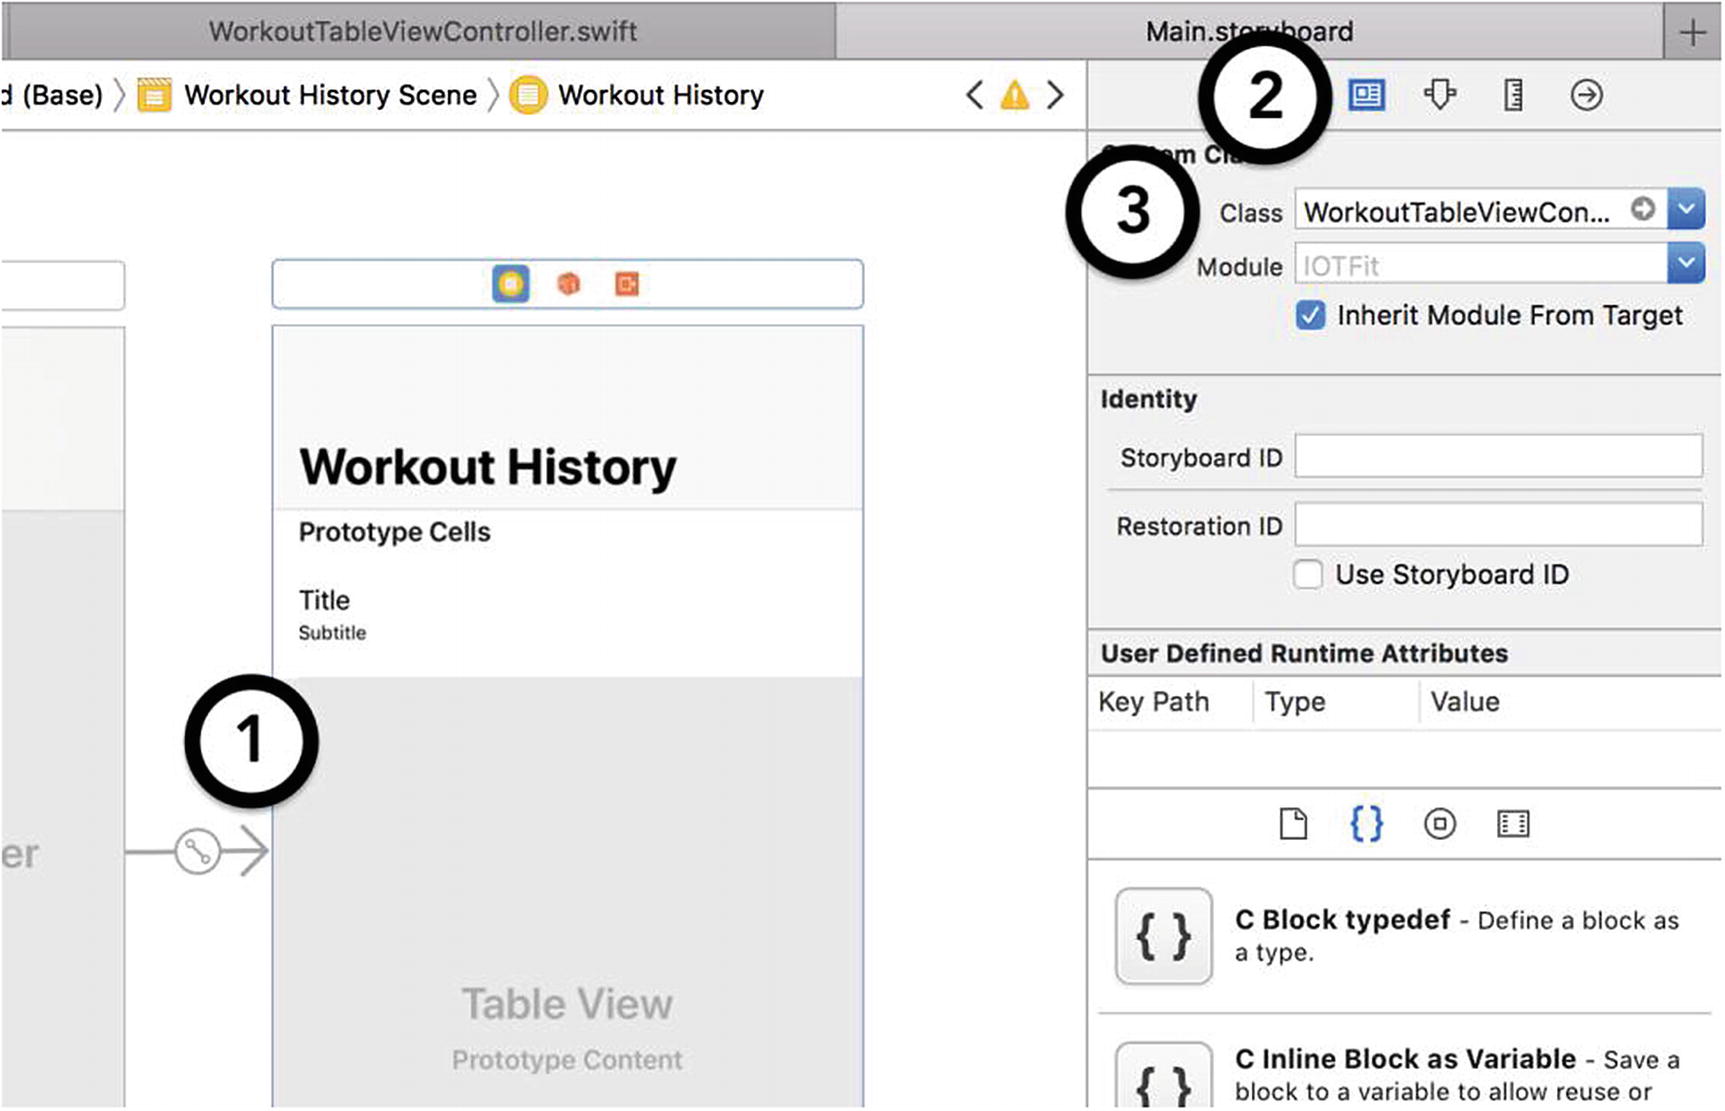
Now that the layout is complete, you must modify the ownership and outlets of the Workout Table View Controller so that it can interact with the WorkoutTableViewController.swift file. Click the Table View Controller, then navigate to the Identity Inspector, and in the Class text field, type “WorkoutTableViewController,” to set the ownership of the file, as shown in Figure 4-13.
Figure 4-13
Setting ownership for the Table View Controller
Note
Setting ownership only works when a class or property is defined in your project using a subclass based on the object library template you are trying to use (for example, Table View Controller, Button).
In Chapters 1 and 2, you used outlets to connect button handlers to methods in an object’s owning class. For a Table View Controller, you must perform a similar operation to identify the UITableViewDataSource and UITableViewDelegate delegate objects. As shown in Figure 4-14, click Connections Inspector, then drag lines from the dataSource and delegate outlets to the Workout Table View Controller.
Figure 4-14
Setting delegate outlets for the Table View Controller
For the final connection step, you must set an identifier for the cell template in the Workout Table View Controller. Based on this identifier, you can look up the cell and modify its contents at runtime. As shown in Figure 4-15, select the cell, then navigate to the Attributes Inspector and enter a title in the Identifier text field, to set the identifier for the cell.
Figure 4-15
Setting an identifier for a Table View Cell
Using the UITableViewDataSource Protocol to Populate the Table View
Now that the Workout Table View Controller is completely laid out, you must implement the UITableViewDataSource protocol methods to populate the table view. These let you specify the number of rows, sections, titles, and editing features of the table view, such as if you want the user to be able to rearrange cells in the table. For the IOTFit app, the methods you must implement are focused on the number of sections and rows in the table view. The pattern most developers use to implement this behavior is to define a single or multidimensional array to represent the data and extract the hierarchy of the data from there. In Listing 4-11, I added the workouts property to the WorkoutTableViewController class to hold the workout data and used that to determine the values for the numberOfSections() and tableView(numberOfRowsInSection:) delegate methods. Apple’s Table View Controller template provided empty implementations (stubs) for these methods.
class WorkoutTableViewController: UITableViewController {
var workouts: [Workout]?
override func numberOfSections(in tableView:
UITableView) -> Int {
return 1
}
override func tableView(_ tableView: UITableView,
numberOfRowsInSection section: Int) -> Int {
return self.workouts?.count ?? 0
}
...
}
Listing 4-11
Using an Array to Determine the Rows and Sections in a Table View Controller
Although you specified the number of rows and sections for the Table View Controller in Listing 4-11, the workouts property will be empty until you populate it. For this purpose, you can bring together everything you learned so far in this chapter and use the loadWorkoutsFromHealthKit() method from the Workout Data Manager to populate the workouts array. In Listing 4-12, I have modified the WorkoutTableViewController class to override the viewWillAppear() method and make the call to load the data there. The viewWillAppear() method is called every time the table view is about to be presented, such as switching from another tab in the app, and is an appropriate place to check for updates.
class WorkoutTableViewController: UITableViewController {
Inside the completion handler, I called the reloadData() method on the tableView property of the class to force it to reload the data. Although the array is populated, the table view will not reload the data until you ask it to.
Using the UITableViewDelegate Protocol to Map Data to Cells
To display the data from the workouts array on the Workout Table View Controller, you must implement the UITableViewDelegate protocol. This protocol is responsible for the display and general user interaction properties of the table view, such as the height of each cell, assigning methods to populate cell contents, and what should happen when a user selects a cell. As with the UITableViewDataSource protocol, for the IOTFit app, you do not have to implement all of the methods provided by this protocol. To populate the cells in the IOTFit app, you will implement the tableView(cellForRow:) method. This allows use of a section and row number to determine the display of a cell at runtime. Additionally, every time you reload the table view, this method is called for each of the cells.
The advantage of using an array to manage the data for a Table View Controller is that it makes mapping data extremely simple. You can simply correlate a row number to the position in the array. In Listing 4-13, I use this logic to implement the tableView(cellForRow:) method for the WorkoutTableViewController class. I use the workoutCell identifier to look up the cell template, then create formatted strings, based on the values in each Workout item.
class WorkoutTableViewController: UITableViewController {
...
let dateFormatter = DateFormatter()
...
override func tableView(_ tableView: UITableView,
cellForRowAt indexPath: IndexPath) ->
UITableViewCell {
let cell = tableView.dequeueReusableCell(withIdentifier:
"workoutCell", for: indexPath)
guard let workouts = workouts else {
return cell
}
let selectedWorkout = workouts[indexPath.row]
let dateString = dateFormatter.string(from:
selectedWorkout.startTime)
let durationString =
WorkoutDataManager.stringFromTime(timeInterval:
selectedWorkout.duration)
let titleText = "(dateString) |
(selectedWorkout.workoutType) | (durationString)"
let detailText = String(format: "%.0f m | %.0f floors",
arguments: [selectedWorkout.distance,
selectedWorkout.flightsClimbed])
cell.textLabel?.text = titleText
cell.detailTextLabel?.text = detailText
return cell
}
}
Listing 4-13
Populating Table View Cells with Data
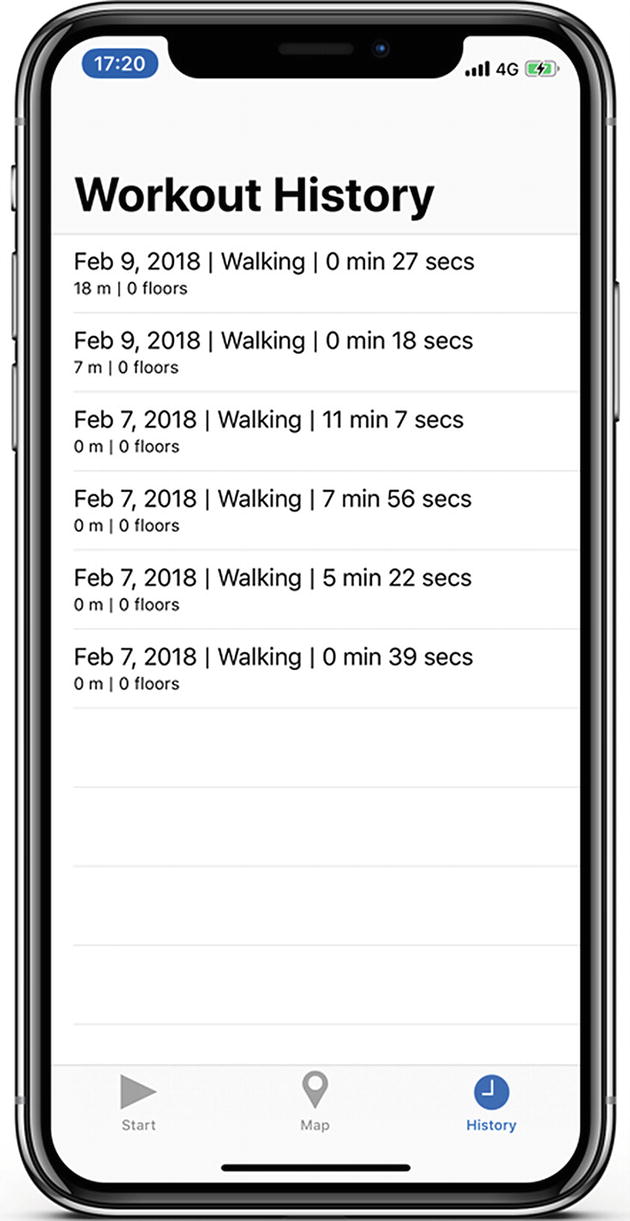
Now, if you re-compile the app and save a few more workouts, when you go to the History tab, the table view will display the start time, distance, total steps, and floor counts for the last ten workouts in the user’s HealthKit store, similar to the screenshot in Figure 4-16.
Figure 4-16
The completed History tab for the IOTFit app
Summary
In this chapter, by expanding the Workout Data Manager and adding a Table View Controller for displaying workout history, you learned how you to harness the power of HealthKit to securely import and export health data in the IOTFit app. In the first iterations of the app, you had to rely on a property-list file for data management and had no way of getting it out of the app. After applying the familiar lessons of accessing permission-based hardware resources and learning how HealthKit represents data, you were able to help users manage all of their workouts in one place and see your workout data from other apps they may also use.
Although HealthKit is unique in its representations of data, the protocol and completion handler-based communication methods you practiced in this chapter are applied often through Apple’s IoT-related frameworks. Furthermore, with small modifications, most of the code in this chapter can be reused in the Apple Watch version of this app later in the book, just as with your Core Motion code from the previous chapter.