Although the Apple TV was introduced in 2007, its adoption rate was slow for several years, and it was famously described as “a hobby” by Steve Jobs. At that time, its main purpose was to serve as a set-top box for media purchased on iTunes. In 2012, a lower-priced, iOS-inspired Apple TV 2 came out and took off immediately. Instead of being limited to iTunes content, users could suddenly watch content from Netflix and popular TV channels via apps that were packaged with system updates. This led many people to suspect that the device was, in fact, based on a fork of iOS, and the hope was that Apple would one day offer its software development kit to all developers.
In 2015, these predictions came true when Apple announced the Apple TV 4, the public release of the software development kit for its operating system (now called tvOS) and an App Store for the device. As many people speculated, tvOS is based on iOS, and developers can write apps for it using Swift and close forks of frameworks from iOS, including Cocoa Touch and Core Location. As of this writing, the notable exceptions are MapKit and WebKit—meaning you cannot embed web pages or maps directly into your native tvOS apps.
With this in mind, for this chapter, you will bridge the two worlds of tvOS and the Internet of Things (IoT) by taking what you know about iOS and using it to build an Apple TV dashboard for the IOTHome hardware. To make the user experience compelling, you will include data from both the IOTHome web server and the OpenWeatherMap.org weather API, allowing you to show climate inside and outside a user’s home.
Note
Although you can use the Apple TV simulator and any Linux-based device to develop the project in this chapter, the code samples and explanations are optimized for an Apple TV 4 and Raspberry Pi 3 or newer versions.
Learning Objectives
In this chapter, you will learn how to build an Apple TV dashboard app by adding an Apple TV target to the IOTHome project, creating tvOS-resources for the target, and writing code to make the tvOS app render its user interface and make network requests on its own. In creating the tvOS dashboard app, you will learn the following key concepts for iOS IoT application development:
Adding a tvOS target to an existing iOS app
Creating a user interface for a tvOS project
Making HTTP requests within a tvOS app
Requesting user location from a tvOS app
Connecting to the OpenWeatherMap.org public weather API
Running a tvOS app on an Apple TV
One of Apple’s great accomplishments with tvOS was the large extent to which it preserved iOS development tools and practices for the platform. You will find yourself forgetting what platform you are writing code for, compared to watchOS, in which many APIs are absent, or macOS, in which there is little overlap in workflows or shared frameworks. As you work through this chapter, I will highlight these similarities and how you can apply them to tvOS. As an added bonus, although you will be writing new code for the user interface, you will be able to reuse the network code from Chapter 8 with almost no changes.
In this chapter, I assume you are familiar with the IOTHome sensors (Chapters 5–7) and the web server (Chapter 8). If you are unfamiliar with either of these, I highly recommend reviewing them before continuing with this chapter. As with previous chapters, you can find the completed project for this chapter on the GitHub repository for this book (https://github.com/Apress/program-internet-of-things-w-swift-for-ios ), under the Chapter9 folder.
Setting Up the tvOS Target
If you have ever downloaded any games or weather apps for iOS, and happen to also own an Apple TV, you may have noticed some of these apps magically appearing on your Apple TV home screen. You can re-create this experience for your users and increase adoption of your tvOS experience by adding your tvOS app as a new target to your IOTHome iOS app. To get started, make a copy of the IOTHome app from Chapter 8, or download a fresh copy from the GitHub repository for the book. Next, open the project in Xcode and then select New ➤ Target from the File menu, as shown in Figure 9-1.
Figure 9-1
Adding a tvOS target to an existing iOS project
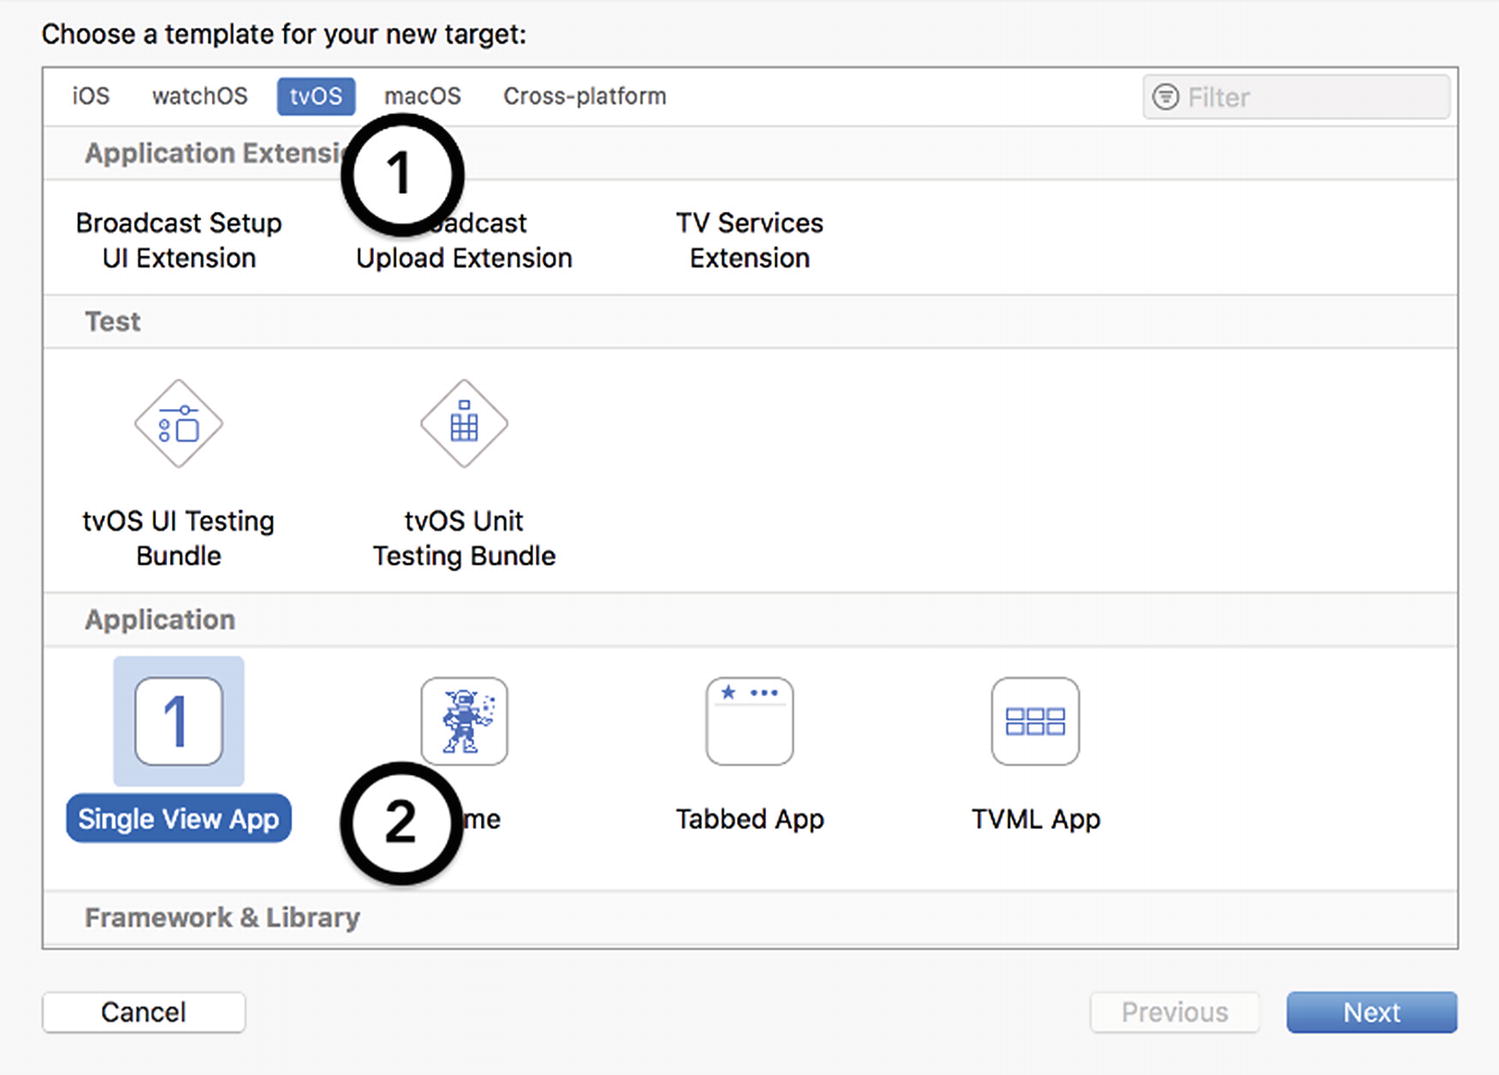
In the Template Picker window that appears after clicking the menu item, select tvOS and then Single View App, as shown in Figure 9-2.
Figure 9-2
Selecting the Single View App tvOS template
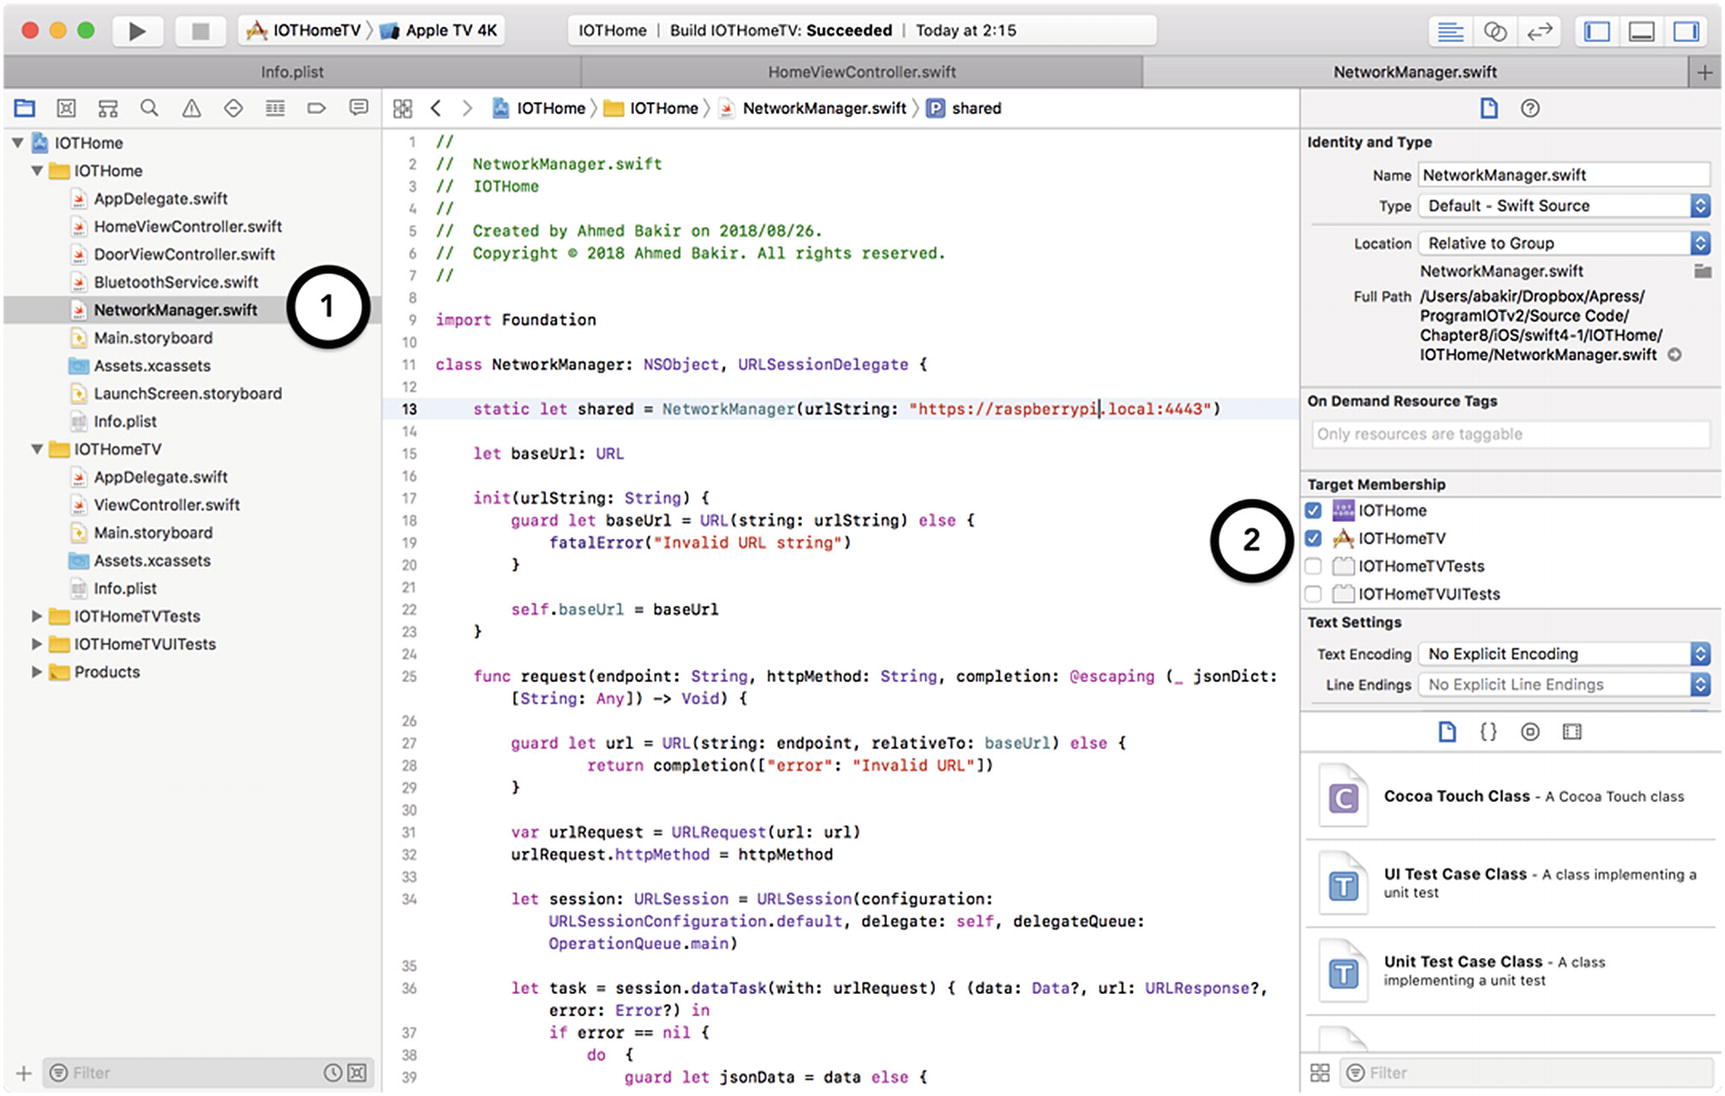
When asked to name the product, call it “IOTHomeTV.” Your organization identifier should be the same as that you used for the previous iterations of the applications (reverse domain notation for your name or web site domain). Your project should now contain a new scheme and new folders for the IOTHomeTV target, as shown in Figure 9-3.
Figure 9-3
IOTHome project hierarchy, including the new tvOS scheme and files
Next, you must copy over the network whitelist from the iOS project, in order to connect to the self-signed HTTPS end points. Open the Info.plist file for the IOTHome iOS app (in the IOTHome folder) and secondary-click (right-click) the key named App Transport Security Settings. Select Copy to copy the contents of the key-value pair. Next, open the Info.plist file for the IOTHomeTV tvOS app (in the IOTHomeTV folder), and from the secondary-click (right-click) menu, select Paste, to paste the key-value pair. Your resulting Info.plist file should look similar to my result in Figure 9-4.
Figure 9-4
Info.plist file for the IOTHomeTV target, including the network whitelist
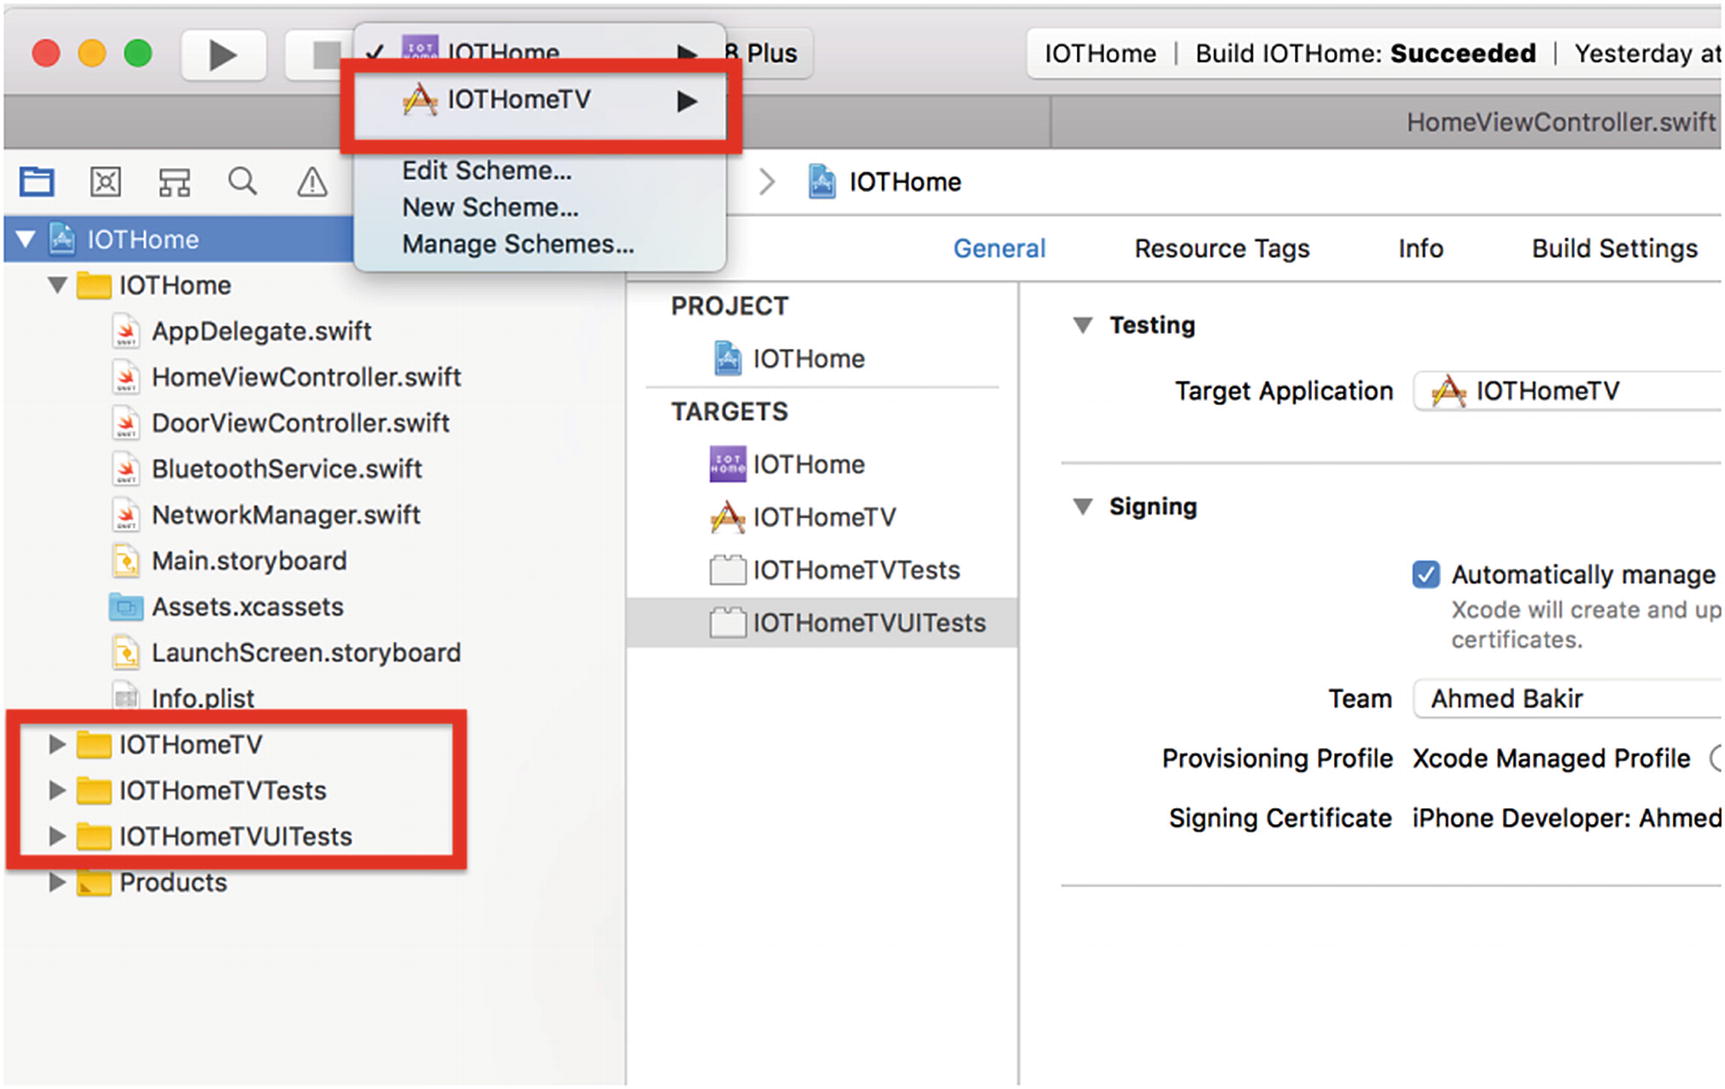
For the final project setup step, you have to make the NetworkManager class from the iOS target available to the tvOS target. One of the benefits of using the same project to manage both targets is that you can accomplish this task by using the same source file in both projects. As shown in Figure 9-5, to enable this capability, click the NetworkManager.swift file in the Project Navigator, then select the check box next to IOTHomeTV.
Figure 9-5
Sharing a source code between multiple targets in a project
To verify that the source file was added successfully and is compatible with tvOS, select the IOTHomeTV scheme and Apple TV 4K target device from the drop-down menu next to the Run button at the top of Xcode. You should be able to compile the target successfully with the new file included.
Creating the User Interface
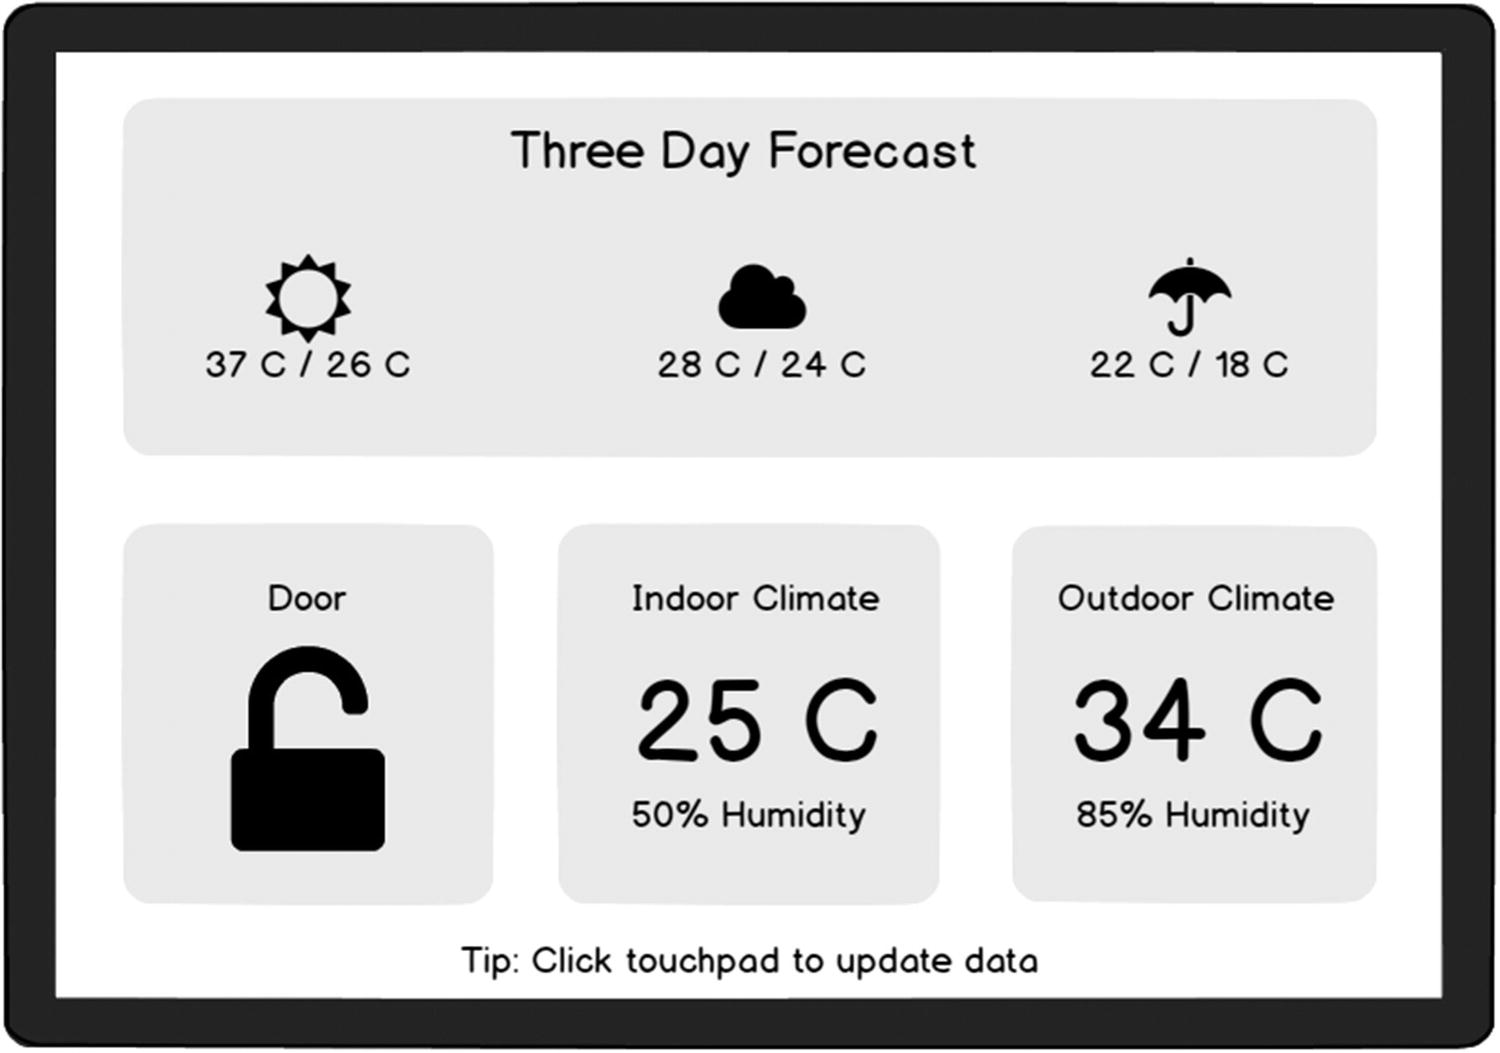
Now that the new target for the tvOS is set up and compiles, you can begin building the user interface for the dashboard application. A dashboard is widely expected to be displayed for an extended period and should be easy to read. To achieve these goals, in Figure 9-6, I provide a wireframe for a tile-based user interface that displays the door status and inside temperature and humidity data from the IOTHome sensors, a three-day weather forecast, and the current outdoor temperature. The weather data is provided by querying OpenWeatherMap.org, employing the user’s current location. You will import the icons from the FontAwesome.swift (https://github.com/thii/FontAwesome.swift) open source library.
Figure 9-6
Wireframe for IOTHomeTV dashboard
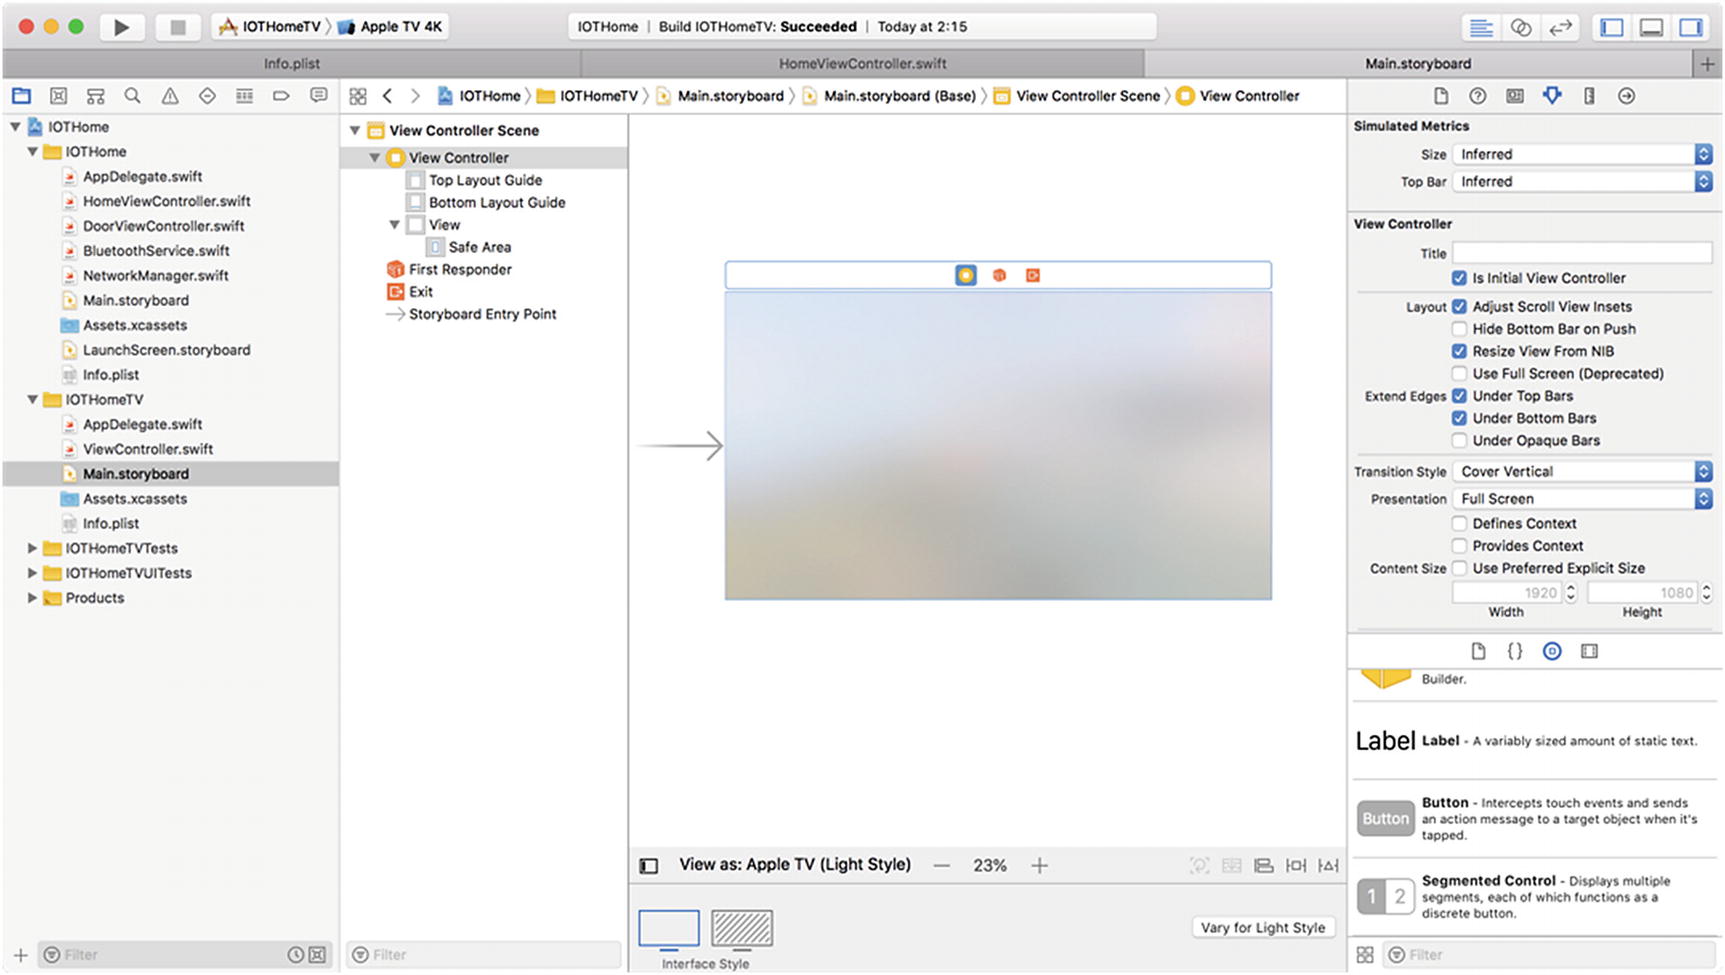
One of the most convenient aspects of tvOS is that Apple allows you to reuse a significant majority of the development tools and practices you are familiar with from iOS development to help you build your apps. For the IOTHomeTV app, you can quickly build the user interface using Interface Builder and simple UIView, UIImage, and UILabel objects. To get started, open the Main.storyboard file for the IOTHomeTV target. The initial display of the empty storyboard should resemble the screenshot in Figure 9-7.
Figure 9-7
Blank storyboard for an Apple TV app
In the same manner as an iOS app, you can compose your user interface by dragging and dropping items from the Object Library at the bottom right of Interface Builder onto the storyboard. To further control the placement of elements, you can also use Auto Layout in the same manner as you would an iOS app. Using Table 9-1 as a guide, lay out the user interface. The labels and graphics should be placed over the tiles. Do not worry about the rounded borders on the views, as you will implement those programmatically later in this section.
Table 9-1
Styling for Main View Controller User Interface Elements
Element Name
Text Style
Align Relative to
Top Margin
Bottom Margin
Left Margin
Right Margin
“Three Day Forecast” background view
—
View
8
60
8
8
“Bottom Row” background views
—
View
60
40
60
60
“Tip” label
Title 3
View
40
20
8
8
“Title” labels
Title 2
Parent (center X)
30
—
—
—
“Icon” image views
—
Parent (center X, Y)
—
—
—
—
“Detail” text labels
Headline
“Icon” image views (center X)
20
—
—
—
As of this writing, there is only one aspect ratio supported by tvOS, so you can choose to skip setting the Auto Layout constraints for this project, if you would like to.
For the final step of setting up the user interface, you must link the storyboard to your source. In Listing 9-1, I have expanded the ViewController class for the IOTHomeTV project to include Interface Builder–accessible properties for all of the user interface elements.
class ViewController: UIViewController {
@IBOutlet weak var forecastView: UIView?
@IBOutlet weak var indoorView: UIView?
@IBOutlet weak var outdoorView: UIView?
@IBOutlet weak var lockView: UIView?
@IBOutlet weak var firstDayLabel: UILabel?
@IBOutlet weak var secondDayLabel: UILabel?
@IBOutlet weak var thirdDayLabel: UILabel?
@IBOutlet weak var indoorTempLabel: UILabel?
@IBOutlet weak var indoorHumidityLabel: UILabel?
@IBOutlet weak var outdoorTempLabel: UILabel?
@IBOutlet weak var outdoorHumidityLabel: UILabel?
@IBOutlet weak var tipLabel: UILabel?
@IBOutlet weak var lockImageView: UIImageView?
@IBOutlet weak var firstDayImageView: UIImageView?
@IBOutlet weak var secondDayImageView: UIImageView?
@IBOutlet weak var thirdDayImageView: UIImageView?
override func viewDidLoad() {
super.viewDidLoad()
}
}
Listing 9-1
View Controller Definition, Including User Interface Properties
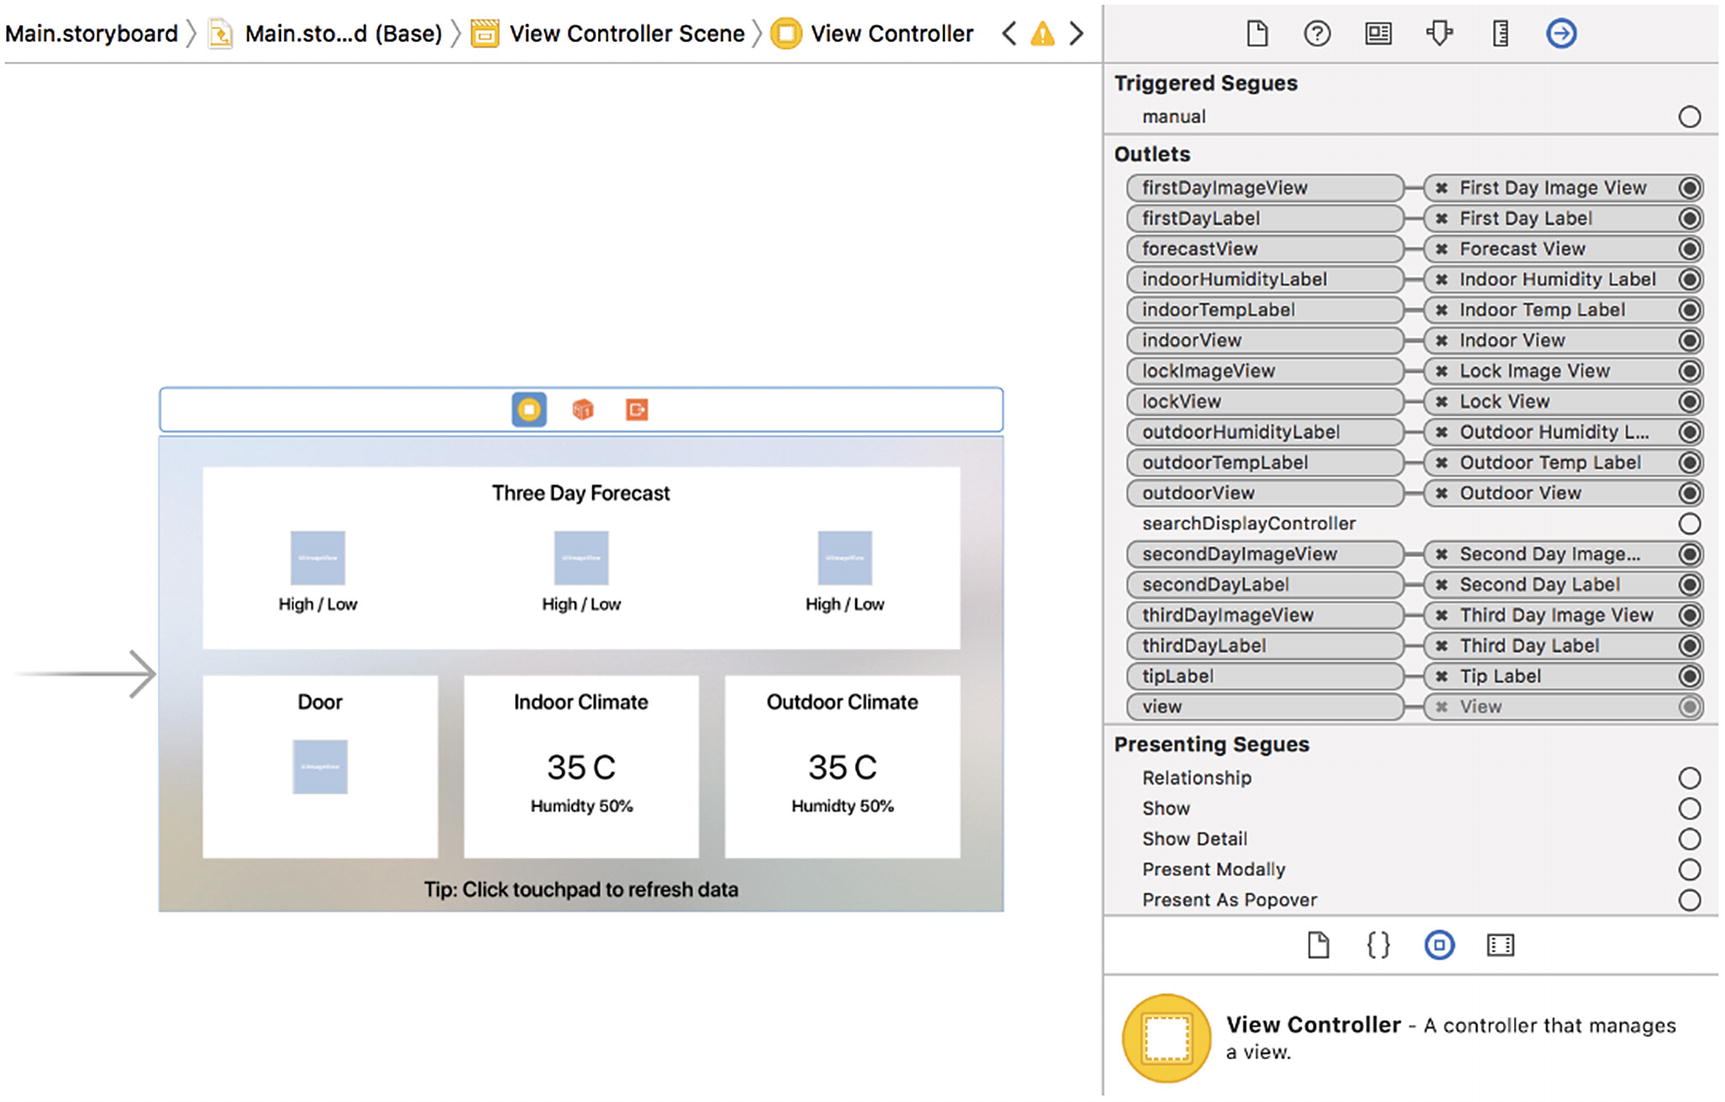
After modifying the source file, link the properties to the storyboard, using the Connection Inspector in Xcode. In the same manner as in previous examples, you can review Chapter 1 for a refresher course on using Interface Builder. After making the connections, your completed storyboard should resemble my implementation in Figure 9-8.
Figure 9-8
Completed storyboard for the IOTHomeTV app
Programmatically Styling Elements to Match the tvOS Design Language
Having laid out the user interface, you may have noticed it is a bit…plain. By adding soft shadows, rounded corners, and a blur effect to the backgrounds of the tiles, you can make a user interface that more closely matches what users are familiar with from the Apple TV home screen. These are changes you must make using code, but luckily, they are not very complicated to implement.
You can begin by adding the blur effect to the view. To achieve this, you can use the UIVisualEffectView class, which allows you to apply complicated visual effects, pre-built by Apple, to any UIView. To apply a modern iOS blur effect, use a UIBlurEffect object. In Listing 9-2, I applied the visual effect to the tiles by creating a helper method called applyEffects().
class ViewController: UIViewController {
...
override func viewDidLoad() {
super.viewDidLoad()
applyEffects(to: [forecastView, indoorView,
outdoorView, lockView])
}
func applyEffects(to views: [UIView?]) {
for view in views {
addBlurEffect(to: view)
}
}
func addBlurEffect(to targetView: UIView?) {
guard let targetView = targetView else { return }
view.backgroundColor = UIColor.clear
let blurEffect = UIBlurEffect(style: .regular)
let blurView = UIVisualEffectView(effect:
blurEffect)
blurView.frame = view.bounds
targetView.addSubview(blurView)
targetView.sendSubview(toBack: blurView)
}
}
Listing 9-2
Adding a Blur Effect to a View
Although you must add the visual effect as a sub-view, it does not have to block the content. By calling the sendSubview(toBack:) method, you can blur the effect to the back of the tile without affecting the previous layout of the view from the storyboard. The logic for applying the effects is called from the viewDidLoad() method for the view controller, as that method is executed after the view has been laid out from the storyboard and the view controller is ready to use.
Adding the corner radius is a more straightforward process. To apply a corner radius, provide a numerical value to apply to the CALayer for the view (the object that represents how the view is drawn) and specify that you want to clip the area under the rounded corners. In Listing 9-3, I have expanded the applyEffects() method to include the corner radius effect.
class ViewController: UIViewController {
override func viewDidLoad() {
super.viewDidLoad()
applyEffects(to: [forecastView, indoorView,
outdoorView, lockView], cornerRadius: 20)
}
func applyEffects(to views: [UIView?],
cornerRadius: CGFloat) {
for view in views {
addBlurEffect(to: view)
addRoundedCorners(to: view, cornerRadius:
cornerRadius)
}
}
func addRoundedCorners(to targetView: UIView?,
cornerRadius: CGFloat) {
guard let targetView = targetView else { return }
targetView.layer.cornerRadius = cornerRadius
targetView.layer.masksToBounds = true
}
}
Listing 9-3
Adding a Rounded Corner to a View
For the shadow, you need to combine concepts from both of these effects. A shadow by itself is created by applying a shadow color, blur radius, and shadow position to a CALayer. This serves to replicate soft or hard light in real life. Unfortunately, the required masking to enable the rounded corners would clip the shadows, if applied to the same view. You can work around this by creating another view with the same position, applying the shadow effect to this new view and placing it underneath the content view. In Listing 9-4, I have expanded the view controller to implement these steps and add a shadow effect to the tiles.
The frame property of a UIView includes its x and y positions. The bounds property sets these to (0,0). When adding a sub-view to a view, try to use bounds. When copying or moving a view, try to use frame.
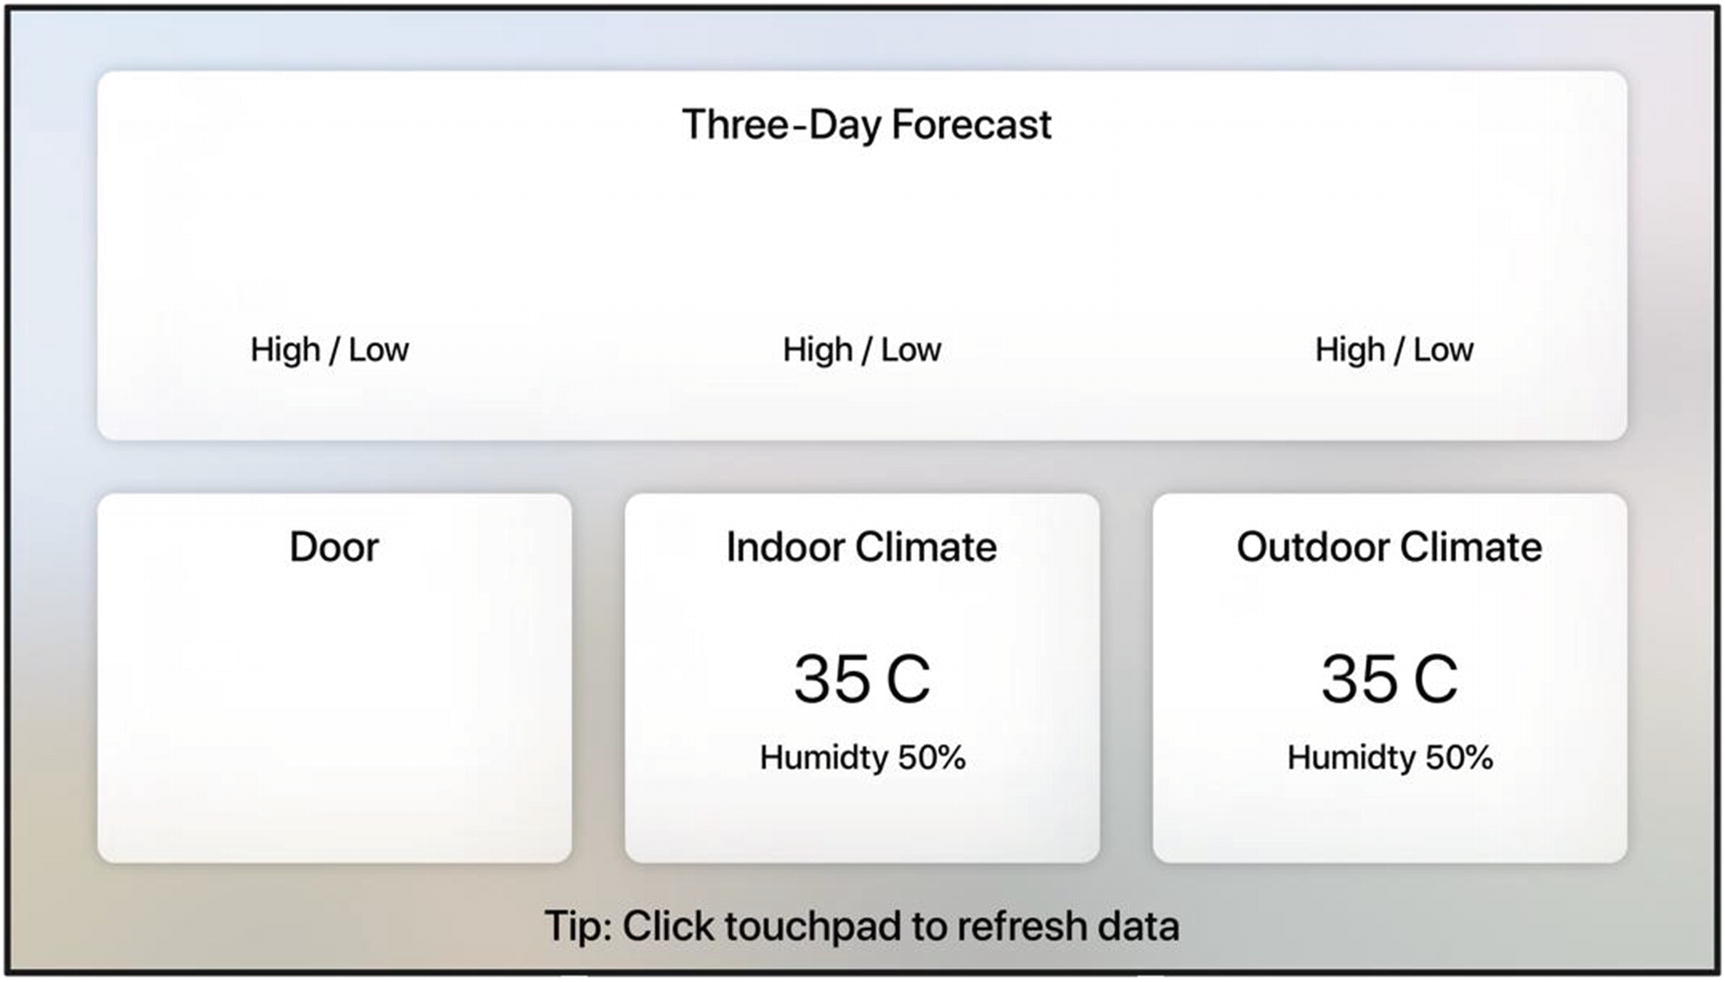
After applying both visual effects and running the application in the Apple TV simulator, your output should resemble the screenshot in Figure 9-9.
Figure 9-9
Stylized user interface for the IOTHomeTV app
Using Font Awesome for Font-Based Graphics
For the final piece of the user interface puzzle, you must add graphics to the application. Instead of importing graphics files directly, for this section, I would like to introduce a very popular font-based alternative, Font Awesome, and its Swift implementation, FontAwesome.swift. Font Awesome is a font file that provides a massive collection of icons. It is a popular choice in web development for helping reduce page size and the amount of work you have to hire a graphic designer for. On iOS, it provides the same benefits, in addition to allowing you to remove the burden of managing and scaling images yourself. The implementation you will use in this section, FontAwesome.swift, allows you to create UIImage objects based on the font, making its use exactly the same as if you were using graphics from an Assets Catalog or other source.
To get started, download or clone the repository for FontAwesome.swift from its GitHub page: https://github.com/thii/FontAwesome.swift. Next, copy all of the files in the archive’s FontAwesome folder to your project, except for the Info.plist file. You can perform this operation by using the Add Files to IOTHome option in the File menu. As shown in Figure 9-10, when the file section pop-up window appears, select IOTHome and IOTHomeTV as the targets to include the files in both the iOS and tvOS apps. Make sure you also select Copy Items If Needed, to copy the files to add a copy of the files to the project.
Figure 9-10
Importing the files for FontAwesome.swift into the IOTHome project
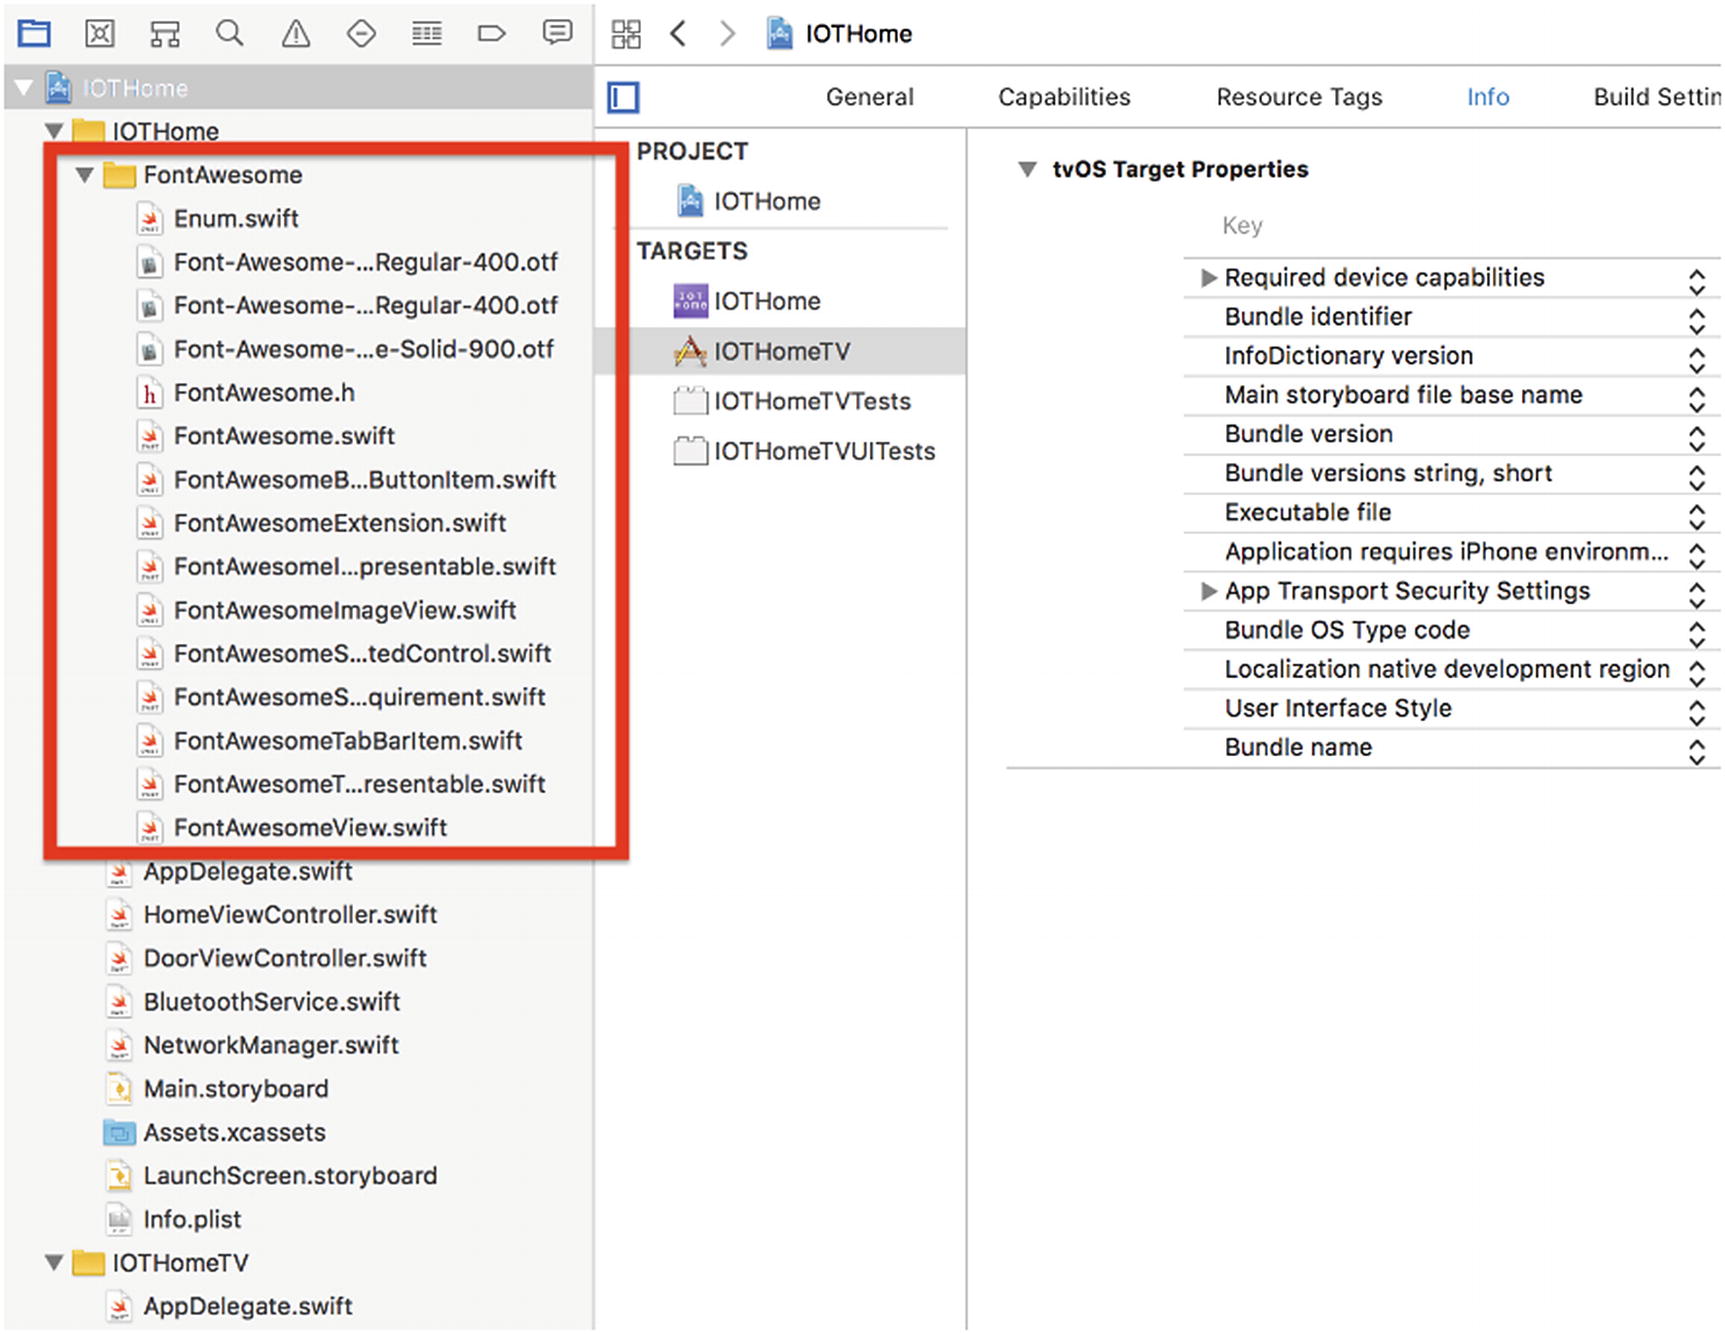
After the files for FontAwesome.swift have been added to your project, select all of them, then secondary-click (right-click), to present the context menu. Select New Group from Selection, to place all of the files in a single folder in your project. Your Xcode Project Navigator should now resemble my example in Figure 9-11.
Figure 9-11
Project Navigator after adding FontAwesome.swift to the project
Finally, to use the library, you must create UIImage objects based on icons available in the font. Rather than pure Unicode Hex codes alone, Font Awesome provides names for each icon. To discover what icons are available, and their names, I like to use the official search tool for the font, available at: https://fontawesome.com/icons?d=gallery&m=free. To start the project off, use lock for the lock graphic and sun for the sunny weather graphic.
To create the graphic, you can use FontAwesome.swift’s extension for the UIImage class, UIImage.fontAwesome(name:style:textColor:size:). As the name suggests, you have to call the API using the icon’s name, display style, a tint color, and the size. In Listing 9-5, I have added these calls to the ViewController class.
After adding the image views, running the application in the Apple TV simulator should provide output resembling that in the screenshot in Figure 9-12.
Figure 9-12
IOTHomeTV with Font Awesome images
Adding Data Sources to the tvOS App
Now that the user interface for the IOTHomeTV app is ready, you can begin integrating its data sources and populating it with real data from the IOTHome sensors you built in Chapters 5–7 and OpenWeatherMap.org. Although you can connect directly to Bluetooth devices from an Apple TV, for this system, it is more efficient and reliable to take advantage of the heavy lifting on the web server. In addition to being able to use a consistent interface, removing the need to add additional clients will free up the sensors to accept more connections.
At the beginning of the chapter, you were able to verify that the network client code from Chapter 8 compiles without issue on tvOS. To integrate the client, you simply have to call it from the IOTHomeTV app. In Listing 9-6, I began this integration by using the NetworkManager class to request the indoor climate data from the sensor on the Raspberry Pi.
Fetching Temperature Data from the IOTHome Web Server in the tvOS App
Looking back at Chapter 8, you will remember that the Network Manager is responsible for managing the address of the server, using URLSession to make the network connection, and validating the JSON response. When a network request is complete, the manager executes the completion handler specified by the user, whose return parameter is a JSON dictionary containing an error key-value pair or the response from the target end point. Inside the completion handler, I used the temperature and humidity key-value pairs to update the text for the Indoor Temperature and Indoor Humidity labels. The network request is triggered from the viewDidLoad() method, so that the app can update the data when it is launched.
In Listing 9-7, I have expanded the fetchNetworkData() method further, to include the status from the door sensor. Instead of updating a label, in that sample, I updated the image for the door status.
class ViewController: UIViewController {
...
func fetchNetworkData() {
NetworkManager.shared.getTemperature { [weak
self] (resultDict: [String: Any]) in
...
}
NetworkManager.shared.getDoorStatus{ [weak self]
(resultDict: [String: Any]) in
if let error = resultDict["error"] as? String {
self?.tipLabel?.text = "Error: (error)"
} else {
DispatchQueue.main.async { [weak self] in
if let doorStatus =
resultDict["doorStatus"] as? String {
if doorStatus == "0" {
self?.addFontAwesomeImage(to:
self?.lockImageView, name:
.lockOpen)
} else {
self?.addFontAwesomeImage(to:
self?.lockImageView, name: .lock)
}
}
}
}
}
}
}
Listing 9-7
Fetching Door Sensor Data from the IOTHome Web Server in the tvOS App
Requesting User Location
At the beginning of the chapter, I described how I thought it would be useful to display a three-day forecast and current weather conditions in the IOTHomeTV dashboard. Although users are often aware of the conditions inside their home, having data on the weather outside allows them to better prepare for when they must leave. In order to request location-based forecasts, you must request the user’s current location, just as in Chapter 2, when you used location tracking to build a workout app.
As with the project in Chapter 2, before you can request a user’s location, you must set a description for the tvOS location permission request dialog. As shown in Figure 9-13, open the Info.plist file for the IOTHomeTV target, then add the Privacy – Location When in Use key-value pair. For my description string, I used the text: “IOTHomeTV would like to use your location to show you weather information for your area.”
Figure 9-13
Adding a user location permission description to the IOTHomeTV app
Next, you must add the permission request after the app launches. Just as on iOS, user location on tvOS is managed through a CLLocationManager object. As shown in Listing 9-8, initialize an object, to manage this request; implement the viewWillAppear() method, to make the request; and the locationManager(didChangeAuthorization status:) delegate method to handle the result.
Requesting User Location Permission from the IOTHomeTV App
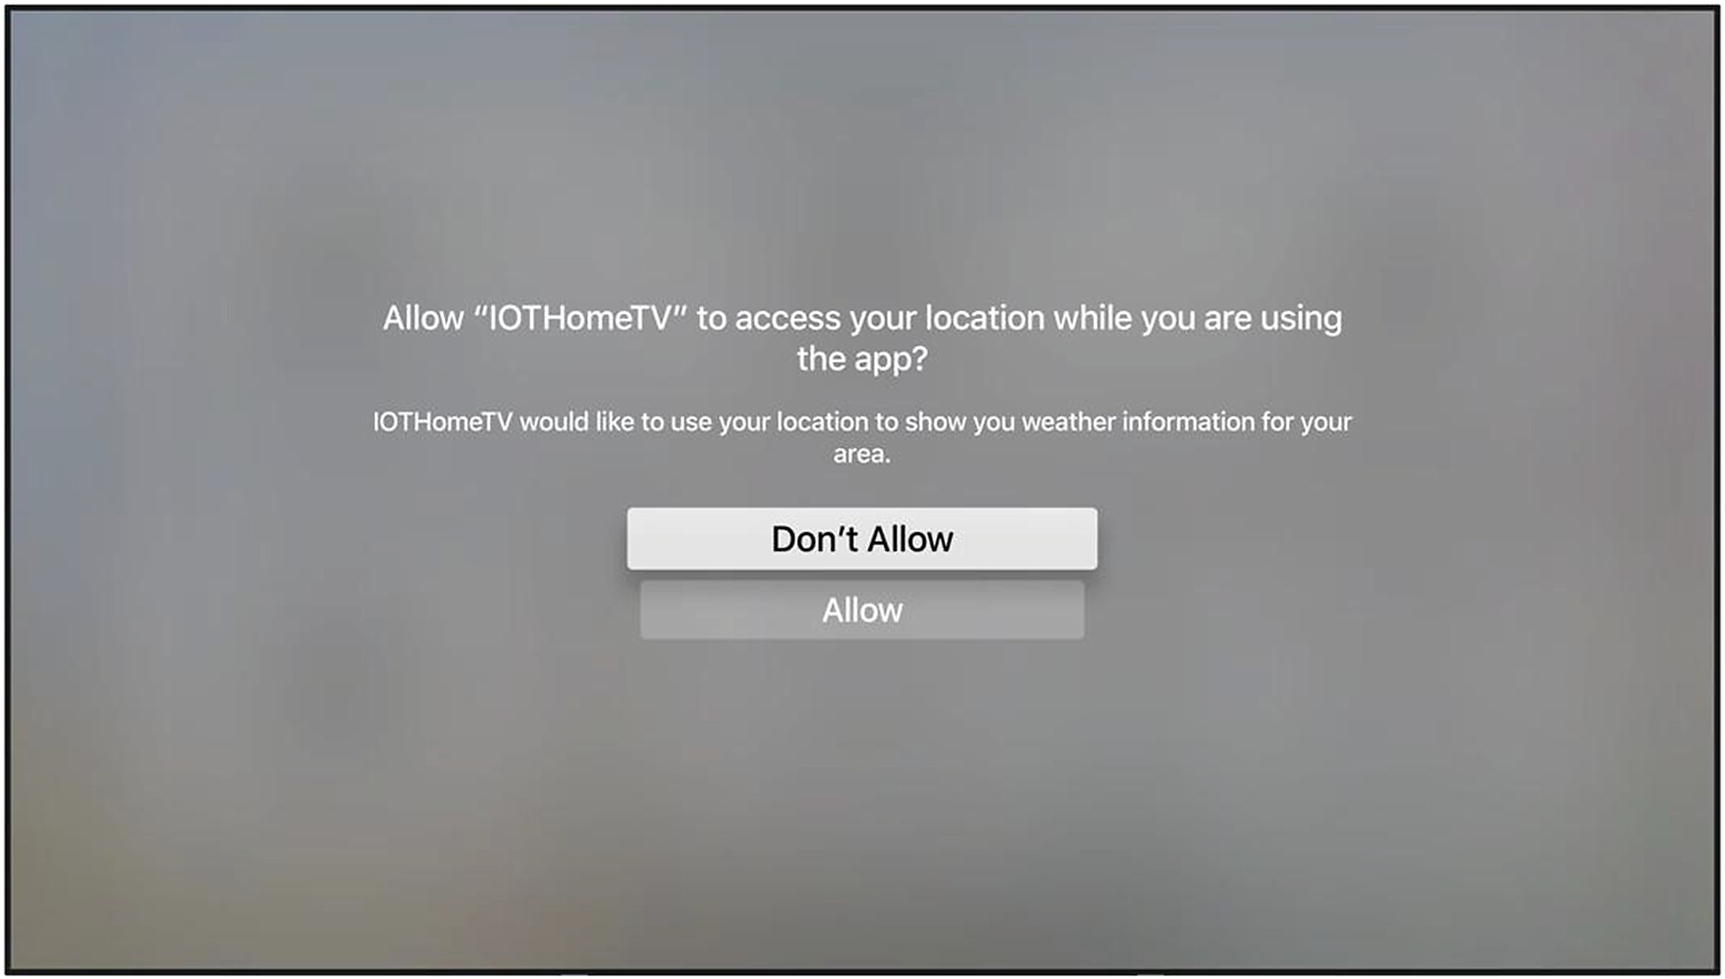
To verify the result, run the app in the Apple TV 4K simulator. You should receive a full-screen alert asking you for your user location permission, as shown in Figure 9-14.
Figure 9-14
User Location permission pop-up for the IOTHomeTV app
Finally, to request the current user location, modify the locationManager(didChangeAuthorization status:) delegate method to request the current user location, after you have verified that permission has been granted. As shown in Listing 9-9, add another delegate method, locationManager(didUpdateLocations locations:), to handle the location update, and then save the result in a property you can use later.
Requesting Current User Location from the IOTHomeTV App
Connecting to the OpenWeatherMap API
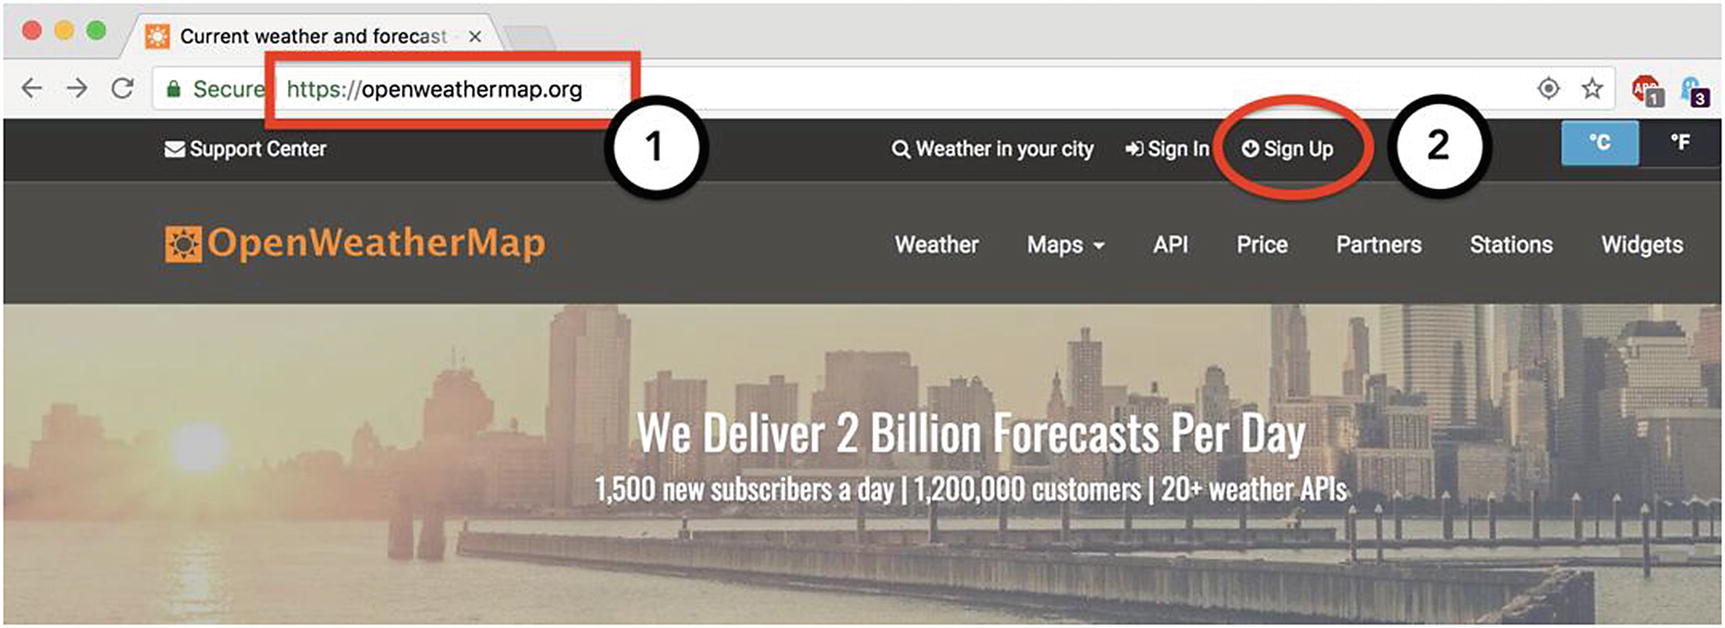
With the user interface, network functionality, and user location in place, you are almost ready to start using OpenWeatherMap’s public weather database, to add outside weather information to the IOTHomeTV app. For the final piece in the setup puzzle, you must request an API key from OpenWeatherMap.org. Many services that allow others to use their data through a web API often require an API key to authenticate requests or enforce data access, according to membership level. For example, OpenWeatherMap.org allows up to 60 requests a minute on a free account, but anything above this requires a paying membership. As shown in Figure 9-15, to request a free account, navigate to www.openweathermap.org in your browser, then click the Sign Up link.
Figure 9-15
Creating an account on OpenWeatherMap.org
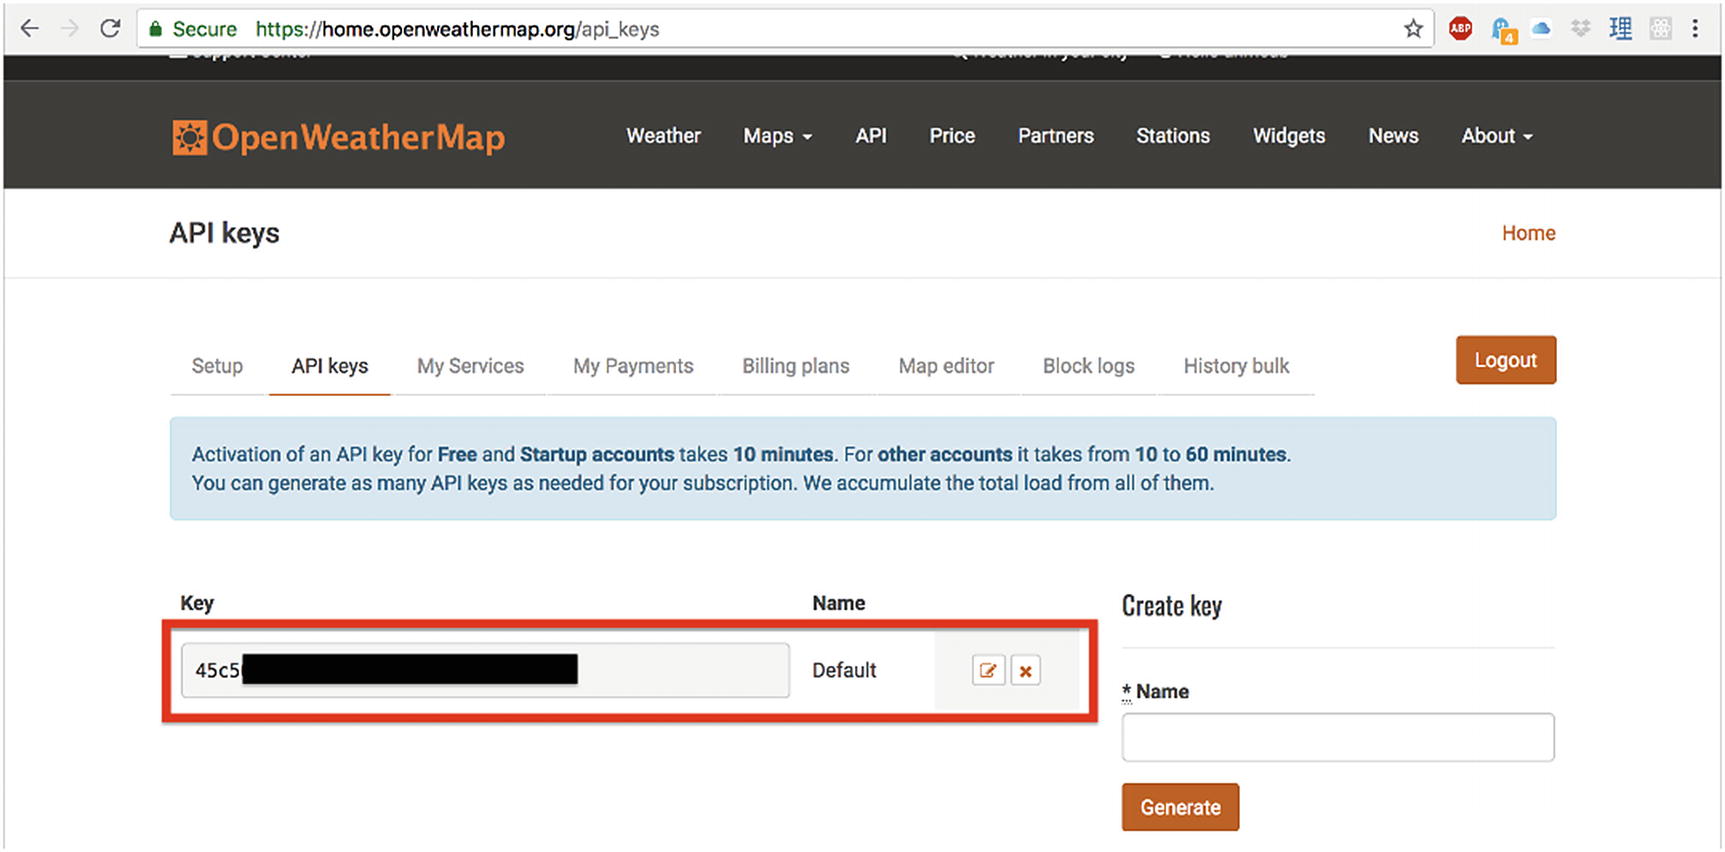
After you have completed creating your account, you will be redirected to the API keys page, pictured in Figure 9-16, which lists all of the OpenWeatherMap API keys available to you. Make a note of the Default key and do not share it with others, or you may risk losing access to your account.
Figure 9-16
OpenWeatherMap.org API keys page
Now that you have an OpenWeatherMap API key and the user’s current location, you can begin using the service to fetch weather data. To populate the weather fields on the app, you will use two end points from OpenWeatherMap: /weather (for current weather conditions) and /forecast (for the three-day forecast). Looking at the documentation for the /weather end point (https://openweathermap.org/current), you will notice that you can use URL parameters to call the end point with geographic coordinates. URL parameters are a way of passing values to an end point by appending them to the end of the URL. For the coordinate (35.730534, 139.705001), you would use the URL:
In Listing 9-10, I have included the JSON response for this API call. For the Outdoor Conditions label, you need only the temperature and humidity fields, which you can extract from the temp and humidity key-value pairs inside the main dictionary.
{
"coord": {
"lon": 139.71,
"lat": 35.73
},
"weather": [{
"id": 803,
"main": "Clouds",
"description": "broken clouds",
"icon": "04n"
}],
"base": "stations",
"main": {
"temp": 27.64,
"pressure": 1009,
"humidity": 74,
"temp_min": 26,
"temp_max": 29
},
...
}
Listing 9-10
Sample JSON Response for the OpenWeatherMap Current Conditions End Point
The NetworkManager class so far has always used end points relative to the domain for the IOTHome web server. To support OpenWeatherMap, you will have to expand the Network Manager to use multiple base URLs and append parameters to the end of the URL. One special requirement of URL parameters is that the first parameter must be prefixed with ?, and every consecutive parameter must be prefixed with &. Rather than writing the logic for this yourself, you can take advantage of the URLComponents class to build a properly formatted URL. In Listing 9-11, I have expanded the request(endpoint:httpMethod:completion:) method in the Network Manager to accept a base URL and URL parameter dictionary as input parameters. Additionally, I have modified the remaining methods with the new parameters and added a formattedURL(baseUrl:endpoint:parameters:) method to build the formatted URL.
class NetworkManager: NSObject, URLSessionDelegate {
let deviceBaseUrl = "https://raspberrypi.local"
let opmBaseUrl = "https://api.openweathermap.org/data/2.5"
Expanding the NetworkManager Class to Support Multiple Base URLs and URL Parameters
In this example, rather than using a for loop to build the array of URLQueryItem objects, I used the new compactMap() method. This API takes cues from functional programming languages (such as Haskell) and has been taking off in popularity recently as a way of performing a calculation based on iterating through a set.
Now that the Network Manager is ready to handle your new requirements, you can add a getOutdoorTemperature() method to the Network Manager, to make the request and handle the response in the main view controller of the app, as shown in Listing 9-12.
class NetworkManager: NSObject, URLSessionDelegate {
Requesting Current Weather Conditions Using the Network Manager
To make the user experience more streamlined, I added calls to request the outside weather conditions, along with the other network requests, and when the current location is confirmed. As it can take a few seconds to confirm the user’s location, the call in the location delegate will enable you to display valid data the first time the user loads the application.
OpenWeatherMap provides a free end point (/forecast) and a paid end point (/forecast/daily) for getting the daily forecast. The paid end point is significantly more convenient to use, but to expand the access of this book, I will cover using the free end point. The API documentation for the /forecast end point is available at https://openweathermap.org/forecast5. In Listing 9-13, I have expanded the Network Manager to include a method for calling the /forecast end point. There are no surprises here; it closely resembles the /weather end point.
class NetworkManager: NSObject, URLSessionDelegate {
Adding a Method for Requesting the Forecast from OpenWeatherMap
The response provides the daily forecast for five days, in three-hour blocks. Within the record for each block, you can find a human-readable description of the condition (for example: Sunny) and detailed statistics ranging from minimum temperature to barometric pressure. In Listing 9-14, I have provided an extremely abbreviated sample of one of these responses.
{
"cod": "200",
"message": 0.1654,
"cnt": 38,
"list": [{
"dt": 1535781600,
"main": {
"temp": 287.67,
"temp_min": 287.67,
"temp_max": 288.554,
"pressure": 1019.41,
...
},
"weather": [{
"id": 800,
"main": "Clear",
"description": "clear sky",
"icon": "01n"
}],
...
}],
"city": {
"id": 5391959,
"name": "Tokyo",
...
}
}
Listing 9-14
Sample Response for OpenWeatherMap Forecast End Point
Unfortunately, this API is much more complicated to use than the /weather end point. The data for each three-hour block is inside an array of dictionaries. As you can guess, you will have to traverse the sub-dictionaries to extract the values you require (list, main, weather). A common way of accomplishing this is by nesting guard-let statements.
To get an accurate average maximum and minimum temperature, you will have to average the results for each day. However, to demonstrate API usage, I will abbreviate this and use three samples that are spaced 24 hours apart. In Listing 9-15, I have expanded the view controller to include the request for the forecast.
class ViewController: UIViewController {
...
func fetchOutdoorTemperature() {
...
NetworkManager.shared.getForecast(latitude:
"(latitude)", longitude: "(longitude)") {
[weak self] (resultDict: [String: Any]) in
if let error = resultDict["error"] as? String {
self?.tipLabel?.text = "Error: (error)"
} else {
guard let resultList = resultDict["list"]
as? [Any] else {
self?.tipLabel?.text = "Error: Invalid
response"
return
}
guard resultList.count > 15 else { return }
//today
self?.setupForecastView(dictionary:
resultList[0], index: 0)
//tommorrow
self?.setupForecastView(dictionary:
resultList[7], index: 1)
//the day after
self?.setupForecastView(dictionary:
resultList[15], index: 2)
}
}
}
Listing 9-15
Requesting the Forecast from the View Controller
I have offloaded processing the request and mapping it to the views in the setupForecastView(dictionary:index:) method, provided in Listing 9-16.
Processing the Forecast Request in the View Controller
This method contains a lot of logic to extract the nested values from the dictionaries for each block of data and map them to the user interface. Unfortunately, this is a common design oversight in many big data APIs. If possible, use this experience as an opportunity to advocate for simple network API responses in your back-end projects.
Handling Touch Input from the Siri Remote
For the final step in developing the IOTHomeTV app, you should take advantage of the primary human interface device for the Apple TV, the Siri Remote. Every Apple TV has included a remote control with the device; however, the fourth-generation Apple TV introduced the Siri Remote, with a touchpad for app-like gestures and a microphone for accepting Siri voice commands. In this section, I will focus on how to accept button and touchpad click input from the remote, to refresh the data in the application.
To begin, you can implement a button press. The basic interface of every Apple TV has relied on using directional buttons for moving between items, using the Play/Pause button to navigate to the detail page for an item, and the Menu button to navigate out of the item. For the IOTHomeTV, the natural interaction to implement would be to use the Play/Pause button to refresh the data in the application.
You can implement support for button presses on tvOS, using the UITapGestureRecognizer class. If you have implemented your own custom gesture recognizer on iOS (for example, making a view swipeable or clickable without using UIButton or UIPageController), you are already familiar with the UITapGestureRecognizer class and its parent class, UIGestureRecognizer. Their implementations are mostly the same on tvOS. The way gesture recognizers work is that you specify a gesture to observe (for example, tap, touch, swipe, pinch), a view to observe these events on, and a selector (method signature) to call when these events are recognized. You specify your event by instantiating a single-purpose subclass of UIGestureRecognizer, such as UITapGestureRecognizer or UISwipeGestureRecognizer. UIGestureRecognizer is an abstract class and cannot be instantiated directly.
To implement the Play/Pause button handler, instantiate a UITapGestureRecognizer object. As shown in Listing 9-17, specify the fetchNetworkData() method as the handler for the tap event by creating a selector with its method signature. In the same manner as on iOS, use the addGestureRecognizer() method from the UIView class, to attach the gesture to the main view for the view controller. Unlike iOS, you can limit button presses to only the Play/Pause button, using the allowedPressTypes property.
class ViewController: UIViewController {
...
override func viewDidLoad() {
super.viewDidLoad()
...
setupGestureHandlers()
}
func setupGestureHandlers() {
let tapRecognizer = UITapGestureRecognizer(target:
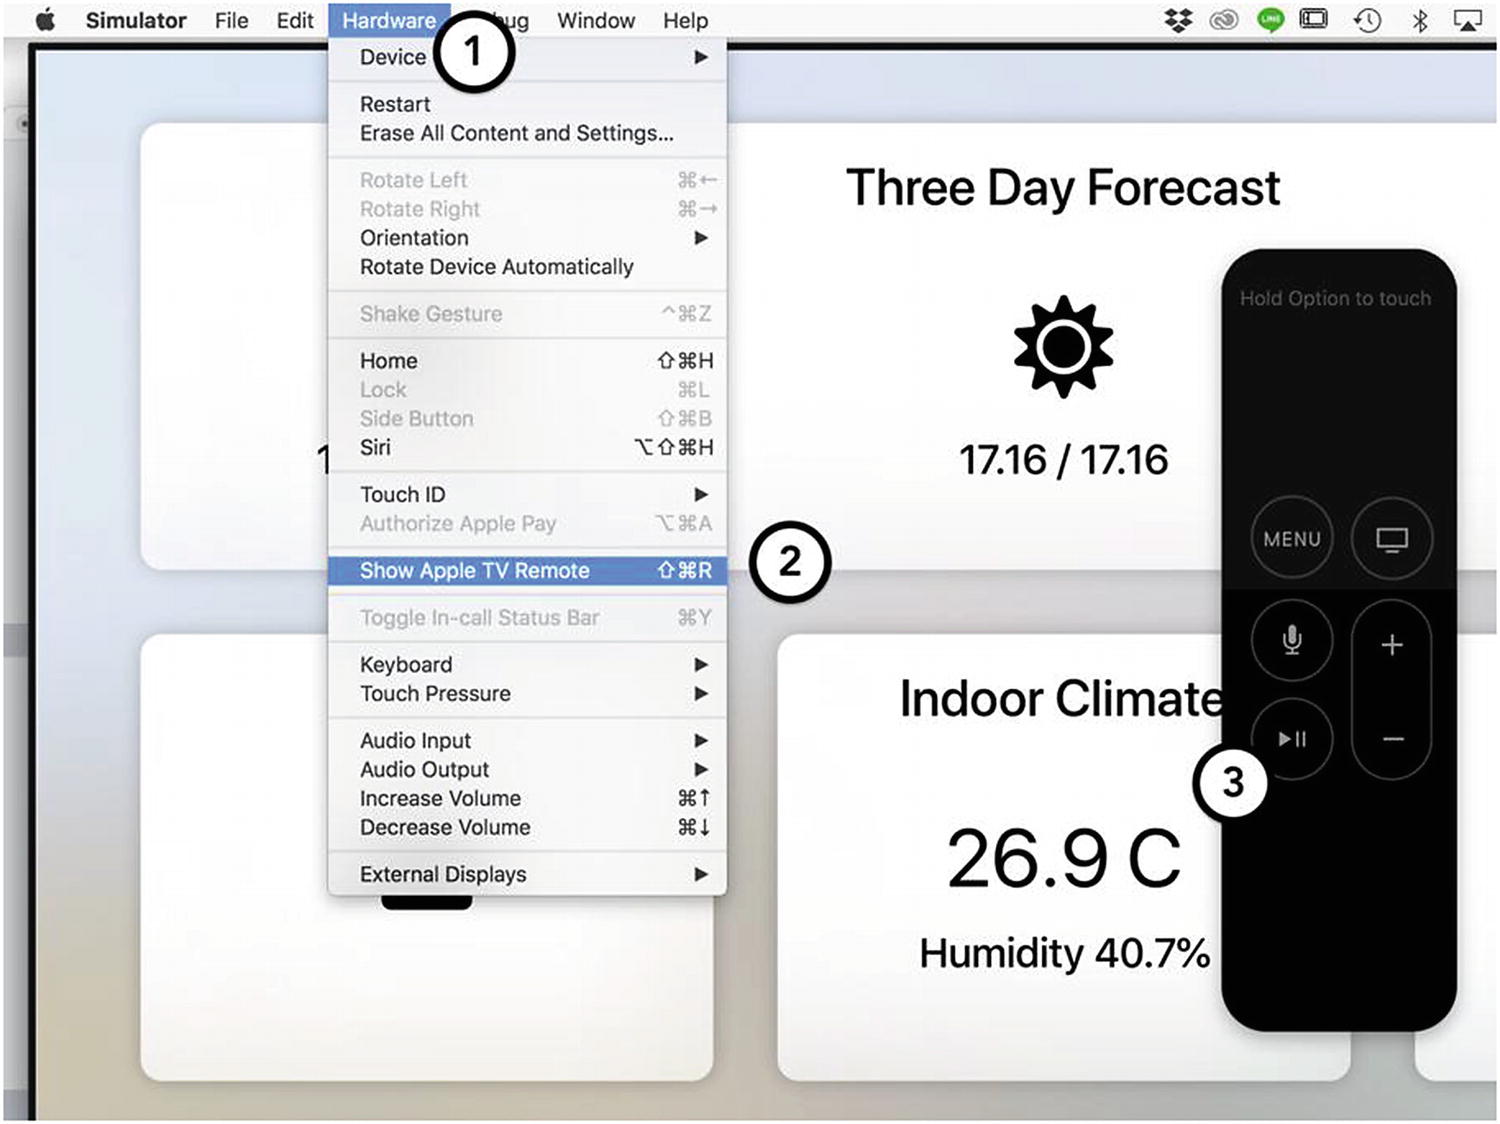
To test the gesture recognizer, run the Apple TV simulator. As shown in Figure 9-17, under the Hardware menu, select Show Apple TV Remote. Click the onscreen remote control, and verify that the fetchNetworkData() method is called, via an update in the displayed data or a breakpoint.
Figure 9-17
Using the onscreen remote in the Apple TV simulator
Implementing a touchpad click in tvOS takes advantage of another concept from iOS, press events. However, these are implemented in a different fashion from gesture recognizers. Subclasses of UIViewController have default handler methods for UITouch and UIPress events, which are triggered by any touch or press event. To add touchpad click support, override the default delegate method for when a press is completed, pressesEnded(presses:with Event:), and insert a call to refresh the network data only when the Select event has been recognized, as shown in Listing 9-18.
class ViewController: UIViewController {
...
override func pressesEnded(_ presses: Set<UIPress>, with
event: UIPressesEvent?) {
for pressEvent in presses {
if pressEvent.type == .select {
fetchNetworkData()
}
}
}
}
Listing 9-18
Adding Touchpad Click Support
To test the touchpad click event, open the Apple TV simulator again. Press down on the Option key on your keyboard to enable touchpad support in the simulator, and click inside the touchpad again. Once again, the call to fetchNetworkData() should be triggered.
Debugging the App on an Apple TV
Having completely developed the IOTHomeTV app and verified that it works through the Apple TV simulator, there is just one step left to round out your journey into tvOS development: running the app on Apple TV hardware. In the same vein as iOS devices, starting with Xcode 9, if you have a valid Apple Developer account, you can connect to an Apple TV and debug it wirelessly from your Mac, via your home or office network connection.
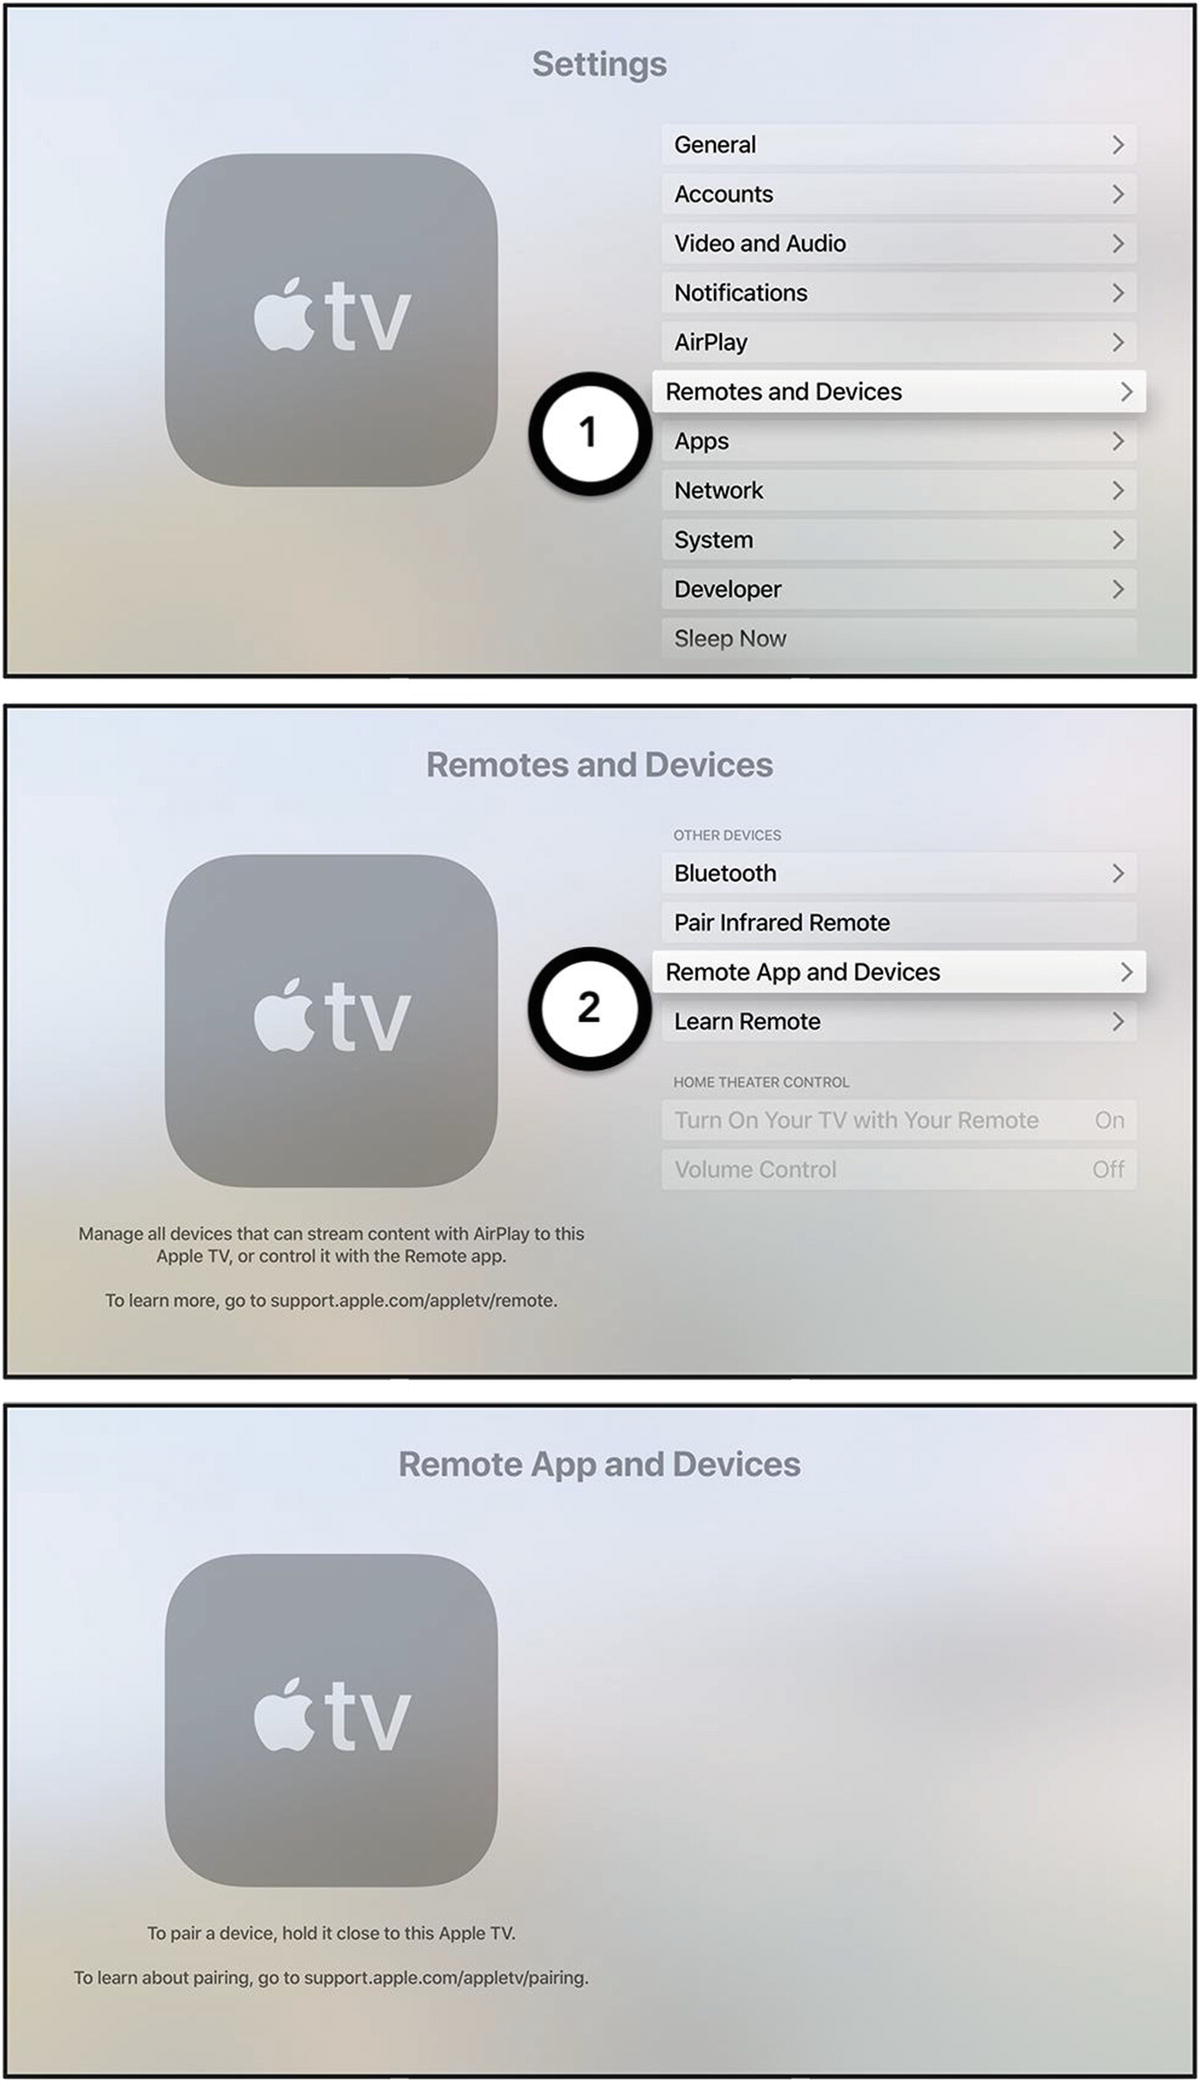
To begin, verify that your Mac and Apple TV are connected to the same wireless network. Next, open the Settings app on your Apple TV. As shown in Figure 9-18, select Remotes and Devices, and then Remote App and Devices. If you pair your Apple TV with an iPhone or iPad via the Remote app, it should show up on this screen; otherwise, it should be empty.
Figure 9-18
Preparing an Apple TV for pairing with a Mac
Leave the Remote App and Devices screen open on your Apple TV and open up Xcode. Within Xcode, click the Window menu and then Devices and Simulators. Inside the Devices and Simulators window, you should see a graphic of an Apple TV and a Pair button that includes the name of your Apple TV in its title text. As shown in Figure 9-19, after clicking this button, you will be presented with an authentication dialog that asks you to type in the identification code displayed on your Apple TV. Enter this code and then press Connect.
Figure 9-19
Pairing an Apple TV from a Mac
After the pairing process has been completed successfully, the Devices and Simulators window will update to show statistics about your Apple TV, as shown in Figure 9-20.
Figure 9-20
Confirmation of successful pairing with an Apple TV
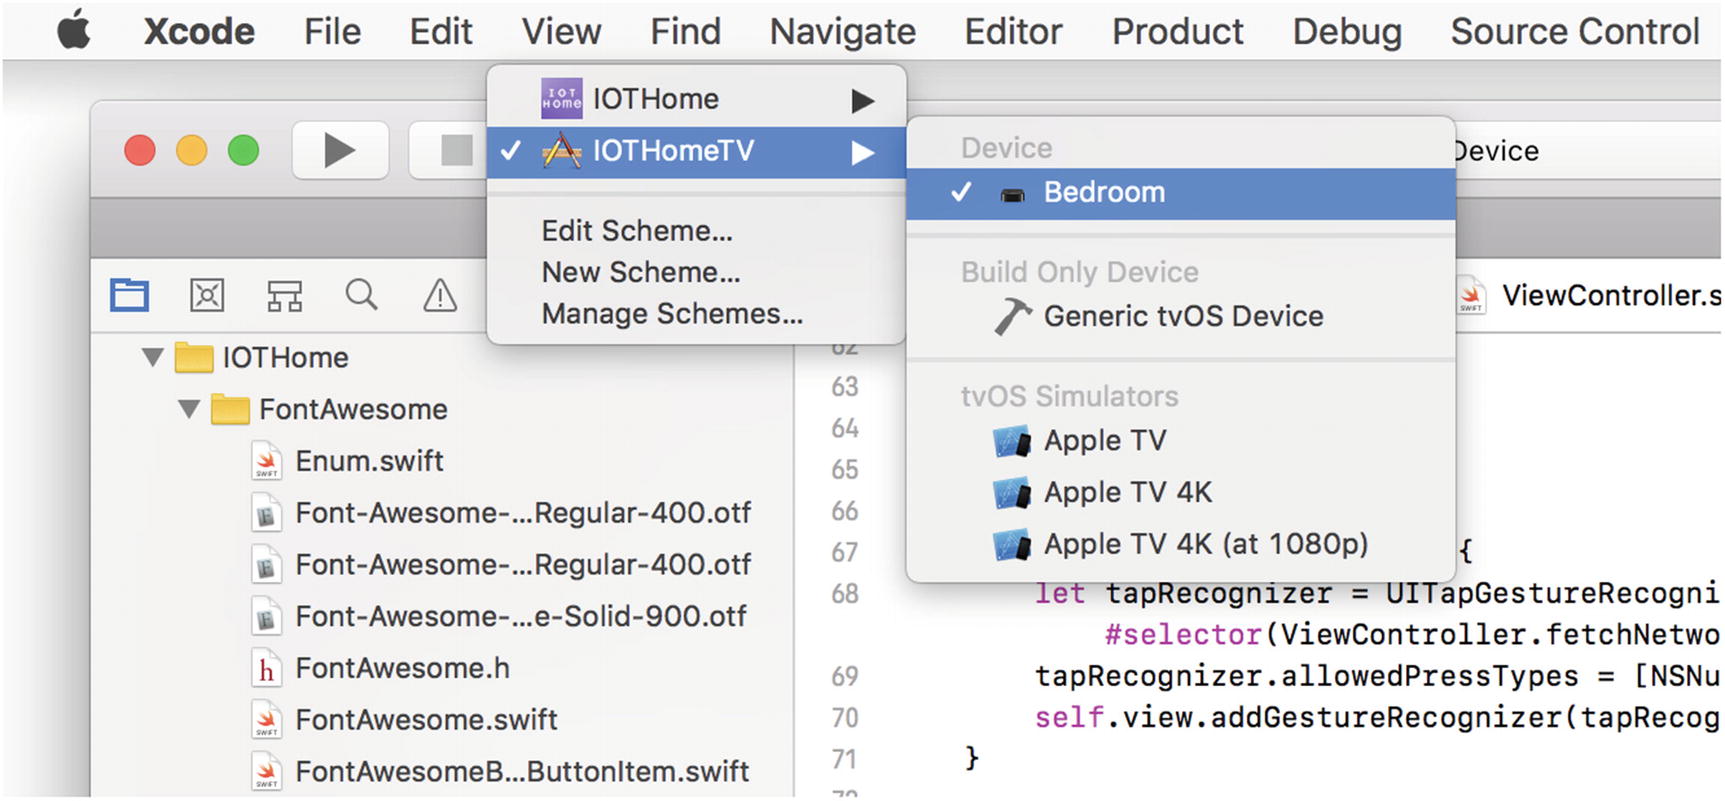
After waiting several minutes for Xcode to download the debugging symbols for your device, you will be able to select your Apple TV as a Debugging Target from the target selection menu next to the Run button in Xcode, as shown in Figure 9-21. The first time you connect a device, you will also be prompted to add it to your Apple Developer Program account. Select the confirm action in this pop-up, to complete the device setup process.
Figure 9-21
Selecting an Apple TV as a debugging target
At this point, you can press the Run button to run the app on the device, and you should be able to access debugging features you are used to on iOS devices, including breakpoints and stack inspection. Congratulations on building and running your first Apple TV app!
Summary
In this chapter, you learned how to leverage your knowledge of iOS programming to create a tvOS dashboard app for the IOTHome hardware. Although you had to make some special exceptions for tvOS, the development flow and APIs that were available for use closely resembled their counterparts in iOS. By adding the tvOS app as a target to the IOTHome project, you were able even to share code with the iOS app, including the Network Manager. To add that last bit of useful polish to the app, you learned how to apply visual effects to views, use Font Awesome for font-based icons, and OpenWeatherMap.org for public weather data.
As fun as it was building the app, it also gave you an opportunity to make the data from the IOTHome sensors more useful and easier to access for users. The biggest recurring challenge I kept seeing when consulting for companies implementing IoT sensors and big data was how to use all the data that has been generated. By giving your users a visualization of their data and augmenting it with other useful, related information data, you were able to reduce the friction of using the hardware and increase its value to your users. By making systems that improve a user’s life, you can help transform IoT devices from toys to tools.