As you have learned so far in this book, Internet of Things (IoT) technologies can be used to expand the conveniences in people’s lives. Compared to a few years ago, these devices have increased in their capabilities, as have the barriers of entry to creating a device. In this book alone, you have already taken advantage of an Arduino, Raspberry Pi, and iPhone as IoT sensors.
However, as they say, new medicines come at the cost of new side effects. For the IoT, the most unfortunate, unexpected side effect of its adoption has been an increase in security exploits, originating from improperly secured IoT devices. As mentioned throughout the book, much of the popularity of IoT has been powered by the availability of affordable system-on-a-chip (SoC) solutions, such as the ESP32 you used in earlier chapters. Unfortunately, when a widely used system’s design shortcomings are exploited, its high adoption rate can lead to devastating damage.
This was precisely what has occurred with the Mirai botnet, which exploited a known set of commonly used default passwords on IoT devices to automatically install, replicate, and run a program to use infected devices for a coordinated attack on target systems, otherwise known as a distributed denial-of-service(DDoS) attack. Having affected more than 600,000 devices, in 2017 it took down several Domain Name System (DNS) servers, which form the backbone of routing Internet traffic, and was cited as the largest DDoS attack publicly recorded.1 As of this writing (late 2018), the botnet has continued to increase in sophistication and find new targets.
In Chapter 8, when you learned how to build a web server using a Raspberry Pi, one of the methods you learned for increasing security on a device was adding an SSL certificate to the web server, so that all of the data transferred between the devices and external clients (such as the iOS app) could be secured via HTTPS. Although not a perfect or complete solution, this was one step in making it harder for your users’ data to be intercepted via simple traffic sniffing (using a program to monitor packets transferred on a network). For a complete solution, you should always try to research all of the paths to accessing an administrator account on a system and secure them, including changing passwords, using two-factor authentication, adding input validation to your web application APIs, and installing security patches and helper utilities to prevent known attacks.
In this chapter, you will learn three techniques on the iOS app side that you can use to help prevent your users’ information from being leaked or stolen from their devices: Face ID, Touch ID, and Keychain Services. As an iPhone user, you may already be familiar with the first two services from your Home screen. They allow you to unlock your Home screen using a 3D surface scan of your face (on iPhone X and newer versions) or using a fingerprint (on iPhone 5S–iPhone 8 Plus, and iPad Air 2 and later versions). However, you may not be aware that you can use Keychain Services in your own apps to restrict access to parts of your application. This is a feature popular in many password repository applications (such as 1Password). Similarly, Keychain Services allows you to create an encrypted database for your app’s data, which can only be accessed while your app is active and in the foreground on the user’s devices. Keychain Services is Apple’s recommended method for storing user passwords, API keys, and SSL certificates, which could be exploited greatly, if they were leaked from your app.
Learning Objectives
In this chapter, you will learn how to use Face ID, Touch ID, and Keychain Services to secure data, by expanding the IOTFit application from earlier chapters to use these APIs, to restrict access to the application to only the owner of the iOS device or via a password stored in the keychain. By implementing these improvements to the IOTFit app, you will learn the following key concepts for IoT application development:
Creating a lock screen user interface
Determining Face ID and Touch ID availability on a device
Using Face ID and Touch ID to restrict access to an application
Storing and retrieving values from the iOS keychain
Detecting when an app returns from the background
The workout data stored in the HealthKit store is encrypted and managed by the Health app on the device; however, you can add further security by disabling the portion of the WorkoutDataManager class that was used to backup data to a .plist file in the Documents folder for the application. Although the data in an application’s bundle is not available to other applications, it is possible to extract this data via backup applications on a Mac or PC.
As with previous projects in this book, the source code for the completed project is available from the GitHub page for this book (https://github.com/Apress/program-internet-of-things-w-swift-for-ios). If you would like to review how the health features of the IOTFit app were created, please refer to Chapters 2–4. If you would like to review how HTTPS was added to a web server application, please refer to Chapter 8.
Setting Up the Project
To get started, create a duplicate of the IOTFit app from Chapter 10, either by copying your old project or downloading a copy from the GitHub repository for this book. As Face ID is easier to access unintentionally than Touch ID or typing a password into an iPhone, Apple requires permission from the user to enable it in your app. As in the case of HealthKit (Chapter 4), this permission prompt will appear the first time your users try to use Face ID in the app. Another similarity to HealthKit is that the permission prompt is enabled by defining a message string for it in your app’s Info.plist file.
As shown in Figure 11-1, to set the Face ID permission prompt message for your app, open the Info.plist file for the IOTFit target in the Project Navigator, click the (+) button in any column, and add a new entry for the Privacy – Face ID Usage Description key-value pair. In my implementation, I used the message, “IOTFit would like to use Face ID to secure your workout data.”
Figure 11-1
Adding a message string for the Face ID permission prompt
Creating a Lock Screen User Interface
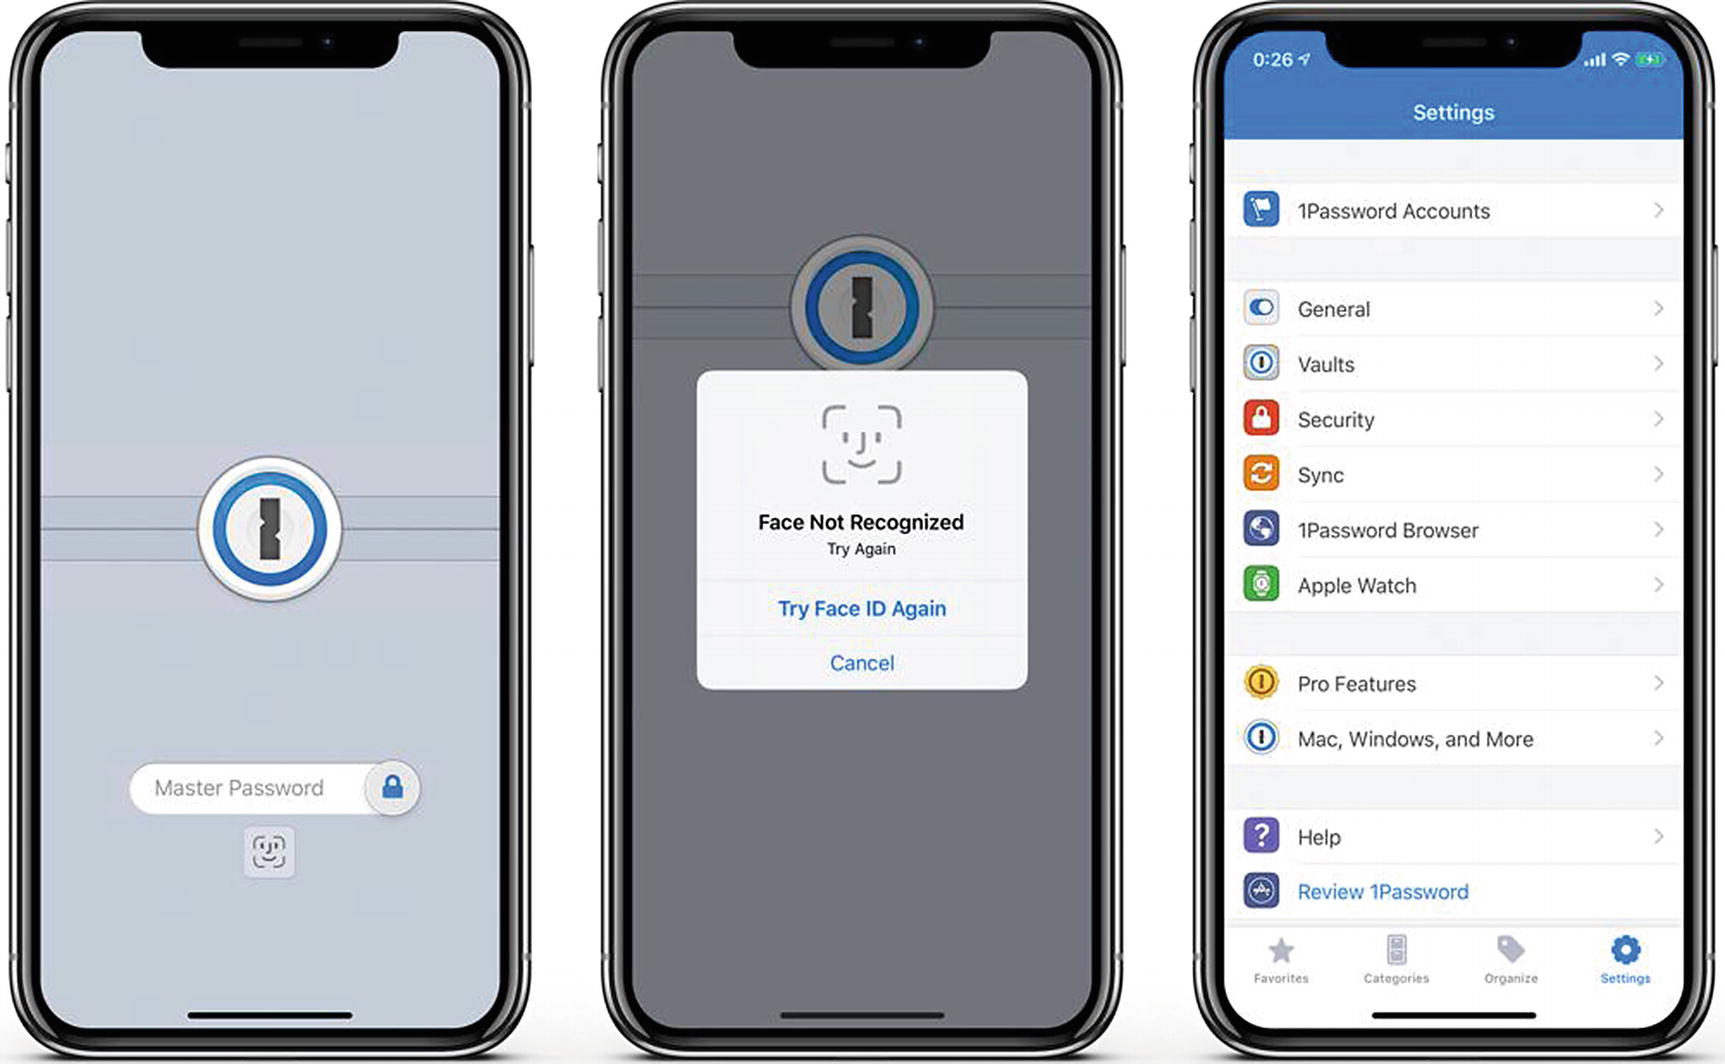
When I was thinking about how to design a project for demonstrating Face ID, the best example that popped into my head was the lock screen for the 1Password password manager app. As shown in Figure 11-2, before you can access the user interface for the app, 1Password asks you to type in a password or press a Face ID button to unlock the app with Face ID. When verification is successful, the lock screen performs an animation that mimics a door opening, revealing the main user interface when it is complete.
Figure 11-2
Lock screen for 1Password password manager
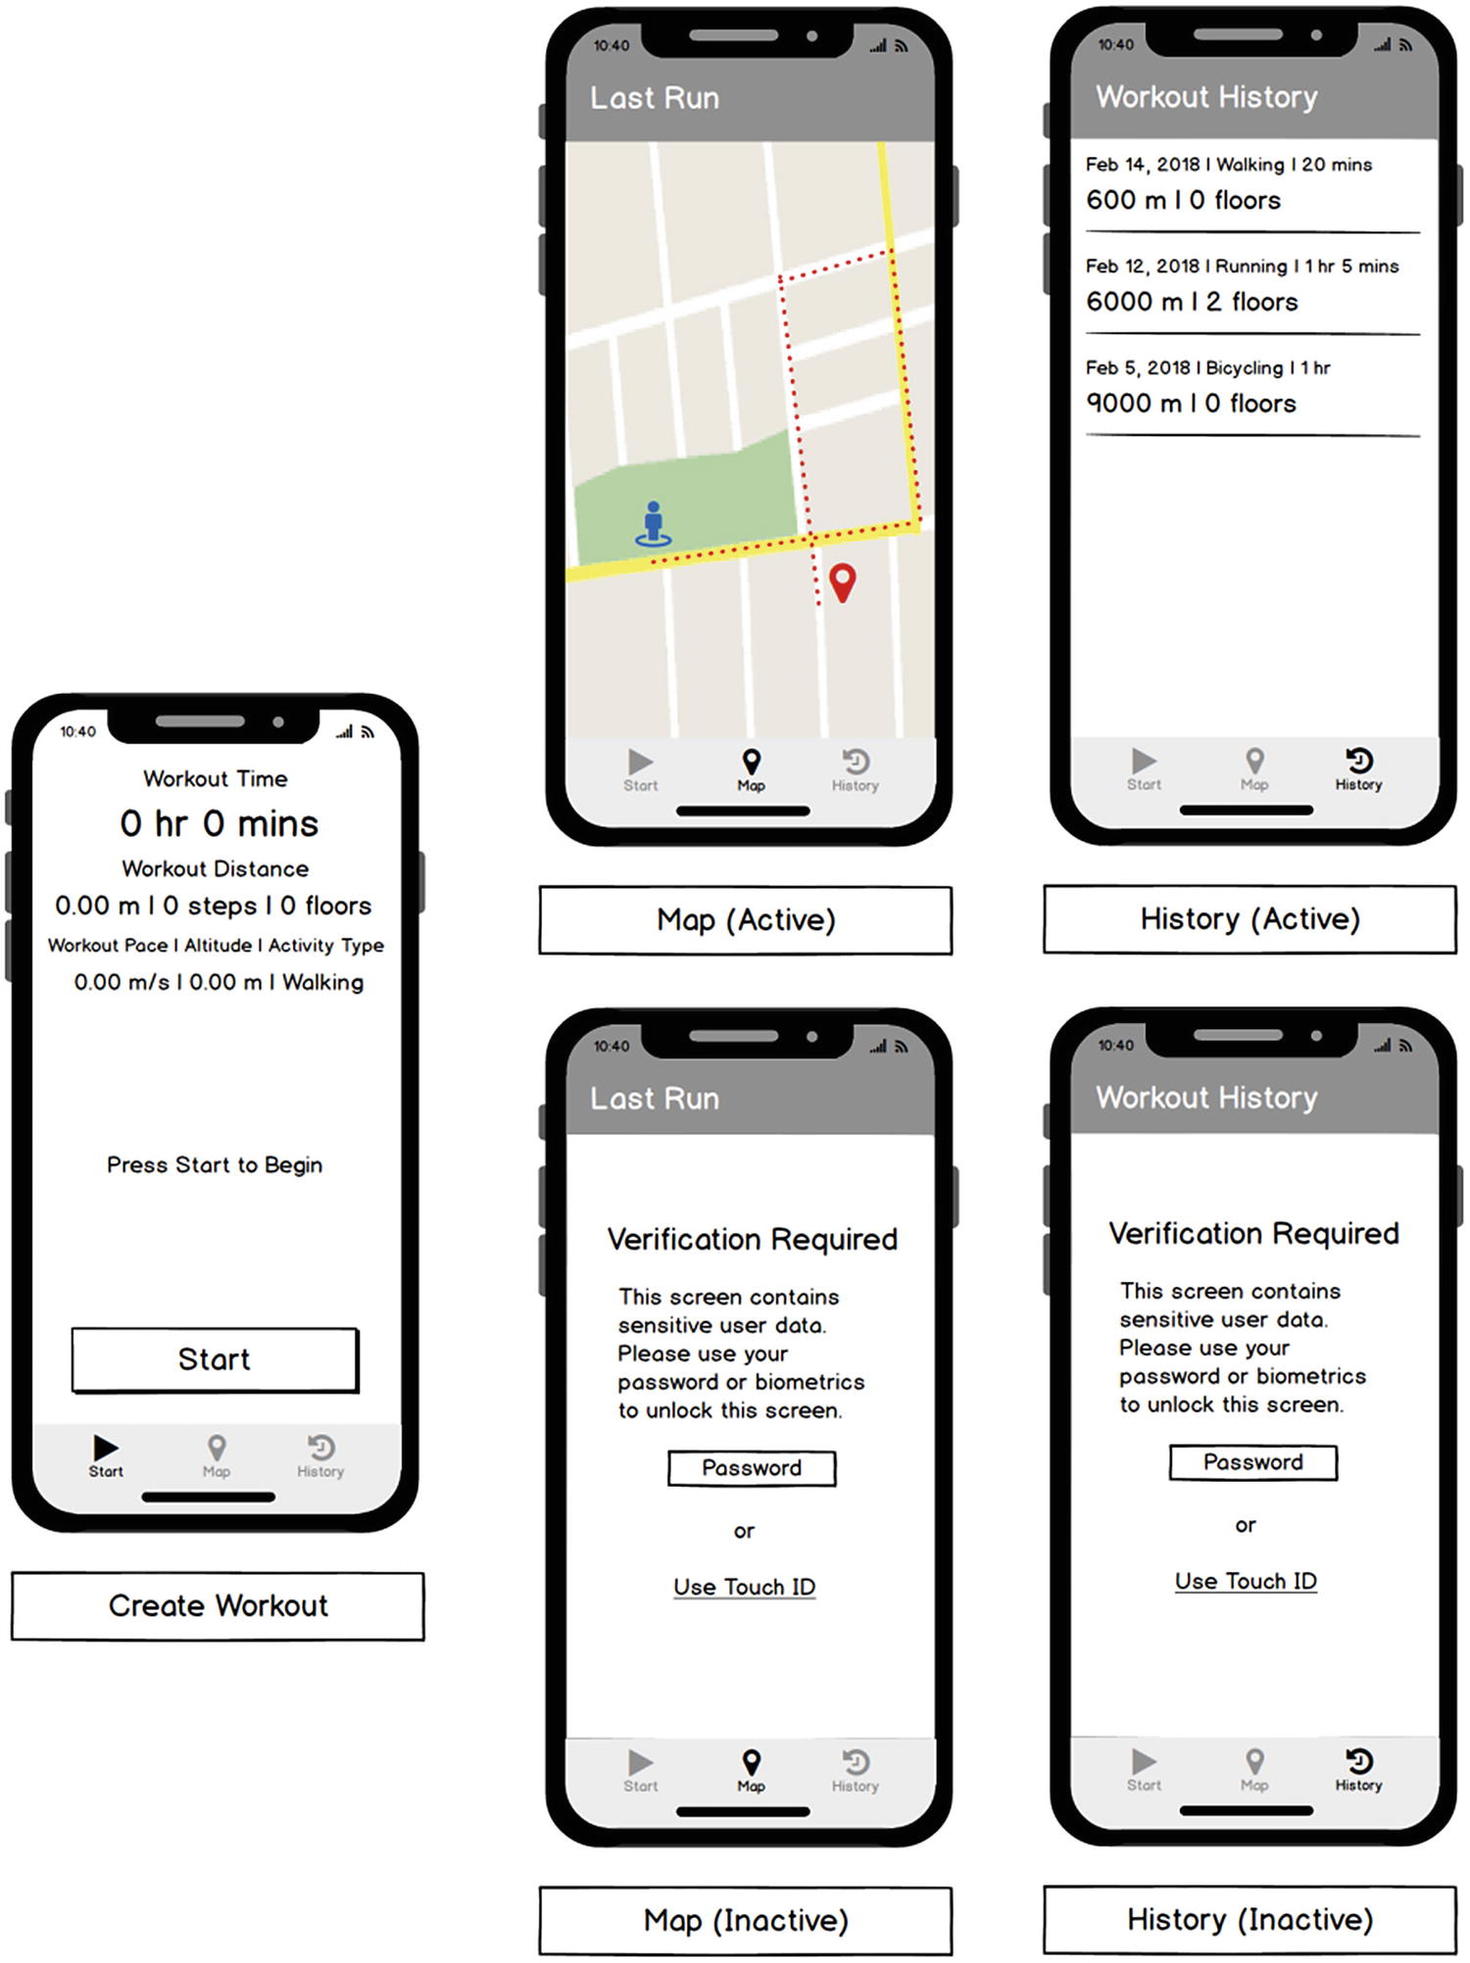
Although the full animation is a bit beyond the scope of this project, I thought the idea of showing a full-screen overlay to block sensitive features would be universally appropriate. In the IOTFit app, the most sensitive pieces of data are the user’s past location and workout data. As shown in Figure 11-3, I have expanded the wireframes for the app to show a simple lock screen over the Workout History and Last Run screens. For the sake of simplicity, you will reveal the lock screen whenever the screens are navigated to within the Tab bar and when the app becomes active.
Figure 11-3
Design wireframes for the IOTFit app, including lock screen
As with 1Password, I have included a button to initiate Face ID (or Touch ID), and a password text field as a backup authentication method. In the app, by detecting which sensor is available on the device, you can update the text to show Touch ID or Face ID. As opposed to 1Password, I only applied the lock screen over the screens that display data, as the primary purpose of the app is recording workouts, and it is a good design practice to reduce the friction leading up to this activity.
To prevent the lock screen from blocking access to the Tab bar, I suggest implementing the lock screen as a UIView that will be displayed over the contents of the Workout History and Last Run view controllers. After authentication is successful, you will use a simple animation to dismiss the view and present the data. To begin this process, you must create a new UIView subclass and NIB (.xib) file to represent the lock screen.
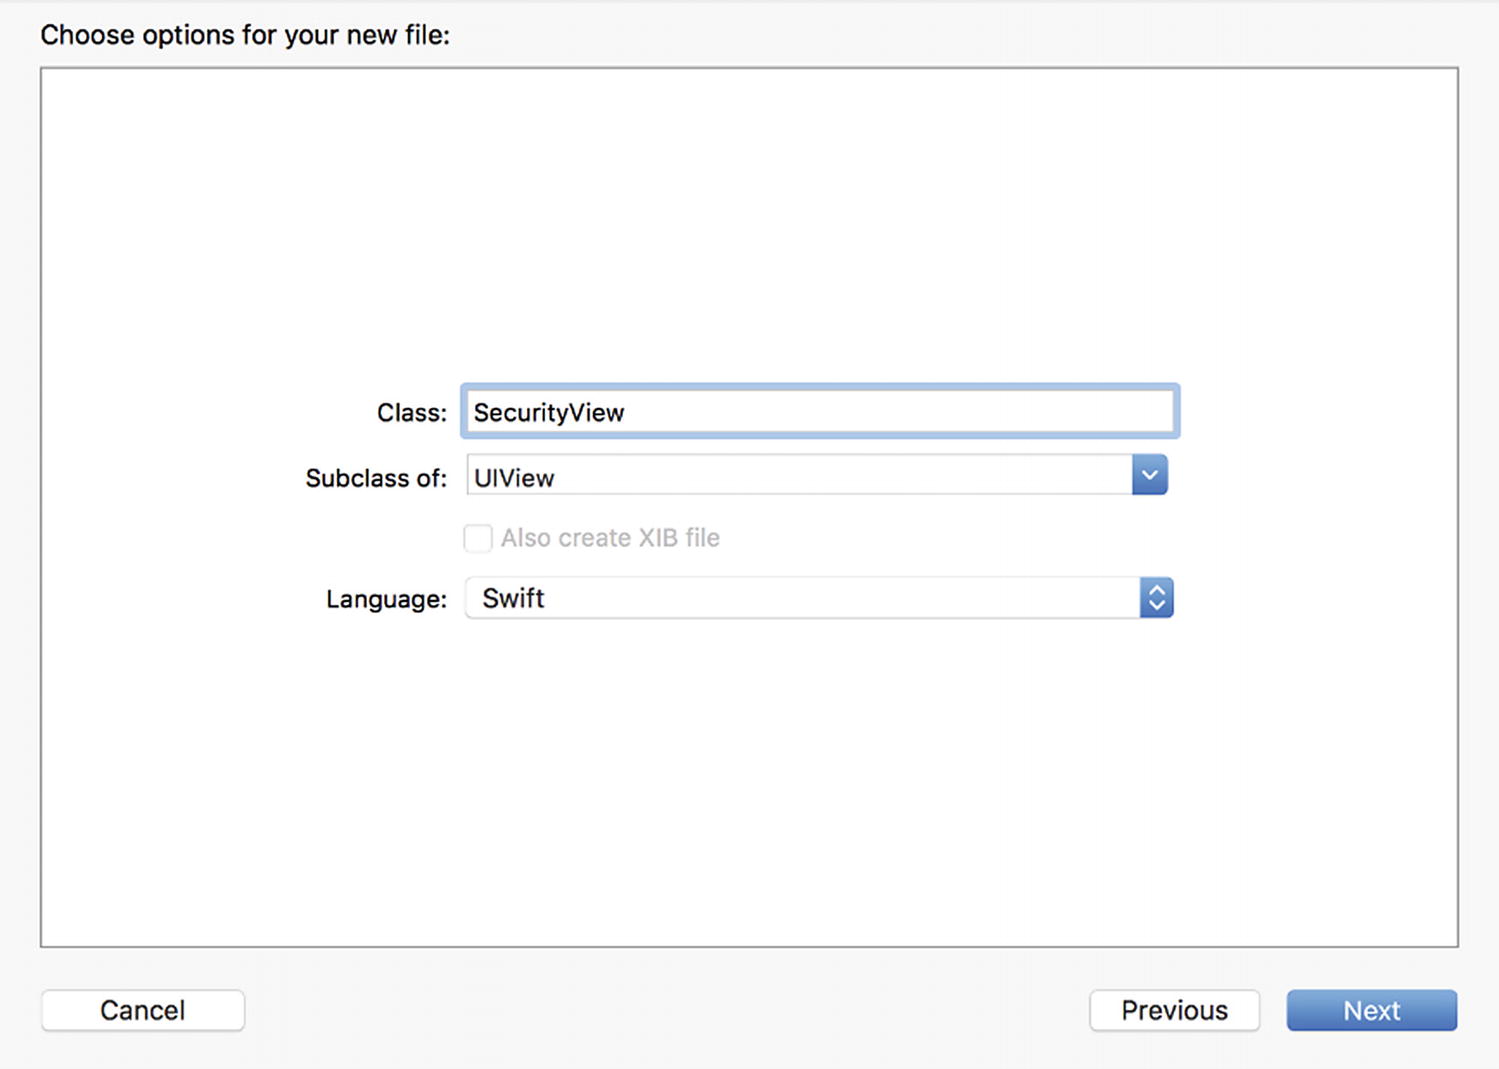
As with previous examples in the book, create the UIView subclass by going to the File menu and selecting New ➤ File… . From the template picker that appears, select iOS ➤ Cocoa Touch Class. As shown in Figure 11-4, create a subclass of UIView named SecurityView.
Figure 11-4
Adding a UIView subclass to the project
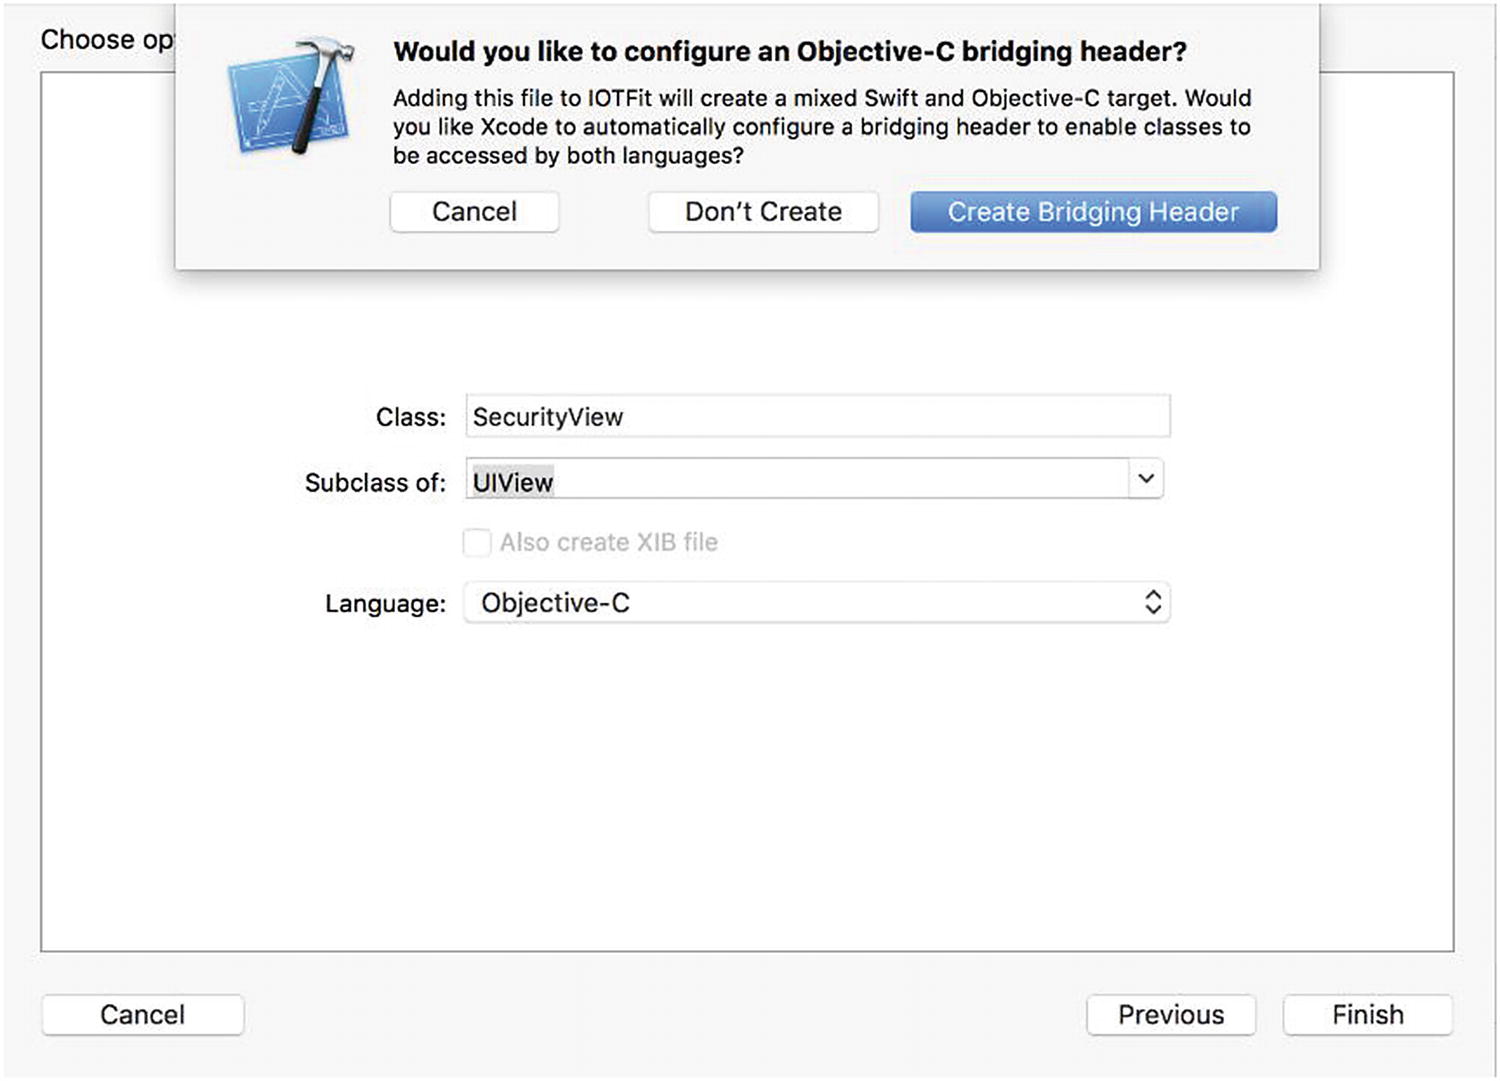
Because UIView subclasses can be used without modification in Objective-C classes, the first time you add a new one to a Swift project, you will be asked to add an Objective-C bridging header to the project, as shown in Figure 11-5. Select Create Bridging Header to create the bridging header and continue with the setup process.
Figure 11-5
Prompt for adding an Objective-C bridging header to a Swift project
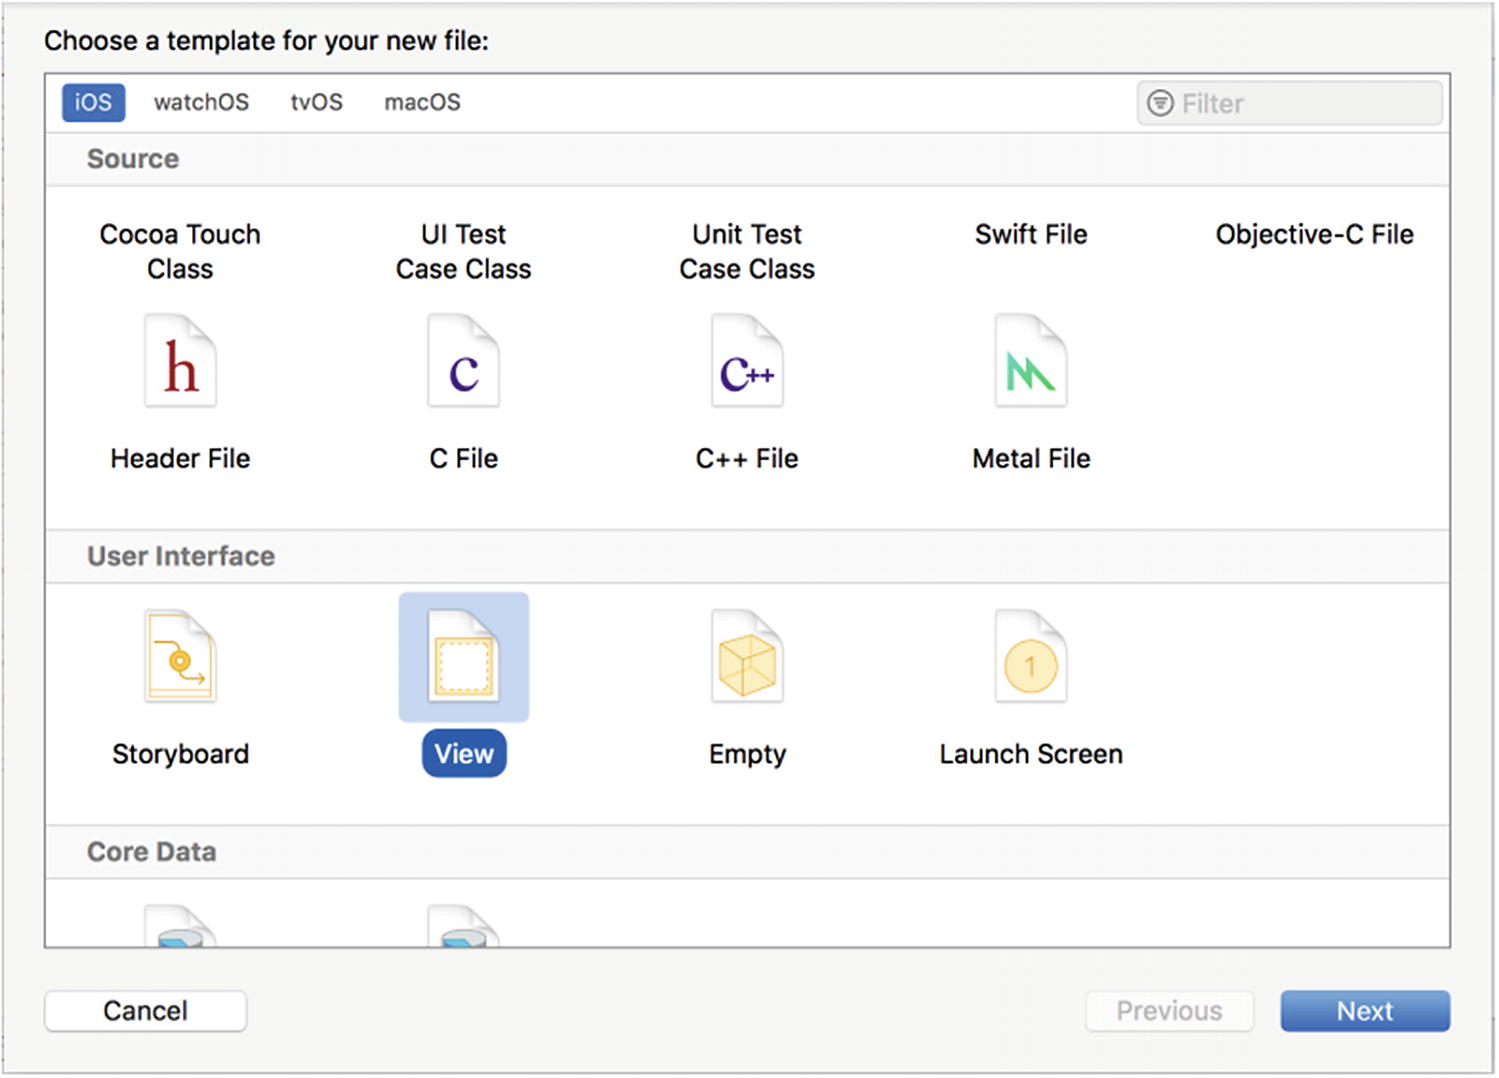
Next, you must create a NIB (.xib) file to manage the visual layout of the SecurityView class. While previous examples in the book managed all of these user interfaces on a single storyboard file, when you are creating a view that will be reused multiple places in an app, the common practice in the industry is to manage the single view in its own NIB file. NIBs are the original visual layout tool for Interface Builder and are intended to manage single views or view controllers, as opposed to storyboards, which are designed to manage common segues between multiple view controllers. To create a new NIB, open the File menu again and select New ➤ File... one more time. This time, scroll further down in the iOS template picker, as shown in Figure 11-6, and select View. When asked to name the file, use the name SecurityView.xib, to match the UIView subclass.
Figure 11-6
Selecting a View NIB from the Xcode template picker
After clicking the NIB file in the Project Navigator, you should see a single blank view inside Interface Builder, similar to when you created a new storyboard file. Using Table 11-1 as a guide, lay out the user interface, paying particular attention to the UITextField for password entry and the UIButton for presenting Face ID.
Table 11-1
Styling for Security View User Interface Elements
Element Name
Text Style
Align Relative to
Top Margin
Bottom Margin
Left Margin
Right Margin
“Verification Required” label
Title 1
View
60
40
40
40
“Description” label
Footnote
“Verification” label
40
40
40
40
“Password” text field
Body
“Description” label
40
8
80
80
“or” label
Footnote
“Password” text field
8
8
80
80
“Use Face ID” button
Body
“or” label
8
—
80
80
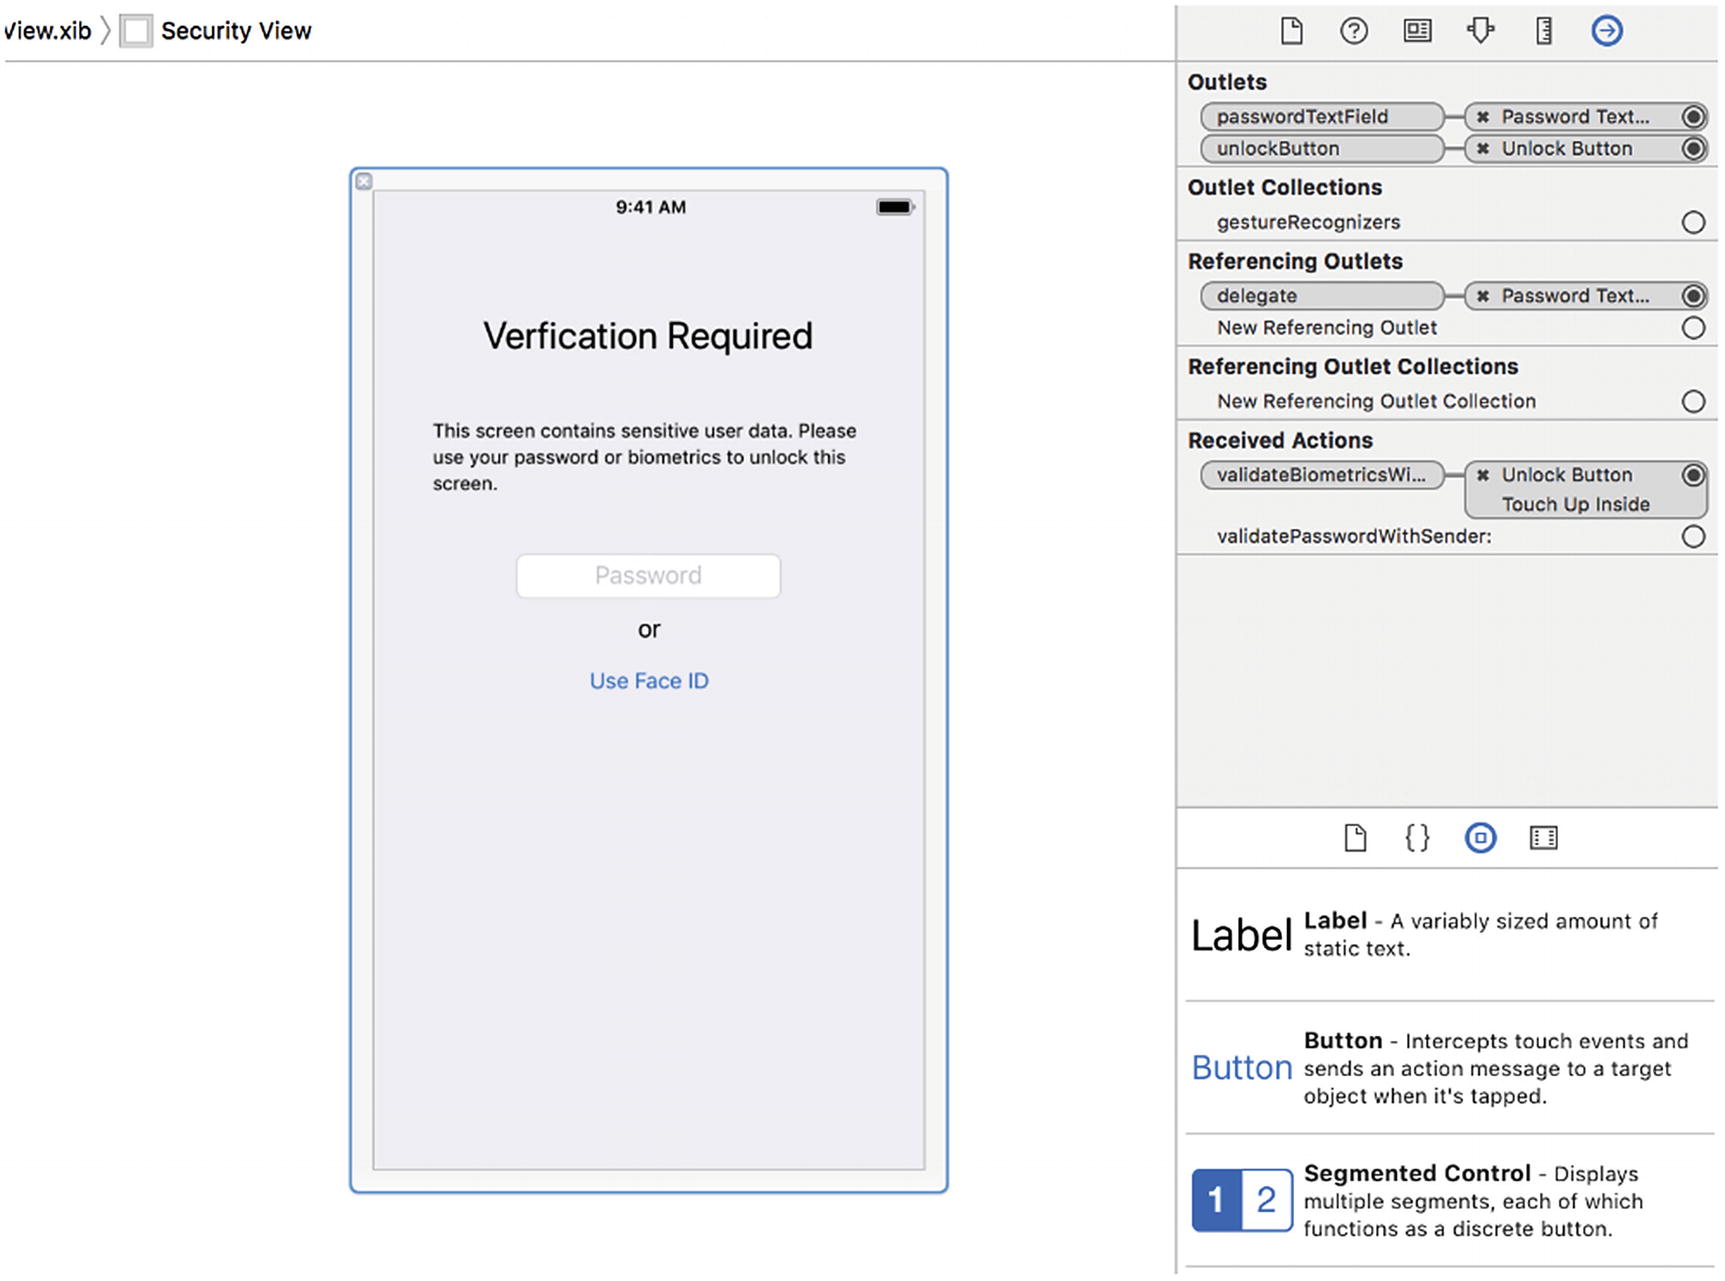
The NIB file for your completed security view should resemble the screenshot in Figure 11-7, after applying these styles. In the same manner as in previous chapters, your next step should be to define the SecurityView class, including its properties.
Figure 11-7
Final layout for the security view
Switch back to the SecurityView.swift class and use my example in Listing 11-1 as a starting point for your implementation. Pay careful attention to declare the button and text field with the @IBOutlet keyword and the button handlers with the @IBAction keyword, so that both will be compatible with Interface Builder.
import UIKit
class SecurityView: UIView {
@IBOutlet var unlockButton: UIButton?
@IBOutlet var passwordTextField: UITextField?
@IBAction func validatePassword(sender:
UITextField) {
//password handling will go here
}
@IBAction func validateBiometrics(sender:
UIButton) {
//biometrics handling will go here
}
}
Listing 11-1
Initial Definition for the SecurityView Class
To round out the SecurityView class, you will have to connect its outlets to the parent class. As with previous examples, you can find detailed instructions for this process in Chapter 1. In particular, do not forget to
Set the SecurityView class as the parent class in the Identity Inspector (the third tab from the left).
Connect the unlockButton and passwordTextField on the NIB file to their respective properties in the class (using the Connections Inspector).
Connect the passwordTextField’s delegate property to the SecurityView class (so you can handle its events).
Connect the unlockButton’s Touch Up Inside event to the validateBiometrics(sender:) method.
After making all of the connections, the Connections Inspector for the security view should resemble the screenshot in Figure 11-8.
Figure 11-8
Connections Inspector for completed security view
For the final user interface setup tasks, you must display the security view when the WorkoutMapViewController and WorkoutTableViewController classes become visible. To begin, you must load the security view from the NIB file and make it available to the calling class. Unlike the Main storyboard, which is loaded as part of the app’s initialization process, to load a view from a NIB file, you must attempt to load the file via its bundle path (its relative path in the .app bundle) and verify that the contained class matches your expectations. In Listing 11-2, I have implemented this via a setupSecurityView() method, in which I use the Bundle class to load this view and then use the main view for calling the view controller to set the size and destination for the security view.
class WorkoutTableViewController: UITableViewController {
...
var securityView: SecurityView?
override func viewDidLoad() {
super.viewDidLoad()
...
setupSecurityView()
}
...
func setupSecurityView() {
guard let securityNibItems =
Bundle.main.loadNibNamed("SecurityView", owner:
nil, options: nil),
let securityView = securityNibItems.first as?
SecurityView else { return }
securityView.frame = view.frame
securityView.autoresizingMask = [.flexibleWidth,
.flexibleHeight]
self.securityView = securityView
view.addSubview(securityView)
}
}
Listing 11-2
Adding the Security View to a View Controller (WorkoutTableViewController.swift)
For the sake of brevity, my code listings for this chapter will be for the WorkoutTableViewController class only, but all of the same logic can be copied directly into the WorkoutMapViewController class, with a few exceptions, which I will point out throughout the chapter.
To make the security view visible to the user, you must bring it to the top of the view hierarchy when the WorkoutTableViewController or WorkoutMapViewController classes become active. In Listing 11-3, I perform this step via the showSecurityView() method, which is called from the viewWillAppear() method.
class WorkoutTableViewController: UITableViewController {
...
override func viewWillAppear(_ animated: Bool) {
super.viewWillAppear(animated)
...
showSecurityView()
}
...
func showSecurityView() {
if let securityView = self.securityView,
securityView.isHidden == true {
tableView.reloadData()
securityView.alpha = 1.0
securityView.isHidden = false
view.bringSubview(toFront: securityView)
}
}
}
Listing 11-3
Presenting the Security View When a Tab Becomes Active (WorkoutTableViewController.swift)
As the name view hierarchy suggests, views are presented as a stack, with the topmost view being the one that the user sees. When you built your user interfaces in Interface Builder, you simply added child views to the main view. As all of the child views were on the same presentation level (z-order), there was no need to manage view visibility. In the case of the security view, it should be presented over every other view in its calling class, to obstruct the user interface during the locked state. I was able to perform this operation in the showSecurityView() method. I used the bringSubview(toFront:) method on the main view. To avoid side effects, I also used the isHidden property on the security view, to prevent the view from being presented twice, if it was already active.
Querying for Sensor Availability
In the same manner you used to implement the other hardware-based APIs in this book, before attempting to use Touch ID or Face ID, you must first check if either is available on the device and that your app has access to them. To query this information, and eventually access the sensor, you will have to establish a security context for the app using the LocalAuthentication framework. To maintain its device-based security model, Apple performs all encryption on the iPhone via a discrete microprocessor called the Security Enclave. The LocalAuthentication framework allows you to access the Security Enclave through sessions referred to as contexts, in which you can query the availability of a security policy (for example, authentication via a biometric sensor) and attempt to request validation through that security policy. At no time does your app have access to the user’s personal information or encryption keys, maintaining the security of the device. Success or failure is returned through a Boolean return value and an error object, which will be set to a non-nil value describing the failure reason.
You can establish the security context for the security view using the LAContext class from the LocalAuthentication framework, and you can perform the availability query using the canEvaluatePolicy(policy:error:) method on the LAContext object. In Listing 11-4, I have expanded the SecurityView class to include this functionality by maintaining the context and authentication type as properties that can be reused when the authentication request is made later.
Detecting the Availability of Biometrics Using a Context (SecurityView.swift)
As with the viewDidLoad() method on a view controller, a view has an awakeFromNib() method that is called after it is loaded from a NIB file. As of this writing, Apple’s primary security policies are Biometrics and Device Passcode or Biometrics only. Because, the app will use its own passcode, I have chosen to skip the device passcode option for the IOTFit app.
Although the policy query does not return information on the sensor type, after you have determined that the app has access to biometrics, you can use the biometryType property of the LAContext object to determine this information. In Listing 11-5, I have expanded the commonInit() method to check for this information and update the title of the Use Face ID button to properly reflect the sensor type. If biometrics are unavailable, I disable the button, so that the user cannot press it by accident.
import UIKit
import LocalAuthentication
enum AuthenticationType : String {
case faceID
case touchID
case password
case notAvailable
}
class SecurityView: UIView {
...
var authenticationType: AuthenticationType?
...
private func commonInit() {
let error: ErrorPointer = nil
if context.canEvaluatePolicy(
.deviceOwnerAuthenticationWithBiometrics,
error: error) {
switch (context.biometryType) {
case LABiometryType.faceID:
authenticationType = AuthenticationType.faceID
unlockButton?.setTitle("Use Face ID", for:
.normal)
case LABiometryType.touchID:
authenticationType = AuthenticationType.touchID
unlockButton?.setTitle("Use Touch ID", for:
.normal)
default:
authenticationType =
AuthenticationType.notAvailable
unlockButton?.isEnabled = false
}
} else {
NSLog("Biometrics unavailable on device")
unlockButton?.isEnabled = false
}
}
}
Listing 11-5
Accessing the Sensor Type from a Context (SecurityView.swift)
Using Face ID or Touch ID to Restrict Access to Features
Now that you have established the availability of biometrics on the device and determined the sensor type, you can use this information to make the authentication request via the context property on the SecurityView class. To make this call, you will use the evaluatePolicy(policy:localizedReason:) method on the LAContext object. As described earlier, in keeping with Apple’s security restrictions, it will return a Boolean value indicating success or failure and a non-null Error object, if the request failed. In Listing 11-6, I make this call from the validateBiometrics(sender:) method.
In addition to making calls to the Security Enclave for you, the LocalAuthorization context also provides the initial permission pop-up to enable Face ID for your app and the pop-up that appears when you make the preceding authorization request. Unfortunately, it is up to you, as the developer, to handle the result yourself. One limitation of the view-based implementation is that views exist outside of view controllers, so by default, you will not be able to present any user interface updates outside of the view. To resolve this, you can establish a protocol to pass along information back to the presenting view controller when the security request has completed with success or failure.
In Listing 11-7, I have defined this protocol as SecurityViewDelegate, to reflect that classes that implement it are delegates of the protocol. Its methods are didFinishWithAuthenticationType(type:), which is called when the request completes successfully, and didFinishWithError(description:), which is called in case of a failure. This is similar to the design of the UIImagePickerControllerDelegate protocol used for the iPhone’s image picker and allows success and failure to be treated as discrete events.
Defining a Protocol to Pass Messages from the Security View (SecurityView.swift)
Messages are passed back to the presenting view controller via the delegate property on the security view. It is defined as an optional value to prevent crashes if the developer did not choose to implement a delegate.
The final steps to complete the authentication process are to now declare the WorkoutTableViewController and WorkoutMapViewController classes as delegates that implement the SecurityViewDelegate protocol and to implement the methods that will be called when the success or failure events are triggered. In Listing 11-8, I implemented this by setting the delegate property when presenting the security view from the WorkoutTableViewController class. For the success event, I dismissed the security view and for the failure event, and I presented a UIAlertController with the error description over all other views in the view controller. To implement a smoother transition, such as 1Password’s unlock animation, I used the UIView class’s animate() method to animate the alpha level (transparency) of the security view fading to zero.
class WorkoutTableViewController: UITableViewController {
Implementing the SecurityViewDelegate Protocol to Receive Messages from the Security View (WorkoutTableViewController.swift)
When I was implementing this application, I noticed that the UITableViewController class expects to be the primary view in the hierarchy and can sometimes display under the views that are presented over it. To alleviate this problem, I modified the UITableViewDataSource delegate methods shown in Listing 11-9 to show data only from HealthKit when the security view is not active. I made this call after every call that affected the presentation state of the security view.
class WorkoutTableViewController: UITableViewController {
...
// MARK: - Table view data source
...
override func tableView(_ tableView: UITableView,
numberOfRowsInSection section: Int) -> Int {
guard let securityView = securityView else { return 0 }
Showing or Hiding Table View Data Based on the State of the Security View (WorkoutTableViewController.swift)
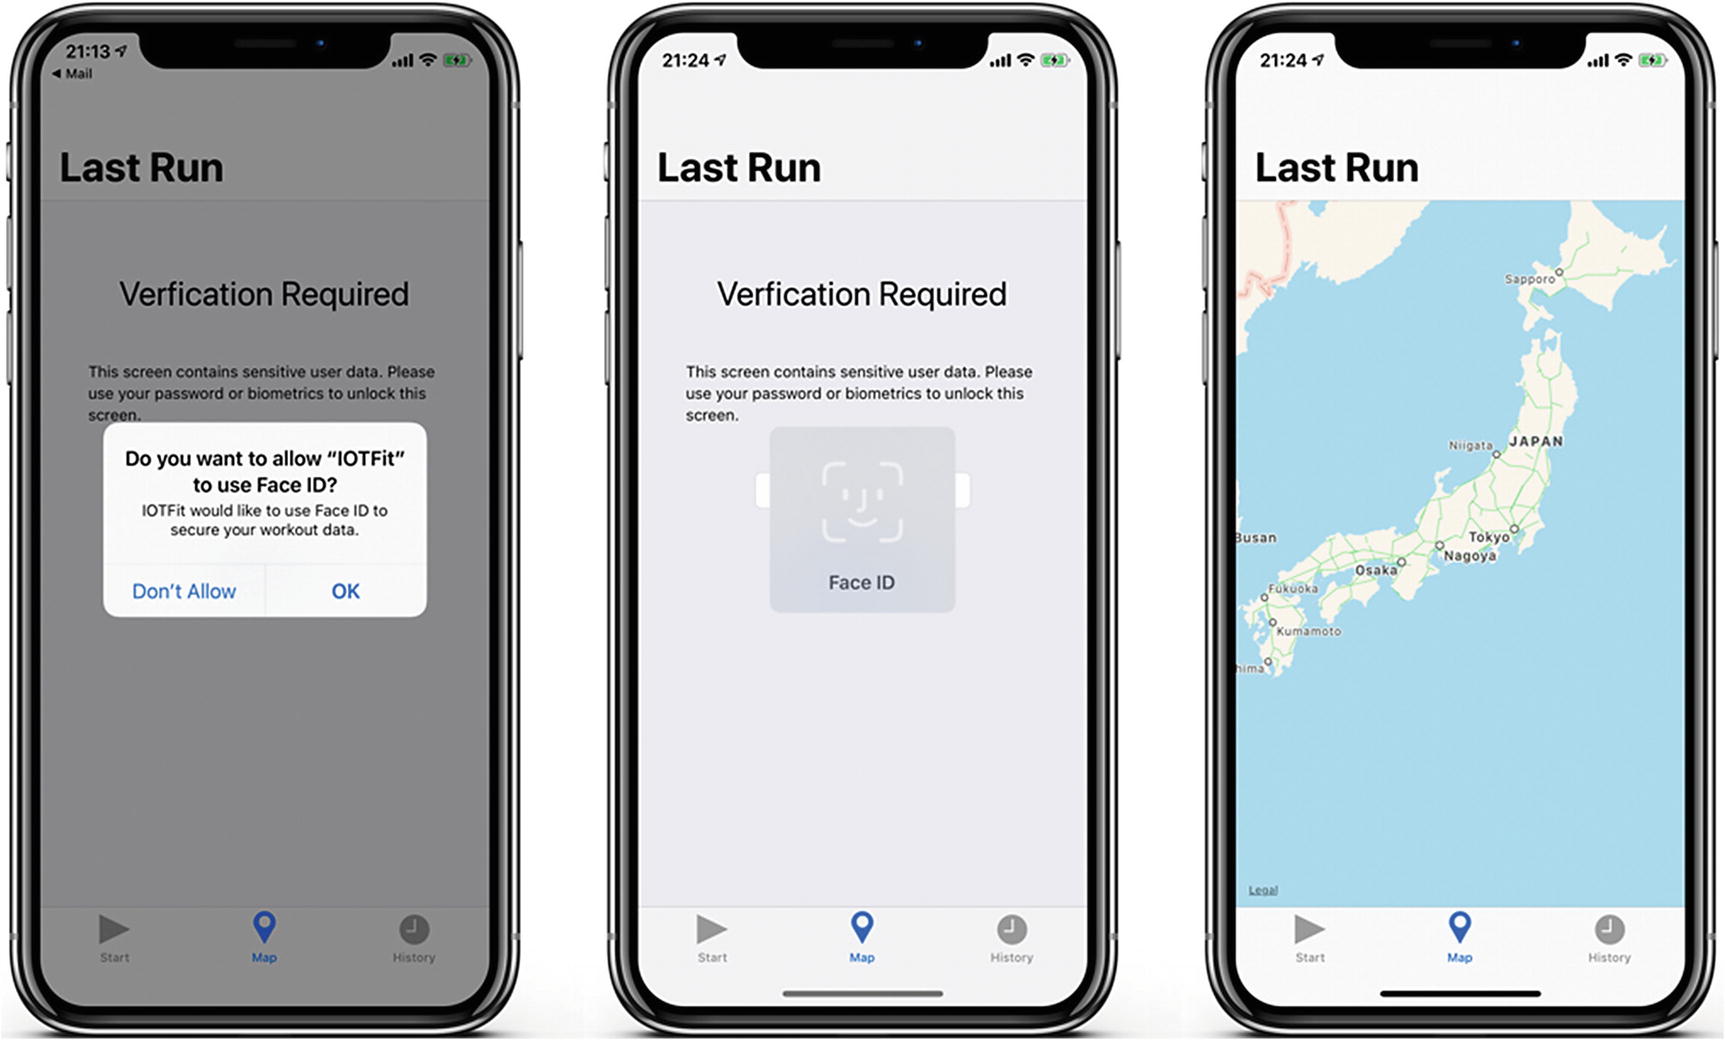
If you attempt to test the application now, the first time you click on the Use Face ID button in either the Workout History or Last Run screens, you will be presented with the system dialog to accept Face ID authentication, then the Face ID scan dialog. After you have validated, the security view will disappear, as shown in Figure 11-9.
Figure 11-9
Unlocking the Last Run screen using Face ID
Using Keychain Services to Secure Data
Now that the app can authorize users via biometrics, you must implement the password field as a backup, in case the user is having trouble with Face ID or Touch ID. As mentioned at the beginning of the chapter, you will store the password in the device’s Secure Enclave via Keychain Services. This data is only unencrypted and available when your app is active and in the foreground.
To begin, you must implement the UITextFieldDelegate protocol, to handle events from the password text field. Although the protocol defines several events, such as when editing begins or the entered text changes, the event you will want to observe is when the Return key is pressed on the onscreen keyboard. In Listing 11-10, I have implemented this event in the security view, by implementing the textFieldShouldReturn() delegate method. Although it is intended for enabling or disabling the Return key, many developers augment this by calling other methods before this one completes. For the IOTFit app, when the Return key is pressed, you should attempt to validate the password and clear the text field.
Performing an Action for a Text Field When the Return Key Is Pressed (SecurityView.swift)
Next, you must validate the password. Unfortunately, the implementation of the application so far has not prompted the user for an initial password yet nor stored it anywhere. You can perform this operation in a similar manner to accessing values from the UserDefaults for your app, namely by checking if a key-value pair exists in the Secure Enclave and setting it if it does not. When using Keychain Services, this is accomplished by attempting to extract values based on a search query.
Despite its name, a Keychain Services search query is closer to a predicate than a simple key-value pair lookup. To perform a search query, you must specify the type of value you are trying to interrogate (for example, web site password, general password, SSH secret), the number of matches you want to investigate, whether you want to access the data from the query, and identifying information for the data (such as the app name). For the IOTFit app, the data you will want to store is a general password, identified by the app’s name, in place of an account name. In Listing 11-11, I have expanded the SecurityView class to make this query, via a checkPasswordExistence() method. Because the presenting view controller will have to present the user interface for requesting the password, I have expanded the SecurityViewDelegate protocol to include new methods reflecting the password state of the application.
protocol SecurityViewDelegate {
func didFinishWithAuthenticationType(_ type:
AuthenticationType)
func didFinishWithError(description: String)
func needsInitialPassword()
}
class SecurityView: UIView {
...
let ACCOUNT_NAME: String = "IOTFit"
...
func checkPasswordExistence() {
guard let accessControl = accessControl else { return }
let query: [String: Any] = [kSecClass as String:
kSecClassGenericPassword,
kSecAttrAccount as String: ACCOUNT_NAME,
kSecMatchLimit as String: kSecMatchLimitOne,
kSecReturnAttributes as String: true,
kSecReturnData as String: true]
let queryStatus = SecItemCopyMatching(query as
CFDictionary, nil)
if queryStatus != errSecSuccess {
delegate?.needsInitialPassword()
} else {
NSLog("Password has already been set")
}
}
}
Listing 11-11
Querying If a Password Exists in the Secure Enclave (SecurityView.swift)
Although it breaks the pattern of many of Apple’s other APIs, the only way to execute the query is by attempting to perform an operation on the Keychain (copy, update, add, or delete). Because the SecItemCopyMatching(query:result:) method does not return an error object, you can verify the result of the operation via the OSStatus value that is returned after performing the operation. Any value other than errSecSuccess indicates that the operation failed. When I was debugging this application, I noticed that searching for the error code in Google was effective in determining the failure reason. Apple uses the OSStatus type in both iOS and OS X, so there is a wealth of information on what its possible values represent.
Note
The terms Security Enclave and Keychain are used interchangeably on iOS, as Keychain Services borrows its design from Keychain Services on macOS. In macOS, the secure store is referred to colloquially as the Keychain.
Next, you must make the call to check if the passcode exists and prompt the user to enter a password if it does not. It would make sense that before presenting the security view, which contains a password text field, you should check if there is a password to validate against. In my implementation, I performed this logic by adding a call to check the password state, after presenting the security view in the showSecurityView() methods in the WorkoutMapViewController and WorkoutTableViewController classes, as shown in Listing 11-12.
class WorkoutTableViewController:
UITableViewController {
...
func showSecurityView() {
if let securityView = self.securityView,
securityView.isHidden == true {
...
}
securityView?.checkPasswordExistence()
}
}
Listing 11-12
Checking If a Password Has Been Set When Presenting the Security View (WorkoutTableViewController.swift)
To handle the case in which the password does not exist, you must create a method for saving a string value to the Keychain. As mentioned earlier, all Keychain Services operations must be executed with a query. When it comes to adding a new item to the Keychain, the query is almost exactly like that for looking up a value, except that you need to include the new value as binary data. In Listing 11-13, I have added this logic to the SecurityView class via the savePassword(password:) method. Pay careful attention to the kSecValueData key-value pair and SecItemAdd(query:result:), as they are responsible for implementing the add value operation.
protocol SecurityViewDelegate {
...
func needsInitialPassword()
func didSavePassword(success: Bool)
}
class SecurityView: UIView {
...
func savePassword(password: String) {
guard let passwordData = password.data(using:
String.Encoding.utf8) else { return }
let query: [String: Any] = [kSecClass as String:
kSecClassGenericPassword,
kSecAttrAccount as String: ACCOUNT_NAME,
kSecValueData as String: passwordData]
let queryStatus = SecItemAdd(query as CFDictionary,
nil)
if queryStatus == errSecSuccess {
delegate?.didSavePassword(success: true)
} else {
NSLog("Error saving passcode: (queryStatus)")
delegate?.didSavePassword(success: false)
}
}
}
Listing 11-13
Saving a Value to the Keychain (SecurityView.swift)
As with checking the password status, I expanded the SecurityViewDelegate protocol to include a method for indicating whether the password was saved successfully. To complete the process of saving the password, implement the needsInitialPassword() and didSavePassword(success:) methods in the WorkoutTableViewController and WorkoutMapViewController classes, as shown in Listing 11-14. In my implementation, I chose to present a UIAlertController with a text field to accept the new password and logged the result of the operation to the console using NSLog().
installation", message: "Please set a passcode for
your data", preferredStyle: .alert)
alert.addTextField { (textField: UITextField) in
textField.placeholder = "Password"
textField.isSecureTextEntry = true
}
let okAction = UIAlertAction(title: "OK", style:
.default) { [weak self] (action: UIAlertAction) in
guard let textField = alert.textFields?.first,
let password = textField.text else { return }
self?.securityView?.savePassword(password:
password)
}
let cancelAction = UIAlertAction(title: "Cancel",
style: .cancel, handler: nil)
alert.addAction(okAction)
alert.addAction(cancelAction)
present(alert, animated: true)
}
func didSavePassword(success: Bool) {
NSLog("Password save status: (success)")
}
...
}
Listing 11-14
Prompting for a New Password (WorkoutTableViewController.swift)
For the final step in the password validation process, you must implement the validatePassword() method in the SecurityView class, which should compare the saved password to the text that was entered into the text field on the security view. The query for extracting the value from the Keychain is exactly like that for detecting the presence of a value; however, after performing the copy operation, you should inspect its result to extract the password. In Listing 11-15, I have implemented this by adding a getSavedPassword() method to the SecurityView class.
class SecurityView: UIView {
...
private func getSavedPassword() -> String? {
let query: [String: Any] = [kSecClass as String:
kSecClassGenericPassword,
kSecAttrAccount as String: ACCOUNT_NAME,
kSecMatchLimit as String: kSecMatchLimitOne,
kSecReturnAttributes as String: true,
kSecReturnData as String: true]
var keychainItemRef: CFTypeRef?
let queryStatus = SecItemCopyMatching(query as
CFDictionary, &keychainItemRef)
guard queryStatus == errSecSuccess,
let keychainItem = keychainItemRef as? [String:
Any],
let passwordData = keychainItem[kSecValueData as
String] as? Data,
let password = String(data: passwordData, encoding:
Validating a Password Against a Saved Value in the Keychain (SecurityView.swift)
Just as you had to serialize strings to binary data to save them in the keychain, to use stored values for string comparisons, you must reassemble them from binary data, using the String(data:encoding:) constructor.
Using Biometrics or an App Password to Lock Keychain Items
As an added bonus security feature, you can lock Keychain items even further, by limiting them to a specific security context. For example, if you were building a password manager, you could use this feature to make a specific set of passwords only available via Face ID or the device’s passcode. This is used as a technique to replace building your complete security overlay, as you did in this chapter.
To add this extra layer of security to your Keychain items, you simply have to add a security context and access control settings to each search query. Similar to how the LocalAuthentication framework presents the initial Face ID permission prompt for you, it will also present the system’s biometrics or password prompts when you try to access values using access control-enabled search queries.
For the extra security settings, you can use the same security context you used through the SecurityView class. However, you will have to define a separate access control policy via the SecAccessControl class. In Listing 11-16, after initializing the SecurityView class, I specified a security policy that will keep the Keychain items available only when the device is unlocked, and the user has validated his/her presence via Face ID or an app-specific password.
Adding an Access Control Policy (SecurityView.swift)
To use the access policy and context to protect the Keychain items, simply modify the copy and add queries from before, to include the context and access control policies for the SecurityView class, as shown in Listing 11-17.
class SecurityView: UIView {
...
func checkPasswordExistence() {
guard let accessControl = accessControl else { return }
let query: [String: Any] = [kSecClass as
String: kSecClassGenericPassword,
kSecAttrAccount as String: ACCOUNT_NAME,
kSecMatchLimit as String: kSecMatchLimitOne,
kSecReturnAttributes as String: true,
kSecReturnData as String: true,
kSecAttrAccessControl as String: accessControl as Any,
kSecUseAuthenticationContext as String: context]
...
}
func savePassword(password: String) {
guard let accessControl = accessControl,
let passwordData = password.data(using:
String.Encoding.utf8) else { return }
let query: [String: Any] = [kSecClass as
String: kSecClassGenericPassword,
kSecAttrAccount as String: ACCOUNT_NAME,
kSecAttrAccessControl as String: accessControl as
Any,
kSecUseAuthenticationContext as String: context,
kSecValueData as String: passwordData]
...
}
private func getSavedPassword() -> String? {
guard let accessControl = accessControl else {
return nil
}
let query: [String: Any] = [kSecClass as
String: kSecClassGenericPassword,
kSecAttrAccount as String: ACCOUNT_NAME,
kSecMatchLimit as String: kSecMatchLimitOne,
kSecReturnAttributes as String: true,
kSecAttrAccessControl as String:
accessControl as Any,
kSecUseAuthenticationContext as String:
context,
kSecReturnData as String: true]
...
return password
}
}
Listing 11-17
Using the Access Control Policy and Context in Keychain Search Queries (SecurityView.swift)
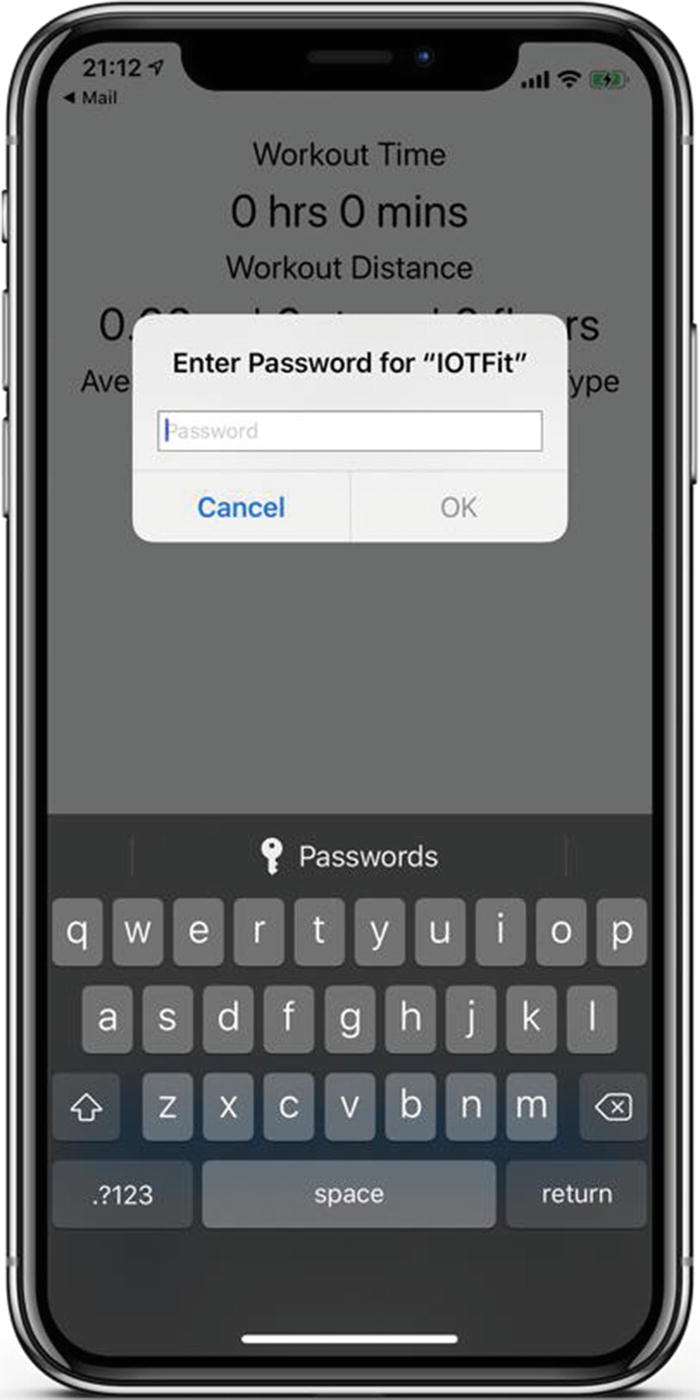
Now, if you load the IOTFit app on your device and attempt to access the Last Run or Workout History tabs, you will be presented with an App Password dialog before the tab loads, as shown in Figure 11-10. After entering the password, you will have a minute or two in which to navigate between the tabs freely, before you are asked to re-validate the app. Although the extra password prompt is a bit excessive for the IOTFit app, it may be helpful to you in your other projects.
Figure 11-10
App password prompt for Access Control–protected Keychain items
Caution
After setting a security policy for Keychain items, you will always be prompted for the original security settings whenever you try to access those values again. To reset these values, you will have to add a delete operation to your app or reset your device. At the time of writing, Keychain items are retained, even after an app is deleted.
Detecting When an App Returns to the Foreground
For the final security enhancement to the IOTFit app, you will display the security view over the Last Run and Workout History screens when the app returns to the foreground from the background. If you use a password manager on a regular basis, you will recognize this as one of the functions it provides to prevent your information from being stolen after you initially unlock the app.
If you have ever looked into the AppDelegate.swift file in any of your projects, you may have noticed applicationDidEnterBackground() and applicationDidEnterForeground() methods, which handle when your app enters the foreground or background. These are intended to give you an opportunity to start or stop background tasks, such as network calls or database writes, when your app’s state changes. One of the ways Apple saves battery power is through a scheduler that only gives apps’ background execution times based on when they are used most often. Unfortunately, these times can be unpredictable, and these methods give you a few seconds of execution time to prepare or wind down your app before it gets sent to the background, and all tasks are paused.
For the IOTFit app, however, there are no globally running tasks or objects that you can pause from the app delegate. Instead, you must observe the state changes from the individual view controllers. To implement this, you can use iOS’s Notification Center to observe the UIApplicationWillResignActive event within the Workout History and Last Run view controllers. When observing notifications, whether they originate from system events, internal messages, or push notifications, you always specify the notification name and a selector (method signature), to handle the notification. In Listing 11-18, I have updated the WorkoutTableViewController class to call the showSecurityView() method when the background event has been detected.
class WorkoutTableViewController: UITableViewController {
...
override func viewDidLoad() {
super.viewDidLoad()
...
setupSecurityView()
let notificationCenter = NotificationCenter.default
notificationCenter.addObserver(self, selector
#selector(showSecurityView), name:
Notification.Name.UIApplicationWillResignActive,
object: nil)
}
}
Listing 11-18
Using a Notification Observer to Detect When the App Is Backgrounded (WorkoutTableViewController.swift)
You should call the notification observer only once, as multiple observers will cause the selector to be called multiple times. In my example, I ensured it would be called once by adding the observer to the viewDidLoad() method for the view controller.
When you try to compile the app, you will receive a compiler error about the showSecurityView() method being unfit as a selector. To fix this, add the @objc keyword before the function definition, as shown in Listing 11-19. This is owing to the fact that selectors are a concept ported over from Objective-C, requiring Swift methods to be defined as compatible with Objective-C, in order to be used as selectors. After the modification, the app should now compile successfully.
class WorkoutTableViewController: UITableViewController {
...
@objc func showSecurityView() {
...
securityView?.checkPasswordExistence()
}
}
Listing 11-19
Defining a Method As Compatible with Objective-C (WorkoutTableViewController.swift)
If you try to run the app on your device now, after unlocking the Last Run or Workout History screens and backgrounding the app, when you reopen the app, the security view will reappear. You have now created one of the most secure workout applications out there. Congratulations!
Summary
In this chapter, you learned how to leverage Face ID, Touch ID, and Keychain Services to secure the sensitive user data in the IOTFit app. Using iOS’s LocalAuthentication framework, you were able to detect if biometrics were available to the app, modify the user interface accordingly, and unlock the security view, using the device’s biometric sensor. As a backup option, in case biometrics were unavailable or failed, you learned how to store a password for the app in the device’s Secure Enclave and how to perform add and lookup operations for this data, using Keychain Services. To go the extra mile, you learned how you could sidestep having to write your own security view, using access control for Keychain Services, and figured out how to lock the screens when the app was backgrounded.
When designing this project, I took inspiration from password managers, because I feel the security user experience they provide is appropriate for any case in which user data must be protected beyond the initial lock screen for the device. My hope is that with the lessons in this chapter, you can now build apps that protect against data theft that results from simply having access to an unlocked device or plugging it into a computer and reading the user data on the device.