
Chapter 9. Web Applications
Knowing Web forms inside and out is an important first step on the road to becoming an ASP.NET programmer. But Web forms alone do not an application make. Building full-fledged Web applications like the ones at Amazon, eBay, and other popular Web sites requires infrastructure above and beyond what Web forms provide, including per-user data stores to hold shopping carts and other information that’s unique to individual users, caching services to boost performance, and security services to identify users and prevent unauthorized accesses. ASP.NET provides all these services and more. Once you know the ropes, ASP.NET lets you build commercial-quality sites in a fraction of the time required by older Web programming technologies such as ASP and CGI.
This chapter is about the facilities that ASP.NET provides for turning Web forms into Web applications. Among other things, you’ll learn about Web.config and Global.asax files and the roles that they play in ASP.NET applications; how to use application state and the ASP.NET application cache to improve performance by caching frequently used data in memory; how to use session state to store per-user data for visitors to your site; and about the various session state configuration options that ASP.NET places at your disposal. You’ll also learn how to build applications that are compatible with Web farms. To top it off, the chapter concludes with a full-blown Web application that brings many of these concepts together under one roof and demonstrates some of the most important principles of ASP.NET-style Web programming.
There’s a lot to cover, so let’s get started.
Structure of an ASP.NET Application
A logical way to begin a chapter on ASP.NET applications is to define the term “ASP.NET application.” An ASP.NET application consists of all the files in a virtual directory and its subdirectories. If your Web server has a subdirectory named MyApp and MyApp is a virtual directory, all the files in MyApp and any subdirectories that stem from it make up an ASP.NET application. Typically, an application includes one or more of the following file types:
ASPX files containing Web forms
ASCX files containing user controls
Web.config files containing configuration settings
A Global.asax file containing global application elements
DLLs containing custom types employed by the application
An application can contain an unlimited number of ASPX and ASCX files, each representing a different Web page or portion of a page. Only one Global.asax file is permitted. The number of Web.config files isn’t restricted, but each must reside in a different directory. ASP.NET places no limit on the number of DLLs an application uses. DLLs are normally found in the application root’s bin directory.
Example 9-14 diagrams the physical structure of a very simple ASP.NET application that consists of a lone Web form in an ASPX file. The directory containing the ASPX file has been transformed into a virtual directory with the IIS configuration manager and is therefore URL-addressable on the server.

Figure 9-2 depicts an ASP.NET application that’s more representative of those found in the real world. The virtual directory at the top of the directory hierarchy (the “application root”) houses several ASPX files, each representing a single page in the application, as well as ASCX files containing user controls. It also holds a Global.asax file containing event handlers and other elements that are global to the application. Underneath the virtual root is a pair of subdirectories containing ASPX files of their own. Each directory contains a Web.config file containing configuration information for the file or files in that directory. Inside the virtual root’s bin subdirectory are DLLs containing code-behind classes, custom controls, and other custom types used by the application.

The Web.config File
One of the goals of the Microsoft .NET Framework from the outset was to support XCOPY installs—that is, the ability to install applications by copying them to a directory on your hard disk and uninstall them by deleting files and directories. Having this ability means, among other things, that managed applications don’t store configuration settings in the registry as traditional Windows applications do. Instead, they store them in text-based XML files. Web.config is the XML file in which ASP.NET applications store configuration data.
Here’s the general structure of a typical Web.config file:
<configuration>
  <appSettings>
    <!-- appSettings values go here -->
  </appSettings>
  <system.web>
    <!-- ASP.NET configuration settings go here -->
  </system.web>
</configuration>
This file is partitioned into two sections: an appSettings section that holds application-specific data items such as database connection strings, and a system.web section that holds ASP.NET configuration settings. These sections aren’t the only ones that can appear in a Web.config file, but they are the most common. Web.config’s architecture is extensible, enabling developers to define custom sections when circumstances warrant.
<appSettings>
The appSettings section of Web.config holds application-specific values (strings) that are keyed by other strings. Its purpose is to parameterize an application’s behavior, and to allow that behavior to be modified without changing any source code.
Suppose, for example, that you coded the following statements into a Page_Load handler:
SqlDataAdapter adapter = new SqlDataAdapter
    ("select * from titles where price != 0",
     "server=hawkeye;database=pubs;uid=sa;pwd=");
DataSet ds = new DataSet ();
adapter.Fill (ds);
The only problem with this code is that if the database connection string changes—if the database moves to another machine, for example, or if the user name or password changes—you have to modify the code to update the database connection string. If you work in a big company, code modifications probably trigger a mountain of paperwork and require all or part of the application to be retested and reapproved.
A better solution to encoding connection strings and other data that’s subject to change over the lifetime of an application is to put it in the appSettings section of Web.config. The following Web.config file declares a connection string and assigns it the name “MyConnectionString”:
<configuration>
  <appSettings>
    <add key="MyConnectionString"
      value="server=hawkeye;database=pubs;uid=sa;pwd=" />
  </appSettings>
</configuration>
Page_Load can be rewritten to extract the connection string from Web.config:
string conn = ConfigurationSettings.AppSettings["MyConnectionString"];
SqlDataAdapter adapter = new SqlDataAdapter
    ("select * from titles where price != 0", conn);
DataSet ds = new DataSet ();
adapter.Fill (ds);
AppSettings is a static method belonging to the ConfigurationSettings class in the FCL’s System.Configuration namespace. It retrieves values by name from the appSettings section of Web.config. The benefit to doing it this way? Storing the database connection string in Web.config enables you to change it without touching any actual program code. It’s analogous to storing program settings in the registry in a Windows application, and it comes with all the perks but none of the drawbacks.
<system.web>
The system.web section of Web.config holds configuration settings used by ASP.NET. Its content is categorized by subsections. Although the type and number of subsections that can appear is technically unlimited—as developers are free to define custom subsections—the ones listed in the following table are supported by default and can be used without writing custom configuration handlers.
|
Section Name |
Description |
|
authentication |
Sets the authentication mode and specifies settings for the mode selected |
|
authorization |
Specifies who is allowed to access resources in this directory and its subdirectories |
|
browserCaps |
Maps user-agent data to browser capabilities |
|
clientTarget |
Maps user-agent data to browser types |
|
compilation |
Specifies run-time compilation settings such as whether executables should be compiled with debug symbols, maps file name extensions and Language attributes to compilers, and identifies the assemblies that ASP.NET links to |
|
customErrors |
Enables the use of custom error pages and specifies how errors should be reported on clients and servers |
|
httpRuntime |
Specifies request time-outs and other settings used by the ASP.NET runtime |
|
globalization |
Specifies character encodings for requests and responses |
|
httpHandlers |
Maps URLs to HTTP handlers (for example, maps requests for ASPX files to System.Web.UI.PageHandlerFactory) |
|
httpModules |
Identifies HTTP modules called in response to HTTP requests |
|
identity |
Controls the identity that ASP.NET assigns to individual requests |
|
machineKey |
Specifies encryption and validation settings (for example, the key and algorithm used to encrypt authentication cookies) |
|
pages |
Specifies page-level configuration settings such as whether output buffering, session state, and view state are enabled |
|
processModel |
Specifies configuration settings for ASP.NET worker processes |
|
securityPolicy |
Maps trust levels to CONFIG files containing security policies |
|
sessionState |
Specifies session state settings (for example, where session state is stored) |
|
trace |
Enables and disables tracing and specifies trace settings |
|
trust |
Specifies the code access security trust level |
|
webControls |
Identifies the location on the server of client scripts used by ASP.NET Web controls |
|
webServices |
Contains Web service settings |
Here’s a sample Web.config file that enables tracing. Drop it in the application root, and ASP.NET appends useful trace information (including strings written to trace output with Trace.Write and Trace.Warn) to the application’s pages:
<configuration>
  <system.web>
    <trace enabled="true" />
  </system.web>
</configuration>
Here’s another Web.config file that enables tracing, instructs ASP.NET to compile debug executables, moves session state to a back-end SQL Server database (a topic you’ll learn about later in this chapter), tells ASP.NET to assume code found in the application’s files is written in C# unless otherwise noted, and enables view state validation by appending hashes to view state values round-tripped to the client:
<configuration>
  <system.web>
    <trace enabled="true" />
    <sessionState
      mode="SQLServer"
      sqlConnectionString="server=localhost;uid=sa;pwd="
    />
    <compilation debug="true" defaultLanguage="c#" />
    <pages enableViewStateMac="true" />
  </system.web>
</configuration>
Because element and attribute names in XML are case-sensitive, statements in Web.config are case-sensitive, too. For example, the statement
<Pages enableviewstatemac="true" />
isn’t valid and will generate an error message. Even attribute values are case-sensitive. The statement
<pages enableViewStateMac="True" />
is invalid because the T in “true” must be lowercase.
If you’re going to use Web.config files to affect configuration changes, knowing what the default settings are so that you know what needs changing and what doesn’t is helpful. Default configuration settings are defined in Machine.config, which is located in the Windows (or Winnt) directory’s Microsoft.NETFrameworkvn.n.nnnnConfig directory. For example, tracing is disabled by default as the result of the following statement in Machine.config:
<trace enabled="false" ... />
Because Machine.config holds configuration settings for all managed applications on the host machine, modifying Machine.config changes the defaults machine-wide. If you want tracing to be enabled by default, simply edit the statement above to read
<trace enabled="true" ... />
Settings in Web.config, by contrast, apply only to local applications.
The Microsoft .NET SDK documents most of the elements and attributes that Web.config supports out of the box. But the ultimate source of reference is Machine.config. It’s sprinkled with comments placed there by Microsoft developers documenting the options available and the syntax of individual elements. If you have a question about Web.config and can’t find an answer in the documentation, turn to Machine.config; chances are it’ll have the answer you’re looking for.
Configuration Inheritance
One of the hallmarks of Web.config files is configuration inheritance. Simply put, configuration inheritance means that settings specified in a Web.config file pertain to all files in the host directory (the one that holds Web.config) and its subdirectories. In other words, if you put the following Web.config file in wwwroot:
<configuration>
  <system.web>
    <compilation defaultLanguage="c#" />
  </system.web>
</configuration>
the default language for subdirectories stemming from wwwroot is also C#. Why? Because subdirectories inherit configuration settings from parent directories.
Subdirectories inherit their parents’ configuration settings, but they can override those settings with Web.config files of their own. As an example, consider the directory structure in Figure 9-3. The top-level directory contains a Web.config file that sets the default language to C#. One of its subdirectories holds a Web.config file that sets the default language to Visual Basic .NET; the other subdirectory has no Web.config file. In this case, C# is the default language in wwwroot and wwwrootCSharpFiles, but Visual Basic .NET is the default language in wwwrootVBFiles. If the subdirectories contained subdirectories of their own, those subdirectories too would inherit settings from their parents. Specifically, subdirectories underneath wwwrootCSharpFiles would default to C# and subdirectories beneath wwwrootVBFiles would default to Visual Basic .NET. Those settings, of course, could be overridden by placing Web.config files in the subdirectory’s subdirectories.

Machine.config sits at the top of the inheritance hierarchy. Default settings for the .NET Framework, ASP.NET included, are defined in Machine.config and are inherited by all framework applications. That’s why settings in Machine.config apply to every managed application on the machine, and why you can look to Machine.config to determine what a server’s default settings are. When you drop a Web.config file into a local directory, all you’re really doing is overriding settings inherited from Machine.config.
The Global.asax File
Global.asax is a text file that houses application-level event handlers, declarations that pertain to all parts of the application, and other global application elements. ASP.NET applications don’t have to include Global.asax files, but most do. An application can have only one Global.asax file. That file must be located in the application’s virtual root directory.
What’s inside a Global.asax file? Global.asax supports three element types:
Global directives
Global event handlers
Global object tags
Of the three, the first two are used more often. Global event handlers are particularly important and are the number one reason why developers include Global.asax files in their applications. We’ll discuss global directives first and global event handlers second. Then, for completeness, we’ll talk about global object tags, too.
Global Directives
Global directives, also known as application directives, provide application-wide instructions to the ASP.NET compilation engine. A Global.asax file supports three types of global directives:
@ Application directives
@ Import directives
@ Assembly directives
Global.asax can contain just one @ Application directive, but it places no limit on the number of @ Import and @ Assembly directives.
The @ Application Directive
@ Application directives serve two purposes: they enable developers to add descriptive text to applications, and they facilitate code-behind programming in Global.asax files. An @ Application directive accompanied by a Description attribute adds descriptive text, as in
<%@ Application Description="My First ASP.NET Application" %>
ASP.NET ignores Description attributes, so descriptions declared with it are visible only to those persons with access to your Global.asax files.
The @ Application directive also supports an Inherits attribute that enables code to be removed from Global.asax and packaged in a separate DLL. Suppose, for example, that you included the following Global.asax file in an application:
<%@ Import Namespace="System.Data" %>

<script language="C#" runat="server">
  void Application_Start ()
  {
      DataSet ds = new DataSet ();
      ds.ReadXml (Server.MapPath ("GlobalData.xml"));
      Application["GlobalData"] = ds;
  }
</script>
Coded this way, Application_Start, which is an event handler that fires each time the application starts up, is compiled the first time Global.asax is accessed by ASP.NET. To avoid run-time compilation, you can remove Application_Start from Global.asax and code it into a class that derives from System.Web.HttpApplication:
using System.Web;
using System.Data;

public class MyApp : HttpApplication
{
    public void Application_Start ()
    {
        DataSet ds = new DataSet ();
        ds.ReadXml ("GlobalData.xml");
        Application["GlobalData"] = ds;
    }
}
Then you compile the CS file into a DLL, place the DLL in the application root’s bin directory, and reduce Global.asax to one simple statement:
<%@ Application Inherits="MyApp" %>
Code-behind offers the same benefits to Global.asax that it offers to ASPX files: it catches compilation errors before the application is deployed, and it enables developers to code handlers in C++ and other languages that ASP.NET doesn’t explicitly support.
A look behind the scenes reveals why code-behind classes used by Global.asax files derive from HttpApplication. ASP.NET starts an application running when the very first request for that application arrives. Starting an application involves launching a process named Aspnet_wp.exe (commonly referred to as the ASP.NET worker process) if it isn’t already running and creating a new application domain in that process to host the application and segregate it from other running ASP.NET applications. In the absence of code-behind, startup also involves parsing Global.asax and placing any content found there into a temporary file containing a class derived from HttpApplication, compiling the temporary file into a DLL, and instantiating the derived class. The resulting HttpApplication object handles the request that prompted the application to start up. As a performance optimization, ASP.NET maintains a pool of such objects and uses them to service incoming requests.
One implication of this design is that any code you include in Global.asax executes in the context of an HttpApplication object. That means you can call HttpApplication instance methods and access HttpApplication instance properties from anywhere in Global.asax. It also explains why using code-behind in Global.asax means deriving from System.Web.HttpApplication rather than System.Web.UI.Page. Because the system places Global.asax code in an HttpApplication-derived class, you must do the same if you want to get your code out of Global.asax and into a DLL.
The @ Import Directive
The @ Import directive serves the same purpose in Global.asax that it serves in ASPX files: it imports namespaces that ASP.NET doesn’t import by default. For example, let’s say you include the following <script> block in Global.asax:
<script language="C#" runat="server">
  void Application_Start ()
  {
      DataSet ds = new DataSet ();
      ds.ReadXml (Server.MapPath ("GlobalData.xml"));
      Application["GlobalData"] = ds;
  }
</script>
Because DataSet is defined in the System.Data namespace and System.Data isn’t imported by default, you must either fully qualify all references to DataSet by including the namespace name or place the following directive at the top of Global.asax:
<%@ Import Namespace="System.Data" %>
@ Import directives in Global.asax pertain only to code in Global.asax. They do not import namespaces into other of the application’s files.
The @ Assembly Directive
The @ Assembly directive does for Global.asax what @ Assembly does for ASPX files: it identifies assemblies Global.asax uses that ASP.NET doesn’t link to by default. (For a list of default assemblies, see Chapter 5.)
As an example, suppose your Global.asax file uses classes in the System.DirectoryServices namespace. Because that namespace isn’t imported by default and because the types that belong to that namespace live in System.DirectoryServices.dll, which ASP.NET doesn’t link to by default, you need to include the following statements in Global.asax:
<%@ Import Namespace="System.DirectoryServices" %>
<%@ Assembly Name="System.DirectoryServices" %>
If you don’t, ASP.NET will greet you with an error message the moment the application starts up.
Global Event Handlers
The most common reason for including Global.asax files in ASP.NET applications is to handle global events—events that aren’t specific to a particular page but that apply to the application as a whole. Some global events are fired by the HttpApplication instances that process individual requests. Others are fired by HTTP modules—plug-in components that provide services such as authentication and output caching to ASP.NET. Some events fire on every request. Others fire at predictable junctures in an application’s lifetime, such as when the application starts or stops. Still others fire conditionally—for example, when an unhandled exception occurs. Regardless of when a global event fires or who fires it, you can process it by including a handler in Global.asax.
Start and End Events
ASP.NET fires global events named Start and End when an application starts and stops. To process these events, include handlers named Application_Start and Application_End in Global.asax:
<script language="C#" runat="server">
  void Application_Start ()
  {
    ...
  }

  void Application_End ()
  {
    ...
  }
</script>
Application_Start is called when the application receives its first request. This handler is frequently used to initialize application state or the ASP.NET application cache (both of which are introduced later in this chapter) with data that is global to the application—that is, shared by all of its users. Application_End is called when the application shuts down. Typically, that happens when the application has run for 20 minutes without receiving an HTTP request. Application_End isn’t used all that often because ASP.NET applications don’t have to clean up after themselves by deleting objects created in Application_Start, but it’s sometimes used to write data to a persistent storage medium prior to shutdown so that the data can be reloaded the next time the application starts and to dispose of objects that encapsulate unmanaged resources such as database connections.
Later in this chapter, you’ll learn about ASP.NET session state. Session state is a mechanism for storing per-user information (such as shopping carts) in Web applications and preserving it across requests. Session state services are provided by an HTTP module named SessionStateModule, which fires a Start event each time it creates a session and an End event each time a session ends. You can process these events by including handlers named Session_Start and Session_End in Global.asax:
<script language="C#" runat="server">
  void Session_Start ()
  {
    ...
  }

  void Session_End ()
  {
    ...
  }
</script>
Session_Start is called when a user visits your site who hasn’t been there recently (usually in the last 20 minutes). Session_End is typically called when a session times out, which by default happens 20 minutes after the last request is received from the user for whom the session was created. The most common use for Session_Start is to initialize session state with data that is unique to each user. You’ll see examples later in this chapter.
Per-Request Events
Global.asax can also include handlers for events fired by HttpApplication instances. If present in Global.asax, the following methods are called in every request in response to HttpApplication events. They’re listed in the order in which they’re called.
|
Method |
Description |
|
Application_BeginRequest |
Called at the beginning of each request |
|
Application_AuthenticateRequest |
Called to authenticate the caller |
|
Application_AuthorizeRequest |
Called to determine whether the caller is authorized to access the requested resource |
|
Application_ResolveRequestCache |
Called to resolve the current request by providing content from a cache |
|
Application_AcquireRequestState |
Called to associate the current request with a session and populate session state |
|
Application_PreRequestHandlerExecute |
Called to prepend content to the HTTP response |
|
Application_PostRequestHandlerExecute |
Called to append content to the HTTP response |
|
Application_ReleaseRequestState |
Called to release (store) any state associated with this session |
|
Application_UpdateRequestCache |
Called to update a cache with content returned in the response |
|
Application_EndRequest |
Called at the end of each request |
These handlers let you customize ASP.NET by plugging into the request processing pipeline. For example, Application_ResolveRequestCache and Application_UpdateRequestCache could be used to implement a custom output cache. Application_AuthenticateRequest and Application_AuthorizeRequest provide hooks for modifying ASP.NET’s security apparatus. The event handlers Application_PreRequestHandlerExecute and Application_PostRequestHandlerExecute enable HTTP responses to be modified before they’re returned to clients. The following Global.asax file uses the latter of these two methods to place a copyright notice at the bottom of each and every page (assuming, of course, that your pages use HTML flow layout rather than absolute positioning):
<script language="C#" runat="server">
  void Application_PostRequestHandlerExecute (Object sender, EventArgs e)
  {
      HttpApplication app = (HttpApplication) sender;
      app.Context.Response.Write ("<hr><center><i>" +
          "Copyright © 2002 by Me, Myself, and I</i></center>");
  }
</script>
Outputting a copyright notice this way rather than duplicating it in every ASPX file lets you change it in one place to modify it everywhere it shows up.
Error Events
The events listed above fire in each and every request. HttpApplication also defines an Error event that fires if ASP.NET throws an unhandled exception. You can process Error events by including an Application_Error handler in Global.asax. Here’s a Global.asax file that logs unhandled exceptions in the NT event log. It uses the FCL’s System.Diagnostics.EventLog class to write to the event log:
<%@ Import Namespace="System.Diagnostics" %>

<script language="C#" runat="server">
  void Application_Error (Object sender, EventArgs e)
  {
      // Formulate a message to write to the event log
      string msg = "Error accessing " + Request.Path + "
" +
          Server.GetLastError ().ToString ();

      // Write an entry to the event log
      EventLog log = new EventLog ();
      log.Source = "My ASP.NET Application";
      log.WriteEntry (msg, EventLogEntryType.Error);
  }
</script>
It’s not unwise to include a handler like this one in every ASP.NET application so that you can detect unhandled exceptions by periodically checking the NT event log. You could even modify the handler to send an e-mail message to a system administrator to apprise him or her of unhandled exceptions (a sure sign of a sick or buggy application) the moment they occur.
Don’t be surprised if you encounter a Global.asax file containing an event handler that’s not mentioned here. HttpApplication fires a few other events that I haven’t listed because they’re rarely used or used internally by ASP.NET. Plus, ASP.NET can be extended with HTTP modules that fire global events of their own. HTTP modules can also sink global events, which is precisely how the HTTP modules built into ASP.NET work much of their magic. A full discussion is beyond the scope of this chapter, but further information regarding HTTP modules and events is available in the Microsoft .NET Framework SDK.
Global Object Tags
Global object tags create object instances declaratively. Suppose you want a new instance of ShoppingCart created for each user that visits your site. Rather than do this:
<script>
  void Session_Start ()
  {
      Session["MyShoppingCart"] = new ShoppingCart ();
  }
</script>
you can do this:
<object id="MyShoppingCart" class="ShoppingCart" scope="session"
  runat="server" />
Assuming ShoppingCart has an Add method, a Web form could add an item to a user’s shopping cart by doing this:
MyShoppingCart.Add (...);
This code might not make a lot of sense right now, but it’ll make plenty of sense by the end of the chapter.
An <object> tag’s Scope attribute assigns a scope to the object instances it creates. Scope=“Application” creates one object instance, which is shared by all users of the application. Scope=“Session” creates one object instance per session (that is, per user). Scope=“Pipeline” creates a unique instance of the object for each and every request.
ASP.NET doesn’t create objects declared with <object> tags unless it has to—that is, until they’re requested for the first time. “Lazy instantiation” prevents objects from being created unnecessarily if the application doesn’t use them.
Application State
ASP.NET offers two mechanisms for improving application performance by caching frequently used data: application state and the application cache. The former is a holdover from ASP. The latter is new to ASP.NET and largely obviates the need for application state. It also offers compelling features that application state does not. Application state might be useful for quickly porting old ASP code to ASP.NET, but new ASP.NET applications should use the application cache instead.
Application state and the application cache have three important characteristics in common:
Both make the data that they store available to all parts of an application. Store a product list in application state or the application cache, for example, and items in the list are available to every page in (and every user of) the application.
Both store data in memory and offer no options for storing it anywhere else. This means that application state and the application cache are fine places for caching data to avoid performance-inhibiting accesses to external data stores, but also that neither should store important data that can’t be regenerated if the server goes down.
Both store dictionaries of key/value pairs and are generically typed to store anything that derives from System.Object. Since all managed types derive from System.Object, you can store instances of any managed type in application state and the application cache and key those instances with strings.
When is it appropriate to use application state or the application cache? Imagine you’re writing a Web application that serves up real-time stock prices and that the application is backed by a massive database of stock prices that’s updated periodically. Rather than query the database every time someone asks for a stock price, you could query it every few minutes, cache the results in application state or the application cache, and retrieve prices directly from memory. Prices fetched from your site might be a few minutes old, but the decreased number of database accesses will enable the application to respond to individual requests much more quickly.
Using Application State
Application state is physically represented by instances of System.Web.HttpApplicationState. Pages access instances of HttpApplicationState through the Application property that they inherit from Page; Global.asax files access them through the Application property that they inherit from HttpApplication.
HttpApplicationState properties and methods expose the contents of application state. The following statements add three stock prices keyed by stock symbols to application state and work equally in an ASPX file, in Global.asax, or in a code-behind file:
Application["AMZN"] = 10.00m;
Application["INTC"] = 20.00m;
Application["MSFT"] = 30.00m;
You can also add items to application state using HttpApplicationState.Add:
Application.Add ("AMZN", 10.00m);
Application.Add ("INTC", 20.00m);
Application.Add ("MSFT", 30.00m);
However, Add and [] behave slightly differently when adding items to application state. Add adds an item even if an item with the specified key already exists; [] does not. These statements add two separate items to application state:
Application.Add ("AMZN", 10.00m);
Application.Add ("AMZN", 11.00m);
You can retrieve both items by iterating over the contents of application state, but if you simply ask for the item keyed by “AMZN,” you’ll get back 10. The following example, by contrast, adds just one item to application state. The first statement creates the item and assigns it the value 10. The second statement changes the item’s value to 11:
Application["AMZN"] = 10.00m;
Application["AMZN"] = 11.00m;
How do you read values from application state? The following statements retrieve the stock prices inserted earlier:
decimal amzn = (decimal) Application["AMZN"];
decimal intc = (decimal) Application["INTC"];
decimal msft = (decimal) Application["MSFT"];
The casts are necessary to convert the generic System.Object references retrieved from application state to strong types. To remove items from application state, call Remove, RemoveAt, RemoveAll, or Clear through the Application property. Clear and RemoveAll are semantically equivalent; they empty application state by removing all items.
Locking and Unlocking
Internally, ASP.NET uses a reader/writer lock to synchronize access to application state so that two threads representing two concurrent requests can’t read it and write it at the same time. However, if you perform multistep operations on application state and need them to be treated as one atomic operation—that is, to ensure thread A can’t read from application state while thread B performs a multistep update—you should surround the updates with calls to Lock and UnLock, as shown here:
Application.Lock ();
Application["ItemsSold"] = (int) Application["ItemsSold"] + 1;
Application["ItemsLeft"] = (int) Application["ItemsLeft"] - 1;
Application.UnLock ();
In between calls to Lock and UnLock, other threads that call Lock and UnLock can neither read nor write application state. Locking and unlocking is necessary only when multiple operations performed on application state must be treated as one.
The AppCounter Application
The application in Example 9-4 uses application state to keep a running count of the number of times its pages are requested. Its one and only page is AppCounter.aspx, which reads the count from application state, increments it, writes the incremented count back to application state, and displays it. The Application_Start handler in Global.asax writes the count to application state each time the application starts up. The count is persistent—that is, it doesn’t reset to 0 when the application shuts down—because Global.asax includes an Application_End handler that saves the count in a text file named Count.txt when the application ends. Next time the application starts up, Application_Start reads the count from the file. Only if the file doesn’t exist or contains invalid data does Application_Start initialize the count to 0.
Application_Start calls Server.MapPath to convert Count.txt’s URL into a physical path name. Rather than do the same, Application_End reads the path from a static field (_path) initialized by Application_Start. The reason? Server.MapPath throws an exception if called from Application_End. By the time Application_End is called, the application has almost shut down and some HttpApplication facilities normally available to handlers in Global.asax are no longer usable. Server.MapPath happens to be one of those facilities.
Take the application for a spin by copying the two source code files to wwwroot (or the virtual directory of your choice) and calling up AppCounter.aspx in your browser. The resulting page should show a count of 1. Refresh the page a few times and observe that each refresh increments the count. Now close your browser, open a command prompt window, and type iisreset to restart IIS. This command shuts down the application, which causes Application_End to be called, which writes the count to Count.txt. Call up AppCounter.aspx again and the count should pick up right where it left off.
Global.asax
<%@ Import NameSpace="System.IO" %>

<script language="C#" runat="server">
  static string _path;

  void Application_Start ()
  {
      StreamReader reader = null;

      try {
          // If Count.txt exists, read the count from it and
          // store the count in application state
          _path = Server.MapPath ("/Count.txt");
          reader = new StreamReader (_path);
          string line = reader.ReadLine ();
          int count = Convert.ToInt32 (line);
          Application["Count"] = count;
      }
      catch (Exception) {
          // If Count.txt does not exist or contains an invalid
          // count, store a 0 in application state
          Application["Count"] = 0;
      }
      finally {
          // Close the StreamReader
          if (reader != null)
              reader.Close ();
      }
  }

  void Application_End ()
  {
      StreamWriter writer = null;

      try {
          // Save the current count in Count.txt
          writer = new StreamWriter (_path, false);
          writer.Write (Application["Count"]);
      }
      finally {
          // Close the StreamWriter
          if (writer != null)
              writer.Close ();
      }
  }
</script
AppCounter.aspx
<%@ Page Language="C#" %>

<html>
  <body>
    <%
      // Fetch the count and increment it by 1. Lock application state
      // to prevent the count from changing as it’s being updated.
      Application.Lock ();
      int count = (int) Application["Count"] + 1;
      Application["Count"] = count;
      Application.UnLock ();

      // Write the count to the page
      Response.Write ("Pages in this application " +
          "have been requested " + count + " time");
      if (count > 1)
          Response.Write ("s");
      Response.Write (".");
    %>
  </body>
</html>
The Application Cache
Now that you know about application state, forget that it even exists. The ASP.NET application cache does everything application state does and more, and it’s loaded with features that make it bigger and better than application state in every way.
What is the ASP.NET application cache? It’s a per-application, in-memory data store that, like application state, can store instances of any managed type, including complex types such as DataSet and Hashtable, and key them with strings. Unlike items placed in application state, items placed in the application cache can be assigned expiration policies. If you want an item to expire 15 minutes after it’s placed in the cache or when the file it was initialized from changes, for example, you simply say so and ASP.NET automatically removes the item at the prescribed time. If that’s still not enough to convince you to forget about application state, consider this: ASP.NET will optionally call the callback method of your choice when it removes an item from the cache. You can refresh the cache by writing callback methods that replace deleted items. Finally, when memory grows short, ASP.NET discards items in the application cache based on usage patterns (such as which items have been accessed the least recently) or on priorities that you assign.
Adding and Removing Items
The application cache is represented by instances of System.Web.Caching.Cache. Like application state, the application cache is exposed to program code through properties in ASP.NET base classes. Pages access the application cache through Page.Cache; Global.asax files access it through HttpApplication.Context.Cache. The following statements add three items—once more, decimal stock prices keyed by stock symbols—to the application cache from Global.asax:
Context.Cache["AMZN"] = 10.00m;
Context.Cache["INTC"] = 20.00m;
Context.Cache["MSFT"] = 30.00m;
ASPX files add items to the application cache without using Context as an intermediary:
Cache["AMZN"] = 10.00m;
Cache["INTC"] = 20.00m;
Cache["MSFT"] = 30.00m;
Items can also be added to the application cache with Cache.Insert:
Cache.Insert ("AMZN", 10.00m);
Cache.Insert ("INTC", 20.00m);
Cache.Insert ("MSFT", 30.00m);
Both Insert and [] replace an existing item if an existing key is specified. In other words, the following statements add just one item to the cache but modify its value three times:
Cache["AMZN"] = 10.00m;
Cache["AMZN"] = 11.00m;
Cache.Insert ("AMZN", 12.00m);
Cache.Insert ("AMZN", 13.00m);
Here’s how a Web form retrieves items from the application cache:
decimal amzn = (decimal) Cache["AMZN"];
decimal intc = (decimal) Cache["INTC"];
decimal msft = (decimal) Cache["MSFT"];
As with application state, the cast is necessary to let the compiler know what kind of items were retrieved from the cache. To remove an item from the application cache, call Cache.Remove.
Locking and Unlocking
The application cache doesn’t have Lock and UnLock methods as application state does. But that doesn’t mean locking isn’t necessary; it means you have to come up with your own mechanism for doing it. System.Threading.ReaderWriterLock is the perfect tool for the job. Assuming rwlock is an instance of ReaderWriterLock, here’s how you’d lock the application cache during an update:
rwlock.AcquireWriterLock (Timeout.Infinite);
try {
    Cache["ItemsSold"] = (int) Cache["ItemsSold"] + 1;
    Cache["ItemsLeft"] = (int) Cache["ItemsLeft"] - 1;
}
finally {
    rwlock.ReleaseWriterLock ();
}
And here’s how you’d read “ItemsSold” and “ItemsLeft” values from the cache:
rwlock.AcquireReaderLock (Timeout.Infinite);
try {
    int sold = (int) Cache["ItemsSold"];
    int left = (int) Cache["ItemsLeft"];
}
finally {
    rwlock.ReleaseReaderLock ();
}
As with application state, locking the application cache is necessary only when performing multistep updates that are to be treated as atomic operations.
Expiration Policies
If you use the application cache as shown above—that is, if you do nothing more than add static items and later retrieve them—then the application cache is little better than application state. The real power of the cache comes into play when you assign items expiration policies and process the callbacks that fire when the items expire. The following example, which is taken from a Global.asax file, initializes the application cache with a Hashtable containing three stock prices when the application starts up. It also sets the item to expire 5 minutes after it’s added to the cache:
<script language="C#" runat="server">
  void Application_Start ()
  {
      Hashtable stocks = new Hashtable ();
      stocks.Add ("AMZN", 10.00m);
      stocks.Add ("INTC", 20.00m);
      stocks.Add ("MSFT", 30.00m);

      Context.Cache.Insert ("Stocks", stocks, null,
          DateTime.Now.AddMinutes (5), Cache.NoSlidingExpiration);
  }
</script>Insert’s fourth parameter—a DateTime value specifying a time 5 minutes hence—tells ASP.NET to remove the item from the cache in 5 minutes. That’s called an absolute expiration. As an alternative, you can assign the item a sliding expiration by passing a TimeSpan value in the fifth parameter and Cache.NoAbsoluteExpiration in the fourth. A sliding expiration configures the item to expire when it has not been accessed (retrieved from the cache) for a specified length of time.
Absolute expirations and sliding expirations are one way to define expiration policies. Another option is to use Insert’s third parameter to establish a dependency between an item added to the cache and one or more files or directories. When the file or directory changes—when the file is modified, for example—ASP.NET removes the item from the cache. The following code sample initializes a DataSet from an XML file, adds the DataSet to the application cache, and creates a dependency between the DataSet and the XML file so that the DataSet is automatically removed from the cache if someone modifies the XML file:
DataSet ds = new DataSet ();
ds.ReadXml (Server.MapPath ("Stocks.xml"));
Context.Cache.Insert ("Stocks", ds,
    new CacheDependency (Server.MapPath ("Stocks.xml")));
Used this way, a CacheDependency object defines a dependency between a cached item and a file or directory. You can also use CacheDependency to set an item to expire when another item in the cache expires. Simply pass an array of key names identifying the item or items on which your item depends in the second parameter to CacheDependency’s constructor. If you don’t want to establish a file or directory dependency also, pass null in the constructor’s first parameter.
Cache.Insert also lets you assign priorities to items added to the application cache. When memory grows short, ASP.NET uses these priorities to determine which items to remove first. If you don’t specify otherwise, an item’s priority is CacheItemPriority.Normal. Other valid CacheItemPriority values, in order of lowest to highest priorities, are Low, BelowNormal, AboveNormal, High, and NotRemovable. Priority values are specified in Insert’s sixth parameter. The following statement inserts a DataSet named ds into the application cache, sets it to expire 1 hour after the last access, and assigns it a relatively high priority so that items with default or lower priority will be purged first in low-memory situations:
Context.Cache.Insert ("Stocks", ds, null,
    Cache.NoAbsoluteExpiration, TimeSpan.FromHours (1),
    CacheItemPriority.AboveNormal, null);
Specifying a CacheItemPriority value equal to NotRemovable is the only way to ensure that an item added to the cache will still be there when you retrieve it. That’s important, because it means code that retrieves an item from the application cache should always verify that the reference to the item returned by the cache isn’t null—unless, of course, the item was marked NotRemovable.
Cache Removal Callbacks
All items except those marked NotRemovable are subject to removal from the cache at any time if ASP.NET needs the memory for other purposes. If you’d like to be notified when an item is removed, you can pass a CacheItemRemovedCallback delegate to Insert identifying the method you want ASP.NET to call if and when it removes the item from the cache. The following example extends one of the examples in the previous section by adding a DataSet to the application cache, configuring it to expire when the XML file it’s initialized from changes, and automatically replacing the old DataSet with a new one using a callback method:
<%@ Import Namespace="System.Data" %>

<script language="C#" runat="server">
  static Cache _cache;
  static string _path;

  void Application_Start ()
  {
      _cache = Context.Cache;
      _path = Context.Server.MapPath ("Stocks.xml");

      DataSet ds = new DataSet ();
      ds.ReadXml (_path);

      _cache.Insert ("Stocks", ds, new CacheDependency (_path),
          Cache.NoAbsoluteExpiration, Cache.NoSlidingExpiration,
          CacheItemPriority.Default,
          new CacheItemRemovedCallback (RefreshDataSet));
  }

  static void RefreshDataSet (String key, Object item,
      CacheItemRemovedReason reason)
  {
      DataSet ds = new DataSet ();
      ds.ReadXml (_path);

      _cache.Insert ("Stocks", ds, new CacheDependency (_path),
          Cache.NoAbsoluteExpiration, Cache.NoSlidingExpiration,
          CacheItemPriority.Default,
          new CacheItemRemovedCallback (RefreshDataSet));
  }
</script>
When RefreshDataSet (or any other CacheItemRemovedCallback method) is called, the first parameter identifies the string that the item was keyed with, the second identifies the item itself, and the third specifies why the item was removed. This example is simple enough that no callback parameters need to be examined. In a more complex application that stores multiple items in the application cache, however, you’d probably use at least the first of the three parameters to determine which item needs refreshing.
The Cache.Add Method
Earlier, I showed you how to add items to the application cache using Insert and []. You can also add items with Cache.Add. Unlike Insert, however, Add isn’t overloaded to support simplified usage; when you call it, you have to provide seven different parameters, as shown here:
Context.Cache.Add ("Stocks", ds, null,
    Cache.NoAbsoluteExpiration, Cache.NoSlidingExpiration,
    CacheItemPriority.Default, null);
Add doesn’t behave exactly like Insert. Add adds an item to the cache, but only if the key you specify in Add’s first parameter doesn’t already exist. By contrast, Insert always adds an item to the cache. If the key specified in Insert’s first parameter already exists, Insert simply replaces the old item with the new one.
The SmartQuotes Application
For an example of how the ASP.NET application cache might be used to improve performance, consider the following ASPX file:
<%@ Import Namespace="System.IO" %>

<html>
  <body>
    <asp:Label ID="Output" RunAt="server" />
  </body>
</html>

<script language="C#" runat="server">
  void Page_Load (Object sender, EventArgs e)
  {
      ArrayList quotes = new ArrayList ();
      StreamReader reader = new StreamReader (Server.MapPath ("Quotes.txt"));

      for (string line = reader.ReadLine (); line != null;
          line = reader.ReadLine ())
          quotes.Add (line);

      reader.Close ();

      Random rand = new Random ();
      int index = rand.Next (0, quotes.Count - 1);
      Output.Text = (string) quotes[index];
  }
</script>
Each time this ASPX file is requested, it opens a text file named Quotes.txt, reads its contents, and displays a randomly selected line. If Quotes.txt contains a collection of famous quotations, a randomly selected quotation appears each time the page is refreshed.
So what’s wrong with this picture? Nothing—unless, that is, you value performance. Each time the page is requested, it opens and reads the text file. Consequently, each and every request results in a physical file access. File accesses impede performance because file I/O is a relatively time-consuming undertaking.
This ASPX file, simple as it is, can benefit greatly from the ASP.NET application cache. Suppose that instead of reading Quotes.txt every time the page is requested, you read it once—when the application starts up—and store it in the application cache. Rather than physically access the file, the ASPX file could then retrieve a line directly from the application cache. Furthermore, the cached data could be configured so that it’s deleted from the cache if the file that it comes from changes. You could write a callback method that refreshes the cache when the data is removed. That way, the application would incur just one physical file access at startup and would never access the file again unless the contents of the file change.
Figure 9-5 shows what the output looks like for a Web application that fits the description in the previous paragraph. Example 9-6 contains the source code. Global.asax’s Application_Start method reads the contents of Quotes.txt into an ArrayList and inserts the ArrayList into the application cache. It also establishes a dependency between the ArrayList and Quotes.txt so that if the latter changes, the ArrayList is removed from the cache and Global.asax’s RefreshQuotes method is called. RefreshQuotes refreshes the cache by rereading the file and placing the resulting ArrayList in the cache. The ASPX file—SmartQuotes.aspx—retrieves the ArrayList and displays a randomly selected line. And just in case it hits the cache after the ArrayList is deleted and before the new one is added, SmartQuotes.aspx displays a “Server busy” message if the cache read returns a null reference. Refreshing the page again should replace “Server busy” with a famous quotation. To try the application for yourself, copy the source code files to wwwroot or the virtual directory of your choice, open SmartQuotes.aspx in your browser, and refresh the page a few times.

Global.asax
<%@ Import NameSpace="System.IO" %>

<script language="C#" runat="server">

  static Cache _cache = null;
  static string _path = null;

  void Application_Start ()
  {
      _cache = Context.Cache;
      _path = Server.MapPath ("Quotes.txt");

      ArrayList quotes = ReadQuotes ();

      if (quotes != null) {
          _cache.Insert ("Quotes", quotes, new CacheDependency (_path),
              Cache.NoAbsoluteExpiration, Cache.NoSlidingExpiration,
              CacheItemPriority.Default,
              new CacheItemRemovedCallback (RefreshQuotes));
      }
  }

  static void RefreshQuotes (String key, Object item,
      CacheItemRemovedReason reason)
  {
      ArrayList quotes = ReadQuotes ();

      if (quotes != null) {
          _cache.Insert ("Quotes", quotes, new CacheDependency (_path),
              Cache.NoAbsoluteExpiration, Cache.NoSlidingExpiration,
              CacheItemPriority.Default,
              new CacheItemRemovedCallback (RefreshQuotes));
      }
  }

  static ArrayList ReadQuotes ()
  {
      ArrayList quotes = new ArrayList ();
      StreamReader reader = null;

      try {
          reader = new StreamReader (_path);
          for (string line = reader.ReadLine (); line != null;
              line = reader.ReadLine ())
              quotes.Add (line);
      }
      catch (IOException) {
          return null;
      }
      finally {
          if (reader != null)
              reader.Close ();
      }
      return quotes;
  }
</script>
SmartQuotes.aspx
<%@ Import Namespace="System.IO" %>

<html>
  <body>
    <asp:Label ID="Output" RunAt="server" />
  </body>
</html>

<script language="C#" runat="server">
  void Page_Load (Object sender, EventArgs e)
  {
      ArrayList quotes = (ArrayList) Cache["Quotes"];

      if (quotes != null) {
          Random rand = new Random ();
          int index = rand.Next (0, quotes.Count - 1);
          Output.Text = (string) quotes[index];
      }
      else {
          Output.Text = "Server busy";
      }
  }
</script>
Quotes.txt
<h3>Give me chastity and continence, but not yet.</h3>
<i>Saint Augustine</i>
<h3>The use of COBOL cripples the mind; its teaching should
  therefore be regarded as a criminal offense.</h3><i>Edsger
  Dijkstra</i>
<h3>C makes it easy to shoot yourself in the foot; C++ makes it
  harder, but when you do, it blows away your whole leg.</h3>
  <i>Bjarne Stroustrup</i>
<h3>A programmer is a device for turning coffee into code.</h3>
  <i>Jeff Prosise (with an assist from Paul Erdos)</i>
<h3>I have not failed. I’ve just found 10,000 ways that won’t
  work.</h3><i>Thomas Edison</i>
<h3>Blessed is the man who, having nothing to say, abstains from
  giving wordy evidence of the fact.</h3><i>George Eliot</i>
<h3>I think there is a world market for maybe five computers.</h3>
  <i>Thomas Watson</i>
<h3>Computers in the future may weigh no more than 1.5 tons.</h3>
  <i>Popular Mechanics</i>
<h3>I have traveled the length and breadth of this country and talked
  with the best people, and I can assure you that data processing is a
  fad that won’t last out the year.</h3><i>Prentice-Hall business books
  editor</i>
<h3>640K ought to be enough for anybody.</h3><i>Bill Gates</i>
Session State
One of the more difficult problems in Web programming is storing per-user state. Suppose you intend to write a site that lets visitors drop items into virtual shopping carts by clicking Add to Cart buttons. It sounds simple enough, but remember: the Web server sees the button clicks as a series of unrelated HTTP requests, and the requests generated by one user are mixed in with similar requests from other users. Finding a place to store the contents of your shopping carts—in memory on the server, for example, or in hidden <input> fields round-tripped to the client and back—is only half the battle; the other half involves examining each incoming request, determining whether that request came from a user for whom a shopping cart has been created, and either correlating the request to an existing shopping cart or creating a brand new shopping cart. The challenge is far less trivial than most people realize.
ASP offers a convenient and easy-to-use solution to the per-user-state problem in the form of sessions. When a user who hasn’t visited an ASP-driven site recently (typically in the last 20 minutes) submits a request to that site, ASP creates a session for that user and returns a cookie that uniquely identifies the session. In subsequent requests from the same user, ASP uses the cookie to correlate the request to the session it created earlier. If hundreds of users browse a site simultaneously, each is assigned his or her own session, and each session implements a data store that’s exposed to ASP scripts through a session object. Information written to that data store is called session state. One simple statement in an ASP script writes a value to session state or reads it back. And because each session corresponds to exactly one user, data written to session state is stored strictly on a per-user basis.
Despite its elegance, ASP’s session state implementation suffers from two fatal flaws:
ASP session state is stored in memory, which means it’s incompatible with Web farms—clusters of Web servers that act as one—and also that it’s destroyed if IIS is restarted or the server is rebooted.
ASP session state relies on cookies to correlate users to sessions. If a user disables cookies in his or her browser, an ASP Web server is powerless to map incoming requests to sessions.
For these reasons, many large sites that rely on ASP either don’t use session state or use a custom implementation that replaces ASP’s default session state provider with one of their own.
ASP.NET also uses sessions to enable Web applications to store per-user state. ASP.NET’s session state implementation is better thought out and more robust, however, and it suffers from none of the shortcomings of ASP session state. It supports a variety of storage models, enabling session state to be physically stored in-process to ASP.NET, in another process, on another machine, or even in a database, and it supports cookieless operation for the benefit of browsers that don’t support cookies (or that have cookies turned off). All in all, it’s a huge improvement over ASP and one of ASP.NET’s greatest strengths. And it’s the perfect place to store shopping carts or anything else that requires unique storage for each visitor to your site.
Using Session State
Using ASP.NET session state is simplicity itself. Pages access it through the Session property that they inherit from System.Web.UI.Page. Global.asax files access it through the Session property inherited from System.Web.HttpApplication. In both cases, the Session property maps to an instance of System.Web.SessionState.HttpSessionState specially created by ASP.NET to store data for the user who originated the request.
HttpSessionState.Add adds an item to session state. As are items stored in application state or the application cache, an “item” is an instance of any managed type keyed by a string. The following statement adds an item named “10012552” to session state and assigns it the value “Quantity=1”:
Session.Add ("10012552", "Quantity=1");Or, if you’d prefer, you can add it this way:
Session["10012552"] = "Quantity=1";
The Add method and [] operator are semantically equivalent. In other words, both add items to session state, and both replace an existing item if an existing key is specified.
Retrieving an item from session state is equally painless:
string value = Session["10012552"];
The same can be said about enumerating items and the strings that they’re keyed with:
NameObjectCollectionBase.KeysCollection keys = Session.Keys;
foreach (string key in keys) {
    // key is the item’s key
    // Session[key] returns the item’s value
       .
       .
       .
}
To remove items from session state, use HttpSessionState’s Remove, RemoveAt, and RemoveAll methods. You can also use Clear, which is equivalent to RemoveAll.
ASP.NET uses randomly generated session IDs, which aren’t unlike COM GUIDs (globally unique identifiers), to identify sessions. If you’d like to know what the ID of a given session is, you can retrieve it from the SessionID property of the corresponding HttpSessionState object. Another interesting HttpSessionState property is IsNewSession, which reveals whether the session ID was generated for the current request (true) or a previous request (false).
Incidentally, if you perform a multistep update on session state and are concerned that a read from another thread at just the wrong time might catch the data in an indeterminate state, don’t fret. ASP.NET locks session state when an HttpApplication instance fires an AcquireRequestState event and unlocks it following the next ReleaseRequestState event. The practical effect is that it’s impossible for two requests to read and write session state at the same time, even in the unlikely event that two requests that correspond to the same session overlap each other.
The SessionSpy Page
For a firsthand look at session state in action, check out the Web page in Example 9-7. Called SessionSpy.aspx, it uses session state to store a count of the number of times a user visits the site. The first time you request the page, you’ll be greeted as a first-time visitor and shown the ID of the session that was created for you. Each time thereafter, you’ll be told how many times you’ve visited the site (that is, requested the page).
The count is a simple integer stored in session state and keyed with the string “Count”. SessionSpy.aspx reads the HttpSessionState object’s IsNewSession property to determine whether this access is the first one to the page and its SessionID property to get the session ID.
SessionSpy.aspx
<%@ Page Language="C#" %>

<html>
  <body>
    <%
      if (Session.IsNewSession || Session["Count"] == null) {
          Session["Count"] = 1;
          Response.Write ("Welcome! Because this is your first " +
              "visit to this site, a new session has been created " +
              "for you. Your session ID is " + Session.SessionID +
              ".");
      }
      else {
          Session["Count"] = (int) Session["Count"] + 1;
          Response.Write ("You have visited this site " +
              Session["Count"] + " times. Your session ID is still " +
              Session.SessionID + ".");
      }
    %>
  </body>
</html>
After you’ve played with the page for a few moments, start a second instance of your browser and open SessionSpy.aspx. Because the new browser instance represents a new “session” and doesn’t share cookies with the first, you’re greeted as a first-time user. But use your browser’s New Window command (Ctrl+N in most browsers) to start a third instance, and you’ll be greeted as a returning user. Why? A browser started with the New Window command doesn’t represent a new session. It shares cookies and other resources with the first instance and thus shares its session state on the server, too.
Cookieless Session State
By default, ASP.NET, like ASP, uses cookies to correlate returning users to sessions on the server. Unlike ASP, ASP.NET supports cookieless session state as well. Cookieless sessions are enabled by adding cookieless=“true” to the sessionState element in Web.config or Machine.config:
<sessionState cookieless="true" />
How does ASP.NET correlate users and sessions when cookies are disabled? By using URL munging. Check out the screen in Figure 9-8, which was taken after a client retrieved a page from an ASP.NET application running in cookieless mode. The strange-looking value in parentheses in the browser’s address bar is the session ID. Before returning the page to the client, ASP.NET inserts the session ID into the URL. When the page posts back to the server, ASP.NET strips the session ID from the URL and uses it to associate the request with a session. URL munging isn’t perfect because there’s nothing preventing the user from editing the URL and invalidating the session ID. But it’s better than nothing, and it prevents ASP.NET session state from being unusable with browsers that don’t honor cookies.
You’re probably wondering, “Is there a way I can ask ASP.NET whether cookies are enabled in a browser, and if so, can I enable cookieless operation on the fly if I detect that a request came from a browser that doesn’t support cookies?” The short answer is no and no. ASP.NET doesn’t attempt to determine whether a browser supports cookies, so if you want to know, you have to find out yourself. The usual technique is to return a cookie to a browser and use Response.Redirect to redirect to a page that checks for the cookie. If the cookie’s not there, you know the browser ignored it. Another approach is to return a cookie along with some client-side script that checks for it. Even if you determine at run time that cookies aren’t supported, however, there’s not much you can do about it as far as session state is concerned because cookieless operation can’t be enabled and disabled programmatically. If you want to know whether cookieless session state is in effect, however, you can read the IsCookieless property of any HttpSessionState object.
Bottom line? If you want session state to work with as many browsers as possible, configure your application to use cookieless session state up front. If you don’t like URL munging and don’t care that your application might not work properly with browsers that have cookies disabled (many applications test for cookie support and display a warning indicating that they might not work properly if cookies are disabled), then stick with the default: cookieless=“false.”

Session State Process Models
Cookieless sessions are an important enhancement to ASP.NET, but even more important are ASP.NET’s new session state process models. ASP session state is always stored in memory, which makes it incompatible with Web farms (a session—and session ID—created on server A are undefined on server B). It also means that you lose everything in session state if the Web server goes down. That’s a big deal to a site like Amazon.com, which at any given time might have millions of dollars worth of potential sales sitting in virtual shopping carts. Web farms are a big deal, too, because setting up clusters of Web servers is a classic and relatively inexpensive way to scale an application to meet the demands of a growing customer base.
That’s why ASP.NET doesn’t limit session to memory on the Web server as ASP does. ASP.NET supports three session state process models:
|
Model |
Description |
|
In-proc |
Stores session state in-process to ASP.NET (that is, in Aspnet_wp.exe) |
|
State server |
Stores session state in an external “state server” process on the Web server or on a remote machine |
|
SQL Server |
Stores session state in a Microsoft SQL Server database on the Web server or on a remote machine |
The default is in-proc, which is very ASP-like, but simple configuration changes applied via Web.config or Machine.config switch to the state server or SQL Server model and get session state out of the ASP.NET worker process Aspnet_wp.exe and into the location of your choosing. The sections that follow describe the necessary configuration changes and also shed light on the pros and cons of the individual process models.
In-Proc Session State
In-proc session state is the fastest, but it’s also the least robust; restart IIS or reboot your Web server and in-proc session state goes away for good. In-proc is the default because of the following statement in Machine.config:
<sessionState ... mode="InProc" />
To be absolutely certain that in-proc session state is in effect regardless of what might be in Machine.config, add a Web.config file to your application’s virtual root directory and include this statement in it:
<sessionState mode="InProc" />
In-proc session state is appropriate when you prefer speed to robustness and your application runs on a single server rather than a Web farm.
State Server Session State
The state server session state model is new in ASP.NET. It moves session state out of Aspnet_wp.exe and into a dedicated “state server” process managed by the system. The state server is actually a running instance of a service named Aspnet_state.exe. If you want to use the state server model, you must do the following:
Start Aspnet_state.exe. You can start it manually (from the command line) by executing the following command:
net start aspnet_state
Or you can configure it to start automatically each time the system is started by using Windows’ Services control panel applet (Figure 9-9).
Add a mode=“StateServer” attribute and a stateConnectionString attribute to the sessionState element in Machine.config or a local Web.config file. The latter of these two attributes identifies the machine that hosts the state server process.

Here’s a Web.config file that configures an application to store session state in a state server process on the same Web server that hosts the application:
<configuration>
  <system.web>
    <sessionState
      mode="StateServer"
      stateConnectionString="tcpip=localhost:42424"
    />
  </system.web>
</configuration>
And here’s one that places session state in a state server process on another machine identified by IP address:
<configuration>
  <system.web>
    <sessionState
      mode="StateServer"
      stateConnectionString="tcpip=192.168.1.2:42424"
    />
  </system.web>
</configuration>
By default, ASP.NET uses port 42424 to communicate with the state server process. That’s why “42424” appears in the state connection string. In the unlikely event that 42424 conflicts with another application on your Web server, you can change the port number by doing the following:
Add the desired port number to the registry at HKEY_LOCAL_ MACHINESystemCurrentControlSetServicesaspnet_state ParametersPort.
Replace 42424 with the new port number in stateConnectionString.
As an example, here’s a Web.config file that changes the session state mode to “StateServer” and directs ASP.NET to use port 31313 to connect Aspnet_wp.exe to Aspnet_state.exe:
<configuration>
  <system.web>
    <sessionState
      mode="StateServer"
      stateConnectionString="tcpip=192.168.1.2:31313"
    />
  </system.web>
</configuration>
The state server model is slower than in-proc session state because data read from and written to session state must travel across process or machine boundaries. However, the state server model prevents session state from being lost if IIS is restarted, and should the state server process be on another machine, it even allows session state to survive if the entire Web server is rebooted. Switching to the state server model is also one way to build ASP.NET applications that work with Web farms.
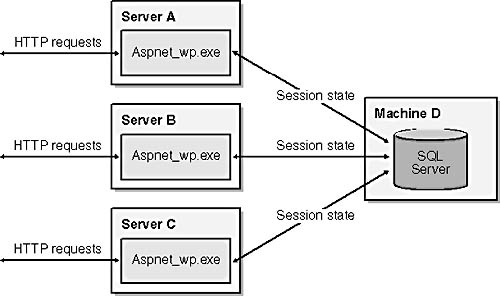
Figure 9-10 illustrates how the state server model solves the Web farm compatibility problem. In this example, the Web farm contains three servers. The application runs in worker processes on all three servers, but each server is configured to store session state in a state server process on a fourth machine. It’s perfectly acceptable now for data to be written to session state on server A and read back on server B because both servers refer to machine D for their session state. If you don’t want to dedicate a machine to host the state server process, no problem: simply designate one of the Web servers as the state server and point the other servers to it with stateConnectionString.

SQL Server Session State
The SQL Server process model offers the ultimate in scalability and reliability. Like the state server model, it moves session state out of Aspnet_wp.exe. But rather than store session state in an external process, the SQL Server model stores it in a Microsoft SQL Server database. You gain Web farm compatibility because you can point all your servers to a common back-end machine (the one that hosts the database). You also achieve robustness because session state is preserved no matter what—even if IIS is restarted or the Web server is rebooted. If SQL Server is clustered or otherwise configured to survive hard failures, you can reboot the database server itself and still preserve the contents of session state.
Configuring ASP.NET to use the SQL Server process model is a breeze. Here are the steps required:
Create the database that holds the session state. The .NET Framework SDK provides a script that creates the database for you; it’s called InstallSqlState.sql. To run it, open a command prompt window and type the following command:
osql -S localhost -U sa -P -i installsqlstate.sql
This command creates a SQL Server database named ASPState on the host machine and adds to it all the tables, stored procedures, and other infrastructure that ASP.NET uses to access the database, as shown in Figure 9-11.
Add a mode=“SQLServer” attribute and a sqlConnectionString attribute to the sessionState element in Machine.config or a local Web.config file. The latter of these two attributes provides the information ASP.NET needs to connect to the database.

The following Web.config file configures an ASP.NET application to store session state in a SQL Server database on the Web server:
<configuration>
  <system.web>
    <sessionState
      mode="SQLServer"
      sqlConnectionString="server=localhost;uid=sa;pwd="
    />
  </system.web>
</configuration>
The next one does the same, but it points ASP.NET to a SQL Server database on a remote machine named “Hawkeye”:
<configuration>
  <system.web>
    <sessionState
      mode="SQLServer"
      sqlConnectionString="server=hawkeye;uid=sa;pwd="
    />
  </system.web>
</configuration>
Performance-wise, the SQL Server model is the slowest of them all, but in return for speed it virtually guarantees that session state won’t be lost. Figure 9-12 shows how the SQL Server option factors into Web farms. A dedicated server holds the state database, and all the Web servers point ASP.NET to that database. If you intend to use ASP.NET to build large, industrial-strength e-commerce sites, this is the architecture you want.
State Servers, SQL Servers, and Serializable Objects
One gotcha to be aware of if you plan to use the state server or SQL Server session state model is that both require types stored in session state to be serializable. Serialization is the process of writing out the data that defines an object instance to a designated storage medium for the purpose of re-creating, or rehydrating, it at a later time or in another place. ASP.NET must be able to serialize objects stored in session state if it’s to transfer them to a state server process or a SQL Server database. And it must be able to deserialize them if they’re to be read back. Nonserializable types work just fine with the in-proc session state model, but try to write a nonserializable type to session state using either of the other process models and ASP.NET will throw an exception.
Here’s an example to help clarify. Suppose you write a class named ShoppingCart to serve as a virtual container for items that users select from your site:
public class ShoppingCart
{
  ...
}
Defined this way, a ShoppingCart instance can be written to session state without any problem as long as session state is stored in-proc:
ShoppingCart cart = new ShoppingCart ();
Session["MyShoppingCart"] = cart;
But the same code throws an exception if you switch to the state server or SQL Server model. To remedy that, make the class serializable by adding a Serializable attribute:
[Serializable]
public class ShoppingCart
{
  ...
}
This quick-and-easy change enables ASP.NET to serialize and deserialize ShoppingCart objects using System.Runtime.Serialization.Formatters.Binary.BinaryFormatter, better known as the .NET Framework’s binary formatter. When you create custom data types with the intention of storing them in session state, always include a Serializable attribute unless you’re certain you’ll only use the types in-proc. It’s never harmful, and it will pay off in spades if you or anyone else attempts to write an instance of the class to session state in an application that uses the state server or SQL Server model.
Session Lifetimes
ASP.NET creates sessions for you. It also deletes them (in reality, hands them over to the garbage collector) when it’s done. Knowing when to delete them requires a bit of guesswork. ASP.NET can’t know definitively when a session is no longer needed because it has no way of knowing whether a given request is that user’s last. So it does the next best thing: if a prescribed time period elapses and ASP.NET receives no requests from a user for whom a session was created, it discards the corresponding session. The default time-out period is 20 minutes, as specified in Machine.config:
<sessionState ... timeout="20" />
You can change the session time-out period in three ways. Option number one is to edit Machine.config. Option number two is to place a statement like this one, which sets the session time-out to 60 minutes, in a local Web.config file:
<sessionState timeout="60" />
And option number three is to write a time-out value (in minutes) to the Timeout property of an HttpSessionState object:
Session.Timeout = 60;
Which route you should choose depends on the desired scope of the change. Setting the time-out interval in Machine.config changes the default for all ASP.NET applications on the Web server. Setting it in a local Web.config file changes it for a single application, and setting it with Session.Timeout changes it for an individual session. The proper time-out interval is both subjective and application-specific. Twenty minutes is fine for most applications, but if you’d like a user to be able to go out to lunch and come back to find his or her shopping cart still full (assuming you’re storing shopping carts in session state), then you might want to up the time-out interval to an hour or more.
You can see session time-outs in action by calling up Example 9-7’s SessionSpy.aspx in your browser, refreshing it a time or two, waiting for 20 minutes, and then refreshing the page again. Because your session timed out while you were away, you’ll be greeted as a first-time visitor. Increase the session time-out, and you’ll be able to stay away for longer periods of time.
An application can explicitly close a session by calling the session’s Abandon method:
Session.Abandon ();
This option is sometimes used by sites that permit users to log out (or that forcibly log them out) after completing a transaction.
Disabling Session State
Session state can also be disabled altogether. Session state exacts a modest price in both memory and performance, so if you don’t use it, you should disable it. You can disable session state for an individual page (ASPX file) with the following @ Page directive:
<%@ Page EnableSessionState="false" %>
You can disable it for an entire application by including this statement in Web.config:
<sessionState mode="Off" />
Or you can disable it for all applications by adding a mode=“Off” attribute to the sessionState element in Machine.config.
A Word on Web Farms
Moving session state to a remote machine and pointing all your Web servers to that machine is essential to building Web applications that are compatible with server farms. But there’s something else you have to do to deploy an ASP.NET application on a Web farm. First, a bit of background.
Each server’s Machine.config file contains a machineKey element that assigns values to a pair of cryptographic keys:
<machineKey ... validationKey="AutoGenerate" decryptionKey="AutoGenerate" />
When configured to prevent tampering by appending hashes to view state values and forms authentication cookies (a topic I’ll cover in Chapter 10), ASP.NET uses validationKey to generate the hashes. If the protection level is sufficiently high, ASP.NET goes even further and uses decryptionKey to encrypt view state and authentication cookies. “AutoGenerate” tells ASP.NET to generate a random key and store it in the host machine’s Local Security Authority (LSA). Randomly generated keys are fine for single-server installations, but in a Web farm, each server must use identical keys; otherwise, a value encrypted on one machine can’t be unencrypted on another.
Before deploying an ASP.NET application on a Web farm, you should make the following configuration change on every server in the Web farm. The change can be made in Machine.config or in a local Web.config file:
Set machineKey’s validationKey attribute to validationKey="mmmm,” where mmmm is a random value from 40 to 128 characters in length. Longer values provide stronger encryption.
Set machineKey’s decryptionKey attribute to decryptionKey="nnnn,” where nnnn is a random value either 16 or 48 characters in length. The latter provides stronger encryption but works only on servers that support 128-bit encryption.
Here’s a sample Web.config file that, if used on every server on which your application is installed, configures each server to use identical validation and encryption keys:
<configuration>
  <system.web>
    <machineKey
      validationKey="DD2B3BB0B07F4FE6917B60DAFEB0D01532C1C3BB07F533A1"
      decryptionKey="C89EFEF650CA4D9C9BC986061211329A9717DC2260BC6199"
    />
  </system.web>
</configuration>
Values for validationKey and decryptionKey should by cryptographically strong to make values encrypted with them difficult to break. Various tools are available for producing cryptographically strong keys. You can even write your own key generator using the FCL’s System.Security.Cryptography.RNGCryptoServiceProvider class. (RNG stands for Random Number Generator.) However you derive your keys, be sure to apply them in a CONFIG file or your Web farm–compatible application might not be so Web farm–compatible after all.
The Congo.com Application
The application pictured in Figure 9-13 breathes life into many of the concepts presented in this chapter. Called Congo.com, it’s a virtual storefront for a fictitious online bookseller. Congo.com’s catalog consists of titles obtained from the SQL Server Pubs database. The main page, Congo.aspx, fetches the titles from the database and displays them in a DataGrid. Each row in the DataGrid contains an Add to Cart button that, when clicked, adds the corresponding book to a virtual shopping cart. Clicking the View Cart button at the top of the page shows the shopping cart’s contents, again using a DataGrid. This DataGrid has Remove buttons that delete items from the shopping cart.

Here’s how to install Congo.com on your Web server:
Once deployment is complete, call up Congo.aspx in your browser and click a few Add to Cart buttons. Then click View Cart to view your shopping cart’s contents. Now do the same using a second instance of your browser. You’ll find that the two browser instances track items added to the shopping cart independently. Why? Because each represents a separate session and is therefore assigned its own session (and own session state) on the server.
Inside Congo.com
Congo.com’s source code, shown in Example 9-14, is remarkably compact considering the amount of functionality it provides. If you don’t believe me, try coding the application as an ISAPI DLL. You’ll see what I mean.
The action begins in Global.asax. Each time a new user requests a page from the site, ASP.NET creates a session for that user and calls Global.asax’s Session_Start handler. Session_Start creates a new ShoppingCart object to serve as a container for the user’s selections and stores a reference to it in session state, keying it with the name “MyShoppingCart”:
Session["MyShoppingCart"] = new ShoppingCart ();
When the user calls up Congo.aspx and clicks an Add to Cart button, Congo.aspx’s OnItemCommand method is called on the server. OnItemCommand retrieves the product ID, title, and price of the corresponding book from the DataGrid and encapsulates them in a BookOrder object:
BookOrder order = new BookOrder (e.Item.Cells[0].Text,
    e.Item.Cells[1].Text, Convert.ToDecimal
    (e.Item.Cells[2].Text.Substring (1)), 1);
OnItemCommand then retrieves the reference to the user’s ShoppingCart from session state and adds the BookOrder to the ShoppingCart:
ShoppingCart cart = (ShoppingCart) Session["MyShoppingCart"];
if (cart != null)
    cart.AddOrder (order);
Congo.aspx’s Page_Load handler populates the DataGrid by binding it to a DataSet holding the results of a database query.
When the user clicks the View Cart button at the top of the page, Congo.com redirects the user to ViewCart.aspx with Response.Redirect:
Response.Redirect ("ViewCart.aspx");ViewCart.aspx declares a DataGrid that’s similar to the one declared in Congo.aspx. But ViewCart.aspx’s DataGrid control doesn’t bind to a DataSet encapsulating the results of a database query; it binds to the ShoppingCart object in session state. Here’s the code that does the binding:
ShoppingCart cart = (ShoppingCart) Session["MyShoppingCart"];
  .
  .
  .
MyDataGrid.DataSource = cart.Orders;
MyDataGrid.DataBind ();
Clearly, ShoppingCart plays a huge role in Congo.com’s operation. Not only does it keep a record of the items the user selected, but it implements an Orders property that supports data binding. Where does ShoppingCart come from, and what’s the magic that enables it to work with data-binding controls?
ShoppingCart is a custom data type defined in Congo.cs. It’s accompanied by BookOrder, which is also defined in Congo.cs. The ShoppingCart class is basically a wrapper around a Hashtable. It implements a private field named _Orders that holds a Hashtable reference, and public methods that enable BookOrder objects to be added to the Hashtable and removed. It also implements a public property named Orders that exposes the Hashtable’s ICollection interface:
public ICollection Orders
{
    get { return _Orders.Values; }
}
That’s why a DataGrid can bind to a ShoppingCart: because its Orders property exposes the underlying Hashtable’s ICollection interface. The statement
MyDataGrid.DataSource = cart.Orders;
does nothing more than put the Hashtable’s ICollection interface into the hands of the DataGrid.
Both ShoppingCart and BookOrder are tagged with Serializable attributes. That’s so they can be stored in session state regardless of the session state process model selected. As I said earlier, it’s wise to mark types that you intend to store in session state as serializable so that your source code doesn’t have to change if the process model changes.
What role does Web.config play in Congo.com’s operation? It stores the connection string that Congo.aspx uses to connect to the Pubs database. Storing the connection string in Web.config rather than hardcoding it into Congo.aspx enables it to be changed without modifying any C# code.
Web.config
<configuration>
  <appSettings>
    <add key="connectString"
      value="server=localhost;database=pubs;uid=sa;pwd=" />
  </appSettings>
</configuration>
Global.asax
<script language="C#" runat="server">
  void Session_Start ()
  {
      Session["MyShoppingCart"] = new ShoppingCart ();
  }
</script>
Congo.aspx
<%@ Import Namespace="System.Data" %>
<%@ Import Namespace="System.Data.SqlClient" %>

<html>
  <body>
    <h1>Congo.com</h1>
    <form runat="server">
      <table width="100%" bgcolor="teal">
        <tr>
          <td>
            <asp:Button Text="View Cart" OnClick="OnViewCart"
              RunAt="server" />
          </td>
        </tr>
      </table>
      <br>
      <center>
        <asp:DataGrid ID="MyDataGrid"
          AutoGenerateColumns="false" CellPadding="2"
          BorderWidth="1" BorderColor="lightgray"
          Font-Name="Verdana" Font-Size="8pt"
          GridLines="vertical" Width="90%"
          OnItemCommand="OnItemCommand" RunAt="server">
          <Columns>
            <asp:BoundColumn HeaderText="Item ID"
              DataField="title_id" />
            <asp:BoundColumn HeaderText="Title"
              DataField="title" />
            <asp:BoundColumn HeaderText="Price"
              DataField="price" DataFormatString="{0:c}"
              HeaderStyle-HorizontalAlign="center"
              ItemStyle-HorizontalAlign="right" />
            <asp:ButtonColumn HeaderText="Action" Text="Add to Cart"
              HeaderStyle-HorizontalAlign="center"
              ItemStyle-HorizontalAlign="center"
              CommandName="AddToCart" />
          </Columns>
          <HeaderStyle BackColor="teal" ForeColor="white"
            Font-Bold="true" />
          <ItemStyle BackColor="white" ForeColor="darkblue" />
          <AlternatingItemStyle BackColor="beige"
            ForeColor="darkblue" />
        </asp:DataGrid>
    </center>
    </form>
  </body>
</html>

<script language="C#" runat="server">
  void Page_Load (Object sender, EventArgs e)
  {
      if (!IsPostBack) {
          string ConnectString =
              ConfigurationSettings.AppSettings["connectString"];
          SqlDataAdapter adapter = new SqlDataAdapter
              ("select * from titles where price != 0", ConnectString);
          DataSet ds = new DataSet ();
          adapter.Fill (ds);
          MyDataGrid.DataSource = ds;
          MyDataGrid.DataBind ();
      }
  }

  void OnItemCommand (Object sender, DataGridCommandEventArgs e)
  {
      if (e.CommandName == "AddToCart") {
          BookOrder order = new BookOrder (e.Item.Cells[0].Text,
              e.Item.Cells[1].Text, Convert.ToDecimal
              (e.Item.Cells[2].Text.Substring (1)), 1);
          ShoppingCart cart = (ShoppingCart) Session["MyShoppingCart"];
          if (cart != null)
              cart.AddOrder (order);
      }
  }

  void OnViewCart (Object sender, EventArgs e)
  {
      Response.Redirect ("ViewCart.aspx");
  }
</script>
ViewCart.aspx
<html>
  <body>
    <h1>Shopping Cart</h1>
    <form runat="server">
      <table width="100%" bgcolor="teal">
        <tr>
          <td>
            <asp:Button Text="Return to Shopping" OnClick="OnShop"
              RunAt="server" />
          </td>
        </tr>
      </table>
      <br>
      <center>
        <asp:DataGrid ID="MyDataGrid"
          AutoGenerateColumns="false" CellPadding="2"
          BorderWidth="1" BorderColor="lightgray"
          Font-Name="Verdana" Font-Size="8pt"
          GridLines="vertical" Width="90%"
          OnItemCommand="OnItemCommand" RunAt="server">
          <Columns>
            <asp:BoundColumn HeaderText="Item ID"
              DataField="ItemID" />
            <asp:BoundColumn HeaderText="Title"
              DataField="Title" />
            <asp:BoundColumn HeaderText="Price"
              DataField="Price" DataFormatString="{0:c}"
              HeaderStyle-HorizontalAlign="center"
              ItemStyle-HorizontalAlign="right" />
            <asp:BoundColumn HeaderText="Quantity"
              DataField="Quantity"
              HeaderStyle-HorizontalAlign="center"
              ItemStyle-HorizontalAlign="center" />
            <asp:ButtonColumn HeaderText="Action" Text="Remove"
              HeaderStyle-HorizontalAlign="center"
              ItemStyle-HorizontalAlign="center"
              CommandName="RemoveFromCart" />
          </Columns>
          <HeaderStyle BackColor="teal" ForeColor="white"
            Font-Bold="true" />
          <ItemStyle BackColor="white" ForeColor="darkblue" />
          <AlternatingItemStyle BackColor="beige"
            ForeColor="darkblue" />
        </asp:DataGrid>
      </center>
      <h3><asp:Label ID= "Total" RunAt="server" /></h3>
    </form>
  </body>
</html>

<script language="C#" runat="server">
  void Page_Load (Object sender, EventArgs e)
  {
      ShoppingCart cart = (ShoppingCart) Session["MyShoppingCart"];
      if (cart != null) {
          MyDataGrid.DataSource = cart.Orders;
          MyDataGrid.DataBind ();
          Total.Text = String.Format ("Total Cost: {0:c}",
              cart.TotalCost);
      }
  }

  void OnItemCommand (Object sender, DataGridCommandEventArgs e)
  {
      if (e.CommandName == "RemoveFromCart") {
          ShoppingCart cart = (ShoppingCart) Session["MyShoppingCart"];
          if (cart != null) {
              cart.RemoveOrder (e.Item.Cells[0].Text);
              MyDataGrid.DataBind ();
              Total.Text = String.Format ("Total Cost: {0:c}",
                  cart.TotalCost);
          }
      }
  }

  public void OnShop (Object sender, EventArgs e)
  {
      Response.Redirect ("Congo.aspx");
  }
</script>
Congo.cs
using System;
using System.Collections;

[Serializable]
public class BookOrder
{
    string _ItemID;
    string _Title;
    decimal _Price;
    int _Quantity;

    public string ItemID
    {
        get { return _ItemID; }
        set { _ItemID = value; }
    }

    public string Title
    {
        get { return _Title; }
        set { _Title = value; }
    }

    public decimal Price
    {
        get { return _Price; }
        set { _Price = value; }
    }

    public int Quantity
    {
        get { return _Quantity; }
        set { _Quantity = value; }
    }

    public BookOrder (string ItemID, string Title, decimal Price,
        int Quantity)
    {
        _ItemID = ItemID;
        _Title = Title;
        _Price = Price;
        _Quantity = Quantity;
    }
}

[Serializable]
public class ShoppingCart
{
    Hashtable _Orders = new Hashtable ();

    public ICollection Orders
    {
        get { return _Orders.Values; }
    }

    public decimal TotalCost
    {
        get
        {
            decimal total = 0;
            foreach (DictionaryEntry entry in _Orders) {
                BookOrder order = (BookOrder) entry.Value;
                total += (order.Price * order.Quantity);
            }
            return total;
        }
    }

    public void AddOrder (BookOrder Order)
    {
        BookOrder order = (BookOrder) _Orders[Order.ItemID];
        if (order != null)
            order.Quantity += Order.Quantity;
        else
            _Orders.Add (Order.ItemID, Order);
    }

    public void RemoveOrder (string ItemID)
    {
        if (_Orders[ItemID] != null)
            _Orders.Remove (ItemID);
    }
}
On Your Own
Congo.com uses the default session time-out, which normally equals 20 minutes. To experience the impact of shortened time-out intervals firsthand, add the following statement to Web.config:
<sessionState timeout="1" />
Call up Congo.aspx, click a few Add to Cart buttons, verify that the items were added to the shopping cart, and return to Congo.aspx. Now wait a couple of minutes and check the shopping cart again. Because the session time-out is a mere 1 minute, the cart should be empty. Finish up by deleting the sessionState element from Web.config in order to reset the time-out interval to 20 minutes.
Because it lacks a Web.config file specifying otherwise, Congo.com settles for the default session state process model. To demonstrate the effect of moving session state out of Aspnet_wp.exe, try this simple experiment:
Open Congo.aspx in your browser.
Add a few items to the shopping cart.
Open a command prompt window and restart IIS by typing iisreset.
View the shopping cart. How many items does it contain?
The answer should be zero because restarting IIS restarts ASP.NET, and restarting ASP.NET shuts down Aspnet_wp.exe. Since that’s where session is stored in the in-proc model, restarting IIS destroys all active session state, too. Now do the following:
In a command prompt window, type
net start aspnet_state
to start the ASP.NET state server process running.
Add the following statement to the system.web section of Web.config:
<sessionState
  mode="StateServer"
  stateConnectionString="tcpip=localhost:42424"
/>
Bring up Congo.aspx in your browser and add a few items to your shopping cart.
Type iisreset again to restart IIS.
Check your shopping cart.
This time, the shopping cart’s contents should still be there because session state is no longer stored in Aspnet_wp.exe. It’s in Aspnet_state.exe, which isn’t restarted when ASP.NET is restarted. If you go the extra mile and move the state server process to another machine (or use a SQL Server database on another machine to store session state), you can reboot your entire server without losing session state.
As a final learning exercise, try modifying Congo.aspx to store the DataSet that it binds to the DataGrid in the application cache. As it stands now, a physical database access is performed every time Congo.aspx is requested. Assuming the contents of the database don’t change very often, it would be far more efficient to query the database periodically, store the results in the application cache, and populate the DataGrid from the cache. Here’s a blueprint for making the change:
Add an Application_Start method to Global.asax.
In Application_Start, populate a DataSet with a database query and add the DataSet to the application cache. Specify that the DataSet expires 5 minutes after it’s added to the cache, and provide a reference to a callback method that’s called when the DataSet expires.
Code the callback method to reexecute the database query and place a new DataSet in the application cache.
Modify Congo.aspx’s Page_Load handler to bind to the DataSet stored in the application cache rather than populate a new DataSet with the results of a database query.
Once these changes are made, a physical database access will occur only every 5 minutes, no matter how often the page is requested. The performance difference will be negligible if you have only a few users, but as the load on the server increases, the improvement will be more and more noticeable. Caching frequently used data in memory is a tried-and-true means of increasing performance, and ASP.NET’s application cache is the perfect tool for the job.