Chapter 3. The .NET Framework Class Library
The .NET Framework class library (FCL) provides the API that managed applications write to. Including more than 7,000 types—classes, structs, interfaces, enumerations, and delegates—the FCL is a rich resource that includes everything from basic types such as Int32 and String to exotic types such as Regex, which represents regular expressions, and Form, which is the base class for windows in GUI applications. I’ll often use the word “classes” to refer to FCL members, but realize that I’m taking literary license and that the FCL is not, as you are well aware after reading Chapter 2, merely a class library.
The FCL is partitioned into approximately 100 hierarchically organized namespaces. System is the root for most namespaces. It defines core data types such as Int32 and Byte, as well as utility types such as Math and TimeSpan. A name such as System.Data refers to a namespace that is a child of the System namespace. It’s not unusual to find namespaces nested several levels deep, as in System.Runtime.Remoting.Channels.Tcp.
Segregating FCL types into namespaces adds structure to the .NET Framework class library and makes it easier to find the classes you need as you learn your way around the FCL. Learning is made easier by the fact that namespace names reflect what the types in a namespace are used for. For example, System.Web.UI.WebControls contains ASP.NET Web controls, while System.Collections is home to the FCL’s collection classes—Hashtable, ArrayList, and others.
This chapter introduces some of the .NET Framework class library’s key classes and namespaces. It’s not meant to be exhaustive; no chapter can possibly cover the FCL in its entirety. The classes you’ll read about here are ones that tend to be used by a broad cross-section of applications. They were chosen not only for their generality, but also because they provide a fair and accurate representation of the breadth, depth, and wide-ranging capabilities of the .NET Framework class library.
File and Stream I/O
Classes in the System.IO namespace enable managed applications to perform file I/O and other forms of input and output. The fundamental building block for managed I/O is the stream, which is an abstract representation of byte-oriented data. Streams are represented by the System.IO.Stream class. Because Stream is abstract, System.IO as well as other namespaces include concrete classes derived from Stream that represent physical data sources. For example, System.IO.FileStream permits files to be accessed as streams; System.IO.MemoryStream does the same for blocks of memory. The System.Net.Sockets namespace includes a Stream derivative named NetworkStream that abstracts sockets as streams, and the System.Security.Cryptography namespace defines a CryptoStream class used to read and write encrypted streams.
Stream classes have methods that you can call to perform input and output, but the .NET Framework offers an additional level of abstraction in the form of readers and writers. The BinaryReader and BinaryWriter classes provide an easy-to-use interface for performing binary reads and writes on stream objects. StreamReader and StreamWriter, which derive from the abstract TextReader and TextWriter classes, support the reading and writing of text.
One of the most common forms of I/O that managed and unmanaged applications alike are called upon to perform is file I/O. The general procedure for reading and writing files in a managed application is as follows:
Open the file using a FileStream object.
For binary reads and writes, wrap instances of BinaryReader and BinaryWriter around the FileStream object and call BinaryReader and BinaryWriter methods such as Read and Write to perform input and output.
For reads and writes involving text, wrap a StreamReader and StreamWriter around the FileStream object and use StreamReader and StreamWriter methods such as ReadLine and WriteLine to perform input and output.
Close the FileStream object.
That this example deals specifically with file I/O is not to imply that readers and writers are only for files. They’re not. Later in this chapter, you’ll see a sample program that uses a StreamReader object to read text fetched from a Web page. The fact that readers and writers work with any kind of Stream object makes them powerful tools for performing I/O on any stream-oriented media.
System.IO also contains classes for manipulating files and directories. The File class provides static methods for opening, creating, copying, moving, and renaming files, as well as for reading and writing file attributes. FileInfo boasts the same capabilities, but FileInfo exposes its features through instance methods rather than static methods. The Directory and DirectoryInfo classes provide a programmatic interface to directories, enabling them to be created, deleted, enumerated, and more via simple method calls. Chapter 4’s ControlDemo application demonstrates how to use File and Directory methods to enumerate the files in a directory and obtain information about those files.
Text File I/O
The reading and writing of text files from managed applications is aided and abetted by the FileStream, StreamReader, and StreamWriter classes. Suppose you wanted to write a simple app that dumps text files to the console window—the functional equivalent of the old DOS TYPE command. Here’s how to go about it:
StreamReader reader = new StreamReader (filename);
for (string line = reader.ReadLine (); line != null;line = reader.ReadLine ())
    Console.WriteLine (line);
reader.Close ();
The first line creates a StreamReader object that wraps a FileStream created from filename. The for loop uses StreamReader.ReadLine to iterate through the lines in the file and Console.WriteLine to output them to the console window. The final statement closes the file by closing the StreamReader.
That’s the general approach, but in real life you have to anticipate the possibility that things might not go strictly according to plan. For example, what if the file name passed to StreamReader’s constructor is invalid? Or what if the framework throws an exception before the final statement is executed, causing the file to be left open? Example 3-1 contains the source code for a managed version of the TYPE command (called LIST to distinguish it from the real TYPE command) that responds gracefully to errors using C# exception handling. The catch block traps exceptions thrown when StreamReader’s constructor encounters an invalid file name or when I/O errors occur as the file is being read. The finally block ensures that the file is closed even if an exception is thrown.
List.cs
using System;
using System.IO;

class MyApp
{
    static void Main (string[] args)
    {
        // Make sure a file name was entered on the command line
        if (args.Length == 0) {
            Console.WriteLine ("Error: Missing file name");
            return;
        }

        // Open the file and display its contents
        StreamReader reader = null;

        try {
            reader = new StreamReader (args[0]);
            for (string line = reader.ReadLine (); line != null;
                line = reader.ReadLine ())
                Console.WriteLine (line);
        }
        catch (IOException e) {
            Console.WriteLine (e.Message);
        }
        finally {
            if (reader != null)
                reader.Close ();
        }
    }
}
Because the FCL is such a comprehensive class library, passing a file name to StreamReader’s constructor isn’t the only way to open a text file for reading. Here are some others:
// Use File.Open to create a FileStream, and then wrap a
// StreamReader around it
FileStream stream = File.Open (filename, FileMode.Open, FileAccess.Read);
StreamReader reader = new StreamReader (stream);

// Create a FileStream directly, and then wrap a
// StreamReader around it
FileStream stream = new FileStream (filename, FileMode.Open, FileAccess.Read);
StreamReader reader = new StreamReader (stream);

// Use File.OpenText to create a FileStream and a
// StreamReader in one step
StreamReader reader = File.OpenText (filename);
There are other ways, too, but you get the picture. None of these methods for wrapping a StreamReader around a file is intrinsically better than the others, but they do demonstrate the numerous ways in which ordinary, everyday tasks can be accomplished using the .NET Framework class library.
StreamReaders read from text files; StreamWriters write to them. Suppose you wanted to write catch handlers that log exceptions to a text file. Here’s a LogException method that takes a file name and an Exception object as input and uses StreamWriter to append the error message in the Exception object to the file:
void LogException (string filename, Exception ex)
{
    StreamWriter writer = null;
    try {
        writer = new StreamWriter (filename, true);
        writer.WriteLine (ex.Message);
    }
    finally {
        if (writer != null)
            writer.Close ();
    }
}
Passing true in the second parameter to StreamWriter’s constructor tells the StreamWriter to append data if the file exists and to create a new file if it doesn’t.
Binary File I/O
BinaryReader and BinaryWriter are to binary files as StreamReader and StreamWriter are to text files. Their key methods are Read and Write, which do exactly what you would expect them to. To demonstrate, the sample program in Example 3-2 uses BinaryReader and BinaryWriter to encrypt and unencrypt files by XORing their contents with passwords entered on the command line. Encrypting a file is as simple as running Scramble.exe from the command line and including a file name and password, in that order, as in:
scramble readme.txt imbatman
To unencrypt the file, execute the same command again:
scramble readme.txt imbatman
XOR-encryption is hardly industrial-strength encryption, but it’s sufficient to hide file contents from casual intruders. And it’s simple enough to not distract from the main point of the application, which is to get a firsthand look at BinaryReader and BinaryWriter.
Scramble.cs contains two lines of code that merit further explanation:
ASCIIEncoding enc = new ASCIIEncoding ();
byte[] keybytes = enc.GetBytes (key);
These statements convert the second command-line parameter—a string representing the encryption key—into an array of bytes. Strings in the .NET Framework are instances of System.String. ASCIIEncoding.GetBytes is a convenient way to convert a System.String into a byte array. Scramble XORs the bytes in the file with the bytes in the converted string. Had the program used UnicodeEncoding.GetBytes instead, encryption would be less effective because calling UnicodeEncoding.GetBytes on strings containing characters from Western alphabets produces a buffer in which every other byte is a 0. XORing a byte with 0 does absolutely nothing, and XOR encryption is weak enough as is without worsening matters by using keys that contain lots of zeros. ASCIIEncoding is a member of the System.Text namespace, which explains the using System.Text directive at the top of the file.
Scramble.cs
using System;
using System.IO;
using System.Text;

class MyApp
{
    const int bufsize = 1024;

    static void Main (string[] args)
    {
        // Make sure a file name and encryption key were entered
        if (args.Length < 2) {
            Console.WriteLine ("Syntax: SCRAMBLE filename key");
            return;
        }

        string filename = args[0];
        string key = args[1];
        FileStream stream = null;

        try {
            // Open the file for reading and writing
            stream = File.Open (filename, FileMode.Open,
                FileAccess.ReadWrite);

            // Wrap a reader and writer around the FileStream
            BinaryReader reader = new BinaryReader (stream);
            BinaryWriter writer = new BinaryWriter (stream);

            // Convert the key into a byte array
            ASCIIEncoding enc = new ASCIIEncoding ();
            byte[] keybytes = enc.GetBytes (key);

            // Allocate an I/O buffer and a key buffer
            byte[] buffer = new byte[bufsize];
            byte[] keybuf = new byte[bufsize + keybytes.Length - 1];

            // Replicate the byte array in the key buffer to create
            // an encryption key whose size equals or exceeds the
            // size of the I/O buffer
            int count = (1024 + keybytes.Length - 1) / keybytes.Length;
            for (int i=0; i<count; i++)
                Array.Copy (keybytes, 0, keybuf, i * keybytes.Length,
                    keybytes.Length);

            // Read the file in bufsize blocks, XOR-encrypt each block,
            // and write the encrypted block back to the file
            long lBytesRemaining = stream.Length;

            while (lBytesRemaining > 0) {
                long lPosition = stream.Position;
                int nBytesRequested = (int) System.Math.Min (bufsize,
                    lBytesRemaining);
                int nBytesRead = reader.Read (buffer, 0,
                    nBytesRequested);

                for (int i=0; i<nBytesRead; i++)
                    buffer[i] ^= keybuf[i];

                stream.Seek (lPosition, SeekOrigin.Begin);
                writer.Write (buffer, 0, nBytesRead);
                lBytesRemaining -= nBytesRead;
            }
        }
        catch (Exception e) {
            Console.WriteLine (e.Message);        }
        finally {
            if (stream != null)
                stream.Close ();
        }
    }
}
Collections
The .NET Framework class library’s System.Collections namespace contains classes that serve as containers for groups, or collections, of data. Hashtable is one example of a System.Collections type. It implements hash tables, which feature lightning-fast lookups. Another example is ArrayList, which represents resizable arrays. The presence of these and other types defined in System.Collections means you can spend more time writing code that makes your application unique and less time writing tedious infrastructural code.
The following table lists the core collection classes defined in System.Collections. Succeeding sections formally introduce the Hashtable and ArrayList classes. Other collection classes, including Stack and SortedList, are used in sample programs presented in this chapter and others.
|
Class |
Implements |
|
ArrayList |
Resizable arrays |
|
BitArray |
Bit arrays |
|
Hashtable |
Tables of key/value pairs structured for fast lookups |
|
Queue |
First-in, first-out (FIFO) buffers |
|
SortedList |
Tables of sorted key/value pairs accessible by key or index |
|
Stack |
Last-in, first-out (LIFO) buffers |
One characteristic of all the collection classes in System.Collections (with the exception of BitArray, which stores Boolean values) is that they’re weakly typed. In other words, they store instances of System.Object. Weak typing enables collections to store virtually any kind of data because all .NET Framework data types derive directly or indirectly from System.Object. Unfortunately, weak typing also means that you have to do a lot of casting. For example, if you put a string in a Hashtable in C# and then retrieve it, you have to cast it back to a string to call String methods on it. If you’re morally opposed to casting, you can use the System.Collections classes CollectionBase and DictionaryBase as base classes for strongly typed collections of your own. However, it’s very likely that a future version of the .NET Framework will support something called generics, which are analogous to C++ templates. If you can stomach a moderate amount of casting for now, building type-safe collection classes should be a lot easier in the future.
Hash Tables
Since the dawn of computing, programmers have searched for ways to optimize data retrieval operations. When it comes to fast lookups, nothing beats the hash table. Hash tables store key/value pairs. When an item is inserted, the key is hashed and the resulting value (modulo the table size) is used as an index into the table, specifying where the item should be stored. When a value is retrieved, the key is hashed again. The resulting index reveals the item’s precise location in the table. A well-designed hash table can retrieve items with just one lookup, irrespective of the number of items in the table.
System.Collections.Hashtable is the FCL’s hash table data type. The following code uses a Hashtable object to build a simple French-English dictionary. The values stored in the table are the French words for the days of the week. The keys are the English words for the same:
Hashtable table = new Hashtable ();
table.Add ("Sunday",    "Dimanche");
table.Add ("Monday",    "Lundi");
table.Add ("Tuesday",   "Mardi");
table.Add ("Wednesday", "Mercredi");
table.Add ("Thursday",  "Jeudi");
table.Add ("Friday",    "Vendredi");
table.Add ("Saturday",  "Samedi");
With the hash table initialized in this manner, finding the French equivalent of Tuesday requires one simple statement:
string word = (string) table["Tuesday"];
Items can also be added to a Hashtable using string indexes:
Hashtable table = new Hashtable ();
table["Sunday"]    = "Dimanche";
table["Monday"]    = "Lundi";
table["Tuesday"]   = "Mardi";
table["Wednesday"] = "Mercredi";
table["Thursday"]  = "Jeudi";
table["Friday"]    = "Vendredi";
table["Saturday"]  = "Samedi";
Semantically, there’s a difference between adding items with Add and adding them with indexers. Add throws an exception if the key you pass to it is already in the table. Indexers don’t. They simply replace the old value with the new one.
Physically, a Hashtable stores items added to it in System.Collections.DictionaryEntry objects. Each DictionaryEntry object holds a key and a value that are exposed through properties named Key and Value. Because Hashtable implements the FCL’s IDictionary interface, which in turn derives indirectly from IEnumerable, you can use the C# foreach command (or the Visual Basic .NET For Each command) to enumerate the items in a Hashtable. The following code writes all the keys and values stored in a Hashtable named table to the console window:
foreach (DictionaryEntry entry in table)
    Console.WriteLine ("Key={0}, Value={1}
", entry.Key, entry.Value);
Hashtable also has methods for removing items (Remove), removing all items (Clear), checking for the existence of items (ContainsKey and ContainsValue), and more. To find out how many items a Hashtable contains, read its Count property. To enumerate only a Hashtable’s keys or values, use its Keys or Values property.
Two factors control Hashtable lookup performance: the Hashtable’s size and the uniqueness of the hashes produced from the input keys. A Hashtable’s size is dynamic; the table automatically grows as new items are added to it to minimize the chance of collisions. A collision occurs when two different keys hash to identical table indexes. Hashtable uses a double hashing algorithm to mitigate the negative effect of collisions on performance, but the best performance comes when there are no collisions at all.
Grow operations are expensive because they force the Hashtable to allocate new memory, recompute the table indexes, and copy each item to a new position in the table. By default, a Hashtable is sized for 0 items, meaning that many grow operations are required to grow it to a respectable size. If you know in advance approximately how many items you’ll be adding to a Hashtable, set the table’s initial size by passing a count to the class constructor. The following statement creates a Hashtable whose size is optimized for 1,000 items:
Hashtable table = new Hashtable (1000);
Initializing the Hashtable size in this manner doesn’t affect lookup performance, but it can improve insertion speed by a factor of 2 or more.
When a Hashtable grows, it always assumes a size that’s a prime number to minimize the likelihood of collisions. (Statistically, if n is a random number, n modulo m is more likely to produce a unique result if m is a prime number.) By default, a Hashtable expands its memory allocation when the item count exceeds a predetermined percentage of the table size. You can control the percentage by varying the load factor. A load factor of 1.0 corresponds to 72 percent, 0.9 corresponds to 65 percent (0.9 × 72), and so on. Valid load factors range from 0.1 to 1.0. The following statement sizes a Hashtable for 1,000 items and sets its load factor to 0.8, meaning that the Hashtable will grow when the item count reaches approximately 58 percent of the table size:
Hashtable table = new Hashtable (1000, 0.8f);
The default load factor (1.0) is fine for most applications, so chances are you’ll never need to change it.
Maximizing the uniqueness of hash values generated from input keys is also critical to a Hashtable’s performance. By default, Hashtable hashes an input key by calling the key’s GetHashCode method, which all objects inherit from System.Object. If you key values with instances of a class whose GetHashCode method does a poor job of generating unique hash values, do one of the following to optimize performance:
Override GetHashCode in a derived class and provide an implementation that produces unique hash values.
Create a type that implements IHashCodeProvider and pass a reference to an instance of that type to Hashtable’s constructor. Hashtable will respond by calling the object’s IHashCodeProvider.GetHashCode method to hash the input keys.
Many FCL data types, including strings, hash just fine and therefore work well as Hashtable keys right out of the box.
Hashtable calls a key’s Equals method—another method inherited from System.Object—to compare keys. If you use a custom data type as Hashtable keys and the Equals method your type inherits from System.Object doesn’t accurately gauge equality, either override Equals in the derived class or pass Hashtable’s constructor an IComparer interface whose Compare method is capable of comparing keys.
Resizable Arrays
The FCL’s System namespace contains a class named Array that models the behavior of static arrays. System.Collections.ArrayList encapsulates dynamic arrays—arrays that can be sized and resized as needed. ArrayLists are useful when you want to store data in an array but don’t know up front how many items you’ll be storing.
Creating an ArrayList and adding items to it is simplicity itself:
ArrayList list = new ArrayList ();
list.Add ("John");
list.Add ("Paul");
list.Add ("George");
list.Add ("Ringo");
Add adds an item to the end of the array and grows the array’s memory allocation if necessary to accommodate the new item. The related Insert method inserts an item into an ArrayList at a specified position and moves higher-numbered items upward in the array. Insert also grows the array if that’s necessary.
If you know approximately how many items you’ll be adding to an ArrayList, you should specify a count at creation time to minimize the number of resizing operations performed. The following code creates an ArrayList containing 100,000 integers:
ArrayList list = new ArrayList ();
for (int i=0; i<100000; i++)
    list.Add (i);
The next code sample does the same, but does it in half the time (10 milliseconds versus 20 milliseconds on the machine I tested it on):
ArrayList list = new ArrayList (100000);
for (int i=0; i<100000; i++)
    list.Add (i);
To retrieve an item from an ArrayList, use a 0-based index:
int i = (int) list[0];
And to assign a value to an existing array element, do this:
list[0] = 999;
The Count property reveals how many items an ArrayList contains. Consequently, one way to iterate through the items in an ArrayList is as follows:
for (int i=0; i<list.Count; i++)
    Console.WriteLine (list[i]);
You can also iterate with foreach:
foreach (int i in list)
    Console.WriteLine (i);
To remove items from an ArrayList, call Remove, RemoveAt, RemoveRange, or Clear. When items are removed, items with higher indexes are automatically shifted down to fill the void. If you delete the item at index 5, for example, the item at index 6 becomes the item at index 5, the item at index 7 becomes the item at index 6, and so on.
Instances of ArrayList automatically allocate memory to accommodate new items. They don’t automatically release that memory when items are removed. To downsize an ArrayList to fit exactly the number of items that it currently contains, call TrimToSize. The following example adds 1000 integers to an ArrayList, deletes the first 500, and then resizes the array to fit the remaining 500:
// Add items
ArrayList list = new ArrayList (1000);
for (int i=0; i<1000; i++)
    list.Add (i);

// Remove items
list.RemoveRange (0, 500);

// Resize the array
list.TrimToSize ();
The number of items that an ArrayList can hold without allocating additional memory is called its capacity. You can find out the capacity of an ArrayList from its Capacity property. Capacity is a get/set property, so you can use it to set the capacity as well as to read it. The ability to increase an ArrayList’s capacity on the fly comes in handy if you don’t know how many items the array will store when you create it, but you do know approximately how many it will store when you start adding items.
The WordCount Application
WordCount is a console application that provides statistics on word usage in text files. To use it, go to a command prompt and type the command name followed by a file name, as in the following:
wordcount readme.txt
The output consists of an alphabetically sorted list of words found in the file and the number of times that each word appears. WordCount uses a StreamReader, a Hashtable, and an ArrayList to do its work. For good measure, it also throws in a SortedList. Its source code appears in Example 13-3.
When executed, WordCount opens the input file and reads through it a line at a time with repeated calls to StreamReader.ReadLine. It extracts the words from each line by calling a local method named GetWords, and it uses each word returned by GetWords as a key in the Hashtable. If the key doesn’t exist—meaning the word hasn’t been encountered before—WordCount adds a 1 to the Hashtable and keys it with the word. If the key does exist—meaning the word has been encountered before—WordCount reads the associated integer value from the Hashtable, increments it by one, and writes it back using the same key. By the time WordCount reaches the end of the file, every word it encountered is represented as a key in the Hashtable, and the value associated with each key is a count of the number of times the word appears. Thus, the Hashtable’s purpose is twofold:
It provides a super-fast way to determine whether a word has been encountered before.
It provides a store for the word list and associated occurrence counts.
How do ArrayList and SortedList fit into the picture? When GetWords begins parsing a line of text, it has no idea how many words it will encounter. Because it can’t very well store the results in a static array, it uses a dynamic array—an ArrayList—instead. After parsing is complete, GetWords allocates a static array just large enough to hold the items in the ArrayList and copies the ArrayList to the static array with ArrayList.CopyTo. Then it returns the static array to the caller.
Method Main uses a SortedList object to sort the word list before writing it to the console window. One simple statement copies the Hashtable to the SortedList; a foreach loop extracts items from the SortedList and outputs them to the screen. Because the values used to key the items in the SortedList are strings, the simple act of inserting them into the SortedList sorts them alphabetically.
WordCount.cs
using System;
using System.IO;
using System.Collections;

class MyApp
{
    static void Main (string[] args)
    {
        // Make sure a file name was entered on the command line
        if (args.Length == 0) {
            Console.WriteLine ("Error: Missing file name");
            return;
        }

        StreamReader reader = null;
        Hashtable table = new Hashtable ();

        try {
            // Iterate through the file a word at a time, creating

            // an entry in the Hashtable for each unique word found
            // and incrementing the count for each word that’s
            // encountered again
            reader = new StreamReader (args[0]);

            for (string line = reader.ReadLine (); line != null;
                line = reader.ReadLine ()) {
                string[] words = GetWords (line);

                foreach (string word in words) {
                    string iword = word.ToLower ();
                    if (table.ContainsKey (iword))
                        table[iword] = (int) table[iword] + 1;
                    else
                        table[iword] = 1;
                }
            }

            // Sort the Hashtable entries using a SortedList
            SortedList list = new SortedList (table);

            // Display the results
            Console.WriteLine ("{0} unique words found in {1}",
                table.Count, args[0]);

            foreach (DictionaryEntry entry in list)
                Console.WriteLine ("{0} ({1})",
                    entry.Key, entry.Value);
        }
        catch (Exception e) {
            Console.WriteLine (e.Message);
        }
        finally {
            if (reader != null)
                reader.Close ();
        }
    }    static string[] GetWords (string line)
    {
        // Create an ArrayList to hold the intermediate results
        ArrayList al = new ArrayList ();

        // Parse the words from the line and add them to the ArrayList
        int i = 0;
        string word;
        char[] characters = line.ToCharArray ();

        while ((word = GetNextWord (line, characters, ref i)) != null)
            al.Add (word);

        // Return a static array that is equivalent to the ArrayList
        string[] words = new string[al.Count];
        al.CopyTo (words);
        return words;
    }

    static string GetNextWord (string line, char[] characters,
        ref int i)
    {
        // Find the beginning of the next word
        while (i < characters.Length &&
            !Char.IsLetterOrDigit (characters[i]))
            i++;

        if (i == characters.Length)
            return null;

        int start = i;

        // Find the end of the word
        while (i < characters.Length &&
            Char.IsLetterOrDigit (characters[i]))
            i++;

        // Return the word
        return line.Substring (start, i - start);
    }
}
Regular Expressions
One of the lesser known but potentially most useful classes in all of the .NET Framework class library is Regex, which belongs to the System.Text.RegularExpressions namespace. Regex represents regular expressions. Regular expressions are a language for parsing and manipulating text. (A full treatment of the language is beyond the scope of this book, but wonderful tutorials are available both in print and on line.) Regex supports three basic types of operations:
Splitting strings into substrings using regular expressions to identify separators
Searching strings for substrings that match patterns in regular expressions
Performing search-and-replace operations using regular expressions to identify the text you want to replace
One very practical use for regular expressions is to validate user input. It’s trivial, for example, to use a regular expression to verify that a string entered into a credit card field conforms to a pattern that’s consistent with credit card numbers—that is, digits possibly separated by hyphens. You’ll see an example of such usage in a moment.
Another common use for regular expressions is to do screen scraping. Say you want to write an app that displays stock prices gathered from a real-time (or near real-time) data source. One approach is to send an HTTP request to a Web site such as Nasdaq.com and “screen scrape” the prices from the HTML returned in the response. Regex simplifies the task of parsing HTML. The downside to screen scraping, of course, is that your app may cease to work if the format of the data changes. (I know because I once wrote an app that used screen scraping to fetch stock prices, and the day after I published it, my data source changed the HTML format of its Web pages.) But unless you can find a data source that provides the information you want as XML, screen scraping might be your only choice.
When you create a Regex object, you pass to the class constructor the regular expression to encapsulate:
Regex regex = new Regex ("[a-z]");In the language of regular expressions, “[a-z]” means any lowercase letter of the alphabet. You can also pass a second parameter specifying Regex options. For example, the statement
Regex regex = new Regex ("[a-z]", RegexOptions.IgnoreCase);creates a Regex object that matches any letter of the alphabet without regard to case. If the regular expression passed to the Regex constructor is invalid, Regex throws an ArgumentException.
Once a Regex object is initialized, you call methods on it to apply the regular expression to strings of text. The following sections describe how to put Regex to work in managed applications and offer examples regarding its use.
Splitting Strings
Regex.Split splits strings into constituent parts by using a regular expression to identify separators. Here’s an example that divides a path name into drive and directory names:
Regex regex = new Regex (@"\");
string[] parts = regex.Split (@"c:inetpubwwwrootwintellect");
foreach (string part in parts)
    Console.WriteLine (part);
And here’s the output:
c:
inetpub
wwwroot
wintellect
Notice the double backslash passed to Regex’s constructor. The @ preceding the string literal prevents you from having to escape the backslash for the compiler’s sake, but because the backslash is also an escape character in regular expressions, you have to escape a backslash with a backslash to form a valid regular expression.
The fact that Split identifies separators using full-blown regular expressions makes for some interesting possibilities. For example, suppose you wanted to extract the text from the following HTML by stripping out everything in angle brackets:
<b>Every</b>good<h3>boy</h3>does<b>fine</b>
Here’s the code to do it:
Regex regex = new Regex ("<[^>]*>");
string[] parts =
    regex.Split ("<b>Every</b>good<h3>boy</h3>does<b>fine</b>");
foreach (string part in parts)
    Console.WriteLine (part);
And here’s the output:
Every
good
boy
does
fine
The regular expression “<[^>]*>” means anything that begins with an opening angle bracket (“<”), followed by zero or more characters that are not closing angle brackets (“[^>]*”), followed by a closing angle bracket (“>”).
With Regex.Split to lend a hand, you could simplify this chapter’s WordCount utility considerably. Rather than having the GetWords method manually parse a line of text into words, you could rewrite GetWords to split the line using a regular expression that identifies sequences of one or more nonalphanumeric characters as separators. Then you could delete the GetNextWord method altogether.
Searching Strings
Perhaps the most common use for Regex is to search strings for substrings matching a specified pattern. Regex includes three methods for searching strings and identifying the matches: Match, Matches, and IsMatch.
The simplest of the three is IsMatch. It provides a simple yes or no answer revealing whether an input string contains a match for the text represented by a regular expression. Here’s a sample that checks an input string for HTML anchor tags (<a>):
Regex regex = new Regex ("<a[^>]*>", RegexOptions.IgnoreCase);
if (regex.IsMatch (input)) {
    // Input contains an anchor tag
}
else {
    // Input does NOT contain an anchor tag
}
Another use for IsMatch is to validate user input. The following method returns true if the input string contains 16 digits grouped into fours separated by hyphens, and false if it does not:
bool IsValid (string input)
{
    Regex regex = new Regex ("^[0-9]{4}-[0-9]{4}-[0-9]{4}-[0-9]{4}$");
    return regex.IsMatch (input);
}
Strings such as “1234-5678-8765-4321” pass the test just fine; strings such as “1234567887654321” and “1234-ABCD-8765-4321” do not. The ^ and $ characters denote the beginning and end of the line, respectively. Without these characters, strings such as “12345-5678-8765-4321” would pass, even though you didn’t intend for them to. Regular expressions such as this are often used to perform cursory validations on credit card numbers. If you’d like, you can replace “[0-9]” in a regular expression with “/d”. Thus, the expression
"^d{4}-d{4}-d{4}-d{4}$"is equivalent to the one above.
Example 3-4 contains the source code for a grep-like utility named NetGrep that uses IsMatch to parse a file for lines of text containing text matching a regular expression. Both the file name and the regular expression are entered on the command line. The following command lists all the lines in Index.html that contain anchor tags:
netgrep index.html "<a[^>]*>"
This command displays all lines in Readme.txt that contain numbers consisting of two or more digits:
netgrep readme.txt "d{2,}"In the source code listing, note the format specifier used in the WriteLine call. The “D5” in “{0:D5}” specifies that the line number should be formatted as a decimal value with a fixed field width of 5—for example, 00001.
NetGrep.cs
using System;
using System.IO;
using System.Text.RegularExpressions;
class MyApp
{
    static void Main (string[] args)
    {
        // Make sure a file name and regular expression were entered
        if (args.Length < 2) {
            Console.WriteLine ("Syntax: NETGREP filename expression");
            return;
        }

        StreamReader reader = null;
        int linenum = 1;

        try {
            // Initialize a Regex object with the regular expression
            // entered on the command line
            Regex regex = new Regex (args[1], RegexOptions.IgnoreCase);

            // Iterate through the file a line at a time and
            // display all lines that contain a pattern matching the
            // regular expression
            reader = new StreamReader (args[0]);
            for (string line = reader.ReadLine (); line != null;
                line = reader.ReadLine (), linenum++) {
                if (regex.IsMatch (line))
                    Console.WriteLine ("{0:D5}: {1}", linenum, line);
            }
        }
        catch (Exception e) {
            Console.WriteLine (e.Message);
        }
        finally {
            if (reader != null)
                reader.Close ();

        }
    }
}
IsMatch tells you whether a string contains text matching a regular expression, but it doesn’t tell you where in the string the match is located or how many matches there are. That’s what the Match method is for. The following example displays all the Hrefs in Index.html that are followed by URLs enclosed in quotation marks. The metacharacter “s” in a regular expression denotes whitespace; “s” followed by an asterisk (“s*”) means any number of consecutive whitespace characters:
Regex regex = new Regex ("href\s*=\s*"[^"]*"", RegexOptions.IgnoreCase);

StreamReader reader = new StreamReader ("Index.html");

for (string line = reader.ReadLine (); line != null;
    line = reader.ReadLine ()) {
    for (Match m = regex.Match (line); m.Success; m = m.NextMatch ())
        Console.WriteLine (m.Value);
}
The Match method returns a Match object indicating either that a match was found (Match.Success == true) or that no match was found (Match.Success == false). A Match object representing a successful match exposes the text that produced the match through its Value property. If Match.Success is true and the input string contains additional matches, you can iterate through the remaining matches with Match.NextMatch.
If the input string contains (or might contain) multiple matches and you want to enumerate them all, the Matches method offers a slightly more elegant way of doing it. The following example is functionally equivalent to the one above:
Regex regex = new Regex ("href\s*=\s*"[^"]*"", RegexOptions.IgnoreCase);

StreamReader reader = new StreamReader ("Index.html");

for (string line = reader.ReadLine (); line != null;
    line = reader.ReadLine ()) {
    MatchCollection matches = regex.Matches (line);
    foreach (Match match in matches)
        Console.WriteLine (match.Value);
}
Matches returns a collection of Match objects in a MatchCollection whose contents can be iterated over with foreach. Each Match represents one match in the input string.
Match objects have a property named Groups that permits substrings within a match to be identified. Let’s say you want to scan an HTML file for Hrefs, and for each Href that Regex finds, you want to extract the target of that Href—for example, the dotnet.html in href="dotnet.html.” You can do that by using parentheses to define a group in the regular expression and then use the Match object’s Groups collection to access the group. Here’s an example:
Regex regex = new Regex ("href\s*=\s*"([^"]*)"", RegexOptions.IgnoreCase);

StreamReader reader = new StreamReader ("Index.html");

for (string line = reader.ReadLine (); line != null;
    line = reader.ReadLine ()) {
    MatchCollection matches = regex.Matches (line);
    foreach (Match match in matches)
        Console.WriteLine (match.Groups[1]);
}
Notice the parentheses that now surround the part of the regular expression that corresponds to all characters between the quotation signs. That defines those characters as a group. In the Match object’s Groups collection, Groups[0] identifies the full text of the match and Groups[1] identifies the subset of the match in parentheses. Thus, if Index.html contains the following line:
<a href="help.html">Click here for help</a>
both Value and Groups[0] evaluate to the text
href="help.html"
Groups[1], however, evaluates to
help.html
Groups can even be nested, meaning that virtually any subset of the text identified by a regular expression (or subset of a subset) can be extracted following a successful match.
Replacing Strings
If you decide to embellish NetGrep with the capability to perform search-and-replace, you’ll love Regex.Replace, which replaces text matching the regular expression in the Regex object with text you pass as an input parameter. The following example replaces all occurrences of “Hello” with “Goodbye” in the string named input:
Regex regex = new Regex ("Hello");
string output = regex.Replace (input, "Goodbye");
The next example strips everything in angle brackets from the input string by replacing expressions in angle brackets with null strings:
Regex regex = new Regex ("<[^>]*>");
string output = regex.Replace (input, "");
A basic knowledge of regular expressions (and a helping hand from Regex) can go a long way when it comes to parsing and manipulating text in .NET Framework applications.
Internet Classes
The FCL’s System.Net namespace includes classes for performing Internet-related tasks such as submitting HTTP requests to Web servers and resolving names using the Domain Name System (DNS). The daughter namespace System.Net.Sockets contains classes for communicating with other machines using TCP/IP sockets. Together, these namespaces provide the foundation for the FCL’s Internet programming support. Other namespaces, such as System.Web and System.Web.Mail, contribute classes of their own to make the .NET Framework a first-rate tool for writing Internet-enabled applications.
Two of the most useful classes in the System.Net namespace are WebRequest and WebResponse, which are abstract base classes that serve as templates for object-oriented wrappers placed around HTTP and other Internet protocols. System.Net includes a pair of WebRequest/WebResponse derivatives named HttpWebRequest and HttpWebResponse that make it easy for managed applications to fetch Web pages and other resources available through HTTP. Learning about these classes is a great starting point for exploring the Internet programming support featured in the FCL.
HttpWebRequest and HttpWebResponse
HttpWebRequest and HttpWebResponse reduce the otherwise complex task of submitting HTTP requests to Web servers and capturing the responses to a few simple lines of code. To submit a request, use the WebRequest class’s static Create method to create a request and then call GetResponse on the resulting HttpWebRequest object:
WebRequest request = WebRequest.Create ("http://www.wintellect.com");
WebResponse response = request.GetResponse ();
GetResponse returns an HttpWebResponse object encapsulating the response. Calling GetResponseStream on HttpWebResponse returns a Stream object that you can wrap a reader around to read the response. The following code echoes the text of the response to a console window:
StreamReader reader = new StreamReader (response.GetResponseStream ());
for (string line = reader.ReadLine (); line != null;
    line = reader.ReadLine ())
    Console.WriteLine (line);
reader.Close ();
It’s that simple. HttpWebRequest also contains methods named BeginGetResponse and EndGetResponse that you can use to submit asynchronous Web requests, which might be useful if you don’t want to wait around for large amounts of data to come back through a slow dial-up connection.
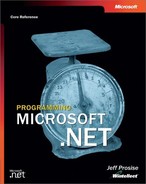
The LinkList application in Example 3-5 uses the WebRequest, WebResponse, and Regex classses to list a Web page’s hyperlinks. Its input is the URL of a Web page; its output is a list of all the URLs accompanying Hrefs in the Web page. Fetching the Web page is easy thanks to WebRequest.GetResponse. Regex.Match simplifies the task of parsing the Hrefs out of the response. To see LinkList in action, as shown in Figure 3-6, compile it and type linklist followed by a URL at the command prompt:
linklist http://www.wintellect.com
LinkList also demonstrates that StreamReader objects can read from any kind of stream, not just file streams. Specifically, it uses a StreamReader to read the contents of the stream returned by WebResponse’s GetResponseStream method. This is abstraction at its finest and is the primary reason that the FCL’s architects decided to use readers and writers to abstract access to streams.
LinkList.cs
using System;
using System.IO;
using System.Net;
using System.Text.RegularExpressions;

class MyApp
{
    static void Main (string[] args)
    {
        if (args.Length == 0) {
            Console.WriteLine ("Error: Missing URL");
            return;
        }

        StreamReader reader = null;

        try {
            WebRequest request = WebRequest.Create (args[0]);
            WebResponse response = request.GetResponse ();
            reader = new StreamReader (response.GetResponseStream ());
            string content = reader.ReadToEnd ();

            Regex regex = new Regex ("href\s*=\s*"([^"]*)"",
                RegexOptions.IgnoreCase);

            MatchCollection matches = regex.Matches (content);
            foreach (Match match in matches)
                Console.WriteLine (match.Groups[1]);
        }
        catch (Exception e) {
            Console.WriteLine (e.Message);
        }
        finally {
            if (reader != null)
                reader.Close ();
        }
    }
}
The System.Web.Mail Namespace
Want to send e-mail from a .NET Framework application? You could do it the hard way by using sockets to establish a connection to a mail server and then transmit a mail message using Simple Mail Transfer Protocol (SMTP). Or you could do it the easy way and rely on classes in the System.Web.Mail namespace. System.Web.Mail provides a simple managed interface to SMTP. The core classes are MailMessage, which represents e-mail messages; MailAttachment, which represents attachments; and SmtpMail, which places a friendly wrapper around the host system’s SMTP mail service.
Here’s how easy it is to send e-mail from a managed application:
using System.Web.Mail;
  .
  .
  .
MailMessage message = new MailMessage ();
message.From = "[email protected]";
message.To = "[email protected]";
message.Subject = "Scheduled Power Outage";
message.Body = "Our servers will be down tonight";
SmtpMail.SmtpServer = "localhost";
SmtpMail.Send (message);
Having the capability to send e-mail programmatically can come in handy in countless ways. For example, you might want to send e-mail confirmations to customers who purchase merchandise from your Web site, or you might write your own software to transmit electronic newsletters to clients. Whatever your motivation, it doesn’t get much easier than this.
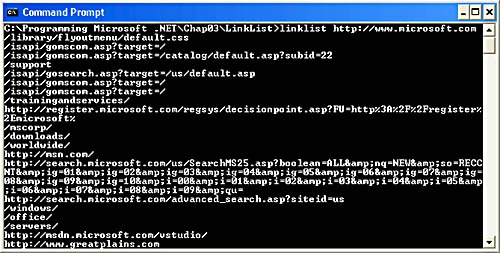
Example 13-7 contains the source code for a simple e-mail client named SendMail, built around the MailMessage and SmtpMail classes. To spice things up just a bit, and to serve as a preview of things to come, SendMail isn’t a console application—it’s a Web application. Specifically, it’s an ASP.NET Web form. (See Example 13-8.) Clicking the Send Mail button activates the OnSend method, which composes an e-mail message from the user’s input and sends it to the recipient. To run the application, copy SendMail.aspx to the Inetpubwwwroot directory of a PC that has ASP.NET and Internet Information Services installed on it. Then open a browser and type http://localhost/sendmail.aspx in the address bar. Once the Web form appears, fill in the fields and click the Send Mail button to send an e-mail message.
Some machines require a bit of reconfiguring to allow ASP.NET applications to send mail. If SendMail.aspx throws an exception when you click the Send Mail button, here’s what to do. First make sure your machine’s SMTP service is running. You can do that in the IIS configuration manager or in the Services Control Panel applet. Second, make sure the SMTP service is configured to allow relaying from localhost. To do that, open the IIS configuration manager (you’ll find it in Administrative Tools), right-click Default SMTP Virtual Server, select Properties, click the Access tab, click the Relay button, select Only The List Below, and use the Add button to add 127.0.0.1 to the list of computers allowed to relay.
SendMail.aspx
<%@ Import Namespace="System.Web.Mail" %>

<html>
  <body>
    <h1>Simple SMTP E-Mail Client</h1>
    <form runat="server">
      <hr>
      <table cellspacing="8">
        <tr>
          <td align="right" valign="bottom">From:</td>
          <td><asp:TextBox ID="Sender" RunAt="server" /></td>
        </tr>
        <tr>
          <td align="right" valign="bottom">To:</td>
          <td><asp:TextBox ID="Receiver" RunAt="server" /></td>
        </tr>
        <tr>
          <td align="right" valign="bottom">Subject:</td>
          <td><asp:TextBox ID="Subject" RunAt="server" /></td>
        </tr>
        <tr>
          <td align="right" valign="top">Message:</td>
          <td><asp:TextBox ID="Body" TextMode="MultiLine" Rows="5"
            Columns="40" RunAt="server" /></td>
        </tr>
      </table>
      <hr>
      <asp:Button Text="Send Mail" OnClick="OnSend" RunAt="server" />
    </form>
  </body>
</html>

<script language="C#" runat="server">
  void OnSend (Object sender, EventArgs e)
  {
      MailMessage message = new MailMessage ();
      message.From = Sender.Text;
      message.To = Receiver.Text;
      message.Subject = Subject.Text;
      message.Body = Body.Text;
      SmtpMail.SmtpServer = "localhost";
      SmtpMail.Send (message);
  }
</script>
Data Access
In recent years, Microsoft has promoted an alphabet soup of database access technologies. First was ODBC. Then came DAO, RDO, ADO, and OLE DB, to name just a few. The .NET Framework has its own database API called ADO.NET. The bad news is that despite its name, ADO.NET has little in common with ADO. The good news is that learning the basics of ADO.NET requires all of about 15 minutes.
The classes that make up ADO.NET are found in the System.Data namespace and its descendants. Some ADO.NET classes, such as DataSet, are generic and work with virtually any kind of database. Others, such as DataReader, come in two distinctly different flavors: one for Microsoft SQL Server databases (SqlDataReader) and one for all others (OleDbDataReader). Sql classes belong to the System.Data.SqlClient namespace. They use a managed provider (that is, a database access layer that consists solely of managed code) that’s optimized to work with Microsoft SQL Server databases. Significantly, Sql classes work only with SQL Server. OleDb classes, on the other hand, can be used with any database for which an OLE DB provider that is compatible with the .NET Framework is available. They tend to be somewhat slower than Sql classes because they’re not optimized for any particular database and because they rely on a combination of managed and unmanaged code, but they’re also more generic, enabling you to switch databases without having to rewrite your application. OleDb classes are defined in the System.Data.OleDb namespace.
ADO.NET is covered in detail in Chapter 12. The next several sections of this chapter offer an introductory look at ADO.NET, which will help you understand some of the data-aware sample programs presented in intervening chapters. For readers accustomed to working with traditional database APIs, the sections that follow also provide an educational first look at data access in the era of .NET.
DataReaders
One of the most common tasks that data-aware applications are asked to perform involves executing a query and outputting the results. For managed applications, the DataReader class is the perfect tool for the job. DataReader objects expose the results of database queries as fast, forward-only, read-only streams of data. DataReaders come in two flavors: SqlDataReader for SQL Server databases and OleDbDataReader for other types of databases. The following example uses SqlDataReader to query the Pubs database that comes with Microsoft SQL Server for all the records in the “Titles” table. It then writes the “Title” field of each record to a console window:
SqlConnection connection =
    new SqlConnection ("server=localhost;uid=sa;pwd=;database=pubs");
connection.Open ();
SqlCommand command =
    new SqlCommand ("select * from titles", connection);
SqlDataReader reader = command.ExecuteReader ();
while (reader.Read ())
    Console.WriteLine (reader.GetString (1));
connection.Close ();
The SqlConnection object represents the database connection. Open opens a connection, and Close closes it. SqlCommand encapsulates the query used to extract records from the database. Calling ExecuteReader on the SqlCommand object executes the command and returns a SqlDataReader object. Reading the records returned by the query is as simple as calling SqlDataReader.Read repeatedly until it returns null.
I purposely didn’t include exception handling code in this sample to keep the code as simple and uncluttered as possible. In the real world, you’ll want to use try/catch/finally to recover gracefully from errors and to ensure that the database connection is closed even in the face of inopportune exceptions:
SqlConnection connection =
    new SqlConnection ("server=localhost;uid=sa;pwd=;database=pubs");

try {
    connection.Open ();
    SqlCommand command =
        new SqlCommand ("select * from titles", connection);
    SqlDataReader reader = command.ExecuteReader ();
    while (reader.Read ())
        Console.WriteLine (reader.GetString (1));
}
catch (SqlException e) {
    Console.WriteLine (e.Message);
}
finally {
    connection.Close ();
}
Tailoring this code to work with databases other than Microsoft SQL Server is a simple matter of changing the Sql classes to OleDb classes and modifying the connection string accordingly.
Inserts, Updates, and Deletes
A Command object’s ExecuteReader method executes a query and returns a DataReader encapsulating the results. The complementary ExecuteNonQuery method performs inserts, updates, and deletes. The following code uses a SQL INSERT command to add a record to SQL Server’s Pubs database:
SqlConnection connection =
    new SqlConnection ("server=localhost;uid=sa;pwd=;database=pubs");

try {
    connection.Open ();
    string sqlcmd =
        "insert into titles (title_id, title, type, pub_id, " +
        "price, advance, royalty, ytd_sales, notes, pubdate) " +
        "values (‘BU1001’, ’Programming Microsoft.NET’, " +
        "‘Business’, ’1389’, NULL, NULL, NULL, NULL, " +
        "‘Learn to program Microsoft.NET’, ’Jan 01 2002’)";
    SqlCommand command = new SqlCommand (sqlcmd, connection);
    command.ExecuteNonQuery ();
}
catch (SqlException e) {
    Console.WriteLine (e.Message);
}
finally {
    connection.Close ();
}
To update or delete a record (or set of records), you simply replace the INSERT command with an UPDATE or DELETE command. Of course, there are other ways to add, modify, and remove records. The full range of options is discussed in Chapter 12.
DataSets and DataAdapters
DataSet, which belongs to the System.Data namespace, is the centerpiece of ADO.NET. A DataSet is an in-memory database capable of holding multiple tables and even of modeling constraints and relationships. Used in combination with SqlDataAdapter and OleDbDataAdapter, DataSet can handle virtually all the needs of modern-day data access applications and is frequently used in lieu of DataReader to facilitate random read/write access to back-end databases.
The following code fragment uses SqlDataAdapter and DataSet to query a database and display the results. It’s functionally equivalent to the SqlDataReader example presented earlier:
SqlDataAdapter adapter = new SqlDataAdapter (
    "select * from titles",
    "server=localhost;uid=sa;pwd=;database=pubs"
);

DataSet ds = new DataSet ();
adapter.Fill (ds);

foreach (DataRow row in ds.Tables[0].Rows)
    Console.WriteLine (row[1]);
SqlDataAdapter serves as a liaison between DataSet objects and physical data sources. In this example it executes a query, but it’s capable of performing inserts, updates, and deletes, too. For details, see—you guessed it—Chapter 12.
Reflection
You already know that managed applications are deployed as assemblies, that assemblies contain files that are usually (but not always) managed modules, and that managed modules contain types. You also know that every managed module has metadata inside it that fully describes the types defined in the module, and that assemblies carry additional metadata in their manifests identifying the files that make up the assembly and other pertinent information. And you’ve seen how ILDASM can be used to inspect the contents of an assembly or managed module. Much of the information that ILDASM displays comes straight from the metadata.
The System.Reflection namespace contains types that you can use to access metadata without having to understand the binary metadata format. The term “reflection” means inspecting metadata to get information about an assembly, module, or type. The .NET Framework uses reflection to acquire important information at run time about the assemblies that it loads. Visual Studio .NET uses reflection to obtain IntelliSense data. The managed applications that you write can use reflection, too. Reflection makes the following operations possible:
Retrieving information about assemblies and modules and the types they contain
Reading information added to a compiled executable’s metadata by custom attributes
Performing late binding by dynamically instantiating and invoking methods on types
Not every managed application uses reflection or has a need to use reflection, but reflection is something every developer should know about, for two reasons. First, learning about reflection deepens one’s understanding of the .NET Framework. Second, reflection can be extraordinarily useful to certain types of applications. While far from exhaustive, the next few sections provide a working introduction to reflection and should at least enable you to hold your own when the conversation turns to reflection at a .NET party.
Retrieving Information About Assemblies, Modules, and Types
One use for reflection is to gather information at run time about assemblies, managed modules, and the types that assemblies and modules contain. The key classes that expose the functionality of the framework’s reflection engine are
System.Reflection.Assembly, which represents assemblies
System.Reflection.Module, which represents managed modules
System.Type, which represents types
The first step in acquiring information from an assembly’s metadata is to load the assembly. The following statement uses the static Assembly.LoadFrom method to load the assembly whose manifest is stored in Math.dll:
Assembly a = Assembly.LoadFrom ("Math.dll");LoadFrom returns a reference to an Assembly object representing the loaded assembly. A related method named Load takes an assembly name rather than a file name as input. Once an assembly is loaded, you can use Assembly methods to retrieve all sorts of interesting information about it. For example, the GetModules method returns an array of Module objects representing the modules in the assembly. GetExportedTypes returns an array of Type objects representing the types exported from the assembly (in other words, the assembly’s public types). GetReferencedAssemblies returns an array of AssemblyName objects identifying assemblies used by this assembly. And the GetName method returns an AssemblyName object that serves as a gateway to still more information encoded in the assembly manifest.
Example 3-9 contains the source code listing for a console application named AsmInfo that, given the name of a file containing an assembly manifest, uses reflection to display information about the assembly. Included in the output is information indicating whether the assembly is strongly or weakly named, the assembly’s version number, the managed modules that it consists of, the types exported from the assembly, and other assemblies containing types that this assembly references. When run on the weakly named version of the Math assembly (Math.dll) presented in Chapter 2, AsmInfo produces the following output:
Naming: Weak
Version: 0.0.0.0

Modules
  math.dll
  simple.netmodule
  complex.netmodule

Exported Types
  SimpleMath
  ComplexMath

Referenced Assemblies
  mscorlib
  Microsoft.VisualBasic
You can plainly see the two types exported from the Math assembly (SimpleMath and ComplexMath) and the modules that make up the assembly (Math.dll, Simple.netmodule, and Complex.netmodule). Mscorlib appears in the list of referenced assemblies because it contains the core data types used by virtually all managed applications. Microsoft.VisualBasic shows up also because one of the modules in the assembly, Simple.netmodule, was written in Visual Basic .NET.
AsmInfo.cs
using System;
using System.Reflection;

class MyApp
{
    static void Main (string[] args)
    {
        if (args.Length == 0) {
            Console.WriteLine ("Error: Missing file name");
            return;
        }

        try {
            // Load the assembly identified on the command line
            Assembly a = Assembly.LoadFrom (args[0]);
            AssemblyName an = a.GetName ();

            // Indicate whether the assembly is strongly or
            // weakly named
            byte[] bytes = an.GetPublicKeyToken ();
            if (bytes == null)
                Console.WriteLine ("Naming: Weak");
            else
                Console.WriteLine ("Naming: Strong");

            // Display the assembly’s version number
            Version ver = an.Version;
            Console.WriteLine ("Version: {0}.{1}.{2}.{3}",
                ver.Major, ver.Minor, ver.Build, ver.Revision);

            // List the modules that make up the assembly
            Console.WriteLine ("
Modules");
            Module[] modules = a.GetModules ();
            foreach (Module module in modules)
                Console.WriteLine ("  " + module.Name);

            // List the types exported from the assembly
            Console.WriteLine ("
Exported Types");
            Type[] types = a.GetExportedTypes ();
            foreach (Type type in types)
                Console.WriteLine ("  " + type.Name);

            // List assemblies referenced by the assembly
            Console.WriteLine ("
Referenced Assemblies");
            AssemblyName[] names = a.GetReferencedAssemblies ();
            foreach (AssemblyName name in names)
                Console.WriteLine ("  " + name.Name);
        }
        catch (Exception e) {
            Console.WriteLine (e.Message);
        }
    }
}
If you’d like to know even more about an assembly—specifically, about the modules that it contains—you can use the Module objects returned by Assembly.GetModules. Calling GetTypes on a Module object retrieves a list of types defined in the module—all types, not just exported types. The following code sample writes the names of all the types defined in module to a console window:
Type[] types = module.GetTypes ();
foreach (Type type in types)
    Console.WriteLine (type.FullName);
To learn even more about a given type, you can call GetMembers on a Type object returned by GetTypes. GetMembers returns an array of MemberInfo objects representing the type’s individual members. MemberInfo.MemberType tells you what kind of member a MemberInfo object represents. MemberTypes.Field, for example, identifies the member as a field, while MemberTypes.Method identifies it as a method. A MemberInfo object’s Name property exposes the member’s name. Using these and other Type members, you can drill down as deeply as you want to into a type, even identifying the parameters passed to individual methods (and the methods’ return types) if you care to.
Using reflection to inspect the contents of managed executables is probably only interesting if you plan to write diagnostic utilities. But the fact that reflection exists at all leads to some other interesting possibilities, one of which is discussed in the next section.
Custom Attributes
One of the ground-breaking new language features supported by CLR-compliant compilers is the attribute. Attributes are a declarative means for adding information to metadata. For example, if you attribute a method this way and compile it without a “DEBUG” symbol defined, the compiler emits a token into the module’s metadata noting that DoValidityCheck can’t be called:
[Conditional ("DEBUG")]
public DoValidityCheck ()
{
  ...
}
If you later compile a module that calls DoValidityCheck, the compiler reads the metadata, sees that DoValidityCheck can’t be called, and ignores statements that call it.
Attributes are instances of classes derived from System.Attribute. The FCL defines several attribute classes, including System.Diagnostics.ConditionalAttribute, which defines the behavior of the Conditional attribute. You can write attributes of your own by deriving from Attribute. The canonical example of a custom attribute is a CodeRevision attribute for documenting source code revisions. Revisions noted with source code comments—a traditional method for documenting code revisions—appear only in the source code. Revisions noted with attributes, however, are written into the compiled executable’s metadata and can be retrieved through reflection.
Here’s the source code for a custom attribute named CodeRevisionAttribute:
[AttributeUsage (AttributeTargets.All, AllowMultiple=true)]
class CodeRevisionAttribute : Attribute
{
    public string Author;
    public string Date;
    public string Comment;

    public CodeRevisionAttribute (string Author, string Date)
    {
        this.Author = Author;
        this.Date = Date;
    }

}
The first statement, AttributeUsage, is itself an attribute. The first parameter passed to it, AttributeTargets.All, indicates that CodeRevisionAttribute can be applied to any element of the source code—to classes, methods, fields, and so on. The second parameter permits multiple CodeRevisionAttributes to be applied to a single element. The remainder of the code is a rather ordinary class declaration. The class constructor defines CodeRevisionAttribute’s required parameters. Public fields and properties in an attribute class can be used as optional parameters. Because CodeRevisionAttribute defines a public field named Comment, for example, you can include a comment string in a code revision attribute simply by prefacing the string with “Comment=.”
Here’s an example demonstrating how CodeRevisionAttribute might be used:
[CodeRevision ("billg", "07-19-2001")]
[CodeRevision ("steveb", "09-30-2001", Comment="Fixed Bill’s bugs")]
struct Point
{
    public int x;
    public int y;
    public int z;
}
Get the picture? You can attribute any element of your source code by simply declaring a CodeRevisionAttribute in square brackets. You don’t have to include the word Attribute in the attribute name because the compiler is smart enough to do it for you.
Reflection is important to developers who write (or use) custom attributes because it is through reflection that an application reads information added to its (or someone else’s) metadata via custom attributes. The following code sample enumerates the code revision attributes attached to type Point and writes them to the console window. Enumeration is made possible by MemberInfo.GetCustomAttributes, which reads the custom attributes associated with any element that can be identified with a MemberInfo object:
MemberInfo info = typeof (Point);
object[] attributes = info.GetCustomAttributes (false);

if (attributes.Length > 0) {
    Console.WriteLine ("Code revisions for Point struct");
    foreach (CodeRevisionAttribute attribute in attributes) {
        Console.WriteLine ("
Author: {0}", attribute.Author);
        Console.WriteLine ("Date: {0}", attribute.Date);
        if (attribute.Comment != null)
            Console.WriteLine ("Comment: {0}", attribute.Comment);
    }
}
And here’s the output when this code is run against the Point struct shown above:
Code revisions for Point struct

Author: billg
Date: 07-19-2001

Author: steveb
Date: 09-30-2001
Comment: Fixed Bill’s bugs
Writing a reporting utility that lists all the code revisions in a compiled executable wouldn’t be difficult because types and type members are easily enumerated using the reflection techniques described in the previous section.
Dynamically Loading Types (Late Binding)
A final use for reflection is to dynamically load types and invoke methods on them. “Dynamic loading” means binding to a type at run time rather than compile time. Let’s say your source code references a type in another assembly, like this:
Rectangle rect = new Rectangle ();
Here you’re practicing early binding because your compiler inserts data into the resulting executable, noting that a type named Rectangle is imported from another assembly. Late binding gives you the ability to use a type without embedding references to it in your metadata. Late binding is accomplished by using reflection.
One use for late binding is to facilitate plug-ins. Suppose you want to enable third-party developers to extend your application by contributing images to the splash screen your app displays when it starts up. Because you don’t know in advance what plug-ins might be present at startup, you can’t early bind to classes in the plug-ins. But you can late bind to them. If you instruct third-party developers to build classes named PlugIn, and if each PlugIn class contains a method named GetImage that returns an image to the caller, the following code calls GetImage on each plug-in represented in the list of assembly names in the names array:
ArrayList images = new ArrayList ();

foreach (string name in names) {
    Assembly a = Assembly.Load (name);
    Type type = a.GetType ("PlugIn");
    MethodInfo method = type.GetMethod ("GetImage");
    Object obj = Activator.CreateInstance (type);
    Image image = (Image) method.Invoke (obj, null);
    images.Add (image);
}
At the end, the ArrayList named images holds an array of Image objects representing the images obtained from the plug-ins.
Visual Basic .NET uses late binding to interact with variables whose declared type is Object. Late binding is an important part of the .NET Framework architecture and something you should be aware of even if you don’t use it.
The FCL in Review
That does it for a whirlwind tour of the .NET Framework class library. The FCL is a vast resource that’s far richer and more comprehensive in scope than the Windows API, MFC, or any other API or class library that Microsoft has ever devised. It’s the API for managed applications. We’ve barely scratched the surface in this chapter, but there’s much more still to come.
Up to now, all the applications presented in this book save one—SendMail—have been console applications. Console applications are just one of five application types that the FCL supports. Now that you’re no longer a stranger to the .NET Framework, it’s time to branch out and learn how to build other types of applications. Phase 2 of your journey begins in Chapter 4, which introduces the programming model used to write GUI applications for the .NET Framework.