Chapter 6
Doing Python with Class
IN THIS CHAPTER
![]() Understanding classes and objects
Understanding classes and objects
![]() Learning how to create a class
Learning how to create a class
![]() Initializing an object in a class
Initializing an object in a class
![]() Populating an object’s attributes
Populating an object’s attributes
![]() Discovering how to give a class methods
Discovering how to give a class methods
![]() Checking out class inheritance
Checking out class inheritance
In the preceding chapter, we talk about functions, which allow you to compartmentalize chunks of code that do specific tasks. In this chapter, you learn about classes, which allow you to compartmentalize code and data. You discover all the wonder, majesty, and beauty of classes and objects (okay, maybe we're overselling things a little there). But classes have become a defining characteristic of modern object-oriented programming languages such as Python.
We’re aware we threw a whole lot of techno jargon your way in previous chapters. Don’t worry. For the rest of this chapter we start off assuming that — like 99.9 percent of people in this world — you don’t know a class from an object from a pastrami sandwich.
Mastering Classes and Objects
As you may know, Python is an object-oriented programming language. The concept of object-oriented programming (OOP) has been a major buzzword in the computer world for at least a couple decades. The term object stems from the fact that the model resembles objects in the real word in that each object is a thing that has certain attributes and characteristics that make it unique. For example, a chair is an object. Lots of different chairs exist that differ in size, shape, color, and material. But they’re all still chairs.
How about cars? We all recognize a car when we see one. (Well, usually.) Even though cars aren’t all exactly the same, they all have certain attributes (year, make, model, color) that make each unique. They have certain methods in common, where a method is an action or a thing the car can do. For example, cars all have go, stop, and turn actions that you control in pretty much the same way.
Figure 6-1 shows the concept where all cars (although not identical) have certain attributes and methods in common. In this case, you can think of the class Car as being a factory that creates all cars. After each car is created, it is an independent object. Changing one car has no effect on the other cars or the Car class.
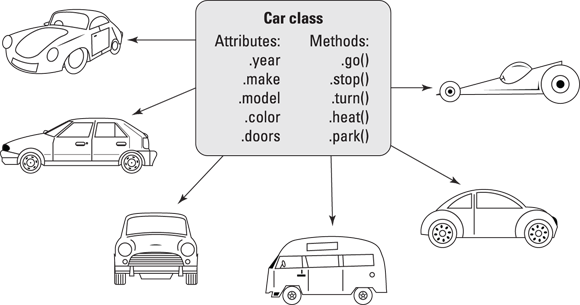
FIGURE 6-1: Different car objects.
If the factory idea doesn't work for you, think of a class as a type of blueprint. For instance, consider dogs. No, there's no physical blueprint for creating dogs, but there's dog DNA that does pretty much the same thing. The dog DNA can be considered a type of blueprint (like a Python class) from which all dogs are created. Dogs vary in attributes such as breed, color, and size, but they share certain behaviors (methods) such as eat and sleep. Figure 6-2 shows an example of a class of animal called Dog from which all dogs originate.
Even people can be viewed as objects in this manner. For example, perhaps you have a club and want to keep track of its members. Each member is a person, of course. But in code you can create a Member class to store information about each member. Each member would have certain attributes — username, full name, and so forth. You could also have methods such as .archive() to deactivate an account and .restore() to reactivate an account. The .archive() and .restore() methods are behaviors that let you control membership, in much the same way the accelerator, brake, and steering wheel allow you to control a car. Figure 6-3 shows the concept.
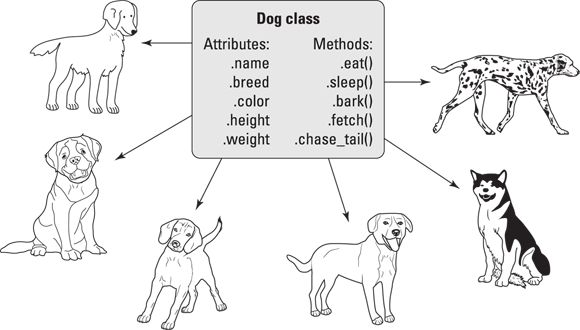
FIGURE 6-2: The Dog class creates many unique dogs.
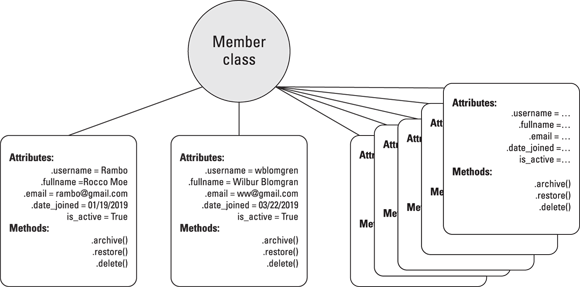
FIGURE 6-3: The Member class and member instances.
The main point is that each instance of a class is an independent object with which you can work. Changing one instance of a class has no effect on the class or on other instances, just as painting one car a different color has no effect on the car factory or on any other cars produced by that factory.
So, going back to initial concepts, all this business of classes and instances stems from a type of programming called object-oriented programming (OOP for short). Python, like any significant, serious, modern programming language, is object-oriented. The main buzzwords you need to get comfortable with are the ones we’ve harped on in the last few paragraphs:
- Class: A piece of code from which you can generate a unique object, where each object is a single instance of the class. Think of a class as a blueprint or factory from which you can create individual objects.
- Instance: One unit of data plus code generated from a class as an instance of that class. Each instance of a class is also called an object just like all the different cars are objects, all created by some car factory (class).
- Attribute: A characteristic of an object that contains information about the object. Also called a property of the object. An attribute name is preceded by a dot, as in
member.usernamewhich may contain the username for one site member. - Method: A Python function associated with the class. A method defines an action that an object can perform. You call a method by preceding the method name with a dot and following it with a pair of parentheses. For example
member.archive()might be a method that archives (deactivates) the member's account.
Creating a Class
You create your own classes like you create your own functions. You are free to name the class whatever you want, so long as it’s a legitimate name that starts with a letter or underscore and contains no spaces or punctuation. It’s customary to start a class name with an uppercase letter to help distinguish classes from variables. To get started, all you need is the word class followed by a space, a class name of your choosing, and a colon. For example, to create a new class named Member, use class Member:.
To make your code more descriptive, feel free to put a comment above the class definition. You can also put a docstring below the class line, which will show up whenever you type the class name in VS Code. For example, to add comments for your new Member class, you might type up the code like this:
# Define a new class name Member.
class Member:
    """ Create a new member. """
That's it for defining a new class. However, it isn’t useful until you specify what attributes you want each object that you create from this class to inherit from the class.
Creating an Instance from a Class
To grant to your class the capability to create instances (objects) for you, you give the class an init method. The word init is short for initialize. As a method, it's really just a function defined inside a class. But it must have the specific name __init__ (that's two underscores followed by init followed by two more underscores).
 That
That __init__ is sometimes spoken as “dunder init.” The dunder part is short for double underline.
The syntax for creating an init method is
def __init__(self[, suppliedprop1, suppliedprop2, …])
The def is short for define, and __init__ is the name of the built-in Python method that's capable of creating objects from within a class. The self part is just a variable name and is used to refer to the object being created at the moment. You can use the name of your own choosing instead of self. But self would be considered by most a best practice because it's explanatory and customary.
This business of classes is easier to learn and understand if you start simply. So, for a working example, you'll create a class named Member, into which you'll pass a username (uname) and full name (fname) whenever you want to create a member. As always, you can precede the code with a comment. You can also put a docstring (in triple quotation marks) under the first line both as a comment but also as an IntelliSense reminder when typing code in VS Code:
# Define a class named Member for making member objects.
class Member:
    """ Create a member from uname and fname """
    def __init__(self, uname, fname):
When the def __init__ line executes, you have an empty object named self inside the class. The uname and fname parameters hold whatever data you pass in; you see how that works in a moment.
An empty object with no data doesn’t do you much good. What makes an object useful is its attributes: the information it contains that’s unique to that object. So, in your class, the next step is to assign a value to each of the object’s attributes.
Giving an Object Its Attributes
Now that you have a new, empty Member object, you can start giving it attributes and populate (store values in) those attributes. For example, let’s say you want each member to have a .username attribute that contains the user's user name (perhaps for logging in). You have a second attribute named fullname, which is the member’s full name. To define and populate those attributes, use the following:
self.username = uname
self.fullname = fname
The first line creates an attribute named username for the new instance (self) and puts into it whatever was passed into the uname attribute when the class was called. The second line creates an attribute named fullname for the new self object, and puts into it whatever was passed in as the fname variable. Add some comments and the entire class looks like this:
# Define a new class named Member.
class Member:
    """ Create a new member. """
    def __init__(self, uname, fname):
        # Define attributes and give them values.
        self.username = uname
        self.fullname = fname
Do you see what's happening? The __init__ line creates a new empty object named self. Next, the self.username = uname line adds an attribute named username to the empty object, and puts into that attribute whatever was passed in as uname. Then the self.fullname = fname line does the same thing for the fullname attribute and the fname value that was passed in.
 The convention for naming things in classes suggests using an initial cap for the class name. Attributes, however, should follow the standard for variables, which is all lowercase with an underscore to separate words within the name.
Creating an instance from a class
When you've created the class, you can create instances (objects) from it using this simple syntax:
this_instance_name = Member('uname', 'fname')
Replace this_instance_name with a name of your own choosing (in much the same way you may name a dog, who is an instance of the Dog class). Replace uname and fname with the username and full name you want to put into the object that will be created. Make sure you don't indent that code; otherwise, Python will think that new code still belongs to the class’s code. It doesn’t. It’s new code to test the class.
So, for the sake of example, let’s say you want to create a member named new_guy with the username Rambo and the full name Rocco Moe. Here's the code for that:
new_guy = Member('Rambo', 'Rocco Moe')
If you run this code and don’t get any error messages, you know it at least ran. But to make sure, you can print the object or its attributes. To see what’s really in the new_guy instance of Members, you can print it as a whole. You can also print just its attributes, new_guy.username and new_guy.fullname. You can also print type(new_guy) to ask Python what type new_guy is. This code does it all:
print(new_guy)
print(new_guy.username)
print(new_guy.fullname)
print(type(new_guy))
Figure 6-4 shows the code and the result of running it in a Jupyter cell.
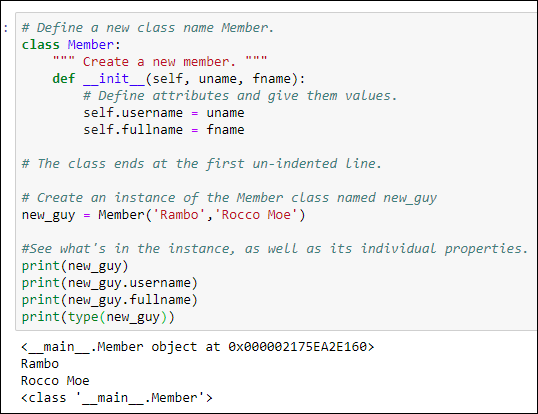
FIGURE 6-4: Creating a member from the Member class in a Jupyter cell.
In the figure, you can see that the first line of output is
<__main__.Member object at 0x000002175EA2E160>
This output tells you that new_guy is an object created from the Member class. The number at the end is its location in memory. Don't worry about that; you won’t need to know about memory locations right now.
The next three lines of output are
Rambo
Rocco Moe
<class '__main__.Member'>
The first line is the username of new_guy (new_guy.username), and the second line is the full name of new_guy (new_guy.fullname). The last line is the type and tells you that new_guy is an instance of the Member class.
 Much as we hate to put any more burden on your brain cells right now, the words object and property are synonymous with instance and attribute. The
 new_guy instance of the Member class can also be called an object, and the fullname and username attributes of new_guy can also be called properties of that object.
Admittedly, it can be difficult to wrap your head around all these concepts, but just remember that an object is simply a handy way to encapsulate information about an item that’s similar to other items (like all dogs are dogs and all cars are cars). What makes the item unique is its attributes, which won’t necessarily be the same as the attributes of other objects of the same type, in much the same way that not all dogs are the same breed and not all cars are the same color.
We intentionally used uname and fname as parameter names to distinguish them from the attribute names username and fullname. However, this isn't a requirement. In fact, if anything, people tend to use the same names for the parameters as they do for the attributes.
Instead of uname for the parameter name, you can use username (even though it's the same as the attribute name). Likewise, you can use fullname in place of fname. Doing so won't alter how the class behaves. You just have to remember that the same name is being used in two different ways, first as a placeholder for data being passed into the class, and then later as an attribute name that gets its value from that passed-in value.
Figure 6-5 shows the same code as Figure 6-4 with uname replaced with username and fname replaced with fullname. Running the code produces the same output as before; using the same name for two different things didn't bother Python one bit.
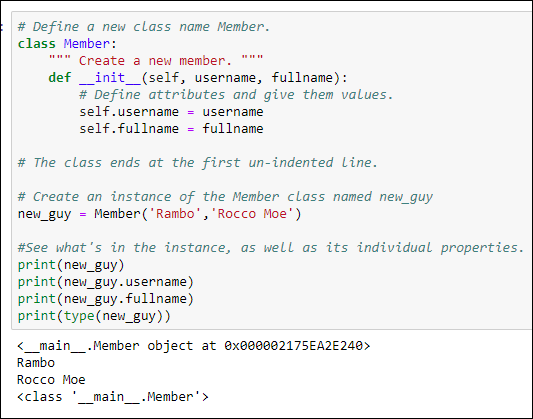
FIGURE 6-5: The Member class with username and fullname for both parameters and attributes.
After you type a class name and the opening parenthesis in VS Code, its IntelliSense shows you the syntax for parameters and the first docstring in the code, as shown in Figure 6-6. Naming things in a way that's meaningful and including a descriptive docstring in the class makes it easier for you to remember how to use the class in the future.
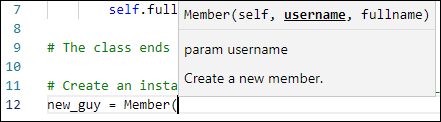
FIGURE 6-6: VS Code displays help when you access your own custom classes.
Changing the value of an attribute
When working with tuples, you can define key:value pairs, much like the attribute:value pairs you see here with instances of a class. There is one major difference, though: Tuples are immutable, meaning that after they’re defined, your code can’t change anything about them. This is not true with objects. After you create an object, you can change the value of any attribute at any time using the following simple syntax:
objectname.attributename = value
Replace objectname with the name of the object (which you’ve already created via the class). Replace attributename with the name of the attribute whose value you want to change. Replace value with the new value.
Figure 6-7 shows an example in which, after initially creating the new_guy object, the following line of code executes:
new_guy.username = "Princess"

FIGURE 6-7: Changing the value of an object's attribute.
The lines of output under that show that new_guy’s username has indeed been changed to Princess. His full name hasn't changed because you didn’t do anything to that in your code.
Defining attributes with default values
You don’t have to pass in the value of every attribute for a new object. If you’re always going to give an attribute some default value at the moment the object is created, you can just use self.attributename = value, the same as before, in which attributename is a name of your own choosing. And value can be some value you just set, such as True or False for a Boolean, or today's date, or anything that can be calculated or determined by Python without you providing the value.
For example, let’s say that whenever you create a new member, you want to track the date you created that member in an attribute named date_joined. And you want to be able to activate and deactivate accounts to control user logins. So you create an attribute named is_active and decide to start a new member with that attribute set to True.
If you’re going to be doing anything with dates and times, you’ll want to import the datetime module, so put that at the top of your file, even before the class Member: line. Then you can add the following lines before or after the other lines that assign values to attributes within the class:
self.date_joined = dt.date.today()
self.is_active = True
Here is how you could add the import and those two new attributes to the class:
import datetime as dt

# Define a new class name Member.
class Member:
    """ Create a new member. """
    def __init__(self, username, fullname):
        # Define attributes and give them values.
        self.username = username
        self.fullname = fullname

        # Default date_joined to today's date.
        self.date_joined = dt.date.today()
        # Set is active to True initially.
        self.is_active = True
If you forget to import datetime at the top of the code, you'll get an error message when you run the code, telling you it doesn’t know what dt.date.today() means. Just add the import line to the top of the code and try again.
There is no need to pass any new data into the class for the date_joined and is_active attributes because those attributes get default values from the code.
Note that a default value is just that: It's a value that is assigned automatically when you create the object. But you can change a default value in the same way you would change any other attribute’s value, using this syntax:
objectname.attributename = value
For example, suppose you use the is_active attribute to determine whether a user is active and can log into your site. If a member turns out to be an obnoxious troll and you don’t want him logging in anymore, you could just change the is_active attribute to False like this:
newmember.is_active = False
Giving a Class Methods
Any object you define can have any number of attributes, each given any name you like, to store information about the object, such as a dog’s breed and color or a car’s make and model. You can also define you own methods for any object, which are more like behaviors than facts about the object. For example, a dog can eat, sleep, and bark. A car can go, stop, and turn. A method is really just a function, as you learned in the preceding chapter. What makes it a method is the fact that it’s associated with a particular class and with each specific object you create from that class.
Method names are distinguished from attribute names for an object by the pair of parentheses that follow the name. To define what the methods will be in your class, use this syntax for each method:
def methodname(self[, param1, param2, …]):
Replace methodname with a name of your choosing (all lowercase, no spaces). Keep the word self in there as a reference to the object being defined by the class. Optionally, you can also pass in parameters after self using commas, as with any other function.
 Never type the square brackets (
[]). They're shown here in the syntax only to indicate that parameter names after self are allowed but not required.
Let’s create a method named .show_date_joined() that returns the user's name and the date the user joined in a formatted string. Here is how you could define this method:
# A method to return a formatted string showing date joined.
def show_datejoined(self):
    return f"{self.fullname} joined on {self.date_joined:%m/%d/%y}"
The name of the method is show_datejoined. The task of this method, when called, is to simply put together some nicely formatted text containing the member's full name and date joined.
To call the method from your code, use this syntax:
objectname.methodname()
Replace objectname with the name of the object to which you're referring. Replace methodname with the name of the method you want to call. Include the parentheses (no spaces). If the class's __init__ method specifies only self, you don't pass anything in. However, if the __init__ specifies additional parameters beyond self, you need to specify values for them. Figure 6-8 shows the complete example.
Note in Figure 6-8 how the show_datejoined() method is defined within the class. Its def is indented to the same level of the first def. The code that the method executes is indented under that. Outside the class, new_guy = Member('Rambo', 'Rocco Moe') creates a new member named new_guy. Then new_guy.show_datejoined() executes the show_datejoined() method, which in turn displays Rocco Moe joined 11/18/20, the day we ran the code.

FIGURE 6-8: Changing the value of an object's attributes.
Passing parameters to methods
You can pass data into methods in the same way you do functions: by using parameter names inside the parentheses. However, keep in mind that self is always the first name after the method name, and you never pass data to the self parameter. For example, let's say you want to create a method called .activate() and set it to True if the user is allowed to log in or False when the user isn't. Whatever you pass in is assigned to the .is_active attribute. Here's how to define that method in your code:
# Method to activate (True) or deactivate (False) account.
def activate(self, yesno):
    """ True for active, False to make inactive """
    self.is_active = yesno
The docstring is optional. However, the docstring would appear on the screen when you're typing relevant code in VS Code, so it would serve as a good reminder about what you can pass in. When executed, this method doesn’t display anything on the screen; it just changes the is_active attribute for that member to whatever you passed in as the yesno parameter.
It helps to understand that a method is really just a function. What makes a method different from a function is the fact that a method is always associated with some class. So a method is not as generic as a function.
Figure 6-9 shows the entire class followed by some code to test it. The line new_guy = Member('Rambo', 'Rocco Moe') creates a new member object named new_guy. Then print(new_guy.is_active) displays the value of the is_active attribute, which is True because that's the default for all new members.

FIGURE 6-9 Adding and testing an .activate() method.
The line new_guy.activate(False) calls the activate() method for that object and passes to it a Boolean False. Then print(new_guy.is_active) proves that the call to activate did indeed change the is_active attribute for new_guy from True to False.
Calling a class method by class name
As you've seen, you can call a class’s method using the following syntax:
specificobject.method()
An alternative is to use the specific class name, which can help make the code easier for humans to understand:
Classname.method(specificobject)
Replace Classname with the name of the class (which we typically define starting with an uppercase letter), followed by the method name, and then put the specific object (which you’ve presumably already created) inside the parentheses.
For example, suppose we create a new member named wilbur using the Member class and this code:
wilbur = Member('wblomgren', 'Wilbur Blomgren')
Here, wilbur is the specific object we created from the Member class. We can call the show_datejoined() method on that object by using the syntax you've already seen:
print(wilbur.show_datejoined())
The alternative is to call the show_datejoined() method of the Member class and pass to it that specific object, wilbur, like this:
print(Member.show_datejoined(wilbur))
The output from both methods is the same (but with the date on which you ran the code):
Wilbur Blomgren joined on 11/18/20
The latter method isn't faster, slower, better, worse, or anything like that. It's just an alternative syntax you can use, and some people prefer it because starting the line with Member makes it clear to which class the show_datejoined() method belongs. This in turn can make the code more readable by other programmers or by yourself a year from now when you don't remember any of the things you wrote in the app.
Using class variables
So far you’ve seen examples of attributes, which are sometimes called instance variables, because they’re placeholders that contain information that varies from one instance of the class to another. For example, in a Dog class, dog.breed may be Poodle for one dog but Schnauzer for another dog.
Another type of variable you can use with classes is called a class variable, which is applied to all new instances of the class that haven't been created yet. Class variables inside a class don’t have any tie-in to self because the self keyword always refers to the specific object being created at the moment. To define a class variable, place the mouse pointer above the def __init__ line and define the variable using the standard syntax:
variablename = value
Replace variablename with a name of your own choosing, and replace value with the specific value you want to assign to that variable. For example, let's say your code includes a free_days variable that grants people three months (90 days) of free access on sign-up. You're not sure if you want to commit to this forever, so rather than hardcode it into your app (so it’s difficult to change), you can just make it a class variable that’s automatically applied to all new objects, like this:
# Define a class named Member for making member objects.
class Member:
    """ Create a member object """
    free_days = 90

    def __init__(self, username, fullname):
Because we define the free_days variable before we define __init__, it's not tied to a specific object in the code.
Now suppose that later in the code, you want to store the date that the free trial expires. You could have an attribute named date_joined that represents the date that the member joined and another attribute named free_expires that represents the date that the user's free membership expires. You could determine the second date by adding the number of free days to the date the member joined. Intuitively, it may seem as though you could add free_days to the date using a simple syntax like this:
self.free_expires = dt.date.today() + dt.timedelta(days=free_days)
But if you tried to run this code, you’d get an error saying Python doesn’t recognize the free_days variable name (even though it’s defined right at the top of the class). Instead, you must precede the variable name with the class name or self. For example, this would work:
self.free_expires = dt.date.today() + dt.timedelta(days=Member.free_days)
Figure 6-10 shows the bigger picture. We removed some of the code from the original class to trim it and make it easier to focus on the new stuff. The free_days = 365 line near the top sets the value of the free_days variable to 365. (We used 90 days in the previous example, but this is a new example, and we want to illustrate how the same code works with any number of days you specify in the free_days variable.) Then, later in the code, the __init__ method uses Member.free_freedays to add that number of days to the current date. Running this code by creating a new member named wilbur and viewing his date_joined and free_expires attributes shows the current date (when you run the code) and the date 365 days after that.

FIGURE 6-10: The free_days variable is a class variable in the Member class.
What if you later decide that giving people 90 free days is plenty. You could just change the 365 day value back to 90 in the class directly. Since it's a variable, you can do it on-the-fly, like this, outside the class:
#Set a default for free days.
Member.free_days = 90
When you run this code, you still create a user named wilbur with date_joined and free_days variables. But this time, wilbur.free_expires will be 90 days after the datejoined, not 365 days.
Using class methods
Recall that a method is a function that's tied to a particular class. So far, the methods you’ve used, such as .show_datejoined() and .activate(), have been instance methods, because you always use them with a specific object — a specific instance of the class. With Python, you can also create class methods.
As the name implies, a class method is a method associated with the class as a whole, not specific instances of the class. In other words, class methods are similar in scope to class variables in that they apply to the whole class and not just individual instances of the class.
As with class variables, you don't need the self keyword with class methods because that keyword always refers to the specific object being created at the moment, not to all objects created by the class. So for starters, if you want a method to do something to the class as a whole, don’t use def name(self) because the self immediately ties the method to one object.
It would be nice if all you had to do to create a class method is exclude the word self, but unfortunately it doesn't work that way. To define a class method, you first need to type this into your code:
@classmethod
The @ at the start of this defines classmethod as a decorator — yep, yet another term to add to your ever-growing list of nerd-o-rama buzzwords. A decorator is generally something that alters or extends the functionality of that to which it is applied.
Below that line, define your class method using this syntax:
def methodname(cls,x, …):
Replace methodname with the name you want to give your method. Leave the cls as-is because it's a reference to the class as a whole (because the @classmethod decorator defined it as such behind-the-scenes). After cls, you can have commas and the names of parameters that you want to pass to the method, just as you can with regular instance methods.
For example, suppose you want to define a method that sets the number of free days just before you start creating objects, so that all objects get the same free_days amount. The following code accomplishes that by first defining a class variable named free_days that has a given default value of 0. (The default value can be anything.)
Further down in the class is this class method:
# Class methods follow @classmethod decorator and refer to cls rather than # to self.
@classmethod
def setfreedays(cls,days):
    cls.free_days = days
This code tells Python that when someone calls the setfreedays() method on this class, it should set the value of cls.free_days (the free_days class variable for this class) to whatever number of days were passed in. Figure 6-11 shows a complete example in a Jupyter cell (which you can type and try for yourself), and the results of running that code.

FIGURE 6-11: The setfreedays() method is a class method in the Member class.
It's easy to forget that uppercase and lowercase letters matter a lot in Python, especially since it seems you're using lowercase 99.9 percent of the time. But as a rule, class names start with an initial cap, so any call to the class name must also start with an initial cap.
Using static methods
Just when you thought you may finally be finished learning about classes, it turns out there is another kind of method you can create in a Python class. It's called a static method and it starts with this decorator: @staticmethod.
So that part is easy. What makes a static method different from instance and class methods is that a static method doesn’t relate specifically to an instance of an object or even to the class as a whole. It is a generic function, and the only reason to define it as part of a class is if you want to use the same name elsewhere in another class in your code.
Wherever you want a static method, you type the @staticmethod line. Below that line, you define the static method like any other method, but you don't use self and you don’t use cls because a static method isn't strictly tied to a class or an object. Here’s an example of a static method:
@staticmethod
def currenttime():
    now = dt.datetime.now()
    return f"{now:%I:%M %p}"
So we have a method called currenttime() that isn’t expecting any data to be passed in and doesn't care about the object or class you’re working with. The method just gets the current datetime using now = dt.datetime.now() and then returns that information in a nice 12:00 PM format.
Figure 6-12 shows a complete example in which you can see the static method properly indented and typed near the end of the class. When code outside the class calls Member.currenttime(), it dutifully returns the time at the moment, without your having to say anything about a specific object from that class.

FIGURE 6-12: The Member class now has a static method named currenttime().
Understanding Class Inheritance
People who are into object-oriented programming live to talk about class inheritance and subclasses and so on, stuff that means little or nothing to the average Joe or Josephine on the street. Still, what they're talking about as a Python concept is something you see in real life all the time.
As mentioned, if we consider dog DNA to be a kind of factory or Python class, we can lump all dogs together as members of a class of animals we call dogs. Even though each dog is unique, all dogs are still dogs because they are members of the class we call dogs, and we can illustrate that, as in Figure 6-13.

FIGURE 6-13: Dogs as objects of the class dogs.
So each dog is unique (although no other dog is as good as yours), but what makes dogs similar to one another are the characteristics they inherit from the class of dogs.
The notions of class and class inheritance that Python and other object-oriented languages offer didn't materialize out of the clear blue sky just to make it harder and more annoying to learn this stuff. Much of the world’s information can best be stored, categorized, and understood by using classes and subclasses and sub-subclasses, on down to individuals.
For example, you may have noticed that other dog-like creatures roam the planet (although they’re probably not the kind you’d like to keep around the house as pets). Wolves, coyotes, and jackals come to mind. They are similar to dogs in that they all inherit their dogginess from a higher-level class we could call canines, as shown in Figure 6-14.
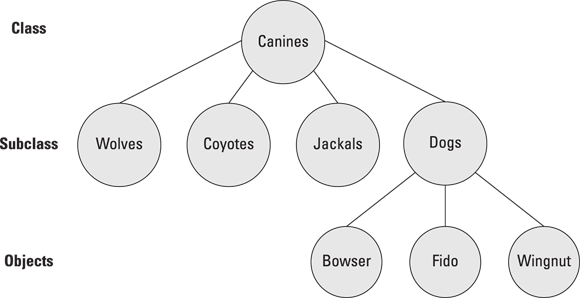
FIGURE 6-14: Several different kinds of animals are similar to dogs.
Using our dog analogy, we certainly don’t need to stop at canines on the way up. We can put mammals above that, because all canines are mammals. We can put animals above that, because all mammals are animals. And we can put living things above that, because all animals are living things. So basically all the things that make a dog a dog stem from the fact that each inherits certain characteristics from numerous classes, or critters, that preceded it.
To the biology brainiacs out there, yes we know that Mammalia is a class, Canis is a genus, and below that are species. So you don’t need to email or message us on that. We’re using class and subclass terms here just to relate the concept to classes, subclasses, and objects in Python.
Obviously the concept doesn’t apply just to dogs. The world has lots of different cats too. There’s cute little Bootsy, with whom you’d be happy to share your bed, and plenty of other felines, such as lions, tigers, and jaguars, with whom you probably wouldn’t.
If you do a web search for living things hierarchy and click Images, you’ll see just how many ways there are to classify all living things, and how inheritance works its way down from the general to the specific living thing.
Even our car analogy can follow along with this. At the top, we have transportation vehicles. Under that, perhaps boats, planes, and automobiles. Under automobiles we have cars, trucks, vans, and so forth and so on, down to any one specific car. So classes and subclasses are nothing new. What’s new is simply thinking about representing those things to mindless machines that we call computers. So let’s see how you would do that.
From a coding perspective, the easiest way to do inheritance is to create subclasses within a class. The class defines things that apply to all instances of that class. Each subclass defines things relevant only to the subclass without replacing anything that’s coming from the generic parent class.
Creating the base (main) class
Subclasses inherit all the attributes and methods of some higher-level main class, or parent class, which is usually referred to as the base class. This class is just any class, no different from what you’ve seen in this chapter so far. We’ll use a Member class again, but we’ll whittle it down to some bare essentials that have nothing to do with subclasses, so you don’t have to dig through irrelevant code. Here is the basic class:
# Class is used for all kinds of people.
import datetime as dt

# Base class is used for all kinds of Members.
class Member:
    """ The Member class attributes and methods are for everyone """
    # By default, a new account expires in one year (365 days)
    expiry_days = 365

    # Initialize a member object.
    def __init__(self, firstname, lastname):
        # Attributes (instance variables) for everybody.
        self.firstname = firstname
        self.lastname = lastname
        # Calculate expiry date from today's date.
        self.expiry_date = dt.date.today() + dt.timedelta(days=self.expiry_days)
By default, new accounts expire in one year. So this class first sets a class variable name expiry_days to 365 to be used in later code to calculate the expiration date from today's date. As you'll see later, we used a class variable to define expiry_days because we can give it a new value from a subclass.
To keep the code example simple and uncluttered, this version of the Member class accepts only two parameters, firstname and lastname.
Figure 6-15 shows an example of testing the code with a hypothetical member named Joe. Printing Joe's firstname, lastname, and expiry_date shows what you would expect the class to do when passing the firstname Joe and the lastname Anybody. When you run the code, the expiry_date should be one year from the date when you run the code.
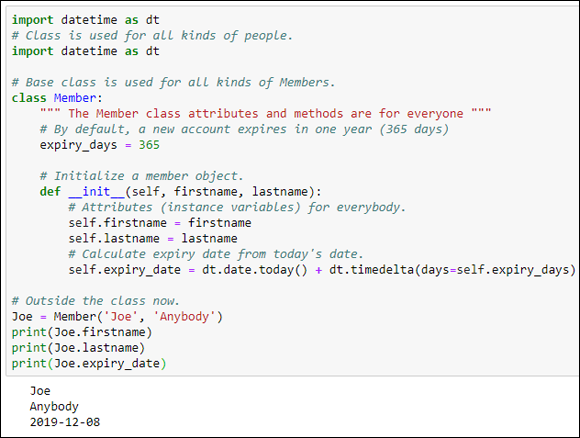
FIGURE 6-15: A simplified Member class.
Now suppose our real intent is to make two different kinds of users, Admins and Users. Both types of users will have the attributes that the Member class offers. So by defining those types of users as subclasses of Member, they will automatically get the same attributes (and methods, if any).
Defining a subclass
To define a subclass, make sure you get the cursor below the base class and back to no indentation, because the subclass isn't a part of, or contained within, the base class. To define a subclass, use this syntax:
class subclassname(mainclassname):
Replace subclassname with whatever you want to name this subclass. Replace mainclassname with the name of the base class, as defined at the top of the base class. For example, to make a subclass of Member named Admin, use the following:
class Admin(Member):
To create another subclass named User, add this code:
class User(Member):
If you leave the classes empty, you won't be able to test them because you'll get an error message telling you the class is empty. But you can put the word pass as the first command in each one. This is your way of telling Python “Yes I know these classes are empty, but let it pass, don’t throw an error message.” You can put a comment above each one to remind you of what each one is for, as in the following:
# Subclass for Admins.
class Admin(Member):
    pass

# Subclass for Users.
class User(Member):
    pass
When you use the subclasses, you don’t have to make any direct reference to the Member class. Admins and Users will both inherit all the Member stuff automatically. So, for example, to create an Admin named Annie, you'd use this syntax:
Ann = Admin('Annie', 'Angst')
To create a User, do the same thing with the User class and a name for the user. For example:
Uli = User('Uli', 'Ungula')
To see if this code works, you can do the same thing you did for member Ann. After you create the two accounts, use print() statements to see what's in them. Figure 6-16 shows the results of creating the two users. Ann is an Admin, and Uli is a User, but both automatically get all the attributes assigned to members. (The Member class is directly above the code shown in the image. We left that out because it hasn't changed.)

FIGURE 6-16: Creating and testing the Admin and User classes.
So what you've learned here is that the subclass accepts all the different parameters that the base class accepts and assigns them to attributes, same as the Person class. But so far, Admin and User are just members with no unique characteristics. In real life, there will probably be some differences between these two types of users. In the next sections, you learn ways to make these differences happen.
Overriding a default value from a subclass
One of the simplest things you can do with a subclass is to give an attribute that has a default value in the base class some other value. For example, in the Member class we created a variable named expiry_days to be used later in the class to calculate an expiration date. But suppose you want Admin accounts to never expire (or to expire after some ridiculous duration so there's still some date there). Simply set the new expiry_date in the Admin class (and you can remove the pass line because the class won't be empty anymore). Here’s how these changes might look in your Admin subclass:
# Subclass for Admins.
class Admin(Member):
    # Admin accounts don't expire for 100 years.
    expiry_days = 365.2422 * 100
Whatever value you pass will override the default set near the top of the Member class and will be used to calculate the Admin's expiration date.
Adding extra parameters from a subclass
Sometimes members of a subclass have a parameter value that other members don’t. In that case, you may want to pass a parameter from the subclass that doesn’t exist in the base class. Doing so is a little more complicated than just changing a default value, but it’s a common technique so you should be aware of it. Let’s work through an example.
For starters, your subclass will need its own def __init__ line that contains everything that’s in the base class’s __init__, plus any extra stuff you want to pass. For example, let's say admins have some secret code and you want to pass that from the Admin subclass. You still have to pass the first and last name, so your def __init__ line in the Admin subclass will look like this:
def __init__(self, firstname, lastname, secret_code):
The indentation level will be the same as the lines above it.
Next, any parameters that belong to the base class, Member, need to be passed up there using this rather odd-looking syntax:
super().__init__(param1, param2, …)
Replace param1, param2, and so forth with the names of parameters you want to send to the base class. The information you're providing in the parameters should be everything that's already in the Member parameters excluding self. In this example, Member expects only firstname and lastname, so the code for this example is
super().__init__(firstname, lastname)
Whatever you didn't provide in the first set of parameters, you can assign to the subclass object using this code:
self.secret_code = parametername
Replace parametername with the name of the parameter that you didn't send up to Member. In this case, that would be the secret_code parameter. So the code would be:
self.secret_code = secret_code
Figure 6-17 shows an example in which we created an Admin user named Ann and passed PRESTO as her secret code. Printing all her attributes shows that she does indeed still have the right expiration date plus a secret code. As you can see, we also created a regular User named Uli. Uli's data isn’t affected by the changes to Admin.
In our working example, we haven’t given regular users a secret code yet. If you try to print a regular user with the Python code as shown, you'll get an error because that Python code isn't yet written to accommodate users that have no secret code.
One solution is to just remember that regular users don’t have a secret code. So when using the app, never try to print the secret code for a regular user. But it would be better if the code handled the error gracefully for us. To do so, we would ensure that every user's account is associated with a secret code. For regular users, the secret code will be empty, which prevents them from accessing administrator information. Only admins would have valid secret codes.
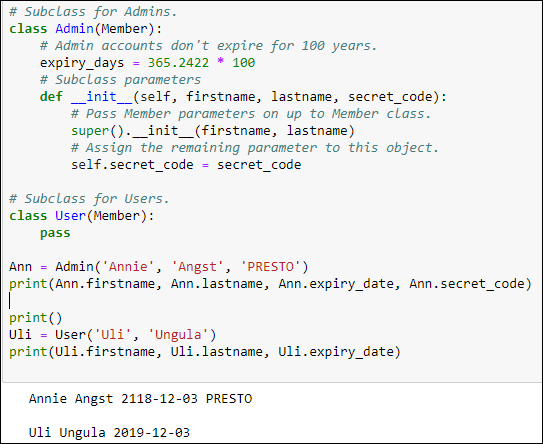
FIGURE 6-17: The Admin subclass has a new secret_code parameter.
Should a member join as a regular member and later become an admin, the Python code need only change the empty secret_code to a valid secret_code.
If your class assigns a secret_code to all users (not just admins), you won't get an error when you print the data for a regular user. Instead, the secret code for a regular user will appear as a blank space. To assign a secret code to every member, even when that secret code is blank, add the following to the main Member class:
# Default secret code is nothing
self.secret_code = ""
So even though you don't do anything with secret_code in the User subclass, you don't have to worry about throwing an error if you try to access the secret code for a User. The User will have a secret code, but it will just be an empty string. Figure 6-18 shows all the code with both subclasses, and also an attempt to print Uli.secret_code, which just displays nothing without throwing an error message.
We left the User subclass with pass as its only statement. In real life, you would probably come up with more default values or parameters for your other subclasses. But the syntax and code is the same for all subclasses. The skills you've learned in this section will work for all your classes and subclasses.
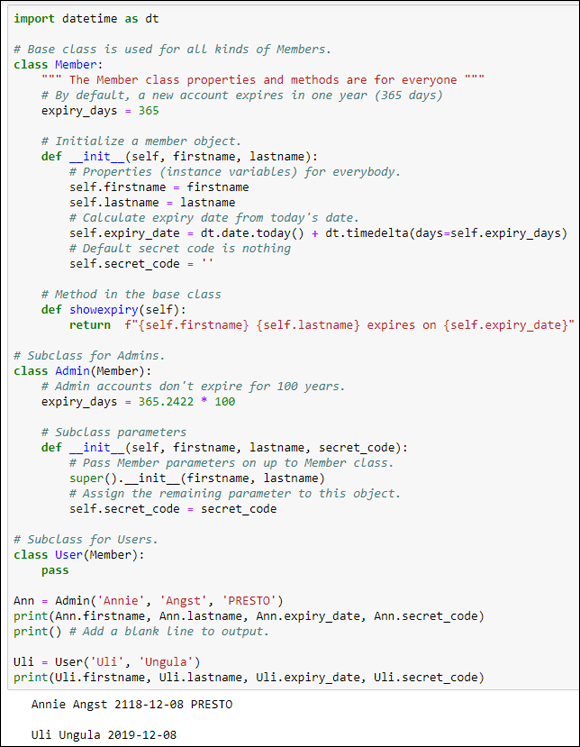
FIGURE 6-18: The complete Admin and User subclasses.
Calling a base class method
Methods in the base class work the same for subclasses as they do for the base class. To try out a method in the base class, add a new method called showexpiry(self) to the bottom of the base class, as follows:
class Member:
    """ The Member class attributes and methods are for everyone """
    # By default, a new account expires in one year (365 days)
    expiry_days = 365

    # Initialize a member object.
    def __init__(self, firstname, lastname):
        # Attributes (instance variables) for everybody.
        self.firstname = firstname
        self.lastname = lastname
        # Calculate expiry date from today's date.
        self.expiry_date = dt.date.today() + dt.timedelta(days=self.expiry_days)
        # Default secret code is nothing
        self.secret_code = ''

    # Method in the base class.
    def showexpiry(self):
       return  f"{self.firstname} {self.lastname} expires on {self.expiry_date}"
The showexpiry() method, when called, returns a formatted string containing the user's first and last name and expiration date. Leaving the subclasses untouched and executing the code displays the names and expiry dates of Ann and Uli:
Ann = Admin('Annie', 'Angst', 'PRESTO')
print(Ann.showexpiry())


Uli = User('Uli', 'Ungula')
print(Uli.showexpiry())
Here is that output, although your dates will differ based on the date you ran the code:
Annie Angst expires on 2118-12-04
Uli Ungula expires on 2019-12-04
Using the same name twice
You may be wondering about what happens when you use the same name more than once? Python will always opt for the most specific one, the one tied to the subclass. It will use the more generic method from the base class only if nothing in the subclass has that method name.
To illustrate, here's some code that defines a Member class with just a few attributes and methods, to get any irrelevant code out of the way. Comments in the code describe what’s going on in the code:
class Member:
    """ The Member class attributes and methods """
    # Initialize a member object.
    def __init__(self, firstname, lastname):
        # Attributes (instance variables) for everybody.
        self.firstname = firstname
        self.lastname = lastname

    # Method in the base class
    def get_status(self):
        return  f"{self.firstname} is a Member."

# Subclass for Administrators
class Admin(Member):
    def get_status(self):
        return  f"{self.firstname} is an Admin."

# Subclass for regular Users
class User(Member):
    def get_status(self):
        return  f"{self.firstname} is a regular User."
The Member class, and both the Admin and User classes, have a method named get_status(), which shows the member's first name and status. Figure 6-19 shows the result of running that code with an Admin, a User, and a Member who is neither an Admin nor a User. As you can see, the get_status called in each case is the get_status()associated with the person's subclass (or base class in the case of the person who is a Member but neither an Admin or User).
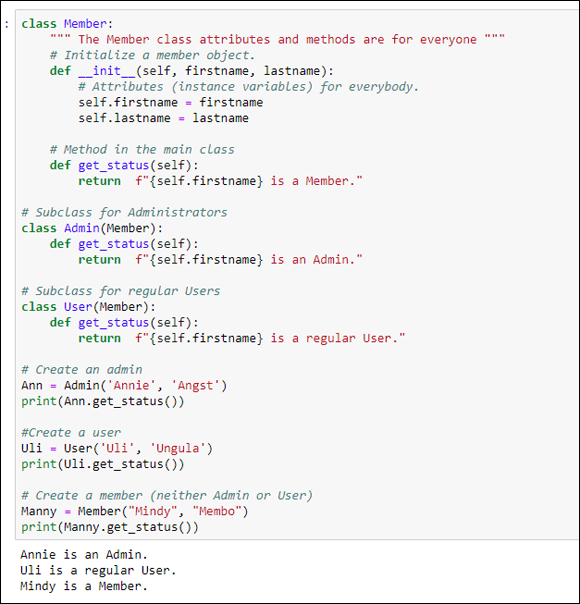
FIGURE 6-19: Three methods with the same name, get_status().
Python has a built-in help() method that you can use with any class to get more information about that class. For example, at the bottom of the code in Figure 6-19, add this line:
help(Admin)
When you run the code again, you'll see some information about that Admin class, as shown in Figure 6-20.

FIGURE 6-20: Output from help(Admin).
You don’t need to worry about all the details in Figure 6-20 right now. The most important section is the one titled Method resolution order, which looks like this:
Method resolution order:
     Admin
     Member
     builtins.object
The method resolution order tells you that if a class (and its subclasses) all have methods with the same name (such as get_status), a call to get_status() from an Admin user will cause Python to look in Admin for that method and, if it exists, use it. If no get_status() method was defined in the Admin subclass, Python looks in the Member class and uses that one, if found. If neither of those had a get_status method, it looks in builtins.object, which is a reference to certain built-in methods that all classes and subclasses share.
So the bottom line is, if you do store your data in hierarchies of classes and subclasses, and you call a method on a subclass, Python will use that subclass method if it exists. If not, Python will use the base class method if it exists. If that also doesn't exist, it will try the built-in methods. And if all else fails, it will throw an error because it can’t find the method your code is trying to call. Usually the main reason for this type of error is that you simply misspelled the method name in your code, so Python can’t find it.
An example of a built-in method is __dict__. The dict is short for dictionary, and those are double-underscores surrounding the abbreviation. Referring to Figure 6-20, executing the following command:
print(Admin.__dict__)
doesn't cause an error, even though we’ve never defined a method named __dict__. That’s because there is a built-in method with that name, and when called with print(), it shows a dictionary of methods (both yours and built-in ones) for that object. The method resolution order isn't something you have to get too involved with this early in the learning curve. Just be aware that if you try to call a method that doesn’t exist at any of those three levels, such as this:
print(Admin.snookums())
you will get an error that looks something like this:
---> print(Admin.snookums())
AttributeError: type object 'Admin' has no attribute 'snookums'
This error is telling you that Python has no idea what snookums() is about. As mentioned, in real life, this kind of error is usually caused by misspelling the method name in your code.
Classes (and to some extent, subclasses) are heavily used in the Python world, and what you’ve learned here should make it easy to write your own classes, as well as to understand classes written by others. You’ll want to learn one more core Python concept before you finish this book: how Python handles errors, and things you can do in your own code to better handle errors.