Chapter 3
Python Elements and Syntax
IN THIS CHAPTER
![]() Understanding the Zen of Python
Understanding the Zen of Python
![]() Introducing object-oriented programming
Introducing object-oriented programming
![]() Discovering why indentations are important
Discovering why indentations are important
![]() Using Python modules
Using Python modules
Many programming languages focus on things that the computer does and how it does them rather than on the way humans think and work. This one simple fact makes most programming languages difficult for most people to learn. Python, however, is based on the philosophy that a programming language should be geared more toward how humans think, work, and communicate than what happens inside the computer. The Zen of Python is the perfect example of that human orientation, so we start this chapter with that topic.
The Zen of Python
The Zen of Python, shown in Figure 3-1, is a list of the guiding principles for the design of the Python language. These principles are hidden in an Easter egg, which is a term for something in a programming language or an app that's not easy to find and that's an inside joke to people who have learned enough of the language or app to be able to find the Easter egg. To get to the Easter egg, follow these steps:
- Launch VS Code from Anaconda Navigator and open your Python 3 workspace.
- If the Terminal pane isn’t open, choose View ⇒ Terminal from the VS Code menu bar.

FIGURE 3-1: The Zen of Python.
Type python and press Enter to get to the Python prompt (
>>>). If you get an error message after you enter the
 pythoncommand, don't panic. You just need to remind VS Code which Python interpreter you’re using. Choose View ⇒ Command Palette from the menu, type python, click Python: Select Interpreter, and choose the Python 3 version that came with Anaconda.Type import this and press Enter.
The list of aphorisms appears. You may have to scroll up and down or make the Terminal pane taller to see them all. The aphorisms are somewhat tongue-and-cheek in their philosophical rhetoric, but the general idea they express is to always try to make the code more human-readable than machine-readable.
The Zen of Python is sometimes referred to as PEP 20, where PEP is an acronym for Python enhancement proposals. The 20 perhaps refers to the 20 Zen of Python principles, only 19 of which have been written down. We all get to wonder about or make up our own final principle.
Many other PEPs exist, and you can find them all on the Python.org website at www.python.org/dev/peps. The one you’re likely to hear about the most is PEP 8, which is the Style Guide for Python Code. The guiding principle for PEP 8 is “readability counts” — that is, readable by humans. Admittedly, when you’re first learning Python code, most other peoples’ code will seem like some gibberish scribbled down by aliens, and you may not have any idea what it means or does. But as you gain experience with the language, the style consistency will become more apparent, and you’ll find it easier and easier to read and understand other peoples’ code, which is an excellent way to learn coding yourself.
We’ll fill you in on Python coding style throughout the book. Trying to read about it before working on it is sure to bore you to tears. So for now, any time you hear mention of PEP, or especially PEP 8, remember that it’s a reference to the Python Coding Style Guidelines from the Python.org website, and you can find it any time you like by doing a web search for pep 8. PEP 8 is also referred to as Pycodestyle, especially in VS Code.
This PEP 8 business can be a double-edged sword for learners. On one hand, you don’t want to learn a bunch of bad habits only to discover later that you have to unlearn them. On the other hand, the strict formatting demands of PEP 8 can frustrate many learners who are just trying to get their code to work.
To ward off this potential frustration, we follow and explain PEP 8 conventions as we go along. You can take it a step further, if you like, by configuring PyLint to help you. PyLint is a tool in Anaconda that makes suggestions about your code as you’re typing. (The program adds a little wavy underline near code that may be wrong, and some people think the lines look like lint, hence the name PyLint.)
You can follow these steps to turn on PyLint and PEP 8 now if you’d like to take it for a spin:
- Choose File (Windows) or Code (Mac), and then choose Preferences ⇒ Settings.
- Under Search Settings, click Workspace.
- In Search Settings, type pylint and select the Python > Linting: Enabled option, as shown in Figure 3-2.
- Type pycodestyle in the Search box.
- Scroll down and select the Python > Linting: Pycodestyle Enabled option, as in the bottom half of Figure 3-2.
- Choose File ⇒ Save All or just Save (if Save All isn't available). Then close the Settings page by clicking the X in its tab.

FIGURE 3-2: Workspace settings with PyLint and Pycodestyle (PEP 8) enabled.
All the settings you choose in VS Code are stored in a settings.json file. You can make changes to settings also via that file. To get to the file through the Preferences options in VS Code, first choose File (Windows) or Code (Mac) and then choose Preferences⇒ Settings. Click the Open Settings (JSON) icon near the top right. The icon looks like a paper document with the top corner folded down, and a rounded arrow near the top.
If the Pycodestyle linting is too demanding, you can change the first line of code to true and the second line to false. (See Figure 3-3.) You can turn off linting altogether by setting the third code line to false as well. There are no right or wrong settings, so try what we have for a while and see how it works for you. If you make any changes to Settings.json, don't forget to save them and close the settings.json tab.
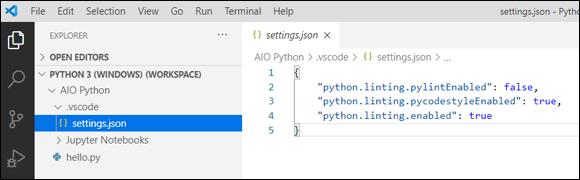
FIGURE 3-3: A different view of Workspace settings.
Introducing Object-Oriented Programming
At the risk of getting too technical or computer science-y, we should mention that there are different approaches to designing languages. Perhaps the most successful and widely used model is object-oriented programming, or OOP, which is a design philosophy that tries to mimic the real world in the sense that it consists of objects with properties as well as methods (actions) that those objects perform.
Take a car, for example. Any one car is an object. Not all cars are exactly the same. Different cars have different properties, such as make, model, year, color, and size, which make them different from one another. And yet, they all serve the same basic purpose: to get us from point A to point B without having to walk or use some other mode of transportation.
All cars have certain methods (things they can do) in common. You can drive them, steer them, speed them up, slow them down, control the inside temperature, and more by using controls in the car that you can manipulate with your hands.
An object in an object-oriented programming language isn't a physical thing, like a car, because it exists only inside a computer. An object is strictly a software thing. In Python, you can have a class (which you can think of as an object creator, such as a car factory) that can produce many different kinds of objects (cars) for varying purposes (sporty, off-road, sedan). All these objects can be manipulated through the controls they all have in common, much as all cars are manipulated by controls such as the steering wheel, brakes, accelerator, and gearshift.
Python is very much an object-oriented language. The core language consists of controls (in the form of words) that allow you to control all different kinds of objects — in your own and other peoples' programs. However, you need to learn the core language first so that when you’re ready to start using other peoples’ objects, you know how to do so. Similarly, after you know how to drive one car, you pretty much know how to drive them all. You don’t have to worry about renting a car only to discover that the accelerator is on the roof, the steering wheel on the floor, and you have to use voice commands rather than a brake to slow it down. The basic skill of driving applies to all cars.
Discovering Why Indentations Count, Big Time
In terms of the basic style of writing code, the one feature that really makes Python different from other languages is that it uses indentations rather than parentheses and curly braces and such to indicate blocks, or chunks, of code. We don’t assume that you’re familiar with other languages, so don’t worry if that statement means nothing to you. But if you are familiar with a language such as JavaScript, you know that you have to do quite a bit of wrangling with parentheses and such to control what’s inside of what.
For example, here’s some JavaScript code. If you’re familiar with the Magic 8 Ball toy, you may have a sense of what this program is doing. But that’s not what’s important. Just note all those parentheses, curly braces, and semicolons:
document.addEventListener("DOMContentLoaded", function () {var question = prompt("Ask magic 8 ball a question");var answer = Math.floor(Math.random() * 8) + 1; if (answer == 1) {alert("It is certain");} else if (answer == 2) {alert("Outlook good");} else if (answer == 3) {alert("You may rely on it");} else if (answer == 4) {alert("Ask again later");} else if (answer == 5) {alert("Concentrate and ask again");} else if (answer == 6) {alert ("Reply hazy, try again");} else if (answer == 7) {alert("My reply is no");} else if (answer == 8) {alert("My sources say no")} else {alert ("That's not a question");}alert("The end");})
The code is a mess and not fun to read. We can make reading it a little easier by breaking it into multiple lines and indenting some of those lines. (Note that doing so isn’t required in JavaScript.) Following is the reformatted code:
document.addEventListener("DOMContentLoaded", function () {
    var question = prompt("Ask magic 8 ball a question");
    var answer = Math.floor(Math.random() * 8) + 1;
    if (answer == 1) {
        alert("It is certain");
    } else if (answer == 2) {
        alert("Outlook good");
    } else if (answer == 3) {
        alert("You may rely on it");
    } else if (answer == 4) {
        alert("Ask again later");
    } else if (answer == 5) {
        alert("Concentrate and ask again");
    } else if (answer == 6) {
        alert("Reply hazy, try again");
    } else if (answer == 7) {
        alert("My reply is no");
    } else if (answer == 8) {
        alert("My sources say no")
    } else {
        alert("That's not a question");}
    alert("The end");
})
In JavaScript, the parentheses and curly braces are required because they identify where chunks of code begin and end. The indentations for readability are optional.
The rules are opposite in Python because it doesn’t use curly braces or any other special characters to mark the beginning and end of a block of code. The indentations themselves mark those. So those indentations aren’t optional — they are required and have a considerable effect on how the code runs. As a result, when you read the code (as a human, not as a computer), it’s relatively easy to see what’s going on, and you’re not distracted by a ton of extra quotation marks. Here is that JavaScript code written in Python:
import random
question = input("Ask magic 8 ball a question")
answer = random.randint(1, 8)
if answer == 1:
    print("It is certain")
elif answer == 2:
    print("Outlook good")
elif answer == 3:
    print("You may rely on it")
elif answer == 4:
    print("Ask again later")
elif answer == 5:
    print("Concentrate and ask again")
elif answer == 6:
    print("Reply hazy, try again")
elif answer == 7:
    print("My reply is no")
elif answer == 8:
    print("My sources say no")
else:
    print("That's not a question")
print("The end")
You may have noticed at the top of the Python code the line that starts with import. Lines that start with import are common in Python, and you'll see why in the next section.
Using Python Modules
One of the secrets to Python's success is that it’s comprised of a simple, clean, core language. That’s the part you need to learn first. In addition to that core language, many, many modules are available that you can grab for free and access from your own code. These modules are also written in the core language, but you don’t need to see that or even know it because you can access all the power of the modules from the basic core language.
Most modules are for some a specific application such as science or artificial intelligence or working with dates and time or … whatever. The beauty of using modules is that other people spent a lot of time creating, testing, and fine-tuning that module so you don’t have to. You simply import the module into your own Python file, and use the module's capabilities as instructed in the module's documentation.
The preceding sample Magic 8 Ball program starts with this line:
import random
The core Python language has nothing built into it to generate a random number. Although we could figure out a way to make a random number generator, we don't need to because someone has figured out how to do it and has made the code freely available. Starting your program with import random tells the program that you want to use the capabilities of the random number module to generate a random number. Then, later in the program, you generate a random number between 1 and 8 with this line of code:
answer = random.randint(1, 8)
Hundreds of free modules for Python are available — you just need to know which ones to import into your program.
Now, you may be wondering where to find all these modules. Well, they’re all over the place online. But you'll probably never need to find and download them because you already have the most widely used modules in the world. They were downloaded and installed along with Anaconda. To see for yourself, follow these steps:
- Open Anaconda in the usual manner on your computer.
In the left column, click Environments.
On the far right are the Python modules installed on your computer and ready for you to import and use as needed, as shown in Figure 3-4. As you scroll down through the list, you’ll see that you already have a ton of them. The rightmost column tells you each module's version.
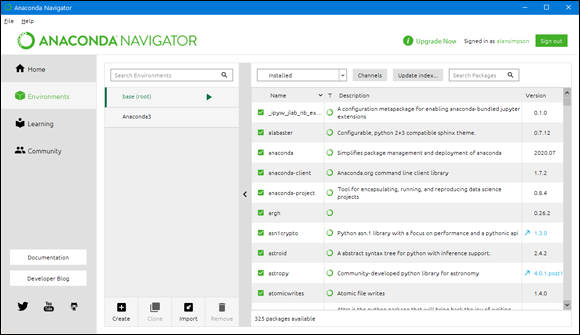
FIGURE 3-4: Installed modules.
You may notice that some version numbers are colored and are preceded with an arrow, which indicates that a more recent version may be available for you to download. As with programming languages, modules evolve over time as their authors improve them and add new capabilities. You’re not required to have the latest version, though. If the version you have is working, you might want to stick with it.
One of many nice things about Anaconda is that to get the latest version, you don’t have to do any weird pip commands, as many older Python tutorials tell you to do. Instead, just click the arrow or version number of the module or modules you want to download, and then click Apply at the bottom-right corner. Anaconda does all the dirty work of finding the current module, determining whether a newer version is available, and then downloading that version, if it is available.
When all the downloads are finished, you see a dialog box like the one shown in Figure 3-5. If no package names are listed, all the selected modules are up-to-date, so click Cancel and then click Home in the left pane to return to Anaconda’s home page. If, on the other hand, package names are listed under The Following Packages Will Be Modified, click Apply to install the latest versions.
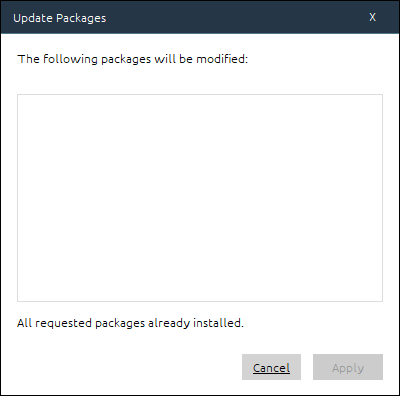
FIGURE 3-5: All our packages are installed and up-to-date.
Understanding the syntax for importing modules
As mentioned, in your own Python code, you must import a module before you can access its capabilities. The syntax for doing so is
import modulename [as alias]
Code written in a generic format like that, with some parts in italic, some in square brackets, is sometimes called a syntax chart because it's not showing you, literally, what to type. Rather, it's showing the syntax (format) of the code. Here is how information is presented in such a syntax chart:
- The code is case-sensitive, meaning you must type
importandasusing all lowercase letters, as shown. - Anything in italics is a placeholder for information you should supply in your own code. For example, in your code, you would replace
modulenamewith the name of the module you want to import. - Anything in square brackets is optional, so you can type the command with or without the part in square brackets.
- You never type the square brackets in your code because they are not part of the Python language. They are used only to indicate optional parts in the syntax.
You can type the import line any place you type Python code: at the Python command prompt (>>>), in a .py file, or in a Jupyter notebook. In a .py file, always put import statements first, so their capabilities are available to the rest of the code.
Using an alias with modules
As you just saw with the import command's syntax, you can assign an alias, or nickname, to any module you import just by following the module name with a space, the word as, and a name of your own choosing.
 Most people use a short name that's easy to type and remember, so they don't have to type a long name every time they want to access the module’s capabilities.
For example, instead of typing import random to import that module, you could import it and give it a nickname such as rnd, which is shorter:
import random as rnd
Then, in subsequent code, you wouldn't use the full name, random, to refer to the module. Instead, you’d use the short name, rnd:
answer = rnd.randint(1, 8)
Using an alternative short name may not seem like a big deal in this short example. But some modules have lengthy names, and you might have to refer to the modules in many places in your code.
Now that you've learned some background information, it's time to apply it and start getting your hands dirty with some real Python code. See you in the next chapter.