
The QuickBooks Home Page is laid out like the workflow you follow when you’re bookkeeping, so it acts like a roadmap to many of the accounting tasks you perform. Shortcuts to other helpful QuickBooks features are sprinkled throughout the program’s icon bars and Vendor, Customer, and Employee centers.
But your business isn’t like anyone else’s. For example, if you run a strictly cash-sales business, you might not care about customer lists and invoices; making deposits, though, is a daily event. Fortunately, you don’t have to accept QuickBooks’ initial take on convenience. The Home Page and the icon bars come stocked with a set of popular shortcuts, but you can add, remove, rearrange, and otherwise edit which features appear on them. The box on Turning Customer and Vendor Icons On and Off describes several ways to customize the QuickBooks desktop. You can also add your favorite features, windows, and reports to the Favorites menu. This chapter covers all your options.
In addition to tweaking QuickBooks’ layout, you can also customize the program’s forms. QuickBooks helps you get up and running with built-in business form templates. They’ll do if you have to blast out some invoices. But when you finally find a few spare minutes, you can create templates that show the information you want, formatted the way you want, and laid out to work with your letterhead. You can even create multiple versions of a form. For example, you can make one invoice template to print on your letterhead and another for creating electronic invoices to email that includes your logo, company name, and address. This chapter describes the most efficient ways to create forms: using QuickBooks’ form designs or built-in templates as a basis for your own. In Appendix G (which is available from this book’s Missing CD page at www.missingmanuals.com/cds), you can learn how to fine-tune forms with advanced customization techniques and even create templates from scratch.
The icons that QuickBooks initially displays on the Home Page are the result of the answers you gave during QuickBooks Setup: The program sets your companywide Desktop View preferences (Desktop View) based on your answers to things such as whether you track inventory, charge sales tax, or track time. But you can alter these settings if your business needs change. For example, if you want to start sending statements to customers, turn on the statement preference (see the Note on Note), and the icons for statement-related tasks appear on the Home Page. And if you just hired your first employee and turn on payroll or time-tracking preferences, the Employees panel appears with payroll and time-tracking icons in it. This section describes how you change the icons that appear on your Home Page.
The Desktop View preference category controls some of the icons that appear in the Home Page’s Vendors and Customers panels. To turn these icons on and off, choose Edit→Preferences→Desktop View, and then click the Company Preferences tab. (Because these settings apply to your whole company, they’re on the Company Preferences tab, which means you have to be a QuickBooks admin to adjust them.) Then, in the Customers and Vendors sections, turn on a checkbox to display the corresponding icon, or turn it off to hide it. For example, if you want to create Sales Receipts, turn on the Sales Receipts checkbox, and the Create Sales Receipts icon appears in the Customers panel, as shown in Figure 27-1.
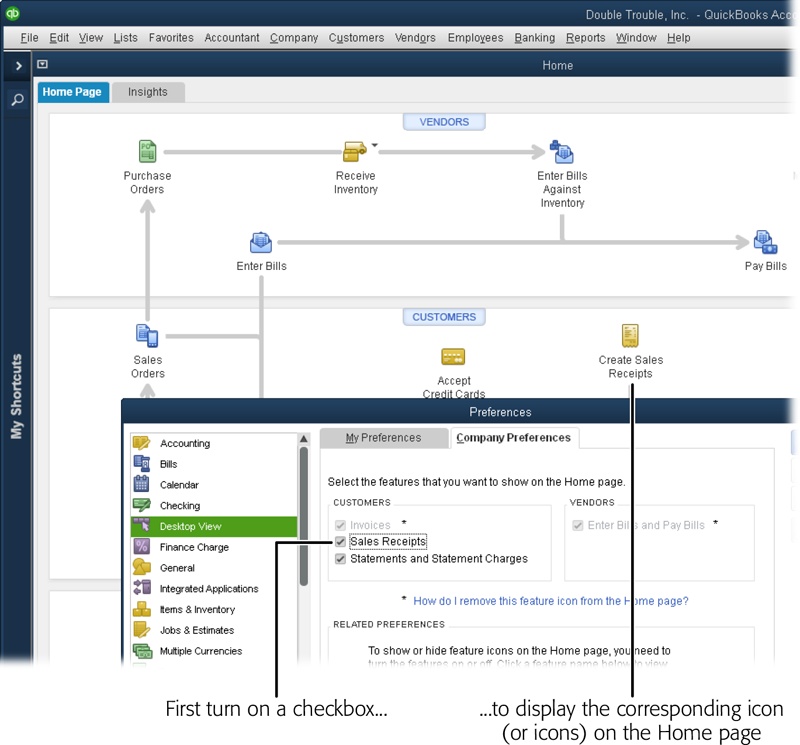
Figure 27-1. In the Desktop View preference category, the settings on the Company Preferences tab let you customize your Home Page. Display or hide icons on the Home Page by turning their checkboxes on or off here. For example, if you want to create sales receipts, turn on the Sales Receipts checkbox. When you do that, QuickBooks displays the Create Sales Receipts icon on your Home Page.
The Invoices checkbox and the “Enter Bills and Pay Bills” checkbox have an additional trick up their sleeves. In some cases, they’re active (meaning you can turn them on or off), just like the Sales Receipts checkbox in Figure 27-1. However, if they’re dimmed (so you can’t click them to toggle them on and off) and have an asterisk next to them, as shown in Figure 27-1, QuickBooks has turned them on automatically because of other preference selections you’ve made. For example, the “Enter Bills and Pay Bills” checkbox is turned on automatically if you turn on inventory. That makes sense if you think about it, because you have to enter bills to pay for inventory you purchase. (Click the “How do I remove this feature icon from the Home page?” link to read a Help topic that lists the settings you need to change.) The Invoices checkbox is turned on automatically in several situations:
Estimates are turned on. QuickBooks turns on invoices when estimates are turned on because you can convert estimates into invoices (Creating an Invoice from an Estimate).
Sales orders (available only in QuickBooks Premier and Enterprise) are turned on. Because sales orders eventually lead to invoices, QuickBooks turns on the Invoices preference if you turn on this preference (Sales & Customers).
Both sales receipts and statements are turned off. When these preferences are both turned off, QuickBooks turns on the Invoices preference, because invoices are the only other type of sales form available.
Sales receipts are turned off, but sales tax is turned on. This combination of settings makes QuickBooks turn on the Invoices preference because invoices are the only other sales form besides sales receipts that handle sales tax.
Some Home Page icons appear or disappear when you turn their corresponding preferences on or off. In the Desktop View preference category (Edit→Preferences→Desktop View), the Company Preferences tab’s Related Preferences section (visible in Figure 27-2) offers shortcuts to those preferences. (These links take you to the Company Preferences tabs in other preference categories, so you need admin privileges to change the settings described in this section.) Here’s how you use the links in that section to turn these icons on or off:
Click the Estimates link and QuickBooks displays the Jobs & Estimates category’s Company Preferences tab. If you select the Yes radio button in the “Do You Create Estimates?” section, QuickBooks displays the Estimates icon in the Home Page’s Customers panel. If you select the No radio button instead, the Estimates icon disappears from the Home Page.
Click the Sales Tax link to jump to the Sales Tax category’s Company Preferences tab. Select the Yes option next to the “Do you charge sales tax?” label to display the Manage Sales Tax icon in the Home Page’s Vendors panel. If you select the No option instead, the Manage Sales Tax icon disappears from the Home Page.
Clicking the Inventory link takes you to the Items & Inventory category’s Company Preferences tab. If you need to track inventory, turn on the “Inventory and purchase orders are active” checkbox. When you do, the Purchase Orders, Receive Inventory, and Enter Bills Against Inventory icons appear on the Home Page. If you turn this checkbox off, these icons disappear.
Click the Payroll link to display the Payroll & Employees category’s Company Preferences tab. If you choose a payroll option in the QuickBooks Payroll Features section, such as Full Payroll, the Pay Employees and Pay Liabilities icons appear in the Employees panel of the Home Page. If you select No Payroll instead, those icons disappear.
Click the Time Tracking link to jump to the Time & Expenses category’s Company Preferences tab. If you click the Yes option next to the “Do you track time?” label, the program displays the Enter Time icon in the Home Page’s Employees panel. If you select the No option instead, the Enter Time icon disappears from the Home Page.
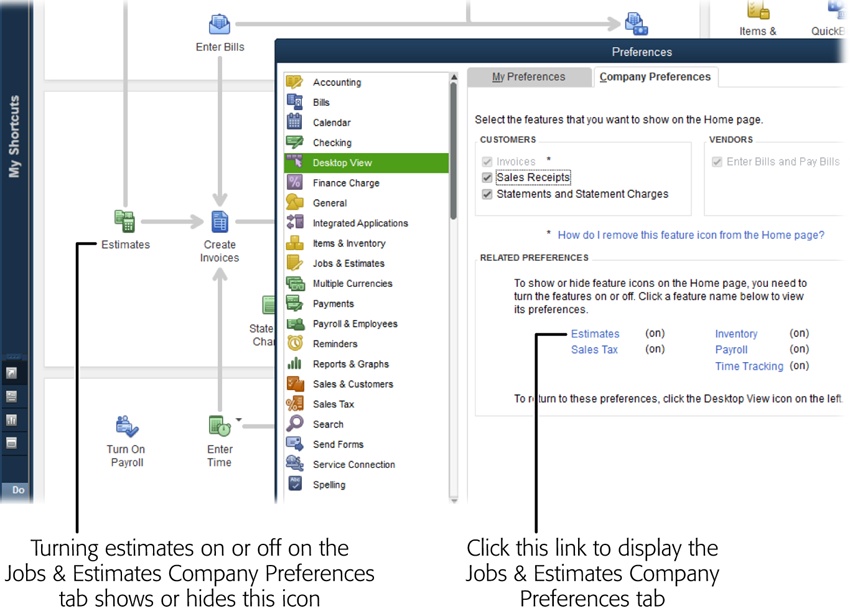
Figure 27-2. To show or hide the icons on the Home Page (like Estimates and Payroll), simply click the links in the Related Preferences section of the Company Preferences tab, and QuickBooks jumps to the corresponding preference section so you can turn the feature on or off. The text “(on)” next to a setting indicates that the preference is currently turned on. If you see “(off)” instead, then the preference is currently turned off.
If you use the top icon bar, then at the Home Page’s top right you’ll see the Account Balances section, which displays your bank accounts and their balances. You can sort the account list by account name or balance.
If you use the left icon bar, the Account Balances section doesn’t appear on the Home Page. Instead, you have to click View Balances in the left icon bar’s middle section to display account balances in the icon bar’s top section. When you display account balances in the left icon bar, you can choose the accounts you want to see in the list and the order in which they appear. To do that, click the “Customize view balances” link at the bottom of the View Balances section. The Customize Account Balances dialog box opens. To add an account to the list, select it in the Available Accounts list, and then click Add. To remove an account, select it in the Selected Accounts list, and then click Remove. To reposition an account, select it in the Selected Accounts list, and then click Move Up or Move Down until it’s where you want it.
In addition to the Home Page, QuickBooks gives you two other ways to access your favorite features fast: the Favorites menu and the icon bar. Out of the box, the Favorites menu is nearly empty, waiting for you to add your preferred features and reports. On the other hand, icons for QuickBooks’ centers and other popular features fill up the icon bar from the get-go, but depending on how you like to work, those icons may languish unclicked. This section describes how to add entries to the Favorites menu and modify the icon bar to display only the features you want.
The Favorites menu, which is located to the right of the Lists menu on the main QuickBooks menu bar, initially has only one entry: Customize Favorites. Choosing this option opens the Customize Your Menus dialog box, where you can add almost any feature or report to the Favorites menu. Here’s how:
Choose Favorites→Customize Favorites.
The Customize Your Menus dialog box opens. The Available Menu Items list is a directory of every feature QuickBooks has to offer—every entry on every menu and submenu on the program’s menu bar appears in this list. The top-level menu bar entries are aligned with the left side of the list box, menu entries are indented, and submenu entries are indented even more. Even the Reports section leaves nothing out—you can choose any built-in, custom, or memorized report in your company file.
In the Available Menu Items list, select a feature you want to add to the Favorites menu, and then click Add.
The feature appears in the Chosen Menu Items list, as shown in Figure 27-3.
To rearrange the entries, select one and then click Move Up or Move Down until it’s in the position you want.
You can’t indent entries or add any kind of separator to help you find the ones you want.
Click OK to close the dialog box.
Now when you click the Favorites menu, it displays all the features you added to it.
The QuickBooks icon bar initially includes icons that open some of the program’s popular features, like the Home Page, the Report Center, and others, depending on which edition of the program you use. If the Home Page always seems to be hidden behind several open windows, you can use the icon bar instead to access your favorite features, memorized reports, or windows you open often. (When you display the icon bar by choosing either View→Left Icon Bar or View→Top Icon Bar, it remains on top of any open windows in the main QuickBooks window—including the Home Page.) You can customize the icon bar to include just the entries you want and change its appearance in several ways. (Any customizations you make apply to both the top and left icon bars.)
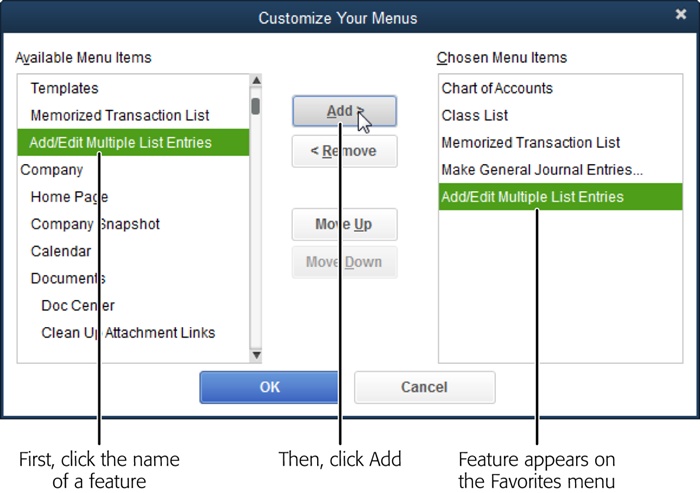
Figure 27-3. To remove an entry from the Favorites menu, select it in the Chosen Menu Items list, and then click Remove. To change the order of the entries, select the entry you want to move, and then click Move Up or Move Down until the entry is where you want it.
Note
The left icon bar makes features easy to find because you can see both their icons and their full text labels. It also offers several other handy features; for the full story, see Menus and the Icon Bar. If the left icon bar takes up too much screen real estate, click the left arrow at the icon bar’s top right to collapse it. To expand it, click the right arrow at the top of the collapsed icon bar.
Here are the basic steps for customizing the icon bar:
Choose View→Customize Icon Bar.
If you use the left icon bar and the My Shortcuts section is displayed at the top of it, you can also click the Customize Shortcuts link at the bottom of the My Shortcuts list (you may have to scroll down to see this link). If the top icon bar is visible, you can right-click it and choose Customize Icon Bar.
Whatever route you use, QuickBooks opens the Customize Icon Bar dialog box.
In the Customize Icon Bar dialog box (Figure 27-4), add shortcuts to the icon bar, remove icons for features you don’t want, and edit or change the order in which they appear, as described in the following sections.
The top icon bar and the left icon bar’s My Shortcuts section immediately reflect the changes you make in this dialog box.
To save your changes, click OK.
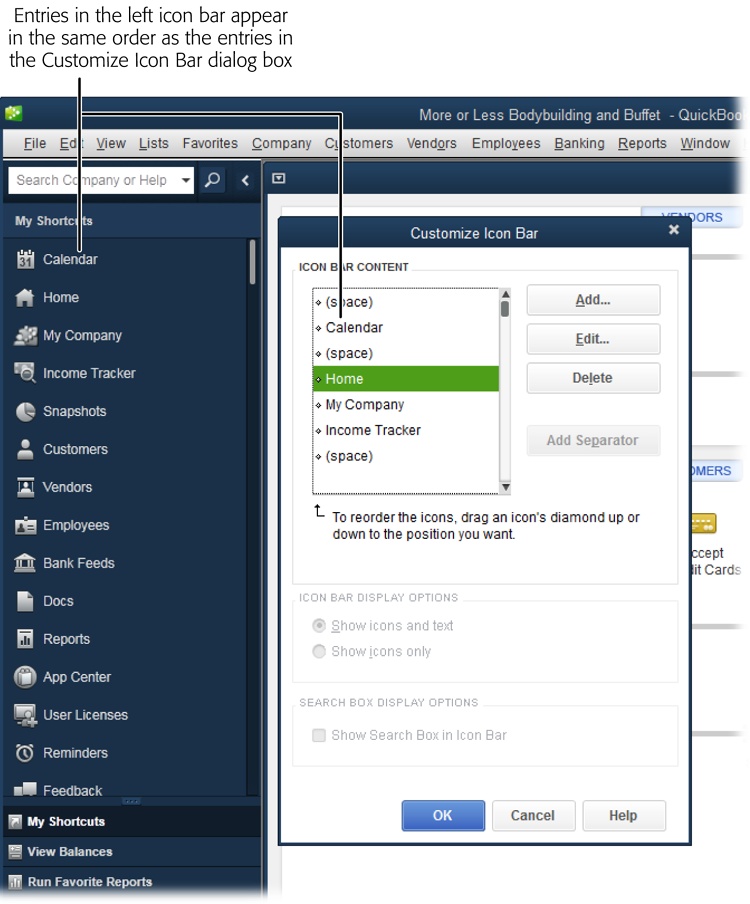
Figure 27-4. This dialog box lets you add icons to the icon bar, remove ones for features you don’t use, and edit an entry’s icon, label, or description. You can also change the order in which icons appear.
If you know which icons you want and don’t want, you can make those changes in one marathon session. Simply open the Customize Icon Bar dialog box by choosing View→Customize Icon Bar, and then do the following:
In the Customize Icon Bar dialog box, select the entry that you want to be above or to the left of the new icon you’re about to insert (depending on whether you use the left icon bar or the top icon bar).
If you use the left icon bar, the icons appear in the same order as in the dialog box’s Icon Bar Content list. The top icon bar, on the other hand, displays the top item in the list on its far left, and the other items to the right of that.
When you select an entry in the list and add an icon, QuickBooks inserts the new icon below the selected entry in the Icon Bar Content list, so it appears below the selected icon on the left icon bar or to the right of the selected icon on the top icon bar.
Click Add.
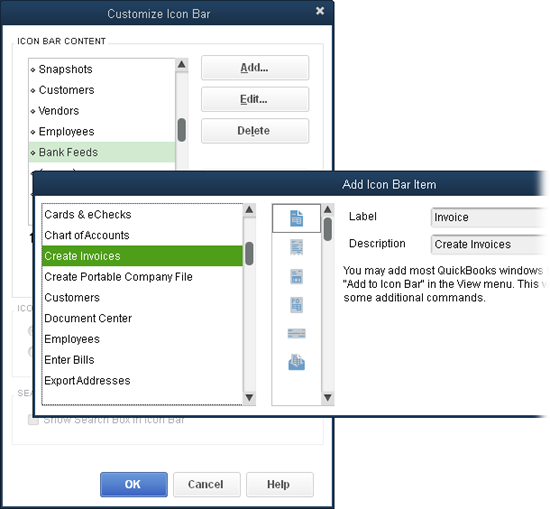
The Add Icon Bar Item dialog box shown in Figure 27-5 opens.
In the list on the Add Icon Bar Item dialog box’s left, click the window or feature you want to add, like Create Invoices (which opens the Create Invoices window).
QuickBooks automatically selects an icon in the list of graphics and fills in the Label and Description boxes. If you like, click a different graphic and/or edit the text in these boxes to change the label that appears on the icon bar or the description that appears as a tooltip when you put your cursor over the icon.
Figure 27-5. In the list on the left side of the Add Icon Bar Item dialog box, select the feature you want to add. (If you don’t see the feature you want, scroll within the list.) If you want to change the item’s icon, label, or description, click a different icon in the list of graphics or type the new text in the Label and Description boxes. Keep the Label text brief so the label isn’t truncated in the left icon bar and doesn’t hog space in the top icon bar. What you type in the Description box pops up as a tooltip when you point your cursor at the icon in the top icon bar.
Click OK to add the item to the icon bar.
You don’t have to close the Customize Icon Bar dialog box to see your changes—QuickBooks makes them right away.
Repeat steps 2–4 to add more icons to the bar.
Back in the Customize Icon Bar dialog box, you can rearrange or edit the entries as explained in the following pages.
To remove an icon from the bar, simply select its entry in the Customize Icon Bar dialog box, and then click Delete.
When you’re done customizing the icon bar, click OK to close the Customize Icon Bar dialog box.
The Add Icon Bar Item dialog box doesn’t list every QuickBooks window, but that doesn’t prevent you from adding windows to the icon bar. Once you realize that you open the same window again and again, you can add an icon for it to the icon bar without even opening the Customize Icon Bar dialog box. For example, you can add an icon for a memorized report that you’ve created (an Accounts Receivable Aging Detail report, say) because reports open in their own windows. Here’s how:
Open the window for the feature or report you want to add to the icon bar, and then choose View→“Add ‘[window name]’ to Icon Bar,” where [window name] is the name of the window you just opened, as in “Add ‘A/R Aging Detail’ to Icon Bar.”
The Add Window to Icon Bar dialog box opens.
In the Add Window to Icon Bar dialog box, click the icon you want to use and, in the Label and Description boxes, type the text you want for the icon’s label and tooltip.
In the left icon bar, the label appears in the My Shortcuts list. In the top icon bar, the label appears below the icon if you display labels as described in the Tip on Tip. In either icon bar, the text in the Description box appears as a tooltip when you put your cursor over the icon. Keep the label short and use the description to elaborate on the window or report’s contents.
Click OK to add the window or report to the icon bar.
QuickBooks plunks the window or report’s icon at the right end of the top icon bar or, if you’re using the left icon bar, at the bottom of the My Shortcuts section. If you want the icon somewhere else, choose View→Customize Icon Bar, and then reposition it in the list (Customizing the Icon Bar).
To change an icon or its associated text, in the Customize Icon Bar dialog box, click the icon’s entry and then click Edit. QuickBooks opens the Edit Icon Bar Item dialog box, which lets you change three features of each icon:
Icon. In the icon list, select the graphic you want to appear on the icon bar. You can’t design your own icons, and QuickBooks doesn’t care whether you choose an icon that fits the feature you’re adding. For instance, an icon with a checkbook register and pen might be good for Writing Checks, but you could choose the faucet with a drop of water if you prefer.
Label. If you want to shorten the icon’s label to condense the top icon bar (or to prevent the label from being truncated in the left icon bar), in the Label box, type the new text.
Description. To change the text that appears as a tooltip for the icon, in the Description box, type your own.
Tip
In the top icon bar, you can squeeze icons together and reduce the icon bar’s height by removing icon labels. Simply open the Customize Icon Bar dialog box and select the “Show icons only” option. Without labels to tell you what the icons represent, you can see a hint by putting your cursor over the icon to display its tooltip description. If you change your mind and want to display labels again, select the “Show icons and text” option.
If you want to group related icons, you can change the order of the items in the icon bar as explained in Figure 27-6. Figure 27-6 also shows you how to add separators to make the groups stand out in the top icon bar. (The left icon bar doesn’t display separators, so you can add them only when the top icon bar is displayed.) To make these changes, open the Customize Icon Bar dialog box.
The Company Snapshot (The Company Snapshot) displays key statistics about your business in one convenient window. You can choose from almost two dozen different views of financial status, like income and expense trends, account balances, customers who owe money, invoice payment status, receivables reports, and so on.
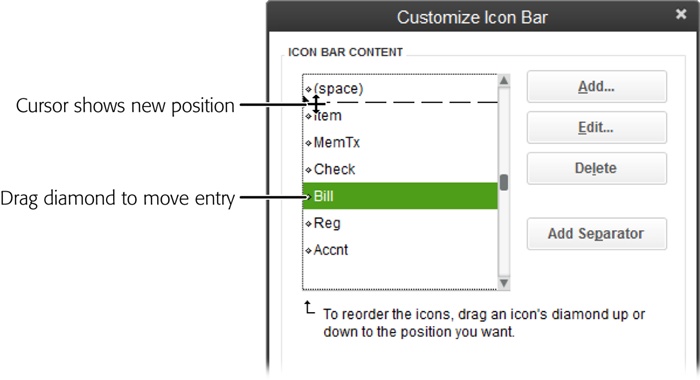
Figure 27-6. To move an icon, drag the diamond to the left of its name. Dragging up or down in this list moves the item to the left or right in the top icon bar, respectively. (In the left icon bar, items appear in the same order as in this list.) To add a separator between groups of icons in the top icon bar, select the last icon in the group, and then click Add Separator. In the Icon Bar Content list, the separator appears below the entry you selected and is listed as “(space).”
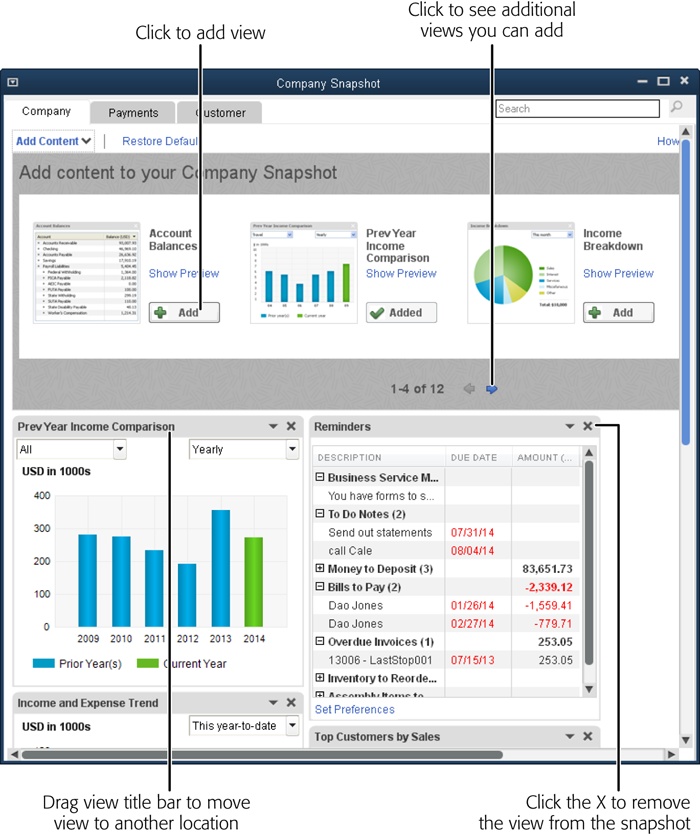
To change the views that appear in the Company Snapshot window, first open the window by choosing Company→Company Snapshot. Next, click the tab you want to customize (Company, Payments, or Customer), and then click Add Content near the top-left corner of the window. The “Add content to your [tab name] Snapshot” panel appears with the name and a thumbnail of each view you can choose, as shown in Figure 27-7. (You may need to resize or maximize the window to see everything shown in Figure 27-7.)
Here’s how you customize the Company Snapshot:
Add a view. In the Add Content panel, click the Add button to the right of the view you want, and QuickBooks adds it to the body of the Company Snapshot. After you add a view, its button’s label changes to a green checkmark and the word “Added.”
Remove a view. In the lower part of the window, click the Close button (the X) at a view’s top-right corner, and then click OK in the message box that appears. (If you change your mind about deleting the view, instead of clicking OK, click the X in the message box’s top right instead.)
Reposition a view. In the lower part of the window, put your cursor over the view’s title and, when the cursor changes to a four-headed arrow, drag the view to its new location in the Company Snapshot window.
When the Company Snapshot shows what you want, click the down arrow to the right of the Add Content label to close the “Add content to your [tab name] Snapshot” panel. If you want to undo the changes you’ve made, click Restore Default near the top of the window.
Everything you do says something about your business—even the forms you use. If you run a small company and don’t have a spare second to customize forms, the built-in QuickBooks invoices and other form templates work just fine. But if you want business forms that convey your sense of style and attention to detail, customized form templates are the way to go. A form template controls the appearance of a specific type of form, such as a purchase order, invoice, or credit memo; you can specify what fields appear on the form, how the fields are formatted, and how they’re laid out. (The box below describes another way to spiff up your QuickBooks forms.)
In QuickBooks, the customization you can apply to form templates comes in several shapes and sizes, described in detail in the sections that follow:
Basic customization. You can add a logo to forms or turn company information fields on or off, depending on what your letterhead includes. Aesthetics like the color scheme and fonts are also at your command.
Changing fields. To notch up the customization, you can choose the fields that appear in forms’ headers, footers, and columns. You can also specify some printing options, whether to print trailing zeroes, and (if you display trailing zeroes) the minimum number of decimal places. To learn all these tricks, see Managing Templates.
Designing form layout. The ultimate in form customization, QuickBooks’ Layout Designer gives you full control over form design. You can add fields and images, plunk them where you want, and format them as you please. For example, you can resize and reposition fields to emphasize the balance due. To learn how to fine-tune forms and build them from scratch, see Appendix G on this book’s Missing CD page at www.missingmanuals.com/cds.
Whether you plan to make minor adjustments or major revisions, you don’t have to start from scratch. One way to build your own forms is to start with a template that comes with QuickBooks or use another customized template that you’ve put together. (To learn how to customize a template while you’re in the middle of a task like creating an invoice, see the box on Editing a Template While You Work.)
Here’s how to edit an existing template:
Choose Lists→Templates.
QuickBooks opens the Templates window, which displays built-in templates and any that you’ve created. If you’re looking for a specific type of form to start with, the Type column displays labels such as Invoice and Credit Memo.
In the Name column, click the template you want to edit, and then press Ctrl+E to open the Basic Customization dialog box (shown in Figure 27-9).
Alternatively, click the template’s name, and then click Templates→Edit Template.
In the Basic Customization dialog box, click Manage Templates.
The Manage Templates dialog box appears, and QuickBooks automatically selects the name of the template you’re editing.
In the Manage Templates dialog box, below the Select Template list, click Copy. Then, in the Template Name box on the dialog box’s right, rename the copy you just created, and then click OK.
When you click Copy, QuickBooks automatically fills in the Template Name box on the right side of the dialog box with “Copy of: [template].” Type over this text to name the template something meaningful, and then click OK to return to the Basic Customization dialog box. By doing this, you can keep the edited template or go back to the original.
Back in the Basic Customization dialog box, make the changes you want.
For basic customization instructions, see the next section. To learn how to change the fields on a template, see Additional Customization. And, for full layout instructions, see Appendix G on this book’s Missing CD page at www.missingmanuals.com/cds.
When the template looks the way you want, in the Basic Customization dialog box, click OK.
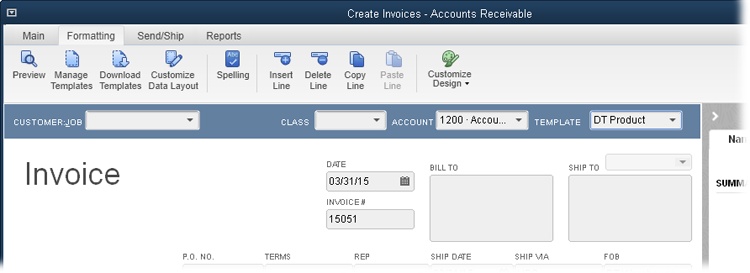
Figure 27-8. To preview a form before you print it, in the transaction window (like Create Invoices, shown here), click the Formatting tab, and then click Preview. If the form doesn’t look the way you want, repeat the template customization steps to change it. When you’re done, click the transaction window’s Main tab, and then click the Print icon.
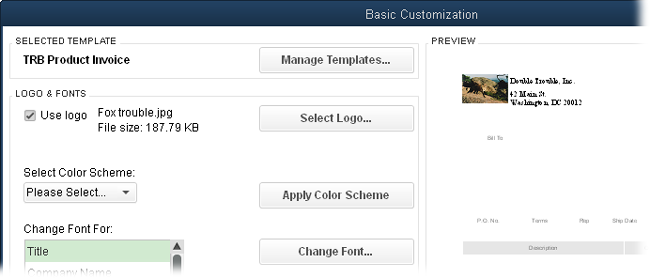
QuickBooks’ Basic Customization dialog box (Figure 27-9) lets you perform the most common types of form changes, while the fancier options stay hidden unless you ask for them. (The previous section explains how to open this dialog box and select a template.) The name of the template you’re customizing appears at the top-left corner of the dialog box, just below the Selected Template label. (It’s a good idea to verify that the template you’re about to edit is the one you want.) This section walks you through your basic options.
Note
The Basic Customization dialog box includes a Preview pane on its right side so you can see whether your template changes are what you want. To preview the form for a transaction like an invoice you’re about to send, in the transaction’s window, click the Formatting tab (shown in Figure 27-8), and then click Preview.
Adding a logo to a QuickBooks template can turn plain paper into a decent-looking document, and it’s the only way to display your company logo on a form you send as a PDF file. Here’s what you do:
In the Basic Customization dialog box, turn on the “Use logo” checkbox.
The Select Image dialog box opens. QuickBooks sets the “Files of type” box to All Image Files, so you’ll see any kind of graphic file in the selected folder. (Later on, if you want to change the image you chose, in the Basic Customization dialog box, click the Select Logo button.)
In the Select Image dialog box, navigate to the folder that contains your logo file, and then double-click the filename. In the message box that appears telling you that QuickBooks will copy your image, click OK.
In the Basic Customization dialog box, the file’s name and size appear to the right of the “Use logo” checkbox, as Figure 27-9 shows. In the dialog box’s Preview pane, QuickBooks puts your logo in the form’s top-left corner.
Figure 27-9. If you print some forms on company letterhead and send others via email, create two templates for the form—one with your logo and one without. Then, when you create the invoice or other transaction, choose the template that matches the way you plan to send the document.
Note
QuickBooks copies the logo file into a subfolder within the folder that holds your company file. For instance, if your company file is named DoubleTrouble.qbw and resides in the folder C:QBCompanyFiles, QuickBooks creates the folder C:QBCompanyFilesDoubleTrouble - Images and places the copy of the logo file there. If you decide to edit your original logo file, be sure to copy the edited file into this subfolder.
If you want to reposition the logo, do so within the Layout Designer (see Appendix G, online).
When the logo looks good, proceed to another customization in the Basic Customization dialog box or click OK to close the dialog box.
If you’re eager to show off your new color printer, you can change the color of the lines and text on the form. In the Basic Customization dialog box’s Select Color Scheme drop-down menu, choose the one you want, and then click the Apply Color Scheme button. The Preview pane shows the Technicolor results.
You can change a template’s fonts to make them easier to read and/or more attractive. (You can also change the font for a single object in a form, as described in online Appendix G.) QuickBooks divides the text on forms into categories: Title, Company Name, Company Address, Labels, Data, Subtotals Label, and Total Label. The Labels category controls the font for all the field labels on the form; the Data category changes the font for the values, like item description and price.
To change the font for a text category, in the Basic Customization dialog box’s Change Font For list, select the category, and then click the Change Font button. The dialog box that opens has all the usual font formatting options, just like the ones you see when you format a report (Customizing Reports). (If you selected a color scheme, the font is set to that scheme’s color and you can’t change it.) When you’re finished making changes, click OK. Back in the Basic Customization dialog box, check out the Preview pane to see the results.
In the Basic Customization dialog box’s Company & Transaction Information section, QuickBooks automatically turns on the Company Name and Company Address checkboxes, which is perfect if you print on plain paper. But if you have letterhead with your company name and address on it, be sure to turn these checkboxes off. The other checkboxes let you add your company’s phone number, fax number, email address, and website address. These values come from the company information you entered; to edit them, choose Company→My Company and then, in the dialog box that appears, click the Edit button (its icon looks like a pencil).
Note
If you’re a QuickBooks administrator, you can modify your company info right from the Basic Customization dialog box. Simply click the Update Information button to open the Company Information dialog box.
Remember the status stamps that QuickBooks adds to forms, such as the word “PAID,” which appears as a watermark on an invoice when you’ve received the payment? QuickBooks turns on the Print Status Stamp checkbox initially, so those watermarks appear when you print forms. If you don’t want to print these status stamps, turn off this checkbox.
At the bottom of the Basic Customization dialog box, clicking Additional Customization displays—you guessed it—the Additional Customization dialog box, which includes several tabs for picking the fields you want on the template and when they should appear. The tabs in this dialog box are the same for every type of form template, unless you create an invoice form and have the Progress Invoicing preference turned on (Jobs & Estimates). In that case, QuickBooks adds the Prog Cols tab, as shown in Figure 27-10, so you can pick the columns you want to add for progress billing.
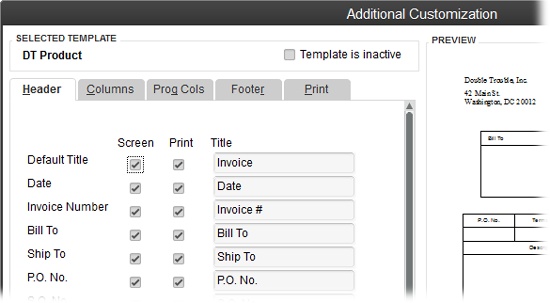
Figure 27-10. To include a field onscreen, turn on its Screen checkbox. To print a field, turn on its Print checkbox. The Title boxes show the text that appears as the field labels. QuickBooks fills them in with either the field’s name or a label that identifies the type of form, such as Invoice for the Default Title field. If you like, you can edit these labels.
Note
If you try to customize one of Intuit’s built-in form templates, you might see a warning that the template is designed for use with Intuit’s preprinted forms. In that case, in the Locked Template message box, click Make a Copy so you can customize a copy of the template. That way, if you decide to use Intuit preprinted forms, you can still select the original template.
Each tab relates to a different area of the form. Setting up the fields on the tabs is straightforward, but a few of them have extra features:
Header. The fields on this tab appear at the top of the form just above the table area. The more common fields for the type of form you’re customizing (like Date, Bill To, P.O. No., and Terms for an invoice) are turned on automatically. At the bottom of the list, you can turn on the checkboxes for custom fields you’ve created to include them on your forms.
Columns. These fields appear as columns in the form’s table area, like the item description, quantity, rate, and amount for each line item in an invoice. In addition to specifying whether they appear onscreen and/or when printed, you can specify the order of the columns by filling in the Order boxes with numbers starting at 1 for the first field. If a field isn’t included in the form, QuickBooks puts a zero in its Order box.
Note
As mentioned on Additional Customization, if you have progress invoicing turned on, you’ll also see the Prog Cols tab.
Footer. The fields that appear in the form’s footer (the area below its table) include Message, Sales Tax, Total, and so on. For an invoice, if you want to include the total balance for a customer—including both the current balance and the previous balance—turn on the Customer Total Balance checkbox. The “Long text” box lets you add a substantial block of text to a form, like a legal disclaimer or other lengthy note. If you add this field to a form, the text in it appears only on the printed version, not onscreen.
Print. You can set up printer options for different types of forms by choosing File→Printer Setup, selecting the form, and then choosing the settings you want (Setting Up QuickBooks to Print Checks). On this tab, QuickBooks automatically selects the “Use [form] printer settings from Printer Setup” option, which means it uses those printer settings. But if you have a special form that doesn’t use the same print settings as the other templates in that category, select the “Use specified printer settings below for this [form]” option instead, and then choose the orientation, number of copies, and paper size for just that form.
QuickBooks automatically turns on the “Print page numbers on forms with more than 2 pages” checkbox. If you bill to fractions of an hour, turn on the Print Trailing Zeros checkbox, which adds zeros and a decimal point so that whole number and decimal quantities line up.
The Templates window (Lists→Templates) includes features for managing the templates you create. In that window’s bottom left, click Templates and then choose an option from the menu. Besides obvious tasks like New, Edit Template, and Delete Template, this menu includes options for other helpful things you can do with templates. This section describes how to manage your templates, and the box on Templates Without Tedium describes how to download premade templates. Templates are company specific, so you’ll also learn how to export your custom templates from one company file to use in others.
Tip
To preview templates before you choose one to work on, in the Templates window, select any template of the type you want (Invoices, Purchase Orders, and so on), and then press Ctrl+E. In the Basic Customization dialog box, click Manage Templates to see a list of all the templates of the same type as the one you selected in the Templates window. Simply click a template’s name to see a preview of it in the Manage Templates dialog box’s Preview pane.
Copying a template before you start editing it is always a good idea, in case your edits go awry and you want the original back. You can create a copy of a template in two ways:
In the Basic Customization dialog box (Starting with an Existing Template in QuickBooks), click Manage Templates. In the Select Template list, click the template’s name, and then click the Copy button below the list. QuickBooks adds the copy to the list and names it “Copy of: [template].” To rename the copy, on the right side of the Manage Templates window, type the new name in the Template Name box, and then click OK.
In the Templates window, select the template you want to copy, and then click Templates→Duplicate. The Select Template Type dialog box appears, which lets you choose any type of template for the duplicate, regardless of what the original template type is. (For example, you can duplicate an invoice template but specify that the copy is a sales receipt instead.) When you click OK in the Select Template Type dialog box, QuickBooks adds the duplicate to the list with “Copy of:” in front of the original’s name. To rename the copy, right-click it in the list and choose Edit Template. In the Basic Customization dialog box, click Manage Templates, type the new name in the Template Name box, and then click OK.
Warning
If you copy a template to use as a basis for a new one you want to create, be sure to edit the copy’s name to identify what the form does, such as InvoiceNoLogo for the one you print on letterhead. If you copy a template as a backup in case you mangle the original, first check that the copy is what you want. (The words “Copy of:” that QuickBooks adds to the beginning of the template’s name tell you that it’s a backup.) After you’ve modified the original template and you’re completely confident that the edited template is correct, you can delete the copy to keep your template list tidy.
You can delete only the templates you create yourself, not ones that come with QuickBooks. To do so, click one in the Templates window, and then click Templates→Delete Template. If you try to delete a built-in QuickBooks template, the program tells you that you’re out of luck.
However, you can hide built-in templates if you don’t want them to appear in the Templates List. The process is just like making a customer, vendor, or invoice item inactive. To do so, in the Templates window, select the template, and then click Templates→Make Template Inactive. You can then reactivate it by first turning on the “Include inactive” checkbox at the bottom of the window to display all templates, and then clicking the X to the left of the template’s name.
If you want to trade form templates between company files, you can export them from one company file and import them into another. Here’s how:
To export a form template, in the Templates window (Lists→Templates), select the template you want to export (you can export only one at a time), and then click Templates→Export.
The “Specify Filename for Export” dialog box opens.
Navigate to the folder where you want to save the file, and in the “File name” box, type a name for the file.
QuickBooks automatically sets the “Save as type” box to “Template Files (*.DES),” which is what you want.
When everything looks good, click Save.
After you’ve saved the template, simply open the other company file in QuickBooks, and then import the template file like so: