Chapter 10
Programming an Arcade Game Using Scratch
In This Chapter
![]() Adding sprites to your game
Adding sprites to your game
![]() Drawing and naming sprites
Drawing and naming sprites
![]() Controlling when scripts are run
Controlling when scripts are run
![]() Using random numbers
Using random numbers
![]() Detecting when a sprite hits another sprite
Detecting when a sprite hits another sprite
![]() Introducing variables
Introducing variables
![]() Making sprites move automatically
Making sprites move automatically
![]() Adding scripts to the Stage
Adding scripts to the Stage
In this chapter, we show you how to use Scratch to create and play an arcade game. You can customize the game with your own graphics, but more importantly, you learn how to put a game project together so you can invent your own games.
In this sample game, you control a flying saucer as it defends its planet from invasion. Grumpy-looking aliens zoom in from above, but you can stop them by hurling fireballs at them. If they get to you, it’s game over. Not just for you, but for your entire planet …
This chapter explains the Control blocks that enable you to coordinate the actions of different sprites with each other and with the player. It assumes a basic understanding of the Scratch interface and how you use blocks to build a script, so refer to Chapter 9 for a refresher if you need it.
 You can download the Scratch file for this game from this book’s companion website. (See the Introduction for more on how to access the book’s online content.) You might find it helpful to look at the color-coded script onscreen while you read this chapter. You can use the File menu at the top of the Scratch window to open the project when you download it, or you can double-click the file’s icon.
Starting a New Scratch Project and Deleting Sprites
If you’ve been playing with Scratch and have blocks and scripts scattered all over the screen, you can start a new project by clicking File on the menu at the top of the screen and then choosing New.
All projects start with the Cat sprite in them, so the first thing you need to do is delete it. Here are the three ways you can delete a sprite:
- Right-click the sprite on the Stage, and then choose Delete from the menu.
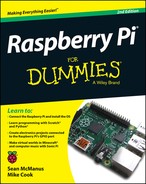
- Right-click the sprite in the Sprite List in the bottom right of the screen, and then choose Delete from the menu you see in Figure 10-1.
- Click the scissors icon above the Stage and then click the sprite on the Stage or in the Sprite List.
Scratch is developed by the Lifelong Kindergarten Group at the MIT Media Lab. See http://scratch.mit.edu.
Figure 10-1: The Sprite List, with the right-click menu open on the cat sprite.
 Take care with the scissors icon: In most art packages, it means Cut, and you can use Paste to replace what you’ve removed. In Scratch, it means Delete, so you lose your sprite completely. If you delete a sprite accidentally, go straight to the Edit menu at the top of the Scratch window and use Undelete to bring it back.
Deleting a sprite is not the same as hiding it. If you hide a sprite, it’s still part of your project, but it’s not visible. You can bring it back later by showing it. If you delete a sprite, its scripts, costumes, and sounds are removed from your project altogether.
Changing the Background
So far, you’ve been working with a plain white Stage, but you can change the background to something more inspiring. The Sprite List contains an entry for the Stage (see Figure 10-1). The Stage can have scripts and different images, just like a sprite can. The Stage’s images are called backgrounds rather than costumes. Click the Stage’s icon in the Sprite List, and then click the Backgrounds tab at the top of the Scripts Area.
You can choose to paint a new background, using the built-in art package (see the section “Drawing Sprites in Scratch,” later in this chapter). Alternatively, you can use an existing image file (or import it in Scratch-speak). Scratch comes with a number of backgrounds you can choose from, or you can use your own photo. Scratch can open images in .jpg, .gif, or .png format.
For this background, we’ve used a photo Sean took of Lanzarote’s barren landscape, which looks almost like it could have been beamed back from Mars.
Adding Sprites to Your Game
There wouldn’t be much demand for a programming language that could only be used to create games about cats. (Actually, given the popularity of cat videos online, maybe there would.) In any case, Scratch gives you three ways to bring new sprites in to your game. You can find the buttons for all three at the top of the Sprite List, indicated in Figure 10-1.
- Paint New Sprite: This opens the Paint Editor so you can draw your sprite in Scratch.
- Choose New Sprite from File: You can use this button to bring one of the preset sprites into your project or to bring in a graphic you’ve created using a different art package. Scratch comes with a wide range of sprites, including dancing people, flying hippos, and fire-breathing dragons (our kind of party!).
- Get Surprise Sprite: Looking for some inspiration? This button fires up your creativity by bringing in a randomly chosen sprite from those that Scratch comes with. It’s also a quick way to get started if you want to experiment with scripting. If you don’t like the sprite you get, you can always delete it and try another surprise.
Drawing Sprites in Scratch
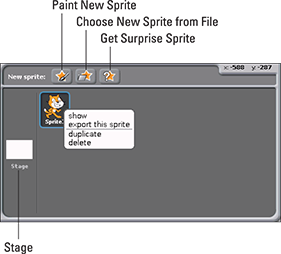
One of the most distinctive ways to put your fingerprint on your game is to draw your own sprites for it. Even if it plays the same as a well-known game, it’ll look unique if you hand-craft your images. Figure 10-2 shows the Paint Editor in Scratch.
Scratch is developed by the Lifelong Kindergarten Group at the MIT Media Lab. See http://scratch.mit.edu.
Figure 10-2: The Paint Editor in Scratch.
The checkered area on the right is the Canvas. The checkered pattern has a special meaning and is used to indicate parts of the image that are transparent, where the background will show through. Usually, you want everything outside the outline of your sprite to be transparent and everything inside it to be another color. Choose the color you want to use, or the checkered transparent “ink,” by using the Color Palette at the bottom left of the Paint Editor (indicated in Figure 10-2).
Above the Color Palette, you can see your drawing and editing tools. Click one to select it, and you can then use it on the Canvas. The icon for your chosen tool is tinted blue so you can easily see which tool you are using. Underneath the tool icons is the Options area (indicated in Figure 10-2). This is where you can choose how to use a particular tool. The main tools are (from left to right, top row first):
- Paintbrush: Hold down the mouse button as you move over the Canvas to leave a line. In the Options area, you can select how big your brush is.
- Eraser: Click the mouse button to delete part of your image. You can hold down the button and move the mouse if you want to delete large parts of the image, or want to delete small sections but have a steady hand. In the Options area, you can choose how big the eraser is.
- Fill: Click inside a shape on your image to fill it with your chosen color. In the Options area, you can choose a graduated pattern to use with your chosen color. To choose a different color to fade into, right-click the Color Palette.
- Rectangle: Click and hold the mouse button to mark one corner of the rectangle and then drag your mouse to the opposite corner and release the button. In the Options area, choose whether you want a filled rectangle or an empty one.
- Ellipse: This is similar to the rectangle tool. Click to indicate the point where lines from the top and left of the ellipse would meet, and then drag the mouse to the opposite side before releasing the button. Again, you have options to draw a filled or empty shape. You can create a perfect curved line by drawing an ellipse and then deleting some of it.
- Line: Click and hold the mouse button at the start of the line, move the mouse to the end of the line, and then release the mouse button. Your options let you choose the brush size, or line thickness.
- Text: You can’t control where text is placed (although you can start a new line by pressing Enter), but you can choose different fonts and sizes in the options.
- Select: Use this to select a rectangular area of your image you would like to modify or remove. Click and hold the mouse button in one corner and drag to the opposite corner and then release the mouse button. You can drag your selected area to move it to a different part of the image or use the buttons at the top of the Paint Editor to enlarge or shrink, rotate anti-clockwise (counterclockwise) or clockwise, flip horizontally, or flip vertically. You can also press Delete on your keyboard to delete the selected area.
- Stamp: Use this tool to copy and paste part of your image. Click and hold the mouse button to mark one corner of the area and then drag your mouse to the opposite corner and release the button. A copy of that area follows your mouse cursor. Click the mouse button to stamp it (or paste it) at that position on the Canvas.
- Eyedropper: Use this tool to choose a color that’s already on your Canvas. If you want to amend part of your sprite and need to use the same ink you used earlier, this tool saves you from having to remember which ink that was.
The Clear button clears the Canvas (except for text), irrespective of what you’ve selected. If you make a mistake, click Undo, shown in Figure 10-2.
When you’ve finished drawing your image, click Set Costume Center at the bottom left of your Paint Editor and then click in the middle of your image. This is important because it controls the point around which your sprite rotates if you use rotation in your game.
Don’t forget to save your game frequently. It’s a good idea to save a new copy of your game with a new filename as you reach each significant point in its development. It means you can go back if you introduce an unexpected error, and also protects you against losing too much of your work if a file gets corrupted (as happened to Sean once while creating this game!).
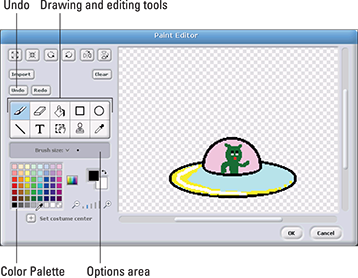
 If you want to edit your picture later, click your sprite’s Costumes tab (see Figure 10-3) and then click Edit beside the costume you want to change. If you want to create additional costumes for a sprite, you can also do that in your sprite’s Costumes tab.
Scratch is developed by the Lifelong Kindergarten Group at the MIT Media Lab. See http://scratch.mit.edu.
Figure 10-3: Changing the names of sprites and costumes.
Naming Your Sprites
Whenever you’re programming, you should give things meaningful names so that you (and others) can easily understand what your program does. Scratch gives your sprites names like Sprite1 and Sprite2, but you can rename them. To rename a sprite, click its name above the Scripts Area (see Figure 10-3) and then type its new name. Your sprite’s costumes are called costume1, costume2, and so on. If you’ve created different costumes for your sprite, you should also give them sensible names so you can easily tell which is which. Go to your sprite’s Costumes tab, click the name beside a costume (see Figure 10-3), and type the new name.
For the space game, you need to create a flying saucer sprite named ship and a sprite named fireball to represent the ship’s weapon. The baddie is a sprite called alien, and should have two costumes: alienok, which shows him looking menacing, and alienhit, which shows him after he’s been hit by the fireball.
To make it easier to see what you’re doing, we recommend you drag your ship to the bottom of the screen, the alien to the top, and put the fireball somewhere in the middle. That roughly reflects where they will be in the finished game.
Controlling When Scripts Run
In Chapter 9, we show you how to start scripts by clicking them in the Scripts Area. Most of the time, you’ll want your scripts to run automatically when certain things happen, such as a player pressing the Fire key.
This is where the Control blocks come in: They allow you to trigger scripts to run when a particular event happens, such as a sprite hitting another sprite or a key being pressed. You use the Control blocks to craft the rules and instructions that govern how your game works.
Using the green flag to start scripts
One of the Control blocks is particularly useful for starting your game and synchronizing your scripts across all your sprites. Above the Stage are two buttons: a green flag and a red stop button. The green flag is used to start scripts running, and you can use a Control block to detect when it’s clicked. This Control block has a curved top on it because no other block can go above it, but it has a notch underneath so you can join motion, looks, sound, or other blocks to it. You can put scripts that are triggered by the green flag being clicked into all your sprites, so clicking the flag makes it easy to start scripts on different sprites at the same time.
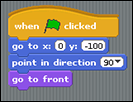
At the end of a game, aliens and the ship could be anywhere, so at the start of the game, you need to reset each sprite to its starting position. For the player’s ship, you need to reset the X position to the center of the screen, set the Y position near the bottom of the screen, reset the ship’s direction, and bring the ship to the front, so that any other sprites will be behind it. Later on, this makes the fireball come from behind the ship, so it looks like it’s being fired from inside, rather than just appearing on top of it.
Figure 10-4 shows the script you should assemble to reset your ship when the green flag is clicked. If you’re making your own graphics, your Y position might need to be higher up, depending on the size of your sprite.
When you have multiple sprites in your project, make sure you’re adding blocks to the right one (the ship, in this case). Each sprite has its own Scripts Area. To choose a sprite, click it in the bottom right.
Scratch is developed by the Lifelong Kindergarten Group at the MIT Media Lab. See http://scratch.mit.edu.
Figure 10-4: Using a green flag Control block to reset your sprite.
Using the Forever Control block
Computers are great at repetitive tasks, and a game program often requires the computer to do the same things over and over again until the game is finished.
Repeated bits of program like this are called loops.
You can use two main Control blocks to make the computer repeat a set of blocks. The Repeat block enables you to specify how many times you want a block or set of blocks to be run. The Forever block runs a block or set of blocks repeatedly until the program is stopped.
Both of them are shaped like a bracket, so they can enclose the blocks you want to repeat inside them. The Forever block doesn’t have a notch on the bottom because it doesn’t make sense to put any other blocks after it: They would never be run because forever never comes to an end.
For the ship in this space game, you need to make sure you keep checking for key presses until the game is finished. Without the Forever loop, the script would check once for a key press, and then finish.
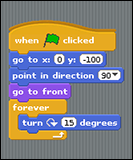
You can find the Forever block by clicking the Control button at the top of the Blocks Palette. Drag it into the script for your ship at the end of your green flag script. The first time you use it, we recommend you test it how it works by dragging a Motion block into its bracket. Figure 10-5 shows a script that makes the ship sprite rotate for as long as the program runs. Click the green flag to start it, but don’t forget to take that rotation block out again when you’ve finished testing.
Scratch is developed by the Lifelong Kindergarten Group at the MIT Media Lab. See http://scratch.mit.edu.
Figure 10-5: The Forever block used to make the ship rotate all the time the program runs.
Enabling keyboard control of a sprite
For our space game, the player needs to be able to move the ship sprite left and right using the arrow keys. In plain English, we need to use a set of blocks that says “If the player presses the left-arrow key, move the ship left.” And we need to put those blocks inside a Forever block, so Scratch keeps checking and moving the sprite all the way through the game. We need a similar set of blocks that move the sprite right too.
The If block is a Control block that enables a set of blocks to be run only under certain conditions. For that reason, it’s often called a conditional statement in programming. Like the Forever block, it’s shaped like a bracket, so you can put other blocks inside it. In the case of the If block, the blocks inside are ones you want to run only in certain circumstances. Drag your If block into the Scripts Area.
Scratch is designed like a jigsaw puzzle, so it gives you visual hints about what blocks can go where if the program is to make sense. The If block has a diamond-shaped hole in it, which is where you describe the circumstances under which you want its blocks to run. There are diamond-shaped Operator and Sensing blocks as well, and we use both in this program.
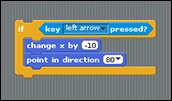
The block we need for keyboard control is a Sensing block called Key Space Pressed?. It detects a tap on the spacebar. If you want it to detect the pressing of a key other than the spacebar, use its menu to set that. In this case, we want it to detect the left-arrow key. You can drag and drop this Sensing block into the diamond-shaped hole in the If block in the Scripts Area.
Figure 10-6 shows the piece of script you need to move the ship left. We’ve used a Motion block to change its X position by -10 units, and we’ve also adjusted its direction, which makes it tilt toward the direction it’s moving. You could change its costume so it looks different when it’s moving left or right, or add any other visual effects or sounds here.
Scratch is developed by the Lifelong Kindergarten Group at the MIT Media Lab. See http://scratch.mit.edu.
Figure 10-6: The If block is used to enable keyboard movement of the sprite.
Enabling a sprite to control another sprite
In programming, you can often choose between several ways to achieve the same effect. The game’s firing mechanism is one such example. You could sense the spacebar (the Fire key) being pressed using a script on the fireball, for example, and use that to trigger the fireball’s ascent.
We’re going to use the firing mechanism as an opportunity to show you how you can make one sprite control another sprite, however. You can’t actually make the ship move the fireball, but you can send a message from the ship to tell the fireball you want it to move itself.
There are two parts to this. The first is that you need to use the Broadcast block on the ship to send a message to all the other sprites. You only want to do this when the spacebar (the Fire button in our game) is pressed, so you need to drag an If block to the Scripts Area of your ship, add a diamond Sensing block to check whether the spacebar is pressed, and finally put the Broadcast block inside the If block’s bracket.
The Broadcast block is one of the Control blocks and it has a menu built into it. Click the menu and click New to create a new message. We’ve called our message fire.
This approach has a couple of advantages. First, you can keep all your game control scripts on one sprite (the ship), which makes the program easier to manage. Second, it’s an efficient way to coordinate multiple sprites. We could, for example, make our alien look terrified when the Fire button is pressed by just changing its costume, and that only requires two blocks: a Control block for when the message fire is received, and the block to change to a new costume where it looks scared. It’s much more efficient than having to look out for the Fire button on the alien too.
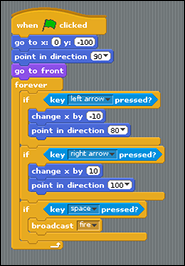
Figure 10-7 shows the script for the ship. When the green flag is clicked, it resets the ship’s position and then enters a loop where it moves the ship left if the left-arrow key is pressed, moves the ship right if the right-arrow key is pressed, sends the fire message if the spacebar is pressed, and then keeps checking for those keys forever. You can run this script to test that the ship moves as expected.
If your script doesn’t behave as expected, check your brackets. You’re allowed to put an If block inside another If block, but that doesn’t make sense here, and it will stop the game’s controls from working properly. If you put the bracket for detecting the Fire key inside the bracket for detecting the right-arrow key, the game will only check for the Fire key when the right-arrow key is pressed.
Scratch is developed by the Lifelong Kindergarten Group at the MIT Media Lab. See http://scratch.mit.edu.
Figure 10-7: The script for resetting and then controlling the ship.
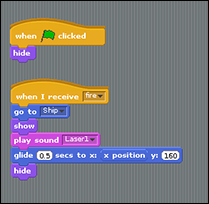
Click the fireball sprite in the Sprite List. You can now add scripts to that sprite. A Control block called When I Receive fire is used to trigger a script when the fire message is broadcast. This script is quite simple: We move the fireball sprite to where the ship is, show the fireball sprite (although it will be behind our ship), play a suitably sci-fi sound from the effects included with Scratch, glide the sprite to the top of the screen, and then hide it again.
In the Glide block, we can drop a block called X Position in place of entering a number for the X position. That means we can keep the X position the same as it already is, while changing the Y position with a gliding movement. The result is that the fireball moves vertically.
The other script we need on the Fireball is one to hide it when the green flag is clicked, just in case it’s onscreen from the previous game when a new one starts.
Remember to make sure you’re adding scripts to the correct sprite.
Figure 10-8 shows the scripts for the fireball sprite. Remember to add the Laser1 sound effect using the sprite’s Sounds tab before creating this script. It’s in the Electronic folder.
Scratch is developed by the Lifelong Kindergarten Group at the MIT Media Lab. See http://scratch.mit.edu.
Figure 10-8: The scripts for the fireball sprite.
Using Random Numbers
Games wouldn’t be much fun if they were always exactly the same, so Scratch enables you to use random numbers in your scripts. To keep players on their toes, we can make the alien appear at a random X position at the top of the screen.
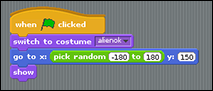
Click your alien in the Sprite List, and then drag in the Green Flag Control block. As with the other sprites, we need to create a script that resets the alien to its starting position. In the case of the alien, the sprite switches to a different costume when it’s hit, so we should make sure it is using its normal costume at the start of a new game and that it is visible onscreen.
For its screen position, the alien needs to have a Y coordinate of 150, which is near the top of the screen. We don’t want to use the full width of the Stage because it looks odd when half the alien is off the edge of the Stage. From experimentation, we found that the ideal starting X position for our alien is between -180 and 180, but yours might vary depending on its size.
Drag in the Motion block you used previously to go to a particular X and Y position. If you click Operators at the top of the Blocks Palette, you can find a block to pick a random number from 1 to 10. Drag this block into the hole where you would normally type the X position, and then change the numbers in the random number block to -180 and 180.
Figure 10-9 shows your initial script for the alien. You can use the green flag to test whether it works and positions the alien at a random point at the top of the screen each time.
Scratch is developed by the Lifelong Kindergarten Group at the MIT Media Lab. See http://scratch.mit.edu.
Figure 10-9: The script to reset the alien at the start of the game.
Detecting When a Sprite Hits Another Sprite
There’s no point throwing flaming fireballs at an alien if it’s not even going to raise an eyebrow. To make this game fun, we need to make the alien sprite react when it’s hit. Most games involve sprites hitting each other (bats and balls, targets and weapons, chasing and catching), so collision detection, as it is often called, is a staple of game design.
You can detect whether the fireball is touching the alien sprite from the fireball, but it is the alien that must react, so that’s where we need to put our script.
You can use a Sensing block to check whether a sprite is touching another sprite, and we combine that with an If block to trigger a reaction when the alien and fireball touch each other.
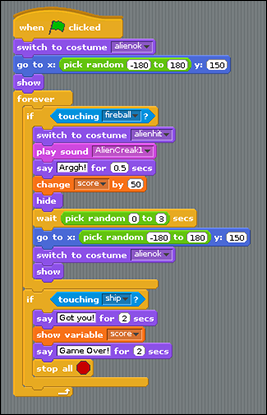
Like the key press detection for the ship, we want to keep checking for the alien being hit throughout the game, so we put the If block inside a Forever block (see Figure 10-10). Inside the first If block are the instructions for what to do when the alien is touching the fireball: Change the alien’s costume to what it looks like when it’s been hit, make it say “Arggh!” in a speech bubble, play a sound effect, and then hide the alien. After a random delay of a few seconds, the alien is repositioned at the top of the screen, switched back to its normal costume and shown, so the horrible cycle of invasion and destruction can begin again.
Scratch is developed by the Lifelong Kindergarten Group at the MIT Media Lab. See http://scratch.mit.edu.
Figure 10-10: Setting up the alien and detecting when it’s hit.
Introducing Variables
Variables are a way of storing information in a program so you can refer back to it later or reuse it. You give that piece of information a name, and then you can refer to it by that name in your script. For example, we want to keep a running tally of the score, and we use a variable to do that. They’re called variables because their value can change over time. The score is zero at the start of the game, for example, but it goes up each time the player zaps an alien out of the sky.
We can tell our script to reset the score to zero, increase it when an alien is hit, and display the score at the end. Each time, we just refer to it as score, and the program works out what number that refers to.
To create a variable, click the Variables button above the Blocks Palette. In the Blocks Palette itself is a button called Make a Variable. Click that, and you will be asked for the variable’s name, which is score in this case.
 You’re also asked whether this variable should be for all sprites or just for the sprite you’re working on now. It’s important to get this right. For our score, we want to make a variable that all our sprites can see. If you have a variable that’s only used by one sprite, it’s better to create a variable that’s only for that sprite because it stops other sprites from being able to interfere with it. When you duplicate a sprite, all its scripts and variables are duplicated with it too, so you might find you have sprites that use variables that share the same name, but that you want to use independently of each other. You see an example of this later in this chapter when we add extra aliens.
When you create a variable, new blocks appear in the Blocks Palette that you can use to change the variable’s value and show or hide it on the Stage. We want the score to go up by 50 each time the alien is hit (be generous — it’s not an easy game!), so drag the Change score by 1 block into your script and edit the number in it to 50. This block needs to go inside the If bracket that detects whether the alien touches the fireball, as you can see in Figure 10-10.
In Chapter 9, you see how you can display a sprite’s position and direction on the Stage. By default, the values of variables are shown on the Stage too. They appear in the top left, but you can drag them wherever you want them. This can be useful for tracing and fixing problems, but it can get in the way of the game. We recommend you deselect the check box beside your new score variable in the Blocks Palette to remove it from the Stage again.
In the finished game, the alien comes down the screen toward the ship, and the game ends when the alien catches the player’s flying saucer. At this point, we want to show the score variable on the Stage and use a special Control block that stops all scripts so the program comes to an end. Figure 10-10 also includes the blocks that do this, which use a similar pattern to the blocks used for detecting when the alien is hit.
Making Sprites Move Automatically
If you’re wondering why we left the alien’s movement to the end, it’s because it makes it easier to test the game. We’ve now got a spaceship that the player can move, a working firing mechanism, and an alien that dies and then regenerates when shot. We can test all that at our leisure and fix any problems without worrying about having to keep up with the alien.
Our alien moves from left to right and then from right to left, and then back again. Each time it changes direction, it moves down the screen a little bit. This is quite sophisticated behavior, but you can create most of it using the blocks you’ve already used this chapter. The art of programming is partly about working out how you use the different blocks or commands at your disposal to achieve what you want to.
To start, we need to make a new variable, which we’ll call leapsize. When you create the leapsize variable, you are asked whether this variable should apply to all sprites or to this sprite only (the alien). Make sure you click the button to make it apply only to this sprite.
Each time Scratch goes around the alien’s Forever loop, it moves the sprite and then checks whether it’s touching a fireball or the spaceship. The leapsize variable is used to store how much the alien’s X position should change by each time. If the alien is going right, the leapsize variable is 20, and if it’s going left, it’s -20.
If you don’t make the leapsize variable for this sprite only, you’ll have problems when you duplicate the sprite later because the aliens will use the same leapsize variable. The leapsize variable is personal to each sprite and its correct value depends partly on where a sprite is on the screen. If you have sprites stuck at the edge of the screen, they are probably interfering with each other’s variables.
When the alien reaches the edge of the screen, the leapsize variable is changed so that the alien goes back in the other direction, and the alien is moved down the screen by 20 units.
Figure 10-11 shows the movement script you need to insert into your alien’s Forever loop as its first blocks.
The green Operators blocks enable you to build more sophisticated instructions. They include the capability to do sums, check how one value compares to another value, and combine different conditions in an If block. They can be hard to understand because you can often put other blocks inside them.

Scratch is developed by the Lifelong Kindergarten Group at the MIT Media Lab. See http://scratch.mit.edu.
Figure 10-11: The alien’s movement script.
The If blocks in our alien’s movement script use Operator blocks to compare the X position with a number so that they can detect when the alien reaches the edge of the screen. We found that -200 and 200 represented the minimum and maximum desirable X positions if you want to avoid the alien slipping partly off the Stage. The comparison blocks are diamond-shaped, so they slot into the hole in the If block. You can use one to check whether the X position is more than (>) 200 and another to check whether it is less than (<) -200. (We shouldn’t check for an exact match with 200 or -200 because the alien starts at a random position, and its steps increase by 20 units. If it started at X position 170, for example, it would go to 190 and 210 but never 200.)
You also need to insert a block to set the starting value of leapsize to 20; otherwise, it will be zero and your alien won’t move. In the Blocks Palette, drag the block for setting a variable’s value to the start of your script, and edit it to set leapsize to 20. This block must go inside your alien’s green flag script but outside your Forever loop.
Fixing the Final Bug
In many commercial software development projects, most of the time and money is spent testing programs to make sure they work as expected, and then fixing them when they don’t. Errors in programs are often called bugs, and even in our simple game here, we have one that would enable the player to cheat.
If the fireball is moving up the screen and the player presses the Fire key again, the firing sequence starts over. That means the fireball that was traveling through the air disappears, and a new one is sent up from the ship. That doesn’t make any logical sense, and it means players suffer no consequences if they misfire: They can just fire again and it’s as if the misfired shot never happened.
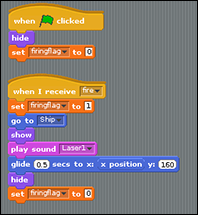
We can use a variable to keep note of when the fireball is moving up the screen so that we can stop the ship from allowing a fireball to be fired again at that time. Variables like this, which are just used to keep track of whether something is happening, are called flags. Our firing flag needs to be able to say whether the fireball is in play or not, so it has two values. While the fireball is onscreen, we give the firing flag a value of 1. When it isn’t, the firing flag has a value of 0.
Click the Variables button at the top of the Blocks Palette, and click the option to make a variable. Give it the name firingflag and make sure the button is selected so it is available for all sprites.
After you’ve created the variable, you can drag a block in from the Variables section of the Blocks Palette to set its value to 1 at the start of the fireball’s firing sequence, and to 0 at the end again. You should also update the fireball’s green flag script so that it resets the firing flag to 0 at the start of a game in case a game ended while the fireball was onscreen. Figure 10-12 shows the final scripts for the fireball.
Scratch is developed by the Lifelong Kindergarten Group at the MIT Media Lab. See http://scratch.mit.edu.
Figure 10-12: The final scripts for the fireball, including the firing flag.
We also need to modify the script for the ship so that it only fires if the firingflag variable is 0 at the time the spacebar is pressed. This is a little bit complicated because we need to lock together lots of different blocks to express this idea.
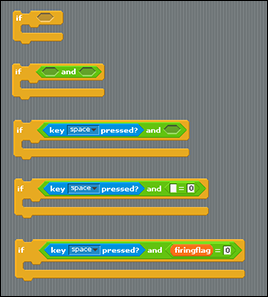
Go back to the ship’s script. You’ll need to modify the If block that checks whether the spacebar is pressed. Figure 10-13, read from top to bottom, shows how you build up your blocks. For simplicity’s sake, we’ve emptied the instructions from inside the If block and separated it out from the rest of the script.
Start by dragging the Sensing block for the spacebar out of the If block’s diamond-shaped hole. In its place, drag the And operator block. This means the blocks inside the If block’s bracket are run only if two things are true. The first is that the spacebar must be pressed, so drag your Sensing block for the spacebar into the diamond-shaped hole inside the And statement. The second is that we need to make sure the firingflag is 0. Drag the '=0' Operator block into the And operator block on the right, and then drag the firingflag variable into the other side of the And operator.
That should ensure the ship can only fire one fireball at a time. They might be aliens, but they still deserve a fair fight!
Scratch is developed by the Lifelong Kindergarten Group at the MIT Media Lab. See http://scratch.mit.edu.
Figure 10-13: How to build the If block that checks whether the ship should fire.
Adding Scripts to the Stage
As well as sprites, you can add scripts to the Stage. Click the Stage in the Sprite List, and you’ll find it has its own Scripts Area. It’s a real pain to have to hunt through your sprites to find where you put a particular block so you can change it, so this is a good place to put scripts that affect the whole game and that aren’t associated with a particular sprite.
For this game, we should add a block to the Stage to set the score to 0 when the green flag is clicked. Otherwise, the score will rise ever higher with each successive game and will never be set back to zero when a new game starts.
Duplicating Sprites
Because of the way we’ve created our alien, with the leapsize variable only applying to that one sprite, we can add more aliens by simply duplicating the first one. Right-click it in the Sprite List and choose Duplicate. Having two aliens makes the game more nail-biting.
Playing Your Game
To play your game without the distraction of your scripts and other clutter on the screen, click the Easel icon near the top right of the screen that says Switch to Presentation Mode when you hover over it. The Stage enlarges to fill the screen. You can use the green flag to play as usual. To close the full-screen view again, click the arrow in the top left. Figure 10-14 shows our final game, but yours might look quite different with your own art in it.
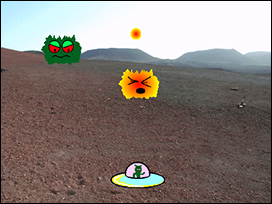
Figure 10-14: Got him! The final game.
Adapting the Game’s Speed
This game runs at a challenging but playable speed on my Raspberry Pi, and runs faster now than it did when the first edition of this book was written. That’s because a lot of work has been done to improve the speed of Scratch over the last couple of years. If the game is unplayable on your Raspberry Pi with the latest software, you can slow down the aliens by reducing the magnitude of the leapsize variable (including after the alien changes direction), or changing the amount by which the alien’s Y position decreases when the sprite changes direction. You can also put a small wait into the alien’s loop, although that might mean the collision detection is less accurate. The game also slows down if you add more aliens or other sprites to it, which would be a creative way to adjust the gameplay to take advantage of the increased speed.
Taking It Further with Scratch
In this chapter, we’ve covered many fundamental concepts that are used in programming, including loops, operators, and variables. You’ve seen how you can use Scratch to design your own games, where sprites interact with each other and respond to the player’s control. You can do lots of things to customize this game. Draw your own sprites. Change the speed of the aliens each time they’re shot, or the way they move. But your next real adventure is to use Scratch and the skills learned in this chapter, perhaps with some of the other blocks we haven’t had room for, to make your very own game.
To find out more about Scratch, and find games and animations others have made, visit the website at http://scratch.mit.edu. You can also share your own work there and get feedback from other Scratch fans.
To dig deeper into Scratch and find more example programs, see Sean’s book Scratch Programming in Easy Steps.