Chapter 5
Using the Linux Shell
In This Chapter
![]() Exploring the Linux file system
Exploring the Linux file system
![]() Creating, removing, and browsing files and directories
Creating, removing, and browsing files and directories
![]() Discovering and installing great free software
Discovering and installing great free software
![]() Managing user accounts on your Raspberry Pi
Managing user accounts on your Raspberry Pi
![]() Customizing your shell with your own commands
Customizing your shell with your own commands
You’ve already had a glimpse of the Linux shell: It’s the text-based way of issuing instructions to your Raspberry Pi. When you switch on your Raspberry Pi, the shell is the first thing you see, and it’s where you type startx if you want to enter the desktop environment. The shell on the Raspberry Pi is called Bash, which is used in most other Linux distributions too. Its name is short for Bourne Again Shell, a pun because it was created to replace the Bourne shell.
In this chapter, you learn how to use the shell to manage your Raspberry Pi. There are several reasons why it’s a good idea to learn how to use the shell. Most importantly, it’s a faster solution for certain tasks than the desktop environment is. Learning Linux is also a useful skill in itself: Linux is a powerful and popular operating system, and the Raspberry Pi can provide an accessible introduction to the basics. It also gives you some understanding of what’s going on behind the scenes on your Raspberry Pi.
To get ready for this chapter, log in to your Raspberry Pi, but don’t type startx to go into the desktop environment. Alternatively, if you’re already in the desktop environment, double-click the LXTerminal icon to open a shell session in a window there.
 If the screen goes blank while you’re using the shell, don’t worry. You can get it back again by pressing any key on the keyboard.
Understanding the Prompt
When you log in to your Raspberry Pi, you see a prompt that looks like this, with a cursor beside it ready for you to enter your command:
pi@raspberrypi ~ $
At first glance, that prompt can look quite foreign and unnecessarily complicated (why doesn’t it just say OK or Ready?), but it actually contains a lot of information. This is what the different bits mean:
- pi: This is the name of the user who is logged in. Later in this chapter, we show you how to add different users to your Raspberry Pi, and if you log in as a different user, you see that user’s name here instead.
- raspberrypi: This is the hostname of the machine, which is the name other computers might use to identify the machine when connecting to it.
- ~ : In Linux, people talk about organizing files in directories rather than folders, but it means the same thing. This part of the prompt tells you which directory you are looking at (the current working directory). The tilde symbol (a horizontal wiggly line) is shorthand for what is known as your home directory, and its presence in the prompt here shows that you’re currently working in that directory. As explained in Chapter 4, this is where you should store your work and other files. An ordinary user doesn’t have permission to put files anywhere except for his or her home directory or any directories inside that home directory.
- $: The dollar sign means that you are a humble ordinary user, and not an all-powerful superuser. If you were a superuser, you would see a # symbol instead. Later in this chapter, we go into more detail about user permissions.
Exploring Your Linux System
It’s perfectly safe to take a look at any of the files and directories on your SD card. As an ordinary user, you’re blocked from deleting or damaging any important files in any case, so you can explore the files on your SD card without fear of deleting anything important.
Listing files and directories
The command for listing files and directories is ls. Because you start in your home directory, if you enter it now, you see the folders and files (if any) in your home directory. Here’s what the output looks like on Sean’s Raspberry Pi. In this chapter, we use bold text for the bits you type, and normal text for the computer’s output.
pi@raspberrypi ~ $ ls
Desktop ocr_pi.png python_games
 Linux is case-sensitive, which means LS, ls, Ls, and lS are completely different instructions. Linux doesn’t see that uppercase and lowercase letters are related to each other, so an S and an s look like completely different symbols to the computer, in the same way that an A and a Z look different to us. If you get the capitalization wrong in your command, it won’t work, and that applies to everything in the shell. If you misplace a capital letter in a filename, Linux thinks the file you want doesn’t exist. When you come to use more advanced command options later, you might find that some commands use upper- and lowercase options to mean different things.
Changing directories
Desktop and python_games are both blue, which means they are directories, so we can go into them to take a look at the files they have inside. The command to change a directory is cd, and you use it together with the name of the directory you would like to go into, like this:
pi@raspberrypi ~ $ cd python_games
Your prompt changes to show the directory you have changed to after the tilde character, and you can double-check that the current directory has changed by using ls to view the files there.
Checking file types
If you want to find out more about a particular file, you can use the file command. After the command name, put the name of the file you’d like more information on. You can list several files in one command by separating them with spaces, like this:
pi@raspberrypi ~/python_games $ file boy.png match0.wav wormy.py
boy.png: PNG image data, 50 x 85, 8-bit/color RGBA, non-interlaced
match0.wav: RIFF (little-endian) data, WAVE audio, Microsoft PCM, 16 bit, mono 44100 Hz
wormy.py: Python script, ASCII text executable
The file command can tell you quite a lot about a file. You not only learn what kind of data is in the first two files (an image and an audio recording), but also how big the image is (50×85 pixels) and that the audio is mono.
 If you’re an experienced computer user, you might have been able to guess what kind of files those were from the file extensions (the .png, .wav, and .py on the end of the filenames). Linux doesn’t require files to have extensions like that, however, so the file command can sometimes be a huge help. (In practice, a lot of applications choose to use file extensions, and users often prefer to do so because it’s more user-friendly than having filenames without any context for the file type.)
You can also use the file command on a directory. For example, when you’re in your pi directory, you can find out about Desktop and python_games like this:
pi@raspberrypi ~ $ file Desktop python_games
Desktop: directory
python_games: directory
That confirms to us that both of these are directories. It might seem counterintuitive to use a command called file to find out about a directory, but it illustrates an important feature of Linux: Linux considers everything to be a file, including hard drives and network connections. It’s all just a bunch of files according to Linux.
Changing to the parent directory
In this chapter so far, we’ve used cd to change into a directory that’s inside the current working directory. However, you will often want to change into the directory above your current working directory, which is known as its parent directory. The python_games directory is inside your pi directory, for example, so the pi directory is the parent directory for it.
To change to the parent directory, you use cd with two dots. You can use that command while in python_games to change your home directory (indicated by a ~ symbol in the command prompt).
pi@raspberrypi ~/python_games $ cd ..
pi@raspberrypi ~ $
The ~ symbol is really just a shorthand for your home directory. Its real name is the same as your username, which means it will usually be pi, the default username. The parent directory of your home directory is, rather confusingly, called home and it’s used to store the home directories of all users of the computer.
When you’re in your home directory, try using cd .. to go into the directory called home. If you use it again, you will find yourself at the highest directory of your operating system, known as the root and indicated with a / in your command prompt. Try navigating through the parent directories to get to the root and then listing what’s there, like this:
pi@raspberrypi ~ $ cd ..
pi@raspberrypi /home $ cd ..
pi@raspberrypi / $ ls
bin boot dev etc home lib lost+found media mnt opt proc root run sbin selinux srv sys tmp usr var
Feel free to use the cd command to nose around these directories. You can use ls to see what’s in the directory, cd to change into a directory you come across, and file to investigate any files you find.
Understanding the directory tree
When people think about how the directories are organized on a computer, they often use the metaphor of a tree. A tree has a single trunk with many branches that come off it, secondary branches that sprout from those branches, and so on until you get down to twigs.
Your Raspberry Pi has a single root directory, with directories that come off it, and subdirectories inside those, and maybe subdirectories inside those too.
Figure 5-1 is a partial picture of the directory tree on your Raspberry Pi. It doesn’t show all the subdirectories in the root, and it doesn’t show all their subdirectories either, but it does show you where your home directory is, relative to other directories and the root. You can think of it as a map. If you are at the root and you want to get to the python_games directory, the tree shows you need to go through the home and pi directories to get there.

Figure 5-1: Part of the directory tree on your Raspberry Pi.
When you get to the root, there are 20 directories there. All the programs, files, and operating system data on your Raspberry Pi are stored in these directories, or in their subdirectories. It’s safe to go into the various directories and have a look around, and to use file to investigate any files you find.
You will rarely need to use any of these directories, but in case you’re curious, here’s what some of them are used for:
- bin: This is short for binaries, and contains small programs that behave like commands in the shell, including ls and mkdir, which you will use to make directories later.
- boot: This contains the Linux kernel, the heart of the operating system, and also contains configuration files that store various technical settings for the Raspberry Pi. Appendix A shows you how you can edit the config.txt file here to change some of your computer’s settings.
- dev: This stores a list of devices (such as disks and network connections) the operating system understands.
- etc: This is used for various configuration files that apply to all users on the computer.
- home: As already discussed, this directory contains a directory for each user and that is the only place a user is allowed to store or write files by default.
- lib: This directory contains libraries (shared programs) that are used by different operating system programs.
- lost+found: The name looks intriguing, but hopefully you’ll never have to deal with this directory. It’s used if the file system gets corrupted and recovers partially.
- media: When you connect a removable storage device like a USB key and it is automatically recognized in the desktop environment, its details are stored here in the media directory.
- mnt: This directory is used to store the details of removable storage devices that you mount yourself (see “Mounting External Storage Devices” in Appendix A).
- opt: This directory is used for optional software on your Raspberry Pi. Usually in Linux, this directory is used for software you install yourself, but on the Raspberry Pi, many programs install into /usr/bin instead.
- proc: This directory is used by the Linux kernel to give you information about its view of the system. Most of this information requires specialist knowledge to interpret, but it’s fun to take a peek anyway. Try entering less /proc/cpuinfo to see how the kernel views the Raspberry Pi’s processors, or less /proc/meminfo to see how much memory your Raspberry Pi has and how it’s being used. (You’ll learn how to use less fully later, but for now, you just need to know that you press Q to quit.) If you use the file command to look at these files, they appear to be empty, which is a peculiarity that arises because they’re being constantly updated.
- root: You don’t have permission to change into this directory as an ordinary user. It’s reserved for the use of the root user, which in Linux is the all-powerful user account that can do anything on the computer. The Raspberry Pi discourages the use of the root account and instead encourages you to use sudo to issue specific commands with the authority of the root user (sometimes called the superuser). Later in this chapter, we show you how this is used to install software (see “Installing software”).
- run: This directory is a relatively recent addition to Linux and provides a place where programs can store data they need and have confidence it will be available when the operating system starts up. Data in the tmp folder is vulnerable to being removed by disk cleanup programs, and the usr directory might not always be available at startup on all Linux systems (it can be on a different file system).
- sbin: This directory contains software that is typically reserved for the use of the root user.
- selinux: This directory is used by Security-Enhanced Linux, a security enhancement to Linux. The directory is empty by default.
- srv: This is another empty directory, which is sometimes used in Linux for storing data directories for services such as FTP, which is used to copy files over the Internet.
- sys: This directory is used for Linux operating system files.
- tmp: This directory is used for temporary files.
- usr: This directory is used for the programs and files that ordinary users can access and run.
- var: This directory stores files that fluctuate in size (or are variable), such as databases and log files. You can see the system message log with the command less /var/log/messages (use the arrow key to move down and press Q to quit).
Using relative and absolute paths
We’ve been discussing how to move between directories that are immediately above or below each other on the directory tree, a bit like the way you might work in a desktop environment. You click to open one folder, click to open the folder inside it, and click to open the folder inside that. It’s easy (which is why it’s popular), but if you’ve got a complex directory structure, it soon gets tedious.
If you know where you’re going, the shell enables you to go straight there by specifying a path, which is a description of a file’s location. There are two types of paths: relative and absolute. A relative path is a bit like giving directions to the directory from where you are now (go up a directory, down through the Desktop directory, and there it is!). An absolute path is more like a street address: It’s exactly the same wherever you are.
Absolute paths are usually measured from the root, so they start with a / and then they list the directories you go through to find the one you want. For example, the absolute path to the pi directory is /home/pi. Whichever directory you are in, you can go straight to the pi directory using
cd /home/pi
If you wanted to go straight to the Desktop directory, you would use
cd /home/pi/Desktop
To go straight to the root, just use a slash by itself, like this:
cd /
Besides using the root as a reference point for an absolute path, you can also use your home directory, which you represent with a tilde (~). You can use it by itself to jump back to your home directory:
cd ~
Alternatively, you can use it as the start of an absolute path to another directory that’s inside your home directory, like this:
cd ~/Desktop
Relative paths use your current working directory as the starting point. It’s shown in the command prompt, but you can also check it by entering the command
pwd
Whereas your command prompt uses the tilde (~) character if you’re in your home directory, pwd tells you where that actually is on the directory tree and reports it as /home/pi.
A relative path that refers to a subdirectory below the current one just lists the path through the subdirectories in order, separating them with a slash. For example, on Figure 5-1, you can see that there is a directory called home, with a directory called pi inside it, and a directory called Desktop inside that. When you’re in the directory with the name home, you can change into the Desktop directory by specifying a path of pi/Desktop, like this:
pi@raspberrypi /home $ cd pi/Desktop
pi@raspberrypi ~/Desktop $
You can change into any directory below the current one in this way. You can also have a relative path that goes up the directory tree by using .. to represent the parent directory. Referring to Figure 5-1 again, imagine you want to go from the Desktop directory into the python_games directory. You can do that by going through the pi directory using this command:
pi@raspberrypi ~/Desktop $ cd ../python_games
pi@raspberrypi ~/python_games $
As the prompt shows, you’ve moved from the Desktop directory into the python_games directory. You started in Desktop, went into its parent directory (pi), and then changed into the python_games directory there. You can go through multiple parent directories to navigate the tree. If you wanted to go from the pi directory to the boot directory, you could use
pi@raspberrypi ~ $ cd ../../boot
pi@raspberrypi /boot $
That takes you into the parent directory of pi (the directory called home), takes you up one more level to the root, and then changes into the boot directory.
You can choose to use an absolute or relative path depending on which is most convenient. If the file or directory you’re referring to is relatively close to your current directory, it might be simplest to use a relative path. Otherwise, it might be less confusing to use an absolute path. It’s up to you. Paths like this aren’t just used for changing directories. You can also use them with other commands and to refer to a specific file by adding the filename at the end of the path. For example, you can use the file command like this:
file /boot/config.txt
As you discover more commands in this chapter that work with files, you’ll be able to use your knowledge of paths to refer to files that aren’t in the same directory as your current working directory.
Be careful not to confuse absolute and relative paths. In particular, pay attention to where you use a slash. You should only use a / at the start of your path if you intend to use an absolute path starting at the root.
If you want to change into a directory for a quick look around and then go back again, you can use a shortcut to change back to your previous directory:
cd -
If you enter this, the shell shows you the previous directory you were in and then changes your current working directory to that.
You can also change to your home directory quickly by using the cd command alone, like this:
pi@raspberrypi /boot $ cd
pi@raspberrypi ~ $
Investigating more advanced listing options
You can use ls to look inside any directory outside the current working directory by specifying its path, like this:
pi@raspberrypi ~ $ ls /boot
Although you’re in your home directory, that command gives you a listing from the /boot directory.
When we provide information for a command to process like this, such as a filename or a path, it’s called an argument. Many Linux commands can accept arguments in this way (including the cd and file commands). Some commands can also accept options. Options tell the command how to do its work, and they have the format of a hyphen followed by a code that tells the command which option(s) to use.
There are several options you can use with ls to change its results, shown in Table 5-1. For example, change into your home directory and use
pi@raspberrypi ~ $ ls -R
This lists all the contents in your home directory, and then all the contents in the Desktop and python_games folders, which are both inside your home directory.
When you are using options and arguments together, the options come before the arguments, so the format of the typical Linux command is
command -options arguments
For example, try using the -X option to list the contents of the python_games folder. All the .png, .py, and .wav files will be grouped together, so it’s easier to see what’s there. The command to use is
pi@raspberrypi ~ $ ls –X ~/python_games
You can use several options together by adding all the option codes after a single hyphen. For example, if you want to look in all your directories under your current directory (option R), and you want to group the results by file type (option X), and use symbols to indicate directories and executables beside their filenames (option F), you would use
pi@raspberrypi ~ $ ls -RXF
Figure 5-2 shows the resulting output. One thing you might notice here is that a single period (full stop) is used to refer to the current directory in the pathnames, so the path for the first set of results is simply a period. This short code for the current directory is similar to the two periods used to refer to the parent directory.
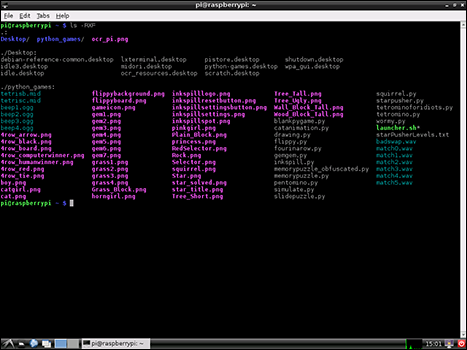
Figure 5-2: A listing including all subdirectories, sorted by file type, with symbols used to indicate folders and executables by their filenames.
When you’re experimenting with ls (or at any other time, come to that), use the command clear to empty the screen if it gets messy and hard to follow.
Table 5-1 Options for ls Command
|
Option |
Description |
|
-1 |
Adding a number 1 outputs the results in a single column instead of a row. |
|
-a |
Displays all files, including hidden files. The names of hidden files start with a period (full stop). Hidden files are usually put there (and required) by the operating system, so they’re best left alone. You can create your own hidden files by using filenames that start with a period. |
|
-F |
This option puts a symbol beside a filename to indicate its type. When you use this option, directories have a / after their names, and executables have a * after their name. |
|
-h |
In the long format, this option expresses file sizes using kilobytes, megabytes, and gigabytes to save you the mental arithmetic of working them out. It’s short for human-readable. |
|
-l |
This displays results in the long format, which shows information about the permissions of files, when they were last modified and how big they are. Note that this option uses a letter l, short for long. |
|
-m |
Lists the results as a list separated by commas. |
|
-R |
This is the recursive option. As well as listing files and directories in the current working directory, it opens any subdirectories and lists their results too, and keeps opening subdirectories and listing their results, working its way down the directory tree. You can look at all the files on your Raspberry Pi using ls -R from the root. Be warned: It’ll take a while. To cancel when you get bored, use Ctrl+C. |
|
-r |
This is the reverse option, and it displays results in reverse order. By default, results are in alphabetical order, so this will show them in reverse alphabetical order. Note that -r and -R are completely different options. |
|
-S |
This sorts the results by their size. |
|
-t |
This sorts the results according to the date and time they were last modified. |
|
-X |
This sorts the results according to the file extension. |
Understanding the Long Listing Format and Permissions
One of the most useful ls options is long format, which provides more information on a file. You trigger it using the option –l (a letter l) after the ls command, like this:
pi@raspberrypi ~/ $ ls -l
total 40
-rw-r--r-- 1 pi pi 256 Nov 18 13:53 booknotes.txt
drwxr-xr-x 2 pi pi 4096 Oct 28 22:54 Desktop
drwxrwxr-x 2 pi pi 4096 Nov 17 13:40 python_games
drwxr-xr-x 2 pi pi 4096 Nov 3 17:43 seanwork
-rw-r--r-- 1 pi pi 20855 Nov 12 2010 spacegame.sb
This listing includes some of Sean’s work files on the Raspberry Pi (booknotes.txt, spacegame.sb and the directory seanwork), which we can use to see how different files are described.
This layout might look a bit eccentric, but it’s easier to follow if you read it from right to left. Each line relates to one file or directory, with its name on the right and the time and date it was last modified next to that. For older files, the date’s year appears in place of the modification time, as you can see for the file spacegame.sb in the preceding list.
The number in the middle of the line is the size of the file. Three of the entries (Desktop, python_games, and seanwork) are directories that have the same file size (4096 bytes), although they have vastly different contents. That’s because directories are files too, and the number here is telling you how big the file is that describes the directory, and not how big the directory’s contents are. The file size is measured in bytes, but you can add the –h option to give you more meaningful numbers, translating 4096 bytes into 4K, for example.
The rest of the information concerns permissions, which refer to who is allowed to use the file and what they are allowed to do with it. Linux was designed from the start to offer a secure way for multiple users to share the same system, and so permissions are an essential part of how Linux works.
Many people find they can use their Raspberry Pi without needing to know too much about permissions, but permissions tell you a lot about how Linux works, and you might find the knowledge useful if you want to be a bit more adventurous.
The permissions on a file are divided into three categories: things the file’s owner can do (who is usually the person who created the file), things that group owners can do (people who belong to a group that has permission to use the file), and things that everyone can do (known as the world permissions).
In the long listing, you can see the word pi is shown twice for each file. These two columns represent the owner of the file or directory (the left of the two columns), and the group that owns the file. These both have the same name here because Linux creates a group for each user with just that user in it, and with the same name as the user. In theory, the group could be called something like students, and include all the students who have usernames for the computer.
The far left column contains a code that explains what type of file each file is, and what the permissions are on that file. To make sense of the code, you need to break it down into four chunks, like Table 5-2, which represents the code shared by booknotes.txt and spacegame.sb in our long listing.

The two main file types you’re likely to come across are regular files and directories. Regular files have a hyphen (-) for their file type at the start of their code, and directories have a d. You can see both of these symbols used in our long directory listing.
Next come the permissions for the owner, group and world. These are the three different types of permission someone can have:
- Read permission: The ability to open and look at the contents of a file, or to list a directory
- Write permission: The ability to change a file’s contents, or to create or delete files in a directory
- Execute permission: The ability to treat a file as a program and run it, or to enter a directory using the cd command
That probably seems logical and intuitive, but there are two potential catches: Firstly, you can only read or write in a directory if you also have execute permission for that directory; and, secondly, you can only rename or delete a file if the permissions of its directory allow you to do so, even if you have write permission for the file.
The permissions are expressed using the letters r (for read), w (for write), and x (for execute), and these make up a three-letter code in that order. Where permission has not been granted, the letter is replaced with a hyphen. So in Table 5-2, you can see that the owner can read and write the file, but the group owner and world (everyone else) can only read it.
The code for the Desktop folder in our long listing is drwxr-xr-x. The first letter tells you it’s a directory. The next three letters (rwx) tell you that the owner can read, write to it, and execute it, which means they have freedom to list its contents (read), add or delete files (write), and enter the directory in the first place to carry out those actions (execute). The next three characters (r-x) tell you group owners may enter the directory (execute) and list its contents (read), but may not create or delete files. The final three characters (r-x) tell you everyone else (the world) has been granted those same read-only permissions.
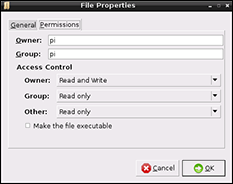
Several commands are used to change the permissions of a file (including chmod to change the permissions, chown to change a file’s owner, and chgrp to change the file’s group owner). We don’t have space to go into detail here, but see “Learning More about Linux Commands” in this chapter for guidance on how to get help with them. The easiest way to change permissions, in any case, is through the desktop environment. Right-click a file in File Manager (see Chapter 4) and open its properties. The Permissions tab of the File Properties window, shown in Figure 5-3, enables you to change all the permissions associated with a file.
LXDE Foundation e.V.
Figure 5-3: Changing file permissions using File Manager.
Slowing Down the Listing and Reading Files with the Less Command
The problem with ls is that it can deluge you with information that flies past your eyes faster than you can see it. If you use the LXTerminal from the desktop environment, you can use a scrollbar to review information that has scrolled off the screen.
The more usual solution, however, is to use a command called less, which takes your listing and enables you to page through it, one screen at a time. To send the listing to the less command, you use a pipe character after your listing command, like this:
ls | less
When you’re using less, you can move through the listing one line at a time using the up and down arrow keys, or one page at a time using the Page Up (or b) and Page Down (or space) keys. You can search by pressing / and then typing what you’d like to search for and pressing Enter. When you’ve finished, press the Q key (upper- or lowercase) to quit.
You can cancel a Linux command, including an overwhelming listing, by pressing Ctrl+C.
You can also use less to view the contents of a text file by giving it the filename as an argument, like this:
less /boot/config.txt
This is a great way to read files you find as you explore Linux. The less command warns you if the file you want to read might be a binary file, which means it’s computer code and likely to be unintelligible, so you can try using the less command on anything and bow out gracefully if you get the warning. Displaying binary code on screen can result in some strange results, including distorting the character set in the shell.
If you want to see the first ten lines of a file, perhaps just to check what version it is, you can use the command head followed by the filename.
Now you have all the tools you need to explore your Linux operating system!
Speeding Up Entering Commands
Now you’ve learned a few basic commands, we can teach you a few tricks to speed up your use of the shell.
First of all, the shell keeps a record of the commands you enter called your history, so you can save retyping if you want to reuse a command. If you want to reuse the last command, just type in two exclamation marks and press Enter. If you want to use an earlier command, tapping the up arrow brings back your previous commands in order (most recent first) and puts them after your prompt. The down arrow moves through your history in the other direction if you overshoot the command you want. You can edit the command before pressing Enter to issue it.
The shell also tries to guess what you want to type and automatically completes it for you if you tap the Tab key. You can use it for commands and files. For example, type
cd /bo
and then press the Tab key, and the path is completed as /boot/.
This technique is particularly helpful if you’re dealing with long and complicated filenames. If it doesn’t work, you haven’t given the shell enough of a hint, so you need to give it some more letters to be sure what you mean.
Using Redirection to Create Files in Linux
Before you look at how you delete files and copy them, you should prepare some files to play with.
It’s possible to send the results from a command to a file instead of the screen; in other words, to redirect them. You could keep some listing results in a file, for example, so you have a permanent record of them or so you can analyze them using a text editor. You turn screen output into a file by using a greater-than sign and the filename you’d like to send the output to, like this:
ls > ~/listing.txt
 You don’t need to have the file extension of .txt for it to work in Linux, but it’s a useful reminder for yourself, and it helps if you ever copy the file back to a Windows machine.
Try using this command twice from two different directories and then looking at the contents of listing.txt with the less command. You’ll see just how unforgiving Linux is. The first time you run the command, the file listing.txt is created. The second time you do it, it’s replaced without warning. Linux trusts you to know what you’re doing, so you need to be careful not to overwrite files.
If you want a bit of variety, you can use some other commands to display content on screen:
- echo: This displays whatever you write after it on screen. You can use it to solve mathematics problems if you put them between two pairs of brackets (parentheses) and put a dollar sign in front, for example:
echo $((5*5)).
- date: This shows the current time and date.
- cal: This shows the current month’s calendar, with today highlighted. You can see the whole year’s calendar using the option –y.
If you want to add something to the end of an existing file, you use two greater-than signs, as you can see in this example:
pi@raspberrypi ~ $ echo I made this file on > testfile.txt
pi@raspberrypi ~ $ date >> testfile.txt
pi@raspberrypi ~ $ cal >> testfile.txt
pi@raspberrypi ~ $ echo $((6+31+31+28+31+7)) Days until my birthday! >> testfile.txt
pi@raspberrypi ~ $ less testfile.txt
I made this file on
Sat Nov 24 14:40:43 GMT 2012
November 2012
Su Mo Tu We Th Fr Sa
1 2 3
4 5 6 7 8 9 10
11 12 13 14 15 16 17
18 19 20 21 22 23 24
25 26 27 28 29 30
134 Days until my birthday!
You can use redirection like this to create some files you can practice copying and deleting. If you don’t want to spend time creating the file contents, you can make some empty files by redirecting nothing, like this:
> testfile1.txt
Top Tips for Naming Your Files in Linux
If you plan to use the shell, you can follow a few guidelines when creating files that will make your Linux life much easier. These tips apply even if you’re creating files using the desktop environment, but it only really matters when you start working with files in the shell.
Here’s our advice:
- Only use lowercase so you don’t have to remember where the capital letters are in a filename.
- Don’t use filenames with spaces. They have to be treated differently in the shell (put inside single or double quote marks); otherwise, Linux thinks each of the words in the filename is a different file. An underscore is a good substitute.
- Don’t use filenames that start with a hyphen. They’re liable to get confused with command options.
- Don’t use the / character anywhere in a filename.
- Avoid using an apostrophe (’), question mark (?), asterisk (*), quotation (speech) marks (”), slash (), square brackets ([]), or curved braces ({}). If they appear in a filename in the shell, you’ll need to either put a character before each one or put the whole filename in speech marks (assuming it doesn’t already have any).
Creating Directories
As you may know from other computers you’ve used, it’s a lot easier to manage the files on your computer if they’re organized into directories (or folders). You can easily create a directory in your home directory using the command mkdir:
mkdir work
To save time, use one command to create several directories, like this:
pi@raspberrypi ~ $ mkdir work college games
pi@raspberrypi ~ $ ls
college Desktop games ocr_pi.png python_games work
You might see additional files here, especially if you followed the earlier examples to make some text files, but the important thing is that one command made three new directories for you.
The mkdir command’s ability to make several directories at the same time isn’t unusual: Many other commands can also take several arguments and process them in order. You can see the listing of two different directories like this, for example:
ls ~ /boot
The mkdir command doesn’t give you a lot of insight into what it’s doing by default, but you can add the -v option (short for verbose), which gives you a running commentary as each directory is created. You can see what it looks like in the next code snippet.
If you want to make some directories with subdirectories inside them, it would be a nuisance to have to create a directory, go inside it, create another directory, go inside that, and so on. Instead, use the -p option, like this:
pi@raspberrypi ~ $ mkdir –vp work/writing/books
mkdir : created directory 'work'
mkdir : created directory 'work/writing'
mkdir : created directory 'work/writing/books'
The command keeps you informed of any changes it makes, but if the work directory already exists, you won’t see the first line of output above.
Deleting Files in Linux
After experimenting with creating files and directories, you probably have odd bits of file and meaningless directories all over the place, so it’s time to tidy up.
To delete files in Linux, you use the rm command, short for remove. Use it very carefully. There’s no trash can or recycle bin to recover your file from again, so when it’s gone, it’s gone. Actually, expert Linux users might be able to get it back using specialized software and huge amounts of time and patience, so it’s not a secure deletion. But for an average user without access to such software and expertise, when you tell Linux to remove a file, it acts fast and decisively.
The rm command has this format:
rm options filename
As with mkdir, the command doesn’t tell you what it’s doing unless you use the verbose option (-v). As an example, you could remove a file called letter.txt using
pi@raspberrypi ~ $ rm –v letter.txt
removed 'letter.txt'
Like mkdir, running the rm command can take several arguments, which means it can remove several files at once if you list all their names, for example:
pi@raspberrypi ~ $ rm –v letter.txt letter2.txt
removed 'letter.txt'
removed 'letter2.txt'
This is where you need to be extremely careful. Imagine you have two files called old index.html and index.html. The latter is your new website homepage, which you’ve toiled over all weekend (you can see where this is going, can’t you?). You want to clear out the old development file, so you issue this command:
pi@raspberrypi ~ $ rm –v old index.html
rm : cannot remove 'old': No such file or directory
removed 'index.html'
Arrrggh! Because of that space in the old index.html filename, the rm command thinks that you wanted to remove two files, one called old and the other called index.html. It tells you it can’t find the file called old, but goes right ahead and wipes out index.html. Nasty!
To pin up a safety net, use the -i option (for interactive), which tells you which file(s) will be deleted, and prompts you to confirm each deletion. Using that would have avoided this mistake, as shown here:
pi@raspberrypi ~ $ rm -vi old index.html
rm : cannot remove 'old': No such file or directory
rm : remove regular file 'index.html'?
No, no, no! When prompted, you enter Y to confirm the deletion or N to keep the file and move on to the next one (if any).
The risk of deleting the wrong file is one reason why you should avoid files with spaces in their names. For the record, the correct way to remove a file whose name contains a space would be to enclose it in quotes:
pi@raspberrypi ~ $ rm –vi 'old index.html'
Using Wildcards to Select Multiple Files in Linux
Often, a directory contains lots of files that have similar filenames. Sean’s digital camera, for example, creates files with names like these:
img_8474.jpg
img_8475.jpg
img_8476.jpg
img_8477.jpg
img_8478.jpg
If you want to delete a group of them, or to copy them or do anything else with them, you don’t want to repeat the command typing out each filename in turn. Computers are good at repetition, so it’s better to leave the donkey work to the shell.
Wildcards enable you to do that. Instead of giving a specific filename to a command, you can give it a pattern to match, such as all the files that begin with img, or all the files that have the extension .jpg. The asterisk wildcard replaces any number of any character, so *.jpg returns any filenames that end with .jpg, no matter how long they are, and no matter how many of them there are. The question mark asterisk replaces just one character, so img?.jpg would select img1.jpg, img2.jpg, and imgb.jpg, but ignore img11.jpg or any other longer filenames.
If you want to choose files that begin with a particular letter, you can use the square brackets wildcard. To choose any files beginning with the letters a, b, or c, you would use [abc]*. To narrow that down to just those that end with .jpg, you would use [abc]*.jpg.
Table 5-3 provides a quick reference to the wildcards you can use, with some examples.

You can use wildcards anywhere you would usually use a filename. For example, you can delete all your files starting with the letters img, like this:
rm –vi img*
To delete all the files ending with the extension .txt, use
rm –vi *.txt
Be especially careful about where you put your spaces when you’re using wildcards. Imagine you add a sneaky space in the previous example, like this:
rm –vi * .txt
Doh! The shell thinks you want it to delete *, which is a wildcard for every file, and then to delete a file called .txt. Luckily, you’ve used the -i option, so you’ll be prompted before deleting each file, but people often omit that when they’re deleting a lot of files because otherwise they spend a long time confirming each deletion, which is almost as tedious as not using wildcards in the first place.
One way you can test which files match a wildcard is to use the file command with it before you delete using it. For example
file *.txt | less
Take care that you don’t introduce any spaces between testing with file and removing with rm!
Another thing to be careful about is using wildcards with hidden files. Hidden files begin with a full stop, so you might think that .* would match all the hidden files. It does, but it also matches the current directory (.) and its parent directory (..), so .* matches everything in the current directory and the directory above it.
Removing Directories
You can use two commands for removing directories. The first one, rmdir, is the safer of the two, because it refuses to remove directories that still have files or directories inside them. Use it with the name of the directory you want to remove, for example books, like this:
rmdir books
If you want to prune a whole branch of your directory tree, you can use the rm command to remove a directory and delete anything inside it and its subdirectories. Used with the recursive option (-R), it works its way down the directory tree, and with the force option (-f), it deletes any files in its way. It’s a rampaging beast of a command. Here’s an example:
rm –Rf books
It acts silently and swiftly, deleting the books directory and anything in it.
You can add the interactive option to cut the risk, which prompts you for confirmation of each deletion, as you can see in this example where we’ve left a file in the folder work/writing/books:
pi@raspberrypi ~ $ rm –Rfi work
rm: descend into directory 'work'? Y
rm: descend into directory 'work/writing'? Y
rm: descend into directory 'work/writing/books'? Y
rm: remove regular file 'work/writing/books/rapidplan.txt'? Y
rm: remove directory 'work/writing/books'? Y
rm: remove directory 'work/writing'? Y
rm: remove directory 'work'? Y
You can use wildcards when removing directories, but take special care with them, and make sure you don’t introduce any unwanted spaces that result in you removing * (everything). If you use rm –Rf .* to try to remove hidden directories, you also match the current directory (.) and the parent directory (..). That means it deletes every file in the current directory (hidden or not), all its subdirectories and their contents (hidden or not), and everything in the parent directory, including its subdirectories (again, whether or not they are hidden).
Our own experience of the Linux community has been that it’s friendly and supportive, and people welcome newcomers who want to join. But occasionally, you might come across some joker online advising inexperienced users that the solution to their problems is to issue the command rm -Rf /* as root, which attempts to delete everything, starting at the root.
Copying and Renaming Files
One of the fundamental things you’ll want to do with your files is copy them, so let’s take a look at how to do that. The command you need to use is cp, and it takes this form:
cp [options] copy_from copy_to
Replace copy_from with the file you want to copy, and copy_to for where you want to copy it to.
For example, if you wanted to copy the file config.txt from the /boot directory to your home directory (~) so you can safely play with it, you would use
cp /boot/config.txt ~
If you wanted to copy the file into your current working directory, wherever that is, you could use
cp /boot/config.txt .
You can also specify a path to an existing folder to send the file to
cp /boot/config.txt ~/files/
Your original file and the copy don’t have to have the same name. If you specify a different filename, the copy takes that name. For example:
cp /boot/config.txt ~/oldconfig.txt
That copies config.txt from the /boot directory to your home directory and renames it as oldconfig.txt. This same technique enables you to keep a safe copy of a file you’re working on, in case you want to revert to an old version later. The paths are optional, so if you were in your home directory, you could create a backup copy of the file timeplan.txt there using
cp timeplan.txt timeplan.bak
You can use several options with cp, some of them familiar from the rm command. The cp command overwrites any files in its way without asking you, so use the -i option to force it to ask you before it overwrites any existing files with the new copies. The -v option gives you an insight into what the command has done, as it does with rm.
You can use wildcards, so you can quickly copy all your files, or all your files that match a particular pattern. If you want it to copy subdirectories too, however, you need to use the recursive option, like this:
cp -R ~/Scratch/* ~/homebak
That command copies everything in your Scratch directory (including any subdirectories) into a folder called homebak in your home directory. The homebak directory must exist before you run the command for it to work. For advice on using the shell to copy to external storage devices, see Appendix A.
If you don’t want to make a copy of a file, but instead want to move it from one place to another, use the mv command. For example, if you misfiled one of your images and wanted to move it from the australia directory to the japan one, both in your home directory, you would use
mv ~/australia/itinerary.txt ~/japan
That works as long as the destination directory exists. If it doesn’t, the command assumes you want the file to have the new filename of japan, and so the file stops being itinerary.txt in the australia directory, and becomes a file called japan in the home directory. It’s confusing if you do it by mistake, but this quirk is how you rename files in Linux. You move them from being the old name, into being the new name, usually in the same folder, like this:
mv oldname newname
There’s no recursive option with the mv command because it moves directories as easily as it moves files by default.
Installing and Managing Software on Your Raspberry Pi
After you’ve got the hang of it, the Raspberry Pi makes it incredibly easy to discover, download, and install new software. Linux distributions come with thousands of packages, which are software programs that are ready to download from the Internet and install on your computer.
Some packages require other packages to work successfully, but luckily a program called a package manager untangles all these dependencies and takes responsibility for downloading and installing the software you want, together with any other software it needs to work correctly. On the Raspberry Pi, the package manager is called apt.
Installing software requires the authority of the root user or superuser of the computer. The Raspberry Pi doesn’t come with a root account enabled, in common with some other Linux distributions. One school of thought says that a root account is a security threat because people are inclined to use it all the time rather than log in and out of it when they need it. That leaves the whole system and its files vulnerable, including to any malicious software that might get in. Instead of using a root account, you use the word sudo before a command on the Raspberry Pi to indicate that you want to carry it out with the authority of the root user. You can’t use it before all commands, but it’s essential for installing software.
If you ever get an error message that tells you something can only be done with the authority of the root, try repeating the command but putting sudo in front of it.
Updating the cache
The first step in installing software is to update the repository, which is the list of packages the package manager knows about. You do that by entering the following command:
sudo apt-get update
You need to have a working Internet connection for this to work, and it’s likely to take some time. Consider leaving the Raspberry Pi to get on with it while you have a cup of tea, or a slice of raspberry pie, perhaps.
Finding the package name
The apt cache contains an index of all the software packages available, and you can search it to find the software you want. For example, you can find all the games by using
sudo apt-cache search game
The list is huge, so you might want to use less to browse it, like this:
sudo apt-cache search game | less
The screen output looks like this:
pi@raspberrypi ~ $ sudo apt-cache search game
0ad-data - Real-time strategy game of ancient warfare (data)
3dchess - Play chess across 3 boards!
4digits - guess-the-number game, aka Bulls and Cows
7kaa-data - Seven Kingdoms Ancient Adversaries - game data
a7xpg - chase action game
a7xpg-data - chase action game - game data
abe - Side-scrolling game named "Abe's Amazing Adventure"
abe-data - Side-scrolling game named "Abe's Amazing Adventure"
[list continues…]
The bit before the hyphen tells you the name of the package, which is what you need to be able to install it. That might not be the same as the game’s title or its popular name. For example, there are lots of solitaire card games you can install, but none of them have the package name solitaire. To find the package name for a solitaire game, you would use
sudo apt-cache search solitaire
This search returns 20 results, and the first one is
ace-of-penguins - penguin-themed solitaire games
Installing software
If you know the name of the package you would like to install, the following command downloads it from the Internet and installs it, together with any other packages it needs to work correctly (known as dependencies):
sudo apt-get install ace-of-penguins
The last bit is the name of the package we found by searching the cache.
Note that when you’re searching the cache, you use apt-cache in the command and when you’re installing software you use apt-get. It’s easy to get these mixed up, so if it doesn’t work, double-check you’re using the right one.
Running software
Some programs can be run directly from the command line by just typing in their names, such as
penguinspuzzle
which runs the Penguins Puzzle game (see Chapter 19). This game doesn’t show up in the menus in the desktop environment, and needs to be run from the command line using this command.
Most end-user applications require the X server, which means you need to be in the desktop environment to run them. After installing them, you can find them in your Programs menu.
Whether a program should be run from the command line or in the desktop environment depends on the program, so consult its instructions if you can’t work out how to start it.
Upgrading the software on your Raspberry Pi
The package manager’s responsibility doesn’t end once it has installed software. It can also be used to keep that software up to date, installing the latest enhancements and security improvements. You can issue a single command to update all the software on your Raspberry Pi:
sudo apt-get upgrade
It’s a good idea to update the cache first to make sure apt installs the latest updates to your installed packages. You can combine both commands into a single line, like this:
sudo apt-get update && sudo apt-get upgrade
The && means that the second command should be carried out only if the first one succeeds. If the update to the cache doesn’t work, it won’t attempt to upgrade all the software.
The upgrading process ties up your Raspberry Pi for some time.
If you want to update just one application, you do that by issuing its install command again. Imagine you’ve already installed Ace of Penguins and you enter
sudo apt-get install ace-of-penguins
That prompts apt to check for any updates to that package and install them. If there are none, it tells you that you’re already running the latest version.
Removing software and freeing up space
The package manager can also be used to remove software from your Raspberry Pi. For example:
sudo apt-get remove ace-of-penguins
This leaves traces of the applications, which might include user files and any files of settings. If you’re sure you won’t need any of this information, you can completely remove and clean up after an application using
sudo apt-get purge ace-of-penguins
You can do two other things to free up some precious space on your SD card and clean up your system. First, you can automatically remove packages that are no longer required. When a package is installed, other packages it requires are usually installed alongside it. These packages can remain after the original program has been removed, so there’s a command to automatically remove packages that are no longer required. It is
sudo apt-get autoremove
It lists the packages that will be removed and tells you how much space it will free up before prompting you to enter a Y to confirm you want to continue.
When you install a package, the first step is to download its installation file to your Raspberry Pi. After the package has been installed, its installation file remains in the directory /var/cache/apt/archives. Over time, as you try out more and more packages, this can amount to quite a lot of space on your SD card. Take a look in that directory to see what’s built up there. These files aren’t doing much. If you reinstall a program, you can always download the installation file again.
The second thing you can do to clean up your SD card is remove these files using
sudo apt-get clean
Finding out what’s installed on your Raspberry Pi
To find out what software is installed on your Raspberry Pi, you can use
dpkg --list
This command doesn’t need root authority to run, so it doesn’t require you to put sudo at the start.
If you want to find out whether a specific package is installed, use
dpkg --status packagename
For applications that are installed, this also provides a longer description than the short apt cache description, which might include a web link for further documentation.
The Raspberry Pi includes many packages that come with the Linux operating system and are required for its operation. If you didn’t deliberately install a package, exercise caution before removing it.
Managing User Accounts on Your Raspberry Pi
If you want to share the Raspberry Pi with different family members, you could create a user account for each one, so they all have their own home directory. The robust permissions in Linux help to ensure that people can’t accidentally delete each other’s files too.
When we looked at the long listing format, we discussed permissions. You might remember that users can be members of groups. On the Raspberry Pi, groups control access to resources like the audio and video hardware, so before you can create a new user account, you need to understand which groups that user should belong to. To find out, use the groups command to see which groups the default pi user is a member of:
pi@raspberrypi ~ $ groups pi
pi : pi adm dialout cdrom sudo audio video plugdev games users netdev input spi gpio
When you create a new user, you want to make him a member of most of these groups, except for the group pi (which is the group for the user pi). Be warned that if you give users membership of the sudo group, they will be able to install software, change passwords, and do pretty much anything on the machine (if they know how). In a home or family setting, that should be fine, however. The permissions system still protects users from accidentally deleting data they shouldn’t, as long as they steer clear of the sudo command.
To add a user, you use the useradd command with the -m option to create a home directory for him and the -G option to list the groups the user should be a member of, like this:
sudo useradd –m –G [list of groups] [username]
For example:
sudo useradd –m –G adm,dialout,cdrom,sudo,audio,video,plugdev,games,users,netdev,input,spi,gpio karen
Make sure the list of groups is separated with a comma and there are no spaces in there.
You can do a quick check to confirm that a new home directory has been created with the user’s name in the directory /home, alongside the home directory for the pi user:
ls /home
You also need to set a password for the account, like this:
sudo passwd [username]
For example,
sudo passwd karen
You are prompted to enter the password twice, to make sure you don’t mistype it, and you can use this command to change the password for any user. There is no output on the screen as you type the password, which can be a bit off-putting, but keep typing and it should work fine.
You can test whether it’s worked and log in as the new user without restarting your Pi by logging out from your current user account:
logout
If you use the passwd command to set a password for the username root, you will be able to log on as the superuser, who has the power to do anything on the machine. As a last resort, this might enable you to get some types of software working, but we advise you against using it. It’s safer to take on the mantle of the superuser only when you need it, by using sudo.
Don’t forget how cheap SD cards are. If you want to share the Raspberry Pi with different family members, you could just give each user his own SD card to insert when he’s using the machine, and let him log on with the pi username and password.
Learning More about Linux Commands
Lots of information about Linux is available on the Internet, but plenty of documentation is also hidden inside the operating system itself. If you want to dig further into what Linux can do, this documentation can point you in the right direction, although some of it is phrased in quite a technical way.
Commands in Linux can take several different forms. They might be built in to the shell itself, they might be separate programs in the /bin directory, or they could be aliases (which are explained in the next section). If you want to look up the documentation for a command, first find out what kind of command it is, using the type command, like this:
pi@raspberrypi ~ $ type cd
cd is a shell builtin
pi@raspberrypi ~ $ type mkdir
mkdir is /bin/mkdir
pi@raspberrypi ~ $ type ls
ls is aliased to 'ls --color=auto'
If you want to find out where a particular program in installed, use the which command together with the program name:
which mkdir
To get documentation for shell built-ins, you can use the shell’s help facility. Just enter help followed by the filename you’re looking for help with:
help cd
The help command’s documentation uses square brackets for different options (which you may omit), and uses a pipe (|) character between items that are mutually exclusive, such as options that mean the opposite of each other.
For commands that are programs, such as mkdir, you can try using the command with --help after it. Many programs are designed of accept this and display help information when it’s used. Example usage is
mkdir --help
When we used this approach on apt-get, the help page told us that “APT has Super Cow Powers.” Try apt-get moo to see what it means!
There is also a more comprehensive manual (or man page) for most programs, including program-based Linux commands and some applications such as LibreOffice (see Chapter 6). To view the manual for a program, use
man program_name
For example,
man ls
The manual is displayed using less, so you can use the controls you’re familiar with to page through it. This documentation can have a technical bent, so it’s not as approachable to beginners as the help pages.
If you don’t know which command you need to use, you can search across all the manual pages using the apropos command, like this:
pi@raspberrypi ~ $ apropos delete
argz_delete (3) - functions to handle an argz list
delete_module (2) - delete a loadable module entry
dphys-swapfile (8) - set up, mount/unmount, and delete an swap file
groupdel (8) - delete a group
rmdir (2) - delete a directory
shred (1) - overwrite a file to hide its contents, and optionally delete it
tdelete (3) - manage a binary tree
timer_delete (2) - delete a POSIX per-process timer
tr (1) - translate or delete characters
unlink (2) - delete a name and possibly the file it refers to
userdel (8) - delete a user account and related files
You can then investigate any of these programs further by looking at their man pages, or checking whether they can accept a --help request. The number in brackets (parentheses) tells you which section of the man page contains the word you searched for.
For a one-line summary of a program, taken from its man page, use whatis:
pi@raspberrypi ~ $ whatis ls
ls (1) - list directory contents
If you’re not yet drowning in documentation, there’s an alternative to the man page, which is the info page. Info pages are structured a bit like a website, with a directory of all the pages at the top, and links between the various pages. You use info like this:
info ls
The controls used to move around an info document are a bit different to those in a man page. To call up the list of keys, tap ? (pressing the Shift key) when the info page opens.
Customizing Your Shell with Your Own Linux Commands
If you want to stamp your identity on your Raspberry Pi, you can make up your own Linux commands for it. You can have fun inventing a command that shows a special message if someone enters your name (use the echo command for this), but it’s genuinely useful for making more memorable shortcuts so you don’t have to remember all the different options you might want to use. We show you how to make a command for deleting files that uses the recommended options to confirm each file that will be deleted, and to report on what’s been removed. We’ll call it pidel, a mashup of Pi and delete.
The first step is to test whether your preferred command name is already in use. If the type command tells you anything other than not found, you need to think up another command name, or risk upsetting an existing command. Here’s our test:
pi@raspberrypi ~ $ type pidel
-bash: type: pidel: not found
Now that you know that the command pidel is not yet taken, you can create your command. To do that, make an alias, like this:
alias pidel='rm –vi'
Between the quote marks, put the Linux command you want to execute when you enter the pidel command. As you can see from this alias instruction, when you use pidel, it behaves like rm -vi, but you won’t have to remember the letters for those options any more. For example:
pi@raspberrypi ~ $ pidel *.txt
rm: remove regular file 'fm.txt'? y
removed 'fm.txt'
rm: remove regular file 'toc.txt'? n
pi@raspberrypi ~ $
You can combine lists of commands in your alias definition by separating them with semicolons, for example:
alias pidel='clear;echo This command removes files with the interactive and verbose options on.;rm –vi'
Your alias only lasts until the computer is rebooted, but you can make it permanent by putting the alias instruction into the file .bashrc in your home directory. To edit that file, use
nano ~/.bashrc
Nano is a simple text editor that is covered in more detail in Appendix A, but in brief, you can edit your file, use Ctrl+O to save, and Ctrl+X to exit.
Your alias can go anywhere in the .bashrc file. For convenience, and to avoid the risk of disturbing important information there, we suggest you add your aliases at the top. Each one should be on its own line.
Any commands added in .bashrc take effect when you next start up your Raspberry Pi (see the next section, “Shutting Down and Rebooting Your Raspberry Pi”).
Sometimes you might want to replace an existing command with an alias, so that your chosen options are enforced whenever you use it. If you look at the type for ls, for example, it’s aliased so it always uses the color option to classify files.
Shutting Down and Rebooting Your Raspberry Pi
You can just remove the power on your Raspberry Pi to switch it off, but there is a risk that this might corrupt the SD card. To minimize that risk, use the following Linux command to turn off your Raspberry Pi safely:
sudo halt
To switch on your Raspberry Pi again, disconnect and reconnect the power. This is easiest to achieve, with minimal wear on your power supply or Raspberry Pi, if you plug your power supply into a power socket that has a switch on it. You can then use that switch to first remove and then, after a few seconds, restore the power to your Raspberry Pi.
You can reboot (or restart) your Raspberry Pi without disconnecting and reconnecting the power, like this:
sudo reboot