Chapter 1
Introducing the Raspberry Pi
In This Chapter
![]() Getting familiar with the Raspberry Pi
Getting familiar with the Raspberry Pi
![]() Figuring out what you can do with a Raspberry Pi
Figuring out what you can do with a Raspberry Pi
![]() Determining its limitations
Determining its limitations
![]() Getting your hands on a Raspberry Pi
Getting your hands on a Raspberry Pi
![]() Deciding what else you need
Deciding what else you need
The Raspberry Pi is perhaps the most inspiring computer available today. Although most of the computing devices we use (including phones, tablets, and games consoles) are designed to stop us from tinkering with them, the Raspberry Pi is exactly the opposite. From the moment you see its shiny green circuit board, it invites you to prod it, play with it, and create with it. It comes with the tools you need to start making your own software (or programming), and you can connect your own electronic inventions to it. It’s cheap enough that if you break it, it’s not going to break the bank, so you can experiment with confidence.
Lots of people are fired up about its potential, and they’re discovering exciting new ways to use it together. Dave Akerman (www.daveakerman.com) and friends attached one to a weather balloon and sent it nearly 40 kilometers above the earth to take pictures of earth from near space using a webcam.
Professor Simon Cox and his team at the University of Southampton connected 64 Raspberry Pi boards to build an experimental supercomputer, held together with Lego bricks. In the supercomputer (see Figure 1-1), the Raspberry Pis work together to solve a single problem. The project has been able to cut the cost of a supercomputer from millions of dollars to thousands or even hundreds of dollars, making supercomputing much more accessible to schools and students.
The Pi is also being used to make synthesizers, robots, gaming devices, audiobook players, home automation controls, and much more, as you discover in Chapter 20.
Courtesy of Simon Cox and Glenn Harris, University of Southampton
Figure 1-1: Two of the Raspberry Pi boards used in the University of Southampton’s supercomputer, with the rest of the supercomputer in the background.
Although those projects are grabbing headlines, another story is less visible but more important: the thousands of people of all ages who are taking their first steps in computer science thanks to the Raspberry Pi.
Both of the authors of this book used computers in the 1980s, when the notion of a home computer first became a reality. Back then, computers were less friendly than they are today. When you switched them on, you were faced with a flashing cursor and had to type something in to get it to do anything. As a result, though, a whole generation grew up knowing at least a little bit about how to give the computer commands, and how to create programs for it. As computers became friendlier, and we started to use mice and windows, we didn’t need those skills any more, and we lost touch with them.
Eben Upton, designer of the Raspberry Pi, noticed the slide in skill levels when he was working at Cambridge University’s Computer Laboratory in 2006. Students applying to study computer science started to have less experience with programming than students of the past did. Upton and his university colleagues hatched the idea of creating a computer that would come with all the tools needed to program it, and would sell for a target price of $25 (£15). It had to be able to do other interesting things too so that people were drawn to use it, and had to be robust enough to survive being pushed in and out of school bags hundreds of times.
That idea started a six-year journey that led to the Raspberry Pi you probably have on your desk you as you read this book. It was released in February 2012, and sold half a million units by the end of the quarter. By the time the Model B+ launched in July 2014, there were about three million Raspberry Pis in homes, schools, and workplaces.
Getting Familiar with the Raspberry Pi
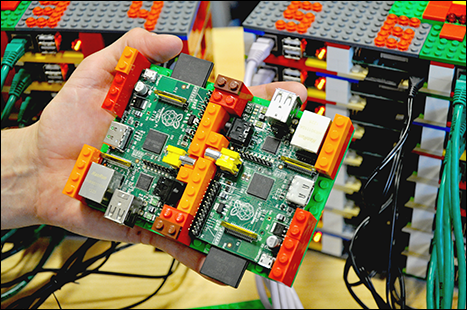
When your Raspberry Pi arrives, you’ll see it’s a circuit board, about the size of a credit card, with components and sockets stuck on it, as shown in Figure 1-2. In an age when most computing devices are sleek and shiny boxes, the spiky Pi, with tiny codes printed in white all over it, seems alien. It’s a big part of its appeal, though: Most of the cases you can buy for the Raspberry Pi are transparent because people love the look of it.
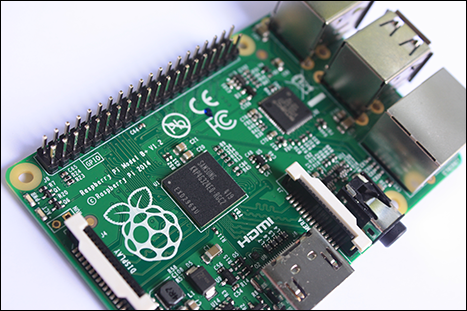
Figure 1-2: Up close with the Raspberry Pi.
There are several different versions of the Raspberry Pi:
- Model B with 256MB memory: Although it’s called Model B, this was the first Raspberry Pi to be released, in February 2012. The Raspberry Pi Model B features an Ethernet connection for the Internet and two USB ports. This 256MB version is no longer in production. It’s called the Model B, incidentally, as a tribute to the BBC Microcomputer that was popular in the UK in the 1980s. It’s sobering to think that the BBC Micro cost about ten times the price of a Raspberry Pi, which, thanks to 30 years of progress in computer science, has more than 8,000 times more memory.
- Model B with 512MB memory: Released from October 2012, the Raspberry Pi Model B had twice the memory capacity. This improved the speed of some software, especially applications that used images heavily. Although the Model B has been superseded by the Model B+, the Raspberry Pi Foundation has said it will keep the Model B in production for as long as there is demand for it.
- Model A: The Model A, released in February 2013, is a stripped-down version of the Model B. It has just one USB port and doesn’t have an Ethernet port for connecting to the Internet. It has 256MB of memory. Because it requires about a third of the power of the Model B, the Model A is ideal for robots and projects in remote locations, where a wired electricity supply isn’t viable and batteries must be used instead.
- Model B+: The Model B+, released in July 2014, has been described by the Raspberry Pi Foundation as “the final evolution of the original Raspberry Pi.” It runs all the same software as the previous versions of the Raspberry Pi, but it has four USB ports, more GPIO pins for connecting electronics projects to the Pi, and lower power consumption and better audio than the Model B. In common with the Model B, it has 512MB of memory. Although all previous versions use SD cards for data storage, the Model B+ uses the smaller MicroSD cards.
- Compute Module: You’ll see it in the online stores alongside the Raspberry Pi, but the Raspberry Pi Compute Module is something quite different. It’s aimed at engineers creating industrial applications (known as embedded systems) or products based on Raspberry Pi technology. At the time of writing, products in development based on it include a media center and a handheld camera. We only mention it here in case you wonder what it is: It’s not covered further in this book, and it’s almost certainly not what you want to buy for your first Raspberry Pi.
So, which version should you get? Our advice would be to get the Model B+ unless you have a specific application in mind that requires low power, in which case get a Model A. There’s one caveat: If you want to use add-on components that connect to your Raspberry Pi, beware of compatibility problems. Because there are more GPIO pins on the Model B+, add-ons designed for the Model A or Model B might not fit the Model B+, and vice versa.
 The Raspberry Pi was made possible in part by the advances in mobile computer chips that have happened in recent years. At its heart is a Broadcom BCM2835 chip that contains an ARM central processing unit (CPU) and a Videocore IV graphics processing unit (GPU). The CPU and GPU share the memory between them. The GPU is powerful enough to be able to handle Blu-ray quality video playback.
Instead of running Windows or Mac OS, the Raspberry Pi uses an operating system called Linux. It’s a leading example of open source, a completely different philosophy to the commercial software industry. Instead of being created within the heavily guarded walls of a company, with its design treated as a trade secret, Linux is built by companies and expert volunteers working together. Anyone is free to inspect and modify the source code (a bit like the recipe) that makes it work. You don’t have to pay to use Linux, and you’re allowed to share it with other people too.
You probably won’t be able to run the software you have on your other computers on your Raspberry Pi. It won’t run Windows or Mac software, and not all Linux software works on the Raspberry Pi. But a lot of Linux software that is compatible with the Raspberry Pi is available and is free of charge.
Figuring Out What You Can Do with a Raspberry Pi
The Raspberry Pi is a fully featured computer, and you can do almost anything with it that you can do with a desktop computer.
When you switch it on, it has a text prompt (see Chapter 5), but you can use a graphical windows desktop to start and manage programs. You can use it for browsing the Internet (see Chapter 4), word processing and spreadsheets (see Chapter 6), or for editing photos (see Chapter 7). You can use it for playing back music or video (see Chapter 8), or for playing games. You can use the built-in software to write your own music, too (see Chapter 14). It’s the perfect tool for homework, but it’s also a useful computer for writing letters, managing your accounts, and paying bills online.
The Raspberry Pi is at its best, however, when it’s being used to learn how computers work, and how you can create your own programs or electronics projects using them. It comes with Scratch (see Chapter 9), which enables people of all ages to create their own animations and games, while learning some of the core concepts of computer programming along the way.
It also comes with Python (see Chapter 11), a professional programming language used by YouTube, Google, and Industrial Light & Magic (the special effects gurus for the Star Wars films), among many others.
It has a General Purpose Input/Output (GPIO) port on it that you can use to connect up your own circuits to the Raspberry Pi, so you can use your Raspberry Pi to control other devices and to receive and interpret signals from them. In Part V, we show you how to build some electronic games controlled by the Raspberry Pi.
Determining Its Limitations
For something that costs so little, the Raspberry Pi is amazingly powerful, but it does have some limitations. Although you probably use it as a desktop computer, its power is closer to a mobile device (like a tablet) than a modern desktop PC.
By way of example, the Raspberry Pi Foundation says the Pi’s overall performance is comparable with a PC using a 300 MHz Pentium 2 processor, which you might have bought in the mid to late nineties, except that the Raspberry Pi has much better graphics. The memory of the Raspberry Pi is more limited than you’re probably used to, with just 512MB or 256MB available. You can’t expand that with extra memory in the way you can a desktop PC.
The graphics capabilities lag behind today’s market somewhat too: The Raspberry Pi Foundation says the Pi’s graphics are roughly the same as the original Xbox games console, which was released ten years ago.
Both the Pentium 2 PC and the original Xbox were fine machines, of course, for their time. They’re just not as snappy as we’re used to, and that’s where you might experience some problems. You might find that the Pi can’t keep up with the demands of some modern software and that some programs don’t run fast enough to be useful on it. However, it’s easy to find programs, try them, and remove them if they’re no good (see Chapter 5), and plenty of programs for work and play run well on the Raspberry Pi (see Chapter 19).
If you already have another computer, the Raspberry Pi is unlikely to usurp it as your main machine. But the Pi gives you the freedom to try lots of things you probably wouldn’t dare to try, or wouldn’t know how to try, with your main PC.
Getting Your Hands on a Raspberry Pi
The Raspberry Pi was created by the Raspberry Pi Foundation, a charity registered in the UK. The charity’s six trustees funded the manufacture of the first large batch themselves, but it sold out rapidly so it quickly became clear that they needed something that would scale better.
The Foundation now licenses the design of the Raspberry Pi to RS Components (www.rs-components.com), Allied Electronics (www.alliedelec.com), and Premier Farnell, which uses the brand name Element 14 (www.element14.com/community/groups/raspberry-pi). In China, you can buy a red-colored Raspberry Pi from Egoman (http://mall.egoman.com.cn). These companies fund and manage the manufacture of the Raspberry Pi, market and sell it, and look after their customers. They accept orders through their websites and are able to offer a number of the accessories you might also need. Some other electrical retailers also stock the Pi now, typically as part of a bundle with a keyboard, mouse, and other accessories. The official Raspberry Pi Swag Store (http://swag.raspberrypi.org/) also sells some Raspberry Pi boards and accessories.
It’s possible that more companies will license the design of the Pi in the future, so check the Raspberry Pi Foundation’s website at www.raspberrypi.org for current links to stores that sell the Pi.
Secondhand Raspberry Pis can be bought on eBay (www.ebay.com), but we would recommend getting a new one so you benefit from the customer support available, and have the peace of mind that it hasn’t been damaged by the previous owner.
Deciding What Else You Need
The creators of Raspberry Pi have stripped costs to the bone to enable you to own a fully featured computer for about $35, so you’ll need to scavenge or buy a few other bits and pieces. We say “scavenge” because the things you need are exactly the kind of things many people have lying around their house or garage already, or can easily pick up from friends or neighbors. In particular, if you’re using a Raspberry Pi as your second computer, you probably have most of the peripherals you need. That said, you might find they’re not fully compatible with the Raspberry Pi and you need to buy replacements to use with the Pi.
Here’s a checklist of what else you might need:
- Monitor: The Raspberry Pi has a high definition video feed and uses an HDMI (high definition multimedia interface) connection for it. If your monitor has an HDMI socket, you can connect the Raspberry Pi directly to it. If your monitor does not support HDMI, it probably has a DVI socket, and you can get a simple and cheap converter that enables you to connect an HDMI cable to it. Older VGA (video graphics array) monitors require a device to convert the HDMI signal into a VGA one. If you’re thinking of buying a converter, check online to see whether it works with the Raspberry Pi first. A lot of cheap cables are just cables, when what you need is a device that converts the signal from HDMI format to VGA, not one that just fits into the sockets on the screen and your Raspberry Pi. These converters can be quite expensive, so Gert van Loo has designed a device that uses the Raspberry Pi’s GPIO pins to connect to a VGA monitor. He’s published the design specs so anyone can build one, and sell it if she wants to too. Take a look at eBay if you need one and you might well find what you need. For more information see www.raspberrypi.org/gert-vga-adapter. (If your monitor is connected using a blue plug, and the connector has three rows of five pins in it, it’s probably a VGA monitor.)
- TV: You can connect your Raspberry Pi to a high definition TV using the HDMI socket and should experience a crisp picture. If you have an old television in the garage, you can also press it into service for your Raspberry Pi. The Pi can send a composite video signal through an RCA cable, so it can use a TV as its display. When we tried this, it worked but the text lacked definition, which made it difficult to read. If a TV is your only option, see Appendix A for advice on tweaking the settings to get the clearest possible picture. It’s better to use a computer monitor if you can, though. You’ll need to get the a cable with the right connector to fit your Pi: The Model A and Model B have a dedicated RCA video socket, but the Model B+ uses the headphone socket for its video output too.
- USB hub: The Raspberry Pi has one, two, or four USB sockets (depending on the model you get). It’s a good idea to consider using a powered USB hub for two reasons. Firstly, and especially if you have a Model A or B, you’re going to want to connect other devices to your Pi at the same time as your keyboard and mouse, which use two sockets. And secondly, a USB hub provides external power to your devices and minimizes the likelihood of experiencing problems using your Raspberry Pi, especially if connecting relatively power-intensive devices such as hard drives. Make sure your USB hub has its own power source independent of the Raspberry Pi.
- USB keyboard and mouse: The Raspberry Pi only supports USB keyboards and mice, so if you’re still using ones with PS/2 connectors (round rather than flat), you need to replace them.
 When the Raspberry Pi behaves unpredictably it’s often because the keyboard is drawing too much power, so avoid keyboards with too many flashing lights and features.
 - MicroSD card or SD card: The Raspberry Pi doesn’t have a hard drive built in to it, so it uses a MicroSD card (Model B+) or SD card (Model A and B) as its main storage. You probably have some SD cards that you use for your digital camera, although you might need to get a higher capacity one. We would recommend an 8GB card as a minimum, but you can use a 4GB card if you use NOOBS Lite (see Chapter 2) or XMBC (see Chapter 8). Even that isn’t much space compared to the hard drive on a modern computer, but you can use other storage devices such as external hard drives with your Raspberry Pi too. SD and MicroSD cards have different class numbers that indicate how fast you can copy information to and from them. The Raspberry Pi Foundation recommends using a class 4 card. The easiest way to get started with the Raspberry Pi is to buy a card with the NOOBS software already on it. The official Raspberry Pi Swag Store (http://swag.raspberrypi.org/), Element14, and RS Components all sell an 8GB MicroSD card that has the NOOBS software preloaded on it (see Chapter 2). It comes with an SD card adapter, shown in Figure 1-3, so the card fits the Model A and B (with the adapter) and B+ (without it).
Figure 1-3: A NOOBS card. The MicroSD card fits into the SD card adapter. The MicroSD card works on the B+, and inside the adapter it also fits the Model A and Model B.
- SD or MicroSD card writer for your PC: Many PCs today have a slot for SD or MicroSD cards so you can easily copy photos from your camera to your computer. If yours doesn’t, you might want to consider getting an SD or MicroSD card writer to connect to your computer. You can use it to copy software to an SD card for use with your Raspberry Pi, but you won’t be able to use it to copy files from your Raspberry Pi to a Windows computer. Alternatively, as we said previously, you can buy a MicroSD card with an SD adapter that has the Raspberry Pi software already on it.
- USB keys:USB keys (also known as flash drives or memory sticks) are fairly cheap and high capacity now (a 64GB USB key is readily affordable), which makes them an ideal complement to your Raspberry Pi. You can transfer files between your PC and your Raspberry Pi using a USB key, too.
- USB Wi-Fi adapter: The Model A doesn’t have an Ethernet socket, so if you want to connect it to the Internet you’ll need a USB Wi-Fi adapter. You might already have one of these from a laptop. Some are incompatible with the Raspberry Pi, but companies that sell the Pi usually sell a compatible Wi-Fi adapter too.
- External hard drive: If you want lots of storage, perhaps so you can use your music or video collection with the Raspberry Pi, you can connect an external hard drive to it over USB. You’ll need to connect your hard drive through a powered USB hub, or use a hard drive that has its own external power source.
- Raspberry Pi Camera Module: The Raspberry Pi has stimulated entrepreneurs to create all kinds of add-ons for it, but this is a product that originated at the Raspberry Pi Foundation. This five-megapixel fixed-focus camera can be used to shoot HD video and take still photos.
- Speakers: The Raspberry Pi has a standard audio out socket, compatible with headphones and PC speakers that use a 3.5mm audio jack. You can plug your headphones directly into it, or use the audio jack to connect to speakers, a stereo, or a TV. If you’re using a TV or stereo for sound, you can get a cable that goes between the 3.5mm audio jack and the audio input(s) on your television or stereo. You won’t always need speakers: If you’re using an HDMI connection, the audio is sent to the screen with the video signal so you won’t need separate speakers, but note that this doesn’t work if you use a DVI monitor.
- Power supply: The Raspberry Pi uses a Micro USB connector for its power supply, and is theoretically compatible with a lot of mobile phone and tablet chargers. In practice, many of these can’t deliver enough current (up to 700 milliamperes), which can make the Raspberry Pi perform unreliably. The resistance in the cables that connect the Pi to the power supply varies greatly too, and this can prevent peripherals like the mouse from working. It’s worth checking whether you have a charger that might do the job (it should say how much current it provides on it), but for best results, we recommend buying a compatible charger from the same company you got your Raspberry Pi from. Don’t try to power the Pi by connecting its Micro USB port to the USB port on your PC with a cable, because your computer probably can’t provide enough power for your Pi. The Raspberry Pi Foundation advises that you should only use batteries to power your Raspberry Pi if you know what you’re doing because there’s a risk of damaging your Raspberry Pi.
- Case: It’s safe to operate your Raspberry Pi as-is, but many people prefer to protect it from spills and precariously stacked desk clutter by getting a case for it. You can buy plastic cases on eBay (www.ebay.com), most of which are transparent so you can still admire the circuitry and see the Pi’s LED lights. These cases typically come as simple kits for you to assemble. The Pibow (www.pibow.com) is one of the most attractively designed cases, assembled from layers of colored plastic (see Figure 1-4). It’s designed by Paul Beech, who designed the Raspberry Pi logo. You don’t have to buy a case, though. You can go without or make your own using cardboard or Lego bricks. Whatever case you go with, make sure you can still access the GPIO pins so you can experiment with connecting your Pi to electronic circuits and try the projects in Part V of this book.
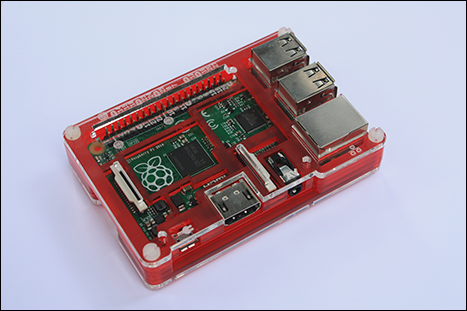
Figure 1-4: The Pibow Coupe case for the Model B+.
- Cables: You’ll need cables to connect it all up, too. In particular, you need an HDMI cable (if you’re using an HDMI or DVI monitor), an HDMI to DVI adapter (if you’re using a DVI monitor), an RCA cable (if you’re connecting to an older television), an audio cable (if connecting the audio jack to your TV or stereo), and an Ethernet cable (for networking on the Model B or B+). You can get these cables from an electrical components retailer and might be able to buy them at the same time as you buy your Raspberry Pi. Any other cables you need (for example, to connect to PC speakers or a USB hub) should come with those devices.
 The Raspberry Pi has been designed to be used with whatever accessories you having lying around to minimize the cost of getting started with it but, in practice, not all devices are compatible. In particular, incompatible USB hubs, keyboards, and mice can cause problems that are hard to diagnose. USB hubs that feed power back into your Raspberry Pi through the Pi’s USB port (known as backpowering) could potentially cause damage to the Raspberry Pi if they feed in too much power.
A list of compatible and incompatible devices is maintained at http://elinux.org/RPi_VerifiedPeripherals and you can check online reviews to see whether others have experienced difficulties using a particular device with the Raspberry Pi.
If you’re buying new devices, you can minimize the risk by buying recommended devices from Raspberry Pi retailers.
In any case, you should set a little bit of money aside to spend on accessories. The Raspberry Pi is a cheap device, but buying a keyboard, mouse, USB hub, and cables can easily double or triple your costs, and you might have to resort to that if what you have on hand turns out not to be compatible.