Chapter 9
Introducing Programming with Scratch
In This Chapter
![]() Starting Scratch
Starting Scratch
![]() Understanding the Scratch screen layout
Understanding the Scratch screen layout
![]() Positioning and resizing your sprite
Positioning and resizing your sprite
![]() Making your sprite move
Making your sprite move
![]() Changing your sprite’s appearance
Changing your sprite’s appearance
![]() Adding sounds and music
Adding sounds and music
The Raspberry Pi was created partly to inspire the next generation of programmers, and Scratch is the perfect place to start. With it, you can make your own cartoons and games and discover some of the concepts that professional programmers use every day.
Scratch is designed to be approachable for people of all ages. The visual interface makes it easy to see what you can do at any time without having to remember any strange codes, and you can rapidly achieve great results. Scratch comes with a library of images and sounds, so it only takes a few minutes to write your first Scratch program.
In this chapter, we introduce you to Scratch so you can start to experiment with it. In Chapter 10, we show you how to use Scratch to make a simple arcade game.
Understanding What Programming Is
 Before we dip into Scratch, we should clear up some of the jargon surrounding it. A program is a repeatable set of instructions to make a computer do something, such as play a game. Those instructions can be extremely complicated because they have to describe what the computer should do in detail. Even a simple bouncing-ball game requires instructions for drawing the ball, moving it in different directions, detecting when it hits something, and then changing its direction to make it bounce.
Programming is the art and science of creating programs. You can create programs in lots of different ways, and Scratch is just one of them. In Chapter 11, you read about Python, another one.
Scratch and Python are both programming languages, different ways of writing instructions for the computer. Different programming languages are best suited for different tasks. Scratch is ideal for making games, for example, but it’s not much use if you want to create a word processor. Using Python to create games takes longer, but it is more powerful than Scratch and gives you much more flexibility in the type of things you can get the computer to do.
Starting Scratch
You access Scratch from the desktop environment, so switch on your Raspberry Pi and then use startx to access it (see Chapter 4 for a guide to using the desktop environment).
To start Scratch, either double-click its icon on the desktop (which shows the head of a smiley orange cat), or select it from your Programs menu in the bottom left of the screen. You can find Scratch in the Programming folder.
Understanding the Scratch Screen Layout
Scratch divides the screen into four main areas, as you can see in Figure 9-1. In the top right is the Stage, where you can see your game or animation take shape. There’s a cat on it already, so you can get started straightaway by making him do things, as you see in a minute.
The bottom-right area is your Sprite List. You can think of sprites as the characters in your game. They’re images that you can make do things, such as move around or change their appearance. For now, there’s just the cat, which has the name Sprite1.
You create a Scratch program by snapping together blocks, which are short instructions. On the left, you can see the Blocks Palette, which currently shows the Motion blocks, which include instructions to move ten steps, rotate, go to a particular grid reference, and point in a particular direction.

Scratch is developed by the Lifelong Kindergarten Group at the MIT Media Lab. See http://scratch.mit.edu.
Figure 9-1: The screen layout when you first start Scratch.
The tall middle panel is the Scripts Area. This is where the magic happens! You assemble your program in this space, by dragging blocks into it from the left.
You can use two buttons in the top right (indicated in Figure 9-1) to toggle the size of the Stage between full and small. When the Stage is small, the Scripts Area is bigger, so you might find that useful when you’re writing scripts later in this chapter.
 You’ll find it easier to use Scratch if you maximize it so it fills the screen. Click the button in the top right of its window, as indicated on Figure 9-1.
Positioning and Resizing Your Sprite
You can drag and drop your sprite (the cat) around the Stage to position it where you would like it to be at the start of your program.
You can also resize it. Two buttons above the Stage (indicated in Figure 9-1) are used to enlarge or shrink a sprite. Click one of them, and your mouse pointer changes to arrows pointing outward (for enlarging) or inward (for shrinking). Click your sprite on the Stage repeatedly to change its size to what you want.
When you’ve finished resizing, click something that isn’t a sprite to return the mouse pointer to normal and stop resizing.
Making Your Sprite Move
Experimenting with Scratch is easy. To try out different blocks, just click them in the Blocks Palette. For example, try clicking the block to move 10 steps, and you should see your cat move to the right. You can also turn it 15 degrees in either direction by clicking the appropriate blocks.
 If your cat goes somewhere you don’t want it to (don’t they always?), you can click it on the Stage and drag it back to where you want it. You can fix rotation too by clicking the tiny cat at the top of the Scripts Area, holding down the mouse button, and rolling your mouse in a circle pattern on the desk.
 Not all the blocks will work at the moment. Some of them need to be combined with other blocks, or only make sense at certain times. There’s no harm in experimenting, however. If you click something that doesn’t work, you might get an error message, but you won’t cause any harm to Scratch or your Raspberry Pi.
Next, we talk you through the different Motion blocks you can use.
Using directions to move your sprite
You can use two different methods to position and move your sprites. The first is to make your sprite “walk,” and to change its direction when you want it to walk the other way.
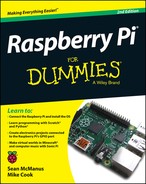
Here are the five blocks you use to move your sprite in this way (see Figure 9-2):
- Move 10 Steps: This makes your sprite walk in the direction it is facing. If your sprite has been rotated, the steps taken could move your sprite in a diagonal line across the Stage. You can click the number in this block and then type another number to increase or decrease the number of steps taken, but bigger numbers spoil the illusion of movement.
Scratch is developed by the Lifelong Kindergarten Group at the MIT Media Lab. See http://scratch.mit.edu.
Figure 9-2: The directional movement blocks.
- Turn Right or Left 15 Degrees: This block rotates your sprite. As with the number of steps, you can edit the number to change the degree by which your sprite is rotated. Your sprite walks in the direction it is facing when you use the Move 10 Steps block.
- Point in Direction 90: Whatever direction your sprite is facing, this block points it in the direction you want it to face. Use this block as-is to reset your sprite to face right. You can change the number in this block to change the direction you want your sprite to face and the numbers are measured in degrees from the position of facing up (see Figure 9-3). It helps to think of it like the hands of a clock: When the hand is pointing right, it’s 90 degrees from the 12 o’clock position; when it’s pointing down, it’s 180 degrees from the top. To point left, you use –90. When you click the arrow in the right of the number box, it gives you a menu from which you can select the four main directions, but you can enter any number. You might be wondering whether you can enter 270 to point left, and the answer is that it works, but it can cause errors in your programs. If you turn your cat to direction 270 and then ask Scratch which way your cat is facing, it tells you –90. To avoid any inconsistencies like this, keep your direction numbers in the range –179 to 180.
- Point Towards: You can also tell the sprite to point toward the mouse pointer or another sprite. Use the menu in this block to choose what you would like your sprite to point toward.

Figure 9-3: The number of degrees used to face in different directions.
If you’re changing the number value in a block, you still need to click the block to run it.
Using grid coordinates to move and position your sprite
You can also move and position your sprite using grid coordinates. That makes it easy to position your sprite at an exact place on the screen, irrespective of where it currently is.
Every point on the Stage has two coordinates, an X position (for where it is horizontally) and a Y position (indicating where it is vertically). The X positions are numbered from -240 at the far left, to 240 at the far right. The Y positions are numbered from -180 at the bottom edge of the Stage, to 180 at the top edge. That means the Stage is a total of 480 units wide and 360 units tall. The center point of the screen, where your cat begins his day, is where X equals 0 and Y equals 0. Figure 9-4 provides a quick visual reference of how the coordinates work.
When you move your mouse over the Stage, the grid reference of your mouse pointer is shown just underneath the Stage on the right.

Figure 9-4: The grid coordinates on the Stage.
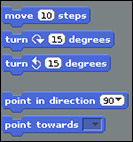
Six Motion blocks use the X and Y coordinates (see Figure 9-5):
- Go to x:0 y:0: You can use this block to position your sprite at a specific point on the Stage. By default, it returns a sprite to the center of the screen (x=0, y=0). Edit the numbers for X and Y to position your sprite somewhere else.
- Go to: Use this block to move your sprite to the mouse pointer’s location, or to the location of another sprite if you have more than one.
- Glide 1 secs to x:0 y:0: When you use the Go To block, your sprite just jumps to its new position. The Glide block makes your sprite float there smoothly instead. You can change the number of seconds the glide takes, including using decimals for part of a second (for example, 0.5 for half a second).
- Change X by 10: This moves your sprite 10 units right. You can change the number of units and use a negative number if you want to move left instead. Note that this doesn’t affect your sprite’s vertical position and is independent of which way around your sprite is facing.
- Set X to 0: This changes the horizontal position of your sprite on the Stage, without affecting its vertical position. The value 0 returns it to the center of the screen horizontally, and you can edit the number to position it left or right of that. Use a negative number for the left half of the screen and a positive number for the right half.
- Change Y by 10: This moves your sprite 10 units up the Stage, without affecting its horizontal position, and irrespective of which direction it is facing. You can change the number of units and use a negative number to move the sprite down the screen instead.
- Set Y to 0: This changes the vertical position of your sprite on the Stage without affecting its horizontal position, and without regard to which way it faces. Use a positive value for the top half of the Stage and a negative value for the lower half.
Scratch is developed by the Lifelong Kindergarten Group at the MIT Media Lab. See http://scratch.mit.edu.
Figure 9-5: The blocks used for moving sprites using grid coordinates.
Don’t forget that you need to run a block to actually see its effect on your sprite. Do this by clicking it.
Showing sprite information on the Stage
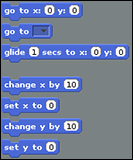
It can be hard to keep track of where your sprite has got to and which direction it’s facing, but you can show the values for its X position, Y position, and direction on the Stage. Select the boxes at the bottom of the Blocks Palette to do this (see Figure 9-6). They clutter up the screen a bit, but they can be essential tools for testing when you’re creating a game.
Scratch is developed by the Lifelong Kindergarten Group at the MIT Media Lab. See http://scratch.mit.edu.
Figure 9-6: The blocks used to show sprite information on the Stage.
Changing Your Sprite’s Appearance
As well as moving your sprite around the screen, you can change what it looks like.
Using costumes
One way to think of sprites is like the characters in a game (although they can be used for lots of other objects too, such as obstacles). Each sprite can have a number of costumes, which are different pictures of it. If the costumes look fairly similar, you can create the illusion of animation by switching between them. Your cat sprite comes with two costumes, and when you switch between them, it looks like the cat is running.
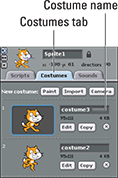
You can see the costumes for your sprite by clicking the Costumes tab at the top of the Scripts Area, as shown in Figure 9-7. If you want to modify the cat’s appearance, you can click the button to edit one of the costumes, or if you want to create a new animation frame, you can click the Copy button beside a costume and then edit the bits you want to change.
Scratch is developed by the Lifelong Kindergarten Group at the MIT Media Lab. See http://scratch.mit.edu.
Figure 9-7: You can change a sprite’s appearance by giving it a new costume.
It doesn’t matter so much when you’re experimenting with sprites, but when you make your own games and animations, you can save yourself a lot of brain ache by giving your sprites meaningful names. It’s much easier to remember that the costume with the name gameover should be shown when the player is defeated than it is to remember it’s called costume7. To rename a costume, click the Costumes tab to show the costumes, and then click the costume’s current name (see Figure 9-7) and type its new name.
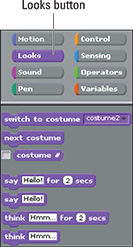
In the Blocks Palette, there are two blocks you can use to switch between costumes (see Figure 9-8). Click the Looks button above the Blocks Palette to show them:
- Switch to Costume: If you want to switch to a particular costume, choose its name from the menu in this block and then click the block.
- Next Costume: Each time you use this block, the sprite changes to its next costume. When it runs out, it goes back to the first one again.
Scratch is developed by the Lifelong Kindergarten Group at the MIT Media Lab. See http://scratch.mit.edu.
Figure 9-8: Some of the Looks blocks you can use to change your sprite’s appearance.
You can show a sprite’s costume number on the Stage too so it’s easier for you to work out what’s going on. Just check the box next to Costume # in the Blocks Palette.
Using speech and thought bubbles
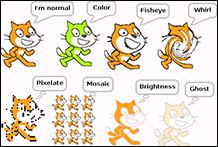
Scratch includes four blocks you can use to show a speech bubble or a thought bubble onscreen, as you can see in Figure 9-8. To see them, and the other blocks that change a sprite’s appearance, click the Looks button above the Blocks Palette. The speech and thought bubbles are great for giving a message to the player or viewer. You can edit the word in the block (Hello or Hmm...) to change the text in the bubble. Figure 9-9 shows the speech bubbles (top row) and thought bubbles (bottom row) in action.
If you use one of the options with a length of time in it, the sprite pauses for that length of time and the bubble disappears when it’s elapsed.
If you use a block without a length of time, you can make the bubble disappear again by using the Say or Think block again, but editing the text so the text box in the block is empty.
Using graphic effects
You can apply several graphic effects to your sprite using Looks blocks. In Figure 9-9, we’ve used eight sprites to demonstrate them on the Stage. The Color effect changes the sprite’s color palette, turning orange to green in the case of the cat. The Fisheye effect works like a fish-eye lens, making the central parts of the sprite appear bigger. Whirl distorts the sprite by twisting its features around its middle. Pixelate makes the sprite blocky. Mosaic shrinks the sprite and repeats it within the space it usually occupies. The Brightness and Ghost effects can sometimes look similar, but the Brightness effect increases the intensity of the colors (turning the cat’s black outline silver while softening the orange) and the Ghost effect fades all the colors out evenly.
Scratch is developed by the Lifelong Kindergarten Group at the MIT Media Lab. See http://scratch.mit.edu.
Figure 9-9: The different graphic effects you can apply to your sprite.
Here are the three blocks you use to control graphic effects:
- Change Color Effect by 25: You can select which effect you want to change (by default, it’s the color effect), and enter the amount of it you want to add. You can use negative numbers to reduce the extent to which the effect is applied to your sprite. The color effect has 200 different levels (from 0 to 200), and the other effects typically look best with levels in the range -100 to 100. Experiment!
- Set Color Effect to 0: Use this block to set a chosen effect to a specific level. Choosing 0 turns the effect off again. You can use any of the seven effects with this block.
- Clear Graphic Effects: This block removes all the graphic effects you’ve applied to a particular sprite, so it looks normal again.
The graphic effects look great, but they are quite slow. They’re best used in moderation for special moments in your animation or game; otherwise, they make it appear unresponsive.
Resizing your sprite
Earlier in this chapter, we show you how to change the starting size of your sprite on the Stage. You can use blocks to issue instructions to change its size too, so you could make it get larger as the game progresses, for example.
There are two blocks you can use to resize your sprite:
- Change Size by 10: This block enables you to change the size of your sprite by a certain number of units, relative to its current size. As usual, you can edit the number. If you want to decrease the sprite’s size, use a negative number.
- Set Size to 100%: This block sets your size to a percentage of its original size, so with the default value of 100 percent, it effectively resets any resizing you’ve done.
You can also select the check box beside the Size block to show the sprite’s size on the Stage, in the same way you displayed other sprite information (see “Showing sprite information on the Stage” earlier in this chapter) there. This can be useful for testing purposes.
Changing your sprite’s visibility
Sometimes you might not want your sprite to be seen on the Stage. If a spaceship is blown up in your game, for example, you want it to disappear from view. These two blocks give you control over whether a sprite is visible:
- Hide: Use this block to make your sprite invisible on the Stage. If a sprite is hidden, Scratch won’t detect when it touches other sprites, but you can still move a hidden sprite’s position on the Stage, so it’s in a different place when you show it again.
- Show: By default, your sprite is visible, but you can use this block to reveal it again after you have hidden it.
Sometimes sprites might get on top of each other. You can use the Go to Front block to make a sprite appear on top of all the others. To push a sprite backward and allow others to appear on top of it, use the Go Back 1 Layers block.
Adding Sounds and Music
As well as changing a sprite’s appearance, you can give it some sound effects. Scratch comes with sounds including slurps, sneezes, and screams; ducks, geese, and owls; and pops, whoops, and zoops. There are effects there for most occasions, and many of them are a natural partner for one of the sprites that Scratch provides.
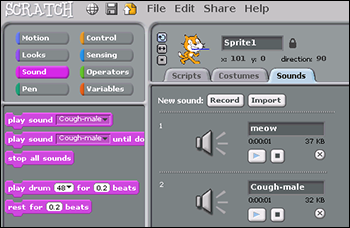
- Import the sound to your sprite. To do this, click the Sounds tab above the Scripts Area, as shown in Figure 9-10, and then click the Import button. Browse the provided sounds. You can click a file once to hear a preview of it, and click it twice to bring it into your sprite.
After you’ve imported a sound, click the speaker beside it to preview it, or click the X button to delete it from your project. If you a delete a sound in this way, it remains on your SD card so you can import it again later.
- Use one of the blocks to play a sound. To see the Sound blocks, click the Sound button at the top of the Blocks Palette first.
The Play Sound block enables you to choose which sound you’d like to play from those you have imported. The Play Sound Until Done block stops any movement or other blocks on the same sprite until the sound has finished playing.
In Chapter 10, we cover how to use multiple sprites in a project. The sound is imported to a particular sprite, so if you can’t see it as one of the choices in the Play Sound block, be sure you’ve imported it to the correct sprite.
There are also blocks you can use to create music using Scratch, using drums and pitched instruments. Notes are numbered, with C being 60, C# being 61, D being 62, and so on. There’s a block called Play Note 60 For 0.5 Beats that plays a note with a particular number for a certain duration. When you click the menu in this block to specify which note to play, a piano opens that you can use to select the note. If you’re new to music, you can generally get a good result by starting with C, sticking to the white notes, and making sure no two consecutive notes are too far apart on the piano. There is also a block called Set Instrument to 1 that you can use to change the instrument, although at the time of writing, this doesn’t work on the Raspberry Pi.
The note numbers used in Scratch are the same as those used in Sonic Pi (see Table 14-1 in Chapter 14).
Scratch is developed by the Lifelong Kindergarten Group at the MIT Media Lab. See http://scratch.mit.edu.
Figure 9-10: Adding sound effects to your sprite.
Creating Scripts
Clicking blocks in the Blocks Palette is one way to issue commands to Scratch, but you’re not really programming. If you have to click each block every time you want to run it, you’re doing all the hard work of remembering the instructions, and the computer can only work as fast as you can click the blocks.
A program is a reusable set of instructions that can be carried out (or run) whenever you want. To start to create a program, you drag blocks from the Blocks Palette and drop them in the Scripts Area in the middle of the screen. Most blocks mentioned so far have a notch on the top of them and a lug on the bottom of them, so they fit together like jigsaw pieces. You don’t have to align them perfectly: Scratch snaps them together for you if they’re close enough when you release the mouse button.
You put your blocks in the order you want Scratch to run them, starting at the top and working your way down. It’s a bit like making a to-do list for the computer.
A group of blocks in the Scripts Area is called a script, and you can run it by clicking anywhere on it. Its border flashes white, and you’ll see the cat move around the Stage as you’ve instructed it to.
You can have multiple different scripts in the Scripts Area, so you could have one to make the cat walk left and another to make it walk right, for example. When you add multiple sprites (see Chapter 10), each sprite has its own Scripts Area and scripts there to control it.
If you want to tidy up the Scripts Area, you can move a script by dragging its top block. If you drag a block lower down in the script, it is separated from the blocks above it and carries all the blocks below it with it. If you want to delete a block or set of blocks, drag it back to the Blocks Palette on the left.
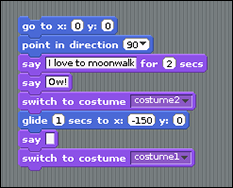
The moonwalk is the dance popularized by Michael Jackson where the dancer looks like he’s walking forward, but actually moves backward. Figure 9-11 shows an example script to make your cat moonwalk across the Stage. The first two lines in the script reset the cat to the middle of the screen, facing right. The cat tells you it loves to moonwalk and then lets out a little whoop like Michael Jackson, which it keeps up for the duration of the dance. The costume switch changes the position of the cat’s legs, and it then glides 150 units to the left. Close the speech bubble by using the Say block with nothing in it, and then switch back to the other costume, which makes the cat’s legs move back to their default position. Give it a go!
Scratch is developed by the Lifelong Kindergarten Group at the MIT Media Lab. See http://scratch.mit.edu.
Figure 9-11: This is how you make a cat moonwalk. Ow!
Using the Wait Block to Slow Down Your Sprite
As you put your script together, you might find that some of the movements happen so fast you can hardly see what’s going on.
If you click the Control button at the top of the Blocks Palette, you can find a set of yellow blocks that are used to govern when particular things happen. You read more about these in Chapter 10, but for now, it’s worth knowing that there is a block here that enables you to wait for a certain number of seconds. Drag this into your script where necessary to introduce a delay so you can see each of your blocks in action. The length of the delay is 1 second by default, but you can change it to whatever you want, including parts of a second (for example, 0.5 for half a second).
The Say Hello! for 2 Secs block can be also be used to force the sprite to pause before running any more blocks.
Saving Your Work
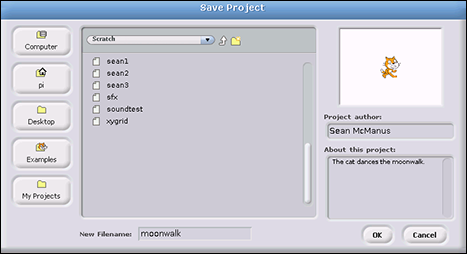
Remember to save your work so you can come back to it again later. You can find the option to save in the File menu at the top of the screen, or you can click the floppy disk icon in the top left.
When the Save dialog box opens (see Figure 9-12), you’ll see buttons on the left to choose from various places you could save your file, although you might not have permission to use all of them (see Chapter 5 for more on permissions). We recommend you use the Scratch folder inside your pi directory.
On the right, you can add your name and some project notes to remind you what the project was about later. You can see and edit the project notes associated with a file by going through the File menu when you’re working on a program.
Scratch is developed by the Lifelong Kindergarten Group at the MIT Media Lab. See http://scratch.mit.edu.
Figure 9-12: Saving your work so you can come back to it later.