It's now time to get XBMC to use our content, which can be done from a variety of locations and protocols.
Adding sources allows XBMC to access the locations we add and play content from them.
The following steps show how you can add a source in XBMC:
- From the main menu, open the relevant section based on the type of source we are adding. For example, if we are adding a video source, we should select Videos.
- Now, select the files.
- If you are planning on using a USB device, you will see that they are already shown; however, the device can be defined as a source as well. The advantages of this are as follows:
- When using Library Mode, something that we will explore in Chapter 4, Streaming from a Computer, you may have different types of content on the drive—such as TV shows and movies—in different folders. Setting the content type can only be done at the drive level if this is treated as a source.
- Pin-code locking is unavailable.
- Setting content types this way may not always be persistent.
- We would now click on Add Videos if we were adding a video-based source.
- This presents us with an interface shown in the following screenshot:

- We can navigate through this dialog with the arrow keys on a keyboard or our remote.
- The field that initially says <None> is a field that can contain a path to content. As we can see, a source can be made up of several different media locations. This is particularly useful if your content spans two drives.
- Next, click on Browse. Here, we will locate the paths that will make up our sources.
- To add a USB drive that is connected to Raspberry Pi, click on Root Filesystem and then select the media directory. Your disk will be there, listed by its volume name. If the device has no volume name, then its UUID will be listed. Click on OK to add it as a location.
- To add a network location, such as an NFS or SMB share, select Add network location…. There is another way of adding these sources, that is, by selecting Windows network (SMB) or Network Filesystem (NFS) from the Browse menu; however, this is not as reliable as manually adding the shares, and the first option will allow us to add FTP and HTTP shares too.
- Select the type of network location we are trying to access, under Protocol.
- Enter the relevant details. If the share does not have a username or password set, you can leave these fields blank. For example, if I were adding an SMB share for my TV Library, I may fill it out as shown in the following screenshot:
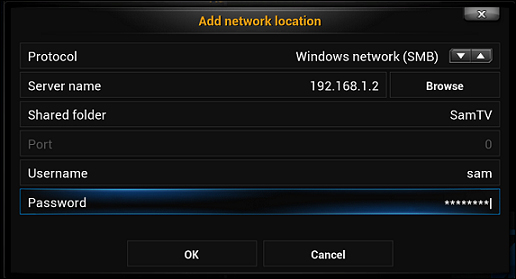
- Click on OK to add this as a location. It will now appear in XBMC as shown in the following screenshot:

Note
We take a further look at network-based streaming in Chapter 4, Streaming from a Computer.
- Select the location so that its contents are visible onscreen and click on OK. It will now be added as a location.
- We can do this repeatedly until we have added all the locations we would like to define as that source. Simply click on Add each time you wish to add another source, and then Browse as before.
- Only locations with the same type of content should be grouped together, that is, locations with music, locations with movies, and locations with TV shows should be added as separate sources. This will help us with Library Mode later.
- By the end of this, we will now see locations defined along the left-hand side of the dialog. In the following screenshot is an example of a source with multiple locations:

- You should now proceed to name the source, and then click on OK.
- Ignore any dialog titled Set Content for now, we'll look at that in a later chapter. For now, just click on Cancel.
The source will now be visible in XBMC.
To manage sources effectively, it is vital to learn about the context menu. The context menu provides additional source options such as the ability to edit, delete, and password protect sources.
Invoking the context menu is different depending on your method of controlling Raspbmc. Using a mouse, one can right-click, this is also the button that should be pressed on some remotes. However, when using a keyboard, pressing the c key will bring up the menu. On the MCE remote and Xbox DVD remote this is the guide key. This menu should appear as shown in the following screenshot:
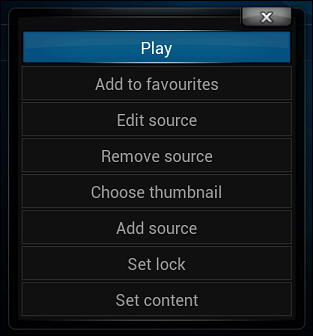
You can edit the locations of the sources you added before at any time by invoking the context menu and selecting Edit source.
Deleting a source can be done as follows:
- Enter the screen to which the source was added, that is Videos/Music/Pictures.
- Select the files.
- Highlight the source and then bring up the context menu.
- Select Remove Source.
- You will be prompted if you wish to remove all references of the source from the library. It is recommended that you select yes.
The source will now be removed.
Locking a source allows you to restrict who can access it. It should be noted that the implementation is not very strong in XBMC, and this can be trivially circumvented as the pin is stored as text in the XBMC data folder.
Nonetheless, it can still be useful. A prime example would be restricting all sources that are not PG if a young child is using the media center as well.
A pin lock can be set via the context menu; however, Master Lock must be enabled in the system settings first:
- Go back to the main menu if you are not already on it.
- Go to System | Settings, and then select the System tab.
- Go to the Master lock pane and select Master lock code and settings.
- You will now be prompted with a dialog allowing you to choose which parts of XBMC you wish to protect with a code.
- You can choose the kind of master lock implementation from the following choices: Numeric password (recommended) / Gamepad button combo / Full-text password.
- Once you have done that click on OK.
- Find the source you wish to protect and highlight it.
- Bring up the context menu.
- Select the Set Lock menu option.
- Enter a code and click on Done.