
By default, XBMC will use an internal SQLite-based database implementation. However, we would like to get XBMC to use our MySQL database instead. This is done by defining the database in advancedsettings.xml. We'll cover how to set up advancedsettings.xml for Raspbmc, but for other platforms, you should consult http://wiki.xbmc.org/index.php?title=HOW-TO:Sync_multiple_libraries/Setting_up_XBMC.
The best method for editing the settings file is via Secure Shell (SSH). SSH allows us to run commands on our Raspbmc installation as if we were typing them via a keyboard. The advantage of this is that we do not need to plug in a USB keyboard (which may not be available in spare) into the unit to edit the file.
- On Linux and OS X systems, all we need is to open a Terminal and run the following command (substituting the IP address of the Raspberry Pi itself):
- As you are connecting to the database for the first time, you are likely to see a message similar to the following:
sam@ubuntu:~$ ssh [email protected]
The authenticity of host '192.168.1.6 (192.168.1.6)' can't be established.
ECDSA key fingerprint is 55:36:12:f1:df:de:06:1a:7a:a4:36:b4:e1:09:a0:e2.
Are you sure you want to continue connecting (yes/no)?
- You should type
yesand then enter the password for thepiuser. This password israspberryby default, unless you have changed it in Raspbmc Settings. - On Windows systems, there is, by default, no SSH client installed, so we need to download one. PuTTY is a very capable client and can be downloaded from http://the.earth.li/~sgtatham/putty/latest/x86/putty.exe.
- The program is a standalone executable, so it can be run from wherever you saved it to. Enter the IP address of the device in the box entitled Host Name. The Port number can be left at the default value of 22, as shown in the following screenshot:

- Click on Open to initialize a connection to the device.
- You will be prompted for a username and password (the default username is
pi, and the default password israspberry). - As with OS X- and Linux-based connections, you will be prompted to verify the authenticity of the system. You should type
yeswhen you see the following message:The authenticity of host '192.168.1.6 (192.168.1.6)' can't be established. ECDSA key fingerprint is 55:36:12:f1:df:de:06:1a:7a:a4:36:b4:e1:09:a0:e2. Are you sure you want to continue connecting (yes/no)?
- Now, whether we are using OS X, Linux, or Windows, we have successfully connected to our Pi. It's time to now edit the
advancedsettings.xmlfile. We'll do this using the nano text editor. The following command will open the nano text editor:nano .xbmc/userdata/advancedsettings.xmlWe will now be presented with an interface similar to the one that follows:

We can type the contents of our file into this program. The file we are editing is an XML file (Extensible Markup Language), which means its layout and structure is very precise.
- All settings are defined within the
<advancedsettings>scope, so we will start with the following:<advancedsettings> </advancedsettings>
- Now, to use a MySQL database for video content, we can add the following segment; it needs to be indented under the
advancedsettingstags:<videodatabase> <type>mysql</type> <host>192.168.1.2</host> <port>3306</port> <user>xbmc</user> <pass>xbmc</pass> </videodatabase> - You should substitute the relevant details, such as the host (IP address of the MySQL server) and the password for the
xbmcuser, here, if you specified a custom password. - Likewise, if we want to add database support for audio as well, we would use the
<audiodatabase>tags.Overall, we should end up with something akin to the following:

- Now, press CTRL + O to save the file. You will be prompted where to save the file. As we specified the file path as an argument when we invoked nano, we only need to press Enter.
- You can now press CTRL + X to exit nano.
- For these changes to take place,
XBMCmust be restarted; this can be done via the following command:sudo initctl xbmc restart
You can now exit the SSH session by typing exit.
The Library mode will automatically download FanArt and content information (such as episode descriptions and ratings), which can enhance the XBMC experience greatly. Libraries are scraped using a variety of content providers that provide data for your content. Let's learn how to set up the Library mode:
- Go to Videos or Music depending on the kind of content you are trying to set.
- Navigate to your files.
- Select the source you wish to configure.
- Bring up the context menu (we explored how to do this in Chapter 3, Managing Content).
- Select Set Content. You will now be presented with the following dialog:
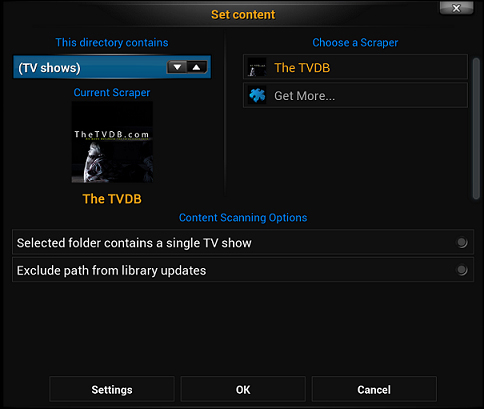
- The This directory contains option allows you to set the type of content that the folder holds. Choose the type of content.
- The Choose a Scraper option allows you to choose the content provider that will bring you detailed information and FanArt. Many more scrapers, such as IMDB, are available via the Get More... option.
- Selecting Settings will bring up additional settings pertinent to the scraper you are using, as shown in the following screenshot:

- In the preceding example, we can select a variety of options, such as whether we prefer posters to banners, using the The TvDB scraper.
- When you have configured the source, click on OK.
- You will be prompted with Do you want to refresh info for all items in this path?; select Yes.
- Your content will now be scraped into your Library. You will notice under Videos (if you set content on a video source) that a new option called Library is available as a submenu. Furthermore, as I added TV Shows to my library, a new option called TV Shows is now available, as shown in the following screenshot:

- The Library option will now show the FanArt and descriptions (when available) for your content. These steps can be repeated for all sources you have added; however, scraping must be finished before another source can be configured for scraping.