Converting media is also sometimes known as transcoding. This is different from encoding, as encoding is considered to be the first conversion from the source format to the reproduced format (for example, from a film studio to Blu-ray Disc). All future conversions after this will thus be transcoded.
We'll use the popular and freely available Handbrake. This is because it works on Mac OS X, Windows, and Linux, and is capable of delivering some impressive results with minimal effort.
Handbrake can be downloaded from http://handbrake.fr/downloads.php. I will not cover its installation here as it is not only fairly simple but also platform-specific.
After launching Handbrake, we are presented with an interface similar to the one that follows:

Let's see how to convert video files:
- First, select the Source tab and choose Video File.
- Find the video file you would like to convert and select it.
- Now, we should set the destination filename, profile level, and Container type as shown in the following screenshot:

- Select the Container type as MKV File. The Matroska container is a versatile container that allows the embedding of multiple streams.
- Click on the Browse button and specify a filename. This is the name of the file that will be created.
- Select the profile level as Regular | Normal. This will give you a decent level of quality taking into consideration the average amount of time required to convert the videos.
- Now, we need to configure video-specific settings. This will allow us to set the desired subtitle streams and audio streams (if available). Furthermore, we will be able to set the level of quality that Handbrake outputs in the new video file.
The aspect ratio and cropping can be adjusted easily in the Picture tab shown as follows:

- Handbrake provides standard stretching options under the Anamorphic setting.
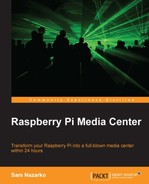
- Video filters can be applied as well. For example, if you are transcoding interlaced material, you should turn the Deinterlace filter on.
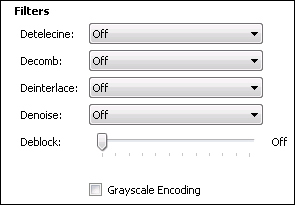
- Under the Video tab, you can adjust the video encoding quality of the codec being used. I recommend you keep the video codec at H264 (x264). The framerate can be adjusted, but this is generally only necessary if you are deinterlacing. In terms of quality options, the following are available:
- Constant quality: This will keep image quality constant regardless of the file size. RF stands for reference frames, and as a general rule of thumb, I would say 20 is acceptable for DVD and 18 is acceptable for high-definition content. Feel free to experiment with this in any way you like.
- Average bitrate: This will allow you to transcode at a constant bitrate. As such, you will be able to manage the file size produced by Handbrake. This is generally not as high a quality as constant, quality-based encoding. A two-pass encoding will distribute the bits used for encoding more efficiently as one pass is taken to analyze the video and the other is used to encode it. The downside is that this takes longer.
- When adding audio streams to the new video, we can add or remove multiple streams if the original video has them.

The table shown in the preceding screenshot is broken down as follows:
- Source: This is the original track that is embedded in the video.
- Audio Codec: This is the new track format that will be created.
- Mixdown: This is the number of channels that will be supported.
- Samplerate: This is the highest frequency of audio in the track that will be encoded. It is best to leave it as Auto.
- Bitrate: This is the number of kilobits per second that the audio stream is encoded with.
- DRC: This is dynamic range compression.
- Gain (in decibels): The volume can be changed using this option.
Note
It is possible to add multiple tracks even if they are originating from the same stream. One could simply select the desired source track and press Add Track. This is particularly useful if a device does not support a specific audio codec but if you wish to retain the one with a higher quality for devices that do.
- The subtitles tab operates on the same principle where you can add or remove subtitle streams if they are in the original file, so we will not cover this in detail.
Chapters, if not already available in the original file, can be imported from an external file.

- As this is a simple introduction to the basics of video encoding, we will not go into detail about the advanced settings.
Now that we are ready to start encoding, we can click on the Start icon, which is shown in the following screenshot:

- The progress of your conversion will be shown at the bottom of Handbrake's screen:

When the conversion is complete, the file will appear in the location you specified. Provided you have used the default settings outlined in this chapter, it will now be ready for playback in Raspbmc. You can add this to one of your predefined sources in Raspbmc.