At this point in the chapter, you know how to kickstart a new React Native project. You also have your iOS and Android device simulators ready to go. In this final section, we'll walk through the process of building and deploying your project to a virtual device in development mode.
In the previous section, you opened up the iOS project for your React Native using the Xcode application itself. But it turns out that, most of the time, you won't actually need to do this. The simulator is a separate process, so we can run it using the React Native tools, from the MyProject/ directory:
react-native run-ios
This will start up the React Native packager process. It builds the app and is used to start up the simulator and to communicate with it. Here's what the iOS simulator looks like with the default React Native project:

There you have it; you're up-and-running in a simulated iOS environment! But rather than restarting the simulator every time you want to test a code change, why not have the packager rebuild and update the app as changes are made? There are two ways to do this. We can enable live reloading or hot module reloading. Live reloading refreshes the entire application, while hot reloading keeps the application state while swapping in new component code.
If you're making frequent changes to a specific feature, then hot reloading is probably the way to go so that you don't have to keep navigating back to it. But hot reloading is more resource-intensive, so if it's a simple app you're working on, live reloading might be the better choice. Either of these options can be set in the developer menu. In the simulator UI, press Cmd+D:

Finally, if you want to run your iOS using a different device simulator, you can specify this as an argument to the run-ios command. First, you can issue the following command to get a list of available device names:
xcrun simctl list devices | grep unavailable -vi
We're using grep here to filter out unavailable device names. The output should look something like this:
== Devices ==
-- iOS 9.3 --
    iPhone 4s (2E2C7E46-FB08-4464-BA9B-BA90CBDEE2D9) (Shutdown)
    iPhone 5 (0028976C-7E4B-4764-AA9A-3E099E0A5DCF) (Shutdown)
    iPhone 5s (221FAFB3-0BDC-42E1-849E-0F4D8FECDCB1) (Shutdown)
    iPhone 6 (14399036-4B2C-4BA0-90B6-90948BC1CA8D) (Shutdown)
    iPhone 6 Plus (8BE16249-B9E1-4862-85E5-1AEAADCF3008) (Shutdown)
    iPhone 6s (DE4D9DA5-9FF9-48D2-A87E-58EC1BF73757) (Shutdown)
    iPhone 6s Plus (0E37E6E8-4B00-404F-9E47-C9796963C138) (Shutdown)
    iPad 2 (6F6FCD37-AD12-430F-A06D-ACC34310A2D2) (Shutdown)
    iPad Retina (855D92C5-4911-4392-B320-C99D3602C6CB) (Shutdown)
    iPad Air (76D2B2FB-7D90-4A6E-8575-414B18600E96) (Shutdown)
    iPad Air 2 (2C0CC11F-7F2F-4558-B5ED-124B84BFA6BB) (Shutdown)
    iPad Pro (B2BFC081-0E89-46A0-92CA-B78E6BCD90F6) (Shutdown)
-- tvOS 9.2 --
    Apple TV 1080p (59F20EC8-3FEF-42A7-916A-67665A5C8B24) (Shutdown)
-- watchOS 2.2 --
    Apple Watch - 38mm (FCF7F7A2-6D12-4A2B-B4B5-FD08E01895F9) (Shutdown)
    Apple Watch - 42mm (6E7749AD-580C-431D-B920-27E44FF514D6) (Shutdown)
Now, you can specify one of these device names as the simulator argument when running the React Native tool:
react-native run-ios --simulator='iPad 2'
Running your React Native app in a simulated Android environment works the same way as running it in a simulated iOS environment. The differences are in the tooling. Instead of an Xcode simulator, you use Genymotion to simulate a device. The main difference is that the simulated device needs to be up-and-running before you deploy your app via the React Native packager.
Otherwise, you'll see an error message that looks like this when you try running react-native run-android:
Make sure you have an Android emulator running or a device connected and have set up your Android development environment
Easy enough; let's go ahead and fire up a simulated Android device from within Genymotion. In your list of devices, just select the device you want to use and click the start button. This will start the virtual Android environment. Now when you run react-native run-android, you should see the React Native application show up on the emulated screen:

The same developer menu that we looked at in the preceding section is here as well; you just access it differently.
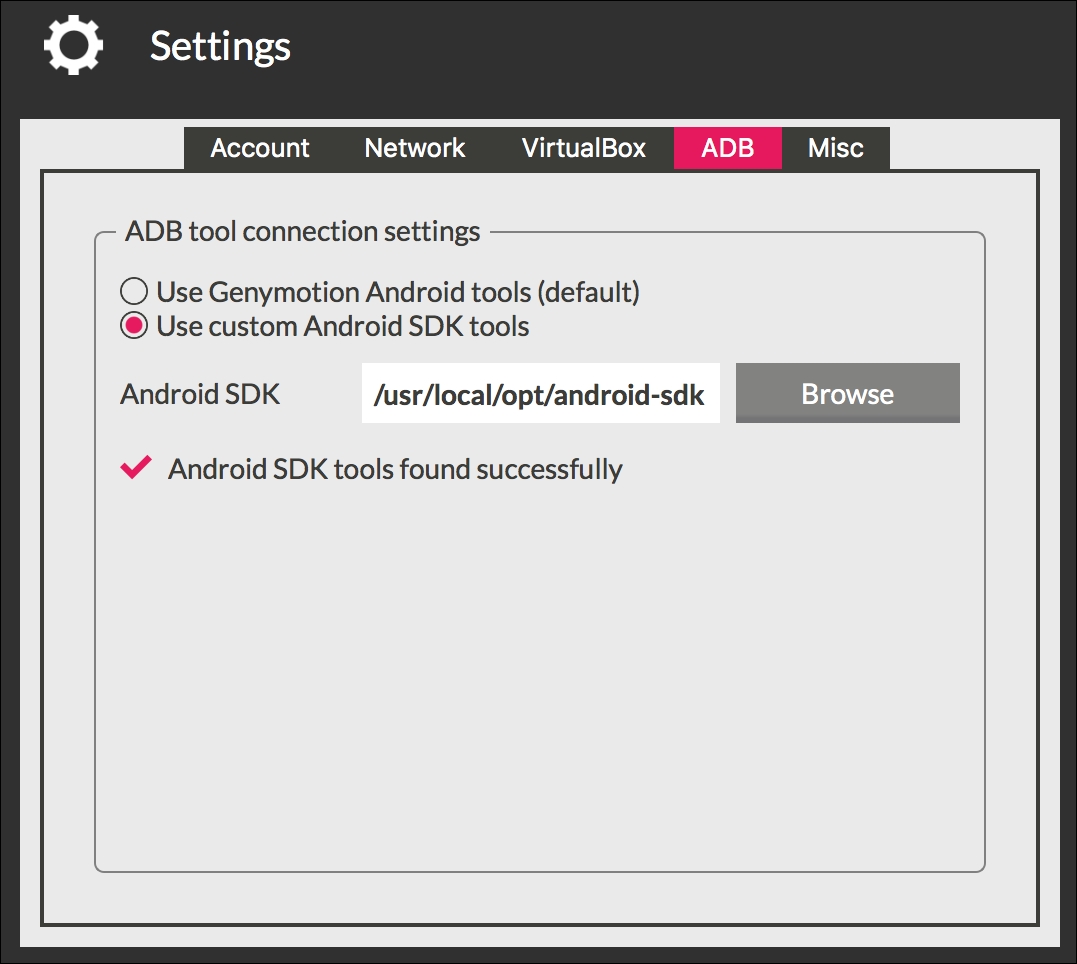
When implementing this example, I ran into some trouble trying to deploy my React Native app to my virtual device. I was seeing something like this:
E/adb: error: could not install *smartsocket* listener: Address already in use
E/adb: ADB server didn't ACK
E/adb: * failed to start daemon *
E/ddms: '/usr/local/opt/android-sdk/platform-tools/adb,start-server' failed -- run manually if necessary
E/adb: error: cannot connect to daemon
Genymotion uses its own ADB (Android Debug Bridge: https://developer.android.com/studio/command-line/adb.html) to connect with the virtual Android environment. It turns out that I had already installed Android Studio, which meant I had two ADB instances running. This was easy enough to fix, I just had to tell Genymotion to use the existing ADB tool: