Chapter 5. Getting to the Point of Vector Graphics
Unlike raster images, which use bitmaps in a grid of colors known as pixels, vector graphics use mathematical formulas to define the shape of lines and curves. Adobe built an application around vector graphics — Adobe Illustrator, first demonstrated at the January 1987 Macworld Expo. At its heart was the Pen tool — a tool that a designer could use to visually create the same curves described in mathematical formulas.
In the early days of Illustrator and Photoshop (released in 1990), the chasm between such vector programs as Illustrator and pixel programs as Photoshop was huge. Vector paths and pixel images never mixed. To modify a scanned image, you had to work in Photoshop. To set PostScript type or create a company logo, you had to use Illustrator. Page layout programs such as PageMaker (later InDesign) were the only places where you could combine vector paths and pixels. But even then, the two different formats never interacted with each other.
These days the boundaries between the two formats have blurred. Illustrator, Photoshop, and InDesign all have Pen and other tools that let you create and work with vector paths. They also have features to soften vector paths into pixels and add pixel drop shadows to paths. This chapter explains the different features for working with vector tools in each of the CS2 applications as well as the cross-suite similarities. It also looks at the formats used to save vector information and how to transfer paths between the programs.
Are Vectors Better Than Pixels?
This question could spark one of those classic feuds, such as the Capulets and Montagues, Macintosh versus Windows, or Burger King and McDonald’s. People who create vector graphics often state that vector graphics are better than raster images. (Sandee, well known to her friends as Vectorbabe, has made her fondness for vector graphics quite clear. Steve, while not an official PixelPal, tends to enjoy working with raster images and their formats.)
As you work with the Creative Suite applications, it is important to know when you are creating vector paths and when you are creating pixels, and the benefits of working with each format.
Scaling Vectors or Pixels
Vector graphics are device-independent. This means that they can be enlarged several hundred times their original size without any loss of quality. That is what made PostScript fonts so revolutionary.
In contrast, pixel images, such as those taken by digital cameras, are device- and resolution-dependent; that is, they contain a fixed number of pixels. Scaling up a pixel image or printing it at a lower resolution than what it was created for can cause jagged edges (when the pixels are enlarged to fit the new size) or blurry details (when the program tries to figure out how to add new pixels to fit the larger image).
This is why many companies use vector programs to create their company logos. Vector graphics can be scaled up to any size without any loss of image quality. The mathematical formulas that define the image are simply adjusted for the larger-size logo.
Comparing File Sizes of Vectors and Pixels
Vector graphics create smaller files than pixel images. A six-inch, vector-graphic circle drawn in Illustrator creates a file only of 4.4K — microscopic in computer file terms. In fact, the size of the circle is irrelevant; if you enlarge the circle, the file size doesn’t increase.
However, a six-inch circle at 300 pixels per inch (ppi) in a pixel program creates a file of more than 12MB — hardly an insignificant amount! And if you enlarge the size of the pixel image, the file size increases accordingly.
Choosing Vectors or Pixels
So which should you choose for artwork — vectors or pixels? If you don’t know the final size of the artwork, vectors are the clear choice. But other factors matter. Because vector artwork is made up of individual paths, it is much easier to modify. This makes vector the best choice for graphic designers, illustrators, technical illustrators, and cartographers — in short, anyone who needs to alter the size, shape, and color of his or her artwork. For example, it is much easier to change the shape of a road if it is a vector path than an array of pixels.
Vector graphics also output with crisp, PostScript edges. This is what makes text appear to float, as if superimposed, over an image (see Figure 5-1). Of course if you don’t want this effect, use pixel artwork. For instance, to add text to an image that looks part of the original photo, use text that is converted to pixels.
Figure 5-1. The House Tours text is PostScript (vector) text, The date on the house on the right is pixel text with slight blur added to help the text blend into the image.

Pixels are still the only way to capture images in scanners and digital cameras. Pixels are also the easiest way to create soft drop shadows, blurs, glows, and faded edges. Most textures also need pixels to look natural and organic. Can you create realistic illustrations with soft shadows and highlights using vectors? Yes; many photorealistic artists work exclusively with vector objects to create stunning images (see Figure 5-2). However, they have to work awfully hard compared to those who work with pixels.
Figure 5-2. Illustrator artwork created by Thomas-Bradley Associates using only vector objects.

Using the Adobe Pen
When Illustrator first debuted the Pen tool, it let users create lines and curves based on Bézier’s original mathematics (see the preceding sidebar, “Behind the Scenes: The Father of Vector Curves”). More than 15 years later, the Pen tool has changed very little. In fact, the biggest change has been that it has become standardized across the three main applications in Adobe Creative Suite. Although it may seem daunting at first, it is rather easy to use the Adobe Pen.
Creating Paths with the Adobe Pen
The Adobe Pen tool creates paths by connecting anchor points together. This is similar to the primitive art that is created by tying string around nails hammered into a board. But string art can create only straight lines between the nails; the paths in Creative Suite allow curves between the nails.
The Pen tool creates four different types of anchor points. Each type of point creates a different type of line or curve. Straight lines are created between two plain corner points. Curved lines are created between curved points.
Creating Straight Lines
Plain corner points create straight lines — the simplest types of lines to create (see Figure 5-3). You simply click to create the corner point that defines one end of the path. Click in a new position to create the other end. Click to create additional segments of the path.
Figure 5-3. Click with the Pen tool to create straight lines.

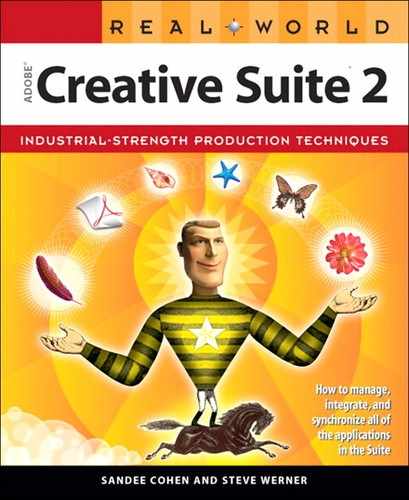
To close the path, click with the Pen tool over the first point. To leave the path open and start another path, deselect it so that you can click to start a new point: Hold the Command/Ctrl key and click to deselect the path. Release Command/Ctrl to return to the Pen tool with a start point. (All Adobe pen tools use the same keyboard modifiers. See Table 5-1, “Shortcuts to Switch Pen Tool Controls,” at the end of this section, for a list of the common keyboard modifiers for working with the Adobe Pen tool.
Table 5-1. Shortcuts to Switch Pen Tool Controls
Creating Smooth Curves
Smooth curved points create gentle curves that gradually change direction. The slope of a roller coaster is a good example of a smooth curve. As the coaster moves to the bottom of the track, it changes direction along a smooth bend. An abrupt change in direction would cause the coaster to jam or crash at the bottom of the track.
Press the mouse button and drag with the Pen tool to create smooth curves. As you drag, a tangent line extends from both sides of the point. These handles control the direction of the curve. The longer you make the handles, the steeper the curve becomes (see Figure 5-4). The handles extending from a smooth curved point move in unison. As one handle moves down, the other moves up. This is what keeps the curve smooth.
Figure 5-4. Creating smooth curved points with the Adobe Pen tool.

Creating Curved Corner Points
Life is not all smooth, and neither are curves. Consider the path of a bouncing ball. As the ball moves toward the ground, it follows a curve. But when the ball hits the ground, it abruptly changes direction. You can create a similar shape using the Adobe Pen. The anchor point at the center of the bounce is a curved corner point. This corner point has two independent handles that extend out from the point. Each handle controls a separate curved segment.
You press the mouse button and drag to create a curved point. Without releasing the mouse button, hold down the Option/Alt key and then move the mouse. This changes the smooth curved point into a corner point with two separate handles. Pivot the second handle to the direction that you want the second part of the curve to take.
Figure 5-5. Creating curved corner points with the Adobe Pen tool.
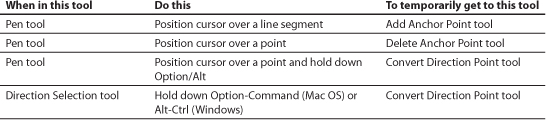
Two other types of curved corner points have only one handle coming into or going out of the anchor point. If the handle goes into the anchor point, the curve stops at the anchor point and a straight line extends out from the point (see Figure 5-6). You create this type of point by dragging to create a curved point. Move the Pen cursor back over the point you just created. A caret symbol (^) appears next to cursor. This indicates that you are about to modify that point. Click the point. The angle that extended out from the anchor point snaps back into point. You can then click to create a straight line that extends out from the curve.
Figure 5-6. Creating a curved to straight segment with the Adobe Pen tool.

You can also make a straight line with a curve that comes out of the point (see Figure 5-7). Click to create the points of the straight-line segment. Move the Pen cursor over the endpoint of the path you have created. The caret sign appears next to cursor. Press the mouse button and drag on the point. A single handle extends out from the point. This handle controls direction and slope of curve that extends out from the point.
Figure 5-7. Creating straight to curved segments with the Adobe Pen tool.

Tools for Modifying Paths
Just as a carpenter needs several different types of tools — hammer, screwdriver, level, and so on — so you need extra tools to work with the Adobe Pen. These tools let you modify existing paths and points.
Adding and Subtracting Points
The Add Anchor Point tool lets you click a path to add a point to a path. In Illustrator and InDesign, adding a point to a straight segment creates a plain corner point with no handles. Adding a point to a curved segment creates a smooth curve point with two handles. However, when you use the pen tools in Photoshop, adding any points to path segments creates smooth curved points. We’re not quite sure why this is so. Perhaps the Photoshop engineers thought that the paths in Photoshop needed smooth curves.
Similarly, the Delete Anchor Point tool lets you click a point to delete it from a path.
Modifying Points
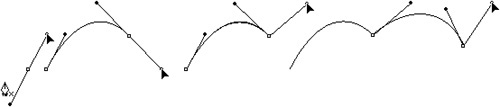
Once you have a point on a path, you can convert it from a plain corner point to a smooth curved point or a corner point with handles using the Convert Anchor Point tool. This tool has three different names in the Suite applications: the Convert Anchor Point tool in Illustrator, the Convert Direction Point tool in InDesign, and the Convert Point tool in Photoshop. (For the sake of brevity, we’ll stick with the Photoshop name.) The Convert Point tool works similarly to the Pen tool. If you click a smooth point with the Convert Point tool, you change the point to a plain corner point (see Figure 5-8). If you drag a corner, you extend two handles from the point just as if you were dragging with the Pen tool (see Figure 5-8). Once you have extended handles from a point, use the Convert Point tool on each individual handle so that they move independently.
Figure 5-8. Click with the Convert Point tool to change a curved point to a corner point (top). Drag with the Convert Point tool to change a corner point to a curved point (bottom).

The Missing Feature in the Pen Tool
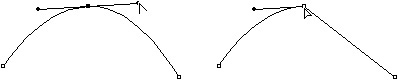
What if you want to convert a smooth corner point to a corner point with only one handle? If you position the Convert Point tool over one of the handles, you can drag the handle so that it moves independently from the other (see Figure 5-8). So far there’s nothing wrong with what you’re doing. But it’s not easy to retract the handle back into the anchor point, as you can do when first drawing the path.
In Illustrator you can push the handle back into the anchor point; when Snap To Point is turned on (View > Snap To Point), the cursor changes to white from black to indicate that the handle has moved into the anchor point (see Figure 5-9). But that awkward technique requires a bit of precision dragging. In InDesign and Photoshop, the handle doesn’t retract all the way into the anchor point — even if you drag very, very carefully! Zoom in as far as you can and you’ll see a little handle sticking out from the anchor point. So if you are used to Illustrator’s features, don’t knock yourself out trying to get the exact same result in InDesign or Photoshop.
Figure 5-9. Retracting a handle into an anchor point.
Power Shortcuts for the Pen tool
Really skillful Pen tool users anticipate the best position and angle for anchor points and handles. In addition, they use keyboard modifiers to switch among all the pen tools without constantly going to the Tools palette. Once you feel comfortable with the Pen tool, you can use these shortcuts to work even faster.
Other Vector Drawing Tools
There are two types of people who use Illustrator: those who know how to use the Pen tool and those who don’t. Fortunately, there are plenty of tools in the CS2 applications that make it possible to work without ever picking up the pen.
Shape Tools
Illustrator, InDesign, and Photoshop each have tools for creating rectangles, circles, and polygons. However, they don’t have all the same tools (see Table 5-2).
Table 5-2. Creative Suite Vector Tools
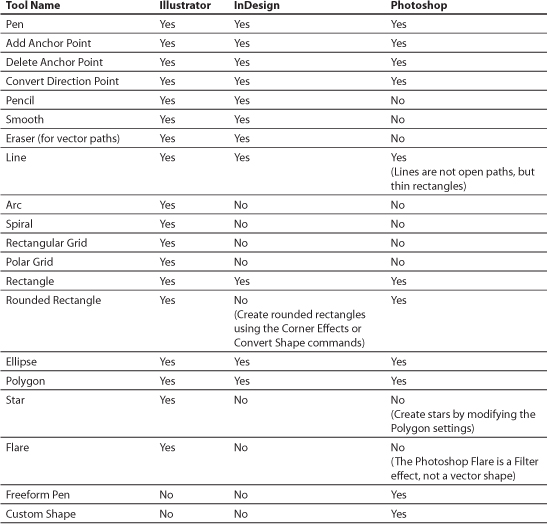
Illustrator comes out ahead, with the largest number of tools. In addition to those for creating rectangles, ellipses, lines, polygons, and stars, Illustrator has an exotic Flare tool and tools for creating arcs, spirals, and rectangular and polar grids.
Tip: Take control of your shape
To set the options for the shape tools in Illustrator and InDesign (number of sides, dimensions, and so on), select the tool and click the page.
InDesign has slightly fewer tools, but several different frame tools. The Rectangle, Ellipse, and Polygon tools create unassigned paths that can have fill and stroke default settings. The Rectangle Frame, Ellipse Frame, and Polygon Frame tools create graphics frames that indicate that an image should be inserted into the frame.
InDesign doesn’t have any of Illustrator’s “way out” vector tools — no Flare, no Grid tools, no Arc tool, and no Spiral. But who needs ’em? You can easily move vector paths from one application to another. That’s one of the big advantages to working with the CS2 applications. Illustrator becomes the back-door drawing program for InDesign and Photoshop. You can use Illustrator to create a spiral, and then copy and paste it into InDesign or Photoshop. (See the section “Moving Paths Between Applications” later in this chapter for more information on moving vectors between the applications.)
Like the Pen tool, the shape tools in each of the applications have common keyboard controls for creating objects. For instance, you can hold down the Shift key to constrain a rectangle or ellipse into a square or circle. Use the modifiers in Table 5-3 to change how the shape tools work in Illustrator, InDesign, and Photoshop.
Table 5-3. How to Modify Shape Tools While Drawing

Pencils and Free-Form Tools
If you are truly pen-impaired, you can still draw curves and other free-form shapes. Both Illustrator and InDesign have a Pencil tool that lets you simply drag to create lines and curves. Photoshop’s Pencil tool is not a vector-drawing tool. It only works in a pixel-drawing mode.
Using the Pencil Tool in InDesign and Illustrator
Choose the Pencil tool in the Tools palette. Drag to create a path. When you release the mouse button, the program creates the proper anchor points to create the shape you have defined. We find that at the default settings, the Pencil tool creates paths that are too rough: Too many anchor points correspond to every little wiggle of the mouse. To smooth out the Pencil paths, use the Pencil Tool preferences.
Double-click the Pencil tool in the Tools palette to open the Pencil Tool preferences (see Figure 5-10). Change the two Tolerances controls, Fidelity and Smoothness, to make the Pencil tool less sensitive to small jiggles and create smoother paths.
Figure 5-10. Pencil Tool preferences for Illustrator (left) with an option to fill new pencil strokes, and InDesign (right).

The Fidelity slider controls how much the Pencil tool-drawn path follows your mouse movements. Low Fidelity settings create more anchor points causing all sorts of little bumps and curves along the path. As you increase the Fidelity value, the path ignores small mouse movements. The Smoothness slider changes the smoothness of the path curves. Lower smoothness values usually result in more anchor points and preserve more of a line’s irregularities; higher values result in fewer anchor points and a smoother path. The default of 0% applies no smoothness to the path.
Using the Freeform Pen Tool in Photoshop
Why doesn’t Photoshop have a Pencil tool? The answer is that Photoshop already had a bitmapped Pencil tool. So rather than confuse people, Adobe created a Freeform Pen tool for Photoshop. The Freeform Pen tool has two modes. The regular mode lets you draw irregular paths by dragging, similar to using the Pencil tool in Illustrator or InDesign.
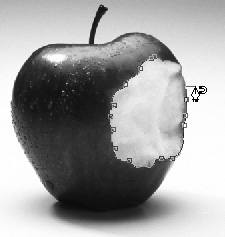
However, most people use the vectors in Photoshop to outline images, such as for clipping paths that create silhouettes of images. The second mode of the Freeform Pen tool, the Magnetic Pen tool, automatically snaps paths to the defined edges of the image. The Freeform Pen tool options let you control how the path is created.
Figure 5-11. Photoshop Magnetic Pen tool outlining an image, with path snapping around its outline.
Using the Smooth Tool in InDesign and Illustrator
So what if you’ve created a path or inherited some art that is quite jagged and needs to be smoothed out? Illustrator has a command to Smooth Path. But what if you want to smooth just a section of a path? Or you want to smooth a path in InDesign, which has no Smooth Path command? That’s when you choose the Smooth tool. Drag the Smooth tool along a jagged path and smooth out all the nooks and crannies.
Using the Eraser Tool in InDesign and Illustrator
In the early days of Illustrator, to delete part of a path, you selected the anchor points along that section and pressed the Delete key. That still works, but these days you young’uns now have a vector Eraser tool. Just drag the Eraser tool along part of a path to delete that section. The advantage to working with the Eraser tool is you can erase part of a path even if that part has no anchor points. The Eraser tool adds the necessary points to delete just that portion of the path.
Applying Custom Shapes in Photoshop
Think of the Custom Shape tool as a library of shapes that you can quickly add to an image. Simply choose the Custom Shape tool from the Options bar, and then select the shape you want in the Shape palette (see Figure 5-12). Drag to create the shape. The shapes can be distorted as you drag or hold down the Shift key to constrain them to their original proportions.
Figure 5-12. Photoshop CS2 Shape palette with sample of included shapes.
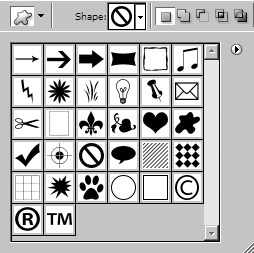
The shapes in the palette are just a sample of the ones that ship with Photoshop. Click the palette menu to add more shapes, such as talk bubbles, music, banners, animals, arrows, and ornamental shapes.
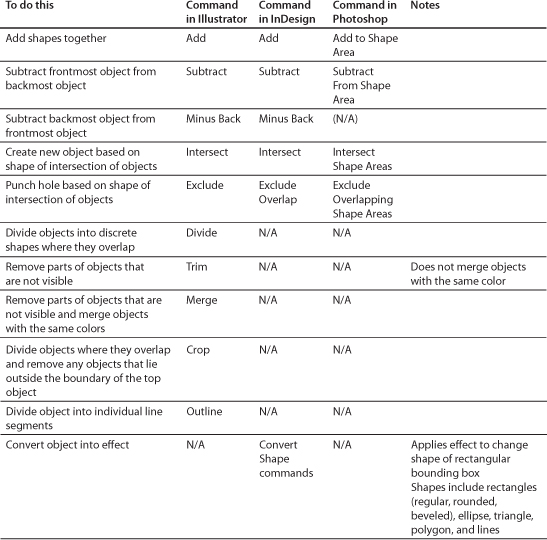
Working with the Pathfinder Commands
Pathfinder commands let you take one vector shape and use it to modify the shape of another object. With these commands, it’s easy to combine a rectangle and triangle into a house, cut a hole out of a circle to create a new moon, or divide and recolor circles into Olympic rings. As powerful as the original Pathfinder commands were when first released in 1993 in Illustrator 5, today’s Pathfinders are even more amazing.
Pathfinders in Illustrator
Illustrator CS2 has several types of Pathfinder commands. The most obvious are the ones in the Pathfinder palette (see Figure 5-13), which is divided into two groups. The Shape Modes allow you to merge and combine objects without actually changing the original vector artwork. These are called non-destructive changes. The six Pathfinder command buttons on the bottom make actual cuts and changes to the objects. These are called destructive changes. You can convert an object from its non-destructive Pathfinder state to a permanent, destructive state by using the Expand button in the Pathfinder palette or pressing Option/Alt as you click the Shape Modes buttons. See Table 5-4 at the end of this section for a review of all the Pathfinder commands in the Creative Suite applications.
Figure 5-13. Illustrator CS2 Pathfinder palette
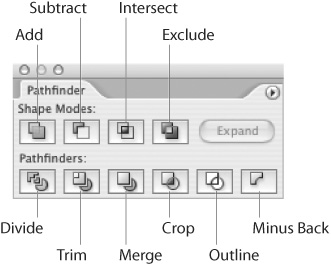
Table 5-4. Pathfinder Commands in CS2 Applications
Illustrator CS2 also has Pathfinder commands in the Effects menu. These are similar to the commands in the Pathfinder palette, but they can be applied to single objects, groups, or all the objects on a layer. These effects are also non-destructive but can be expanded into permanent changes using the Object > Expand command.
Pathfinder Commands in InDesign
Compared to the non-destructive commands in Illustrator, InDesign’s Pathfinder commands are a step back into the Dark Ages. However, InDesign’s Pathfinder palette does contain a few extra goodies that you will need sooner or later (see Figure 5-14).
Figure 5-14. InDesign CS2 Pathfinder palette
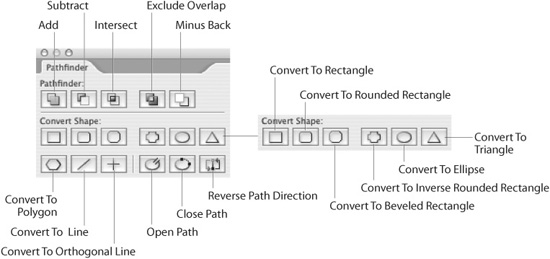
The top five Pathfinder buttons work similarly to Illustrator’s Pathfinder commands. But InDesign doesn’t have live Shape Modes. Here, applying a Pathfinder command to objects permanently changes the shape of the path. There is no way to edit the original objects unless you invoke the Undo command.
However, the twelve Convert Shape buttons are similar to the Shape Modes in Illustrator, except that they only work on individual objects. When you apply any of the first nine Convert Shape buttons (Rectangle, Rounded Rectangle, Beveled Rectangle, Inverse Rounded Rectangle, Ellipse, Triangle, Polygon, Line, and Orthogonal Line), you apply an effect to change the shape of the object. The actual object is a rectangular bounding box. The shape of the object comes from the effect applied to that rectangular box. The other three buttons will open a path, close a path, or reverse the direction of a path.
What if you want to expand these premade shapes into actual vector paths, with honest-to-goodness anchor points instead of electronic instructions? No problem! One of the advances in InDesign CS2 is that the Pathfinder commands now honor the shape effects applied to objects.
Tip: Expanding a single shape into a discrete object
InDesign Pathfinder commands expand the shape effects into paths, but the commands require two shapes to work. What if you want to expand a single shape? Simply click the Open Path button and then the Close Path button. This expands the shape effect into an ordinary path.
Pathfinder Commands in Photoshop
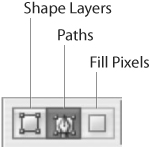
Strictly speaking, Photoshop does not have Pathfinder commands or a Pathfinder palette. Using the default setting, Photoshop always creates a new shape layer as you draw with the vector-drawing tools. You can change this behavior using the shape-layer options in the Options bar (see Figure 5-15). These are similar to the Illustrator Shape Modes in the Pathfinder palette.
Figure 5-15. Photoshop CS2 Pathfinder-type controls
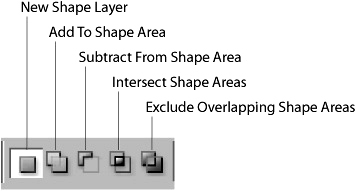
To use these Pathfinder-type controls, select the control before you draw. The default is to create a new shape layer each time a shape is created. The other options automatically add new shapes to the same layer. The options control whether the shapes combine with each other, subtract from each other, create an intersection where they overlap, or create a hole where they overlap.
You can change the control for each new object as you draw on the layer. For example, you can have two objects added together that a third object subtracts from the shape.
You can also change existing objects from one Pathfinder control to another. Use the Selection tool to select the objects, and then click the Pathfinder controls on the Options bar. You can mix and match these controls on the same layer so that, for example, some objects combine and others show intersections or exclusions.
The Pathfinder-type controls in Photoshop are non-destructive (similar to Illustrator’s Shape Modes). You can move the paths around as needed to create new shapes. However, to make the effect permanent, click the Combine button in the Options bar.
Special Vector Features in the Suite Applications
For all their shared history and functionality, the CS2 applications differ significantly when it comes to working with paths. Understanding these differences can help you decide which application to choose when starting a project.
Special Vector Tools in Illustrator
Over the years, Illustrator gained stature as the premiere application for creating and working with vector objects. Illustrator CS2 has added a powerful pixel-tracing feature called Live Trace, and also a new technique called Live Paint for working with vector paths, which frees you from the burden of working with handles, points, and selection tools. Illustrator has the most sophisticated Pathfinder commands of the CS2 applications for combining vector objects into new shapes. Illustrator also has smart guides that make it much easier to align and control the position of objects.
Live Trace Command
We admit that we tend to call this feature “Streamline in Illustrator,” (see “Behind the Scenes: The Sad Demise of Adobe Streamline”) but the truth is that the Live Trace feature is much more powerful.
Live Trace allows you to select a placed pixel image and trace it into vector art. But unlike Streamline, which created a “dead” set of paths, Live Trace keeps a link between the artwork and the tracing. With the tracing active, you can go back and tweak the trace settings as desired. Also unlike Streamline, Live Trace Tracing Options give you a lot of control (see Figure 5-16). Experimenting with these settings creates a wide variety of effects (see Figure 5-17).
Figure 5-16. Live Trace Tracing Options dialog box in Illustrator CS2, with presets to save settings.

Figure 5-17. Examples of Live Trace transforming pixel art. From left to right: Original photo, single outline tracing, six grayscale tracing, stroke-only tracing.

One of Live Trace’s best features is that the image used for the tracing is still linked to the original Photoshop file. This means you can open the scan in Photoshop, apply filters to clean up noise and other unwanted elements, and then Illustrator CS2 will automatically update the Live Trace image. This is the sort of synergy that we love in Creative Suite.
Live Paint Commands
Illustrator paths have always followed strict rules. When one path overlaps another, the path underneath still keeps its shape. If you want to poke a hole in a path — for instance, to see the hole in the donut — you need to create a path that will act as the hole, and then use the Compound Path command to see through the hole.
Illustrator CS2 introduced a new way of working with paths called Live Paint. With Live Paint you no longer have to use compound paths to create a transparent area inside a path. All you do is select the area where you want the hole to appear and press the Delete key. For an old-time Vectorbabe like Sandee, it’s a remarkable thing (see Figure 5-18).
Figure 5-18. Example of Live Paint coloring and deleting objects.

Live Paint has two special tools: the Live Paint Bucket and the Live Paint Selection tool. Use the Live Paint Bucket to pour colors and swatches onto a path. Use the Live Paint Selection tool to select objects to be modified or deleted. The following illustration shows artwork that we made into a Live Paint group, and then created the hole in the donut by deleting the path in the middle.
Smart Guides in Illustrator
In real estate, the most important feature is “location, location, location.” In vector drawing it’s “precision, precision, precision.” That’s why Illustrator gets our vote for having the most precise control over creating paths.
Most people’s first step to working precisely is to drag a ton of guides all over the page. However, Illustrator has a terrific feature called Smart Guides that lets you work precisely, without adding any guides to the page at all.
To work with Smart Guides, choose View > Smart Guides. As you work, the smart guides appear or disappear as needed. Smart Guides will appear as small labels that show you when you are close to an anchor point, a path, the center of an object, or a line segment. Smart Guides also show you when you move an object along certain angles (see Figure 5-19).
Figure 5-19. Moving object with Smart Guides turned on.

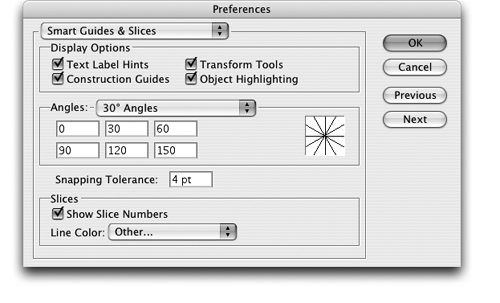
Set the type of information shown in the Smart Guides, as well as which angles will be shown, using the Smart Guides preferences (see Figure 5-20). With the Angles option turned on, you can constrain an object to follow the angle as you move or duplicate it. This makes it very easy to work precisely.
Figure 5-20. Smart Guide preferences, controlling what information will be displayed by guides.
Tip: Photoshop’s primitive form of Smart Guides
Turn on Photoshop guides by choosing View > Show > Smart Guides. These show only 90° angles without any labels; custom angles can’t be added. InDesign has no Smart Guide feature.
Special Vector Tools in InDesign
InDesign really doesn’t have any special vector tools other than the shape tools already mentioned. We doubt that Adobe will put more emphasis on vector drawing in InDesign. That’s what Illustrator is for.
Special Vector Features in Photoshop
Photoshop started life as a pixel-editing application. So it took a while before Photoshop even understood the concept of paths, and even then its path features were very elementary. You could create paths to use as clipping objects to make a transparent outline around an image. You could use paths as the contours that could then be filled or stroked with a color. With the advances in Photoshop CS2, there are now many choices for working with vectors in Photoshop.
Path Objects
Photoshop path objects appear in the Paths palette. These paths don’t affect your artwork unless you apply them as clipping paths or as the outlines for fills and strokes. These paths can also be converted into “marching ants” that indicate the selected area of the image. Because they are vector objects, they are resolution-independent; that is, they can be scaled up or down with no loss of information. This means that the path can be copied from a low-resolution version of an image and pasted into a high-resolution version of the file with no need to scale the path. Scaling the vector path up or down doesn’t lose any information. The path’s size depends on the printing dimensions of the file, not the number of pixels in the image.
Use any of the vector-drawing tools to create a new path object. Choose the tool, and then click the Paths control in the Photoshop Options bar (see Figure 5-21). This is important. The same vector-drawing tool can be used to create path objects, pixel areas, or shape layers (see the next section). So you need to choose the correct control before you start using the drawing tool.
Figure 5-21. Paths control in the Photoshop Options bar.
Shape Layers
Shape layers are a mixed breed. They are vector containers that are filled with pixel information. The vector containers act as vector masks for the layer. Shape layers are created and modified just like any path in Illustrator or InDesign. Shape layers print as pixels.
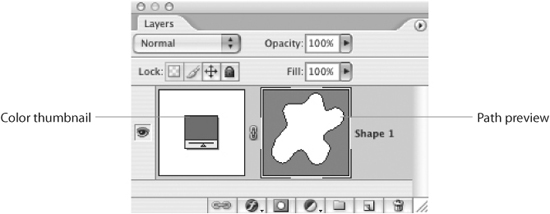
Creating a shape layer is easy. Choose the Shape Layers path control and start drawing with a vector tool. The shape layer appears automatically in the Layers palette, filled with the current foreground color. The Layers palette displays two icons for shape layers. The Color icon shows the flat color that fills the shape layer. The Preview icon shows the shape of the path that defines the shape layer.
Figure 5-22. Shape layer in the Layers palette.
Before Photoshop CS2 added Smart Objects, shape layers were the best way to create artwork that could be scaled up or down in Photoshop without losing pixel information. However, shape layers can only contain one flat color or the colors and gradients applied through Layer Effects. This makes it difficult to use shape layers for intricate artwork. With Smart Objects added to Photoshop CS2, there are fewer reasons to use shape layers. (See the next section for how to create and use Smart Objects.)
You can change the color of the shape layer by double-clicking its color thumbnail in the Layers palette. You can also apply any layer effect without losing the path that defines the shape. However, you must first rasterize the shape layer before applying a filter.
Photoshop Vector Smart Objects
Smart Objects are new to Photoshop CS2. Smart Objects work like symbols in Illustrator. Because Smart Objects have more features than just vector drawing, we’ll cover them in Chapter 9, “Smart Objects and Intelligent Layouts.”
Path Tools for Pixels
The final way to work with Photoshop’s vector-drawing tools is to choose the Fill Pixels mode. This mode lets you draw with the vector tools and is useful for quickly adding a shape to an image. Rather than create a path or shape layer that can be scaled or modified, this mode converts the area into pixels. You cannot reshape the path later, nor use the Pen tool in this mode.
Moving Paths between Applications
It wouldn’t be a Creative Suite if the vectors in one application couldn’t be brought into another. Not only do the applications let you move paths between them, you have choices as to how the information is translated.
Transporting Paths Out of Illustrator
Recently Sandee was teaching a class and a student asked about the future of Illustrator. He wondered, because InDesign had so many similar features to Illustrator, if eventually anyone would ever need Illustrator. Sandee was appalled; no need for Illustrator in the future! How awful!
The reality is that Illustrator is needed more than ever before. Sandee thinks of Illustrator as a little vector hobby shop that you can run over to and craft some intricate vector paths and then bring those paths over to InDesign and Photoshop.
Setting the Preferences
Adobe has made it easy to simply copy and paste or drag and drop artwork out of Illustrator and into InDesign or Photoshop. Before you can do so, you need to set the Illustrator preferences correctly.
The following text uses the terms copy and paste to indicate moving artwork from one program to another. You are not limited to just copy and pasting. For all of these techniques, you can also drag the artwork out of the Illustrator document window and drop it onto the document window of the other application. However, since this requires a lot more screen real estate than either of us has, we are more used to copy and paste.
To display the Preferences dialog box, choose Illustrator > Preferences > File Handling & Clipboard (Mac OS) or Edit > Preferences > File Handling & Clipboard (Windows) (see Figure 5-23). The area of concern is the Clipboard On Quit section. Despite the word Quit in the title, these settings also control how artwork is copied to the Clipboard or dragged out of Illustrator.
Figure 5-23. Illustrator CS2 default preferences for copying artwork to the clipboard.
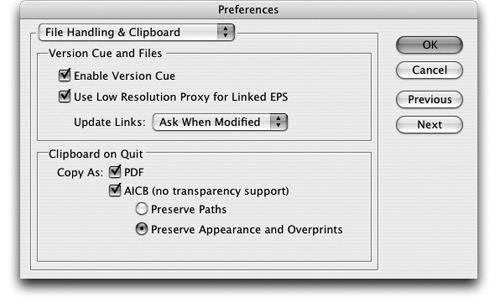
The Copy As PDF setting means that a PDF graphic will be pasted onto the InDesign page, as seen in Figure 5-24. If this option is the only choice selected, it will create several problems. First, the pasted graphic is uneditable in InDesign. Even worse, this uneditable block of PDF artwork doesn’t show up in the Links palette. We shudder at the thought of a production manager looking over the page and wondering from where this mass of PDF came or how to edit it.
Figure 5-24. Examples of effect of Illustrator Clipboard preferences on art pasted into InDesign.

The AICB (No Transparency Support) option supports the preferred format (Adobe Illustrator Clipboard, or AICB) for moving paths between Illustrator and InDesign, as well as between Illustrator and Macromedia FreeHand. If you want to edit the pasted material, be sure to select this option (in addition to Copy As PDF). Transparency effects, such as drop shadows, glows, and feathers will not be supported in the pasted artwork. However, you can choose between two ways to implement the conversion of objects, to best address how you’d like to deal with any transparent elements after pasting:
• With Preserve Paths selected, paths are pasted, but any transparency effects are converted into flattened raster images. The conversion process is far from pretty. In our example in Figure 5-24, a subtle drop shadow is converted into a rather ugly black image on a white background. Fortunately the paths are editable and the ugly images can be deleted.
• With Preserve Appearance And Overprints chosen, paths are pasted as editable objects, but the clipboard does a slightly better job of converting transparency effects into images. As shown in Figure 5-24, the converted drop shadow appears very close to how it did in Illustrator. But because transparency is not supported, the drop shadow appears on a solid background. This setting maintains overprinting as well as the blend modes of transparency effects.
So what should you do if you do want to paste editable paths from Illustrator into InDesign, but still maintain transparency effects? Our solution is to get rid of the effects in Illustrator and apply them in InDesign. For simple effects such as drop shadows and feathers, this is the easiest way to get the best of both possible worlds (see Figure 5-25).
Figure 5-25. Examples of effect of Illustrator Clipboard preferences on art pasted into InDesign: Original Illustrator art with no transparency effects (left), and art pasted into InDesign with drop shadow applied in InDesign (right).
When there are no transparency effects, blend modes, or overprinting, then there is no meaningful difference between the two flavors of the AICB. What you want — to preserve paths — is what you’ll get.
Tip: Pasting Illustrator special effects
If you paste ordinary paths with a single fill or stroke, only one object appears in the InDesign file. However, if you have applied any Illustrator special effects to the path, the special effects are expanded into multiple paths in the InDesign file. Because we usually want to use just a simple path in InDesign, we use just one fill without a stroke on the object. That way, it pastes into InDesign as a single object. This object can then be used as the frame for an image or simply a regular design element in InDesign.
Pasting Into Photoshop
Pasting artwork from Illustrator into Photoshop is a lot simpler than pasting into InDesign. All you have to do is copy the artwork in Illustrator and then move over to Photoshop and paste. The Paste dialog box (see Figure 5-26) appears. This allows you to choose which vector format you want to use.
Figure 5-26. Photoshop CS2 Paste dialog box appears when copying artwork from Illustrator when the Illustrator Preferences AICB option is selected.
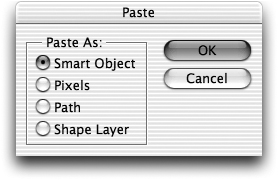
Illustrator preference settings, as described in the previous section, control whether the Paste dialog box appears. If the AICB option is deselected, then the artwork copied from Illustrator will automatically appear pasted in Photoshop as a vector smart object. The other formats for paths, shape layers, and pixels require that you choose one of the AICB options.
You can also move vector artwork from Illustrator into Photoshop using the Illustrator Export commands.
Moving Paths Out of InDesign
We agree that it is far more likely that you want to get paths from Illustrator into InDesign. However, consider this scenario: you’re working in InDesign and have expanded your text into outlines using the Create Outline command. You’ve fiddled around with the shape of the converted text. You show the result to your client (or boss). Suddenly everyone is very excited. You’ve done it — you’ve created the new logo design that everyone has been looking for. There’s only one problem. How can you get the new logo out of InDesign, a page-layout program, and into Illustrator, where everyone will be more comfortable working with it? Steve sometimes likes to move simple vector objects into Illustrator to work on them because it has a more complete vector toolset than InDesign. Although it is not often needed, fortunately there is a way to get paths out of InDesign and into Illustrator.
Copying into Illustrator
Getting paths from InDesign to Illustrator requires no preferences to set, nothing to prepare. All you have to do is select the InDesign object, copy, switch to Illustrator, and paste. The file format out of InDesign is PDF, which Illustrator understands perfectly. However, once you get the path into Illustrator, you need to do a little cleanup.
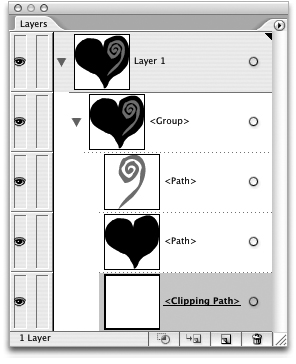
Copying and pasting paths from InDesign into Illustrator creates a group that contains the paths for the artwork as well as a rectangular clipping path that was the bounding box of the objects in InDesign (see Figure 5-27). You may have to delete that clipping path to work with the file in Illustrator; doing so won’t affect the artwork’s appearance. This is a case where expanding the Layers palette display can come in handy.
Figure 5-27. Illustrator CS2 expanded Layers palette displaying items copied from InDesign and pasted into Illustrator, including clipping path (bounding box).
Copying into Photoshop
What happens if you copy from InDesign and paste into Photoshop? Not exactly what you expect. The path is automatically pasted as a Vector Smart Object without any options to paste as pixels, shape layer, or path. If you want to paste InDesign paths into Photoshop as anything but a Vector Smart Object, you need to first paste the paths into Illustrator and then copy and paste from there into Photoshop.
Moving Paths Out of Photoshop
If you need to paste vectors from Photoshop into InDesign or Illustrator, what you get depends on which type of vector object you copy.
Copying Shape Layers and Paths
Shape layers and paths are the two best objects to copy from Photoshop into Illustrator. Simply select the paths or shape layer objects, copy, switch to Illustrator, and then paste. The Paste Options dialog box appears with two choices (see Figure 5-28).
Figure 5-28. Illustrator CS2 Paste Options dialog box controls for pasting paths and shape layers from Photoshop into Illustrator.

Choose Compound Shape (Fully Editable) to paste the objects with Illustrator Compound Shape commands applied. This option maintains any of the shape options that were applied in Photoshop. Objects that were Photoshop shape layers are converted into Illustrator objects. Although the Compound Shape commands are applied, the paths appear in Illustrator without any fill color. This is because Illustrator does not understand the color applied as part of the shape layer. That’s no problem. Simply select the objects and apply a color in Illustrator. If you need to release the Compound Shape, select the objects and choose Release Compound Shape or Expand Compound Shape from the Illustrator Pathfinder palette menu.
Choose Compound Path (Faster) to paste the objects as grouped compound paths. Release the group to work with the paths as individual objects. Although they are compound paths, they have not been compounded to each other. Thus the objects won’t interact with each other if overlapped. Like the Compound Shape option, the objects appear in Illustrator with no fill. Select the objects to apply any fill or stroke.
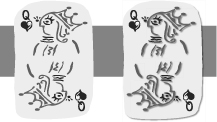
You would think that it would be very rare to move paths out of Photoshop. However, years ago Sandee discovered a cool technique to create custom “twinkles” or stars that can be applied as strokes in Photoshop (see Figure 5-29). The technique lets you work with the precision of Illustrator transformations, and then return to Photoshop to apply a pixel stroke. This technique demonstrates ultimate cross-product cooperation: moving paths from Photoshop to Illustrator and back. Here are the steps to recreate the effect.
1. In Photoshop, use the Pen tool in its Paths mode to create a single line. This line should be the length of one of the strokes you will used in the “final twinkle.”
2. Still in Photoshop, use the Selection tool to copy the line to the clipboard.
3. Switch to Illustrator and paste. Choose Compound Path (Faster) as the option. The line is pasted as a compound path without any fill or stroke.
4. In Illustrator, with the line selected, choose Object > Compound Path > Release.
5. If you want to make it easier to see the line, apply a stroke.
6. With the line selected, double-click the Rotate tool. In the Rotate dialog box, select an angle (like 30°) and click Copy. Choose Object > Transform > Transform Again, and repeat until you’ve created a star. (We can’t use the rotation transformation in Photoshop because it only works if the path encloses an area.)
7. Copy the finished rotated lines, and switch back to Photoshop.
8. Delete the original segment, and then paste the paths created in Illustrator. In the Photoshop Paste dialog box, select Path. This creates the paths to be used for the twinkles.
9. Choose a brush and a foreground color for the twinkles.
10. Select the work path in the Paths palette, and drag it onto to the Stroke Path with Brush button. This strokes the paths with the current brush’s options and foreground color.
11. If desired, create additional twinkles by Option/Alt-dragging the paths you’ve created. (Although a single line segment cannot be rotated, multiple paths can. Thus they can be scaled or otherwise modified to create different twinkle appearances.)
Figure 5-29. Twinkles created by moving and manipulating paths from Photoshop to Illustrator and back to Photoshop.

What about moving paths from Photoshop into InDesign? Strangely, there is no direct route. When we try to copy and paste paths, we get an EPS Import: Undefined Error dialog box. Fortunately, it is rather easy to paste from Photoshop into Illustrator and then paste from Illustrator into InDesign.
Tip: Add a color to a pasted path in Illustrator
Paths that have been pasted from Photoshop into Illustrator lose any fill or stroke. If you then paste that object into InDesign, you will get an error message. Add a color or stroke to the object in Illustrator, and it will paste into InDesign with no problem.
Copying Vector Smart Objects
Don’t bother trying. The vectors in Vector Smart Objects are like roaches in those roach traps. Vectors can be pasted into Photoshop as a Smart Object; but they don’t come out. If you need to recover the vectors used in a Smart Object, you must use the Smart Object editing command to open the Smart Object in Illustrator (see Chapter 9, “Smart Objects and Intelligent Layouts”).
Vectors in Unexpected Places
We love surprises. So we also love to find vector controls in various places in Creative Suite. Once you’ve found these hidden vectors you can use many of the vector modification techniques to change the shape of these paths. Here’s a sample of the unexpected places where you can find vectors.
The Hidden Vectors in Illustrator
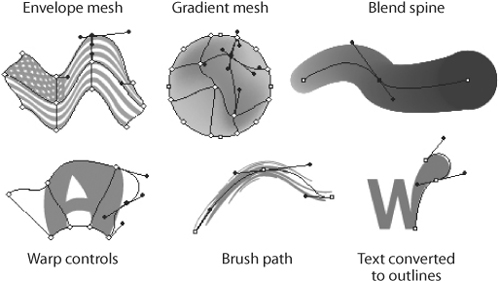
Vector controls show up in Illustrator in many places. In fact, the only surprise is how many places there are. See Figure 5-30 for examples of these places.
Figure 5-30. Some Illustrator CS2 additional vector controls.
Mesh, Blend, Warp, and Brush Objects
• You click an object with the Gradient Mesh tool to create an anchor point that contains a blend of a color. As you add more points you can create intricate designs within the Gradient Mesh.
• The Envelope Distort Mesh tool lets you distort objects using a grid of anchor points. You can create a distortion grid by selecting the objects and then applying the Object > Envelope Distort > Make With Mesh command. This creates a grid of points that can be used to distort the interiors of objects.
• The points in the Gradient Mesh and the Envelope Distort Mesh objects are actually anchor points with Bézier handles. You can modify the length of the gradient or extent of the warp by changing the length of the control handles. You can also use the Pen tool and the Pen tool modifiers to add, delete, and convert the points from smooth to corner and then back to smooth.
Tip: Mesh objects do not retract handles into the anchor point
Don’t waste your time trying to retract the anchor point handles to get perfectly straight-line segments. A tiny handle will always stick out of the point.
• A Blend object is created between two or more paths with the Blend tool. The spine (connecting path) of a blend is also a modifiable vector object, so you can add, delete, and change points on the spine just as you would any other vector path. This makes for loads of interesting effects with blends. For instance, you can extend Bézier handles from the endpoints of the spine to change the rate that the blend changes from one color to another.
• You can warp the shape of an object by choosing the Object > Envelope Distort > Make With Warp or Make With Top Object commands. The spines and curves of the warp controls are also vectors with Bézier handles. Use any of the path-modifier tools to customize the warp. Like the mesh objects, you can change the anchor point from smooth to corner, but you can’t retract the Bézier handles all the way into the anchor point.
• The path that any of the Illustrator brushes follows is, of course, a vector path that behaves exactly as paths created with the Pencil tool. You can modify these paths completely by adding, deleting, or converting points. There are no limitations to retracting the Bézier handles.
Converting Type to Outlines
Of course we must mention the vectors that are created when you convert type to outlines. That’s part of John Warnock’s and Chuck Geschke’s original invention to describe fonts using vector artwork. Converting type to outlines simply exposes the points that were used to create the font. Once you have converted the type to outlines you can apply commands that don’t work with editable text.
One place where we were disappointed to find no vector controls in Illustrator is in the bounding box applied to symbol sets. This is the rectangle that defines the area created when you spray symbols using the Symbol Sprayer tool. When you select the rectangle, you see four anchor points. But those anchor points are completely frozen — they can’t be moved independently, nor can you extend any Bézier handles to make them smooth points or curves. Sigh! What fun we would have if we could.
The Hidden Vectors in InDesign
InDesign has a wealth of places where you can find vector controls as well as a special command to convert vector paths into frames. See Figure 5-31 for examples of these types of objects.
Figure 5-31. Some InDesign CS2 hidden vector controls.

Clipping Paths and Text Wraps
The clipping paths in InDesign are vector paths. When you create a clipping path by choosing Object > Clipping Paths, you are adding a vector shape around your image. Whether you’re choosing a clipping path created in Photoshop or using the Detect Edges option to have InDesign create one, you have access to that path. This vector shape can be modified with any of the pen tools. Even better, however, you can use the Pencil, Eraser, or Smooth tool to modify the shape of the path. We find this very helpful when the clipping path has far too many points. A few passes with the Smooth tool over the path deletes just enough points to make it acceptably smooth. Changes to a Photoshop clipping path are stored in the InDesign file and don’t affect the path in the Photoshop file.
Similarly, all the text wraps applied to objects are actually vector paths. You can modify these vector paths with the Pen tool, the path modification tools, or even the Pencil and Smooth tools.
The Create Outlines Command
Like Illustrator, the InDesign Create Outlines command converts type into its PostScript vector outlines. But the InDesign and Illustrator commands for converting type to outlines differ significantly. Unlike Illustrator, InDesign allows for the conversion of selected type within a text frame. The type is converted as an inline graphic that travels with the text flow. As an alternative, you can select the entire frame that contains the InDesign type and convert it to outlines; this creates frames that are no longer part of the text flow. The latter approach is similar to how Illustrator converts type to outlines.
The Secret InDesign Vector Command
Yet another place we have found hidden vectors in InDesign is a secret command that converts a clipping path to a frame. Start with a clipping path that has been applied to an object. Perhaps it is the clipping path that was created from an alpha channel in Photoshop, or from the Detect Edges command in InDesign. Select the image that contains the clipping path; Control/right-click and choose Convert Clipping Path To Frame from the context menu. The clipping path is converted into an InDesign frame that can be used to hold an image, text, or a color. And, of course, that frame is controlled by vectors and anchor points.
The reason we call this a secret command is that most context menu commands can be found somewhere else in the program — on a menu, a palette, or somewhere. This command is only found in the context menu. So don’t go telling everyone else about it. Let’s keep it our little secret.
The Hidden Vectors in Photoshop
While not as robust as all the hidden vectors in Illustrator, Photoshop provides a few vector controls in unexpected places. See Figure 5-32 for examples of these types of paths.
Figure 5-32. Some Photoshop CS2 additional vector controls.
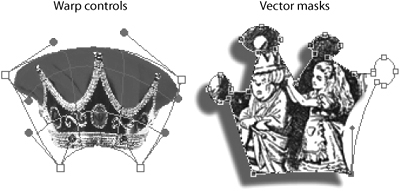
You can warp images using the Edit > Transform > Warp command. The bounding box that appears contains rudimentary Bézier controls. The four points on the corners of the box have Bézier handles that can be moved to change the warping applied to the image. A grid similar to the ones in the Illustrator mesh tools lets you warp the interior of the image. However, none of these controls can be modified using any of the pen tools, nor can points on the grid be added or deleted. It’s a very primitive version of vector controls.
Strangely, however, Photoshop has no vector controls for the warp commands you can apply to text. We figure this is because editable text can’t have the more sophisticated warp applied to it. Working on an editable text layer, warp text by clicking the Create Warp Text button on the Options bar. To apply the kind of warp made with the Transform > Warp command, you must convert your editable text to an ordinary layer and then apply the Warp command.
Vector masks can be applied to image layers. Similar to shape layers, these vector masks are applied to ordinary image layers. This makes it possible to use vectors to mask out areas of an image. To create a vector mask, create a path and then select the layer to which you want to apply the mask. Choose Layer > Vector Mask > Current Path. This converts the path to a vector mask applied to that layer.
Saving and Exporting Vectors
Command-S. Ctrl-S. Command-S. Ctrl-S. Save, save, save your work. It’s one of those reflex actions that do without thinking. Create a tricky layer arrangement in Photoshop — Command-S. Finish formatting a 32-page brochure — Ctrl-S. Set the options exactly right for a tracing in Illustrator — Command-S. It’s our second-favorite keyboard command, right after Undo (Command/Ctrl-Z).
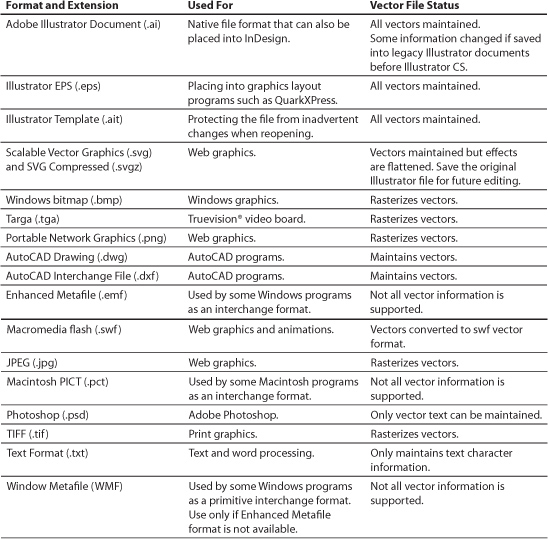
But what are we actually saving when we choose the Save command? What do we lose when we save in other file formats? What’s the difference between saving and exporting? When it comes to precious vector artwork, you need to be informed as you choose the options for saving files. (See Table 5-5, “Illustrator CS2 Save and Export Formats,” at the end of this section for a summary of the right formats for working with vectors.)
Table 5-5. Illustrator CS2 Save and Export Formats
Illustrator Save and Export Options
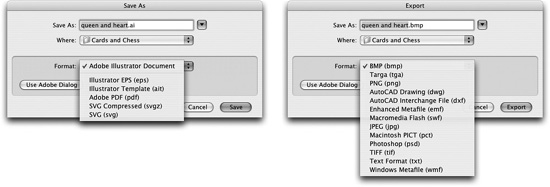
Illustrator has some of the most extensive Save and Export options of the CS2 applications. Sadly, it is also the most confusing when it comes to what choices you should make when saving files. The options for saving files appear when you choose File > Save, File > Save As, or File > Save A Copy. These formats are the ones that can be most easily reopened by Illustrator (see Figure 5-33). For instance, when you choose to save as an Illustrator EPS file or an Adobe PDF file, you can open and work on the file later in Illustrator.
Figure 5-33. Illustrator CS2 options for saving native Illustrator (AI) files.

Illustrator Compatibility
When you save as an Illustrator file, you choose in which version of Illustrator to save to the file. The Illustrator CS2 option provides the most compatibility with the current version of the software. The Illustrator CS option may change artwork slightly. Any of the legacy formats will change type flow (we discuss this in Chapter 6, “Type Magic”). Finally, Illustrator 8 and earlier will also flatten some of the transparency effects. Check the warnings at the bottom of the dialog box to see what may happen when you save in each version.
The Create PDF Compatible File option needs some explanation. Saving with this option does not make a true PDF file. It simply saves the file with a special PDF representation of the Illustrator elements. InDesign and Photoshop require this PDF information to read the Illustrator file. This information causes InDesign to place native Illustrator files as PDF documents.
Illustrator Export options
Export format options are found when you choose File > Export (see Figure 5-34). The major difference between exported artwork and saved artwork is that exported formats can’t be easily reopened by Illustrator. And if you can reopen the file, it won’t necessarily appear as it did originally. For instance, if you export your document as a Macromedia Flash (SWF) file, you also need to save a copy of the file in an Illustrator format if you need to work on the file later.
Figure 5-34. Illustrator CS2 format choices for saving and exporting files.
InDesign Save and Export Options
InDesign also separates its formats into Save and Export dialog boxes. What’s truly confusing here is that some options that appear in the Save dialog box in Illustrator are in the Export dialog box in InDesign. This is because Illustrator has much more power to open other file formats. InDesign can faithfully reopen only its own file formats.
The Save formats are used only for InDesign files and templates (see Figure 5-35). The Export formats convert the files into appropriate formats for placement and use in other page-layout programs or as part of a PDF workflow. Like in Illustrator, the Export formats do not allow reopening the file. If you need to work on the file later, save the original InDesign file as well as the exported document.
Figure 5-35. InDesign CS2 format choices for saving and exporting files.
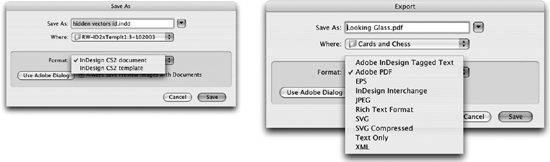
Table 5-6. InDesign CS2 Save and Export Formats

Placing Vectors Into InDesign
You would think that once you have vector information in a file, it would remain vectors if you place it into a page layout program such as InDesign. That’s what we thought until we found out about what happens to the vectors and PostScript text that get placed into InDesign.
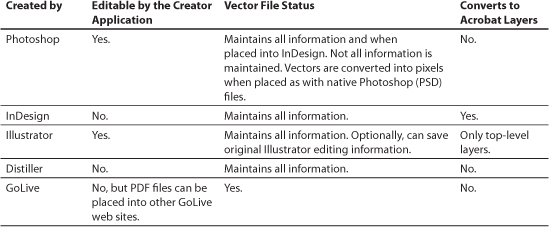
Because InDesign doesn’t quite understand Photoshop’s vector formats, an ordinary Photoshop file placed into InDesign will have its vectors converted into pixels. Table 5-7 shows you what formats maintain the vector information when placed into InDesign and which formats lose the vector information.
Table 5-7. Options for Vector Files Placed into InDesign

Photoshop Save and Export Options
Photoshop lumps almost all its file formats in the Save dialog box (see Figure 5-36). Since Photoshop deals primarily with bitmapped images, it is not surprising that few of the formats recognize the vector information in Photoshop files. However, knowing when or where to save your vector data can be very helpful. We discuss saving Photoshop files in the “Saving Pixels” section of Chapter 4, “Pixels and Raster File Formats.”
Figure 5-36. Photoshop CS2 format choices for saving and exporting files.
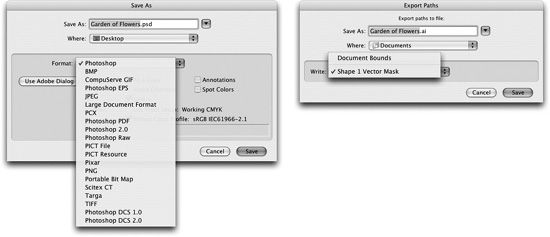
Photoshop also has some export formats in the File > Export menu. Only one of these has interest for us in this chapter: the Paths To Illustrator feature. This command was added way back in the days when you couldn’t copy and paste or drag and drop from one application to another. This command allows exporting the paths in a Photoshop file directly as an Illustrator file. These days we tend to forget about this feature because it is so easy to copy and paste paths. However, the fact that there is an export option lets you use batch processing to convert the paths from many files.
Adobe PDF
It is not surprising that all of the CS2 applications let you save Adobe PDF files. Even better, they all now share a global PDF Export preset. If you create a PDF preset in InDesign, that preset shows up in the PDF Options dialog box in Illustrator when you save a PDF file. This is a terrific way to make sure that all your PDF files have consistent settings. We’ll cover setting all the PDF features in Chapter 14, “Creating and Using PDF Files.” but here are a few basic points to give you an overview of the capabilities. Table 5-8 provides a brief summary of how each of the Adobe applications create PDF files.
• Illustrator includes an option in its Save Adobe PDF dialog box to Preserve Illustrator Editing Capabilities. This means that the ordinary PDF description of the document is augmented with extra Illustrator-specific information that contains all the special features such as swatches, symbols, brushes, effects, and so on that make up the original Illustrator file. Selecting this option enables you to reopen the PDF file in Illustrator and continue working on it without having to save a PDF as well as the AI file. Deselecting the option creates a smaller PDF file, but makes it very difficult to use Illustrator to edit that file later.
• Both InDesign and Illustrator let you save with Acrobat 6 or 7 compatibility (PDF 1.5 or 1.6) and convert top-level layers to Acrobat layers. This allows someone who opens the file in Acrobat to turn layers on and off as desired. However, Photoshop doesn’t give you this option when saving as a PDF.
• Photoshop PDF files maintain the vector information when placed into InDesign. (This is not the case when placing native Photoshop files into InDesign. InDesign rasterizes the vector information in a PSD file.) For this reason, choose Photoshop PDF if you want to maintain PostScript vector information in your documents. (See Chapter 4, “Pixels and Raster File Formats,” for more information about saving in this format.)
• GoLive can convert its web pages into PDF documents. First click the PDF Preview tab in the document window to display the PDF Inspector, and then set the controls. Next, click the Export PDF button in the toolbar or choose File > Export > HTML As Adobe PDF.
Table 5-8. Choices for creating PDF files from the CS2 applications
Unfortunately, GoLive creates a PDF file that uses GIF or JPEG graphics in the HTML page. We were hoping that using native Photoshop or Illustrator Smart Objects (covered in Chapter 9, “Smart Objects and Intelligent Layouts”) would allow us to create a high-resolution PDF from GoLive pages. Sadly, that is not the case.
EPS Files
Today we are astonished when we find anyone using Adobe Creative Suite who saves work as EPS (Encapsulated PostScript) files. There is simply no need to use the EPS format, because InDesign accepts native Illustrator and Photoshop files. These files are slightly smaller than EPS files, save faster, and have much better screen previews in InDesign. However, if you need to send files to some poor souls who use QuarkXPress 4.0, save your files as EPS. Back in the Dark Ages of desktop publishing, the only way to add a file from a vector drawing program into page-layout software was to save it as an EPS file, which packaged all the information as PostScript code. This package also contained a small, bitmapped header that allowed the page-layout program to display an ugly preview of the file.
At the same time, the only way to save a raster file with a clipping path or a duotone was to save it in Photoshop as a raster EPS file. Again, all the information in the document was wrapped up in a package with a crummy preview.
Nowadays, Illustrator and Photoshop still allow saving in the EPS format, as expected, but it’s a nice touch that InDesign also lets you save pages as EPS files. Photoshop EPS files maintain the vector information, but reopening those files in Photoshop causes all the precious vectors to be rasterized. So save a PSD copy of the EPS file if you need to work with the vectors later.
SVG Files
The SVG (scalable vector graphics) format was originally developed for use in web graphics. Because they are vector graphics, SVG files are much smaller than comparable GIF files. Because SVG files also use XML as their file descriptions, SVG files can be modified very easily by modifying just a few lines of code.
Despite the valiant efforts of Adobe and other members of the SVG developing organization, SVG has not been added to many web sites. However, at the start of 2005, a new format, SVG Tiny, started generating news. The SVG Tiny format has been adopted by many mobile phone manufacturers as a standard for displaying graphics. It is very simple to upload the SVG file for display on the phone screen, using Bluetooth technology.
Both Illustrator and InDesign let you save files in SVG format, but only Illustrator lets you save as SVG Tiny. Illustrator also has the option to Preserve Illustrator Editing Capabilities if you need to work on the file later. However, as this option adds to the file size, we’d rather not include it when sending a file to mobile phones.
SWF Files
Flash (SWF) is another type of vector format that is used primarily on the web and in other non-print applications, most often for animated series. Because they are vectors, these animations are very small (in file size) compared to GIF animations or QuickTime movies.
You can create SWF files from Illustrator. Illustrator’s PostScript vector information is then converted into SWF vectors. These vectors are not identical. So if you need to reopen an Illustrator file that has been saved in SWF format, keep the original Illustrator file.
Older Vector Formats
While Steve and Sandee work with state-of-the-art equipment using only the latest and best software, plenty of other people still use older software that doesn’t recognize the newer file formats. That’s why Adobe conscientiously maintains these older file formats for exporting and saving files. However, that doesn’t mean that you should use some of those file formats.
For instance, Windows Metafile (WMF) and Enhanced Metafile (EMF) are vector file formats, developed by Microsoft and native to the Windows operating system, but which have no place in a print-production workflow. The Macintosh PICT (PICT) format is also a vector format, created by Apple for use in its MacDraw application. Again, it doesn’t belong in a professional print workflow.
While not an older format, the AutoCAD Drawing (DWG) format is used in AutoCAD software. However, you may find that today’s AutoCAD applications can open Illustrator CS2 files or older versions of Illustrator files.
Walking Down the Vector Path
Vectors are like gold. They can be modified by moving anchor points. They are easily scaled up or down without losing quality (resolution). They can be pasted between applications. As you use the Creative Suite applications, remember which features create vectors and which ones don’t.
Knowing which formats support vector data will help you avoid nasty surprises when you go to press and see fuzzy pixels instead of your clean, crisp, golden vector shapes.