Chapter 12. The Flexibility of Layers
Pulling a rabbit out of a hat is one of the ways that magicians prove their sophistication and skill. Far more often than rabbits get pulled out of hats, layers pop up whenever you create an image in Photoshop, a vector graphic in Illustrator, or a document in InDesign — just look at the application’s Layers palette for proof! As a creative professional, you show off your sophistication and skill when you use well the powerful tool of layers.
Layers act like pieces of clear acetate, stacked one on top of the other, on which you can place pixels (in Photoshop) or objects (in Illustrator or InDesign). As you work, you can create, move, edit, and delete layers, for great flexibility and efficiency.
As we’ll discuss in this chapter, creating multilayered files in the Adobe Creative Suite applications serves many purposes:
• In Photoshop, layers are your primary way of creating and managing complex compositions, allowing you to control the visibility, position, transparency, and effects applied to different parts of the composition.
• In Illustrator and InDesign, layers let you organize complicated documents, allowing you to separate dozens or hundreds of objects or groups.
• In all these applications, you can use — and share — layers (and in Photoshop, layer comps) to create different versions of artwork or pages. A designer can use versioning to produce alternative compositions as artwork progresses through the approval cycle. A production artist can use layers to produce different editions of the same file, targeted to different audiences.
This chapter discusses how layers work within Adobe Creative Suite applications, with the focus primarily on Photoshop, Illustrator, and InDesign and the similarities that make it easy to switch between these applications and share layers. (GoLive can create HTML layers, but we don’t discuss them in this book.) For example, you can move artwork between Photoshop and Illustrator and retain as much of the layer structure as possible, along with the editability of type, masks, and other elements. You can control which layers and layer comps in Photoshop PSD and PDF files are visible in InDesign and Illustrator. We also touch on layer features in Acrobat and differences in how the Creative Suite applications handle layers.
Layer Essentials
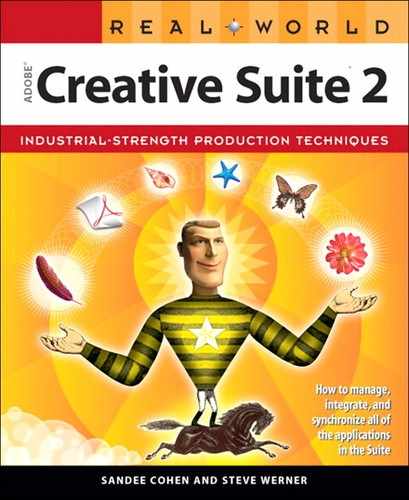
The Layers palette is the main tool for working with layers in Photoshop, Illustrator, and InDesign. It looks and works much the same between the three applications (Figure 12-1). The Layers palette and layers in these applications have common functions, but they also differ because of the contrasting requirements of layering pixels and objects. (For information on the general similarities between palettes in the CS2 applications, see “Using Common Interface Elements” in Chapter 7, “Managing and Customizing the Interface.”)
Figure 12-1. Layers palettes in Photoshop (left), Illustrator (middle), and InDesign (right).
Common Layers Palette Features
All three Layers palettes display layers in the file in a vertical stack that simulates the layer-stacking order in the document. Pixel and object layers that are higher in the Layers palette appear at the front of the document window; they can obscure layers that are lower (behind) in the stacking order.
In Photoshop and Illustrator, you can control the appearance of the palette by choosing Palette Options from the palette menu. In Photoshop, this command controls the size of palette thumbnails and whether they display the layer bounds or the entire document (Figure 12-2, left). In Illustrator, this command controls thumbnail size and whether sublayers, groups, and objects are displayed (Figure 12-2, right). InDesign doesn’t have such a command, but you can select Small Palette Rows from the palette menu to view more layers in the palette.
Figure 12-2. Layers Palette Options in Photoshop controls thumbnail size (left). In Illustrator, it controls thumbnails for sublayers, groups, and objects (right).

Toggling Visibility and Locking Layers
In the Photoshop, Illustrator, and InDesign Layers palettes, click the eye icon to toggle that layer’s visibility.
Tip: Toggle Visibility of One or All Layers
In all CS2 applications, Option/Alt-click any visibility icon to toggle between showing only that layer and displaying all the layers in the file.
To lock layers in Illustrator and InDesign, use the column to the right of the visibility column. Clicking displays a lock icon, indicating that the layer is locked; clicking a second time unlocks the layer.
Photoshop has a more complex concept of layer locking: When a layer is selected, you can choose four icons at the top of the Layers palette to lock transparent pixels, image pixels, position, and all attributes (Figure 12-1).
Adding, Duplicating, and Deleting Layers
You can add, duplicate, and delete layers in similar ways in Photoshop, Illustrator, and InDesign:
• To create a new layer, choose New Layer from the Layers palette menu or click the New Layer button at the bottom of the palette.
• To duplicate a layer, choose Duplicate Layer from the Layers palette menu when a layer is selected, or drag a layer over the New Layer button.
• To delete a layer, choose Delete Layer from the Layers palette menu when a layer is selected, or drag a layer over the New Layer button.
It’s generally a good practice to give your layers meaningful names when you create them, rather than keeping the default names of Layer 1, Layer 2, and so on. To rename a layer, in Photoshop, double-click the layer name to highlight it and rename it; in Illustrator and InDesign, double-click the layer to open the Layer Options dialog box and rename the layer.
Setting Layer Options
The CS2 applications let you set options for each layer including its name and color (Figure 12-3). In Photoshop, choose Layer Properties from the Layers palette menu. In Illustrator and InDesign, double-click a layer. (In Illustrator, you can also set options for sublayers, groups, and objects by double-clicking these elements.) The layer color in Photoshop appears only as a highlight color in the Layers palette. In Illustrator and InDesign, the layer color shows as a selection color in the document window, and as the color of the selection proxy in the Layers palette (which we discuss later in “Selecting and Moving Objects on Layers”). Other options in the Illustrator and InDesign dialog boxes are discussed in the following sections, “Illustrator Layer Highlights” and “InDesign Layer Highlights.”
Figure 12-3. Layer options in Photoshop (left), Illustrator (middle), and InDesign (right).

Selecting Layers
Illustrator and InDesign have always given you the ability to select multiple layers, but in the past, Photoshop has not. Photoshop CS2 presents a more “object-oriented” interface, allowing you to perform commands with more than one layer selected. In all three applications, to select multiple contiguous layers (layers which are next to each other), click the first layer and then Shift-click the last layer. To select noncontiguous layers, Command/Ctrl-click them in the Layers palette (Figure 12-4). In Photoshop, these new capabilities largely replace linking layers, used in previous versions. To link layers in Photoshop, you can still click the Link Layers button at the bottom of the Layers palette.
Figure 12-4. Multiple Photoshop layers selected, with unavailable commands dimmed.

Some activities in Photoshop, like painting or making tonal adjustments, work only on the active layer (the one whose name appears in the document window title bar). Other activities — for example, moving, aligning, or transforming — work with multiple layers.
In Photoshop, you can also select layers in the document window when you have the Move tool selected. If the Auto-Select Layer option on the Options bar is selected, select visible layers by clicking, Shift-clicking, or Command/Ctrl-clicking them.
Tip: Select Multiple Type Layers
If you select multiple Type layers in Photoshop, you can apply text attributes from the Options bar or the Character or Paragraph palettes to all the layers at the same time.
Selecting and Moving Objects on Layers
Because Illustrator and InDesign are object-oriented applications, you need to be able to select objects on a layer or move objects to a different layer. The selected object or objects appear in the Layers palette as a small square called a proxy (Figure 12-5). Use these shortcuts to select and move objects:
• Option/Alt-click a layer to select all the objects on the layer.
• Drag the proxy to a different layer in the palette to move the selected objects to that layer.
• Option/Alt-drag the proxy to another layer to duplicate selected objects from one layer to another.
Figure 12-5. Dragging selection proxy in InDesign to move objects from layer to layer.
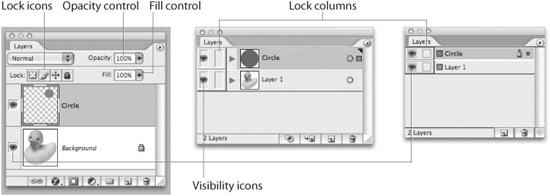
Targeting Layers
Targeting a layer selects it. Both Illustrator and InDesign use the concept of targeting to select a layer — for example, as a way of specifying where an object will appear when drawn, placed, or pasted — but they do it somewhat differently. Figure 12-5 shows targeting in InDesign: The highlighting and the Pen icon indicate that the Hexagon layer is targeted.
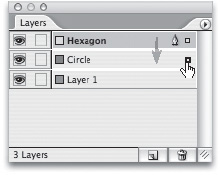
Illustrator has two different ways to target layers — in a sense, they are two different “levels” of targeting. Clicking the name of the layer or sublayer designates on which layer an object will appear when the object is drawn, placed, or pasted. Clicking a layer’s target icon — the circular icon to the right of the layer name — targets a layer (or a sublayer, group, or object) means that transparency or effects will be applied to all objects on that layer.
Figure 12-6. In Illustrator, click the circular target icon to select a layer or subcomponent (here, the Transparency sublayer and its component groups and objects).
To copy layers intact from the Illustrator or InDesign source document to another document, choose Paste Remembers Layers from the Layers palette menu. Otherwise, all the objects will be placed on the targeted layer and the layer structure will be lost.
Moving and Aligning
At any time you can change the stacking order of layers in Photoshop, Illustrator, and InDesign. To move a layer, select it, and then drag it up or down in the Layers palette until an insertion bar appears between layers. Release the mouse button to move the layer to that position.
In Photoshop, when a layer is selected in the Layers palette, choose the Move tool to move all pixels on that layer. In Illustrator and InDesign, Option/Alt-click a layer to select all objects on the layer. Then use the Selection tool to move the objects.
You can choose alignment or distribution options when two or more layers are selected in Photoshop, or when two or more objects are selected in Illustrator and InDesign. In Photoshop, click the alignment and distribution buttons on the Options bar. In Illustrator and InDesign, use the buttons in the Align palette.
Setting Opacity and Blending Modes
Photoshop and Illustrator let you set opacity and blending modes for layers. In Photoshop, set these options at the top of the Layers palette (Figure 12-1, above). Illustrator requires more palettes to achieve the same goal. First, target the layer, and then set the layer’s opacity and blending mode using the options in the Transparency palette. The transparency setting is then displayed in the Appearance palette. (For more on choosing transparency settings, see Chapter 11, “Transparency.)
Merging and Flattening Layers
Photoshop, Illustrator, and InDesign give you options to merge the contents of two or more layers. In Photoshop, with one or more layers selected, choose the context-sensitive Merge Down, Merge Layers, or Merge Visible command from the Layers palette menu. In Illustrator or InDesign, choose the Merge Selected or Merge Layers command from the Layers palette menu.
To combine all layers, use the Flatten Image command in the Layers palette menu in Photoshop, or the Flatten Artwork command in the Layers palette menu in Illustrator.
Photoshop Layer Highlights
The use of layers in Photoshop is the most complex of the Adobe Creative Suite applications. While some Illustrator and InDesign users never create new layers, it’s just about impossible to create a Photoshop composition without using different kinds of layers.
Layer Types
Most of the time when you’re working in Photoshop, its layers contain pixels, as we describe in Chapter 4, “Pixels and Raster File Formats.” Photoshop also allows you to create editable type and various kinds of vectors, with corresponding layers. Photoshop uses seven different types of layers, described in the following sections.
Background Layer
Normally, when you create a new file in Photoshop, you’ll start with a Background layer containing a digitized image, or perhaps a color that provides an opaque background to your composition. The Background layer cannot be transparent. You cannot change the stacking order of the layer, its blending mode, or its opacity. If you want it to be transparent, you’ll need to make it a regular pixel layer: Double-click it in the Layers palette (its name changes to Layer 0), rename it if desired, and click OK. Then select all or some of the pixels and delete them.
Tip: Create a New Background Layer
To make an existing layer into the Background layer, select the layer in the Layers palette and choose Layer > New > Background From Layer.
Pixel Layers
Pixel layers are the bread and butter of working in Photoshop. That’s what you’ll get — a transparent layer ready to contain whatever pixels you want to create on it — whenever you choose Layer > New > Layer or New Layer from the Layers palette, or click the New Layer button. You can add pixels using all the methods we discuss in Chapter 4, “Pixels and Raster File Formats.”
Adjustment Layers
Adjustment layers let you apply a tonal or color adjustment to all the layers below without permanently changing the pixel values of the image. Steve and Sandee usually use this method of making adjustments because it gives us the most flexibility. The advantage of using adjustment layers is that you can tweak them as much as you like, without losing any quality.
To create an adjustment layer, choose Layer > New Adjustment Layer and select from one of twelve tonal or color adjustment commands. Alternatively, click the New Adjustment Layer button at the bottom of the Layers palette and choose an adjustment option. In the dialog box, set any of the options for that adjustment, and click OK (Figure 12-7).
Figure 12-7. Double-click the adjustment layer thumbnail on the layer to change the layer’s settings. Layer mask thumbnail limits area of adjustment.
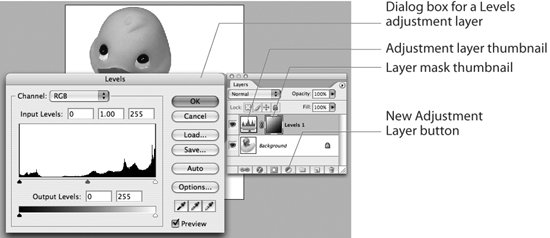
Once you’ve created an adjustment layer, the Layers palette will show two thumbnails for that layer. The left thumbnail on the layer indicates the kind of adjustment. To edit an adjustment layer, double-click the adjustment layer thumbnail and change the settings.
The right thumbnail represents the layer mask (further discussed in “Masking Layers” below). You can use this layer mask to limit the effect of an adjustment to an area that you identified. You can edit the layer mask after it has been created to control the area of adjustment.
Fill Layers
Fill layers work very much like adjustment layers, except they’re used to add layers filled with a solid color, gradient, or pattern. Create them in a similar way: Choose Layer > New Fill Layer and select Solid Color, Gradient, or Pattern. Then select the options for the layer and click OK (Figure 12-8). To edit them, double-click the fill layer thumbnail; to adjust them, create a layer mask.
Figure 12-8. Creating a fill layer also makes the layer editable.

Type, Shape, and Smart Object Layers
Other specialized Photoshop layers are discussed elsewhere in this book:
• We discuss type layers in “Photoshop: Keeping Type As Vector” in Chapter 6, “Type Magic.”
• We describe shape layers in “Special Vector Features in Photoshop” in Chapter 5, “Getting to the Point of Vector Graphics.”
• We cover smart object layers in “Smart Objects in Photoshop” in Chapter 9, “Smart Objects and Intelligent Layouts.”
Grouping Layers
In a complex composition in Photoshop, it’s easy to create dozens or even hundreds of layers. Photoshop makes it easy to group them into layer groups. A layer group is a set of layers that are contiguous and related organizationally. The folder icon represents a layer group on the Layers palette (Figure 12-9).
Figure 12-9. Clicking the triangle next to a layer group (the folder icon) reveals its contents.

The concept of grouping is pretty easy to understand, but here are a few grouping basics:
• To create a group, select contiguous layers in the Layers palette. Then choose Layer > Group Layers, click the New Group button, or press Command/Ctrl-G.
• To add a layer to a group, begin by selecting the group on the Layers palette. Then either click the New Layer icon or drag a layer to the group folder.
• To move a layer group, select the folder icon and move it up or down in the Layers palette.
Applying Layer Effects and Styles
Photoshop comes with a variety of special effects that you can apply to layers as layer styles. These include drop shadows, glows, bevels, overlays, and other editable effects. The effects are linked to the layer contents. Editing or moving the contents updates the effects to reflect the change.
To apply a layer style, select a layer in the Layers palette, choose Layer > Layer Style, and choose an effect, such as Drop Shadow (Figure 12-10, top). (Or click the Add A Layer Style button at the bottom of the Layers palette.) The Layer Style dialog box lets you set options for the effect and preview it. To apply an additional effect to the same layer, check its name in the list on the left side of the dialog box and select options for that effect. Clicking OK displays the combined result of the selected effects. In the Layers palette, the names of the effects applied appear beneath the layer name (Figure 12-10, bottom). Clicking the triangle next to the layer styles icon (a cursive f) expands or collapses the list.
Figure 12-10. Setting options for a layer effect in the Layer Styles dialog box (left); saved layer-style effects show up in the Layers palette (right).

To hide an individual effect or all the layer effects applied to a layer, click the visibility (eye) icon next to the effects. To edit an effect, double-click the name of the effect to open the dialog box again.
Masking Layers
In the Creative Suite applications, masks are used to show or hide parts of objects or layers. Masks in Photoshop reveal or hide parts of a layer. You can use masks to apply a filter, an effect, or an adjustment to only part of a layer, for example. (Illustrator and InDesign, by contrast, mask objects, not layers.)
Photoshop provides three ways to mask layers: layer masks, vector masks, and clipping masks.
Layer Masks
Selections, masks, and channels are integrally related in Photoshop. When you use any of Photoshop’s selection tools on the pixels in an image (using the Marquee or Magic Wand tool, for example), internally Photoshop sees this as a grayscale channel. These selections are soft-edged and can include partially-selected pixels. (For a more in-depth discussion of this important topic, we recommend Real World Adobe Photoshop CS2 from Peachpit Press.) Applying this selection as a mask to a layer, called a layer mask, hides or reveals part of a layer. The layer mask is a resolution-dependent grayscale channel, and you can modify it with painting tools, the Gradient tool, and so on.
You can apply layer masks to any kind of pixel, adjustment, or fill layer. To create a layer mask, first select the layer you want to mask, choose Layer > Layer Mask, and then choose Reveal All or Hide All, depending on whether you want to initially show or hide the pixels in the layer. Alternatively, click the Add Layer Mask button on the Layers palette, which creates a mask that initially reveals all the pixels of the layer.
In the Layers palette, the layer mask thumbnail represents the layer mask, as shown back in Figure 12-7. Clicking the layer mask thumbnail targets the pixels of the mask for editing. Clicking the layer thumbnail targets the pixels of the layer.
Vector Masks
A vector mask creates a sharp-edged shape on a layer and is useful anytime you want to add a design element with clean, defined edges. This kind of mask is also used to hide or reveal parts of a layer, but it’s independent of the resolution of the file.
We discuss vector masks in “The Hidden Vectors in Photoshop” in Chapter 5, “Getting to the Point of Vector Graphics.”
Tip: Combine Layer and Vector Masks
You’re not limited to just a layer mask or a vector mask. You can use both of them on a layer. The layer mask hides part of the layer using a soft edge, and the vector mask hides part of the layer with a hard edge.
Clipping Masks
A clipping mask is a mask created when the contents of one layer are used to mask the layer or layers above it. (In the sidebar “Traditional and Layer-Level Clipping Masks,” we compare how Illustrator creates similar masks with objects.) The content of the underlying base layer clips (reveals) the content of the layers above it in the clipping mask (Figure 12-11). In the illustration, the shape of the duck clips the pattern layer above, and only the portion of the pattern within the duck is shown. The Ducky (base) layer is a simple pixel layer with transparency, and the boundary of the transparency on this layer becomes the clipping mask. Layers which are clipped are indented on the Layers palette as an indicator of their status.
Figure 12-11. The transparency boundary of the Ducky layer clips the content of the Pattern layer in the clipping mask.

To create a clipping mask, arrange the layers so that the base layer is below the layers you want to mask. Then select the layer immediately above the base layer and choose Layer > Create Clipping Mask. You can add other layers to this clipping mask using the same command, but all layers must be contiguous.
Tip: Don’t Confuse Clipping Masks with Clipping Paths
Clipping masks are not clipping paths. Clipping masks are applied in the Layers palette; clipping paths are applied in Photoshop’s Paths palette.
Figure 12-12. In an Illustrator layer-level clipping mask, all objects on a layer (left) are masked by the shape of the object that is the clipping path (right).

Layer Comps
Layer comps are a handy way to save the appearance and visibility of the layers in a Photoshop document. With the layer comp feature, a designer can simply save variations of an image within the file as a layer comp. Without layer comps, a designer might need to save several versions of a file, each containing different variations of the layers selected.
As we’ll discuss in this section, layer comps can be exported as PDF files so that they can be sent to another person for review. They can also be turned on and off when the Photoshop file is placed in Illustrator or InDesign.
Creating Layer Comps
It’s very simple to create a layer comp for a Photoshop document. Start by setting the appearance for the layers in the document. This includes applying any adjustment layers, layer styles, blend modes, and opacity settings for the layers. You can also adjust the x/y (horizontal and vertical) positioning of the layers by moving them with the Move tool.
Once you set the layer artwork the way you want it, open the Layer Comps palette, and click the Create New Layer Comp button at the bottom of the palette. Use the New Layer Comp dialog box to name the layer comp as well as set the options.
Setting Layer Comp Options
You can choose what information is stored as part of the layer comp using the New Layer Comp dialog box (Figure 12-13). As expected, the Visibility option controls whether the layer’s visibility setting is part of the comp; it also controls whether blend modes and opacity are saved as part of the layer comp.
Figure 12-13. New Layer Comp dialog box with save options.
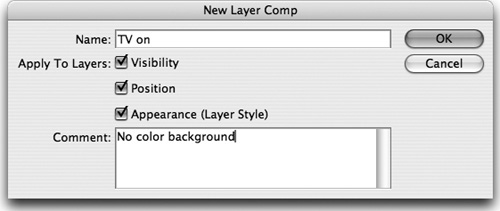
The Position setting stores the x/y coordinates of the artwork on each layer. This stores the horizontal (x) and vertical (y) repositioning of layers as part of the comp. The Position option does not, however, store the z-level stacking order of layers within the Layers palette. This means that layer-level changes, such as dragging a layer to a new level or combining layers into a layer group, cannot be altered by switching to a previously saved layer comp.
The Appearance (Layer Style) setting stores the settings for any layer style described in the previous section, “Applying Layer Effects and Styles.”
After setting these options, click OK to create the layer comp, which will now appear in the Layer Comps palette.
Tip: Name Your Layer Comps and Add Comments
As you work with layer comps, get in the habit of naming each layer comp with a name descriptive of the state of the file. Use the Comments field to add messages to remind you what each layer stands for.
Previewing and Saving Layer Comps
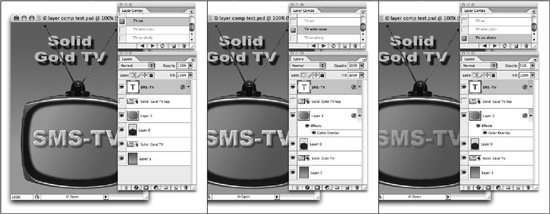
To view a layer comp, you must first apply it in the document: Click the Apply Layer Comp icon next to a selected comp in the Layer Comp palette. To cycle through a view of all the layer comps in the document, use the Previous and Next buttons at the bottom of the palette. Figure 12-14 shows how the Layer Comp palette can alternatively display three different versions of the TV set artwork.
Figure 12-14. Each variation comes from changing which layer comp is active.
You can send layer comps to clients. Sandee’s favorite feature is the ability to export the layer comps as individual pages in a PDF document. With this feature, she can quickly turn a set of layer comps into a PDF presentation that she can send to a client for review and approval. We describe how to do this in the “Scripting in CS2 Applications” section in Chapter 15, “Automating Your Work.” In the section, “Changing Visibility for Layer and Layer Comps,” we’ll show you how you can turn layer comps on and off when placing your Photoshop image in Illustrator and InDesign.
Illustrator Layer Highlights
Because it’s designed to create complex vector artwork, Illustrator handles layers in some unique ways. You can create template layers for tracing images, toggle a layer between Outline and Preview modes, and set layer printing.
Creating Template Layers
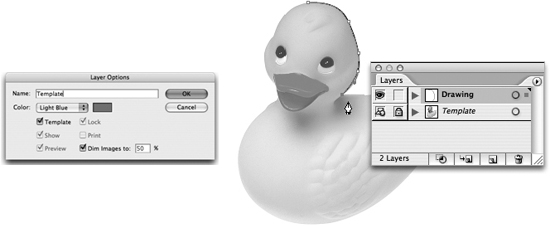
Sometimes you may want to use a piece of bitmapped artwork as the basis for creating a vector drawing. For example, you’ve captured an image with a digital camera or scanned a photograph, but you want to render the bitmap as line art. One way of utilizing the bitmapped artwork is to use the Live Trace command in Illustrator CS2. (We describe this feature in “Special Vector Tools in Illustrator” in Chapter 5, “Getting to the Point of Vector Graphics.”) But the more traditional way is to place a bitmapped file onto an Illustrator template layer and manually trace the image with the Pen tool. If you’re good with the Pen tool, this method may still produce the best result.
To create a template layer, choose File > Place, and choose the image file you want to trace, placing it on the currently selected layer. Then double-click the layer in the Layers palette. In the Layer Options dialog box, check Template, and then click OK (Figure 12-15, left). By default, all images on this layer are dimmed to 50% opacity (which can be adjusted), and the layer is locked. Create a new layer and use the Pen tool to trace the outlines of the image (Figure 12-15, right). Note that the Template layer shows a special layer icon in the left column of the Layers palette.
Figure 12-15. You can turn any layer into a template layer to trace an image (left). The image will be dimmed and locked to allow tracing on a layer above it (right).
Previewing and Outlining Layers
Just as Illustrator provides two modes of viewing entire artwork files — Preview and Outline — you can toggle the view status of individual layers, sublayers, and objects. Check the Preview check box in the Layer Options dialog box to toggle this status.
(For more on the value of switching between these views, see “Highlights of the Illustrator Interface” in Chapter 7, “Managing and Customizing the Interface.”)
Printing and Not Printing Layers
Turning on and off the printing status of layers is useful when you’re creating versioned files. At the time of printing, only layers with the Print status turned on will print. You can control the printing status of Illustrator artwork on a layer-by-layer basis. To make a layer nonprinting, uncheck the Print check box in the Layer Options dialog box.
Tip: Create Animations and Sequences
Illustrator allows distributing multiple objects each onto their own layer. This may be useful for creating Flash animations, for example. Highlight a group or layer in the Layers palette. To release each object to its own layer, choose Release To Layers (Sequence) from the palette menu. To release objects to layers and create a cumulative sequence, choose Release To Layers (Build) from the palette menu.
InDesign Layer Highlights
Unlike in Photoshop and Illustrator, most layouts in InDesign contain more than one page. InDesign layouts may also include master pages, guides, and text wraps, which give working with layers a different flavor.
Layers Include All Pages
Illustrator artwork normally consists of a single page. Layers created in Illustrator manage the objects on that one page. Layers in InDesign, however, apply to all pages of the publication. You can’t create different sets of layers on different pages. You must keep this in mind as you’re designing your publication, and you must create a layer arrangement that will work with all your pages.
Master Pages and Layers
Master pages in InDesign are used to create pages that contain common elements — headers, footers, page numbers, and so on. Changing an object on a master page automatically changes the object on all the pages that are based on that master.
Master pages share the same layers just as document pages do. Objects on a particular layer of the master page appear behind objects assigned to the same layer on a document page. Understanding this stacking order — that the document page is in front of the master page — is important when positioning artwork. For example, you may need to place artwork on a document page in the same spot where a page number is located on the master page (Figure 12-16). To make a master-page object appear in front of a document page object, you must put it on a layer higher in the stacking order.
Figure 12-16. Page number on master page (left) is obscured by artwork placed on same layer in the document page (middle). Page number placed on a higher layer remains visible (right).

Guides, Text Wrap, and Layers
InDesign provides superior controls for working with guides and text wrap when you’re working in a layered document.
Guides in InDesign are treated as objects, just like other “regular” page elements. They can be selected, moved, copied, and pasted. They can also be applied to different layers within your artwork. When selected like any other page object, guides show their layer selection color.
In addition, you can show and lock guides on a layer using controls in the InDesign Layer Options dialog box (see Figure 12-3, above). For example, in a file with language versions, each on its own layer, you can use this feature to hide guides selectively by turning off the visibility for guides for the other language layers.
In some cases, you may also want to control text wrapping on a layer-by-layer basis. If you are working with different language editions of a publication, for example, you may not want a text wrap from another language layer to affect the layout in the currently visible language. In that case, in the Layer Options dialog box, choose the option Suppress Text Wrap When Layer Is Hidden.
Transparency Flattening and Layers
Creating InDesign layers can also be useful when you’re working with artwork that includes type and transparency objects in close proximity. Transparent objects must be flattened for printing, but often, you won’t want to flatten type objects. Placing type on a higher plane in the stacking order can prevent production problems such as having some type outlines thicken (called “spreading”) when adjacent to transparency objects. We describe how to use layers to eliminate unwanted spreading in “Best Practices for Handling Transparency” in Chapter 16, “Preflight and Printing.”
Moving Layers Between Photoshop and Illustrator
Thanks to the great similarities between how layers are handled in Photoshop and Illustrator, it’s possible to move a layered document from Photoshop to Illustrator, or from Illustrator to Photoshop, and retain much of the layer structure that you’ve carefully created. During inter-product importing and exporting, Photoshop and Illustrator retain layers and their components, as well as type, masks, and other elements, as much as possible. However, layers will be merged if retaining them would compromise the appearance of the resulting file. This makes it possible to move artwork back and forth between the two applications, using each application for the kind of work it does best.
Layers from Photoshop to Illustrator
The best way to move a Photoshop image into Illustrator is to use the Illustrator Place or Open command.
• To place a Photoshop image as a sublayer on the currently selected Illustrator layer, in Illustrator choose File > Place, and select the Photoshop image. Uncheck Link to embed the file (you cannot edit a linked file).
• To create a new Illustrator file with each Photoshop layer converted to a new Illustrator layer, in Illustrator choose File > Open, and select the Photoshop image.
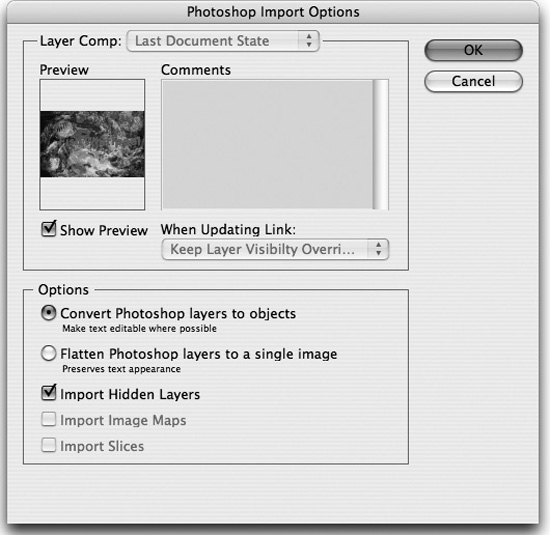
Whether you place or open a Photoshop image, in the Photoshop Import Options dialog box (Figure 12-17), select Convert Photoshop Layers To Objects and Import Hidden Layers, and click OK.
Figure 12-17. Placing a layered Photoshop image gives you the option to convert Photoshop layers to Illustrator objects.
If you opened a Photoshop image, a registration rectangle appears on the bottom layer around the image bounding box. (You can release it by choosing Object > Crop Area > Release.)
Keeping Type and Layers Editable
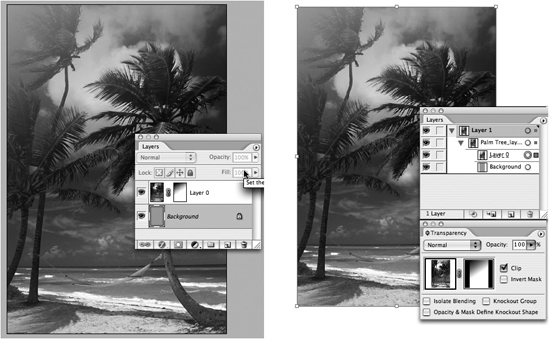
Placing a Photoshop file in Illustrator maintains the editability of type, and converts each Photoshop layer to a single embedded image (as shown in the Links palette) when the Convert Photoshop Layers To Objects option is checked. Any Photoshop layer groups will be imported as Illustrator sublayers. Layer opacity and blend mode settings will be retained when possible. Figure 12-18 shows a simple layered Photoshop file with type and image layers converted to Illustrator objects.
Figure 12-18. Photoshop image (left) contains image layers and a type layer. When converted to Illustrator objects, the type remains editable (right).

Merging Layers with Unsupported Features
Illustrator doesn’t support all Photoshop layer features. When Illustrator imports files with the following layer features, it merges the layers automatically, without alerting you:
• Adjustment layers.
• Layers with certain blending modes (Color Dodge, Color Burn, Difference, Linear Burn, Linear Dodge, Vivid Light, Linear Light, or Pin Light.)
• Layers that use layer effects (depending on specific details of the transparency and blending mode options chosen).
• Layer sets that use the Dissolve blending mode.
Once merged, these layers are no longer editable.
Importing Type
Illustrator can import point type (single lines of type), text frame type, and type on a path. However, type that is warped with the Warp Text dialog box or the Warp transformation command must be rasterized during import. Likewise, type with any layer effects will be turned into pixels.
Tip: Reapply Effects in Illustrator
When you’re bringing Photoshop type into Illustrator, remove any warp or layer effects in Photoshop. Then reapply the effects using commands in Illustrator.
Converting Masks
Photoshop mask features — layer, vector, and clipping masks — are converted to equivalent Illustrator masks.
• Photoshop layer masks become Illustrator opacity masks (Figure 12-19). To see the mask in Illustrator, expand the collapsed list of layers imported from Photoshop, target the layer with the opacity mask (indicated by a dashed line under its name), and then use the Transparency palette to view the opacity mask. The layer thumbnail and layer-mask thumbnails match their Photoshop counterparts. (For more on opacity masks in Illustrator, see Chapter 11, “Transparency.”)
Figure 12-19. A layer mask in a Photoshop image (left) is converted to an Illustrator opacity mask that can be viewed in the Transparency palette.
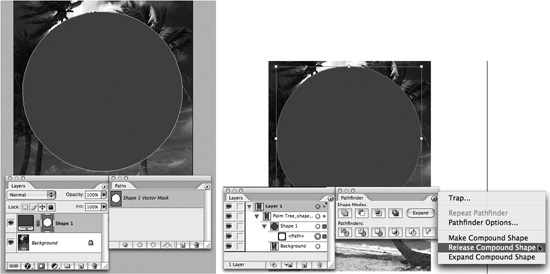
• Vector masks and clipping masks created using vector shape layers become compound shapes in Illustrator (Figure 12-20). Use commands in the Pathfinder palette menu to release or expand the selected compound shape.
Figure 12-20. A vector shape layer in a Photoshop image (left) is converted to an Illustrator compound shape that can be edited in the Pathfinder palette (right).
• Clipping masks created using a pixel layer (in which the boundary of the non-transparent pixels defines the clipping mask) are rasterized when converted to an Illustrator object mask. (In contrast, clipping masks created using a vector shape layer, in which the vector outline defines the clipping mask, are retained along with the layers they mask.)
Layers from Illustrator to Photoshop
Just as you can move layered files from Photoshop to Illustrator, you can export layered Illustrator files to Photoshop to continue editing them. Before exporting to Photoshop, it’s helpful to set up your Illustrator layers to make them as editable as possible in Photoshop. Do this by creating sublayers and compound shapes.
Creating Sublayers and Compound Shapes
Think ahead to which objects you want to maintain as vector in Photoshop. Move those objects to separate sublayers in Illustrator, and then convert them to compound shapes.
We’ll use as an example a simple Illustrator graphic that contains three kinds of type — point, type on a path, and text frame. It also contains some stars that we’d like to move to Photoshop to apply Photoshop layer effects (Figure 12-21, left).
Figure 12-21. Illustrator artwork with type and star shapes (left). To keep the stars as editable vector objects in Photoshop, move them to sublayers and convert them to compound shapes (right).
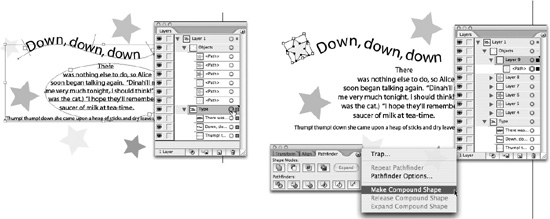
We moved each star to a separate sublayer. We then selected the path of each star on the Layers palette (Figure 12-21, right) and created a compound shape by choosing Make Compound Path from the Pathfinder palette menu.
Preparing Compound Shapes
Before export, Illustrator shapes with strokes must be changed from the default Miter Join attribute to a Round Join in the Stroke palette (Figure 12-22). If the stroke join isn’t properly converted, the object will be rasterized rather than converted to a shape layer. When correctly converted, the stroke is applied as a stroke effect applied to the shape layer.
Figure 12-22. Choosing a Round Join before converting Illustrator shape with stroke.
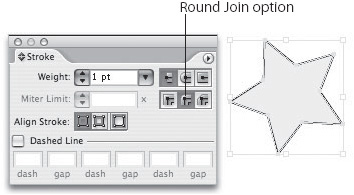
Before exporting compound shapes, also eliminate any brushes, dashed strokes, or graphic styles applied to them, to prevent the objects from being rasterized.
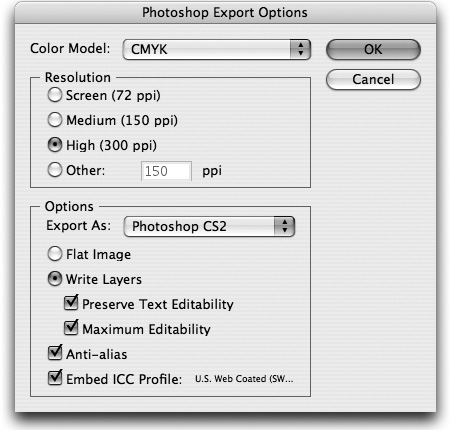
Exporting as a Photoshop File
To export an Illustrator file to Photoshop, choose File > Export and select Photoshop (PSD) as the format. In the Photoshop Export Options dialog box (Figure 12-23), choose from the following options to retain quality and editability:
• Color Model. Choose the same color model as the Illustrator file. Changing to a different color model will flatten the file when it’s converted.
• Resolution. For objects that will be rasterized when exported, select the Photoshop image resolution.
• Export As. Select Photoshop CS2. Selecting the other choice, Photoshop 5.5, limits you to point type and 100 layers.
• Write Layers, Preserve Text Editability, Maximum Editability. Choose all of these options to include layers, sublayers, and type editability. Top-level layers become Photoshop layer groups. Hidden layers become hidden Photoshop layers.
• Anti-alias. Select this option to smooth the edges of pixels, which is usually desirable.
• Embed ICC Profile. Check this to create a color-managed document.
• Click OK to create the Photoshop file.
Figure 12-23. Exporting Illustrator art with Write Layers and Preserve Text Editability options to allow editing in Photoshop.
When the Illustrator file is exported with the Preserve Text Editability option selected, opening the file in Photoshop shows all the type on editable type layers (Figure 12-24, left). Point type, area type, and type on a path are all converted successfully. The figure also shows what happens if sublayers and compound shapes weren’t created — all the stars are rasterized onto a single pixel layer. Creating sublayers and compound shapes puts each star object on its own shape layer, with a vector mask so that it can still be edited in Photoshop as needed (Figure 12-24, right). Opacity and blending modes are also retained.
Figure 12-24. Illustrator type converted to Photoshop type layers (top). Putting vector objects on sublayers and making them compound shapes in Illustrator retains their editability in Photoshop (bottom).

Illustrator masks convert to Photoshop masks: Both “traditional” clipping masks and layer-based masks are turned into Photoshop shape layers.
Moving Layers to PDF Files
Layers from Illustrator and InDesign can be exported to an Adobe PDF file, provided the proper settings are chosen when creating the file. (Unfortunately, for technical reasons that we don’t understand, you cannot export Photoshop layers.) You can view the layers in the PDF file and control how they export and print in Acrobat 6.0 and 7.0 or in the free Adobe Reader 6.0 and 7.0. In addition, exporting PDF files from Illustrator with layers lets you create versioned files in InDesign, as we describe in the following section, “Using Layered Files to Control Versioning.”
Exporting Layers from Illustrator and InDesign
As we’ve described earlier in this chapter, both Illustrator and InDesign files can be created with layers. These layers can be exported to PDF files, and the layers retained, depending on the export settings.
The most common reason to export layers is to carry versioning information. In Illustrator, a layered file can be created to show versioning. To create layers that can be exported to an Adobe PDF file, the layers that you want to adjust (make visible or hidden) must be top-level layers in the Layers palette. Sublayers created in Illustrator will be discarded on export. Figure 12-25 shows a file with different versions of a chart for the dates 2006 and 2007 that can be turned on and off with the visibility (eye) icon in the Layers palette. Additional layers turn on labels in French or English (Figure 12-25, left).
Figure 12-25. Illustrator file showing versioning (top). File information saved to an Adobe PDF file with Acrobat 7 compatibility and Create Acrobat Layers options (bottom).
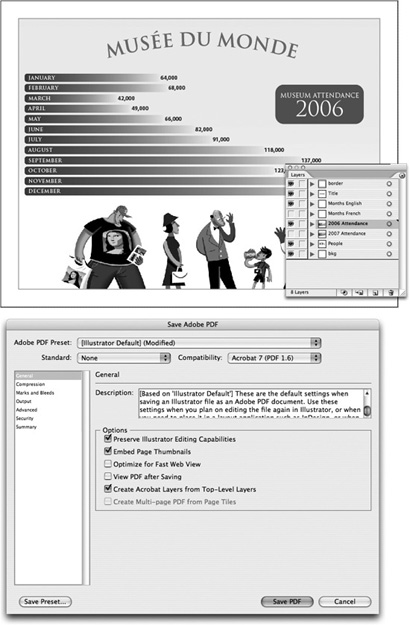
To export a layered Illustrator file to PDF, choose File > Save As and choose the Adobe PDF (pdf) format. In the General panel of the Save Adobe PDF dialog box, choose either Acrobat 6 or 7 from the Compatibility menu, and check Create Acrobat Layers From Top-Level Layers (Figure 12-25, right). (We discuss other options for creating PDF files in the “Creating PDF Files in Creative Suite Applications” section of Chapter 14, “Creating and Using PDF Files.”)
Similarly, to export a layered InDesign file to PDF, choose File > Export and select Adobe PDF from the Format menu. In the General panel of the Save Adobe PDF dialog box, choose Acrobat 6 or 7 from the Compatibility menu, and check Create Acrobat Layers.
Working with Layers in Acrobat
Acrobat 6.0 and 7.0 and Adobe Reader 6.0 and 7.0 can open and view the layers you’ve saved from Illustrator and InDesign in the Layers panel of the Navigation pane. The initial visibility matches how the PDF was saved: Layers that were hidden when the PDF was created have their visibility turned off (Figure 12-26).
Figure 12-26. A layered file opened in Acrobat 6.0 or 7.0 shows the same layering options as when the file was created.

An Adobe PDF file containing layers displays a Layer icon (layer cake) in the file’s lower left status line.
You can toggle the visibility of layers on and off in the Layers panel. Once the file is closed, it will reopen with the same visibility as when the file was saved.
To view and set properties for each layer in Acrobat, select a layer in the Layers panel; then, from the Options menu in the Layers panel, choose Layer Properties (Figure 12-27). Use the Default State menu to change the layer’s default visibility, and to control whether a layer is printable or will export when the layer is visible. Changes made to the layer properties and then saved to the PDF file are permanent. (You cannot save changes to layers in Adobe Reader.)
Figure 12-27. Setting properties for PDF layers in the Layer Properties dialog box in Acrobat 7.0.

As much as we love using all the bells and whistles of layers in PDF files, we recognize that not all print service providers and publishers are able to work with layered PDF files. Before you create them, verify that your print service provider will be able to work with them.
Changing Visibility for Layers and Layer Comps
InDesign CS2 and Illustrator CS2 have exciting new capabilities to control the visibility of layers and layer comps in placed Photoshop PSD and PDF files. For example, a designer can place more than one version of the same Photoshop image into a layout, using layers and layer comps to control the visibility of image features. Or, a designer can create different language editions of an Illustrator graphic saved as a layered PDF file, and turn on the appropriate layers of the graphic once it’s placed in an InDesign layout. With Illustrator CS2, you can choose a Photoshop layer comp as you place a PSD file. With InDesign CS2, you can control layer and layer-comp visibility for PSD and PDF layers at any time.
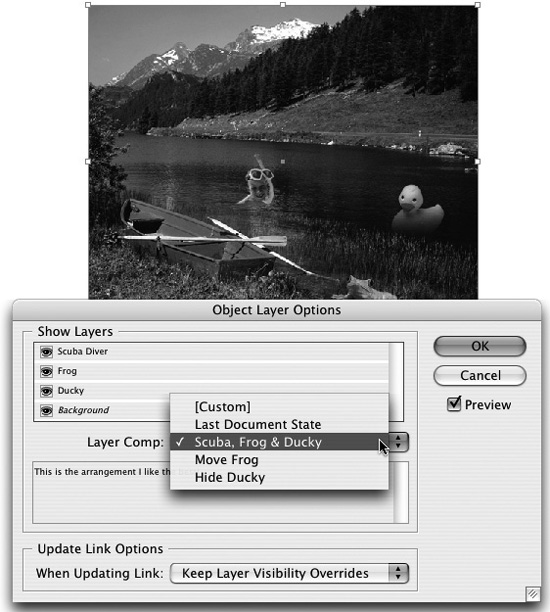
Controlling Layer Visibility in InDesign
InDesign CS2 lets you control the visibility of layers in placed Photoshop PSD files, select layer comps saved with the file and view any comments about the comps, and control which layers remain visible when the linked image is updated. These features are useful for creating different versions of the same file, such as for client reviews.
In InDesign CS2, placing a Photoshop PSD file that has layers or layer comps displays a new Layers panel in the Image Import Options dialog box (Figure 12-28). Here you can select layers to turn on or off by clicking the visibility icons in the Show Layers section. Use the Layer Comp menu to select layer comps that have been saved with the file and view any comments that have been saved with each comp. In this way, a designer could place the same image more than once into a publication, and show different visibilities with each iteration.
Figure 12-28. Placing a Photoshop PSD file with layers or layer comps in InDesign CS2 displays additional options for setting layer visibility.
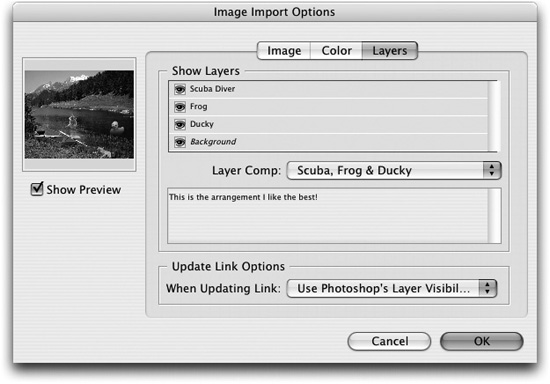
In addition, choose which layers remain visible when the linked image is updated, using the When Updating Link option. To use the layer visibility of the updated Photoshop file to determine what appears in the layout, choose Use Photoshop’s Layer Visibility. To keep the layer visibility that is already set in the layout (usually what you want), choose Keep Layer Visibility Overrides. If you choose this option, it’s important that you consult with your print service provider before sending a file for output. Make sure that the provider doesn’t flatten the Photoshop file, which would necessarily lock in a single visibility choice.
You can change the visibility of layers and layer comps in InDesign CS2 at any time by choosing Object Layer Options from the Object (or context) menu (Figure 12-29). These options match those in the Import Options dialog box.
Figure 12-29. Changing visibility of layers by choosing Object Layer Options.
You can also set the visibility of placed layered PDF files in InDesign CS2, and choose which layers to turn on and off (Figure 12-30).
Figure 12-30. Changing the visibility of PDF layers in InDesign CS2.

Controlling Layer Visibility in Illustrator
Illustrator CS2 lets you set only the visibility of Photoshop PSD files with layer comps, and these only when placing the file. Illustrator can’t turn layers on or off. To change the visibility of layer comps once they’re placed, you must place the file again.
Using Layered Files to Control Versioning
Here we’ll describe the steps to follow in Photoshop, Illustrator, and InDesign to use layers and layer comps to create a versioned file. A versioned file is one that’s used for different editions of the same publication.
This example shows how to create a three-language (English, Spanish, and French) product flyer that describes the features of Adobe Creative Suite. The flyer includes a layered Photoshop CS2 file that displays the Adobe Creative Suite logo on a 3D box, and an Illustrator graphic of the product features which also has language versions.
A different approach to creating versions, using the Version Cue file manager and versioning feature, is described in “Create File Versions” in the next chapter.
It’s not necessary to use a Version Cue workflow to create versions, and you can follow these steps whether or not you’re using Version Cue.
1. In Photoshop, create the artwork for the box cover that is common to all language versions. At the top level of the art, create three layer groups that contain the artwork particular to each language versions (Figure 12-31, left). In the example shown, the Vanishing Point filter was used to add perspective type for the box cover. One by one, turn on each language version (and turn off the other language layer groups) and create a layer comp. You’ll end up with a layer comp for each language. Save the file as a Photoshop PSD file.
Figure 12-31. Layers and layer comps in Photoshop for language versions (left); language layers in Illustrator saved to a PDF file (right).

2. In Illustrator, create a base layer that contains artwork for all language versions. Then add a layer for each language with the art for that language (Figure 12-31, right). Save the file as an Adobe PDF file, turning on the options described in this chapter’s “Moving Layers to PDF files” section.
3. In InDesign, create a layer that has the common elements for the flyer. Add a layer for each language.
4. In InDesign, select the English language layer and place the Photoshop PSD file. Turn on Show Import Options and select the English layer comp. Select the Keep Layer Visibility Overrides option, and click OK. Choose File > Place and select the Illustrator PDF file. Turn on Show Import Options. Select the English layer and click OK.
5. Repeat step 4 for each of the remaining language editions in the InDesign file. The resulting file includes all the language versions. Turn on and off the language layers to make a particular edition visible and printable (Figure 12-32).
Figure 12-32. The language versions of the PSD and PDF files are placed on their appropriate layer in InDesign. Turn layers on and off to view and print a particular language.
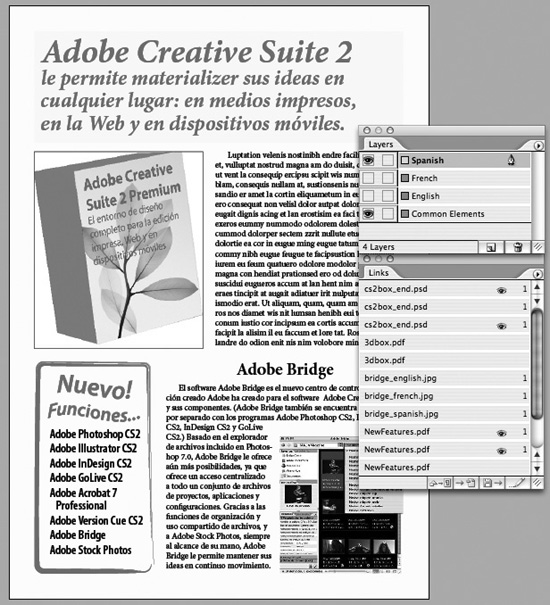
6. If you need to send this file to a commercial printer, create a separate PDF file of each language edition to ensure that there is no mix-up with layering at the print shop.
Multilayered Flexibility
Layers in the Adobe Creative Suite applications can serve many purposes. They provide a way to build compositions in Photoshop that use all the powerful tools that application offers, yet give you the ability to easily change your mind. You can rearrange and edit the layers to create dynamic, new compositions.
In complex artwork in InDesign and Illustrator, layers are optional, but worth the effort: They give you added flexibility, allowing you to turn off layers you don’t need to see, or quickly select and work with the parts you do.
In all applications, you can use layers to create different versions — for different languages, different regional editions, or anything else your creativity can imagine.