Chapter 15. Automating Your Work
Who wouldn’t like to find faster ways to do the mundane, repetitious work that consumes much of our workdays? In this chapter, you’ll learn how to set up the Creative Suite applications to automate many of these recurrent tasks.
Here’s one example of automation: Part of your job is to regularly resize a large number of images to a predetermined size, convert them from RGB to CMYK for print, and save them to a particular format. This is a perfect candidate for automation. Or another: You regularly receive from a client PDF files that must be checked against a particular set of production standards for output. (We discuss preflighting, the process of analyzing and checking files in a print workflow, in Chapter 16.)
Automating your work saves time, and it ensures that it will be done consistently (who hasn’t occasionally dozed off when doing repetitious tasks?). It also creates a way to standardize tasks for the different people in your workgroup. These are many of the same reasons we have given for using styles or presets, as we have described in other chapters of this book.
Here are some of the ways that Creative Suite applications can automate your work. These methods make use of features built into the interface of your CS2 applications. If you’re technically inclined, you can create very elaborate processes using these methods. But if you’re not, don’t be afraid: Most of these processes can be run easily straight out of the “box,” with little technical knowledge. You can:
• Record a series of commands as an action in Photoshop or Illustrator that you can play back on a file or a group of files.
• Turn an action into a mini-application called a droplet in Photoshop, or do the same with a preflight profile in Acrobat 7.0 Professional. You can drop one or more images (Photoshop) or PDF files (Acrobat) onto the droplet, and it runs the action or preflights the file.
• Run batch processes in Photoshop, Illustrator, Acrobat 7.0 Professional, or Bridge on multiple files—operations that work on those files without even opening them.
• Use InDesign’s Data Merge feature to merge a data-source file from a word processor or database with an InDesign document to produce mailing labels or other variable-data documents.
But sometimes your work requires that you perform tasks beyond the built-in capabilities of your CS2 applications. You can extend those applications to perform specialized work that will make you more productive, and, in many cases, automate the processes. You can:
• Create (or acquire) and run scripts. The Creative Suite applications are eminently scriptable. Even if you don’t have the desire to write your own scripts, you can make use of already-written scripts or hire someone to create a time-saving script for you.
• Acquire and install plug-ins. Photoshop, Illustrator, InDesign, Bridge, and Acrobat are structured in such way that they can easily be extended by the use of plug-ins. Often created by third-party (non-Adobe) developers, these can add powerful functionality to your existing applications.
We summarize the automation capabilities of the CS2 applications at the end of the chapter, in Table 15-1.
Table 15-1. Summary of CS2 automation features

Creating Actions in Photoshop and Illustrator
One of the simplest ways to automate your work and reduce drudgery is to record actions for a repetitious series of commands in either Photoshop or Illustrator. These actions can then be played back on one or more files. (In another application, these actions might be called macros.) Both applications come with some premade actions that can be useful as is, but you can also examine them to help you create actions of your own. Actions are so easy to make that anyone can use them to handle some of the mindless activities that can take up much of our time.
Both Photoshop and Illustrator create and manage actions with an Actions palette that is virtually identical (Figure 15-1). (ImageReady also has an Actions palette that has some differences. You can read about that in Photoshop Help in the Adobe Help Center.) In both applications, choose Window > Actions to open the palette.
Figure 15-1. Actions palette (Photoshop shown).

Tip: Try Out the Prebuilt Actions
You may find some useful actions already included with Photoshop and Illustrator. For example, Illustrator has a useful action to delete unused palette items, which removes unused colors, patterns, and brushes, and can reduce your file sizes. Photoshop, by default, lists only the action set called Default Actions in the Actions palette, but at the bottom of the Actions palette menu lists many other useful action sets. Just select the sets called Commands, Frames, etc. to display them.
Recording and Running an Action
Let’s imagine that we’d like to automate the task we described at the beginning of the chapter—resizing a large number of images to a standard size, converting them to CMYK, and saving them in a different file format. How could we create an action to do that?
Recording an action is quite easy. Remember that you can take as much time as you like when it’s being recorded, and you can always edit the action later on if you make a mistake. Here are the steps:
1. Open a file on which you want to record an action.
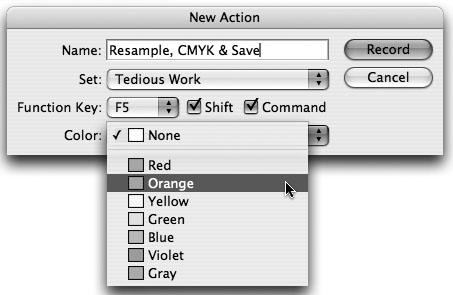
2. Click the Create New Action button on the Actions palette. Give the new action a name (we called it Resample, CMYK & Save) and choose an action set for it to be stored in from the Set menu (Figure 15-2). If you like, you can also give it a keyboard shortcut, and even a color—which applies only in Button mode. (We discuss actions sets and Button mode in the “Managing Actions” section below.) When you click Record or press Return/Enter, the application begins recording the sequence of your operations.
Figure 15-2. New Action dialog box.
3. Perform the operations you want the action to include. The Record button turns red, indicating the steps are being recorded. (In the simple example we’re working on, we would choose Image > Image Size and set the options for resizing a sample image; choose Image > Mode > CMYK Color to convert to CMYK mode; and save the file in the Photoshop (PSD) format.)
4. When you’re finished, click the Stop Playing/Recording button.
Playing Back Actions
To play back an action, open an appropriate file. Select the name of the action in the Actions palette, and click the Play Selection button, or press the keyboard shortcut if you created one. You can also play back part of an action by selecting the command where you want to begin in the palette, and clicking the button.
Keep in mind that when playing back an action, the results will depend on the current application settings, and the active layer and foreground/background color (Photoshop) or the current fill and stroke color (Illustrator).
If the action doesn’t play back correctly, it may be that Photoshop or Illustrator couldn’t record a step (see the next section).
Tip: Save a Snapshot or Work on a Copy
If you’re recording a longer action, you may not be able to undo back to the original file, if you make a mistake. In Photoshop, save a snapshot by choosing Save Snapshot from the History palette menu before you start recording. Illustrator has no History palette, so work on a copy of your file.
Editing Actions
Take it slow and easy, and you may be able to create an action right the first time. But if you don’t, you can always edit and correct the action later on. Here are some ways you can edit an action:
• Examine the commands in an action by clicking the triangle to the left of the command name to see the steps and settings.
• Toggle a command within an action by selecting the command and clicking in the checkbox column to the left of the name to turn it off or on.
• Add more commands to the end of an action by selecting the action in the Actions palette and clicking the Begin Recording button. Then start applying commands you want to record. When you finish, click the Stop Playing/Recording button.
• Move a command within an action by dragging it up and down in the list. Duplicate a command by Option/Alt-dragging it—even from another action.
• Change a setting within a command by double-clicking a command name to open a dialog box (if there are settings for the command). Here you can change the setting, and press Return/Enter to close the dialog box. (If you click the Toggles Modal Control column beside the command—adding an embossed square icon—the action pauses when played so the user can specify values in a dialog box.)
• Delete a command by selecting its name and pressing the Delete Selection button.
As you get more experience creating and editing actions, here are a few hints that may help you build more useful and sophisticated actions:
• Not all actions can be recorded. While most commands and tool operations can be recorded, some cannot. Watch the Actions palette for commands that don’t appear. In Photoshop, nonrecordable actions include using the painting and toning tools and View and Window menu commands. In Illustrator, nonrecordable actions include using the Selection, Pen, Paintbrush, Pencil, Gradient, Mesh, Eyedropper, Paint Bucket, and Scissors tools and View and Effects menu commands.
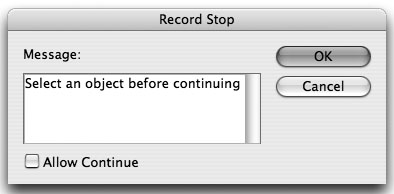
• You can insert a stop to perform an operation that cannot be recorded, such as painting. Select a command to insert a stop after that command. Then choose Insert Stop from the Actions palette menu (Figure 15-3). Type a message you’d like to appear. Don’t check Allow Continue, and click OK. Now when the action is played, the action will stop at that point. After a user clicks OK in the message dialog box, he or she can add a painting operation, for example, and continue the action by selecting the next command, and pressing the Play Current Selection button. You can also use a stop to insert a warning to the user. Check Allow Continue in the dialog box if you want the application to continue the action after the user clicks OK.
Figure 15-3. Record a stop by selecting Insert Stop from the Actions palette menu.
• You can insert a menu item for an action that cannot be recorded, such as View > Rulers. Select a command to insert the item after that command. Then choose Insert Menu Item from the Actions palette menu. With the Insert Menu Item dialog box open, select a command from its menu, and click OK.
• Don’t assume that a file includes a particular layer or channel (Photoshop). Avoid referring to layers or channels by name unless the action has created them.
• Don’t assume that you’re in a particular image mode. Some filters only act on RGB images, for example.
In addition to the prebuilt actions that come with Photoshop and Illustrator, you can look for actions which other people have created and shared. One good source is the Adobe Studio Exchange (see the Appendix, “Creative Suite Resources” for more details).
Managing actions
Both Photoshop and Illustrator store actions in action sets. You can create a new set by clicking the Create New Set button on the Actions palette or delete a set by selecting it and pressing the Delete Selection button. To rename a set, double-click its name.
You can move actions between sets by dragging them. To show and hide the actions within a set, click the triangle beside their names.
You can save and load action sets by choosing Save Actions or Load Actions from the Actions palette menu. Photoshop stores its saved action sets in this location: Applications > Photoshop CS2 > Presets > Photoshop Actions. Illustrator stores its saved action sets here: Applications > Illustrator CS2 > Presets > Actions.
Tip: Save Your Actions in Sets
Actions are stored by default in the application’s preferences. If your preferences are reset, you will lose them. To save them, you must save the action set they are in (you cannot save a single action).
You can also use the Actions palette menu to choose the commands Reset Actions (returning the Actions palette to default settings), Replace Actions (removing all sets and replacing them with a single set you choose), or Clear All Actions.
If you’d prefer to display each action as a button (we don’t, because all you can see is the button’s name, and not its commands), you can choose Button mode from the Actions palette menu.
Creating Droplets (Mini-Applications)
Another way to automate the tedious is to make a droplet. Droplets are mini-applications that run when you drop a file (or a folder of files) on them. They apply one or more operations to the files without having to manually open them and run the same operations. You can create droplets in Photoshop and Acrobat 7 Professional, but in different ways and to do different things. There is no way to create a droplet in the other CS2 applications.
Unlike the batch-processing features that we describe in the “Batch Processing in the CS2 Applications” section that follows, you determine the settings for the droplets when you create them, and they’re locked into the mini-application. To change the settings, you need to create a new droplet.
Droplets in Photoshop
Photoshop droplets are integrated with the Actions feature. You create droplets as a way of applying an action to one or more files, so you must create an action before creating the droplet. (See Photoshop Help for information about using droplets with ImageReady.)
In Photoshop, you create a droplet by choosing File > Automate > Create Droplet. In the Play section of the Create Droplet dialog box, you select an action and action set from the Action and Set menus (Figure 15-4). In the Save Droplet In section, you choose where to save the droplet and give it a name by clicking the Choose button at the top of the dialog box. In the Destination section, you choose what will happen to the files that are produced by the droplet’s action. Your choices are None (leave them open in Photoshop), Save And Close (overwrite the source file—usually not a good idea!), and Folder. With the Folder option chosen, use the Choose button in this section to specify a destination folder for output. Finally, you can rename the files if you wish, and, in the Errors section, choose Stop For Errors if an error occurs, or merely log the errors to a file.
Figure 15-4. Create Droplet dialog box in Photoshop (left); a Photoshop droplet (right).
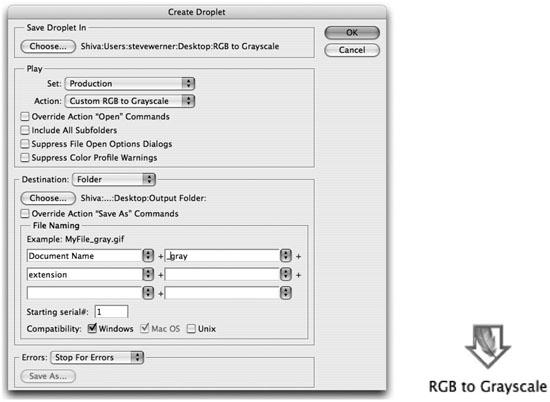
Once created, a Photoshop droplet can be placed anywhere that is convenient, such as on the Desktop (Figure 15-4, right). You just drag a file or folder of files on top of the droplet and, if necessary, Photoshop will be launched, and the files processed with the action.
Because droplets are portable, you may receive one from a user on the other computer platform. If you’re a Mac user creating a Photoshop droplet, you should name it with an .exe extension to be Windows-compatible. When a Mac user receives a Windows-created droplet, just drag it over the Photoshop application icon once, and it will be made Mac-compatible.
Droplets in Acrobat 7.0 Professional
Acrobat 7.0 Professional can also create droplets for use with the Preflight tool, which is used to check PDF files against particular workflow criteria. (We discuss preflighting PDF files and the Preflight tool in “Preflighting, Correcting, and Printing PDF Files” in Chapter 16, “Preflighting and Printing.”)
After you have created or selected a preflight profile, you need to make sure it’s displayed in the Preflight dialog box. Then choose Create Preflight Droplet from the Options menu. Choose a Preflight Profile in the pop-up menu at the top of the dialog box (Figure 15-5, left). In the On Success section, choose an option for a file that passes the preflight check: Copy PDF File, Move PDF File, or Save Alias Of PDF File. You can select a folder to receive successful files, and, if desired, create a report. In the On Error section, you can make similar settings for files that fail to pass preflighting. When you click Save, you can save the Preflight droplet to a location of your choice.
Figure 15-5. Preflight: Droplet Setup dialog box (left); a Preflight droplet (right).
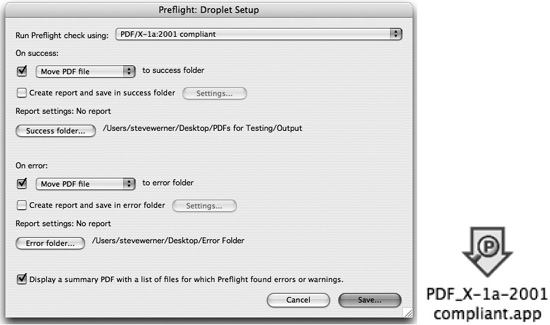
As with a Photoshop droplet, you can place the Preflight droplet anywhere that’s convenient (Figure 15-5, right). Drop a file or folder onto the droplet. If Preflight is not already open, Acrobat 7.0 Professional will open, and the files get processed into the selected folders.
Tip: Sharing Preflight Droplets
In order to use a droplet, you must have its preflight profile showing in the Preflight dialog box. Use the Export Preflight Profile command on the Options menu to create a preflight package file (.kfp extension) to send to someone else along with its associated droplet. Use the Import Preflight Profile command on the Options menu and select the .kfp file to import it and display it in the Preflight dialog box.
Batch Processing in the CS2 Applications
Batch processing is designed for people who are either very busy or lazy (or both!). It lets you apply a series of processes to multiple files—letting the computer do the heavy lifting. Photoshop, Illustrator, Acrobat 7.0 Professional, and Bridge all support batch processing. This feature can be extremely powerful, but each application has a different way of accomplishing it:
• Photoshop offers a Batch command for applying an action, and additional Automate commands under the File menu.
• Illustrator lets you run a Batch command from the Actions palette menu to apply an action.
• Bridge contains a Batch Rename command, and allows you to run automated tasks for the other CS2 applications.
• Acrobat 7.0 Professional lets you create batch sequences—a series of commands applied to one or more files.
Batch and Automate Commands in Photoshop
Photoshop is the most batch-oriented application in the Suite. It seems to add new automation features with every version. Pretty soon, you’ll just have to press a button, and it will do all the work!
Photoshop offers a Batch command that works with actions and a number of other automated commands created with Photoshop plug-ins; all of them are found in the File > Automate menu. These include Create Droplet (described above), PDF Presentation, Picture Package, Contact Sheet II (described in the “Contact Sheets and Layer Comps” section of Chapter 2, “Which Application Does What?”), Web Photo Gallery (described in Chapter 17, “To the Web”), Crop And Straighten Photos, and a few others that are more specialized. For those that we don’t have the space to describe, refer to Photoshop Help in the Adobe Help Center.
Batch Command in Photoshop
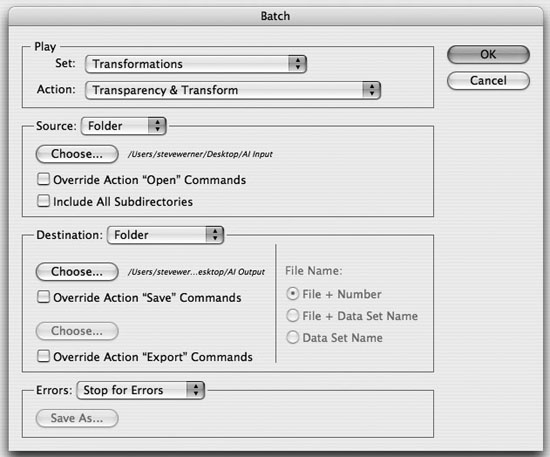
The Batch command takes an action and applies it to a group of files. It works very much like a droplet, except that you choose the settings for the batch process at each session (Figure 15-6). Remember the action that we talked about in the “Recording and Running an Action” section? If you ran that action on an open file, it would automate three steps—resizing the image, converting it to CMYK, and saving it in the Photoshop format. As an action, you would still have to open each file, run the action, and close the file. With the Batch command, you can apply that action to a folder of files, and let Photoshop do it all.
Figure 15-6. Batch dialog box in Photoshop.
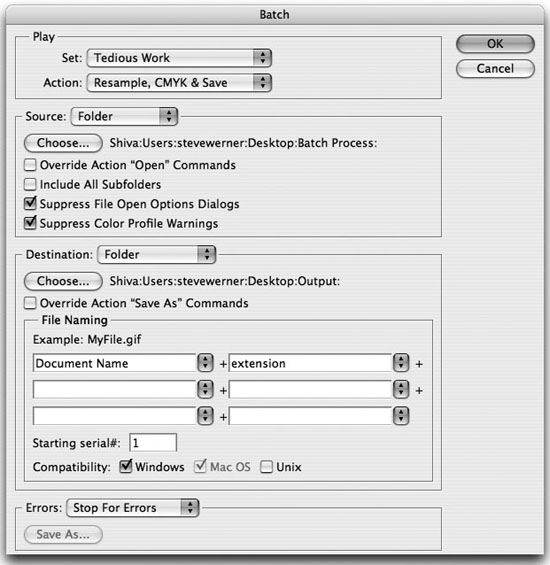
The choices in the Batch dialog box are similar to those in the Create Droplet dialog box: In this case, select the action that you want to batch process (we chose the Resample, CMYK & Save action). In the Source section, you have four choices of input: You can choose all currently open documents in Photoshop; a folder of images (click the Choose button to select the folder); images imported with Photoshop’s File > Import command; or—when using Bridge—the files currently selected in the Bridge window. (We discuss using the Batch command in Bridge in the “Batch Processing in Bridge” section below.)
Two more sections of the dialog box are the same as for creating a droplet in Photoshop—the Destination and the Errors options. See the “Droplets in Photoshop” section for a description. But, in addition, in the Batch command, you can also choose a precise naming and numbering structure for files you’re saving.
PDF Presentation in Photoshop
The PDF Presentation feature is a quick way of taking a set of images and creating a PDF presentation to send to someone else. You could use it to send a portfolio of photographs, or pictures you took on your vacation, or anything else you can think of. The feature can create a PDF file that opens in full-screen presentation mode—even including fancy transitions between images—viewable by anyone in either Acrobat or the free Adobe Reader. Choose File > Automate > PDF Presentation to set it up (Figure 15-7).
Figure 15-7. PDF Presentation dialog box.
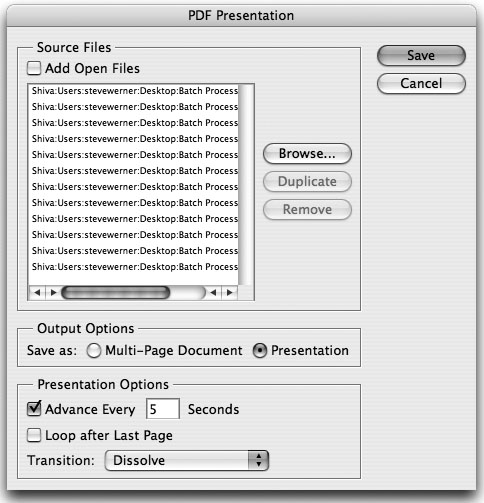
To select source files, click on the Browse button and select them. Shift-click or Command/Ctrl-click to select multiple files. To work on files that are currently open in Photoshop, check Add Open Files. You can also use this command with Bridge (see “Batch Processing in Bridge” below). The order of the files in the list is the same as how they will appear in the PDF file; you can drag the pathnames up and down in the list to change the order. Undoubtedly, you’ll need to scroll to see the names of the files.
You can choose to create either a simple multipage PDF file, or a PDF presentation (a slide show in Acrobat’s Full Screen mode). If you choose Presentation, you can also choose some presentation options, including which transition to use between slides.
Picture Package in Photoshop
The Picture Package feature lets you take one or more images and arrange them at precise sizes into a layout. Picture Package takes over all the work of duplicating, rotating, and scaling the images. You could use this to create images of different sizes for client, for example. Figure 15-8 shows the flower image in an 8x10-inch layout to create one 5x7-inch copy and two 3.5x5-inch copies.
Figure 15-8. Picture Package dialog box.

By default, Picture Package chooses the frontmost image open in Photoshop, or you can use the Choose button to select a file or folder. In the Document section, choose the final page size, and a layout. Be sure to choose an appropriate color mode and resolution for your final output (the default is 72 ppi). Once you’ve picked a layout, you can double-click an image in the Layout section to replace an individual image with another. The options for Label are a little sparse. If you wish, you can click the Edit Layout button to customize the layout area—setting positions and sizes precisely.
When you click OK, the image copies are created and arranged. They are placed on a single pixel layer, above a background layer. You could change the background color if you wanted.
Crop and Straighten Photos in Photoshop
The Crop And Straighten Photos feature provides a simple way to solve a common problem: When you have several images to scan on your flatbed scanner, you can scan them one by one and tediously rotate and crop them manually, or you can use Crop And Straighten to automate the process.
To use it, place the images on your scanner, scan the images as one image, and choose File > Automate > Crop And Straighten Photos (Figure 15-9). The plug-in analyzes the position of the images, and creates a rotated and cropped copy of each one as a separate file. It works the best if the background is a solid color and there is a clear delineation between the image and the background.
Figure 15-9. Two images scanned together on a flatbed scanner (left). Crop And Straighten Photos rotates and crops them, and creates two new files (right).
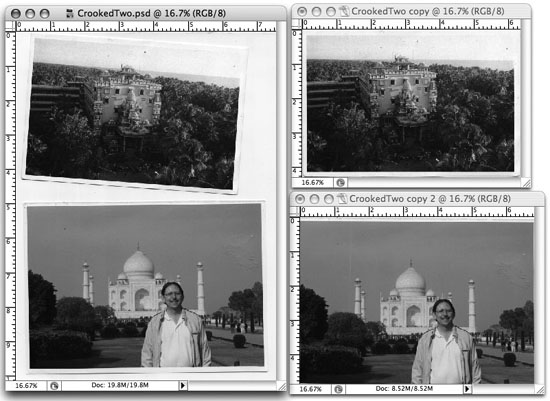
If you want Crop And Straighten Photos to pick only a couple images out of several, draw selection marquees around them before applying the command, and only those images will be cropped and rotated. Or, if Photoshop cannot distinguish an image from its background (it breaks it into pieces), drag a marquee around it and some adjoining background, and hold down Option/Alt before selecting the command. (Only this one image will be separated from the background.)
Batch Command in Illustrator
The Batch command (Figure 15-10) in Illustrator is located in the Actions palette menu. This command automatically executes batch commands as well as applying batch processing to actions created in Illustrator.
Figure 15-10. Batch dialog box in Illustrator.
Since it is so much like the Batch command in Photoshop (described in the previous section), we’ll only focus on the differences: You can only select Folder as your Source (the other option is Data Sets, which works only in the very specialized case of using the Variables feature, as we describe in the “Working with Illustrator Variables” sidebar in Chapter 2, “Which Application Does What?”).
The Destination and Errors options are the same, but there is no opportunity to rename files as you save them. The safest choice is to create an Input folder and an Output folder to batch process Illustrator files with an action.
Batch Processing in Bridge
Bridge has batch-processing controls as well: You can rename files when you’re viewing a folder in a Bridge window. You can also use the Photoshop batch-processing commands when you’re viewing images in a Bridge window.
Batch Rename in Bridge
It’s easy to rename a file Bridge: Just double-click a filename and enter a new one. However, if you want to rename a whole folder of images—like the ones you just pulled off of your camera with names like 244_0101.jpg—that’s when you need to use the Batch Rename command. To rename files in a batch, select their thumbnails (if nothing is selected, all the files in the Bridge window will be selected), and choose Tools > Batch Rename, or press Shift-Command/Ctrl-R. This gives you the Batch Rename dialog box (Figure 15-11).
Figure 15-11. Batch Rename dialog box in Bridge.
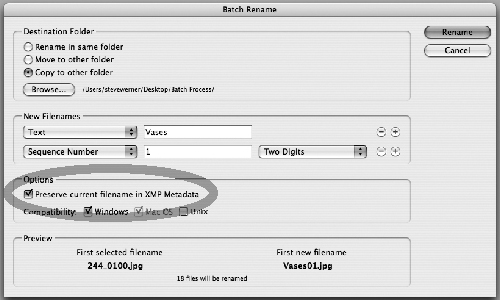
In the Destination Folder section, you can choose between renaming in the same folder, moving to another folder, or copying to another folder. You can use the Browse button to designate the output folder.
The New Filenames section gives you great flexibility in choosing a name. You can build a name from one or more elements. An element can consist of the current or preserved filename, text (your choice) a sequence number or letter, a new file extension, date and time, and metadata—with different options when each element is chosen. You can add a new element to the filename by clicking the + [plus] icon, or delete one by press in the − [minus] icon.
Tip: Preserve Current Name in XMP Metadata
You can’t undo a rename. So we recommend that you always check the Preserve Current Filename in XMP Metadata option. That saves the current name (before renaming) in metadata, so you could search for it, just in case.
Applying Photoshop Automate Commands in Bridge
Many of the Photoshop batch-processing commands, which we described in the “Batch and Automate Commands in Photoshop” section, can be invoked when you’re viewing images in a Bridge window. For example, to use the Photoshop Batch command to apply an action to a group of images, select the images in Bridge. Then choose Tools > Photoshop > Batch (Figure 15-12).
Figure 15-12. Choosing the Photoshop automate commands from Bridge.
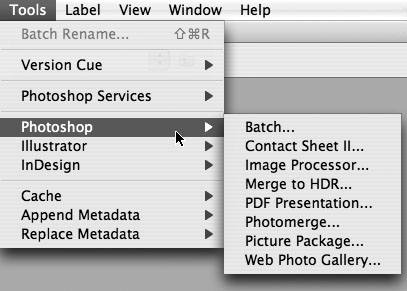
The Photoshop Batch dialog box appears. The Source option should point to Bridge. The rest of the controls are as we described them in the “Batch Command in Photoshop” section above.
You can also use the other batch-processing commands listed in Figure 15-12 in a similar way.
Batch Sequences in Acrobat 7.0 Professional
Acrobat 7.0 Professional has a different take on batch processing. It allows you to create batch sequences—a series of commands strung together—that you can apply to PDF files. You don’t record batch sequences like an action, but you create them in a series of dialog boxes in Acrobat. You can also apply these batch sequences to many files using input and output options similar to those we’ve seen in the other CS2 applications. (Note that this feature is not available with Acrobat 7.0 Standard.)
Let’s imagine that every month you create a number of PDF files that contain sample files from your workgroup, which you send to your customers. You create the PDF files in InDesign, which provides great controls for setting PDF options (as we describe in “Creating PDF Files in Creative Suite Applications” in Chapter 14, “Creating and Using PDF Files”).
But you’d like to set other PDF options that can only be set in Acrobat: You’d like to make it so that PDF files open with Pages (thumbnails) visible in the Navigation pane of Acrobat or Reader, to make it easier for your customers to navigate through the files. You’d also like to put a watermark with the word “Sample Pages” on the pages to make it difficult for them to be misused. You can set up these behaviors file by file in Acrobat, in the Initial View tab of the File > Document Properties dialog box, and by choosing Document > Add Watermark & Background. But if you use Acrobat’s Batch Sequences feature, you can automate the whole process.
Defining a Batch Sequence in Acrobat
1. Define a batch sequence. Choose Advanced > Batch Processing. This opens the Batch Sequences dialog box (Figure 15-13, left); the prebuilt Acrobat batch sequences appear in a list on the right.
• To create a new sequence, click the New Sequence button. Another dialog box appears to name the sequence. Enter a name (we called ours Set Initial Opening & Background) and click OK. The Edit Batch Sequence dialog box appears; initially, it’s empty (Figure 15-13, right).
• To use or modify a prebuilt sequence, select it in the list on the right, and click the Edit Sequence button.
Figure 15-13. The Batch Sequences dialog box lists prebuilt and custom-built sequences (left); the Edit Batch Sequence dialog box is the central control for building sequences (right).

2. Choose the commands you want to add to or edit in your batch sequence in the Edit Batch Sequence dialog box. To add one, click the Select Commands button. This opens the Edit Sequence dialog box (Figure 15-14). Select a command from the list on the left, and click the Add button to move it to the right side. (Figure 15-14 shows that we added the Open Options and Add Watermark & Background commands.)
Figure 15-14. The Edit Sequence dialog box lets you add commands to your batch sequence.

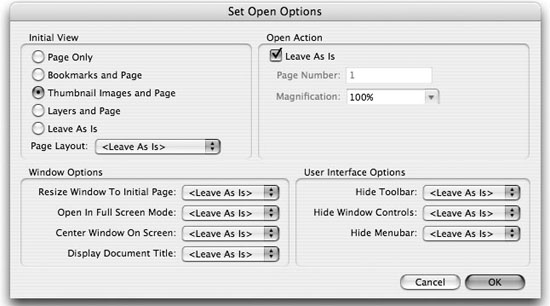
3. Set options for each command. In the list on the right side of the Edit Sequence dialog box, select each command in turn and click the Edit button.
• When we edited the Open Options command in the Set Open Options dialog box, we selected Thumbnail Images And Page as the Initial View (Figure 15-15).
Figure 15-15. The Set Open Options dialog box allowed us to customize this command in our sequence.
• When we edited Add Watermark & Background, another dialog box appeared (not shown). There we chose to add a watermark (which appears on top of every page), and specified that it should appear when viewing and printing. We typed the text of the watermark—“Sample Text”—set options for text’s font, size, and position, and closed that dialog box. You would set similar options for each command you want to include in the sequence.
• When you finish, you should be back in the Edit Sequence dialog box. Click OK to close it.
4. Select the files to be batch processed. Back in the Edit Batch Sequence dialog box (Figure 15-13, right), use the Run Commands On menu to make this selection.
• Selected Files or Selected Folder activates the Choose button, where you select the files or folder to run the commands on.
• Ask When Sequence Is Run prompts you for the files whenever you run the batch sequence.
• Files Open In Acrobat means you’ll need to open the files you want to batch (which isn’t very automated).
5. Select the output location. Also in the Edit Batch Sequence dialog box, use the Select Output Location menu to specify a destination folder for your finished files.
• Ask When Sequence Is Run prompts you for a destination folder at the time you run the sequence.
• Same Folder As Original(s) saves the output files into the same folder as the originals, possibly replacing them (we don’t recommend this).
• Don’t Save Changes, a seemingly strange concept, is useful when processing files using JavaScripts or other specialized uses.
5. Set the output options. There are additional choices if you click the Output Options button in the Edit Batch Sequence dialog box (Figure 15-16, left).
• The File Naming section lets you keep the original name or add to the base name with a prefix or suffix.
• The Output Format section lets you save the output as Adobe PDF, or export to the formats that Acrobat 7.0 Professional supports, like Microsoft Word or Rich Text Format (which we describe in the “Saving PDF Files in Other Formats” section of Chapter 14, “Creating and Using PDF Files”).
• You can even make use of the PDF Optimizer feature we describe in Chapter 14 as you’re saving your file—perhaps changing the PDF Compatibility settings as you’re saving them. When we clicked OK, the Edit Batch Sequence dialog box looked like Figure 15-16 (right).
Figure 15-16. Output Options lets you change filenaming conventions and choose an output format (left); the Edit Batch Sequence dialog box after our batch sequence is built (right).

Running a Batch Sequence in Acrobat
Fortunately, running a batch sequence is usually faster than building it. As a preface to running the sequence, if you are inputting PDF files from a folder and saving them to a folder, make sure these folders are ready.
To run a batch process, choose Advanced > Batch Processing. Select the batch sequence you want to run in the list on the right, and click the Run Sequence button. If you haven’t changed Acrobat’s Batch Processing preferences, you’ll see a dialog box to confirm the input, commands, and output chosen. When you click OK, the process will begin. If you have chosen Ask When Sequence Is Run, you’ll be prompted for source files for batch processing and/or a folder where the output files will be placed.
Data Merge in InDesign
InDesign also has its own unique approach to automation: It can create documents which have personalized, or variable, information—such as business cards, mailing labels, form letters, even simple catalogs. The data for the personalization comes from the structured information in a database. But you have a wide range of sources: Any data source that can create comma- or tab-delimited text is fair game (including Excel spreadsheets, database files, or Microsoft Word documents with tabbed text). You can, of course, do a mail merge in Word, but in InDesign, you have access to all its typographic refinements.
If you’re not familiar with data sources, it’s helpful to understand their language: A datasource file (which contains the structured information of a database or spreadsheet) is made up of fields and records. A field is a category of information—for example, an address or a zip code. A record is the complete set of fields that extend across a row of the data: Each field is separated with a tab or comma character, and each record is ended with a return character. Here are two more bits of terminology: The InDesign document that contains data-field placeholders is called the target document. It may also contain other boilerplate information—for example, the text in a merged letter—that remains the same in each iteration of the data merge. The merged document is the InDesign document that contains the boilerplate information, repeated as many times as it takes to accommodate each record selected from the data source.
Creating a Merged Document in InDesign
Let’s create a mailing list as a simple example of a data merge.
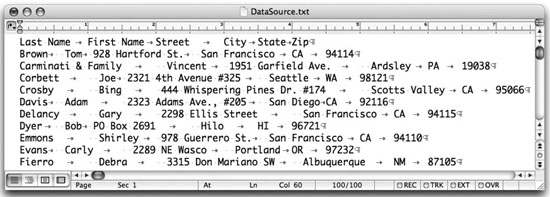
1. Examine your data-source document. Open your data-source file and save it, if necessary, into a tab- or comma-delimited format. We started with a Word file with tabs between the fields (Figure 15-17).
Figure 15-17. Data-source file for a mailing list.
2. Create the target document. Create a new InDesign document that will contain any boilerplate information and data-field placeholders. We created a letter-sized document.
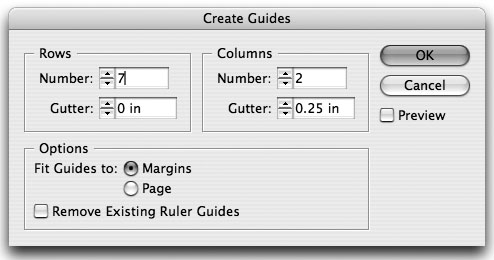
3. (Optional) Use guides to make a grid for multiple records on a page. Because we wanted to place multiple mailing labels on a page, we found it helpful to use the Layout > Create Guides feature to preview how many labels we wanted to place on a page. We decided on a 2 x 7 array of labels, with a .25-inch gutter between columns, and clicked OK to add guides to our document page (Figure 15-18). (You could also place data-field placeholders on a master page, but we didn’t choose to do that.)
Figure 15-18. The Create Guides dialog box can be used to create a page grid.
4. Create text and graphic frame placeholders. Create placeholder frames for text and graphics by using the Type tool for type and the Rectangle Frame tool for graphics. (There are some special instructions for working with graphics, which we describe in the next section.) We added a single frame for the first instance of the mailing label (Figure 15-19). It fit in the upper-left grid square that we created in step 2. Also add any boilerplate material to the target document you want to appear with every record (in this case, we didn’t need it for a mailing list).
Figure 15-19. Dragging a data field to the placeholder frame in the Data Merge dialog box.

5. Select the data source. Open the Data Merge palette (Window > Automation > Data Merge). Choose Select Data Source from the palette menu, and select the file described in step 1. The palette should be populated with the data-field names that are identical to the column heads in the source file.
6. Drag data fields into the placeholder frames. Select one of the text frames you created, and drag the field names from the Data Merge palette to position them in your frame. They become field placeholders, such as <<First Name>>. You can use any of InDesign’s character, paragraph, or text frame attributes to format them, including paragraph and character styles. You can place the data fields in any order that you like. Notice that in our example, First Name comes before Last Name, a different order than in the source file. Add commas, spaces, returns, or any other formatting that you like (Figure 15-19).
7. Preview the data. You can preview the data by checking Preview at the bottom of the palette, and then using the navigation buttons to move forward and back through the records. There are a couple of good reasons to do this:
• To look for records that don’t fit the frame you have created (like a long name you didn’t anticipate). The frame should be large enough to accommodate the largest element in the formatting you’ve chosen.
• To look for other errors in the data (like having the data capitalized when it’s not supposed to be). In general, it’s a good idea to correct these mistakes in the datasource document, rather than the InDesign file.
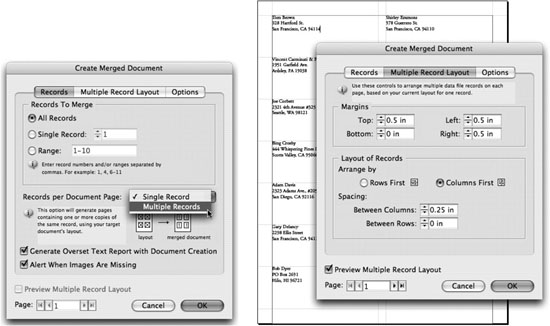
8. Merge the target document with the data-source file. Choose Create Merged Document from the palette menu or click the Create Merged Document button. The Records tab of the Create Merged Document dialog box appears (Figure 15-20, left). On this tab, you can choose which of the records to include in the merged document. You also choose in the Records Per Document menu between Single Record and Multiple Records.
• Single Record means there will be one InDesign page created for each record.
• Multiple Records means you can place multiple records on each page—as we wanted to do for our mailing list. Be sure to also check Preview Multiple Record Layout, and use the navigation buttons to preview your pages. Then on the Multiple Record Layout tab (Figure 15-20, right), you can tweak the page margins and the record layout.
Figure 15-20. The Record tab of the Create Merged Document dialog box lets you choose between one or multiple records on a page (left); the Multiple Record Layout tab controls the layout of multiple records (right).
• When finished with the preview, click OK to generate the merged document. This creates a new InDesign document with the merged data.
Adding Graphics to a Data Merge in InDesign
You can also place graphics in a data merge. We did this in the business cards that we created in the “Business Cards” section of Chapter 2, “Which Application Does What?” As we illustrate in Figure 2-4, there are a few things that you must do when graphics are included in a data merge:
• In the first line of the data-source document, if the field contains a graphic, its name must begin with the “@” character—for example, “@photos”. (The @ sign tells InDesign that you don’t really want the path to appear, but the picture instead.) In subsequent lines of the data-source file, that field should contain the exact file path on your computer to the graphic, in a format appropriate for your operating system:
Mac: Macintosh HD:Photos:sandee.tif
Windows: c:Photosandee.tif
Note that this file path is case-sensitive.
Tip: Creating the @ Character in Excel
If you type the @ character in Excel, it will try to treat the text as a formula. Put a single straight quote (’) in front of the @ character to tell Excel this is text. (Example:’@Photos). When saved as tab- or comma-delimited text, the quote disappears.
• Create the placeholder frame for a graphic with the Rectangle Frame tool.
• In the Data Merge palette, there is a special graphic icon beside the data-field name. Drag the field name to the graphic placeholder frame.
• By default, when merged, the images will be placed in a graphic frame that’s sized proportionally to fit. However, if you want to change this, choose Content Placement Options from the Data Merge palette menu (Figure 15-21).
Figure 15-21. Control image placement with the Content Placement Options dialog box.

Scripting in the CS2 Applications
One of the most powerful, but least publicized, features of Adobe Creative Suite is its ability to be scripted. Scripting is a form of programming. Instead of using the interface of the applications—the buttons, palettes, and commands that we use every day—you write out a series of commands to tell your CS2 application to perform a series of procedures. A script can be very simple, and only do one thing. Or it can be very complex and affect many things in the application—or even in more than one application.
This book is not the place to learn to write scripts, but we’ll give you an overview of scripting in the CS2 applications. If you’d like to write your own scripts, we’ll tell where you can get more information.
Running a Script Is Easy
Before you immediately flip to another section, thinking “I’m no programmer,” you should know that running a script is easy to do. All you need to learn is how to install and run it. And there are many useful scripts included with the Suite applications, and many more are easily available.
Scripting Languages
Photoshop, Illustrator, and InDesign support three widely used scripting languages:
• AppleScript (Macintosh only) Apple installs tools on the Macintosh to create and run AppleScripts. An AppleScript can communicate between different Mac applications.
• Visual Basic (Windows only) Microsoft provides similar platform-specific support as AppleScript. There are different “flavors” of Visual Basic tools available: See the references in the “Finding Scripts and Learning Scripting Section” to find out the details.
• JavaScript is a scripting language that works on both platforms. Adobe uses a version of JavaScript called ExtendScript. For the first time, Adobe Creative Suite 2 installs a utility called the ExtendScript Toolkit, which includes an integrated environment for developing JavaScripts. (This is found on the Mac in Applications > Utilities > Adobe Utilities > ExtendScript Toolkit, and in Windows in Program Files > Adobe > Adobe Utilities > ExtendScript Toolkit.)
Acrobat 7 Professional, GoLive, and Bridge support JavaScript but don’t support the other scripting languages.
Installing a Script
To install a script in Photoshop, Illustrator, or InDesign, put it in this location:
Mac: Applications > [Name of Application] > Presets > Scripts.
Windows: Program Files > Adobe > [Name of Application] > Presets > Scripts.
In Photoshop and Illustrator, some preinstalled scripts are found in the default location for the operating system.
InDesign’s prebuilt scripts are not installed automatically, but are found on the CS2 Std Content installation CD in Technical Information > InDesign CS2 > Scripting > Adobe Sample Scripts. Drag either the AppleScript or JavaScript scripts (Mac) or the Visual Basic or JavaScript scripts (Windows) to the indicated location in the Scripts folder.
Running a Script
In Photoshop or Illustrator, to run a script, choose File > Scripts, and select a script from the submenu. Alternatively, in Photoshop choose File > Scripts > Browse, or in Illustrator choose File > Scripts > Other Scripts, and navigate to select the script you want to execute. Note that in Photoshop you can only run a JavaScript from the menu; to run an AppleScript or Visual Basic script, you must use an external editor—like Apple’s Script Editor (installed automatically on Macs).
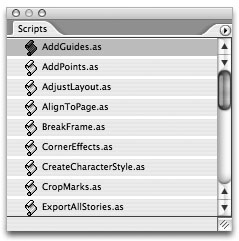
InDesign uses a Scripts palette to run scripts. Choose Window > Automation > Scripts to open it (Figure 15-22). Then either double-click the name of the script you want to execute, or choose Run Script from the palette menu.
Figure 15-22. Scripts palette in InDesign.
Tip: Use a Keyboard Shortcut in InDesign
If you really want to make it easy in InDesign, once you’ve installed your script, use Edit > Keyboard Shortcuts to assign a keystroke to run it. See “Editing Keyboard Shortcuts and Menus” in Chapter 7, “Managing and Customizing the Interface.”
Adobe Bridge includes access to a few Workflow Automation Scripts. These are found in the Tools menu, and are described in the next section. To install a new JavaScript script, place it in the following folder:
Mac: Library > Application Support > Adobe > StartupScripts
Windows: Program Files > Common Files > Adobe > StartupScripts
For scripts in Acrobat, see the sidebar “Scripting in Acrobat.” GoLive uses JavaScript Actions as we describe in the sidebar, “Different Kinds of Actions,” above.
Trying Out the CS2 Scripts
Photoshop, Illustrator, and InDesign each include some scripts that are worth trying out. They’ll whet your appetite for other scripts.
Photoshop Scripts
Five JavaScripts are installed by default in Photoshop, and found in the File > Scripts menu:
• Image Processor is a heavy-duty script that allows you to scale, save in different formats, and apply actions to a large number of images—all from one dialog box.
• Export Layers To Files saves each layer in your file as a separate, flattened document, and allows you to choose the file format.
• Layer Comps To PDF is Sandee’s favorite. You can use this script to save layer comps and separate pages in a PDF presentation (Figure 15-23). (In “Layer Comps” in Chapter 12, “The Flexibility of Layers,” we described how to create a set of layer comps in Photoshop.)
Figure 15-23. Use the Layer Comps To PDF script to export Photoshop layer comps to separate pages in a PDF presentation.

• Layer Comps To Files is like the preceding script, except that it saves each comp as a flattened file, with output options.
• Layer Comps To WPG exports layer comps to a Web Photo Gallery, which we talk about in Chapter 17, “To the Web.”
Illustrator Scripts
Most of the Illustrator scripts included with the application seem to be of most use if you’re learning to write a script. But we found a couple that are worth checking out on the on CS2 Std Content installation CD, in Technical Information > Illustrator CS2 > Scripting > Sample Scripts > AppleScript (Mac) or Visual Basic (Windows). They somewhat compensate for Illustrator’s lack of preflighting features. However, they don’t work quite the way you expect, at least on the Macintosh. On the Mac, if you try to select the AppleScripts from the Script menu as we describe above, they are grayed out. Instead, you must double-click the script file to run them. The Visual Basic scripts (Windows) can be run from the menu.
• Analyze Documents (Macintosh only) prompts you to find a folder that contains one or more Illustrator documents. It analyzes the files and gives you a list of fonts, gradients, spot colors, and placed images in all the documents. This could be useful when you’re handing off your Illustrator files for output. (However, if the folder contains any files that Illustrator cannot open, the whole process fails ungracefully!)
• Collect For Output collects the placed images in an Illustrator file. You need to create an Output folder first (the scripts prompts you for it); the script then makes a copy of your Illustrator file, including its placed images, and places it all into the folder. Initiate it by running the script when an Illustrator file is open, or by dragging the document file over the script file.
InDesign Scripts
InDesign comes with 21 scripts on the installation CDs, as we describe in the “Installing a Script” section above. Some of these add much-requested features to InDesign. Here are some examples:
• AlignToPage aligns objects to specified positions on a page (Figure 15-24).
Figure 15-24. The AlignToPage script aligns object to a page—a feature lacking in InDesign.

• BreakFrame removes a selected text frame and its contents from a story, leaving the remainder of the story linked.
• CropMarks draws crop and/or registration marks around objects that are selected.
• MakeGrid creates a grid by subdividing or duplicating the objects that are selected.
• SortParagraphs sorts the paragraphs of a text selection alphabetically.
Tip: Organize Your InDesign Scripts
If you gather many InDesign scripts, you can place them inside other folders within the Scripts folders for better organization.
Tip: Store Your Scripts Somewhere Else
If you need to reinstall InDesign, the scripts in your Script folder disappear. Place them somewhere else, and create aliases (Mac) or shortcuts (Windows) to them.
Bridge Scripts
There are three Workflow Automation Scripts included with Bridge. By this we mean that you can use Bridge to select files, and then run a JavaScript script, which calls one of the other CS2 applications to perform one of the following commands in the script:
• Create InDesign Contact Sheet (on the Tools > InDesign menu) creates a contact sheet using InDesign for images you select in Bridge. As we describe in “Contact Sheets and Layer Comps,” in Chapter 2, “Which Application Does What?”, we prefer this script to Photoshop’s Contact Sheet II, also available from Bridge. Instead of losing resolution, the images are simply scaled down within InDesign to their final size. By choosing an InDesign template, you can customize the appearance of the contact sheet.
• Export To Flash (on the Tools > Illustrator menu) exports a selected file to Flash (SWF) format when you select an Adobe Illustrator (.ai) file in Bridge. This export command currently works only with Illustrator files.
• Live Trace (on the Tools > Illustrator menu) lets you select images in Bridge, and then prompts you to choose which Live Trace preset you want to use and where you’d like to save the result. (We describe Illustrator’s Live Trace tool for vectorizing images in Chapter 5, “Getting to the Point of Vector Graphics.”)
Adobe Studio Exchange has scripts available that enhance Bridge (see the next section).
Finding Scripts and Learning Scripting
For those of you are who are not so technically inclined, your best bet is to be on the lookout for existing scripts that can ease your workload. Here are some good places to look:
• Adobe Studio Exchange (http://share.studio.adobe.com/default.asp) has scripts available for Photoshop, Illustrator, InDesign, and Bridge. For example, the browsebar.jsx script adds a Browse Bar to Bridge so you can type in a path name, and the ImportCamera_BR.jsx script enhances importing images from a camera (or other removable media) to your hard drive. See the Appendix, “Creative Suite Resources,” for more about this fabulous resource.
• Adobe User to User Forums (http://www.adobe.com/support/forums/main.html) has several forums devoted to scripting, including sections for Acrobat, Bridge, Illustrator, InDesign, and Photoshop. It’s often a source of scripts that are available free of charge (see the Appendix, “Creative Suite Resources”).
Tip: Hire Someone to Write a Script
When you need a more complex script for your workflow, consider hiring a scripter to write one for you. In the long run, it can save you a bundle of money. For starting place, look for a scripter in the Adobe scripting forums.
We encourage you to try scripting, if you have the inclination. Here are some good sources of information when you’re learning scripting:
• Look at the CS2 Documentation. For each of the “big three” CS2 products (Photoshop, Illustrator, and InDesign), there are scripting guides found on the installation CDs. There is also a Bridge JavaScript reference. We give the locations for these in “The Extras” in Chapter 1, “Introducing Adobe Creative Suite.” Unfortunately, there is no JavaScript guide for Acrobat, but you can download the Adobe JavaScript Scripting Guide and Adobe JavaScript Scripting Reference from the Adobe partners and developers web site at http://partners.adobe.com/asn/acrobat/index.jsp (click on the JavaScript support link on the left).
• Look at the Sample Scripts. One of the best ways to learn scripting is to look at scripts that others have written. Start with the sample scripts found on the installation CDs.
• Adobe User to User Forums. We’ll refer you here again, because this is where all the hard-core scripters for JavaScript, AppleScript, and Visual Basic hang out.
• Real World InDesign CS2. Because Ole Kvern, one of the co-authors of this book from Peachpit Press, is one of Adobe’s scripting gurus, the Scripting chapter is a good source of down-to-earth information.
Here are a few more for those learning AppleScript:
• For serious AppleScripters, LateNight Software’s Script Debugger is highly recommended (http://www.latenightsw.com).
• Shane Stanley and Ray Robertson’s periodic AppleScript Pro Seminars are really valuable, and in recent years have included a full day devoted to InDesign (http://www.scriptingmatters.com/aspro.php).
• Another good source of scripts and scripting help for AppleScript users is http://macscripter.net.
Extending Your Application with Plug-ins
Your application may not do everything you want. For example, in InDesign, you might want to work with table styles, but discover that this feature is not in the application. In Photoshop, you might want a cool new filter to create a special effect. Luckily, you can download or buy plug-ins to add these features. In fact, in the CS2 applications, many functions are performed by plug-ins (as described in the sections below).
Third-party developers have greatly expanded the functionality of CS2 applications by developing plug-ins for functions that are too narrow be included in the application—or just by adding features the application doesn’t include yet. (GoLive doesn’t have a plug-in architecture like the other CS2 applications, and we don’t cover it in this section.)
Installing and Uninstalling Plug-ins
To install an Adobe Systems plug-in, use the installer if one is provided. Otherwise, drag a copy of the plug-in to the Plug-ins folder inside the application folder (Acrobat is an exception; see “Plug-ins in Acrobat” below). Restart the application for the plug-in to take effect.
Most third-party plug-ins come with an installer. To install a third-party plug-in, follow the installation instructions that came with the plug-in.
Getting Information About Installed Plug-ins
To get information about a plug-in, choose About Plug-Ins from the application menu (Mac) or Help > About Plug-Ins (Windows). In Acrobat, choose Acrobat > About Adobe Plug-ins (Mac) or Help > About Adobe Plug-ins (Windows).
Managing Plug-ins
If you need to remove a plug-in, use the uninstaller if one is provided. Otherwise, just manually remove it from the Plug-ins folder. (In many cases, plug-ins will be nested inside other folders within the Plug-ins folder.) Because of InDesign’s unique application structure (see “Plug-ins in InDesign”), we’ll discuss it separately.
Plug-ins in Photoshop
One of the things that contributed to Photoshop’s early success was its support for third-party filters. When John Knoll helped his brother Thomas Knoll develop Photoshop, he wrote many of the plug-ins that shipped with the application (see the “Photoshop Revolutionizes Image Editing” sidebar in Chapter 4, “Pixels and Raster Formats”).
Adobe maintained this open policy when it bought Photoshop, allowing many small developers to add functionality to Photoshop through plug-ins—a process that continues until this day.
Photoshop’s Own Plug-ins
Photoshop ships with many importing, exporting, and special-effects plug-ins that are totally integrated into the application. They are found in subfolders in the Plug-ins folder. Examples include many of the filters and effects we describe in Chapter 4, “Pixels and Raster Formats,” or the Automate commands we describe in the “Batch and Automate Commands in Photoshop” section above.
Once installed, Photoshop plug-in modules appear as options in the Import or Export menu; as file formats in the Open, Save As, and Export Original (ImageReady) dialog boxes; or as filters in the Filter submenus.
You can select an additional Plug-ins folder for compatible plug-ins stored with another application (such as Corel Painter and Adobe Fireworks). You can also create an alias (Mac) or a shortcut (Windows) for a plug-in stored in another folder on your system. You can then add the shortcut or alias to the plug-ins folder and use that plug-in with Photoshop.
Photoshop supports some specialized or legacy file formats, but their plug-ins are not installed automatically; an example is the new JPEG 2000 format. These “optional” plug-ins are on the CS2 Std Content install CD, in the Goodies > Photoshop CS2 > Optional Plug-ins folder.
Third-Party Plug-ins
There are hundreds of plug-ins available for Photoshop. Some can be freely downloaded from Adobe Studio Exchange. More can be purchased from third parties. Many have demos you can try out. Here are a few instances of the plug-ins you can purchase for Photoshop:
• Add borders, frames, or edges around pictures with Photo/Graphic Edges
• Create 3D Bevels, Drop Shadows, and other effects with Eye Candy
For the details of where to find these plug-ins, see the Appendix, “Creative Suite Resources.”
Plug-ins in Illustrator
With Illustrator, you can install either plug-ins developed for Illustrator or most Photoshop plug-ins. Photoshop plug-ins appear in the Filter menu in the Photoshop Filter section. You can create an alias (Mac) or shortcut (Window) to a filter you have installed in the Photoshop Plug-ins folder and place it in Illustrator’s Plug-ins folder. (However, Photoshop plug-ins can be used only when an embedded image is selected in Illustrator, and many of them only work when in RGB color mode.)
Like Photoshop, many of Illustrator’s import and export features, filters, and even some tools and palettes are created as plug-ins and automatically installed. For example, both the Transparency and Symbol palettes are implemented as plug-ins.
There are free plug-ins for download from Adobe Studio Exchange and commercial plug-ins. Here are a few you can try out and purchase. For the details of where to find these plug-ins, see the Appendix, “Creative Suite Resources.”
• For precision 2D and isometric AutoCAD technical drawing, you can purchase CADTools from Hot Door.
• To create high-quality maps, you can purchase MAPublisher from Avenza.
• For complex, real-time vector effects like 3D transformations and a Fractalize tool, you can purchase FILTERiT from CValley, Inc.
Plug-ins in InDesign
InDesign was built from the ground up with a plug-in structure. In a way, the application is sort of a glorified plug-in manager along with hundreds of plug-ins that make up the core application. It was designed this way to make it easier for Adobe to update components individually.
Managing Plug-ins
Unlike the other CS2 applications, InDesign provides a dialog box to manage plug-ins (Figure 15-25). Choose InDesign > Configure Plug-ins (Mac) or Help > Configure Plug-ins (Windows).
Figure 15-25. Configure Plug-ins dialog box in InDesign.

Using this dialog box, you can enable or disable plug-ins. If you never use the indexing feature, for example, you can turn it off. Why would you do this? To reduce the memory taken up by InDesign and make the application run slightly faster.
To disable a plug-in, click in the column to the left of the plug-in name. Those with lock icons are from Adobe and cannot be disabled. To make things more confusing, some plug-ins are required by other plug-ins; if you try to turn one of these off, the program alerts you (and if you still agree to turn it off, the other plug-ins will be disabled too). You can also use the Show Info button to view information about dependencies between plug-ins. Note that a change in plug-in configuration requires relaunching InDesign, and means that your Recent Items file history will be lost!
Third-Party Plug-ins
Hundreds of plug-ins are now available for InDesign, and more are being released all the time. Here are a few you might try out:
• Want a History palette? Get EasyHistoryCS from 65bit Software or History from DTP Tools.
• To add table styles, get TableStyles and CellStyles from Teacup Software. We used these plug-ins in formatting the tables in this book.
• To create professional variable-data projects beyond the simple capabilities of Data Merge (described in “Using Data Merge in InDesign”), get uDirect from XMPie.
For the details of where to find these plug-ins, see the Appendix, “Creative Suite Resources.”
Plug-ins in Acrobat
All of the Acrobat viewer applications support a plug-in architecture. Many of the Acrobat or Reader functions are supplied by plug-ins.
Like Photoshop, there has grown up a community of developers creating very specialized plug-ins that extend Acrobat through its plug-in architecture. Most of these third-party plug-ins have an installer. However, if you need to manually install a plug-in, you need to know how to do it.
Manually Installing Acrobat Plug-ins
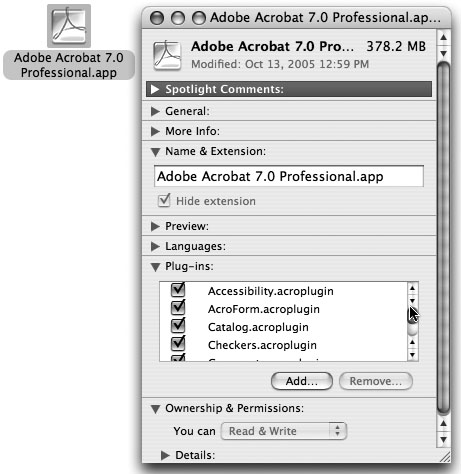
The Mac installation is different than you would expect. On the Macintosh, open your Applications folder. Then open the Acrobat 7 Professional (or Standard) folder. Select the icon of the application, and choose File > Get Info. Click on the triangle beside Plug-ins to view the Plug-ins panel. There are buttons to add or remove plug-ins (Figure 15-26). In Windows, manually place a plug-in in the Program Files > Adobe > Adobe Acrobat 7.0 > Acrobat > plug_ins folder.
Figure 15-26. In Mac OS X 10.3 and 10.4, use the Plug-ins panel of the Get Info dialog box to manually add or remove Acrobat plug-ins.
Third-Party plug-ins
From the hundreds available, here are some of the plug-ins you can purchase to extend Acrobat:
• To create printer impositions of PDF pages, you can get Quite Imposing or Quite Imposing Plus from Quite Software.
• To do preflighting and advanced corrections to PDF files for output, you can buy PitStop Professional from Enfocus Software.
• To dynamically merge data into a PDF file, you can buy PDF/Mergician.
• For advanced PDF splitting and merging capabilities, link management, and bookmark creation and manipulation, buy ARTS PDF Aerialist from ARTS PDF.
For the details of where to find these plug-ins, see the Appendix, “Creative Suite Resources.”
Getting Into Gear
We’ve shown you that CS2 applications provide a variety of ways to automate your tasks. You’ll find that these features include some which are very easy to set up (actions or droplets, for example) and some that are more complex (creating batch sequences in Acrobat can become quite involved, for example). The applications can also be extended to include functions not built into the interface through scripting and installing plug-ins. We summarize these features in Table 15-1.
Speed up your handling of the mundane, repetitive jobs you handle every day by making use of some of these features. Produce your work more consistently. These CS2 automation features will get you into gear to make your work life more productive.