Chapter 1. From Zero to Deploy
Welcome to Ruby on Rails™ Tutorial: Learn Web Development with Rails. The purpose of this book is to teach you how to develop custom web applications, and our tool of choice is the popular Ruby on Rails web framework. In addition to focusing on general principles of web development (rather than on Rails specifically), the Ruby on Rails™ Tutorial teaches the broader skill of technical sophistication (Box 1.1), which is a principal theme developed by the Learn Enough to Be Dangerous tutorials.1 In particular, the Learn Enough introductory sequence consists of a series of tutorials that are suitable as prerequisites to the Ruby on Rails™ Tutorial, starting with Learn Enough Command Line to Be Dangerous,2 which (unlike the present tutorial) is aimed at complete beginners.
1. learnenough.com/story
2. learnenough.com/command-line
The Ruby on Rails™ Tutorial is designed to give you a thorough introduction to web application development, including a basic grounding in Ruby, Rails, HTML & CSS, databases, version control, testing, and deployment—sufficient to launch you on a career as a web developer or technology entrepreneur. If you already know web development, this book will quickly teach you the essentials of the Rails framework, including MVC and REST, generators, migrations, routing, and embedded Ruby. In any case, when you finish the Ruby on Rails™ Tutorial you will be in a position to benefit from the many more advanced books, blogs, and screencasts that are part of the thriving programming educational ecosystem.3 One such offering is the Ruby on Rails Tutorial LiveLessons screencasts, available at informit.com/rubyrailsvid.
3. The most up-to-date version of the Ruby on Rails™ Tutorial can be found on the book’s website at http://www.railstutorial.org/. If you are reading this book offline, be sure to check the online version of the Rails Tutorial book at http://www.railstutorial.org/book for the latest updates.
The Ruby on Rails™ Tutorial takes an integrated approach to web development by building three example applications of increasing sophistication, starting with a minimal hello app (Section 1.3), a slightly more capable toy app (Chapter 2), and a real sample app (Chapter 3 through Chapter 14). As implied by their generic names, the applications developed in the Ruby on Rails™ Tutorial are not specific to any particular kind of website. The final sample application bears more than a passing resemblance to Twitter (which, coincidentally, was also originally written in Rails), but the emphasis throughout the tutorial is on general principles, so you will have a solid foundation no matter what kinds of web applications you want to build.
In this first chapter, we’ll get started with Ruby on Rails by installing all the necessary software and by setting up our development environment (Section 1.2). We’ll then create our first Rails application, called hello_app. The Rails Tutorial emphasizes good software development practices, so immediately after creating our fresh new Rails project we’ll put it under version control with Git (Section 1.4). And, believe it or not, in this chapter we’ll even put our first app on the wider web by deploying it to production (Section 1.5).
In Chapter 2, we’ll make a second project, whose purpose is to demonstrate the basic workings of a Rails application. To get up and running quickly, we’ll build this toy app (called toy_app) using scaffolding (Box 1.2) to generate code; because this code is both ugly and complex, Chapter 2 will focus on interacting with the toy app through its URIs (often called URLs)4 using a web browser.
4. URI stands for Uniform Resource Identifier, while the slightly less general URL stands for Uniform Resource Locator. In practice, the URL is usually equivalent to “the thing you see in the address bar of your browser.”
The rest of the tutorial focuses on developing a single large real sample application (called sample_app), writing all the code from scratch. We’ll develop the sample app using a combination of mockups, test-driven development (TDD), and integration tests. We’ll get started in Chapter 3 by creating static pages and then add a little dynamic content. We’ll take a quick detour in Chapter 4 to learn a little about the Ruby language underlying Rails. Then, in Chapter 5 through Chapter 12, we’ll complete the foundation for the sample application by making a site layout, a user data model, and a full registration and authentication system (including account activation and password resets). Finally, in Chapter 13 and Chapter 14 we’ll add microblogging and social features to make a working example site.
1.1 Introduction
Ruby on Rails (or just “Rails” for short) is a web development framework written in the Ruby programming language. Since its debut in 2004, Ruby on Rails has rapidly become one of the most powerful and popular tools for building dynamic web applications. Rails is used by companies as varied as Airbnb, Basecamp, Disney, GitHub, Hulu, Kickstarter, Shopify, Twitter, and the Yellow Pages. There are also many web development shops that specialize in Rails, such as ENTP, thoughtbot, Pivotal Labs, Hashrocket, and HappyFunCorp, plus innumerable independent consultants, trainers, and contractors.
What makes Rails so great? First of all, Ruby on Rails is 100% open-source, available under the generous MIT License, and as a result it also costs nothing to download or use. Rails also owes much of its success to its elegant and compact design; by exploiting the malleability of the underlying Ruby language, Rails effectively creates a domain-specific language for writing web applications. As a result, many common web programming tasks—such as generating HTML, making data models, and routing URLs—are easy with Rails, and the resulting application code is concise and readable.
Rails also adapts rapidly to new developments in web technology and framework design. For example, Rails was one of the first frameworks to fully digest and implement the REST architectural style for structuring web applications (which we’ll be learning about throughout this tutorial). And when other frameworks develop successful new techniques, Rails creator David Heinemeier Hansson and the Rails core team don’t hesitate to incorporate their ideas. Perhaps the most dramatic example is the merger of Rails and Merb, a rival Ruby web framework, so that Rails now benefits from Merb’s modular design, stable API, and improved performance.
Finally, Rails benefits from an unusually enthusiastic and supportive community. The results include thousands of open-source contributors, fun and informative conferences, a huge number of gems (self-contained solutions to specific problems such as pagination and image upload), a rich variety of informative blogs, and a cornucopia of discussion forums and IRC channels. The large number of Rails programmers also makes it easier to handle the inevitable application errors: the “Google the error message” algorithm nearly always produces a relevant blog post or discussion-forum thread.
1.1.1 Prerequisites
There are no formal prerequisites to this book, and the Ruby on Rails™ Tutorial contains integrated tutorials not only for Rails, but also for the underlying Ruby language, the default Rails testing framework (minitest), the Unix command line, HTML, CSS, a small amount of JavaScript, and even a little SQL. That’s a lot of material to absorb, though, and I generally recommend having some HTML and programming background before starting this tutorial. If you’re new to software development, I recommend starting with the tutorials at Learn Enough to Be Dangerous instead:5
5. As of this writing, the command line, text editor, Git and HTML tutorials are complete, and the other tutorials are in development.
1. Developer Fundamentals
(a) Learn Enough Command Line to Be Dangerous
(b) Learn Enough Text Editor to Be Dangerous
(c) Learn Enough Git to Be Dangerous
2. Web Basics
(a) Learn Enough HTML to Be Dangerous
(b) Learn Enough CSS & Layout to Be Dangerous
(c) Learn Enough JavaScript to Be Dangerous
3. Intro Ruby Web Development
(a) Learn Enough Ruby to Be Dangerous
(b) Learn Enough Sinatra to Be Dangerous
(c) Learn Enough Ruby on Rails to Be Dangerous
4. Professional Ruby Web Development
(a) Ruby on Rails™ Tutorial
One common question when learning Rails is whether to learn Ruby first. The answer depends on your personal learning style and how much programming experience you already have. If you prefer to learn everything systematically from the ground up, or if you have never programmed before, then learning Ruby first might work well for you, and in this case I recommend following the full Learn Enough sequence listed above. On the other hand, many beginning Rails developers are excited about making web applications, and would rather not wait to finish a whole book on Ruby before ever writing a single web page. In this case, I recommend giving this tutorial a go and switching to the Learn Enough sequence if it proves too challenging.
At the end of this tutorial, no matter where you started, you should be ready for the many more intermediate-to-advanced Rails resources out there. Here are some I particularly recommend:
• The Learn Enough Society: Premium subscription service that includes a special enhanced version of the Ruby on Rails™ Tutorial book and 15+ hours of streaming screencast lessons filled the kind of with tips, tricks, and live demos that you can’t get from reading a book. Also includes text and videos for the other Learn Enough tutorials. Scholarship discounts are available.
• Code School: Good interactive online programming courses
• The Turing School of Software & Design: A full-time, 27-week training program in Denver, Colorado
• Bloc: An online bootcamp with a structured curriculum, personalized mentorship, and a focus on learning through concrete projects. Use the coupon code BLOCLOVESHARTL to get $500 off the enrollment fee.
• Launch School: A good online Rails development bootcamp (includes advanced material)
• Firehose Project: A mentor-driven, online coding bootcamp focused on real-world programming skills like test-driven development, algorithms, and building an advanced web application as part of an agile team. Two-week free intro course.
• Thinkful: An online class that pairs you with a professional engineer as you work through a project-based curriculum
• Pragmatic Studio: Online Ruby and Rails courses from Mike and Nicole Clark. Along with Programming Ruby author Dave Thomas, Mike taught the first Rails course I took, way back in 2006.
• RailsApps: A large variety of detailed topic-specific Rails projects and tutorials
• Rails Guides: Topical and up-to-date Rails references
Exercises
The Ruby on Rails™ Tutorial contains a large number of exercises. Solving them as you proceed through the tutorial is strongly recommended. Exercise solutions are available to book purchasers at http://railstutorial.org/solutions.
In order to keep the main discussion independent of the exercises, the solutions are not generally incorporated into subsequent code listings. (In the rare circumstance that an exercise solution is used subsequently, it is explicitly solved in the main text.) This means that over time your code may diverge from the code shown in the tutorial due to differences introduced in the exercises. Learning how to resolve such discrepancies is a valuable exercise in technical sophistication (Box 1.1).
To record your answers and see solutions, you can join the Learn Enough Society, a subscription service from Learn Enough to Be Dangerous that includes a special enhanced version of the Ruby on Rails™ Tutorial.
Many of the exercises are challenging, but we’ll start out with some easy ones just to get warmed up:
1. Which website hosts the Ruby gem for Ruby on Rails? Hint: When in doubt, Google it.
2. What is the current version number of Rails?
3. As of this moment, how many total times has Ruby on Rails been downloaded?
1.1.2 Conventions Used in This Book
The conventions used in this book are mostly self-explanatory. In this section, we’ll go over some that may not be.
Many examples in this book use command-line commands. For simplicity, all command line examples use a Unix-style command line prompt (a dollar sign), as follows:
$ echo "hello, world"
hello, world
Rails comes with many commands that can be run at the command line. For example, in Section 1.3.2 we’ll run a local development webserver with the rails server command:
$ rails server
As with the command-line prompt, the Rails Tutorial uses the Unix convention for directory separators (i.e., a forward slash /). For example, the sample application production.rb configuration file appears as follows:
config/environments/production.rb
This file path should be understood as being relative to the application’s root directory, which will vary by system; on the cloud IDE (Section 1.2.1), it looks like this:
/home/ubuntu/workspace/sample_app/
Thus, the full path to production.rb is
/home/ubuntu/workspace/sample_app/config/environments/production.rb
I will typically omit the application path and just write config/environments/production.rb for short.
The Rails Tutorial often shows output from various programs. Because of the innumerable small differences between different computer systems, the output you see may not always agree exactly with what is shown in the text, but this is not cause for concern. In addition, some commands may produce errors depending on your system; rather than attempt the Sisyphean task of documenting all such errors in this tutorial, I will delegate to the “Google the error message” algorithm, which among other things is good practice for real-life software development (Box 1.1). If you run into any problems while following the tutorial, I suggest consulting the resources listed in the Rails Tutorial help page.6
6. railstutorial.org/help
Because the Rails Tutorial covers testing of Rails applications, it is often helpful to know if a particular piece of code causes the test suite to fail (indicated by the color red) or pass (indicated by the color green). For convenience in the digital editions of this book, code resulting in a failing test is thus indicated with RED, while code resulting in a passing test is indicated with GREEN.
Finally, for convenience the Ruby on Rails™ Tutorial adopts two conventions designed to make the many code samples easier to understand. First, some code listings include one or more highlighted lines, as seen below:
class User < ApplicationRecord
validates :name, presence: true
validates :email, presence: true
end
Such highlighted lines typically indicate the most important new code in the given sample, and often (though not always) represent the difference between the present code listing and previous listings. Second, for brevity and simplicity many of the book’s code listings include vertical dots, as follows:
class User < ApplicationRecord
.
.
.
has_secure_password
end
These dots represent omitted code and should not be copied literally.
1.2 Up and Running
Even for experienced Rails developers, installing Ruby, Rails, and all the associated supporting software can be an exercise in frustration. Compounding the problem is the multiplicity of environments: different operating systems, version numbers, preferences in text editor and integrated development environment (IDE), etc. The Ruby on Rails™ Tutorial offers two recommended solutions to this problem. One possibility is to follow the full Learn Enough intro sequence mentioned in Section 1.1.1, which will automatically lead to a system configured for this tutorial.
The other possibility, recommended for newer users, is to sidestep such installation and configuration issues by using a cloud integrated development environment, or cloud IDE. The cloud IDE used in this tutorial runs inside an ordinary web browser, and hence works the same across different platforms, which is especially useful for operating systems (such as Windows) on which Rails development has historically been difficult. It also maintains the current state of your work, so you can take a break from the tutorial and come back to the system just as you left it.
1.2.1 Development Environment
Considering various idiosyncratic customizations, there are probably as many development environments as there are Rails programmers. To avoid this complexity, the Ruby on Rails™ Tutorial standardizes on the excellent cloud development environment Cloud9. In particular, I am pleased to be partnering with Cloud9 to offer a free development environment specifically tailored to the needs of this tutorial. The resulting Rails Tutorial Cloud9 workspace comes pre-configured with most of the software needed for professional-grade Rails development, including Ruby, RubyGems, and Git. (Indeed, the only big piece of software we’ll install separately is Rails itself, and this is intentional [Section 1.2.2].)
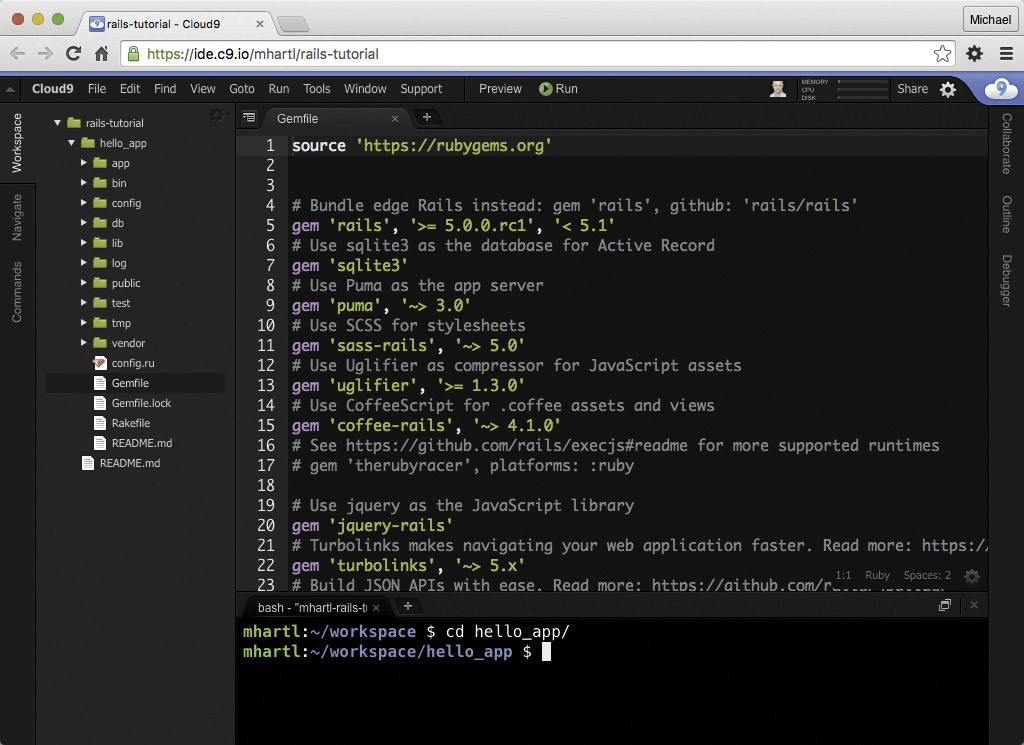
The cloud IDE also includes the three essential components needed to develop web applications: a text editor, a filesystem navigator, and a command-line terminal (Figure 1.1). Among other features, the cloud IDE text editor supports the “Find in Files” global search that I consider essential to navigating any large Ruby or Rails project.7 Finally, even if you decide not to use the cloud IDE exclusively in real life (and I certainly recommend learning other tools as well), it provides an excellent introduction to the general capabilities of text editors and other development tools.
7. For example, to find the definition of a function called foo, you can do a global search for “def foo”.

Here are the steps for getting started with the cloud development environment:
1. Sign up for a free account at Cloud9.8 In order to prevent abuse, Cloud9 requires a valid credit card for signup, but the Rails Tutorial workspace is 100% free, and your card will not be charged.
8. c9.io/signup
2. Click on “Go to your Dashboard”.
3. Select “Create New Workspace”.
4. As shown in Figure 1.2, create a workspace called “rails-tutorial” (not “rails_tutorial”), set it to “Private to the people I invite”, and select the icon for the Rails Tutorial (not the icon for Ruby on Rails).

5. Click “Create workspace”.
6. After Cloud9 has finished provisioning the workspace, it should start automatically.
Because using two spaces for indentation is a near-universal convention in Ruby, I also recommend changing the editor to use two spaces instead of the default four. As shown in Figure 1.3, you can do this by clicking the gear icon in the upper right and then selecting “Code Editor (Ace)” to edit the “Soft Tabs” setting. (Note that this takes effect immediately; you don’t need to click a “Save” button.)
1.2.2 Installing Rails
The development environment from Section 1.2.1 includes all the software we need to get started, except for Rails itself. To install Rails, we’ll use the gem command provided by the RubyGems package manager, which involves typing the command shown in Listing 1.1 into your command-line terminal. (If developing on your local system, this means using a regular terminal window; if using the cloud IDE, this means using the command-line area shown in Figure 1.1)

Listing 1.1: Installing Rails with a specific version number.
$ gem install rails -v 5.0.0
Here the -v flag ensures that the specified version of Rails gets installed, which is important for getting results consistent with this tutorial.
1.3 The First Application
Following a long tradition in computer programming, our goal for the first application is to write a “hello, world” program. In particular, we will create a simple application that displays the string “hello, world!” on a web page, both on our development environment (Section 1.3.4) and on the live web (Section 1.5).
Virtually all Rails applications start the same way, by running the rails new command. This handy command creates a skeleton Rails application in a directory of your choice. To get started, users not using the Cloud9 IDE recommended in Section 1.2.1 should make a workspace directory for your Rails projects if it doesn’t already exist (Listing 1.2) and then change into the directory. (Listing 1.2 uses the Unix commands cd and mkdir; see Box 1.3 if you are not already familiar with these commands.)
Listing 1.2: Making a workspace directory for Rails projects (unnecessary in the cloud).
$ cd # Change to the home directory.
$ mkdir workspace # Make a workspace directory.
$ cd workspace/ # Change into the workspace directory.
The next step on both local systems and the cloud IDE is to create the first application using the command in Listing 1.3. Note that Listing 1.3 explicitly includes the Rails version number as part of the command. This ensures that the same version of Rails we installed in Listing 1.1 is used to create the first application’s file structure. (If the command in Listing 1.3 returns an error like “Could not find 'railties'”, it means you don’t have the right version of Rails installed, and you should double-check that you followed the command in Listing 1.1 exactly as written.)
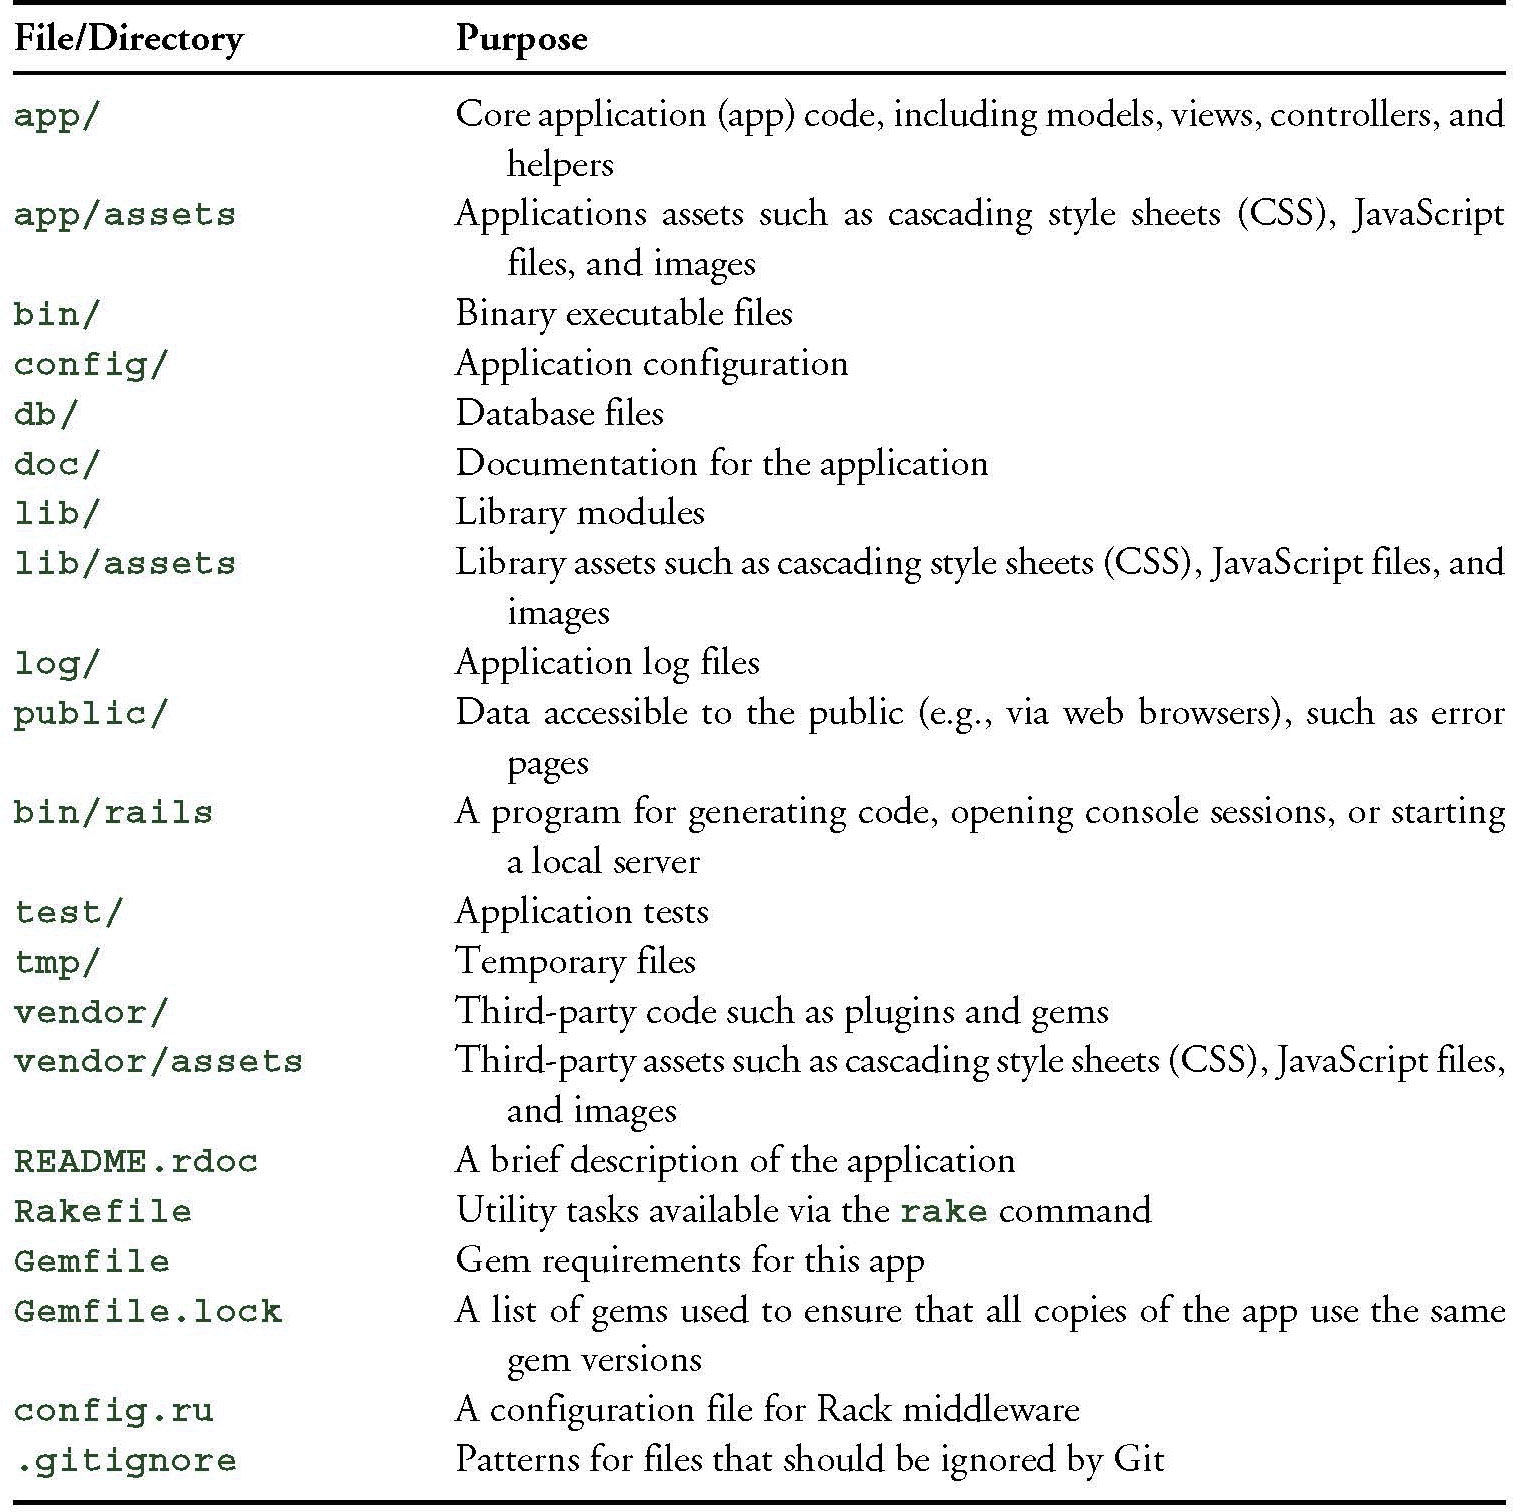
Table 1.1: Some common Unix commands.

Listing 1.3: Running rails new (with a specific version number).
$ cd ˜/workspace
$ rails _5.0.0_ new hello_app
create
create README.md
create Rakefile
create config.ru
create .gitignore
create Gemfile
create app
create app/assets/config/manifest.js
create app/assets/javascripts/application.js
create app/assets/javascripts/cable.js
create app/assets/stylesheets/application.css
create app/channels/application_cable/channel.rb
create app/channels/application_cable/connection.rb
create app/controllers/application_controller.rb
.
.
.
create tmp/cache/assets
create vendor/assets/javascripts
create vendor/assets/javascripts/.keep
create vendor/assets/stylesheets
create vendor/assets/stylesheets/.keep
remove config/initializers/cors.rb
run bundle install
Fetching gem metadata from https://rubygems.org/..........
Fetching additional metadata from https://rubygems.org/..
Resolving dependencies...
Installing rake 11.1.2
Using concurrent-ruby 1.0.2
.
.
.
Your bundle is complete!
Use 'bundle show [gemname]' to see where a bundled gem is installed.
run bundle exec spring binstub --all
* bin/rake: spring inserted
* bin/rails: spring inserted
As seen at the end of Listing 1.3, running rails new automatically runs the bundle install command after the file creation is done. We’ll discuss what this means in more detail starting in Section 1.3.1.

Notice how many files and directories the rails command creates. This standard directory and file structure (Figure 1.4) is one of the many advantages of Rails: it immediately gets you from zero to a functional (if minimal) application. Moreover, since the structure is common to all Rails apps, you can immediately get your bearings when looking at someone else’s code.
A summary of the default Rails files appears in Table 1.2. We’ll learn about most of these files and directories throughout the rest of this book. In particular, starting in Section 5.2.1 we’ll discuss the app/assets directory, part of the asset pipeline that makes it easy to organize and deploy assets such as cascading style sheets and JavaScript files.
Table 1.2: A summary of the default Rails directory structure.
1.3.1 Bundler
After creating a new Rails application, the next step is to use Bundler to install and include the gems needed by the app. As noted briefly in Section 1.3, Bundler is run automatically (via bundle install) by the rails command, but in this section we’ll make some changes to the default application gems and run Bundler again. This involves opening the Gemfile with a text editor. (With the cloud IDE, this involves clicking the arrow in the file navigator to open the sample app directory and double-clicking the Gemfile icon.) Although the exact version numbers and details may differ slightly, the results should look something like Figure 1.5 and Listing 1.4. (The code in this file is Ruby, but don’t worry at this point about the syntax; Chapter 4 will cover Ruby in more depth.) If the files and directories don’t appear as shown in Figure 1.5, click on the file navigator’s gear icon and select “Refresh File Tree”. (As a general rule, you should refresh the file tree any time files or directories don’t appear as expected.)10
10. This is a typical example of technical sophistication (Box 1.1).
Listing 1.4: The default Gemfile in the hello_app directory.
source 'https://rubygems.org'
# Bundle edge Rails instead: gem 'rails', github: 'rails/rails'
gem 'rails', '˜> 5.0.0'
# Use sqlite3 as the database for Active Record
gem 'sqlite3'
# Use Puma as the app server
gem 'puma', '˜> 3.0'
# Use SCSS for stylesheets
gem 'sass-rails', '˜> 5.0'
# Use Uglifier as compressor for JavaScript assets
gem 'uglifier', '>= 1.3.0'
# Use CoffeeScript for .coffee assets and views
gem 'coffee-rails', '˜> 4.2'
# See https://github.com/rails/execjs#readme for more supported runtimes
# gem 'therubyracer', platforms: :ruby
# Use jquery as the JavaScript library
gem 'jquery-rails'
# Turbolinks makes navigating your web application faster.
# Read more: https://github.com/turbolinks/turbolinks
gem 'turbolinks', '˜> 5.x'
# Build JSON APIs with ease. Read more: https://github.com/rails/jbuilder
gem 'jbuilder', '˜> 2.0'
# Use Redis adapter to run Action Cable in production
# gem 'redis', '˜> 3.0'
# Use ActiveModel has_secure_password
# gem 'bcrypt', '˜> 3.1.7'
# Use Capistrano for deployment
# gem 'capistrano-rails', group: :development
group :development, :test do
# Call 'byebug' anywhere in the code to stop execution
# and get a debugger console
gem 'byebug', platform: :mri
end
group :development do
# Access an IRB console on exception pages or by using
# <%= console %> anywhere in the code.
gem 'web-console'
gem 'listen', '˜> 3.0.5'
# Spring speeds up development by keeping your application running
# in the background. Read more: https://github.com/rails/spring
gem 'spring'
gem 'spring-watcher-listen', '˜> 2.0.0'
end
# Windows does not include zoneinfo files, so bundle the tzinfo-data gem
gem 'tzinfo-data', platforms: [:mingw, :mswin, :x64_mingw, :jruby]
Many of these lines are commented out with the hash symbol # (Section 4.2.1); they are there to show you some commonly needed gems and to give examples of the Bundler syntax. For now, we won’t need any gems other than the defaults.
Unless you specify a version number to the gem command, Bundler will automatically install the latest requested version of the gem. This is the case, for example, in the code
gem 'sqlite3'
There are also two common ways to specify a gem version range, which allows us to exert some control over the version used by Rails. The first looks like this:
gem 'uglifier', '>= 1.3.0'
This installs the latest version of the uglifier gem (which handles file compression for the asset pipeline) as long as it’s greater than or equal to version 1.3.0—even if it’s, say, version 7.2. The second method looks like this:
gem 'coffee-rails', '˜> 4.0.0'
This installs the gem coffee-rails as long as it’s newer than version 4.0.0 and not newer than 4.1. In other words, the >= notation always installs the latest gem, whereas the ˜> 4.0.0 notation only installs updated gems where the last digit differs (e.g., from 4.0.0 to 4.0.1), but the digits before that releases (e.g., from 4.0 to 4.1).11 Unfortunately, experience shows that even minor point releases can break the application, so for the Ruby on Rails™ Tutorial we’ll err on the side of caution by including exact version numbers for all gems. You are welcome to use the most up-to-date version of any gem, including using the ˜> construction in the Gemfile (which I generally recommend for more advanced users), but be warned that this may cause the tutorial to act unpredictably.
11. Similarly, ˜> 4.0 would install version 4.9 of a gem but not 5.0. This is especially useful if the project in question uses semantic versioning (also called “semver”), which is a convention for numbering releases designed to minimize the chances of breaking software dependencies.
Converting the Gemfile in Listing 1.4 to use exact gem versions results in the code shown in Listing 1.5. (You can determine the exact version number for each gem by running gem list <gem name> at the command line, but Listing 1.5 saves you the trouble.) Note that we’ve also taken this opportunity to arrange for the sqlite3 gem to be included only in a development or test environment (Section 7.1.1), which prevents potential conflicts with the database used by Heroku (Section 1.5). Important note: For all the Gemfiles in this book, you should use the version numbers listed at gemfiles-4th-ed.railstutorial.org instead of the ones listed below (although they should be identical if you are reading this online).
Listing 1.5: A Gemfile with an explicit version for each Ruby gem.
source 'https://rubygems.org'
gem 'rails', '5.0.0'
gem 'puma', '3.4.0'
gem 'sass-rails', '5.0.5'
gem 'uglifier', '3.0.0'
gem 'coffee-rails', '4.2.1'
gem 'jquery-rails', '4.1.1'
gem 'turbolinks', '5.0.0'
gem 'jbuilder', '2.4.1'
group :development, :test do
gem 'sqlite3', '1.3.11'
gem 'byebug', '9.0.0', platform: :mri
end
group :development do
gem 'web-console', '3.1.1'
gem 'listen', '3.0.8'
gem 'spring', '1.7.2'
gem 'spring-watcher-listen', '2.0.0'
end
# Windows does not include zoneinfo files, so bundle the tzinfo-data gem
gem 'tzinfo-data', platforms: [:mingw, :mswin, :x64_mingw, :jruby]
Once you’ve placed the contents of Listing 1.5 into the application’s Gemfile, install the gems using bundle install:12
12. As noted in Table 3.1, you can even leave off install, as the bundle command by itself is an alias for bundle install.
$ cd hello_app/
$ bundle install
Fetching source index for https://rubygems.org/
.
.
.
The bundle install command might take a few moments, but when it’s done our application will be ready to run.
By the way, when you run bundle install it’s possible that you’ll get a message saying you need to run bundle update first. In this case you should run bundle update first. (Learning not to panic when things don’t go exactly as planned is a key part of technical sophistication, and you’ll be amazed at how often the “error” message contains the exact instructions you need to fix the problem at hand.)
1.3.2 rails server
Thanks to running rails new in Section 1.3 and bundle install in Section 1.3.1, we already have an application we can run—but how? Happily, Rails comes with a command-line program, or script, that runs a local webserver to assist us in developing our application. The exact command depends on the environment you’re using: on a local system, you just run rails server (Listing 1.6), whereas on Cloud9 you need to supply an additional IP binding address and port number to tell the Rails server the address it can use to make the application visible to the outside world (Listing 1.7).13 (Cloud9 uses the special environment variables $IP and $PORT to assign the IP address and port number dynamically. If you want to see the values of these variables, type echo $IP or echo $PORT at the command line.)
13. Normally, websites run on port 80, but this usually requires special privileges, so it’s conventional to use a less restricted higher-numbered port for the development server.
If your system complains about the lack of a JavaScript runtime, visit the execjs page at GitHub for a list of possibilities. I particularly recommend installing Node.js.
Listing 1.6: Running the Rails server on a local machine.
$ cd ˜/workspace/hello_app/
$ rails server
=> Booting Puma
=> Rails application starting on http://localhost:3000
=> Run 'rails server -h' for more startup options
=> Ctrl-C to shutdown server
Listing 1.7: Running the Rails server on the cloud IDE.
$ cd ˜/workspace/hello_app/
$ rails server -b $IP -p $PORT
=> Booting Puma
=> Rails application starting on http://0.0.0.0:8080
=> Run 'rails server -h' for more startup options
=> Ctrl-C to shutdown server
Whichever option you choose, I recommend running the rails server command in a second terminal tab so that you can still issue commands in the first tab, as shown in Figure 1.6 and Figure 1.7. (If you already started a server in your first tab, press Ctrl-C to shut it down.)14 On a local server, paste the URL http://0.0.0.0:3000 into the address bar of your browser; on the cloud IDE, go to Share and click on the Application address to open it (Figure 1.8). In either case, the result should look something like Figure 1.9.
14. Here “C” refers to the character on the keyboard, not the capital letter, so there’s no need to hold down the Shift key to get a capital “C”.
Exercises
Solutions to exercises are available for free at railstutorial.org/aw-solutions with any Rails Tutorial purchase. To see other people’s answers and to record your own, join the Learn Enough Society at learnenough.com/society.
1. According to the default Rails page, what is the version of Ruby on your system? Confirm by running ruby -v at the command line.
2. What is the version of Rails? Confirm that it matches the version installed in Listing 1.1.


1.3.3 Model-View-Controller (MVC)
Even at this early stage, it’s helpful to get a high-level overview of how Rails applications work, as illustrated in Figure 1.10. You might have noticed that the standard Rails application structure (Figure 1.4) has an application directory called app/ containing three subdirectories: models, views, and controllers. This is a hint that Rails follows the model-view-controller (MVC) architectural pattern, which enforces a separation between the data in the application (such as user information) and the code used to display it, which is a common way of structuring a graphical user interface (GUI).
When interacting with a Rails application, a browser sends a request that is received by a webserver and passed on to a Rails controller, which is in charge of what to do next. In some cases, the controller will immediately render a view, which is a template that gets converted to HTML and sent back to the browser. More commonly for dynamic sites, the controller interacts with a model, which is a Ruby object that represents an element of the site (such as a user) and is in charge of communicating with the database. After invoking the model, the controller then renders the view and returns the complete web page to the browser as HTML.

If this discussion seems a bit abstract right now, don’t worry; we’ll cover these ideas in more detail later in this book. In particular, Section 1.3.4 shows a first tentative application of MVC, while Section 2.2.2 includes a more detailed discussion of MVC in the context of the toy app. Finally, the full sample app will use all aspects of MVC: we’ll cover controllers and views starting in Section 3.2, models starting in Section 6.1, and we’ll see all three working together in Section 7.1.2.

1.3.4 Hello, World!
As a first application of the MVC framework, we’ll make a wafer-thin change to the first app by adding a controller action to render the string “hello, world!” to replace the default Rails page from Figure 1.9. (We’ll learn more about controller actions starting in Section 2.2.2.)
As implied by their name, controller actions are defined inside controllers. We’ll call our action hello and place it in the Application controller. Indeed, at this point the Application controller is the only controller we have, which you can verify by running to view the current controllers. (We’ll start creating our own controllers in Chapter 2.) Listing 1.8 shows the resulting definition of hello, which uses the render function to return the HTML text “hello, world!”. (Don’t worry about the Ruby syntax right now; it will be covered in more depth in Chapter 4.)
$ ls app/controllers/*_controller.rb
Listing 1.8: Adding a hello action to the Application controller.
app/controllers/application_controller.rb
class ApplicationController < ActionController::Base
protect_from_forgery with: :exception
def hello
render html: "hello, world!"
end
end
Having defined an action that returns the desired string, we need to tell Rails to use that action instead of the default page in Figure 1.9. To do this, we’ll edit the Rails router, which sits in front of the controller in Figure 1.10 and determines where to send requests that come in from the browser. (I’ve omitted the router from Figure 1.10 for simplicity, but we’ll discuss it in more detail starting in Section 2.2.2.) In particular, we want to change the default page, the root route, which determines the page that is served on the root URL. Because it’s the URL for an address like http://www.example.com/ (where nothing comes after the final forward slash), the root URL is often referred to as / (“slash”) for short.
As seen in Listing 1.9, the Rails routes file (config/routes.rb) includes a comment directing us to the Rails Guide on Routing, which includes instructions on how to define the root route. The syntax looks like this:
root 'controller_name#action_name'
In the present case, the controller name is application and the action name is hello, which results in the code shown in Listing 1.10.
Listing 1.9: The default routing file (formatted to fit).
config/routes.rb
Rails.application.routes.draw do
# For details on the DSL available within this file,
# see http://guides.rubyonrails.org/routing.html
end
Listing 1.10: Setting the root route.
config/routes.rb
Rails.application.routes.draw do
root 'application#hello'
end
With the code from Listing 1.8 and Listing 1.10, the root route returns “hello, world!” as required (Figure 1.11).15 Hello, world!
15. The base URL for the Rails Tutorial Cloud9 shared URLs has changed from rails-tutorial-c9-mhartl.c9.io to rails-tutorial-mhartl.c9users.io, but in many cases the screenshots are identical, so the browser address bar will show old-style URLs in some figures (such as Figure 1.11). This is the sort of minor discrepancy you can resolve using your technical sophistication (Box 1.1).
Exercises
Solutions to exercises are available for free at railstutorial.org/aw-solutions with any Rails Tutorial purchase. To see other people’s answers and to record your own, join the Learn Enough Society at learnenough.com/society.
1. Change the content of the hello action in Listing 1.8 to read “hola, mundo!” instead of “hello, world!”.
2. Show that Rails supports non-ASCII characters by including an inverted exclamation point, as in “¡Hola, mundo!” (Figure 1.12).16 To get a ¡ character on a Mac, you can use Option-1; otherwise, you can always copy-and-paste the character into your editor.
16. Your editor may display a message like “invalid multibyte character”, but this is not a cause for concern. You can Google the error message if you want to learn how to make it go away.
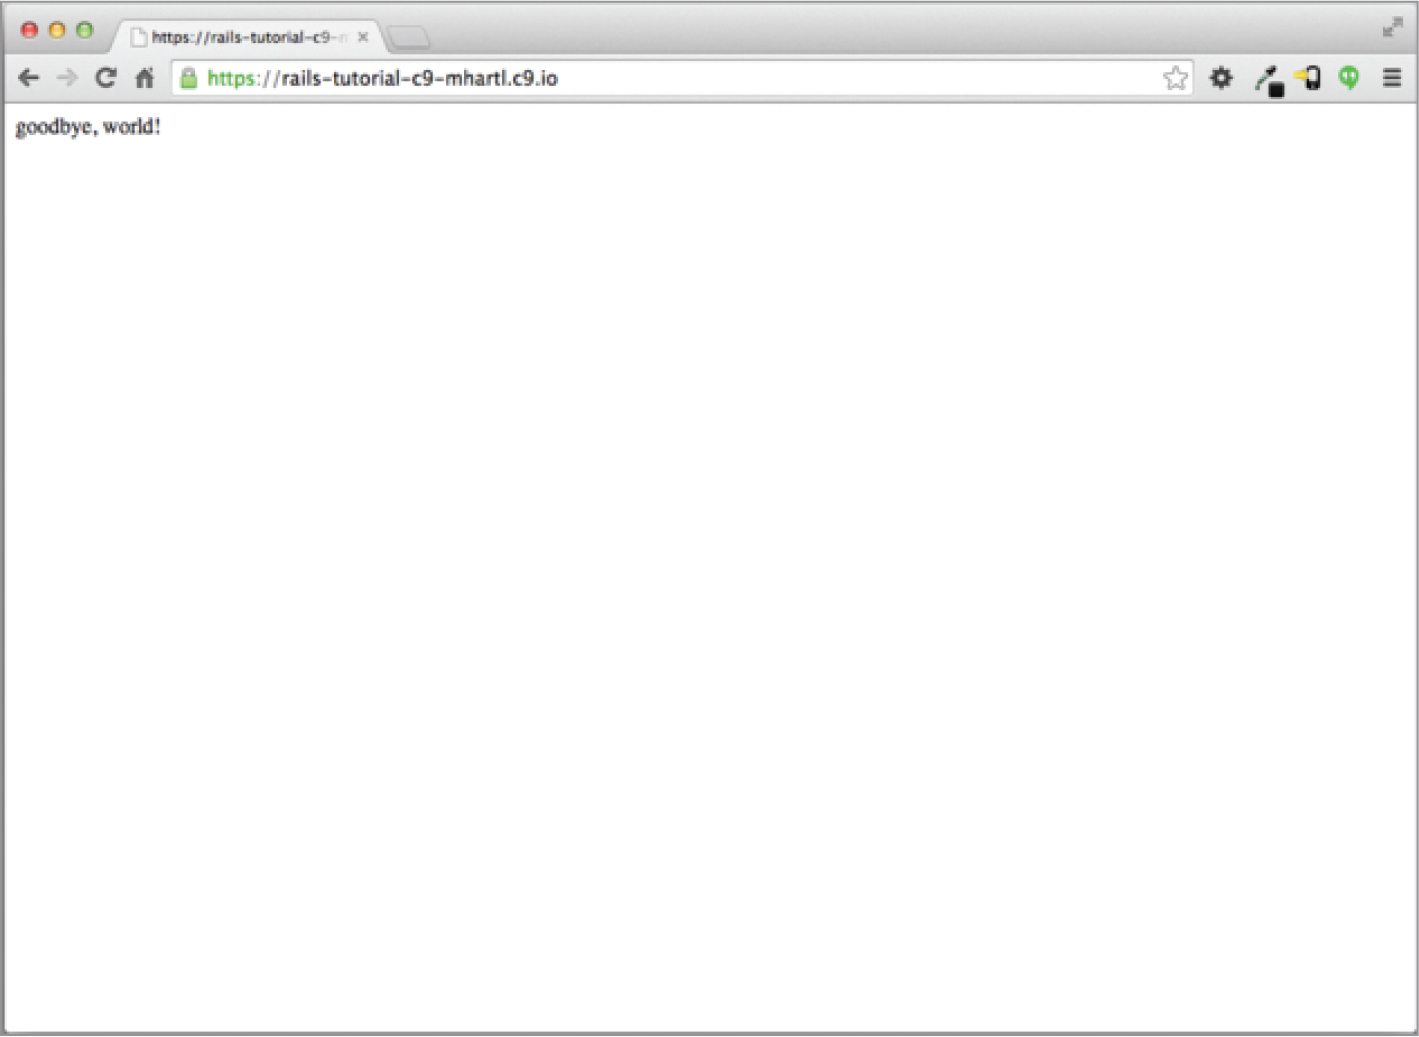
3. By following the example of the hello action in Listing 1.8, add a second action called goodbye that renders the text “goodbye, world!”. Edit the routes file from Listing 1.10 so that the root route goes to goodbye instead of to hello (Figure 1.13).

1.4 Version Control with Git
Now that we have a working “hello, world” application, we’ll take a moment for a step that, while technically optional, would be viewed by experienced software developers as practically essential: placing our application source code under version control. Version control systems allow us to track changes to our project’s code, collaborate more easily, and roll back any inadvertent errors (such as accidentally deleting files). Knowing how to use a version control system is a required skill for every professional-grade software developer.

There are many options for version control, but the Rails community has largely standardized on Git, a distributed version control system originally developed by Linus Torvalds to host the Linux kernel. Git is a large subject, and we’ll only be scratching the surface in this book; for a more thorough introduction, see Learn Enough Git to Be Dangerous.17
17. learnenough.com/git
Putting your source code under version control with Git is strongly recommended, not only because it’s nearly a universal practice in the Rails world, but also because it will allow you to back up and share your code more easily (Section 1.4.3) and deploy your application right here in the first chapter (Section 1.5).
1.4.1 Installation and Setup
The cloud IDE recommended in Section 1.2.1 includes Git by default, so no installation is necessary in this case. Otherwise, Learn Enough Git to Be Dangerous includes instructions for installing Git on your system.
First-Time System Setup
Before using Git, you should perform a couple of one-time setup steps. These are system setups, meaning you only have to do them once per computer:
$ git config --global user.name "Your Name"
$ git config --global user.email [email protected]
Note that the name and email address you use in your Git configuration will be available in any repositories you make public.
First-Time Repository Setup
Now we come to some steps that are necessary each time you create a new repository (sometimes called a repo for short). The first step is to navigate to the root directory of the first app and initialize a new repository:
$ git init
Initialized empty Git repository in /home/ubuntu/workspace/hello_app/.git/
The next step is to add all the project files to the repository using git add -A:
$ git add -A
This command adds all the files in the current directory apart from those that match the patterns in a special file called .gitignore. The rails new command automatically generates a .gitignore file appropriate to a Rails project, but you can add additional patterns as well.18
18. Although we’ll never need to edit it in the main tutorial, an example of adding a rule to the .gitignore file appears in Section 3.6.2, which is part of the optional advanced testing setup in Section 3.6.
The added files are initially placed in a staging area, which contains pending changes to our project. We can see which files are in the staging area using the status command:
$ git status
On branch master
Initial commit
Changes to be committed:
(use "git rm --cached <file>..." to unstage)
new file: .gitignore
new file: Gemfile
new file: Gemfile.lock
new file: README.md
new file: Rakefile
.
.
.
To tell Git we want to keep the changes, we use the commit command:
$ git commit -m "Initialize repository"
[master (root-commit) df0a62f] Initialize repository
.
.
.
The -m flag lets us add a message for the commit; if we omit -m, Git will open the system’s default editor and have us enter the message there. (All the examples in this book will use the -m flag.)
It is important to note that Git commits are local, recorded only on the machine on which the commits occur. We’ll see how to push the changes up to a remote repository (using git push) in Section 1.4.4.
By the way, we can see a list of the commit messages using the log command:
commit af72946fbebc15903b2770f92fae9081243dd1a1
Author: Michael Hartl <[email protected]>
Date: Thu May 12 19:25:07 2016 +0000
Initialize repository
Depending on the length of the repository’s log history, you may have to type q to quit. (As explained in Learn Enough Git to Be Dangerous, git log uses the less interface covered in Learn Enough Command Line to Be Dangerous.)
1.4.2 What Good Does Git Do You?
If you’ve never used version control before, it may not be entirely clear at this point what good it does you, so let me give just one example. Suppose you’ve made some accidental changes, such as (D’oh!) deleting the critical app/controllers/ directory.
$ ls app/controllers/
application_controller.rb concerns/
$ rm -rf app/controllers/
$ ls app/controllers/
ls: app/controllers/: No such file or directory
Here we’re using the Unix ls command to list the contents of the app/controllers/ directory and the rm command to remove it (Table 1.1). As noted in Learn Enough Command Line to Be Dangerous, the -rf flag means “recursive force”, which recursively removes all files, directories, subdirectories, and so on, without asking for explicit confirmation of each deletion.
Let’s check the status to see what changed:
$ git status
On branch master
Changed but not updated:
(use "git add/rm <file>..." to update what will be committed)
(use "git checkout -- <file>..." to discard changes in working directory)
deleted: app/controllers/application_controller.rb
no changes added to commit (use "git add" and/or "git commit -a")
We see here that a file has been deleted, but the changes are only on the “working tree”; they haven’t been committed yet. This means we can still undo the changes using the checkout command with the -f flag to force overwriting the current changes:
$ git checkout -f
$ git status
# On branch master
nothing to commit (working directory clean)
$ ls app/controllers/
application_controller.rb concerns/
The missing files and directories are back. That’s a relief!
1.4.3 Bitbucket
Now that we’ve put our project under version control with Git, it’s time to push our code up to Bitbucket, a site optimized for hosting and sharing Git repositories. (Learn Enough Git to Be Dangerous uses GitHub, but see Box 1.4 to learn the reasons why this tutorial uses Bitbucket instead.) Putting a copy of your Git repository at Bitbucket serves two purposes: it’s a full backup of your code (including the full history of commits), and it makes any future collaboration much easier.
Getting started with Bitbucket is straightforward, though it may take a little technical sophistication (Box 1.1) to get everything to work just right:
1. Sign up for a Bitbucket account if you don’t already have one.
2. Copy your public key to your clipboard. As indicated in Listing 1.11, users of the cloud IDE can view their public key using the cat command, which can then be selected and copied. If you’re using your own system and see no output when running the command in Listing 1.11, follow the instructions on how to install a public key on your Bitbucket account.
3. Add your public key to Bitbucket by clicking on the avatar image in the upper right and selecting “Manage account” and then “SSH keys” (Figure 1.14).
Listing 1.11: Printing the public key using cat.
$ cat ˜/.ssh/id_rsa.pub
Once you’ve added your public key, click on “Create” to create a new repository, as shown in Figure 1.15. When filling in the information for the project, take care to leave the box next to “This is a private repository.” checked. After clicking “Create repository”, follow the instructions under “Command line > I have an existing project”, which should look something like Listing 1.12. (If it doesn’t look like Listing 1.12, it might be because the public key didn’t get added correctly, in which case I suggest trying that step again.) When pushing up the repository, answer yes if you see the question “Are you sure you want to continue connecting (yes/no)?”


Listing 1.12: Adding Bitbucket and pushing up the repository.
$ git remote add origin [email protected]:<username>/hello_app.git
$ git push -u origin --all
The commands in Listing 1.12 first tell Git that you want to add Bitbucket as the origin for your repository and then push your repository up to the remote origin. (Don’t worry about what the -u flag does; if you’re curious, do a web search for “git set upstream.”) Of course, you should replace <username> with your actual username. For example, the command I ran was
$ git remote add origin [email protected]:railstutorial/hello_app.git
The result is a page at Bitbucket for the hello_app repository, with file browsing, full commit history, and lots of other goodies (Figure 1.16).19
19. Because of how my public keys are set up on Cloud9, I created the repository as railstutorial and then added my main account, mhartl, as a collaborator. As a result, I can make commits under either account name.
1.4.4 Branch, Edit, Commit, Merge
If you’ve followed the steps in Section 1.4.3, you might notice that Bitbucket automatically rendered the repository’s README file, as shown in Figure 1.16. This file, called README.md, was generated automatically by the command in Listing 1.3. As indicated by the filename extension .md, it is written in Markdown,20 a human-readable markup language designed to be easy to convert to HTML—which is exactly what Bitbucket has done.
20. See Learn Enough Text Editor to Be Dangerous and Learn Enough Git to Be Dangerous for more information about Markdown.


This automatic rendering of the README is convenient, but of course it would be better if we tailored the contents of the file to the project at hand. In this section, we’ll customize the README by adding some Rails Tutorial–specific content. In the process, we’ll see a first example of the branch, edit, commit, merge workflow that I recommend using with Git.21
21. For a convenient way to visualize Git repositories, take a look at Atlassian’s SourceTree app.
Branch
Git is incredibly good at making branches, which are effectively copies of a repository where we can make (possibly experimental) changes without modifying the parent files. In most cases, the parent repository is the master branch, and we can create a new topic branch by using checkout with the -b flag:
$ git checkout -b modify-README
Switched to a new branch 'modify-README'
$ git branch
master
* modify-README
Here the second command, git branch, just lists all the local branches, and the asterisk * identifies which branch we’re currently on. Note that git checkout -b modify-README both creates a new branch and switches to it, as indicated by the asterisk in front of the modify-README branch.
The full value of branching only becomes clear when working on a project with multiple developers,22 but branches are helpful even for a single-developer tutorial such as this one. In particular, because the master branch is insulated from any changes we make to the topic branch, even if we really mess things up we can always abandon the changes by checking out the master branch and deleting the topic branch. We’ll see how to do this at the end of the section.
22. See, for example, the section on Collaborating in Learn Enough Git to Be Dangerous.
By the way, for a change as small as this one I wouldn’t normally bother with a new branch (opting instead to work directly on the master branch), but in the present context it’s a prime opportunity to start practicing good habits.
Edit
After creating the topic branch, we’ll edit the README to add custom content, as shown in Listing 1.13.
Listing 1.13: The new README file.
README.md
# Ruby on Rails Tutorial
## "hello, world!"
This is the first application for the
[*Ruby on Rails Tutorial*](http://www.railstutorial.org/)
by [Michael Hartl](http://www.michaelhartl.com/). Hello, world!
$ git status
On branch modify-README
Changes not staged for commit:
(use "git add <file>..." to update what will be committed)
(use "git checkout -- <file>..." to discard changes in working directory)
modified: README.md
no changes added to commit (use "git add" and/or "git commit -a")
At this point, we could use git add -A as in Section 1.4.1, but git commit provides the -a flag as a shortcut for the (very common) case of committing all modifications to existing files:
$ git commit -a -m "Improve the README file"
[modify-README 9dc4f64] Improve the README file
1 file changed, 5 insertions(+), 22 deletions(-)
Be careful about using the -a flag improperly; if you have added any new files to the project since the last commit, you still have to tell Git about them using git add -A first.
Note that we write the commit message in the present tense (and, technically speaking, the imperative mood). Git models commit as a series of patches, and in this context it makes sense to describe what each commit does, rather than what it did. Moreover, this usage matches up with the commit messages generated by Git commands themselves. See Committing to Git from Learn Enough Git to Be Dangerous for more information.
Merge
Now that we’ve finished making our changes, we’re ready to merge the results back into our master branch:
$ git checkout master
Switched to branch 'master'
$ git merge modify-README
Updating af72946..9dc4f64
Fast-forward
README.md | 27 +++++----------------------
1 file changed, 5 insertions(+), 22 deletions(-)
Note that the Git output frequently includes things like 34f06b7, which are related to Git’s internal representation of repositories. Your exact results will differ in these details, but otherwise should essentially match the output shown above.
After you’ve merged in the changes, you can tidy up your branches by deleting the topic branch using git branch -d if you’re done with it:
$ git branch -d modify-README
Deleted branch modify-README (was 9dc4f64).
This step is optional, and in fact it’s quite common to leave the topic branch intact. This way you can switch back and forth between the topic and master branches, merging in changes every time you reach a natural stopping point.
As mentioned above, it’s also possible to abandon your topic branch changes, in this case with git branch -D:
# For illustration only; don't do this unless you mess up a branch
$ git checkout -b topic-branch
$ <really mess up the branch>
$ git add -A
$ git commit -a -m "Make major mistake"
$ git checkout master
$ git branch -D topic-branch
Unlike the -d flag, the -D flag will delete the branch even though we haven’t merged in the changes.
Push
Now that we’ve updated the README, we can push the changes up to Bitbucket to see the result. Since we have already done one push (Section 1.4.3), on most systems we can omit origin master, and simply run git push:
$ git push
As with the default README, Bitbucket nicely converts the Markdown in our updated README to HTML (Figure 1.18).

1.5 Deploying
Even though this is only the first chapter, we’re already going to deploy our (nearly empty) Rails application to production. This step is optional, but deploying early and often allows us to catch any deployment problems early in our development cycle. The alternative—deploying only after laborious effort sealed away in a development environment—often leads to terrible integration headaches when launch time comes.23
23. Though it shouldn’t matter for the example applications in the Rails Tutorial, if you’re worried about accidentally making your app public too soon, there are several options; see Section 1.5.4 for one.
Deploying Rails applications used to be a pain, but the Rails deployment ecosystem has matured rapidly in the past few years, and now there are several great options. These include shared hosts or virtual private servers running Phusion Passenger (a module for the Apache and Nginx24 webservers), full-service deployment companies such as Engine Yard and Rails Machine, and cloud deployment services such as Engine Yard Cloud and Heroku.
24. Pronounced “Engine X.”
My favorite Rails deployment option is Heroku, which is a hosted platform built specifically for deploying Rails and other web applications. Heroku makes deploying Rails applications ridiculously easy—as long as your source code is under version control with Git. (This is yet another reason to follow the Git setup steps in Section 1.4 if you haven’t already.) In addition, for many purposes, including for this tutorial, Heroku’s free tier is more than sufficient.
The rest of this section is dedicated to deploying our first application to Heroku. Some of the ideas are fairly advanced, so don’t worry about understanding all the details; what’s important is that by the end of the process we’ll have deployed our application to the live web.
1.5.1 Heroku Setup
Heroku uses the PostgreSQL database (pronounced “post-gres-cue-ell” and often called “Postgres” for short), which means that we need to add the pg gem in the production environment to allow Rails to talk to Postgres:25
25. Generally speaking, it’s a good idea for the development and production environments to match as closely as possible, which includes using the same database, but for the purposes of this tutorial we’ll always use SQLite locally and PostgreSQL in production. See Section 3.1 for more information.
group :production do
gem 'pg', '0.18.4'
end
Also be sure to incorporate the changes made in Listing 1.5 preventing the sqlite3 gem from being included in a production environment, since SQLite isn’t supported at Heroku:
group :development, :test do
gem 'sqlite3', '1.3.11'
gem 'byebug', '9.0.0', platform: :mri
end
The resulting Gemfile appears as in Listing 1.14.
Listing 1.14: A Gemfile with added and rearranged gems.
source 'https://rubygems.org'
gem 'rails', '5.0.0'
gem 'puma', '3.4.0'
gem 'sass-rails', '5.0.5'
gem 'uglifier', '3.0.0'
gem 'coffee-rails', '4.2.1'
gem 'jquery-rails', '4.1.1'
gem 'turbolinks', '5.0.0'
gem 'jbuilder', '2.4.1'
group :development, :test do
gem 'sqlite3', '1.3.11'
gem 'byebug', '9.0.0', platform: :mri
end
group :development do
gem 'web-console', '3.1.1'
gem 'listen', '3.0.8'
gem 'spring', '1.7.2'
gem 'spring-watcher-listen', '2.0.0'
end
group :production do
gem 'pg', '0.18.4'
end
# Windows does not include zoneinfo files, so bundle the tzinfo-data gem
gem 'tzinfo-data', platforms: [:mingw, :mswin, :x64_mingw, :jruby]
To prepare the system for deployment to production, we run bundle install with a special flag to prevent the local installation of any production gems (which in this case consists of the pg gem):
$ bundle install --without production
Because the only gem added in Listing 1.14 is restricted to a production environment, right now this command doesn’t actually install any additional local gems, but it’s needed to update Gemfile.lock with the pg gem. We can commit the resulting change as follows:
$ git commit -a -m "Update Gemfile for Heroku"
Next we have to create and configure a new Heroku account. The first step is to sign up for Heroku. Then check to see if your system already has the Heroku command-line client installed:
$ heroku version
Those using the cloud IDE should see the Heroku version number, indicating that the heroku CLI is available, but on other systems it may be necessary to install it using the Heroku Toolbelt.26
26. toolbelt.heroku.com
Once you’ve verified that the Heroku command-line interface is installed, use the heroku command to log in and add your SSH key:
$ heroku login $ heroku keys:add
Finally, use the heroku create command to create a place on the Heroku servers for the sample app to live (Listing 1.15).
Listing 1.15: Creating a new application at Heroku.
$ heroku create
Creating app... done, fathomless-beyond-39164
https://damp-fortress-5769.herokuapp.com/ |
https://git.heroku.com/damp-fortress-5769.git
The heroku command creates a new subdomain just for our application, available for immediate viewing. There’s nothing there yet, though, so let’s get busy deploying.
1.5.2 Heroku Deployment, Step One
To deploy the application, the first step is to use Git to push the master branch up to Heroku:
(You may see some warning messages, which you should ignore for now. We’ll discuss them further in Section 7.5.)
1.5.3 Heroku Deployment, Step Two
There is no step two! We’re already done. To see your newly deployed application, visit the address that you saw when you ran heroku create (i.e., Listing 1.15). (If you’re working on your local machine instead of the cloud IDE, you can also use heroku open.) The result appears in Figure 1.19. The page is identical to Figure 1.11, but now it’s running in a production environment on the live web.

Exercises
Solutions to exercises are available for free at railstutorial.org/aw-solutions with any Rails Tutorial purchase. To see other people’s answers and to record your own, join the Learn Enough Society at learnenough.com/society.
1. By making the same change as in Section 1.3.4, arrange for your production app to display “hola, mundo!”.
2. As in Section 1.3.4, arrange for the root route to display the result of the goodbye action. When deploying, confirm that you can omit master in the Git push, as in git push heroku.
1.5.4 Heroku Commands
There are many Heroku commands, and we’ll barely scratch the surface in this book. Let’s take a minute to show just one of them by renaming the application as follows:
$ heroku rename rails-tutorial-hello
Don’t use this name yourself; it’s already taken by me! In fact, you probably shouldn’t bother with this step right now; using the default address supplied by Heroku is fine. But if you do want to rename your application, you can arrange for it to be reasonably secure by using a random or obscure subdomain, such as the following:
hwpcbmze.herokuapp.com
seyjhflo.herokuapp.com
jhyicevg.herokuapp.com
With a random subdomain like this, someone could visit your site only if you gave them the address. (By the way, as a preview of Ruby’s compact awesomeness, here’s the code I used to generate the random subdomains:
('a'..'z').to_a.shuffle[0..7].join
Pretty sweet.)
In addition to supporting subdomains, Heroku also supports custom domains. (In fact, the Ruby on Rails Tutorial site lives at Heroku; if you’re reading this book online, you’re looking at a Heroku-hosted site right now!) See the Heroku documentation for more information about custom domains and other Heroku topics.
Exercises
Solutions to exercises are available for free at railstutorial.org/aw-solutions with any Rails Tutorial purchase. To see other people’s answers and to record your own, join the Learn Enough Society at learnenough.com/society.
1. Run heroku help to see a list of Heroku commands. What is the command to display logs for an app?
2. Use the command identified in the previous exercise to inspect the activity on your application. What was the most recent event? (This command is often useful when debugging production apps.)
1.6 Conclusion
We’ve come a long way in this chapter: installation, development environment setup, version control, and deployment. In the next chapter, we’ll build on the foundation from Chapter 1 to make a database-backed toy app, which will give us our first real taste of what Rails can do.
If you’d like to share your progress at this point, feel free to send a tweet or Facebook status update with something like this:
I’m learning Ruby on Rails with the @railstutorial!
http://www.railstutorial.org/
I also recommend signing up for the Rails Tutorial email list,27 which will ensure that you receive priority updates (and exclusive coupon codes) regarding the Ruby on Rails™ Tutorial.
27. railstutorial.org/email
1.6.1 What We Learned in This Chapter
• Ruby on Rails is a web development framework written in the Ruby programming language.
• Installing Rails, generating an application, and editing the resulting files is easy using a pre-configured cloud environment.
• Rails comes with a command-line command called rails that can generate new applications (rails new) and run local servers (rails server).
• We added a controller action and modified the root route to create a “hello, world” application.
• We protected against data loss while enabling collaboration by placing our application source code under version control with Git and pushing the resulting code to a private repository at Bitbucket.
• We deployed our application to a production environment using Heroku.